


Presentation Summary
In this post, two of the members of Under Armour’s Engineering Advocacy Team, Pat Brown and Karim Shehadeh, discuss a recent project they worked on to help further non-engineers at the company better understand the product journey.
Their solution was called an X-Ray Graph, which sits on top of various data sources and it makes it easy to search across the product catalog. X-Ray connects information from these data sources and pulls them into Neo4j, which is able to establish relationships in the product journey.
Following the introduction of X-Ray, Brown and Shehadeh show parts of the GRANDstack application that were built on top of the graph, and also provide an overview of unique hurdles, hiccups and shortcuts learned throughout this process. They conclude the post with a quick tour of Under Armour’s website features, and how to implement them in Cypher and GraphQL.
Full Presentation: Discover the Soul of a Product Using Neo4j and React
Our names are Pat Brown and Karim Shehadeh. Pat is an engineering lead with Under Armour over at the Engineering Advocacy Team, and Karim is the senior manager. We like to say that Karim is responsible for bringing order to chaos, and Pat is responsible for said chaos.
We work on the Engineering Advocacy Team at Under Armour. What that team does is to look both outward to other parts across the business to make engineering accessible for them, then look back inward to work with engineering teams to make engineering more fun, efficient and effective here at Under Armour.
Today, we’ll talk through X-Ray a bit, the journey we took and what we learned about Neo4j along the way. We’ll also go through some of the hurdles we ran into and the solutions we came up with.
X-Ray: The Problem
After discussions with a lot of non-engineering employees at Under Armour, we realized a main problem was enabling them to fully understand the product journey.
By product journey, we mean the full process from the point in which designers and developers design the products, followed by actually building it, then talking to the marketing and merchandising teams within Under Armour, then actually selling it on the site or in retail stores, and finally to the point where the customer wears it and potentially talks to customer service.

Through that entire journey, there’s a lot of data that’s accumulated, and between these various points in the product journey, there are often unreliable or missing data flows. As a result, by the time you actually get to customer service, they have a very limited amount of information to give to the customers.

X-Ray: The Solution
X-Ray was our solution to discovering the soul of our products. X-Ray essentially recognizes that there are disparate data sources within Under Armour; all along the way, data switches between some proprietary database into an Excel spreadsheet, into a PowerPoint, into another database – through multiple stages. It’s during that process where data actually gets lost.

What we wanted to do was connect all of these data sources and pull them into a graph. Then, we’d utilize that graph to aggregate information and establish relationships in a clear way, through which we’d be able to pull out even more information.
Our data sources didn’t just include relational databases; they also included APIs we’d obtain through sites like Bazaarvoice, which does reviews. Of course, in our Connected Fitness engineering arm, a lot of data is exposed through various means. In this way, we could be pulling in information from an S3 bucket, an API endpoint or a relational database. Below, we’ll talk about how to do that and how we make the data available.
Overview of X-Ray
Let’s quickly go through an overview of what X-Ray is and where we ended up.
Below is the actual schema of X-Ray. As you can see, we currently have 150 million nodes, 141 million relationships and 65 gigabytes of actual data. It’s not terribly huge, but still a significant amount.

We have everything from
Styles to Articles, and if you look closely, you’ll see we have different factories and retail data. Again, a big issue was how to get all this data in. Below, we have the homepage. When you go to this site, you can see your “Recent Searches” and “Best Reviewed” searches. You can then click on any of these products and actually view all of its product data and related styles.

Our first task in this process was making this usable by our customer service representatives (CSRs), who would go in and view all this data. Previously, features like the related styles and review data were just not as accessible.
Hurdle: Data Intake
Along the way, we ran into a couple of hurdles. Like we mentioned earlier, our first big hurdle was how do we get our data in, as we had a lot of different sources of data.
If you’re familiar with Neo4j and have looked at some of the tutorials and blogs, there’s a lot of information about CSV files and how to get them up and running quickly. However, we needed a way that not only pulled data in one time and analyzed it, but also functioned as a production-level system. This way, we could store data in the database and also update this data regularly and maintain it easily.
Therefore, our main need was to pool different sources, and our main challenge was that different sources would sometimes field the properties of the same node. For example, we might have one product node that we needed to bring in properties from different locations.
In the example below, we have our ecommerce database, which might have a product number and a name. Then, we have our product development database, which might have data that hasn’t been merchandised yet; this product might not have a merchandise name on it, though it has the same product number. It might also have a release date that could be important for us to use, but a different ID.

We explored several different tools throughout this journey, starting from your traditional ETL. In a traditional ETL, the root is very much like the source, and the outcome is configured.
In essence, you have your data source, it tells you these things, transforms it a certain way and puts it into the data. However, our concern was that this creates a lot of room for spaghetti pipelines. This is similar to spaghetti code, where you don’t really know where things end up or might be unclear as to where that data came from, particularly if properties have different sources.

Moreover, a couple of questions came up as we were exploring this:
- How do you handle indexes and constraints?
- What will be our process if we decide to change our import strategy? Will we be repeating a lot of data? Will we be generating Cypher queries through our traditional ETL and putting that data in?
- What’s the deployment strategy across different environments? How do we actually have a staging environment? How do we have a production environment? What about unorthodox pipelines?
- If we’re pulling review data and it’s a rest API that’s not entirely a straightforward, one-to-one mapping, how do we cleanly perform that in a traditional ETL?

Below is the approach we took. We came up with something called the Data Service, which pools data from different sources, puts it into the graph database and combines properties.

Now, I’ll walk us down the journey we took as we built this. First, we decided to add review data, which we pulled from a third party. In this case, we had our product database and already-working ecommerce database. We wanted to add reviews to that to enable this service to go out, pull that review data and stick it in as a review node, possibly with a rating property. This step was pretty easy.

The main problem was figuring out how to create a relationship between the review and the product, particularly if the third party system used our ecommerce ID but we didn’t actually store that ecommerce ID in Neo4j. For example, we might have already done the product combination based on the product number, but the review doesn’t have the product number; it just has the ecommerce ID and its rating.
From there, we explored two options. First, we thought we could just add source IDs to each node and use it as a property. This way, when we pulled that data in, it would just jam the source IDs on there; if a node had a couple of different sources, it might have a couple of different IDs.
However, we weren’t sure how to index these. How do we enforce a clean naming convention and make sure they’re unique? What if we have some collision in terms of names?
The second option was to create
DataSourceID nodes, which was the option we ended up going with. It was a little bit overhead in terms of data, but in our opinion, the cleaner nature of the structure was worth it. 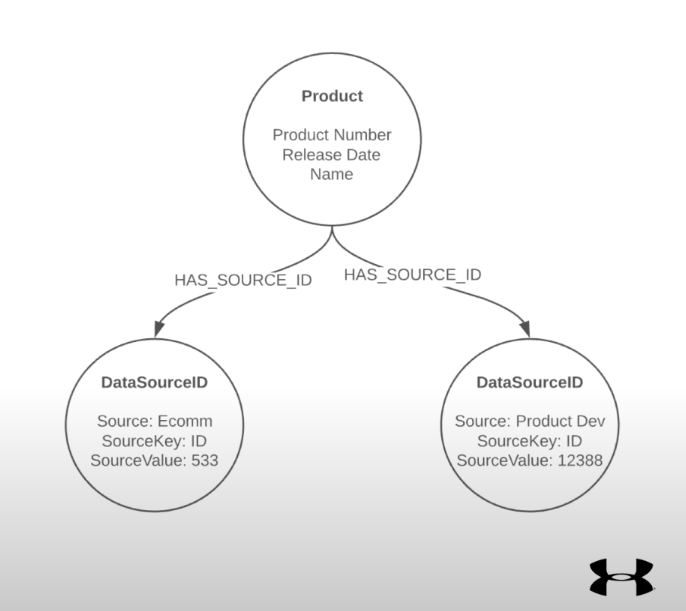
This allowed us to create indexes based on the
DataSourceID nodes to avoid name collisions. We also figured out how to abstract this, so the end-user of this service doesn’t need to know there’s such a thing as DataSourceIDs when pulling in data. Below is the end result of our solution. If we have three different sources for data, two of which are fueling products, the data service will then pull from those locations, perform its typical transformation and load that into the database. Meanwhile, it will also create the aforementioned
DataSourceID nodes. 
If we want it to create a relationship now, it’s pretty easy. When we run our import, we can simply look for the
DataSourceID nodes, follow those back and create our review relationship from there. Lessons Learned
We learned three simple yet impactful lessons along the way:

First, when you’re importing data, insert nodes – then create relationships. Evidently, there are many ways to import data. You can merge it all together at once, particularly if you have two nodes and you want a relationship. You can also pool all of your data into one query by creating the two nodes and then merging, though this might result in performance issues.
Therefore, we found it more effective to perform three separate runs in such instances, where you’d run it once and create your first node, run it again and create your second node, then run it a third time to create your relationship. Obviously, with two single nodes, it’s not a big deal, but when you have a batch load-in of thousands of pieces of data and try to do it all in one query, what Cypher does is aggregate everything together.
The second lesson learned is to use indexes. This seems pretty straightforward, but sometimes it’s easy to forget to create indexes, so when you run an import, it takes forever.
The last lesson is to avoid relationship properties. These are useful in certain situations; however, we ran into situations where it was just easier to either put properties on the nodes themselves or create actual node-style, almost-joined tables whose nodes were designed to embody those relationship properties.
Hurdle: Time
The second hurdle we ran into was time.
We dubbed the tooling we used for this “GRANDstack+.” If you haven’t explored GRANDstack – that’s GraphQL, React, Apollo and Neo4j Database – I highly recommend you do so, as it’s very powerful. But, we call the tools we use GRANDstack+ because we also use TypeScript and Parcel.

If you haven’t heard of Parcel, it’s essentially a front-end bundler, but unlike Web Pack or even Create and React App, there’s not a lot of configuration necessary; it’s very quick to get up to speed.
Below is an overview of the architecture we built:

With GRANDstack, we had a running system up in days, and we were able to iterate on it very quickly.
If you’ve ever tried to put together a GraphQL server, connecting all these dots takes a good chunk of time, so being able to use a GRANDstack to get it up so fast was an incredible value add. GRANDstack is also extremely fast; assuming that your database actually matches your schema, it works almost like magic.
Hiccups & Shortcuts
There were, indeed, a couple of hiccups we encountered, which were previously undocumented, at least to the best of my knowledge.
First, if you’re using GraphQL and want to model your schema just after your nodes, it’s pretty simple. After you make this your schema in GraphQL, it’ll just work.

But, let’s say you want to add images with the
images property. However, these images don’t actually live in your database, because they’re stored in some S3 bucket, so you need to do a lookup to grab the data and spit it back. In return, you add this to your GraphQL schema and try to run it using the augmented schema. Unfortunately, this won’t work; even if you have the customer’s number and all the logic is there, Neo4j will yell at you with the TypeError. To navigate around that, just add a
@neo4j_ignore directive and Neo4j won’t try to build using that image. It’ll work for you. Another helpful tip we found was regarding shortcuts. For example, if you model your GraphQL schema exactly after what’s in Neo4j, you might have a front-end query like the one below, where you want to obtain the URLs to display images for – let’s say – a style.

In this query, you’re basically telling it to give you the style number within those articles, then provide the images and the URL windows. It’s a pretty easy query and requires just a little bit of logic, where you have to loop through each style, then article, then image, and finally obtain the URL. However, this is annoying if you’re a front-end developer.
This is actually pretty easy to do with a shortcut, specifically with a Cypher directive. In this case, you can find the GraphQL server using the Neo4j library, and use the Cypher directive to tell the system, “I actually want to just allow the developer to obtain the images for a style. Don’t worry about the article and all the middle steps there.”
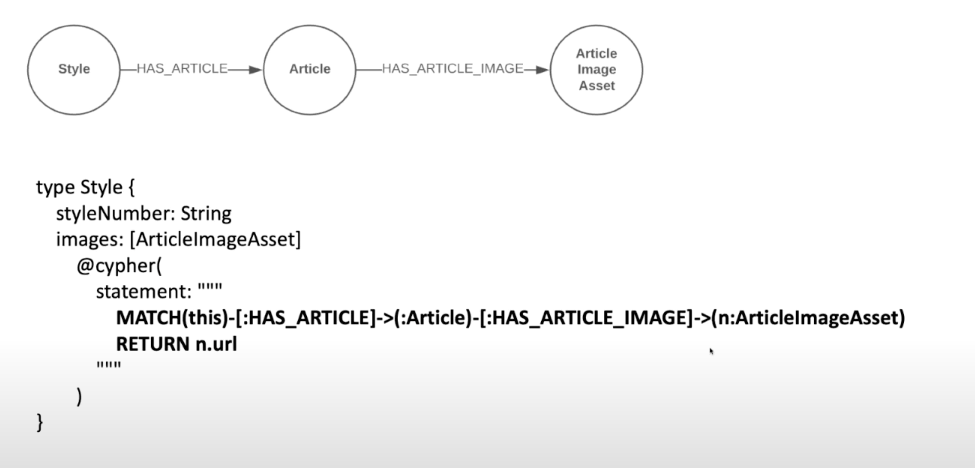
As you can see in the Cypher statement above, we’re just saying, “Give me this thing that has a relationship called
HAS_ARTICLE to the ARTICLE. Go all the way down to the article image asset and return the URL.” Here, you have this shortcut now to see these other images, which can be helpful in some scenarios. Query Params
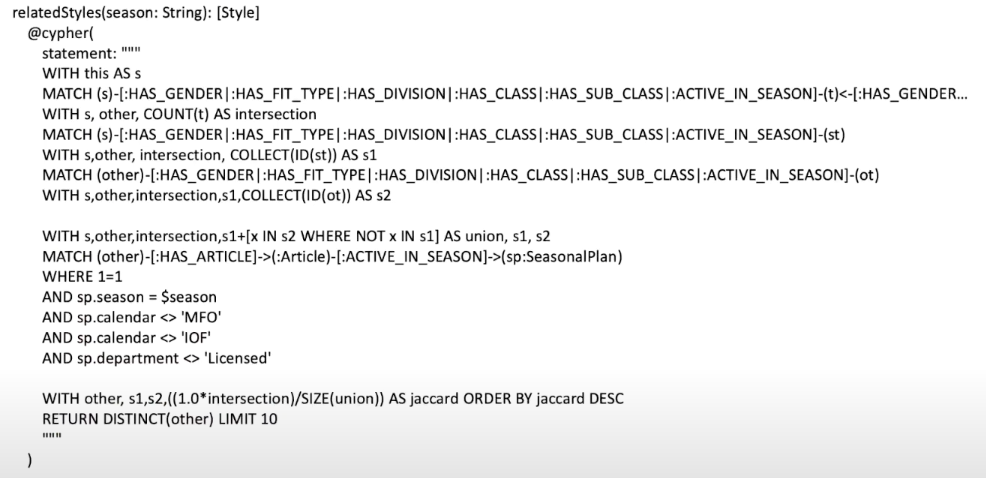
This last discovery is one we just stumbled upon. When we wanted to do the
relatedStyles query, we found we had all this data in our database and a ton of styles from all different seasons – some five years ago, some even six months in the future. So, when we ran the relatedStyles query, we pulled that data that wasn’t relevant to the users. We wanted to give users the ability to see styles that only pertain to the season they were currently looking for. When we tried to tackle this, I thought we’d have to use a custom resolver and do this type of query manually. However, the code below ended up working:

Again, to the best of my knowledge, this isn’t documented or even talked about anywhere, but in your GraphQL schema, you can actually define your type. You have your query name in here called
$season. This way, your Cypher directive now has access to that variable coming in; just like a Cypher parameter, throwing the dollar sign on there makes it work. It’s an incredibly powerful way to keep your Cypher query within the directive and not have to do any of the overhead or custom resolvers. X-Ray: Best Reviewed
We wanted to spend the last bit of the post showing our UI with copy-and-pasted snippets of what the front-end calls and server look like, to give you a glimpse of how simple it is to make something like this.
We start with our homepage, where we have a couple of things customers want to know: recent searches and best reviewed. In this case, if we’re looking for the best reviewed, we’ve already pooled that in our database. What that call actually looks like is pretty straightforward:

We have
highestReviewedProducts, through which you can pass in a first and minCount. As a front-end developer, I want to receive back the styleNumber, marketingName, images, articles and reviews. Indeed, it’s a simple GraphQL query, but again, to even implement a GraphQL server, you can definitely look at that and know there’s a ton going on in the background to make all that happen.
However, using the Cypher directive, the
highestReviewedProduct actually is maybe seven or eight lines of code here: 
As you can see, it’s incredibly simple and only uses the Cypher directive. We’re literally passing in the creates of the database, doing some aggregation, averaging things and returning back the results.
X-Ray: Ordered With
Another example we wanted to run through is the “ordered with” feature.

In the very center of the UI, it says “orders and returns.” Coupled with this, we wanted to include an “ordered with” feature, which you can think of as similar to Amazon’s “other people also ordered this” feature.
We wanted to allow our CSRs to be able to see when this product was ordered and how often. Again, that seems like a lot to figure out and implement.
Actually, it’s just a straightforward front-end query. We’re calling
mostOftenPurchasedWith and simply asking for the marketingName, styleNumber and, again, the images there. 
All we are doing in our GraphQL schema is defining this
mostOftenPurchasedWith and passing in a Cypher statement. A couple matches, a couple wheres and that’s it: 
Again, it’s very powerful for getting up and running quickly, without having a lot of overhead in building and maintaining these things.
X-Ray: Related Styles
We also wanted to show the “related styles” feature. Below is what the UI looked like. If you were landing on a product page, you would have this “related styles” widget:

Above, we also have the front-end call in GraphQL. Again, you’re still seeing that
marketingName, styleNumber, all that. While the back-end is longer, it’s still just a single Cypher query. Being able to have that and define it to use in Neo4j to that capacity proved to be tremendously valuable for us.
If you’re curious, this uses the chart index. There’s a proper function for that, and if you’re curious about reading more about how that works, there’s information on the Neo4j site.
Again, this is how we used Neo4j in our product journey, including shortcuts we found along the way and implementations in our UI. We hope the guidance and examples given here will help some of you in your own designs and development.
Want to learn more about GRANDstack?
Download your free copy of Fullstack GraphQL Applications with GRANDstack – Essential Excerpts.
Get the Book
Download your free copy of Fullstack GraphQL Applications with GRANDstack – Essential Excerpts.
Get the Book


