Analyze a Complex Network in Neo4j With User-Defined Functions

Technical Support Engineer
6 min read
This demonstrative project is designed to explore how it’s possible to extend Neo4j’s capabilities by implementing a user-defined function (UDF) that checks whether an IP address belongs to a specified network segment. It serves as a practical example for developers looking to integrate network validation within their Neo4j graph databases.
Note: Code examples are available on GitHub. These snippets are for demonstration purposes and don’t represent a solution officially supported by Neo4j.
For more information about Neo4j UDFs, refer to the official documentation.
Project Overview
Network management teams often need to verify whether servers belong to specific network segments. While Neo4j excels at representing complex relationships between network entities, it currently lacks native Classless Inter-Domain Routing (CIDR) validation.
That’s where UDFs come in. The UDF enables users to verify whether the ip property of a node (specifically a server node) belongs to a defined network. This can be especially useful in network management applications, monitoring systems, or any scenario where IP allocation must be verified against predefined subnets.
Example Usage
Assuming your Neo4j database contains several nodes (:Server), each with an ip property representing its IP address, the following process illustrates how it’s possible to use the UDF.
1. Understanding the Data Model

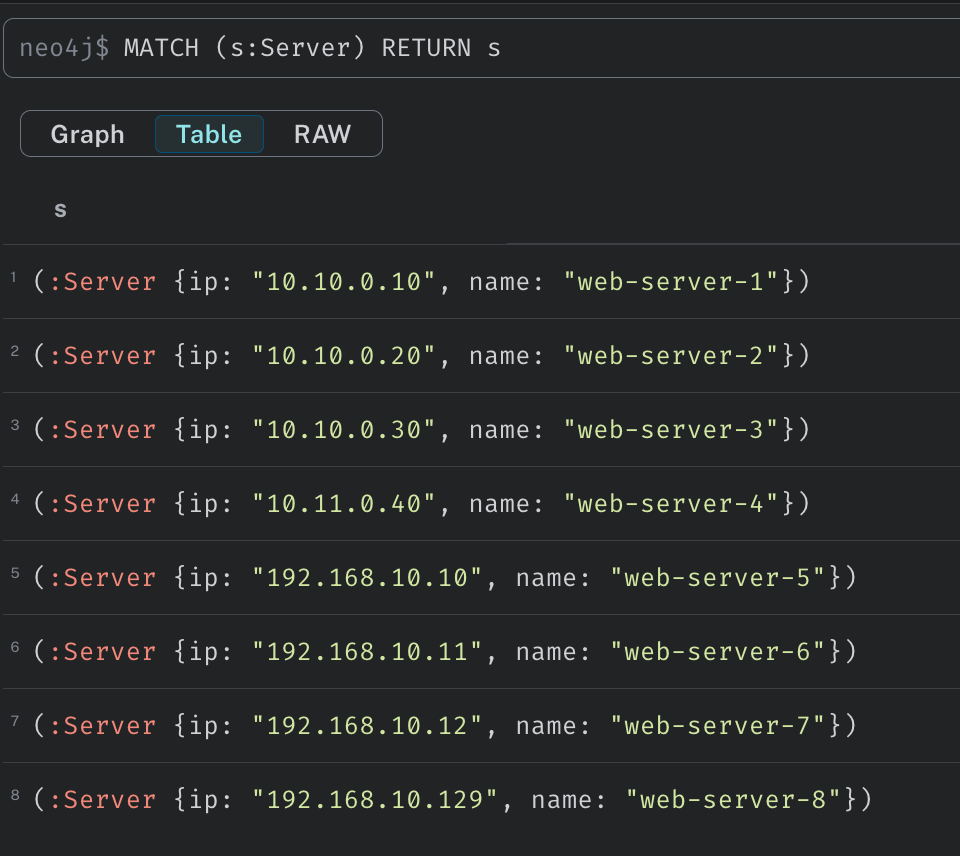
You can visualize the nodes in your database that have assigned the label Server, which represent various servers in our network by running the following Cypher statement:
MATCH (s:Server) RETURN s;2. Display IP Address Node Property
To view the IP addresses stored in your nodes, you can execute the MATCH query from the above step and opt to view the result in a table format. This will display a table containing the matched nodes and their properties.
Using the UDF
The UDF provides a simple function: example.ipBelongsToNetwork(ip, network). Below you’ll find three practical examples.
Example 1: Filter by Name and Network
In this example, we perform a query to filter nodes based on a specific condition (e.g., matching labels and names) and check whether the associated IP address belongs to a specified network segment.
To find all nodes with the label :Server that contain web-server in their name property and verify whether their IP addresses belong to the network 10.10.0.0/16, execute the following query:
MATCH (s:Server)
WHERE s.name CONTAINS 'web-server'
RETURN s.ip, example.ipBelongsToNetwork(s.ip, '10.10.0.0/16') AS belongsToNetwork
Example 2: Network-Based Filtering
Filter nodes based on whether the value of the node property IP belongs to the specified network:
MATCH (s:Server) WHERE example.ipBelongsToNetwork(s.ip, '192.168.10.0/28') RETURN s

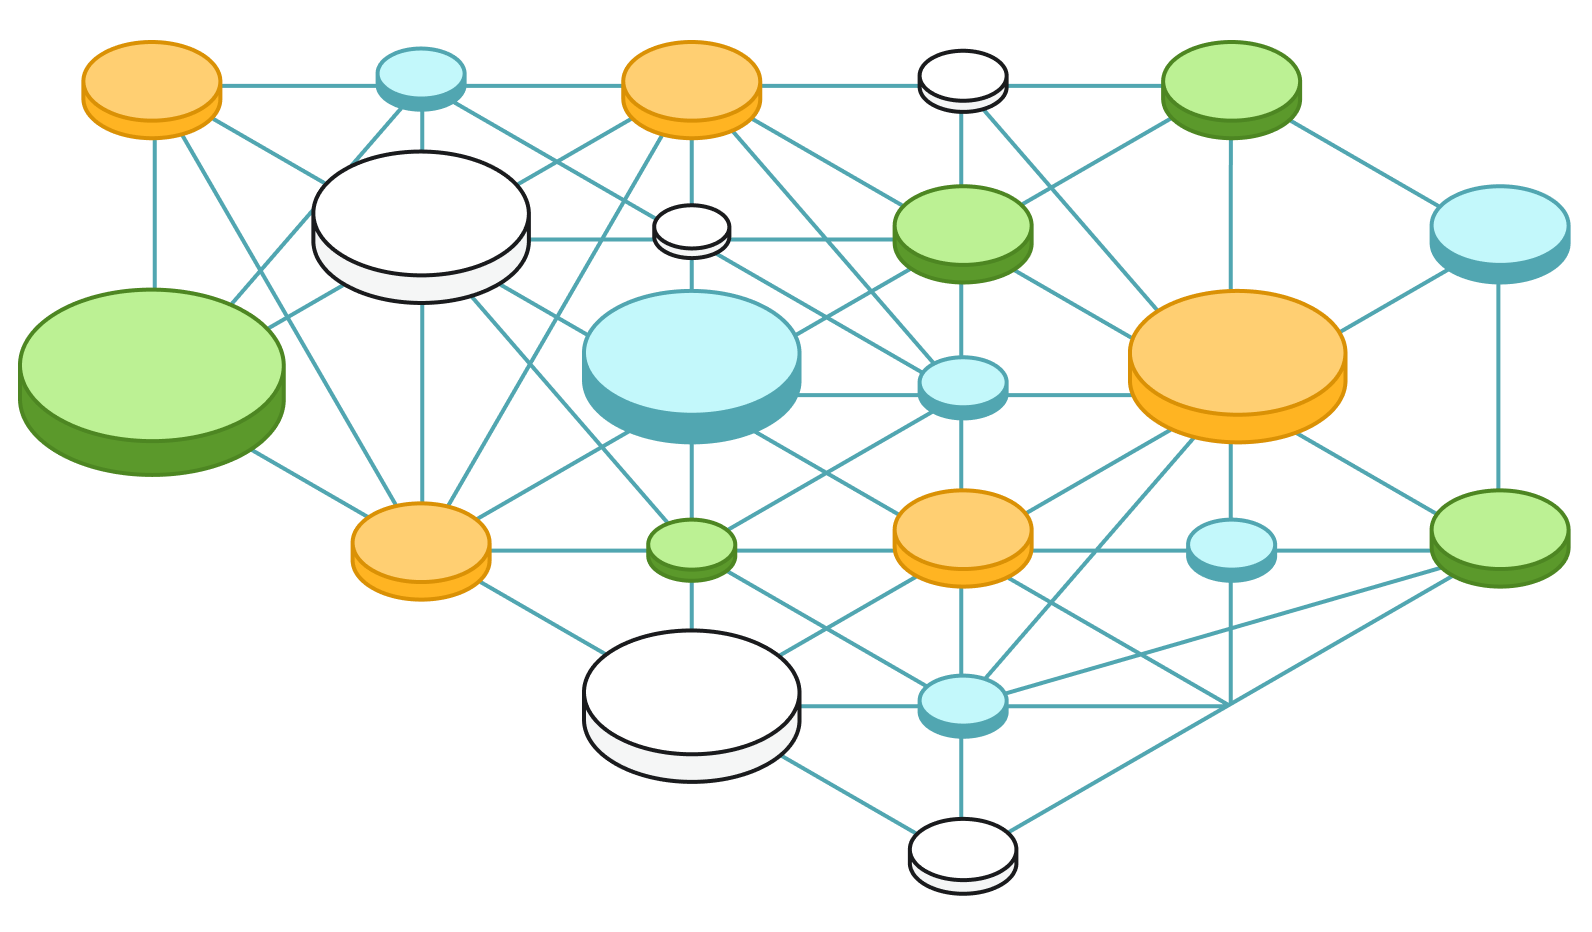
Example 3: Complex Network Topology
For this example, we’ll analyze a more complex graph representing a large network. The dataset used for this example was extracted from the existing GitHub repo.
For the scope of this project, a Docker image was created to import the dataset and configure the UDF that’ll be used to filter nodes based on the value of the IP node property.
To build and run this image locally, check out this repository and build the .jar file with mvn clean install.
Then execute the Docker commands to build the Docker image using the Dockerfile provided in the repository and start the container:
docker build -t neo-udf-ip-check:1.0 .

docker run -it -p 7474:7474 -p 7687:7687 --env=NEO4J_AUTH=neo4j/<PASSWORD> neo-udf-ip-check:1.0Note: If building the image from the neo4j-enterprise Docker image, it’s necessary to add the variable
--env=NEO4J_ACCEPT_LICENSE_AGREEMENT=yes.
Pull the container from the repository:
docker pull ghcr.io/looeejee/neo-udf-cidr-check:mainRun the container:
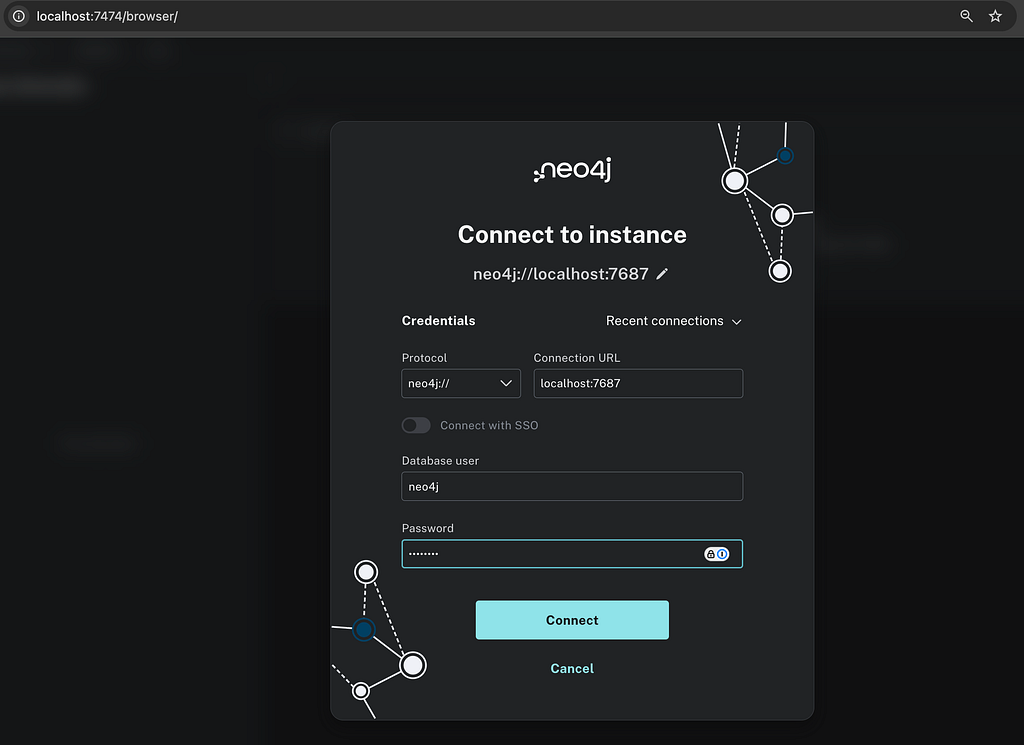
docker run -it -p 7474:7474 -p 7687:7687 --env=NEO4J_AUTH=neo4j/<PASSWORD> ghcr.io/looeejee/neo-udf-cidr-check:mainOnce the container is up and running, connect to it by opening a browser and accessing Neo4j Browser via https://localhost:7474.
Log in using the credentials defined in the step above.
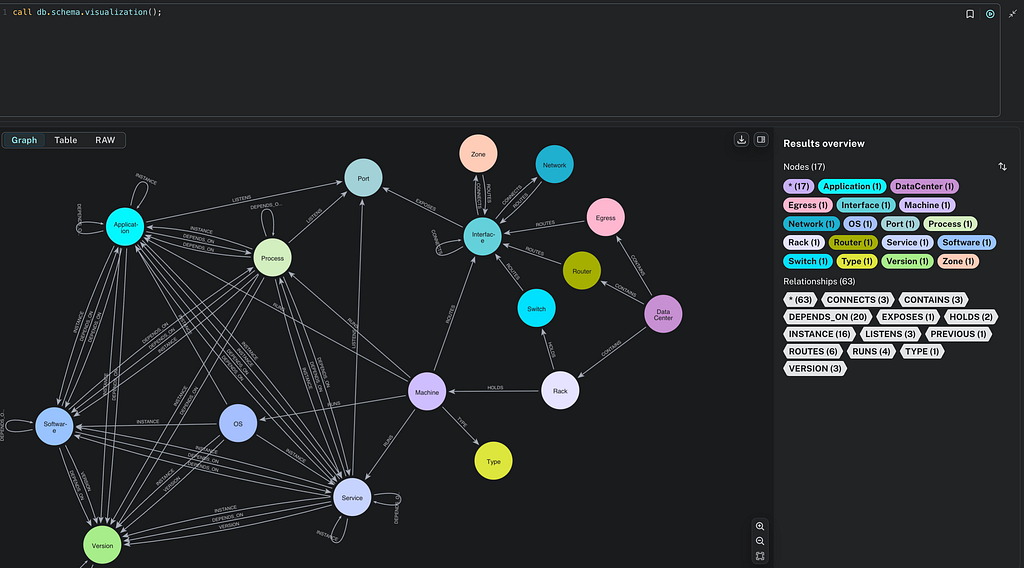
Once logged in, we can review and familiarize ourselves with the nodes and relationships contained in the graph using the Cypher command:
CALL db.schema.visualization();
We can then test the UDF to filter interfaces based on whether their node property IP belongs to a specific network:
MATCH (i:Interface)-[r]-(d) WHERE example.ipBelongsToNetwork(i.ip,"10.4.1.0/28") RETURN i AS InterfaceIP, r as REL, d AS Device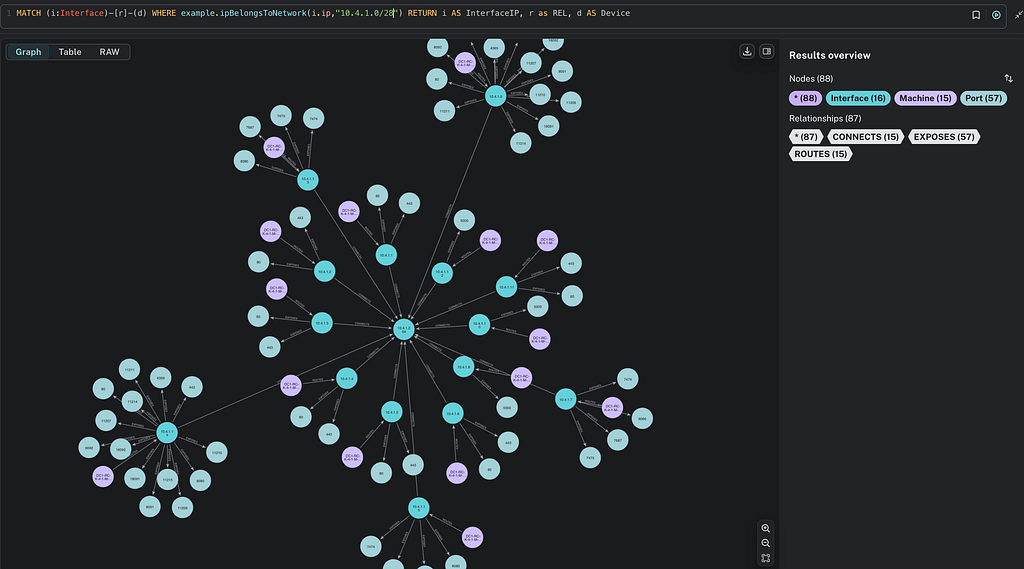

Perform a Network Analysis
We can take this project one step further by integrating the UDF we defined and use it with Neo4j MCP server to perform a detailed network analysis with the help of an LLM.
For this test, I’ve used Claude Desktop and the Neo4j MCP server. Make sure the container that includes the UDF and the demonstrative network data is running:
docker run -it -p 7474:7474 -p 7687:7687 --env=NEO4J_AUTH=neo4j/<PASSWORD> neo-udf-ip-check:1.0- Step 1: Install the MCP server following the examples outlined in neo4j-mcp: installation.
- Step 2: Configure Claude Desktop to use neo4j-mcp to access the tools exposed by the MCP server to run Cypher queries on the network graph stored in my Neo4j server.
- Step 3: Update the claude_desktop_config.json file to include the configuration for the Neo4j MCP server.
{
  "mcpServers": {
    "neo4j-mcp": {
      "type": "stdio",
      "command": "neo4j-mcp",
      "args": [],
      "env": {
        "NEO4J_URI": "bolt://localhost:7687",
        "NEO4J_USERNAME": "neo4j",
        "NEO4J_PASSWORD": "password",
        "NEO4J_DATABASE": "neo4j",
        "NEO4J_READ_ONLY": "true",
        "NEO4J_TELEMETRY": "false",
        "NEO4J_LOG_LEVEL": "info",
        "NEO4J_LOG_FORMAT": "text",
        "NEO4J_SCHEMA_SAMPLE_SIZE": "100"
      }
    }
  }
}
Once the claude_desktop_config.json file is updated with the MCP server configuration, save it, and restart Claude Desktop.
You can now begin a new chat session with Claude Desktop, which accesses the tools made available by the MCP server.
Asking the LLM Questions
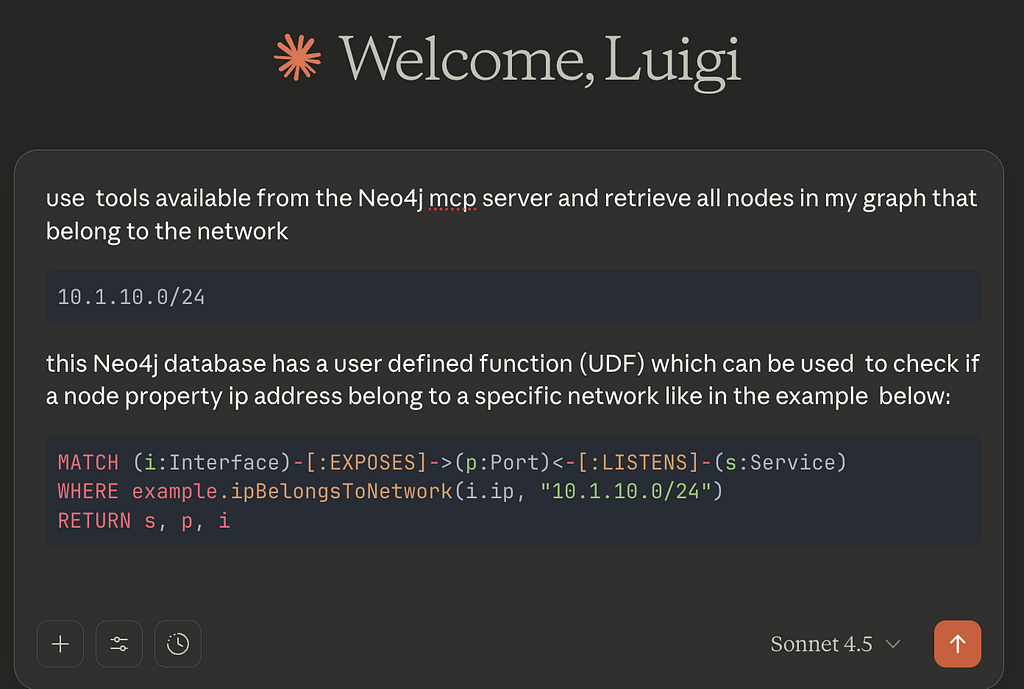
Now that our setup is complete, you can simply ask Claude to:
“Retrieve all nodes that belong to the network 10.1.10.0/24 using the example.ipBelongsToNetwork UDF.”
The LLM will:
- Query your Neo4j database using the UDF
- Analyze the network topology
- Identify connected devices
- Highlight potential security concerns
- Provide actionable recommendations

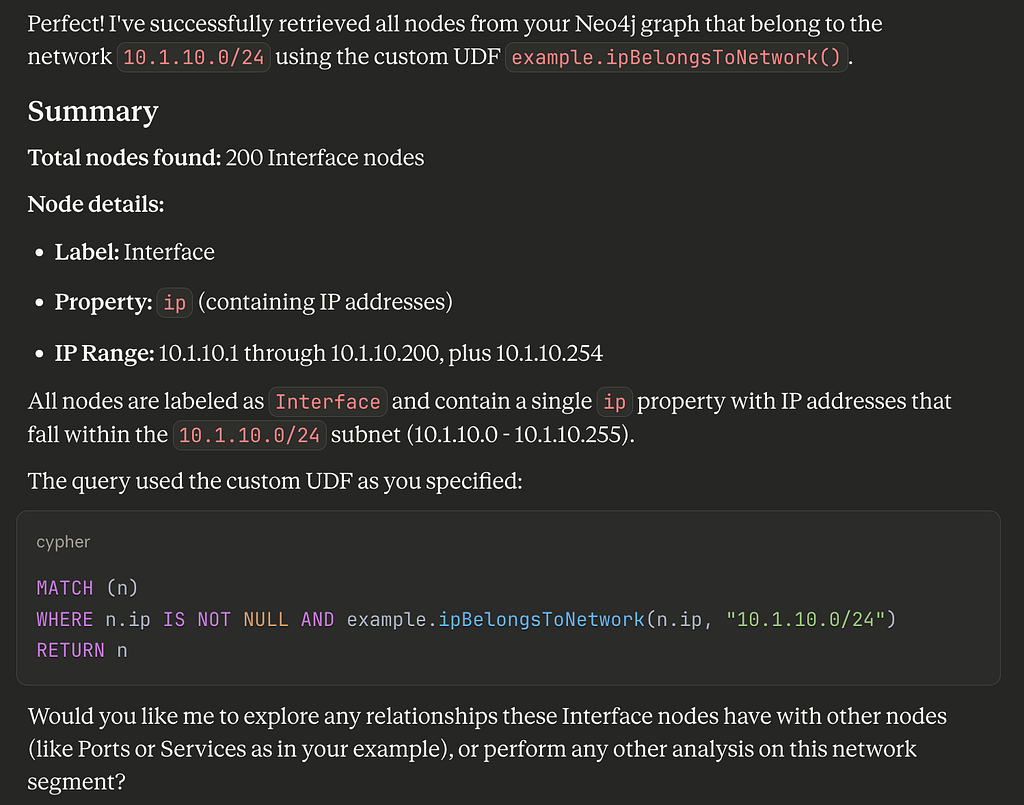
Network Analysis Results via MCP Integration
By accessing the data in our graph via the Neo4j MCP read-cypher tool and leveraging the UDF function we created, the LLM has all the information it needs to provide a detailed analysis of the network segment of our interest.

The complete analysis generated by Claude is available in the project repository.
Summary
This demonstrative project goal is to present an example of how it’s possible to combine Neo4j, LLMs, and UDFs to retrieve detailed information for network analysis. This approach facilitates the tracking of devices connected to a network, identifies unused or unnecessary open ports, and helps troubleshoot connectivity issues in complex IT environments. Ultimately, this integration goal is to demonstrate how to leverage Neo4j to enhance network management capabilities and empower teams to make informed decisions based on comprehensive data analysis.
Check out GraphAcademy for free courses on data analysis to learn more.
Analyze a Complex Network in Neo4j With User-Defined Functions was originally published in Neo4j Developer Blog on Medium, where people are continuing the conversation by highlighting and responding to this story.
Share Article


Explore
Related Articles


Beyond the Lakehouse: Why Your Microsoft Fabric Strategy Needs Neo4j Graph Intelligence