Neo4j data integration pipeline using Snakemake and Docker

MRC Integrative Epidemiology Unit
University of Bristol
7 min read
For around five years, the MRC Integrative Epidemiology Unit at the University of Bristol has been using Neo4j for the Data Mining Epidemiological Relationships programme in a variety of projects, sometimes as the main database and sometimes as part of a larger platform.
We find creating queries with Cypher intuitive and query performance to be good. However, the integration of data into a graph can still be a challenge, especially when using datasets from a variety of sources.
Our latest project, EpiGraphDB, uses data from over 20 independent sources, most of which require cleaning and QC before they can be incorporated. In addition, each build of the graph needs to contain information on the versions of data, the schema of the graph and so on. Schemas, in particular, being imperative for construction of downstream APIs and tracking structural changes between builds.
Most tutorials and guides focus on post-graph construction analytics, with limited focus on how the graph was created. Often the process of bringing all the data together is overlooked or assumed to be straightforward.
To provide access and transparency to the entire process, we designed an open and generalizable Neo4j data integration pipeline to streamline our projects. We believe this pipeline provides a simple method for adding new data to a graph build and could potentially be used collaboratively.
The pipeline
Get the code and documentation for the pipeline here.
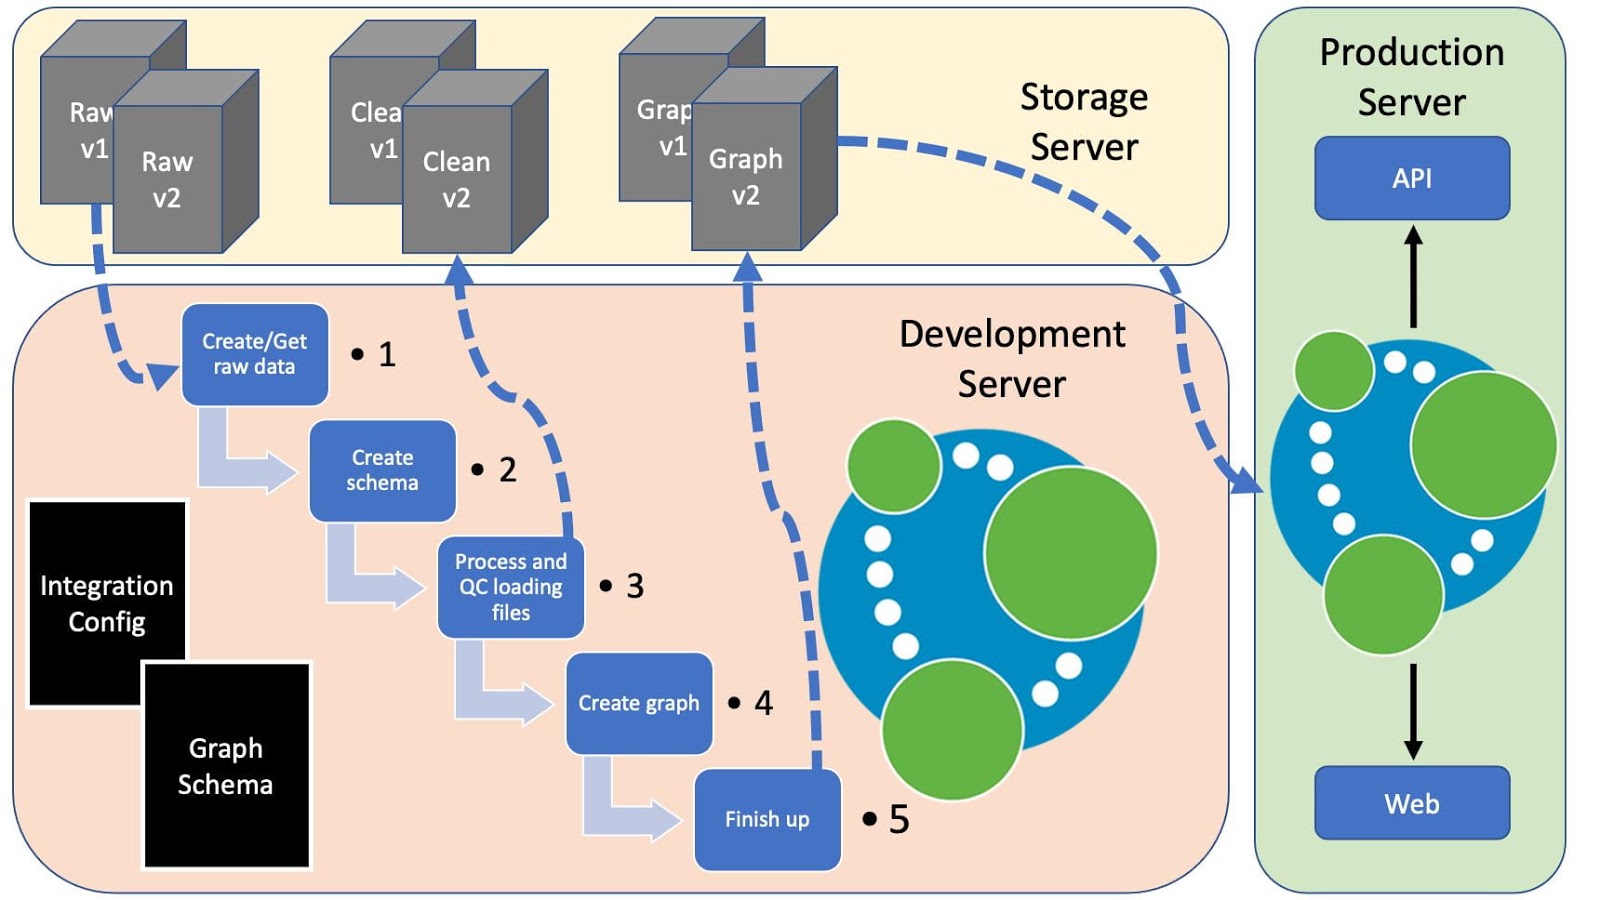
Below is a figure representing how this might fit into a production environment, with the pipeline running on a development server and shared data on a storage server.
Pipeline components
Our data integration pipeline aims to create a working graph from raw data, whilst running checks on each data set and automating the build process. The following gives a little more information on some of the key components:
Snakemake
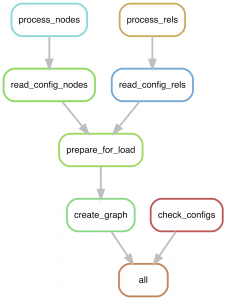
Each step of the build pipeline is controlled by a separate Snakemake rule. First, the config files are checked for formatting using check_configs. At the same time, the process_nodes and process_rels rules process each data set from a config file in parallel. All node data are then merged into clean files (prepare_for_load) and then passed to the graph building step (create_graph).
This invokes the Neo4j admin import command rapidly building a graph in parallel. Following this, any indexes and constraints are then added to the graph.
Docker or local Neo4j graph
Although not required, the pipeline can build a graph directly using a standard Neo4j v4.1.0 Docker image. If using a local Neo4j graph, the files containing the load commands can just be run locally.
Predefined database schema
To ensure uniformity and a consistent build process, the graph schema needs to be created upfront. A test dataset and schema are provided, detailing properties and requirements for each node and relationship.
For example, below is the Protein node example with information on permitted properties, required properties, index (for import) and properties to use for the meta data _id and _name. The latter are used to ensure every node has two meta properties that can be used for global search.
 Protein:
    properties:
      uniprot_id:
        type: string
      name:
        type: string
    required:
      - uniprot_id
      - name
    index: uniprot_id
    meta:
      _id: uniprot_id
      _name: name
Testing new data
Each individual dataset can be tested before being officially added to a graph build. The process of adding a new dataset requires updates to the graph schema and the config files, as well as creating a script for sourcing and processing (QC-ing) the new source data, to create the required files in a clean format e.g. formatted CSV and headers.
Merging nodes
One major issue when creating a large heterogeneous graph is that multiple datasets can contribute to a single node type. For example, we have multiple sources of genetic variant data in our epidemiological graph. These vary in their content and size, so we needed to try and capture as much data as possible, whilst removing redundant information and keeping track of the source of each variant.
The merge step in our data integration pipeline automatically identifies those nodes with multiple datasets, and performs those maintenance steps. Moreover, we have made efforts to optimise the computationally intensive steps, e.g. multiple data frame merges, by implementing the process in a parallelizable way.
Neo4j import
The first iterations of this project used LOAD CSV statements, but that quickly became problematic due to speed and a lack of consistency within the graph structure. This led to the development of a defined structure and the use of the import tool. The benefits of this were increases in build time from hours to minutes, as well as the guaranteed production of clean files.
Data sources
Each node is automatically assigned a ‘source’ array property, containing the data sources that contributed to that node. Each relationship also has a ‘source’ property, but this is a single entry as all relationship types need to be unique. These values can be used to capture source versions or any other information that could be useful.
Remote server
As we often store data on a different server to that which is being used to build the graph, the option of using a remote server for building the graph and storing the resulting data is provided. This can be used for raw and processed data, as well as backups of the graph itself.
Setup
The pipeline comes with a set of test data that can be used to quickly demonstrate functionality and create a basic demo graph. The setup requires only a few steps:
 # clone the repo (use https if necessary)
 git clone [email protected]:elswob/neo4j-build-pipeline.git
 cd neo4j-build-pipeline

 # create the conda environment
 conda env create -f environment.yml
 conda activate neo4j_build

 # create a basic environment variable file for test data
 # works ok for this test, but needs modifying for real use
 cp example.env .env

 # run the pipeline
snakemake -r all --cores 4
For a new project, the steps to create a graph from scratch are detailed here and proceed as follows:
- Set up a local instance of the pipeline and test the demo build
- Data sourcing: Create or retrieve a set of new source data to be added to the graph
- The data can be stored locally with the graph or on an external server
- The data sourcing scripts should be stored in the codebase for transparency
- Data processing: Create processing scripts to transform and read in the new data into the graph
- Modify the graph schema to include new data (nodes and/or relationships)
- Test the build steps of individual or all data files and visualise data summary
- Run the pipeline
- Raw data are checked against schema and processed to produce clean node and relationship CSV and header files
- Overlapping node data are merged
- Neo4j graph is created using neo4j-admin import
- Constraints and indices are added
- Clean data are copied back to the specified location
Future plans
We think the work we have done here may be of interest to others. If anyone would like to get involved in this project we would love to collaborate and work together towards refining and publishing the method. Comments also welcome.
Show off your graph database skills to the community and employers with the official Neo4j Certification. Click below to get started and you could be done in less than an hour.
Share Article


Explore
Related Articles


Why healthcare CIOs can’t afford to scale AI without a knowledge graph foundation
Hey LLM, you’re using OPTIONAL MATCH wrong. Here’s the Cypher that actually works.

How graph intelligence drives breakthroughs in science and society