Theo, the Swift framework for interfacing with Neo4j, is now available in version 3.0.
With this version, Theo gets full support for Swift 3, Linux support, and better integration with popular package managers. This is on top of features you already expect, like CRUD operations for nodes and relationships, Cypher support and transaction support.
Apart from reading the detailed instructions, you can take a look at our example project for how to use Theo in your iOS project below.
You can quickly integrate it into your existing iOS or macOS app as a git submodule, via Cocoapods, via Carthage or via the Swift Package Manager regardless if your app is written in Objective-C or Swift.
You can also easily integrate it in server side Swift project on macOS or Linux as a git submodule or with the Swift Package Manager. If you are new to server-side Swift development, we recommend you try Theo out together with Vapor. Other suggested web frameworks you can integrate Theo with are Kitura and Perfect.
You can also find further instructions on the Developer page for Using Neo4j from Swift.
Theo has been available since Swift 1.2 and has followed the Swift versions ever since. In the future, we plan to stay on top of the latest Swift versions. Theo interfaces with Neo4j via the REST API, but support for the newer Bolt protocol is absolutely a priority on our roadmap ahead.
We look forward to hearing what you create using Theo and Neo4j. Feel free to ask any developer questions on Stack Overflow or Discord.
To demonstrate how to quickly get started with Theo, we provided the following example iOS demo, which we’ll describe in a bit more detail below. You can also find all the information in its GitHub repository.
Getting Started with Theo
After installing Theo in your project, you are ready to
import Theo
Then you can instantiate your client like so:
let theo: Client = Client(baseURL: "hostname.com",
                          user: "username", pass: "password")
Here’s how to create a node:
let node = Node()
let randomString: String = UUID().uuidString

node.setProp("propertyKey_1",
             propertyValue: "propertyValue_1" + randomString)
node.setProp("propertyKey_2",
             propertyValue: "propertyValue_2" + randomString)

theo.createNode(node, completionBlock: { (node, error) in
    print("new node (node)")
})
Here’s how to fetch a node:
theo.fetchNode("IDToFetch", completionBlock: { (node, error) in
    print("meta in success (node!.meta) node (node) error (error)")
})
Here’s how to do a Cypher query:
let cypherQuery: String = "MATCH (node1:Label1)-->(node2:Label2)
                           WHERE node1.propertyA = {value}
                           RETURN node2.propertyA, node2.propertyB"

let cypherParams: Dictionary<String, AnyObject> = ["value" : "someValue"]

theo.executeCypher(cypherQuery, params: cypherParams, completionBlock:
            { (cypher, error) in println("response from cypher (cypher)")
})
Or, here’s how to do a transaction:
let createStatement: String = "CREATE ( bike:Bike { weight: 10 } )
                               CREATE ( frontWheel:Wheel { spokes: 3 } )
                               CREATE ( backWheel:Wheel { spokes: 32 } )
                               CREATE p1 = bike -[:HAS { position: 1 } ]-> frontWheel
                               CREATE p2 = bike -[:HAS { position: 2 } ]-> backWheel
                               RETURN bike, p1, p2"

let resultDataContents: Array<String> = ["row", "graph"]
let statement: Dictionary <String, AnyObject> =
     ["statement" : createStatement,
      "resultDataContents" : resultDataContents]
let statements: Array<Dictionary <String, AnyObject>> = [statement]

theo.executeTransaction(statements, completionBlock: {(response, error) in
    print("response (response) and error (error?.description")
})
As you can see, it is very much how you would expect Swift code to read, and it integrates with Neo4j very much how you would expect a Neo4j integration to be. There are no hard learning curves, meaning you can start being productive right away.
iOS Example Application
You can find our iOS example project of how to use Theo here.
Build & Run
If you haven’t already, install CocoaPods:
$ gem install cocoapods
Then, after downloading the source code, you can set up the demo project and install its dependency in Theo by running this from the project root:
$ pod install
Now open theo-example.xcworkspace and run it in your simulator. To run on a device, you need the necessary certificates.
Demo

In the first screen of our app, we set up the connection details. As you can see, there are a number of standard defaults, but you probably have another hostname and password. In the demo, we access the local IP 10.200.1.125, use the default port 7474 for HTTP access and default username neo4j. We’ve modified the password, and thus we can connect.
How do we connect, you say? The REST API, after all, has no thought about a connection. Well, it really is just a test to see that the parameters are correct, so we grab the Neo4j instance’s metadata:
theo = Client(baseURL: config.host, user: config.username, pass: config.password)
outputTextView?.text = "Connecting..."
theo?.metaDescription({ [weak self] (_, error) in
    DispatchQueue.main.async { [weak self] in
        if let error = error {
            self?.outputTextView?.text = "Error while connecting: (error)"
        } else {
            self?.outputTextView?.text = "Connected"
            self?.enableButtons()
        }
    }
})
This and the following code is from QueryViewController. What happens here is that we’re creating a client based on the connection data provided, and ask it for metadata.
Since we only really wanted to test the parameters, we ignore the returned data (the _ parameter in (_, error) ). Theo allows us to specify what DispatchQueue, we want to have our results served on, but to be explicit we have not set this in the example and thus select the main dispatch queue when the answer returns. On that queue we output any errors, and if there were none, we enable the four buttons we have set up with each their own query.
The first button we access is Create a node:
@IBAction func createNodeTapped(_ sender: UIButton) {
    let node = Node()
    let randomString: String = UUID().uuidString

    node.addLabel("TheoTest")
    node.setProp("propertyKey_1", propertyValue: "propertyValue_1" + randomString)
    node.setProp("propertyKey_2", propertyValue: "propertyValue_2" + randomString)

    theo?.createNode(node, completionBlock: { (node, error) in
        DispatchQueue.main.async { [weak self] in
            let text = self?.outputTextView?.text ?? ""
            if let error = error {
                self?.outputTextView?.text =
                     "Error while creating node: (error)nn(text)"
            } else {
                let nodeId = node?.meta?.nodeID()
                self?.outputTextView?.text =
                      "Created node with ID (nodeId ?? "N/A")nn(text)"
                if let nodeId = nodeId {
                    self?.lastNodeId = nodeId
                }
            }
        }
    })
}
Here we set up the node we want, and then ask Theo to create it. Again, since we want to update the UI, we ask the main queue to handle our result and display the created node’s ID, as well as store the nodeId in an instance variable lastNodeId that we’ll use in our next example.
The second button we access is Fetch created node that will look up the last created node, the one we just stored the node ID of in the lastNodeId instance variable.
@IBAction func fetchNodeTapped(_ sender: UIButton) {
    let fetchingId = lastNodeId
    theo?.fetchNode(fetchingIdz, completionBlock: { (node, error) in
        DispatchQueue.main.async { [weak self] in
            let text = self?.outputTextView?.text ?? ""
            if let error = error {
                self?.outputTextView?.text =
                    "Error while fetching node with ID '(fetchingId)':
                     (error)nn(text)"
            } else {
                self?.outputTextView?.text =
                    "Fetched node with ID (node?.meta?.nodeID() ?? "N/A")
                     successfullynn(text)"
            }
        }
    })

}
Because the instance variable can change while our query is running, we copy it to fetchingId. Then we query for that node, and assuming it is still there, we output that we successfully got it. If it has been deleted in the meanwhile, or the database has gone away, we display the error received.
In the demo video, we then skip forward to Run transaction where we run two Cypher statements:
CREATE (n:TheoTest { myProperty: 'A value' } )CREATE (m:TheoTest { myProperty: 'Another value' } )
@IBAction func runTransactionTapped(_ sender: UIButton) {
    let statement1 = [
        "statement" : "CREATE (n:TheoTest { myProperty: 'A value' } )" as AnyObject,
        "resultDataContents" : ["graph","row"] as AnyObject
    ]
    let statement2 = [
        "statement" : "CREATE (m:TheoTest { myProperty: 'Another value' } )" as AnyObject,
        "resultDataContents" : ["graph","row"] as AnyObject
    ]

    theo?.executeTransaction([statement1, statement2]) { (result, error) in
        DispatchQueue.main.async { [weak self] in
            let text = self?.outputTextView?.text ?? ""
            if let error = error {
                self?.outputTextView?.text =
                    "Error while executing transaction: (error)nn(text)"
            } else {
                self?.outputTextView?.text =
                    "Transaction completed successfullynn(text)"
            }
        }
    }

}
As from the other examples, we then output whether the transaction was successful or not.
Finally, we run a single Cypher query, asking how many nodes there are labelled TheoTest:
@IBAction func runCypherTapped(_ sender: UIButton) {
    theo?.executeCypher("MATCH (n:TheoTest) RETURN count(n) AS num") { (result, error) in
        DispatchQueue.main.async { [weak self] in
            let text = self?.outputTextView?.text ?? ""
            if let error = error {
                self?.outputTextView?.text =
                     "Error while executing cypher: (error)nn(text)"
            } else {
                var num = "N/A"
                if let data = result?.data,
                    let n = data.first?["num"] as? Int {
                    num = "(n)"
                }
                self?.outputTextView?.text =
                    "Asked via Cypher how many nodes there are with label TheoTest.
                     Answer: (num)nn(text)"
            }
        }
    }
}
The result we get contains a data array that has one result for each element we asked for in the Cypher query. Since we only asked for count(n) AS num, we grab the first result with property num and display that in our output to the user.
Not demoed here are relationships, but you can manage them just as easily as nodes via fetchRelationshipsForNode(), createRelationship(), updateReleationship() and deleteRelationship() as well as through Cypher.
Share Article


Explore
Related Articles

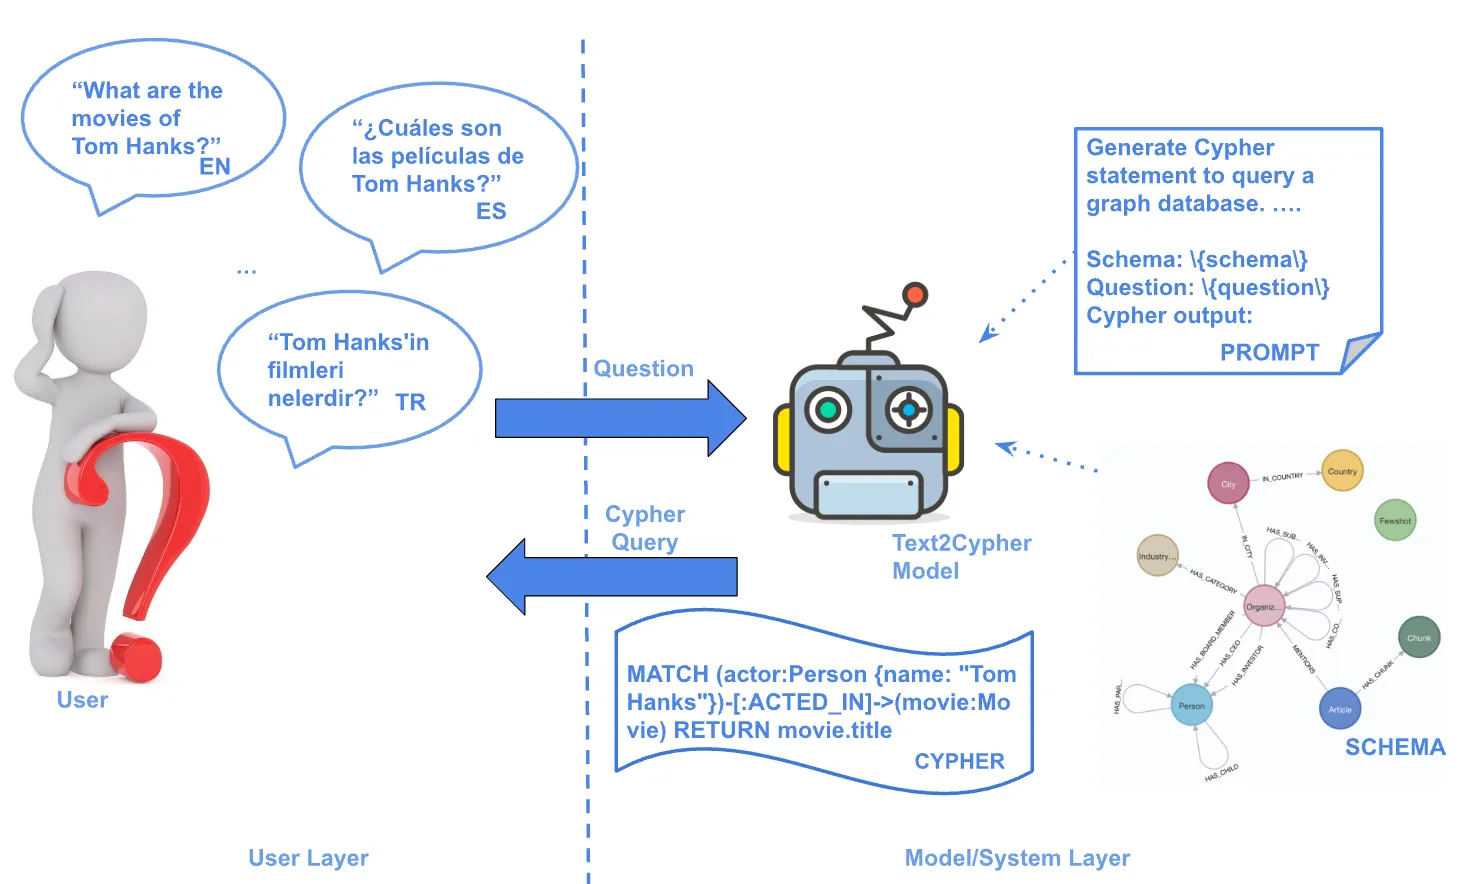
Text2Cypher Across Languages: Evaluating Foundational Models Beyond English