Neo4j now supports AWS Managed Streaming for Kafka (MSK) through MSK Connect, configured as a source and sink with AuraDB Free.
Back in January, I took on the Product Manager role for Neo4j Connectors — the products which enable customers to stream data into and out of Neo4j using products like Apache Kafka / Apache Spark and their commercial alternatives.
In this blog, I will show you how Aura/Neo4j supports AWS Managed Streaming for Kafka (MSK) through MSK Connect with our connector configured as a source and sink with AuraDB Free.
We are using the same database as the source and sink so that you can see how it can be configured to work depending upon your needs — it also means you can do all the graphy stuff for free because you only get one free AuraDB database.
On Thursday the 30th of March, there is a joint hosted online event called Neo4j AWS DevDay, which includes a series of great talks on:
– AWS and Neo4j’s Partnership
– Deploying Neo4j From the AWS Marketplace
– Supervised Learning with AWS SageMaker
– Importing Data Into Neo4j
It is going to be a great event packed with demos. If you are interested, you can register here.
If you were at the event and wanted to replicate what John demoed then this is the blog for you.
Back to Creating a Graph With MSK Connect
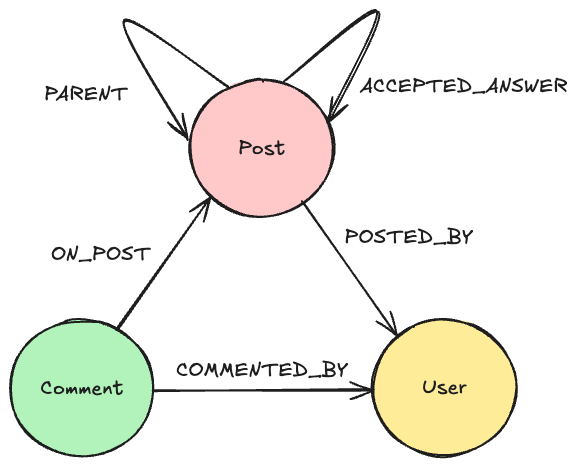
We’ll use the cities of the world dataset available here — a CSV file of cities, their populations, locations, and counties — as our dataset, importing it into AuraDB as a set of isolated nodes for each City with properties for the Country. The Sink Connector will read the data on the topic, and write it back to AuraDB creating a relationship LOCATED_IN between each city and the country.
We are going to use a Terraform module Ed Randle created for you, to build the AWS MSK cluster and networking required to connect to AuraDB.
Why Terraform? Well if you aren’t familiar with Terraform, it is basically Docker Compose for building anything in the cloud, and there is a lot of networking, IAM roles, and permissions to get right for MSK and the module does that all for you. It is well worth the short amount of time you need to invest to set up Terraform.
What Do You Need?
- An AuraDB account
- An AWS Account, an S3 bucket, and a Cloudwatch log group for monitoring (recommended) but you can send the logs to the S3 bucket.
- Terraform on your laptop
- About an hour of hands-on time
- About a 3/4–1hr to work on other stuff while stuff happens in the background
- Your favorite snacks
What Will You End Up With?
- A graph of cities of the world located in their respective countries running in AuraDB
- A running MSK Cluster, MSK Connect configured with a source and sink connector
- A VPC and all the networking you didn’t know you needed (and an easy way to tear it all down)
Please note, while AuraDB Free is free for life, we’ll be creating some AWS resources that you will need to pay for (we have used micro instances where possible, but there are some larger ones that are required for the MSK Cluster). Internet Gateways aren’t cheap to run, and you will incur cost per day and charges for sending data out so bear this in mind. And tear down the estate after you’re done testing.
Preparation
Sign up for AuraDB Free, you can create one here. Make a note and download the URI and the password (save it in your favorite password vault) while the database is being provisioned carry on with the rest of the setup.
Create an S3 bucket if you don’t have one already, and go to GitHub https://github.com/neo4j-contrib/neo4j-streams/releases to get neo4j-kafka-connect-neo4j-5.0.2-kc-oss.zip and upload it to your S3 bucket.
Please dont use the neo4j-kafka-connect-neo4j-5.0.2.zip, because that is intended for use with Confluent.
Install Terraform on your laptop if you don’t have it already, follow this guide.
Install Terraform | Terraform | HashiCorp Developer
Check you can create an S3 micro instance and destroy it — this tutorial is a good test if you are new to Terraform.
Go to Ed’s GitHub repo and take a local clone, and follow the instructions in the readme to create your main.tf and provider.tf files for Terraform.
When you are ready, run
terraform apply -auto-approve
Note, Terraform apply takes about 30 mins to build the environment vs several days :), so you can crack on with some other work.
Once it’s completed, the Terraform module will output the commands you need to connect to the public Bastion machine.
ssh -A -o StrictHostKeyChecking=no ec2-user@10.0.x.135
Then, you need to hop to the client machine that has the Kafka utilities installed on it so that you can create the topic:
ssh -A -o StrictHostKeyChecking=no ec2-user@10.0.x.135
cd kafka
./create-topic.sh
What Question Do We Want to Ask Our Graph?
We have a list of cities of the world which includes information on the country like geolocation and the population.
Let’s start off by asking which city exists in which country, and which countries share city names.
To demonstrate the capabilities of the Sink and Source Connectors, we are going to do this in two phases.
First, create source data to be streamed into the topic; we’ll label it ‘TestSource and each node will have three properties ‘city’, ‘country’ and ‘timestamp’.
Please note that the timestamp property currently needs to be a long value, you can use timestamp() or datetime().epochMillis as source.
Before we try and import all the data from the CSV, let’s create a test node in AuraDB using the Query tab this will help you understand the configuration that is required by the Connector:
CREATE (:TestSource {city: 'London', country: 'England', timestamp: datetime().epochMillis});
The result is the following node for England:
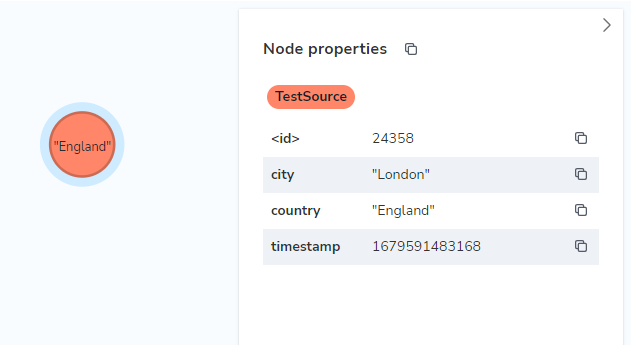
The node can be queried with:
MATCH (ts:TestSource) WHERE ts.city = 'London' return ts;
For the Connector’s configuration, we need a more general statement that picks up the creation of new cities. Neo4j’s Connector for Confluent provides $lastCheck to track the time, and we return all the properties of interest:
neo4j.source.query=MATCH (ts:TestSource) WHERE ts.timestamp > $lastCheck RETURN ts.city AS city, ts.country AS country, ts.timestamp AS timestamp
The Sink Connector needs to stream this data back from the topic,
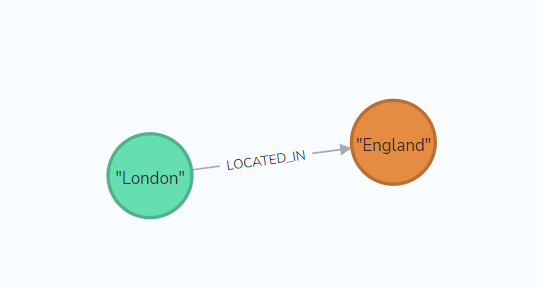
my-topicand create a graph that maps nodes with the City label, to nodes with a Country label through the relationship LOCATED_IN.
This simple graph can be created with the following Cypher in AuraDB’s Query tab:
CREATE (ci:City {name: "London"})
MERGE (co:Country {name: "England"})
MERGE (ci)-[:LOCATED_IN]->(co)
And queried with:
MATCH (ci:City) WHERE ci.name = 'London' return ci;
We need to change the CREATE statement for the Connector’s Sink configuration, and switch to using MERGE so we don’t create duplicate nodes:
neo4j.topic.cypher.my-topic=MERGE (ci:City {name: event.city}) MERGE (co:Country {name: event.country}) MERGE (ci)-[:LOCATED_IN]->(co)
Create a Custom Plugin
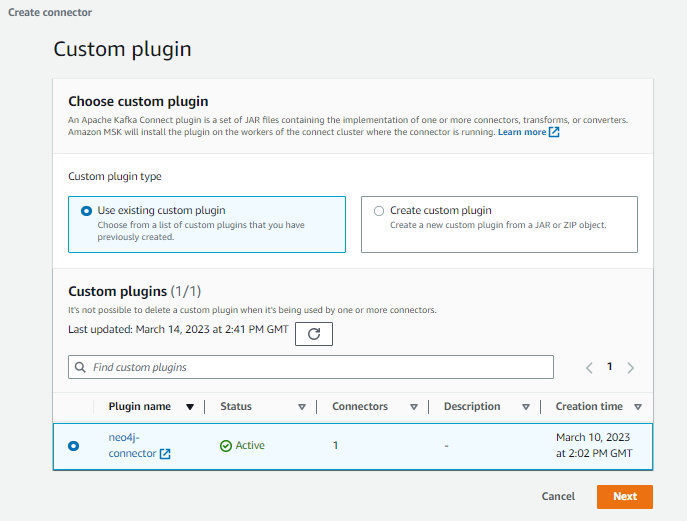
In the AWS Console, go to MSK and select ‘Create custom plugin’.
Please note, it is considered bad practice to mix Terraform created resources with manually created ones because Terraform won’t be able to delete resources if they have any dependencies. I am doing this intentionally to help demonstrate how the Connector configuration relates to the sink and source data.
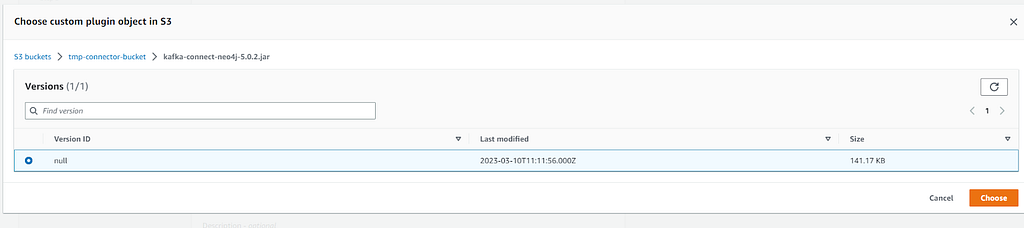
Browse to your S3 bucket, and select the Neo4j Connector for Apache Kafka zip.
Give the plugin a name e.g. neo4j-connector
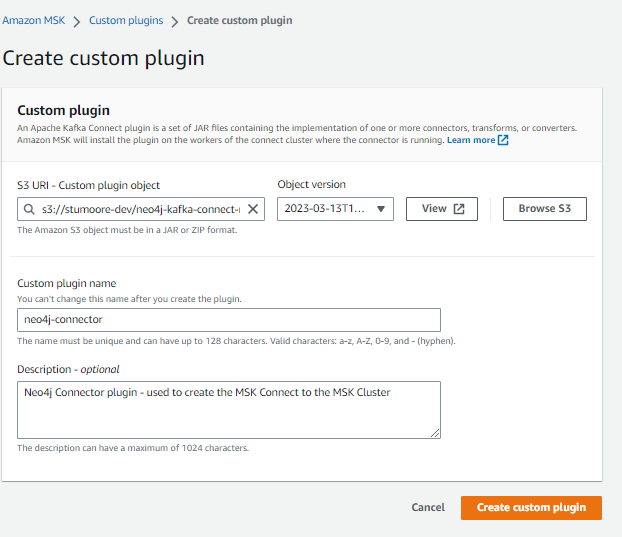
Select the null version, and ‘Choose’
Create a Connector for MSK Connect
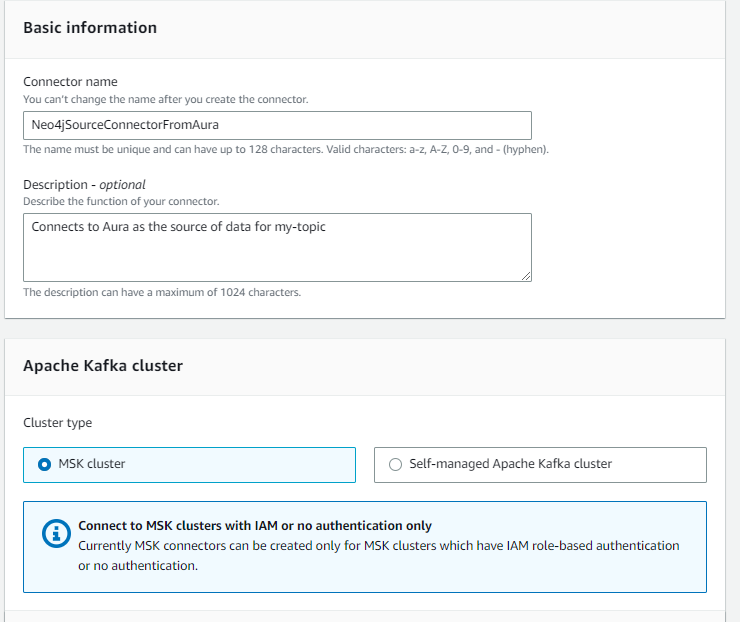
Paste the following into the Connector configuration in the next section, but be sure to replace the neo4j.server.uri and the password with yours (the example below contains the text redacted). Note, the uri for Aura should look like neo4j+s://x57g8ii4.databases.neo4j.io:7687 — you will need to add the port 7687 as this isn’t shown in the Aura console. Notice the configuration line for the neo4j.source.query is the one we created above to query the source data.
topic=my-topic
connector.class=streams.kafka.connect.source.Neo4jSourceConnector
key.converter=org.apache.kafka.connect.storage.StringConverter
key.converter.schemas.enable=false
value.converter=org.apache.kafka.connect.storage.StringConverter
value.converter.schemas.enable=false
tasks.max=2
errors.retry.timeout=-1
errors.retry.delay.max.ms=1000
errors.tolerance=all
errors.log.enable=true
errors.log.include.messages=true
neo4j.server.uri=neo4j+s://redacted.databases.neo4j.io:7687
neo4j.authentication.basic.password=redacted
neo4j.authentication.basic.username=neo4j
neo4j.database=neo4j
neo4j.streaming.poll.interval.msecs=5000
neo4j.streaming.property=timestamp
neo4j.streaming.from=LAST_COMMITTED
neo4j.source.query=MATCH (ts:TestSource) WHERE ts.timestamp > $lastCheck RETURN ts.city AS city, ts.country AS country, ts.timestamp AS timestamp

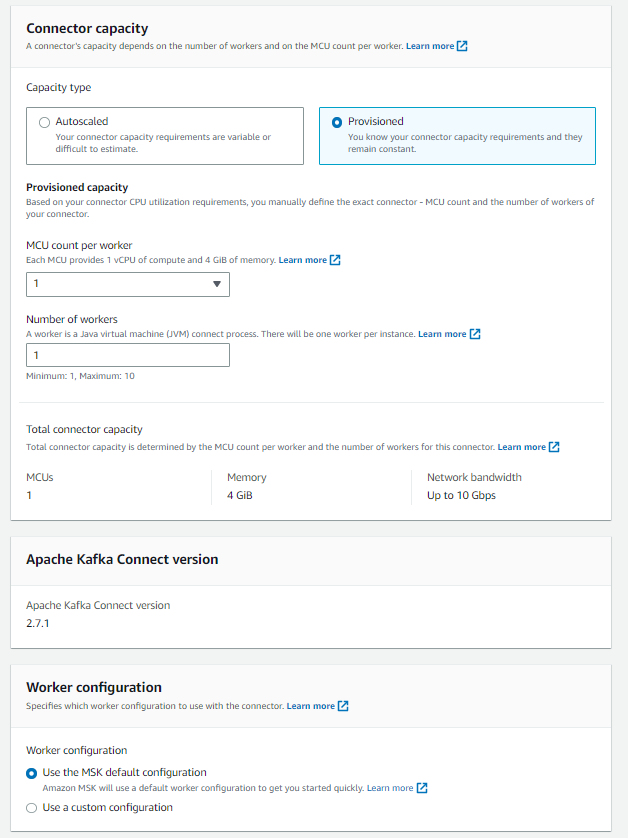
Select ‘Autoscaled’, and all the defaults
Select the IAM role with the prefix you specified in the main.tf.
For example, in mine, I specified t1-neo4j and selected t1-neo4j-env-role.
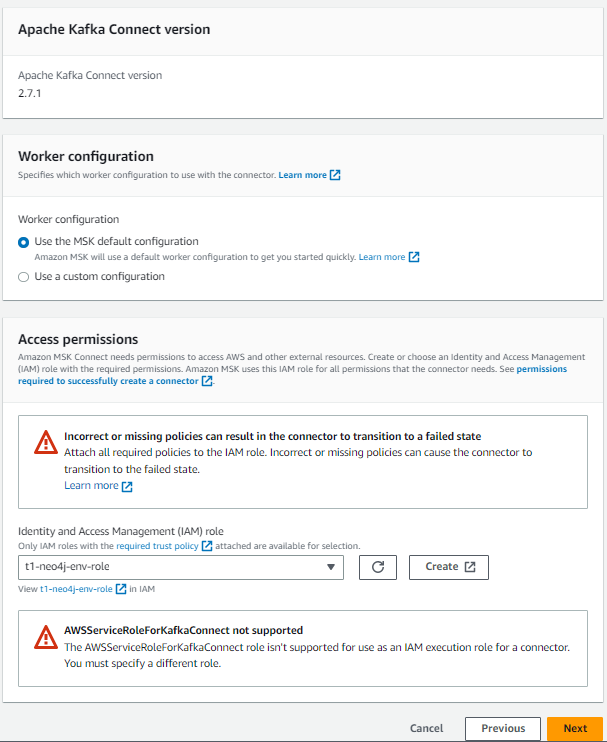
Note the two warnings in Access permissions remain even after you select the IAM Role, you can ignore these because Terraform has created the role IAM policies and role.
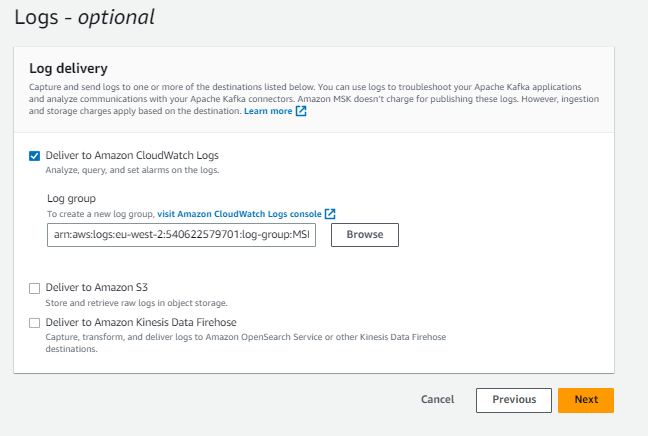
Click ‘Next’, and then again until you see the Logs set up. Go with CloudWatch, it will save you a load of pain downloading and extracting log files if you need to debug the connector and flow of data from Aura and back again.
It is pretty straightforward to set up a Log group, but you will need that to exist before you continue.
Create a Sink Connector
Repeat the same process, but this time create a Neo4jSinkConnectorToAura using the following, replacing the neo4j.server.uri (and port) / password for your AuraDB Free instance — this is where we use the MERGE statement for the neo4j.topic.cypher.my-topic
key.converter=org.apache.kafka.connect.json.JsonConverter
key.converter.schemas.enable=false
value.converter=org.apache.kafka.connect.json.JsonConverter
value.converter.schemas.enable=false
topics=my-topic
connector.class=streams.kafka.connect.sink.Neo4jSinkConnector
tasks.max=1
errors.retry.timeout=-1
errors.retry.delay.max.ms=1000
errors.tolerance=all
errors.log.enable=true
errors.log.include.messages=true
neo4j.server.uri=neo4j+s://redacted.databases.neo4j.io:7687
neo4j.authentication.basic.username=neo4j
neo4j.authentication.basic.password=redacted
neo4j.topic.cypher.my-topic=MERGE (ci:City {name: event.city}) MERGE (co:Country {name: event.country}) MERGE (ci)-[:LOCATED_IN]->(co)
Now go make a cup of tea/coffee and grab a few biscuits/cookies, because it is time to check slack etc. while you wait (times vary but about 10mins is usual).
Check both connectors are Running when you return. If there are errors you will need to go to CloudWatch to review the logs (some troubleshooting steps have been included at the end of the blog).
Now Back to the Fun, Graphy Bit*
Go to Aura Console and test that we can create source information for MKS and have it streamed back via the Sink connector:
CREATE (:TestSource {city: 'London', country: 'England', timestamp: datetime().epochMillis});
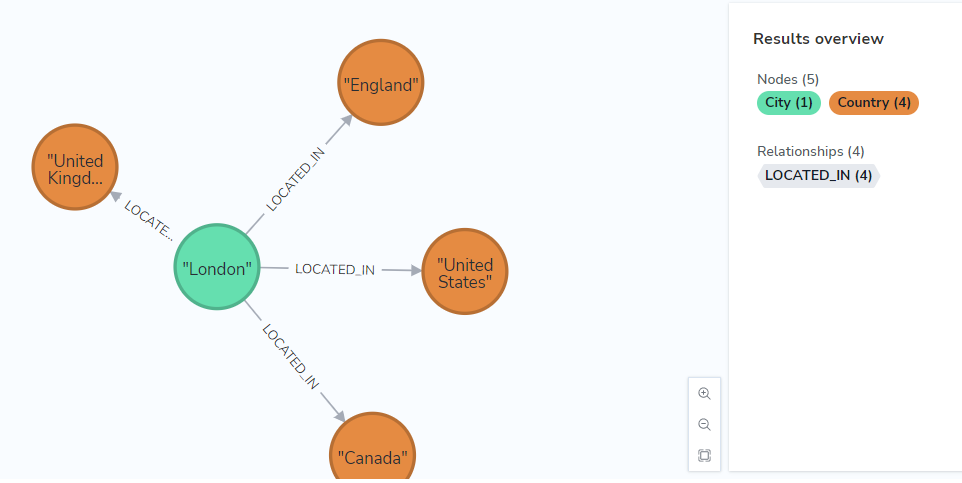
The Neo4jSourceConnectorFromAura will stream the data into my-topic, you can then run the MATCH statement to see the resulting graph which has come back via the Neo4jSinkConnectorToAura
MATCH (ct:City) WHERE ct.name = 'London' return ct;
And there you go, two nodes and one relationship in a graph.
PS. Ed could have got you here a bit quicker with Terraform, but it is really helpful to create the Sink and Source connectors yourself. Plus, if you want to customize the set up with your own data then it is helpful to have done this all manually.
Now as graphs go, that is pretty underwhelming, so let’s clean up:
MATCH n DETACH DELETE n;
And then bring in all the cities in the world to be able to answer the questions:
create constraint if not exists for (ts:TestSource) require (ts.city, ts.country) is unique;

LOAD CSV WITH HEADERS FROM
  'https://storage.googleapis.com/meetup-data/worldcities.csv' AS line
CALL { with line
     MERGE (ts:TestSource { city: line.city, country: line.country})
     ON CREATE SET ts.timestamp=datetime().epochMillis
} IN transactions OF 1000 ROWS;
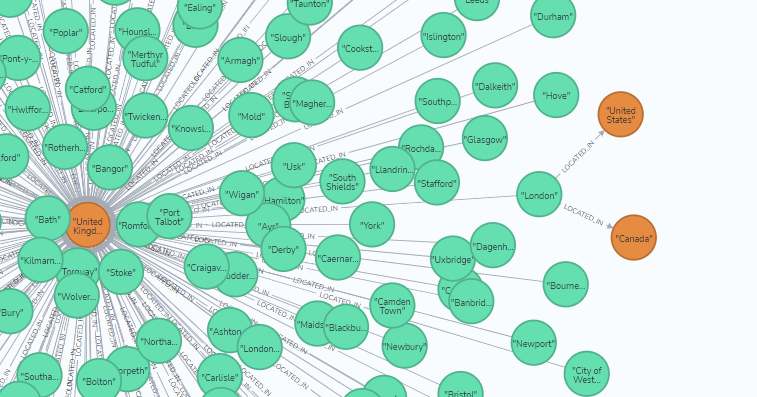
You can now explore the world, and see which city names exist in each country, and where they overlap:
MATCH (ct:City) WHERE ct.name = 'London' return ct;
If you double-click on United Kingdom you can see all the cities that are LOCATED_IN
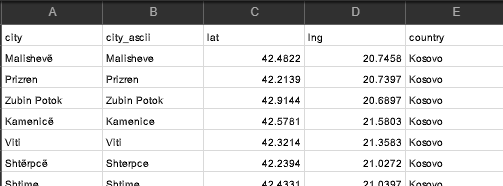
Side note: If you want to bring in more data you can use the following statement which will include the longtitude, latitude. Population data is available, but it is very sparse so probably not worth it.
create constraint if not exists for (ts:TestSource) require (ts.city, ts.country) is unique;

LOAD CSV WITH HEADERS FROM 'https://storage.googleapis.com/meetup-data/worldcities.csv' AS line
  CALL { with line
     MERGE (ts:TestSource { city: line.city, country: line.country })
     SET ts.timestamp = datetime().epochMillis,
     ts.lat = toFloat(line.lat), ts.lng = toFloat(line.lng)
} IN transactions OF 1000 ROWS;
Customize This to Use Different Data
If you want to change the topic name, the data, and the queries used, then have a read through the following summary of steps required to tailor the configuration.
- To create new topics, then ssh to the MSK client machine (from the bastion):
./create-topic.sh topic-name
2. Delete the Sink and Source Connectors if you want to change AuraDB URI / password, or the queries used (takes about 10 mins). Sorry for the bad user experience here, that’s how this works on AWS.
3. Create a new Source Connector (you’ll need to use a new name if you don’t want to wait for the old one to be deleted), and change the following entries in the configuration
topic=my-topic
neo4j.source.query=MATCH (ts:TestSource) WHERE ts.timestamp > $lastCheck RETURN ts.city AS city, ts.country AS country, ts.timestamp AS timestamp
4. If you change the source dataset or results, then you will need to create a new Sink Connector too:
topics=my-topic
neo4j.topic.cypher.my-topic=MERGE (ci:City {name: event.city}) MERGE (co:Country {name: event.country}) MERGE (ci)-[:LOCATED_IN]->(co)
Caution: the source uses ‘topic’, and the sink uses ‘topics’ because you are allowed multiple sinks. Please make sure you get the singular/plural forms correct otherwise the Connector will fail on creation.
5. Import your new data… check out this blog on Data Importer as a handy way of creating a model, mapping CSV files, and importing data into Neo4j.
6. In the Query tab, run the Cypher statement in the Aura console that matches the topic definition in 3.
CREATE (:TestSource {city: 'London', country: 'England', timestamp: datetime().epochMillis});
7. The Neo4jSourceConnectorFromAura will stream the data into the topic you have specified, and then you can run your new match statement, or use the Query tab:
MATCH (ct:City) WHERE ct.name = 'London' return ct;
Don’t Forget to Destroy
Before we can tear everything down with Terraform, we must delete manually created resources within the MSK environment — using the MSK console Delete the Source and Sink Connectors. You can leave the S3 bucket if you want, and you may want to delete the CloudWatch logs too but these won’t affect the Terraform script. Now run
terraform destroy -auto-approve
PS: You can keep AuraDB Free, it is free after all. It will just be auto-paused after 3 days of non-usage to save some computing resources.
Some Handy Troubleshooting
In the CloudWatch logs, search for ‘ERROR’ this will highlight problems like not being able to connect to Aura. For example:
Worker-0a6a93757f8865f6d] [2023-03-26 16:48:15,274] ERROR [Neo4jSourceConnectorFromAura|task-0] WorkerSourceTask{id=Neo4jSourceConnectorFromAura-0} Task threw an uncaught and unrecoverable exception. Task is being killed and will not recover until manually restarted (org.apache.kafka.connect.runtime.WorkerTask:191)
[Worker-0a6a93757f8865f6d] org.apache.kafka.connect.errors.ConnectException: java.lang.IllegalArgumentException: Illegal port: -1
Illegal port: -1 means you forgot to add ‘:7687’ on the URI you provided in the sink or source connectors.
ERROR [MSK-source-connect-to-auradb|task-0] Error: (streams.kafka.connect.source.Neo4jSourceService:164)
[Worker-06882f5c982acf346] org.neo4j.driver.exceptions.ServiceUnavailableException: Could not perform discovery for database 'neo4j'. No routing server available
‘No routing server available’ you may have a connectivity issue between MSK and Aura — test your routing with the nc command. Perform an apt get nc on the MSK Client machine
nc -vz uri-name.databases.neo4j.io 7474
Ncat: Version 7.50 ( https://nmap.org/ncat )
Ncat: Connected to x5.205.xxx.74:7474.
Ncat: 0 bytes sent, 0 bytes received in 0.02 seconds.

nc -vz uri-name.databases.neo4j.io 443
Ncat: Version 7.50 ( https://nmap.org/ncat )
Ncat: Connected to x5.205.xxx.74:443.
Ncat: 0 bytes sent, 0 bytes received in 0.02 seconds.

nc -vz uri-name.databases.neo4j.io 7687
Ncat: Version 7.50 ( https://nmap.org/ncat )
Has the source connector found data to put in the topic?
Poll returns
If you don’t paste the correct Cypher statement into the Source/Sink connector’s config, miss off-characters, or create nodes/relationships in the Source that don’t match the configuration of the Sink, you may get problems parsing messages in the topics. E.g
ErrorData(originalTopic=my-topic

OR

Unrecognized token
When the Sink connector is working you will find the following message
Committing offsets asynchronously
Conclusion
Hope you liked using Ed’s Terraform module to create the environment for MSK and the ease with which you can create sink and source connections between Aura and MSK’s topics with the Neo4j Connector for Apache Kafka.
Hope you enjoy the AWS Dev Day if you are able to attend and give the Connector a go with your own data.
AWS | Neo4j ML Dev Day Virtual Workshop
If you have feedback, please share it as a GitHub issue in the Connector Repository: https://github.com/neo4j-contrib/neo4j-streams
Using AuraDB / Neo4j as a Source and Sink for AWS MSK was originally published in Neo4j Developer Blog on Medium, where people are continuing the conversation by highlighting and responding to this story.
Share Article


Explore
Related Articles


How to Improve Multi-Hop Reasoning With Knowledge Graphs and LLMs