Automating Deployment of Neo4j Java Extensions to (Self-Managed) Google Cloud
Consulting Engineer, Neo4j
10 min read
Neo4j Extensions (namely: Stored Procedures, Functions, plugins, and Triggers if for any reason Java is favored over APOC) are ultimately Jar artifacts that require deployment to the “plugins” folder on the file system of the Server running your Database Instance.
This article presents a method to address some challenges that may be observed during the manual deployment process:
- Developers usually possess the means to code and test locally but deploying artifacts to a Server in the Cloud (e.g. a Compute Engine Instance) requires configuring SSH and a local O/S user account on it with higher permissions. Provisioning these resources becomes cumbersome and difficult to track as the team gets bigger.
- Each account and/or SSH Key has to be shared with an individual person, thus opening a door to a security breach.
- Additionally, each user would require privileges to restart the Database Service, increasing the complexity of the provisioning process.
- The manual nature of this process sets a path to a customized CI/CD pipeline, which on Cloud environments might produce higher resource costs.
The upcoming sections present a design for automating the deployment of Neo4j Extensions on self-managed Google Cloud environments (i.e. not Neo4j Aura). This design provides a framework that can be used to build solutions that address the Administration and Security challenges mentioned above.
You may also deploy and test the solution with the provided code for a complete end to end workflow.
High Level Design
Google Cloud Platform Components
The Table below presents a first look at the GCP Components required to implement this automation — which will be referred to as a “Pipeline” from now on.
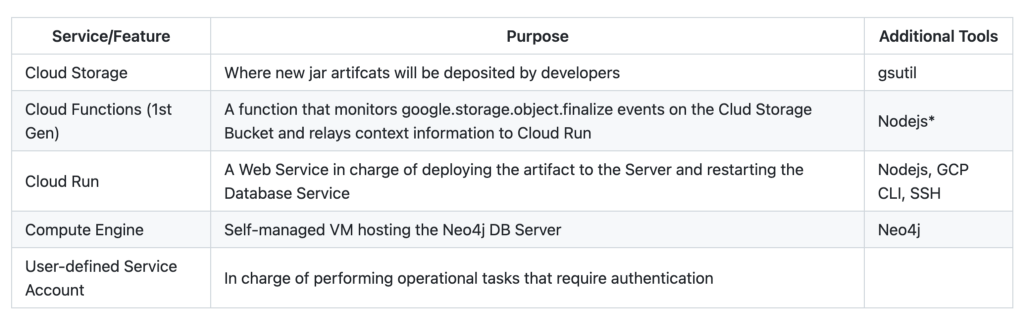
NOTE: Although it may be a possible to instantiate all of these components while keeping costs within the Google Cloud free tier, instructions to do so will not be covered. It is strongly recommended to leverage the pricing calculator by including the components in the table above and your existing services.
Pipeline Workflow Sequence
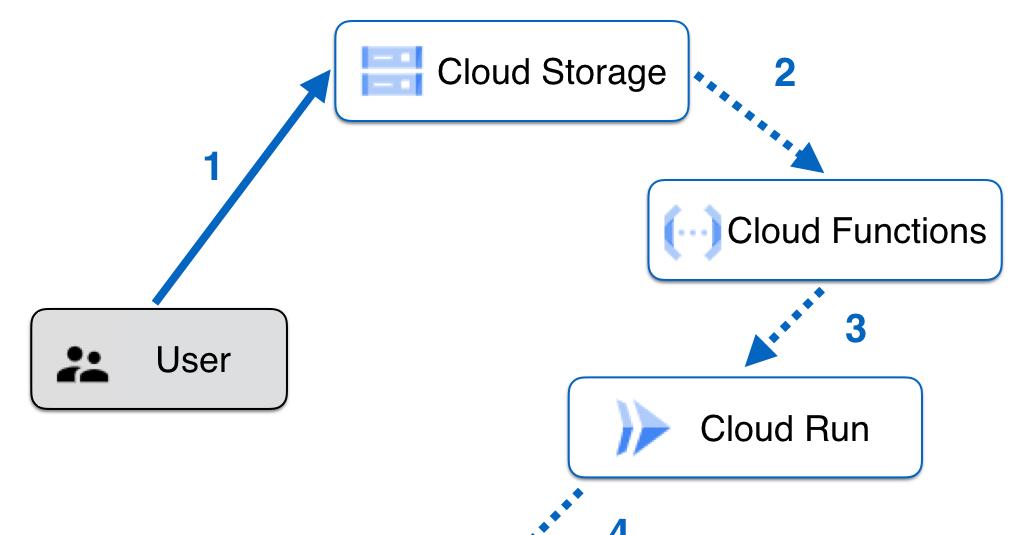
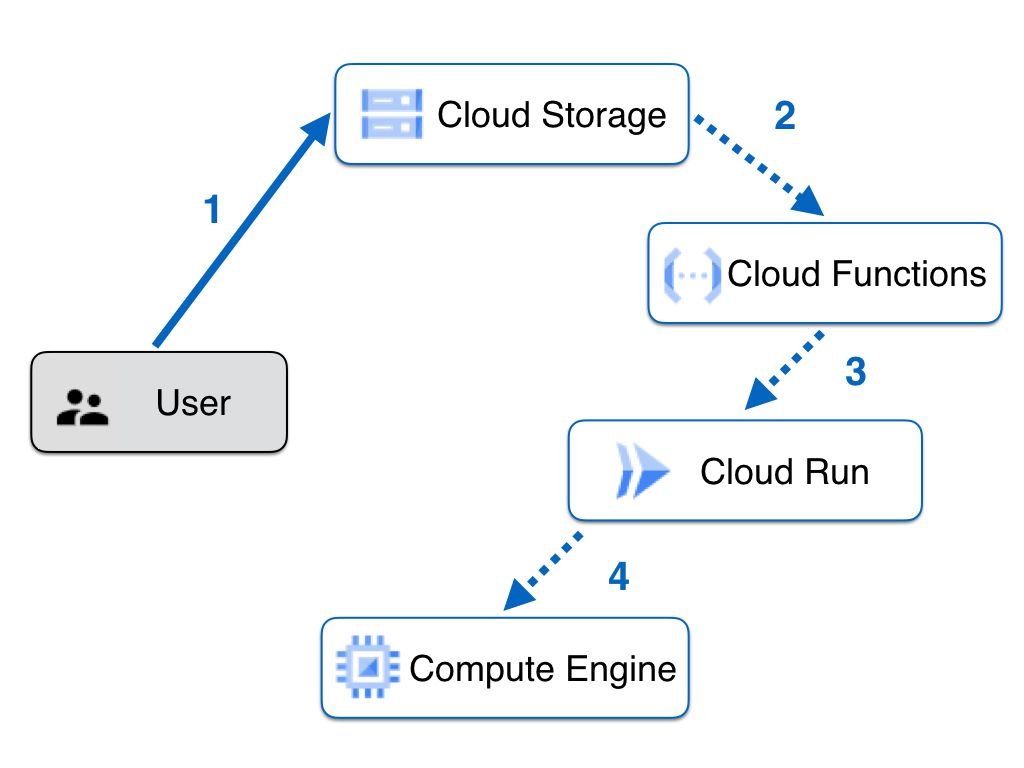
The figure below illustrates the Pipeline and the steps are as follows:
- The developer (authenticated with Google Cloud) uploads the jar artifact to a specific Storage Bucket.
- A Cloud Function, configured to listen for “finalize” events in the aforementioned bucket, is triggered.
- The Cloud Function relays the Event Information to a Web Service on Cloud Run.
- The Web Service obtains the jar file from the Bucket (action not displayed in the diagram for readability), deploys it directly via SSH to the Server hosting the Neo4j Database Instance, and restarts the Database Service.
Services Overview
In the following subsections we will examine code snippets for each solution component. Familiarity with Javascript/Nodejs and Docker is assumed. We focus on explaining the essential tasks behind each architectural component rather than presenting how to create the Nodejs Applications from the ground up.
The code base is in two git repositories, namely the Cloud Function (git repo here) and the Cloud Run App (git here).
- GitHub – ggasg/neo4j-plugindeploy-function: GCP Function for relaying Storage Trigger Data
- GitHub – ggasg/neo4j-plugindeploy-service: Web App for deploying Neo4j Extensions inbound from Cloud Storage
Pre-requisites
Before any code-related activities, three components must exist in your GCP Project:
- Cloud Storage Bucket.
- Service Account. A key must be generated and its .json downloaded as it will be used as part of the automation.
- Compute Engine VM running with the Service Account, and with Neo4j installed. See here for debian installation instructions.
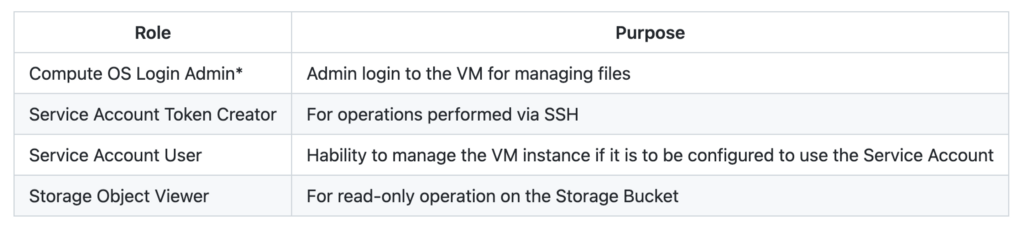
While there are no particulars about the Storage Bucket and the VM besides noting down their names (they will be used as configuration parameters later), the Service Account must be set up with the following IAM Roles:
Storage Event Function
The Cloud function has two main responsibilities:
- Monitor for the google.storage.object.finalize event on the designated bucket.
- Relay the received payload to the Web Service.
Therefore, the logic behind this function is simple:
async function run(funcPayload) {
  let targetAudience = '<YOUR_CLOUD_RUN_APP_ENDPOINT_URL>';
  let authUrl = `https://metadata.google.internal/computeMetadata/v1/instance/service-accounts/default/identity?audience=${targetAudience}`;
  const authRes = await fetch(authUrl, {
    method: 'get',
    headers: {"Metadata-Flavor": "Google"},
  });
  let authToken = Buffer.from(authRes.body.read()).toString();
  let serviceUrl = targetAudience;
  return await fetch(serviceUrl, {
    method: 'post',
    headers: {'Authorization': `Bearer ${authToken}`,
      'ce-subject': 'sample',
      'ce-type': 'ggoogle.cloud.storage.object.v1.finalized',
      'content-type': 'application/json'
    },
    body: JSON.stringify(funcPayload)
  });
}
It is important to point out that in order to relay the Storage Object payload to the Web Service, an Authentication Token must be supplied since in this solution there are no endpoints exposed outside of the Project (Public Access is not enabled anywhere). A method that consists in querying an internal GCP metadata endpoint has been chosen for this. All options are reviewed in this excellent documentation page about “Service-to-Service” Authentication.
The trigger bucket for this function is configured at deployment time. As noted in the documentation, there is no need to explicitly state the “…finalize” event when running this command for deploying 1st Gen Functions.
Deployment Web Service
This Service is essentially a Containerized Nodejs Web Application deployed to Cloud Run. In a nutshell, its tasks are sequenced as follows:
- Download the jar file from the Storage Bucket (as stated in the inbound payload) locally.
- Deploy the file to the Compute Engine VM.
- Restart the Neo4j DB Service via an SSH command.
- Clean up.
Task #1 is implemented with the Cloud Storage Client Library. This will execute as long as the client (the Service Account that was previously created) is authenticated. Notice how the key’s .json file for the Service Account is used for this purpose:
async function downloadFromGcs(bucketName, fileName) {
  const storage = new Storage({keyFilename: 'assets/key.json'});
  await storage.bucket(bucketName).file(fileName)
    .download({destination: destLocal + '/' + fileName});
}
Task #2 is quite different in nature and uses the Command Line Interface due to the fact that at the moment of writing, there is no support for “compute scp” in the Cloud Compute Client Library. Notice usage of Nodejs’ “spawnSync” to run the gcloud compute command as a Child Process:
function sendToComputeInstance(fileName) {
  const sp = spawnSync('gcloud', ['compute', 'scp', fileName,
    `neo4j@${appConfig.dbServerName}:${appConfig.destPluginFolder}`,
    ` - zone=${appConfig.computeZone}`]);

  if (sp.status && sp.status !== 0) {
    console.error(sp.stderr.toString());
    if (sp.error) {
      throw new Error(sp.error);
    }
    throw new Error('Cannot process request');
  }
}
Before attempting to run “gcloud compute” successfully on any environment, it is mandatory to install and configure the CLI. To do so, we encapsulate the configuration in a Docker image which is straightforward and gives plenty of tuning flexibility:
RUN curl -sSL https://sdk.cloud.google.com | bash
RUN gcloud auth activate-service-account ${SERVICE_ACCOUNT} - key-file=./assets/key.json
RUN gcloud config set account ${SERVICE_ACCOUNT}
RUN gcloud config set project ${PROJECT_ID}
Deploying this Cloud Run Application is more involved than simply running gcloud run deploy because the docker build command to build the image will require some environment variables as inputs that will be used by the configuration tasks. At the time of writing, gcloud run deploy does not support supplying environment variables to the build process, but this can be overcome by incorporating Simon Willison’s fantastic approach, which consists in running a shell script that will create and submit a cloudbuild.yml file to Google Cloud prior to building and deploying.
Lastly, in task #3 we issue a Neo4j direct Service restart:
const sp = spawn('gcloud', ['compute', 'ssh',
  `neo4j@${appConfig.dbServerName}`, ` - zone=${appConfig.computeZone}`, " - command=sudo systemctl restart neo4j"]);
You may replace the O/S account “neo4j” above with your designated account and avoid the sudo if following a principle of least privilege.
Setup
First of all, ensure the pre-requisites, presented in the first section, are implemented. If you are working with the code explained in this document, clone the git repositories for the Cloud Function and the Web Service.
Second, go to IAM/Service Accounts in your GCP Console, generate a json key file for your Service account. Ensure the resulting .json file is saved as <YOUR_CLOUD_RUN_APP_BASE_DIR>/assets/key.json
Then, update config.json to match your parameters
{
"appName": "<NAME_OF_CLOUD_RUN_SERVICE",
"projectName": "<YOUR_PROJECT_NAME>",
"dbServerName": "<YOUR_NEO4J_COMPUTE_INSTANCE_NAME>",
"computeZone": "<YOUR_REGION_NAME>",
"destPluginFolder": "/var/lib/neo4j/plugins",
"serviceAccountName": "<YOUR_SERVICE_ACCOUNT_NAME>"
}
The “destPluginFolder” element should not be updated unless you have customized this setting in neo4j.conf.
Next, in the Cloud function, update its config.json
{
"deployWebServiceEndpoint": "<YOUR_CLOUD_RUN_SERVICE_ENDPOINT_URL>"
}
Continue to the next subsections to see how each component is started locally and then deployed to GCP.
Testing Locally
Local testing can involve running either or both the Cloud Function and the Web Service.
The Web Service can be started like any other Nodejs App built with Express. A script based on nodemon has been provided for convenience:
npm run startAppLocal
Next, a request can be issued with the following sample format (some json elements have been omitted for simplicity):
curl - location - request POST 'https://localhost:3000'
 - header 'ce-subject: localTest'
 - header 'Content-Type: application/json'
 - data-raw '{
    "bucket": "gg-neo-plugin-deploy",
    "contentType": "text/plain",
    "crc32c": "rTVTeQ==",
    "etag": "CNHZkbuF/ugCEAE=",
    "metageneration": "1",
    "name": "plugin.jar",
    "selfLink": "https://www.googleapis.com/storage/v1/b/sample-bucket/o/folder/Test.cs",
    "size": "352",
    "storageClass": "MULTI_REGIONAL",
    "timeCreated": "2020–04–23T07:38:57.230Z",
    "timeStorageClassUpdated": "2020–04–23T07:38:57.230Z",
    "updated": "2020–04–23T07:38:57.230Z"
}'
A 200 response code with a plaintext “Process Done” message should be received.
The Cloud Function can be started similarly:
npm run funcStart
# Or just run npm start to see it in action without nodemon
And since the Function acts as a relay to the Web Service, the same json payload can submitted on both tests.
At this point a critical eye may be questioning why the workflow is split between a Cloud Function and a Cloud Run App when the entire logic could be written in a single Web Application. The main reason behind this decision is that running the essential ssh operations (like scp and restarting services) is not supported by the Compute Client Application Library. This introduces a need to obtain more control over the O/S to install and configure the gcloud CLI (see Dockerfile for more information). Now, even with this limitation, it is entirely possible to implement everything in a single Web Application that is virtually identical to the Cloud Run Web Service presented here, but hosted by the Google Kubernetes Engine. Then, an EventArc trigger can be configured to send Storage Events to a GKE Endpoint. However, the simplicity and maintainability of a single code base comes at the higher cost of keeping a GKE cluster running.
Improving the Image Spec
If for any reason you require to alter the environment for the Cloud Run Application (there are many improvements that can be made), feel free to use the following commands as a starting point to build and the image locally:
docker build - build-arg SERVICE_ACCOUNT=<YOUR_SERVICE_ACCOUNT_EMAIL>
 - build-arg PROJECT_ID=<YOUR_PROJECT_ID> -t plugin-cloudrun .
docker run -dp 3000:3000 plugin-cloudrun
Deploying and Running the Pipeline on GCP
Once the local endpoints have been successfully tested, the Cloud Run Service must be deployed first:
npm run deployToCloudRun
The command above runs the shell script that will update the environment variables for the build process if necessary:
Do you need to update environment variables? (Y/N)
If deploying for the first time, choose Y. Whenever this choice is made, the process may take a few minutes. Once it is complete, take note of the URL for the Service by running:
gcloud run services list
Update appConfig.json and then proceed to deploy the Cloud Function:
gcloud functions deploy <FUNCTION_NAME>
 - trigger-bucket=<YOUR_GCS_BUCKET_NAME> - runtime=nodejs12 - region=<REGION_NAME> - service-account=<SERVICE_ACCOUNT_EMAIL>
Triggering the pipeline is straightforward. Just upload a file to your designated bucket:
cp ~/<YOUR_JAR_FILE>.jar gs://<YOUR_GCS_BUCKET_NAME>
Monitoring
We can monitor the following aspects during the development, deployment, and testing phases:
- The Cloud Build History: This will keep the logs for the Cloud Run Container build process triggered by the shell script mentioned previously. If there was a typo with one of the environment variables that set up the CLI, it will be called out here.
- Cloud Run Logs: All the “console.log” messages from the Deployment Web Service.
- Cloud Function Logs: Same as above, but with the Function receiving events from Cloud Storage.
Improvement Opportunities
You are encouraged to improve this code base, adapt it and make it your own. And if you share feedback and/or suggestions with the author, it will be greatly appreciated.
For a more robust design, here are some open questions for inspiration:
- What design changes would you suggest to support deployment of Neo4j Extensions to a Clustered Environment?
- How can the SSH operations be replaced or eliminated?
- How can the Cloud Run App evolve to a Service that also provides metadata about the artifact that is currently deployed in a particular environment? -> This could be potentially of great help to customized CI/CD pipelines.
- If the size of the .jar file becomes significantly larger, which components would have to be refined and how?
Thank you for reading.
Get started with the free lifetime cloud graph database offering Neo4j AuraDB now.
Automating Deployment of Neo4j Java Extensions to (self-managed) Google Cloud was originally published in Neo4j Developer Blog on Medium, where people are continuing the conversation by highlighting and responding to this story.
Share Article


Explore
Related Articles


How to Improve Multi-Hop Reasoning With Knowledge Graphs and LLMs