How We Build a Clone of r/place with GraphQL

Software Engineer at Neo4j
10 min read

r/place was a collaborative project and social experiment hosted on Reddit on April Fools’ Day 2017 and repeated again on April Fools’ Day 2022.
~ Wikipedia
The GraphQL team atNeo4j recently released beta support for GraphQL Subscriptions in the @neo4j/graphql library. Subscriptions allow clients to listen to changes in their Neo4j database for their real-time applications.
To showcase this feature at the 2022 GraphConnect conference, we decided to build a demo, based on the famous r/place, called neo/place.
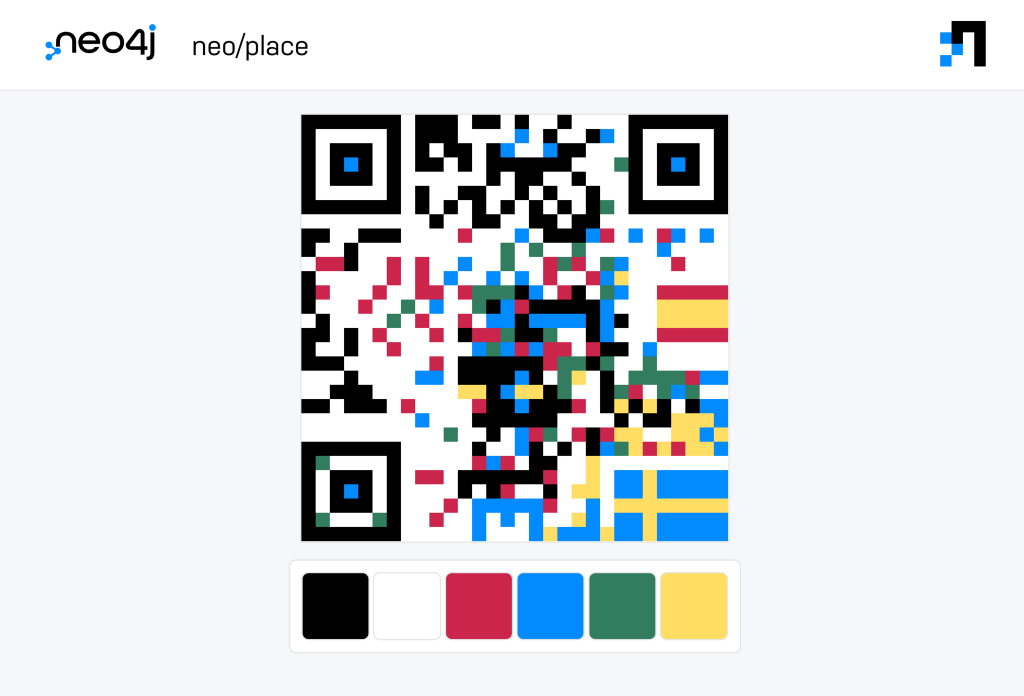
This demo contains a collaborative 30×30 canvas for users to paint where all the changes are shared in real-time across all connected users through WebSockets.
Despite its simplicity, neo/place was built with scalability in mind, serving as an example of how to create a production-ready real-time service with GraphQL.
How GraphQL Subscriptions Work
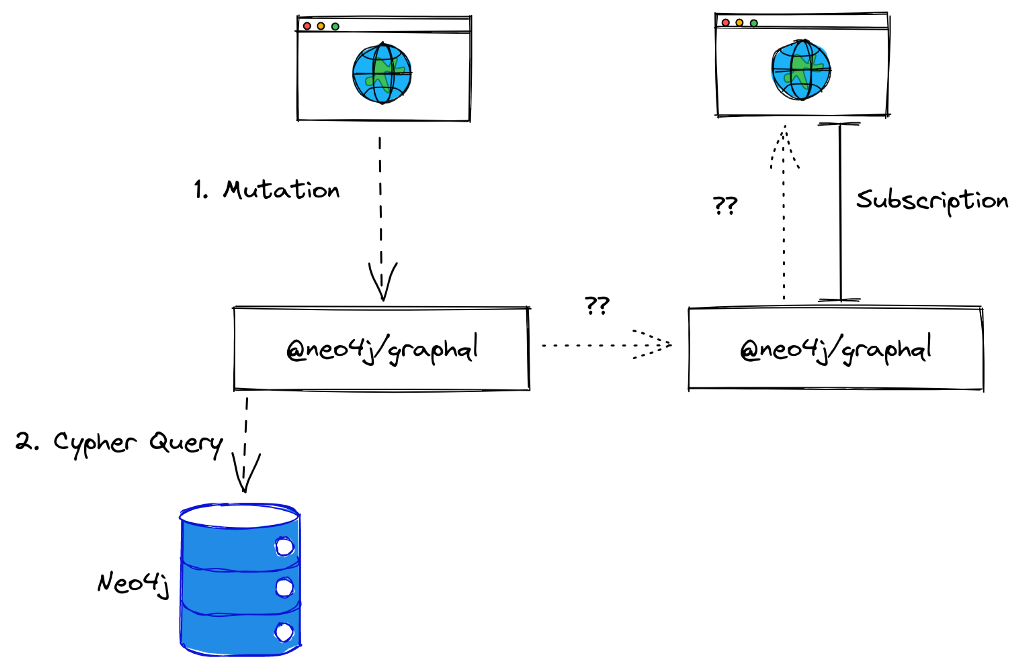
Before getting into details on how neo/place is built, it is worth seeing how GraphQL subscriptions work. At a basic level, subscription operations create a long-lived connection between a client and the server. GraphQL specification does not define what mechanisms should be used for this communication — in practice, WebSockets are the most common way of building subscriptions.

The following is an example of such a subscription:
subscription {
  movieCreated {
    createdMovie {
      title
      genre
    }
  }
}
Just like with any other GraphQL operation, we can define the expected result. However, unlike other operations, this result is not returned as a response to the request. It will, however, be the expected format of subsequent messages sent to the client (events).
How GraphQL works in @neo4j/graphql
When using Neo4jGraphQL, subscriptions are an opt-in feature that, if set, will automatically create subscription endpoints for all entities defined in your GraphQL schema. These endpoints allow subscribing to create, update, and delete mutations.
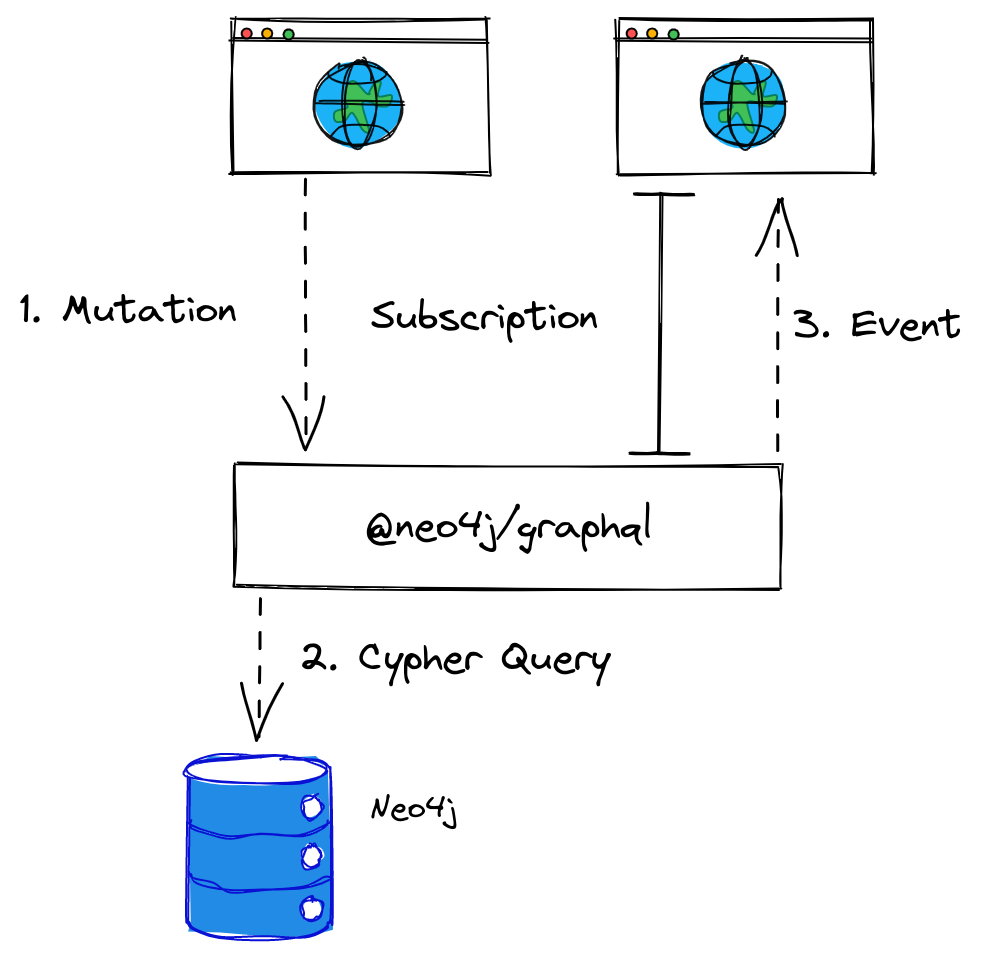
These events will be triggered after a mutation to the Neo4j database.
For instance, the following type definitions:
type Movie {
  title: String!
  genre: String
}
… will provide the subscriptions movieCreated, movieUpdated, and movieDeleted along with the common CRUD operations. This way, the following subscription:
subscription {
  movieCreated {
    createdMovie {
      title
      genre
    }
  }
}
…will automatically trigger a new event whenever createMovies is called:
mutation {
  createMovies(input: [{ title: "The Matrix" }]) {
    movies {
      title
    }
  }
}
You can find more examples and information in the official documentation.
How neo/place Is Built
Neo/place is a simple webpage, backed by an Apollo server, @neo4j/graphql library, and a Neo4j database.
GraphQL schema
When using Neo4jGraphQL both the API and the database schema are defined by a GraphQL schema. For this demo, we used the following schema:
type Pixel @exclude(operations: [CREATE, DELETE]) {
    position: [Int!]! @readonly @unique
    color: String
}

type Query {
    canvas: [String]
        @cypher(
            statement: """
            MATCH(p:Pixel)
            WITH p.color as color
            ORDER BY p.position ASC
            RETURN collect(color) as canvas
            """
        ) @auth(rules: [{isAuthenticated: true}])
}

extend type Pixel @auth(rules: [{isAuthenticated: true}])
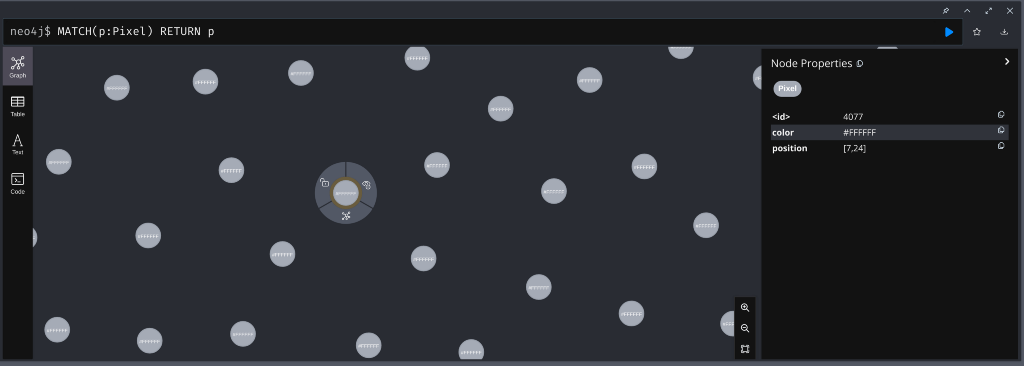
The only type that we need in our database is Pixel, which holds the data of one pixel of our canvas:
- position: An array of two integers holding the 2D coordinates of this pixel. These coordinates are unique (no two pixels can have the same position) and read-only (once the position is set, users cannot modify it)
- color: The current color of that pixel, defined as a string. It will hold a hex value such as
#FF00FF
This type is also defined with two directives that will help us secure our API:
@exclude: We will not allow users to create nor delete pixels, only update them. Exclude will remove these operations from the generated API.@auth: Ensures only authenticated users with a valid JWT authentication can modify the pixels. Because this is a public app without login, the token will just contain a well-known password between client and server. This is a naive mechanism to make it slightly harder for third-party clients to consume the API but could be the base of a better security mechanism with login.
While the library provides most of the CRUD and subscription operations that we will need, for performance reasons, we are going to need a custom query as well. When loading our canvas for the first time, we need to request all pixels. If we were to use the provided CRUD operations, the query would look like this:
query canvas {
    pixels {
        position
        color
    }
}
The response to this query would be something like:
{
    "pixels": [{
     "position": [0,0],
     "color": "#FFFFFF"
    }, {
     "position": [0,1],
     "color": "#FFFFFF"
    }
    // ...
    ]
}
This json format is usually okay for most queries, but in this case, we are trying to get a large number of entities (30×30 = 900 pixels), and each entity holds very little data (color and a position). So, to avoid long loading times and unnecessary networking load, we can optimize the first request by defining a custom database query with the @cypher directive:
MATCH(p:Pixel)
WITH p.color as color
ORDER BY p.position ASC
RETURN collect(color) as canvas
This will bypass our GraphQL model and perform a Cypher query directly to the database. In this example, the query will return all our pixels as an array, ordered by position and only containing the colors. The API response would look like this:
{
  "canvas": ["#FFFFFF", "#FFFFFF", ...]
}
Thanks to the ordering by position, we can safely assume that the first item of the array will always be the pixel [0,0] and the last one [29,29], which, as long as we know the canvas dimensions beforehand, allows us to remove redundant information and end up with a lightweight query for our first load.
Apollo server
For our server and GraphQL runtime, we will use Apollo along with graphql-ws.
We will start by loading and connecting the Neo4j driver to our database:
const driver = neo4j.driver(NEO4J_URL, neo4j.auth.basic(NEO4J_USER, NEO4J_PASSWORD));
We will also import Neo4jGraphQL with two plugins and pass our type definitions and the driver to the library constructor:
const { Neo4jGraphQLSubscriptionsSingleInstancePlugin, Neo4jGraphQL } = require('@neo4j/graphql');
const { Neo4jGraphQLAuthJWTPlugin } = require("@neo4j/graphql-plugin-auth");

const neoSchema = new Neo4jGraphQL({
  typeDefs: typeDefs,
  driver: driver,
  plugins: {
    subscriptions: new Neo4jGraphQLSubscriptionsSingleInstancePlugin(),
    auth: new Neo4jGraphQLAuthJWTPlugin({
      secret: "super-secret42"
    })
  },
});
The two plugins that we are importing are official plugins to enhance the capabilities of Neo4jGraphQL:
Neo4jGraphQLSubscriptionsSingleInstancePluginto enable subscriptions.Neo4jGraphQLAuthJWTPluginto enable JWT authentication with the@authdirective.
Once everything is set, we can build our schema to have a complete GraphQL API, ready to be served by Apollo:
const schema = await neoSchema.getSchema();

await neoSchema.assertIndexesAndConstraints({
  options: {
    create: true
  }
});
This code will also ensure that @unique constraints are properly set in the database for consistency and performance with assertIndexesAndConstraints.
Finally, we need to pass this schema to an Apollo server:
const server = new ApolloServer({
 schema,
 context: ({ req }) => ({ req }),
});
For the full working example, refer to https://github.com/neo4j/graphql/tree/dev/examples/neo-place
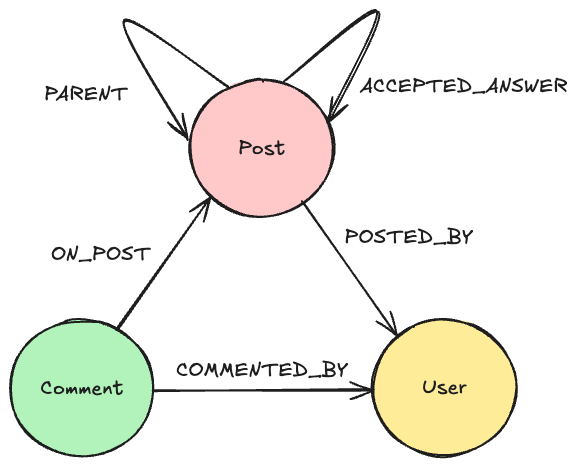
Database model
We will be using a Neo4j Graph database — this means that our pixels will be modeled as “Nodes” in a graph in our database.
As mentioned before, we will have a static set of pixels that users can modify, but cannot create nor delete. We need to populate the database when the server starts. To achieve this, we will simply perform a Cypher query directly from the Neo4j driver:
const session = driver.session();
await session.run(`
  UNWIND range(0, 29) AS x
  UNWIND range(0, 29) AS y
  MERGE(p:Pixel { position: [x, y]})
  ON CREATE SET p.color="#FFFFFF"
`);
await session.close();
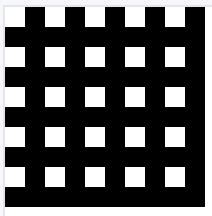
This query will create new entities, with positions from [0,0] to [29, 29] and a default white (#FFFFFF) color. By using MERGE we will only create the entities if these do not exist already.
For this demo, we are running a Neo4j AuraDB Free, so all the hosting and managing was done for us in the cloud.
Building neo/place Client
Our client will consist of a plain HTML webpage with a <canvas> element that will display our collaborative drawing, and some buttons to select colors.
<canvas id="place" height="300px" width="300px"></canvas>

<button class="color-button" style="background-color: rgb(204, 37, 75);"></button>
<button class="color-button" style="background-color: rgb(1, 139, 255);"></button>
<!-- .... -->
Connecting to our server
To fulfill neo/place needs, we will only need three GraphQL queries to our server. To perform these queries we decided to use the GraphQL client urql along with graphql-ws.
We will begin by creating a simple wrapper over our server API.
First, we need to call our custom canvas endpoint, which we will use to render the canvas at the beginning:
async getCanvas() {
  const canvasQuery = gql`
    query Canvas {
      canvas
    }
  `;
  const result = await this.client // urql client
    .query(canvasQuery)
    .toPromise()
  if (result.error) throw new Error(result.error.message)
  return result.data.canvas
}
This method will return the array of colors that we will use later to fill the canvas.
‘
We also need to listen to our server events whenever a pixel is modified. We will do this through a subscription query hooked to a callback on every event received:
onPixelUpdate(cb) {
  const pixelsSubscription = gql`
    subscription Subscription {
      pixelUpdated {
        updatedPixel {
          position
          color
        }
      }
    }
  `;

pipe(
  this.client.subscription(pixelsSubscription), // urql client
  subscribe((result) => {
   if (!result.error) {
    cb(result.data.pixelUpdated)
   }
  })
 );
}
Finally, we need to update a pixel in the database whenever the user clicks on it:
updatePixel(position, color) {
  const updatePixelQuery = gql`
    mutation UpdatePixels($update: PixelUpdateInput, $where: PixelWhere) {
      updatePixels(update: $update, where: $where) {
        pixels {
          position
          color
        }
      }
    }
 `;
  const params = {
    update: {
      color
    },
    where: {
      position
    },
  };

  return this.client.mutation(updatePixelQuery, params).toPromise();
}
Interacting with the canvas
Our canvas is a static 300×300 pixels canvas on our screen. However, we want to display a 30×30 grid on it. Each one of our “pixels” will be rendered as a 10×10 tile that users can draw with a single color.
Like with our API, we will create a few helper methods to handle canvas interaction.
First, we need to be able to draw a pixel as a 10×10 tile:
function drawPixel(pixel, color) {
  const ctx = canvas.getContext("2d");
  const x0 = pixel[0] * 10;
  const y0 = pixel[1] * 10;

  ctx.fillStyle = color;
  // We don't want our browser to smooth our pixels
  ctx.imageSmoothingEnabled = false;

  // Paint a rectangle of 10x10 in the given coordinates
  ctx.fillRect(x0, y0, 10, 10);
}
We also need to listen for a pixel being clicked by the user:
function onPixelClicked(cb) {
  canvas.addEventListener("click", (ev) => {
    const screenPixel = [ev.clientX, ev.clientY];
    const rect = canvas.getBoundingClientRect();

    const x = screenPixel[0] - parseInt(rect.left);
    const y = screenPixel[1] - parseInt(rect.top);

    const pixelClicked = [
      parseInt(x / 10),
      parseInt(y / 10)
    ];

    // Calls the callback to handle interaction with the API
    cb(pixelClicked);
 }, false);
}
Wiring everything together
With these two helpers, we can easily hook our canvas interactions to our API and propagate any changes received by the subscription to the canvas.
Draw canvas on the first request:
// Receives the array with all the canvas colors
const canvasColors = await serverApi.getCanvas();
let i = 0, j = 0;
for (const pixelColor of canvasColors) {
  drawPixel([i, j], pixelColor);
  j++;
  if (j === 30) { // new line in the canvas
    i++;
    j = 0;
  }
}
We need to update the canvas whenever we receive a subscription event:
serverApi.onPixelUpdate((updatedEvent) => {
  const updatedPixel = updatedEvent.updatedPixel;
  drawPixel(updatedPixel.position, updatedPixel.color);
});
Finally, we need to notify the server whenever the user updates the canvas:
let selectedColor = "#FF0000"

onPixelClicked((pixelClicked) => {
  // Draw pixel immediately to provide instant feedback to the user
  drawPixel(pixelClicked, selectedColor);
  // Updates pixel in the database
  serverApi.updatePixel(pixelClicked, selectedColor);
});
For the complete code example, including race conditions and errors handling, check the example at https://github.com/neo4j/graphql/tree/dev/examples/neo-place/client
Horizontal Scale
As mentioned, the demo is relatively simple with not too much code involved, but we also promised this will showcase a production-ready setup that scales horizontally. We will see what changes are required in the different systems of this demo to scale it.
Database
Because we are using the cloud-hosted AuraDB, scaling the database would be as simple as switching to a higher tier. However, because subscriptions are designed in a way that will not produce extra queries or overhead to the database, the database only needs to worry about the relatively simple queries and mutations we are executing.
This means that, even under a heavy load, all of our queries are simple property updates over indexed nodes (the @unique constraint over positions that we already set acts as index). Even in the free tier, we would need a high load to hit a performance limit in the database, so we will stick to the free instance for now.
Server and AppEngine
To host our Node.js server with Apollo, we decided to deploy them to Google cloud AppEngine. This ensures that the server itself will scale according to the load. AppEngine will take care of load balancing (including WebSocket connections) and automatic scaling, so no extra work is needed on this front on our side.
Scaling subscriptions with AMQP
Subscriptions, like any WebSockets service, are traditionally hard to scale. While a client may be subscribed to a certain instance, a mutation may happen in a completely separate instance that may not know about that subscription.
Sadly, this problem is not something that load balancers or AppEngine will solve for us. Having our clients subscribe to all servers or use a single instance to handle all subscriptions would defeat the purpose of scaling the server.
One of the most elegant solutions to this problem is to use a separate broker, such as Redis or RabbitMQ, to efficiently handle and broadcast messages across all our instances:
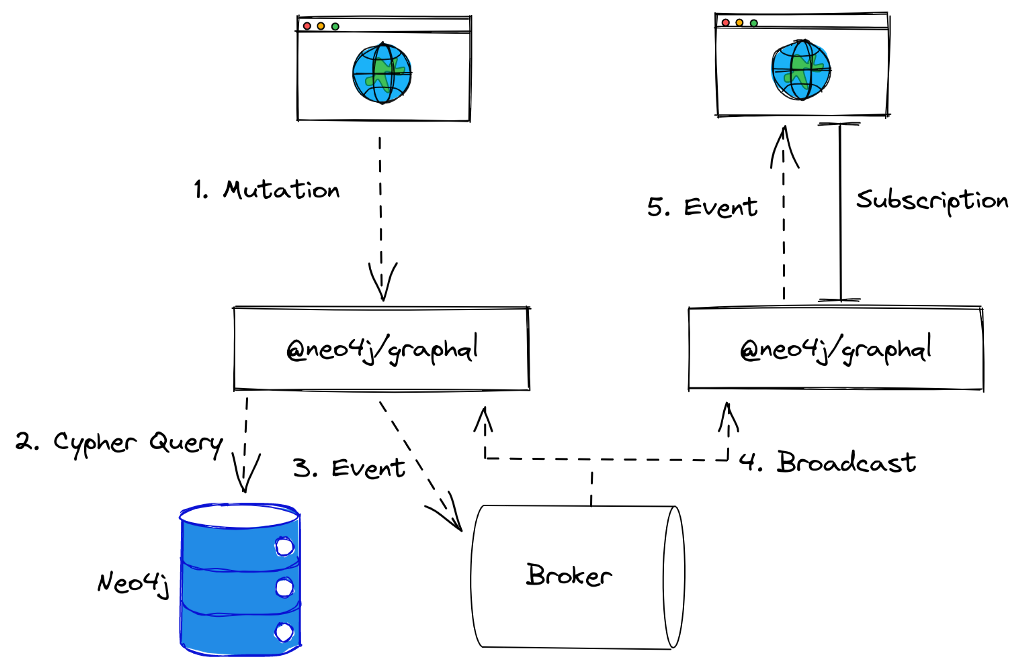
This means that each instance has two jobs regarding subscriptions:
- Notify the broker whenever a mutation happens.
- Listen to the broker, and route these events to its subscribed clients.
Additionally, Neo4jGraphQL will take care of filtering and authentication of the messages received by the broker before sending them to the client.
While all of this may sound like a lot of work, Neo4jGraphQL 362434
Share Article


Explore
Related Articles

How to Improve Multi-Hop Reasoning With Knowledge Graphs and LLMs