On the 26th of July, we announced support for Confluent’s Custom Connectors as a way to connect Confluent Cloud to AuraDB, our fully managed database-as-a-service. In this week’s blog, I am going to show you how easy it is to set up a sink connector to create or update data in a database in Aura when messages are written to a topic.
For sink or for source?
The connector can be configured to work as a sink or a source; just select the appropriate option when you are creating the connector, and use the appropriate connector class.
streams.kafka.connect.sink.Neo4jSinkConnector
streams.kafka.connect.source.Neo4jSourceConnector
It doesn’t have to be Aura either. You can connect Confluent Cloud to Neo4j databases running in AWS, Azure, or GCP.
Current limitations
Confluent has published a list of limitations here, which includes a few rules for naming conventions etc. I have highlighted the most important ones here.
- Custom connector clusters must be in a supported region.
- The cluster must use public internet endpoints which means you can’t use VPC Private Link between Confluent Cloud and AuraDB.
- You must use the fully-qualified domain name (FQDN) when adding networking egress endpoints. Currently, there is no support for static egress IP addresses.
What do you need?
Before you start, make sure you have the following
- A Confluent cluster in a supported AWS region e.g., eu-west-1, which is in Europe (Ireland).
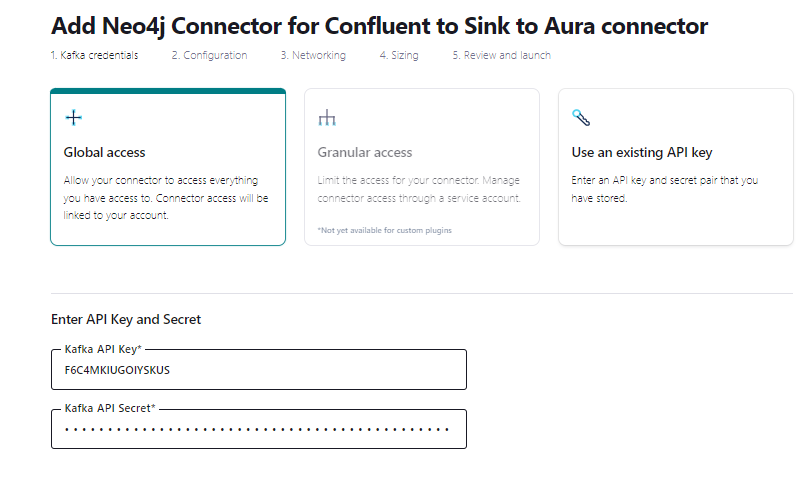
- An API Key, you will need one with Global Access because Service Accounts are not currently supported by Custom Connectors (steps provided below if you need one).
- A topic(s) — the example uses one called my-topic. Feel free to change it throughout. Please create the topic before you create the custom connector, otherwise, provisioning will fail.
- An Aura database — Go Free, Pro, or Enterprise — all are supported, and you can go multi-cloud if you want and have your Confluent Cloud running in AWS, writing data to Aura in GCP or Azure.
How to create an API key for use with custom connectors
(Skip this if you already have one)
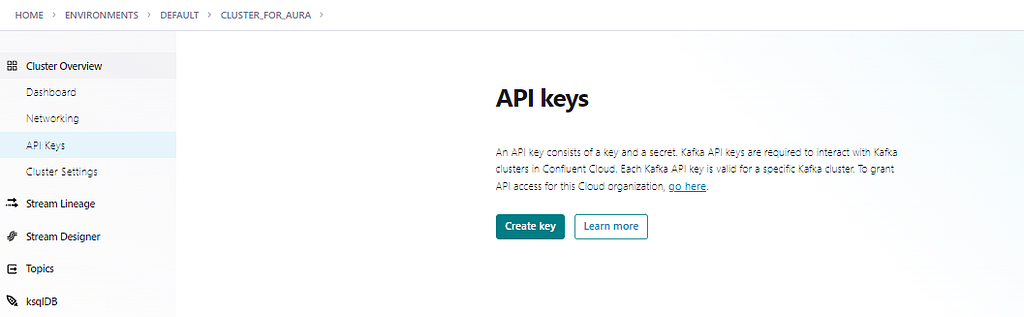
Select API Keys, then Create key.
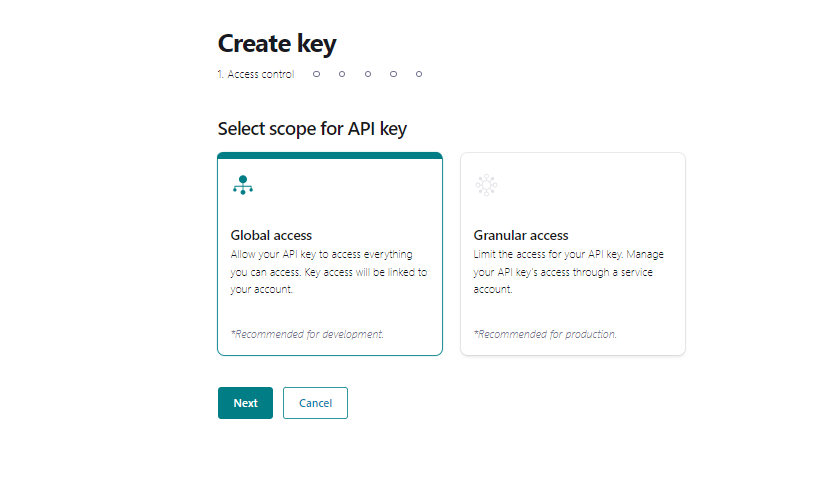
Select Global access and then click Next.
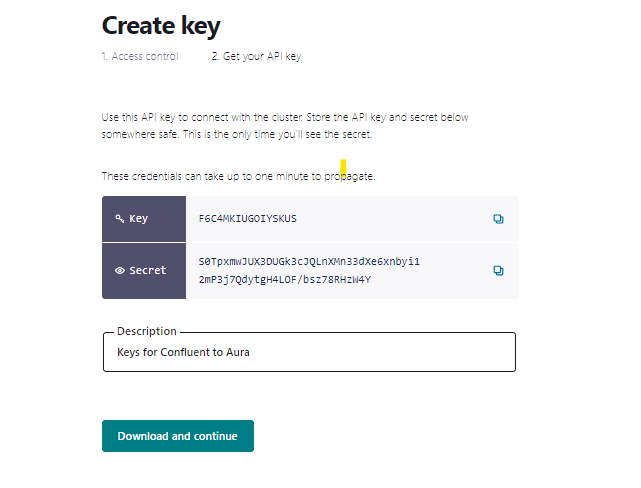
Provide a brief description of the key, then download and put it somewhere safe, like a password vault.
Let’s connect the sink to AuraDB
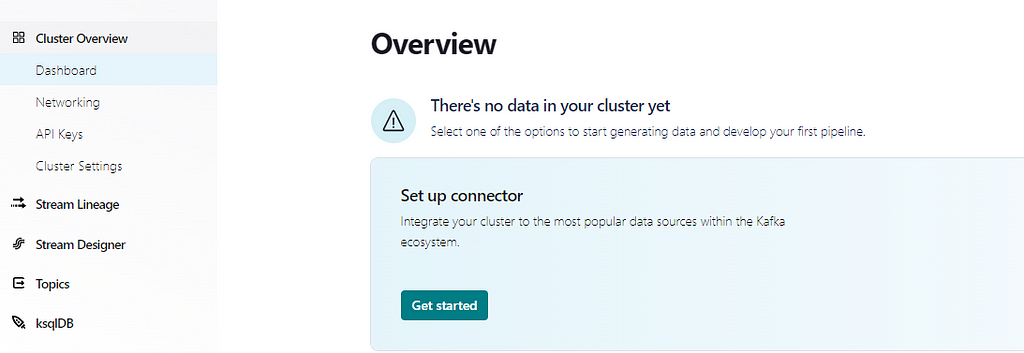
Select Get Started.
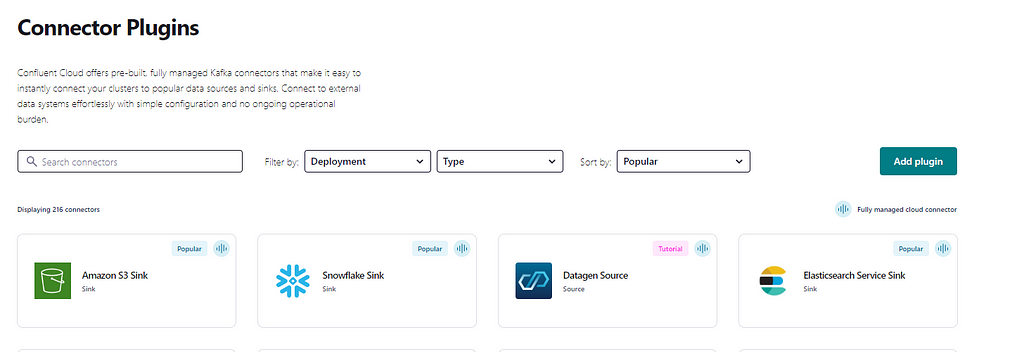
Select Add plugin to create a custom connector — this need only be performed once for a given type, e.g., sink.
Once it has been created in the Confluent Cloud, this connector can be used many times to create instances of sink connections. You will need to repeat the following process if you want to create a custom connector for source connections.
Select Confluent Hub.
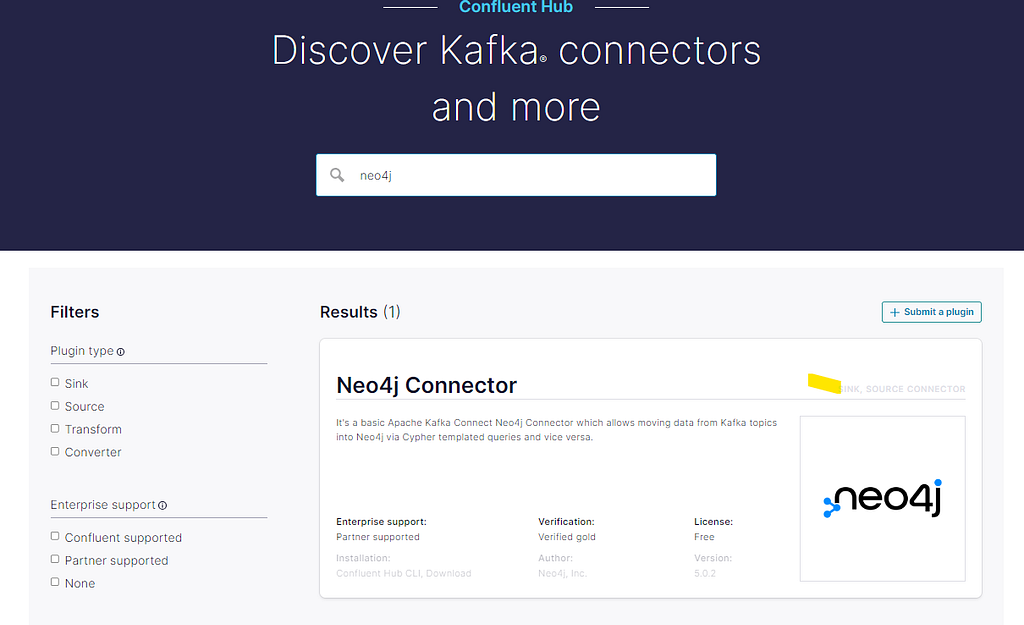
Search for Neo4j in the Confluent Hub and download the connector (or go directly to https://www.confluent.io/hub/neo4j/kafka-connect-neo4j/).
If you are repeating this process to create a source connector, you don’t have to download the Neo4j Connector for Confluent again — simply upload the one you downloaded when creating the sink connector.
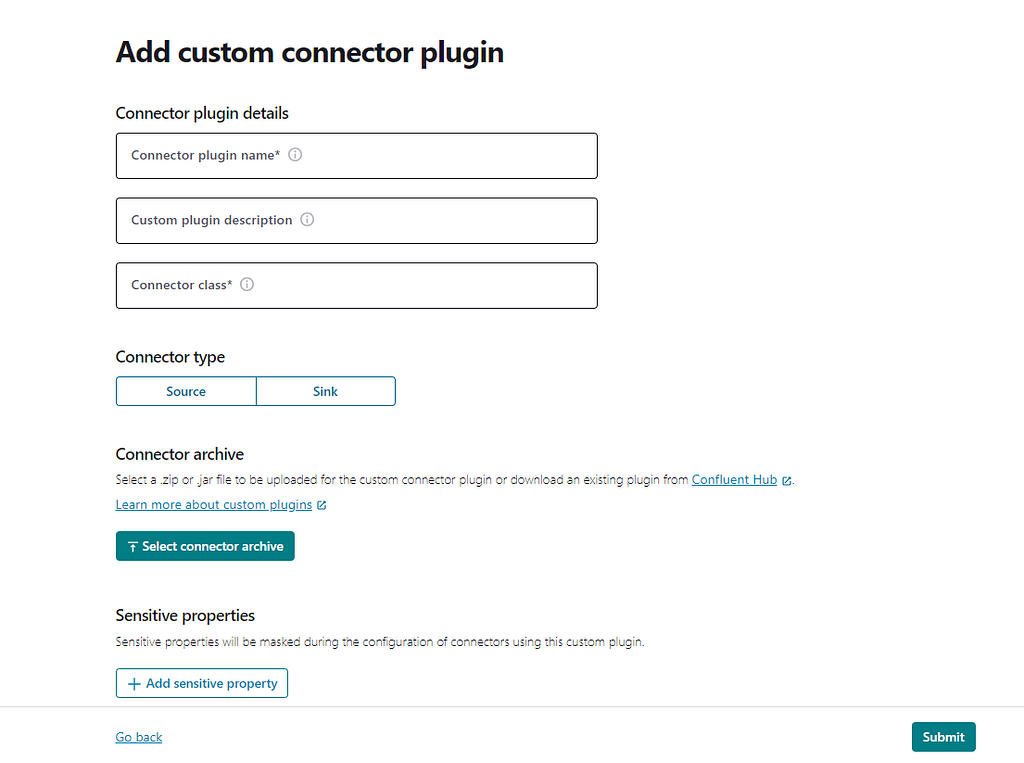
When you complete the form, don’t forget to specify neo4j.authentication.basic.password under the sensitive information to ensure your password is masked.
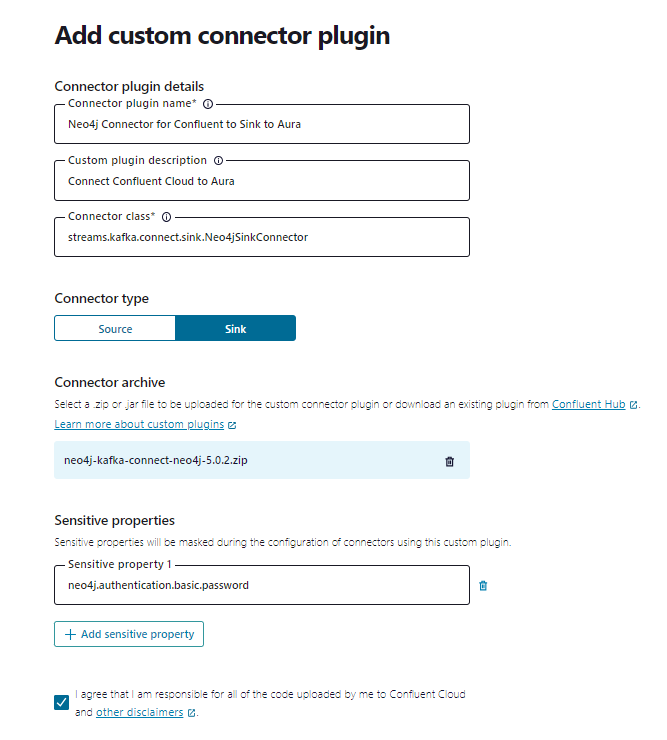
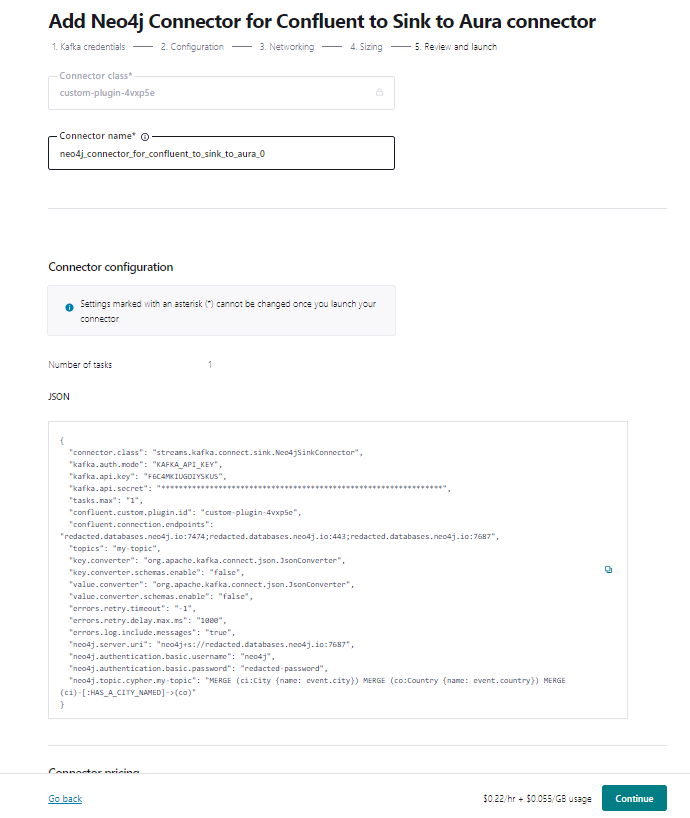
Provide a name, description, and class, which must be streams.kafka.connect.sink.Neo4jSinkConnector, and select Sink. Please add the sensitive properties to ensure your passwords are masked.
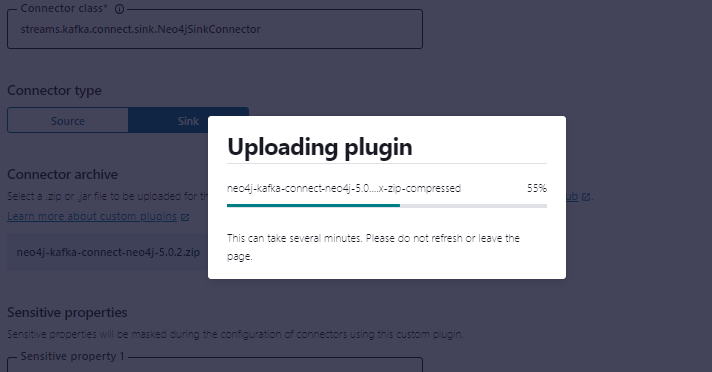
Click submit and then wait about 30s for the connector to upload into the cloud.
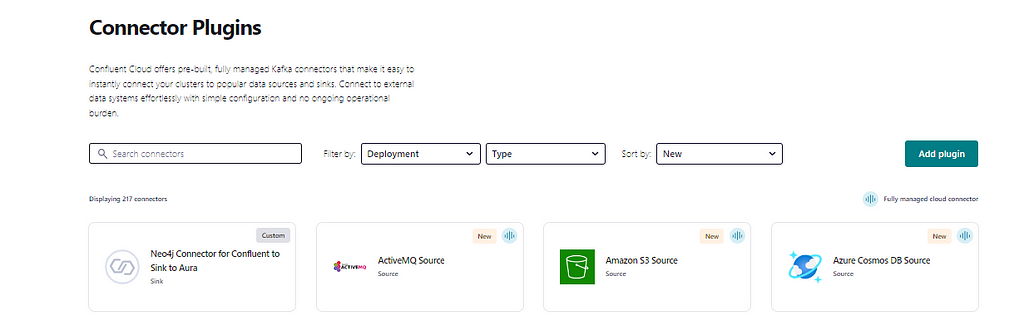
Once it’s completed, you will find it listed on the Connector page. Select the plugin to configure it. You can now select and create an instance of this sink connector with the desired configuration. The following steps can be repeated to create multiple instances of the connector, for example, to sink data to multiple Aura or Neo4j instances.
Once the plugin has been uploaded, you can select and configure the plugin.
Now provide the API Key and Secret you created earlier.
To configure the plugin, you have the option of entering the key-value pairs in the UI, or simply select JSON and paste in the configuration. I am going to use the latter in the example, as it is quicker.
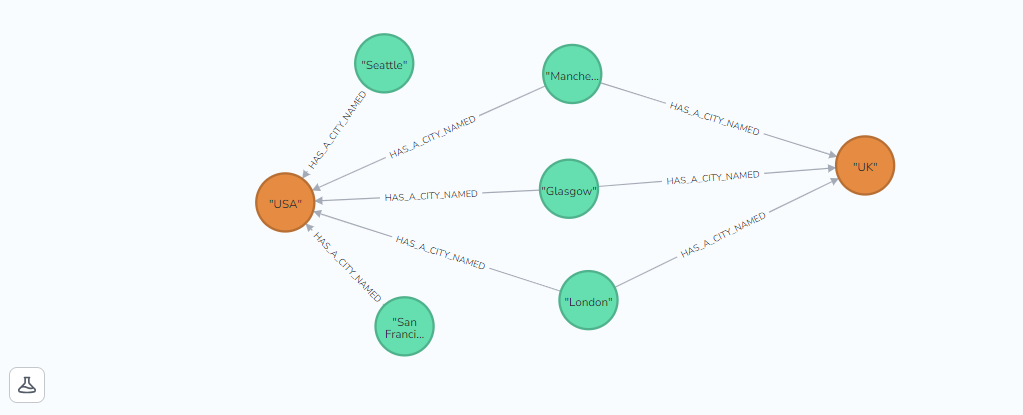
In the following example, I am going to create a Sink Connector that can read the following JSON message.
{
  "city": "London",
  "country": "UK",
  "lastCheck": 1497014222385
}
When the connector runs, it will create a node with a city label and a name property which is the name of the city, and a relationship LOCATED_IN connecting it to a node with the label Country and the name of the country as the property.
{
  "topics": "my-topic",
  "key.converter": "org.apache.kafka.connect.json.JsonConverter",
  "key.converter.schemas.enable": "false",
  "value.converter": "org.apache.kafka.connect.json.JsonConverter",
  "value.converter.schemas.enable": "false",
  "errors.retry.timeout": "-1",
  "errors.retry.delay.max.ms": "1000",
  "errors.log.include.messages": "true",
  "neo4j.server.uri": "neo4j+s://redacted.databases.neo4j.io:7687",
  "neo4j.authentication.basic.username": "neo4j",
  "neo4j.authentication.basic.password": "redacted-password",
  "neo4j.topic.cypher.my-topic": "MERGE (ci:City {name: event.city}) MERGE (co:Country {name: event.country}) MERGE (ci)-[:HAS_A_CITY_NAMED]->(co)"
}
Replace the ‘redacted’ text in the neo4j.server.uri and ‘redacted-password’.
Note: If you want to use your existing self-managed connector config, then you will need to edit it because the Confluent Cloud UI does not support nested JSON — simply remove the “name” and “config” structure from the JSON file so it looks like the example above.
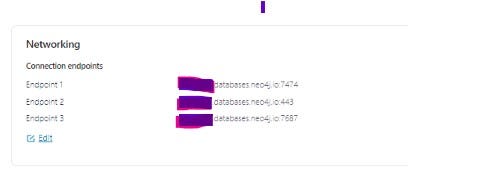
Click continue to provide the connection endpoints. Here, you will need to provide the full URL for the database connection in Aura — and all three ports used by the connector.
Connector sizing enables you to run multiple tasks and process data in parallel — you are charged based on task hours and total throughput — so the more tasks you run, the more costs will go up.
Note: on the trial account, you are limited to a single task.
Finally, review the information provided — with the exception of the class and connector name, you can change everything later.
Connector provisioning is really quick. It only takes a few minutes to provision. Once the connector is running, any changes you make to the configuration are applied quickly — no need to restart.
If you get a failed provisioning message, you will need to review the message and then correct the configuration (refer to the Troubleshooting section at the end of the blog).
You need to create ‘my-topic’ (or whatever you have chosen to call it) before you create the connector (list of things you need before you start). If you don’t, then the connector will fail to start. To fix it, just create the topic and the connector will start up.
The Custom Connectors on Confluent Cloud are excellent in this regard. You don’t have to delete and recreate the connector configuration if you make a mistake. Just make the required change(s) and save. Once the connector reloads with the new configuration, it will start up. Also worth noting is that if you apply a configuration that causes the connector to fail, then the connector will continue to run with the last known good configuration.
Refer to the Troubleshooting section at the bottom for help resolving some other common errors.
Testing the connector
Once the connector is up and running, you need to test that it is able to read a message on the topic and create the desired nodes/ relationships in the Aura database.
Go to Topics, my-topic and click ‘Produce a new message to this topic’.
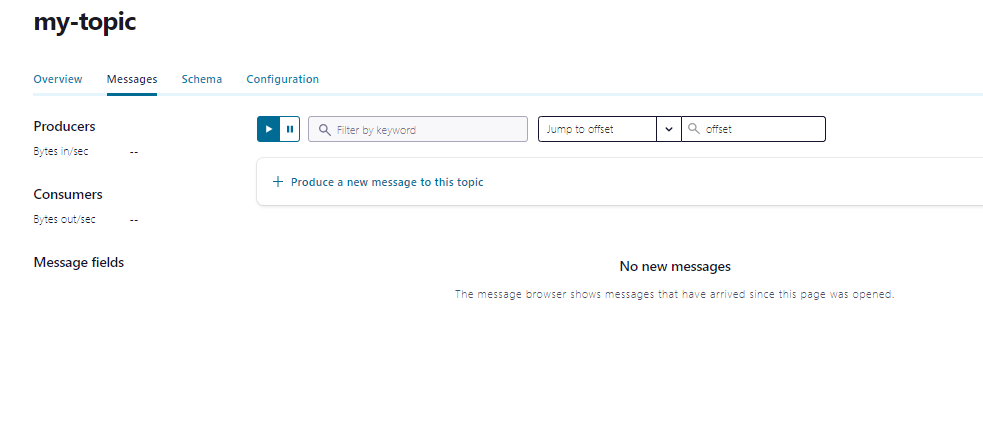
And paste in the following (assuming you are following the example) — where lastCheck is in unix time.
{
  "city": "Test",
  "country": "UK",
  "lastCheck": 1497014222385
}
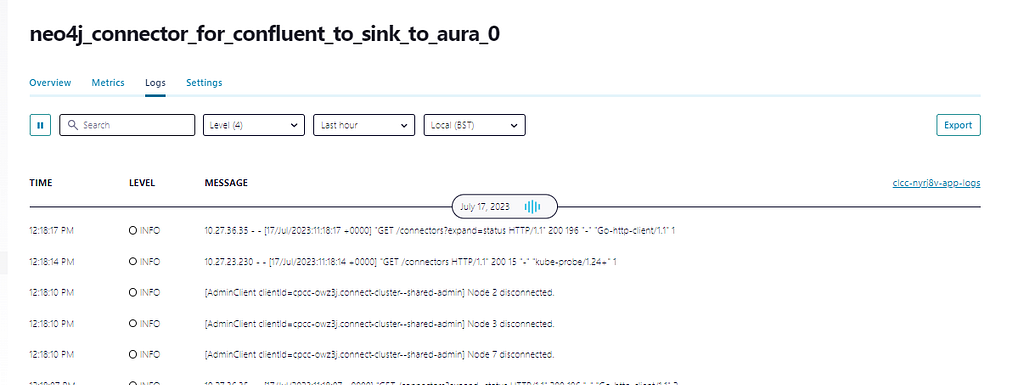
Obtaining logs
Once you have created your connector, you can access logs for support purposes by clicking the Logs and then Export to send them to the Support team at Neo4j. Passwords and secrets are hidden, but the logs do contain IP addresses — please mask them or other information you regard as sensitive.
Customizing the connector
So now that you have it working for the example topic and graph, you can change it to suit your needs by
- Changing the name of the topic — locate the key ‘topics’ in the JSON config and change it from ‘my-topic’ to your desired topic name. Then change the name of the topic in the key neo4j.topic.cypher.my-topic to the new topic name.
- Changing the messages you want to read and the graph you want to create —change the value of neo4j.topic.cypher.my-topic — this is a Cypher statement that is used to create the graph. In the example, it is“MERGE (ci:City {name: event.city}) MERGE (co:Country {name: event.country}) MERGE (ci)-[:HAS_A_CITY_NAMED]->(co)”.
- Changing the message format you want to read from JSON — you will need to change the key.converter and value.converters to a supported format (e.g. string).
- Using Aura as source for creating messages in topics — create a new Custom Connector, select Source as the type and specify the class streams.kafka.connect.source.Neo4jSourceConnector. Remember to specify ‘topic’ as the key and not ‘topics’. You will also need to specify neo4j.source.query=MATCH (ts:TestSource) WHERE ts.timestamp > $lastCheck RETURN ts.city AS city, ts.country AS country, ts.timestamp AS timestamp. Check out the docs for more details on creating a source connector. Everything else is pretty much the same.
Changing the graph you want to create will require knowledge of Cypher — if you are unfamiliar with Cypher, there is a great 60min course in the Academy called Cypher Fundamentals.
Summary
In this blog, we have shown how easy it is to create a custom connector that can read JSON messages in a Confluent Cloud topic and create nodes and relationships for real-time graph analysis in Aura. Plus, we did testing and troubleshooting some common problems starting connectors — demonstrating how responsive Confluent Cloud is to changes in configuration and recovering from errors.
Troubleshooting
To aid the troubleshooting process, you can filter the logs by time period and event type — the latter being particularly helpful for zooming in on problems, for example, WARN, ERROR, and FATAL events. Refer to view from logs for more information.

A common mistake is to specify ‘topic’ instead of ‘topics’ for a sink connector — this will result in an error that either topics or topics.regex has not been defined.
Note: When you create a source connector, you specify ‘topics’, and when you create a sink connector, you specify ‘topic’.
The connector fails to start because it is unable to connect to the database. This can be caused by
- Providing an incorrect URI.
- Forgetting to add the endpoints — to the approved list in the Networking section — refer to Networking Endpoints.
- Using wildcards to specify the connector endpoints — you must specify an FQDN and all three ports.
- Any other network routing problems that may affect ability to make a connection.
exception=org.neo4j.driver.exceptions.ServiceUnavailableException: Could not perform discovery for database ‘<default database>’. No routing server available.
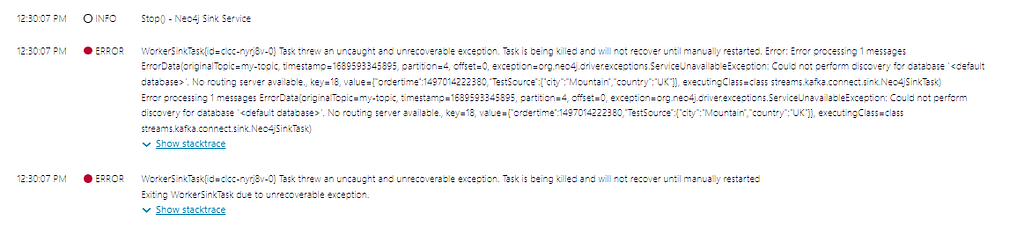
First, double check all the network connection information you have provided in the Connector config is correct and there are no mistakes. Next, follow the steps in this knowledge base article.
Problems authenticating — incorrect login details.
Aura protects against brute force attacks by disabling login when incorrect details are provided too many times in a row. The connector, or you attempting to login, will need to wait for the reset to occur . The following message will appear in the logs — you can ignore references to ‘will not recover until manually restarted’ (refer to failed login Aura)
WorkerSinkTask{id=clcc-nyrj8v-0} Task threw an uncaught and unrecoverable exception. Task is being killed and will not recover until manually restarted. Error: Error processing 1 messages ErrorData(originalTopic=my-topic, timestamp=1689593345895, partition=4, offset=0, exception=org.neo4j.driver.exceptions.SecurityException: The client has provided incorrect authentication details too many times in a row., key=18,)
Unable to process messages in the topic because the message does not match the Cypher query the connector is expecting.
Failure to provide a correctly formatted JSON message with the expected key value pairs will cause the connector to fail. Check you have specified all the expected key value pairs.
Failure: Exiting WorkerSinkTask due to unrecoverable exception.
Caused By: Error processing 1 messages ErrorData(originalTopic=my-topic, timestamp=1689593345895, partition=4, offset=0, exception=Expected parameter(s): lastCheck, key=18, value={“ordertime”:1497014222380,”TestSource”:{“city”:”Mountain”,”country”:”UK”}}, executingClass=class streams.kafka.connect.sink.Neo4jSinkTask).
WorkerSinkTask{id=clcc-nyrj8v-0} Task threw an uncaught and unrecoverable exception. Task is being killed and will not recover until manually restarted. Error: Error processing 1 messages ErrorData(originalTopic=my-topic, timestamp=1689593345895, partition=4, offset=0, exception=org.neo4j.driver.exceptions.ClientException: Expected parameter(s): lastCheck, key=18, value={“ordertime”:1497014222380,”TestSource”:{“city”:”Mountain”,”country”:”UK”}}, executingClass=class streams.kafka.connect.sink.Neo4jSinkTask)
The nodes and relationships are created with a previous Cypher statement.
After changing the Cypher statement and applying changes, nodes and relationships are created using the previous Cypher statement. Delete the Connector and recreate it — you don’t need to perform the upload process again.
Creating a Custom Connector in Confluent Cloud to Sink Data to Aura for Real-Time Analysis (Part 2) was originally published in Neo4j Developer Blog on Medium, where people are continuing the conversation by highlighting and responding to this story.
Share Article


Explore
Related Articles
Hybrid Search in Neo4j: Full-Text, Vectors, and Graph Topology with Cypher