Create a TypeScript Apollo Server and live database with unit tests

CEO, NoStack
17 min read
A quick tutorial using as an example Neo4j and neo-forgery
Many of us have fallen in love with Apollo Server. It is a simplifying yet flexible abstraction layer. So many frameworks and middleware options usually combine without conflicts.
A good example is using the neo4j-driver tool. You can generate a server that magically works with your database. And you can extend the magic with neo4j/graphql. That package automatically generates queries and mutations from your typeDefs, and provides powerful directives to generate resolvers that query the database.
But when it comes to unit testing, the abstraction layer becomes a lot more imposing. How can you stub out the database calls when they are so effectively hidden in the server code?

This tutorial will enable you to create an Apollo Server using unit tests and even TDD!
If you do all of the steps, it will probably be about 30 minutes. Check out the full solution if you’d rather just look at the code or copy it file by file.
This is a follow-up to a tutorial on mocking calls to a Neo4j database using neo-forgery. The technique shown there to mock a call works beautifully when you explicitly run a query using a declared session.
But if you are using directives with an Apollo Server, you will need to mock the driver itself.
This article guides you through creating a TypeScript Apollo Server with a live database. We use Neo4j as a database for a complete live stack. Then we show you how to run integration tests with an Apollo Server. Finally, we create unit tests from the integrations tests.

This tutorial expects you to know the minimal basics of using Node.js, Apollo Server, and Neo4j. But I try to explain everything.
Steps
- Create an empty TypeScript project with AVA [3 minutes]
- Create an Apollo Server instance in TS with a live Neo4j database [2 minutes if you have a database. Maybe 10 minutes if you don’t]
- Create integration tests using
executeOperation[5 minutes] - Use neo-forgery to mock the database. [20 minutes]
1. Create a new project
The following four steps create a TypeScript project that is ready for testing using AVA.
(1) Run these commands in a terminal to create a project with the AVA test runner using TypeScript:
mkdir movies                  # make the code base directory
cd movies                     # move to the directory
npm init -y                   # create a package.json file
npm init ava                  # add the AVA testrunner
npm i -D typescript ts-node   # add TypeScript
mkdir test                    # a folder for tests
mkdir src                     # a folder for source code
(2) Add this AVA specification to your package.json to use AVA with typescript, and to specify a test directory with files to test:
"ava": {
  "files": [
    "test/**/*.test.ts"
  ],
  "extensions": [
    "ts"
  ],
  "require": [
    "ts-node/register"
  ]
},
Or you can just copy over the solution package.json.
(3) Add a tsconfig.json file with the following contents to enable certain things when we begin coding:
{
  "compilerOptions": {
    "declaration": true,
    "importHelpers": true,
    "module": "commonjs",
    "outDir": "lib",
    "rootDirs": ["./src", "./test"],
    "strict": true,
    "target": "es2017"
  },
  "include": [
    "src/**/*"
  ]
}
Notably, the rootDirs gives two root directories so that you can use linting also with your test files.
2. Create an Apollo Server with a live database
If you check out the Apollo Server Getting Started Tutorial, you’ll see simple steps for creating a books server. We’ll do almost the same thing, but we’ll use TypeScript. And we’ll recreate the data and resolvers (an enhanced version actually) with neo4j.
(1) Add some packages to work with Apollo and neo4j.
npm install apollo-server graphql  # server and graphql
npm i neo4j-driver @neo4j/graphql  # neo4j capability
npm i dotenv                       # lets us store credentials in
                                   # an env file
npm i -D neo-forgery               # the mocking tool
(2) Create the following src/index.ts file:
require('dotenv').config();

const neo4j = require('neo4j-driver');
import { Neo4jGraphQL } from '@neo4j/graphql';
import {ApolloServer} from "apollo-server";
const { gql } = require('apollo-server');

const typeDefs = gql`
  type Book {
    title: String
    author: String
  }
`;

const schema = new Neo4jGraphQL({
    typeDefs,
}).schema;

const driver = neo4j.driver(
    process.env.DB_URI,
    neo4j.auth.basic(
        process.env.DB_USER,
        process.env.DB_PASSWORD,
    ),
);

function context({ event, context }: { event: any, context: any }): any {

    return ({
        event,
        context,
        driver,
    });
}

const server:ApolloServer = new ApolloServer(
    {
        schema,
        context,
    });


// @ts-ignore
server.listen().then(({ url }) => {
    console.log(`🚀 Server ready at ${url}`);
});
Let me explain the contents. It is actually almost the same as the one shown in the popular Getting Started With Apollo Server Tutorial. But there are three critical differences:
- Because we will use TypeScript, we will import the type
ApolloServerand use it in our declaration ofserver. - The Getting Started tutorial adds the following
booksarray and resolver rather than a database.
const books = [
    {
        title: 'The Awakening',
        author: 'Kate Chopin',
    },
    {
        "title": "City of Glass",
        "author": "Paul Auster"
    }
];

const resolvers = {
    Query: {
        books: () => books,
    }
};
We’re going to replace those with a live database. To do that, we have added: (a) a dotenv call to allow us to access database secrets; (b) required packages and boilerplate to create schema; (c) different parameters for the ApolloServer constructor, since we’ll be using schema rather than resolvers and typedefs.
- We remove the
Querydeclaration from ourtypedefs. That will be generated automatically by theneo4j/graphqlpackage, along with some resolvers for CRUD functions with theBooktype.
(3) Add a .env file at the root level which contains the credentials for some Neo4j database. If you don’t have one, you can create one for free in a few minutes with neo4j sandbox for the sake of this tutorial. If you create a sandbox, they will give you the credentials.
// neo4j
DB_URI=neo4j+s://<your db uri>
DB_USER=neo4j
DB_PASSWORD=<your password>
(4) Launch your server locally in a terminal to create some data.
$ ts-node src/index.ts
🚀 Server ready at https://localhost:4000/
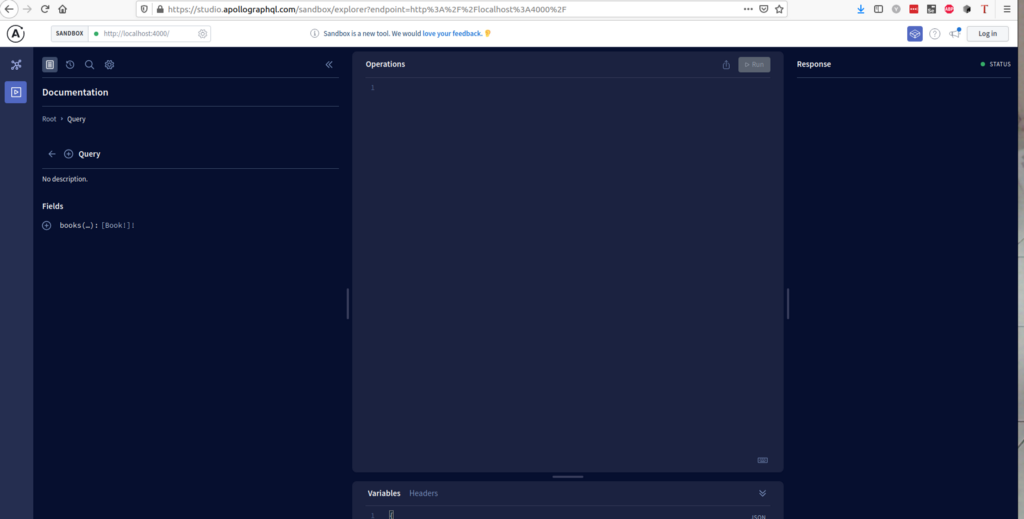
Then click that link for https://localhost:4000. You should see something like this:


Click Query your server and you should enter the ApolloGraphQL Sandbox. It should look something like this:
We can now use this interface to run a first mutation that will populate our database.
Click Root in the Documentation section and then you should see mutation as an option.
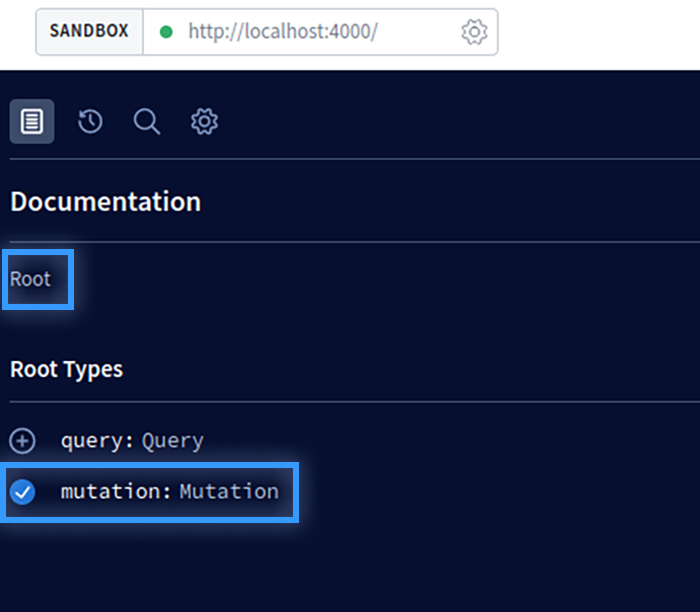
Click mutation , and you should see the Fields open up to show a few mutations generated by @neo4j/graphql:

We need to create the two books in the ApolloServer tutorial in our live database. You can read about it in the documentation by clicking on createBooks if you like. In the Operations panel, enter in
mutation($createBooksInput: [BookCreateInput!]!) {
  createBooks(input: $createBooksInput) {
    books {
      author
      title
    }
  }
}
Then put the proper json into the Variables panel at the bottom:
{
    "createBooksInput": [
        {
            "title": "The Great Gatsby",
            "author": "F. Scott Fitzgerald"
        },
        {
            "title": "Beloved",
            "author": "Toni Morrison"
        }
    ]
}
Click the Run button and you should see the results of the query:
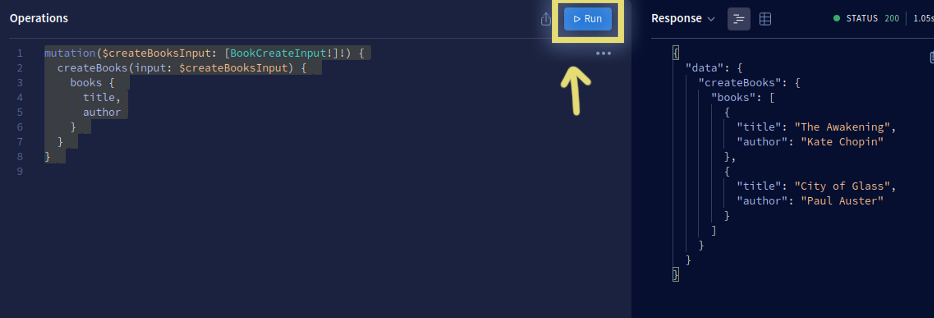
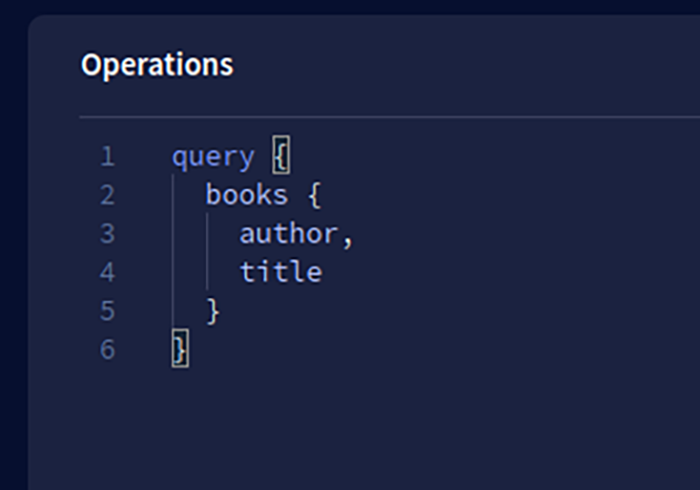
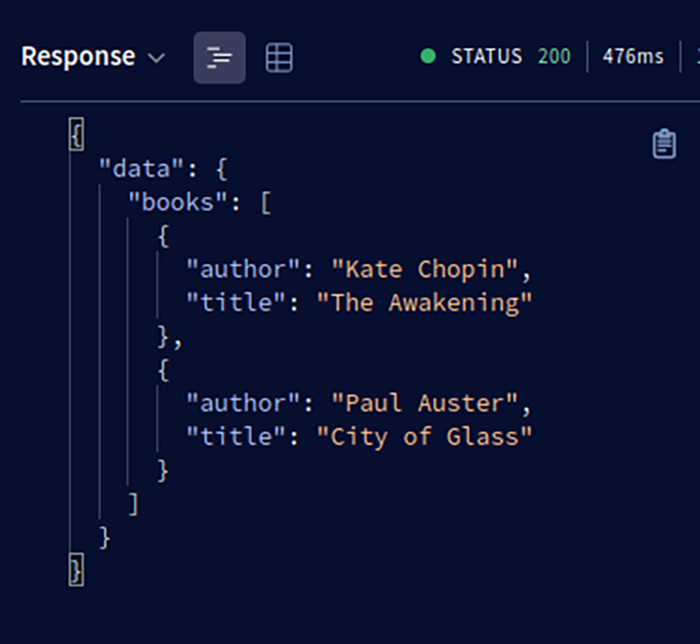
You can now query for books as in the Getting Started tutorial, only now it’s with a live database.
3. Create integration tests
Before we create unit tests for our server, let’s make integration tests. The essential difference is that the integration tests will make async calls to the live database, whereas the unit tests will mock those out.
But even if you work with unit tests, you should have some integration tests anyway to make sure all is well with your database. The integration tests you can run periodically, and the unit tests you should run with every change to your code.
Fortunately, an Apollo Server comes with a built-in function executeOperation that makes integration tests a breeze.
(1) prepare the necessary files for integration testing.
- First, create some folders for testing
mkdir test/int
mkdir test/data
- Then we need to add an AVA config file for integration tests
int-tests.config.cjs:
module.exports = {
  files: ['test/int/**/*.int.ts'],
  "extensions": [
    "ts"
  ],
  "require": [
    "ts-node/register"
  ],
  "timeout": "2m"
};
- Finally, update
scriptsin thepackage.jsonfile to includeint-test:
"scripts": {
  "int-test": "ava --config int-tests.config.cjs",
  "test": "ava"
},
When we want to run an integration test, we’ll be able to do so by calling npm run int-test -- <fileName>. Or we can run all of them with simply npm run int-test. Note that integration tests should be in the directory test/int, and should contain the suffix int.ts.
(2) I’m going to recommend refactoring src/index.ts to make it easier to create tests. Instead of creating server in the src/index.ts file, we’ll create a function createServer() that we import from a separate file. That way, we’ll be able to create test servers as needed, and ultimately mock servers.
If you are in a hurry, you could just copy the solution test/src directory over which combines this refactoring with another one below. Or take a few minutes and work the changes through yourself so that you understand them.
Create src/newServer.ts, which is essentially the same code lifted from src/index.ts and a new function:
require('dotenv').config();

const neo4j = require('neo4j-driver');
import { Neo4jGraphQL } from '@neo4j/graphql';

import {ApolloServer} from "apollo-server";
const { gql } = require('apollo-server');

const typeDefs = gql`
  type Book {
    title: String
    author: String
  }
`;

const schema = new Neo4jGraphQL({
    typeDefs,
}).schema;

const driver = neo4j.driver(
    process.env.DB_URI,
    neo4j.auth.basic(
        process.env.DB_USER,
        process.env.DB_PASSWORD,
    ),
);

function context({ event, context }: { event: any, context: any }): any {

    return ({
        event,
        context,
        driver,
    });
}

export function newServer():ApolloServer {
    const server: ApolloServer = new ApolloServer(
        {
            schema,
            context,
        });
    return server;
}
Now we can remove virtually all of src/index.ts and simply call newServer there:
import {newServer} from "./newServer";

newServer().listen().then(({ url }) => {
    console.log(`🚀 Server ready at ${url}`);
});
(3) Next let’s create our first int test 😍.
The data from our first executed query in the Apollo Sandbox is all we need for a first integration test. A bit of copying and pasting will let you create the file test/data/createBooks.ts:
export const CREATE_BOOKS_MUTATION = `
mutation($createBooksInput: [BookCreateInput!]!) {
  createBooks(input: $createBooksInput) {
    books {
      title,
      author
    }
  }
}
`

export const CREATE_BOOKS_PARAMS = {
    "createBooksInput": [
        {
            "title": "The Great Gatsby",
            "author": "F. Scott Fitzgerald"
        },
        {
            "title": "Beloved",
            "author": "Toni Morrison"
        }
    ]
}

export const CREATE_BOOKS_OUTPUT = {
    "books": [
        {
            "title": "The Great Gatsby",
            "author": "F. Scott Fitzgerald"
        },
        {
            "title": "Beloved",
            "author": "Toni Morrison"
        }
    ]
}
Then create the following integration file as test/int/index.int.ts :
import {newServer} from "../../src/newServer";

const test = require('ava');

import {ApolloServer} from "apollo-server";
const server:ApolloServer = newServer()

import {CREATE_BOOKS_OUTPUT, CREATE_BOOKS_PARAMS, CREATE_BOOKS_MUTATION} from "../data/createBooks";

test('createBooks', async (t: any) => {

    console.log('starting...')
    let result: any
    try {
        result = await server.executeOperation({
            query: CREATE_BOOKS_MUTATION,
            variables: CREATE_BOOKS_PARAMS,
        });
    } catch (error) {
        console.log(error)
    }

    t.true(!result.errors);

    t.deepEqual(
        // @ts-ignore
        result.data.createBooks,
        CREATE_BOOKS_OUTPUT
    );
});
This code simply uses the AVA test runner to confirm that your server calls the createBooks resolver correctly. The executeOperation function is used to call createBooks. There are two assertions here. The first is that the result has no errors. The second is that the output is correct. Check out AVA to learn more about assertions and test generation.
You can now run npm run int-test and you should see this:
$ npm run int-test

> [email protected] int-test
> ava --config int-tests.config.cjs

starting...
  1 test passed
Although we won’t do the other resolvers here, you can trivially repeat the above approach for your other two mutations and for the books query. You can copy over the test/data directory and int test file to get them all. In short:
- run each query with sample data
- create a file in
test/datawith the results - add to
test/int/index.int.tsa test that makes sure the data returned is correct and there are no errors. IMPORTANT NOTE: in AVA you must usetest.serial()in place oftest()for any tests which must be performed in a particular order.
Check out the completed integration test file.
4 Use neo-forgery to mock the database
You could run your int test whenever you’d like, but it’s not appropriate for continuous integration (CI) or test-driven design (TDD). You’ll need real unit tests for those.
Fortunately, it’s not hard with neo-forgery.
(1) in your terminal, create a unit test directory and copy over the int test:
mkdir test/unit
cp test/int/index.int.ts test/unit/index.test.ts
NOTE: it would honestly be more consistent to use the extension unit.ts rather than test.ts. But test.ts is by far the most common convention. I do not want to use the test.ts extension with integration tests, because you could end up accidentally modifying a unit or int test when you intended the other.
Try running npm test just to confirm that you get the same success as you got with the int test. But remember that it’s still calling the database.
(2) refactor context out of newServer
For our unit tests, we’ll need a mock version of the server. To minimize duplicated code, we’ll refactor context to be a parameter for newServer, so that we can easily replace the live database with a mock one. That means that our src/index.ts file will now look like this:
import {newServer} from "./newServer";
import {context} from "./context";

newServer(context).listen().then(({ url }) => {
    console.log(`🚀 Server ready at ${url}`);
});
Here’s the src/context.ts file that it will use:
const neo4j = require('neo4j-driver');
const driver = neo4j.driver(
    process.env.DB_URI,
    neo4j.auth.basic(
        process.env.DB_USER,
        process.env.DB_PASSWORD,
    ),
);

export function context({event, context}: { event: any, context: any }): any {

    return ({
        event,
        context,
        driver,
    });
}
Those contents were simply pulled out of src/newServer, which becomes simpler:
import {Neo4jGraphQL} from '@neo4j/graphql';

import {ApolloServer} from "apollo-server";

require('dotenv').config();

const { gql } = require('apollo-server');

const typeDefs = gql`
  type Book {
    title: String
    author: String
  }
`;
const schema = new Neo4jGraphQL({
    typeDefs,
}).schema;

export function newServer(context: any):ApolloServer {
    const server: ApolloServer = new ApolloServer(
        {
            schema,
            context,
        });
    return server;
}
Just as a sanity check, you might run npm run int-test to confirm that you get:
test/int/index.int.ts(6,29): error TS2554: Expected 1 arguments, but got 0.
That is easily fixed by updating test/int/index.int.ts to use the context:
import {context} from "../../src/context";
const server:ApolloServer = newServer(context)
Run it again, and you’ll see a reassuring green success message!
(3) Now to create our mock context! 😃
We will need a “Query Set”, which is an array of the QuerySpec type. Check out the neo-forgery documentation for more. Let’s create a placeholder in a separate file test/unit/querySet.ts:
import {QuerySpec} from 'neo-forgery'
export const querySet:QuerySpec[] = []
Then we can create a file test/unit/mockContext.ts:
const { querySet } = require('./querySet')

const { mockDriver, mockSessionFromQuerySet } = require('neo-forgery')
const session = mockSessionFromQuerySet(querySet)
const driver = mockDriver(session)

export function context({event, context}: { event: any, context: any }): any {

    return ({
        event,
        context,
        driver,
    });
}
This file exports a context that contains a mock driver instead of the real thing. This mock driver will check only for the contents of querySet when a query is made, and if no matching query is found an error is returned. Since there are currently none, we can expect an error the first time we use it. But that’s okay because when you start using TDD you learn to thrive on failure! 😉
(4) Run the test with the mock server
Now, this is cool… we can make a unit test by copying our int test with a tiny change:
cp test/int/index.int.ts test/unit/index.test.ts
Now just change the import of context to be our mock context:
import {context} from "./mockContext";
[If you are using the complete set of int tests, you should ideally replace any test.serial with a simple test, because for the unit tests, there will be no need to be executed in a particular sequence given that they have no side effects.]
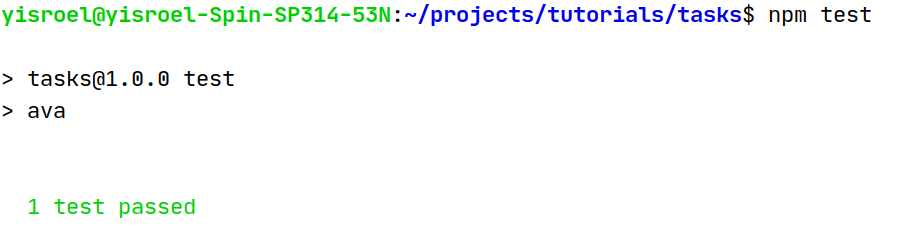
Then we can run the unit test:
$ npm test

> [email protected] test
> ava

the query set provided does not contain the given query:

query:
-----------------
CALL {
CREATE (this0:Book)
SET this0.title = $this0_title
SET this0.author = $this0_author
RETURN this0
}
CALL {
CREATE (this1:Book)
SET this1.title = $this1_title
SET this1.author = $this1_author
RETURN this1
}

RETURN
this0 { .title, .author } AS this0,
this1 { .title, .author } AS this1
-----------------
params: {"this0_title":"The Great Gatsby","this0_author":"F. Scott Fitzgerald","this1_title":"Beloved","this1_author":"Toni Morrison"}

createBooks

test/unit/index.test.ts:21

20:
   21:     t.true(!result.errors);
   22:

Value is not `true`:

false

› test/unit/index.test.ts:21:11

─

1 test failed
Yeah, we failed… but it’s a good kind of failure because it tells us what to fix! 👍 You see that @neo4j/graphql generated a query that we have to add to our set.
As the neo-forgery documentation explains, a QuerySpec requires a query, any params, and a result. We can copy into our file test/unit/querySet.ts the query string and params.
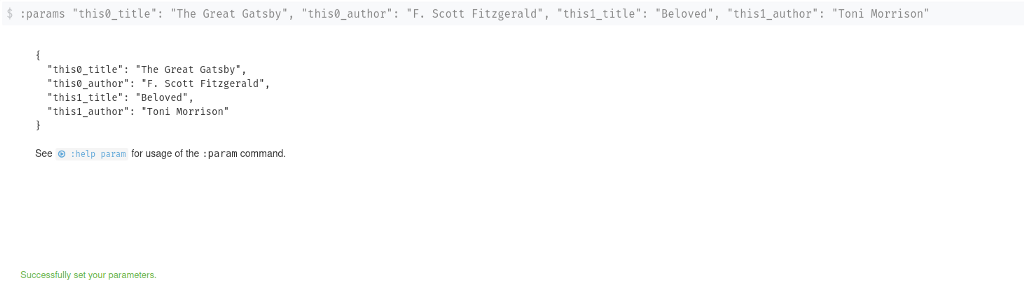
The result will require using the neo4j data browser. First, add the params by using the params: command with the outermost curly braces removed:
:params "this0_title": "The Great Gatsby",
"this0_author": "F. Scott Fitzgerald",
"this1_title": "Beloved",
"this1_author": "Toni Morrison"
The browser should confirm that they were set:
Then run the query, and click on the CODE button on the left. Open Responses, and you can copy the resulting array:
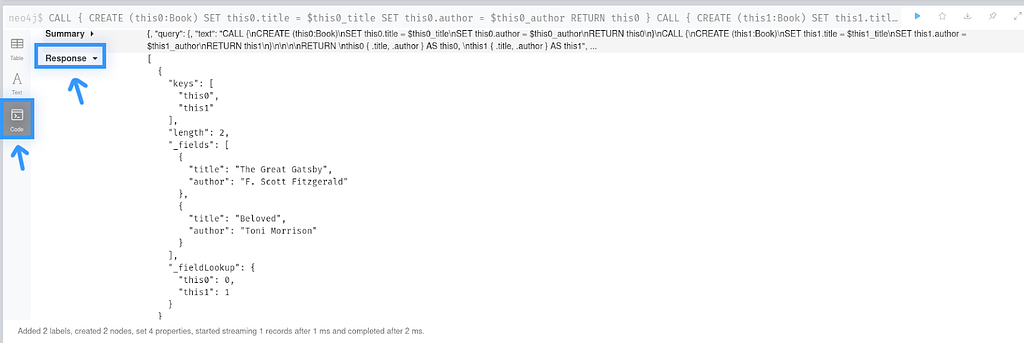
You can use the utility wrapCopiedResults from neo-forgery to
const createBooksOutput = {
    records:

        [
            {
                "keys": [
                    "this0",
                    "this1"
                ],
                "length": 2,
                "_fields": [
                    {
                        "title": "The Great Gatsby",
                        "author": "F. Scott Fitzgerald"
                    },
                    {
                        "title": "Beloved",
                        "author": "Toni Morrison"
                    }
                ],
                "_fieldLookup": {
                    "this0": 0,
                    "this1": 1
                }
            }
        ]
}
The new test/unit/querySet.ts looks like this:
import {dataToStored, QuerySpec, storedToData} from 'neo-forgery'

const createBooksQuery = `
CALL {
CREATE (this0:Book)
SET this0.title = $this0_title
SET this0.author = $this0_author
RETURN this0
}
CALL {
CREATE (this1:Book)
SET this1.title = $this1_title
SET this1.author = $this1_author
RETURN this1
}


RETURN
this0 { .title, .author } AS this0,
this1 { .title, .author } AS this1
`

const createBooksParams = {
    "this0_title": "The Great Gatsby",
    "this0_author": "F. Scott Fitzgerald",
    "this1_title": "Beloved",
    "this1_author": "Toni Morrison"
}

const createBooksOutput = {
    records:

        [
            {
                "keys": [
                    "this0",
                    "this1"
                ],
                "length": 2,
                "_fields": [
                    {
                        "title": "The Great Gatsby",
                        "author": "F. Scott Fitzgerald"
                    },
                    {
                        "title": "Beloved",
                        "author": "Toni Morrison"
                    }
                ],
                "_fieldLookup": {
                    "this0": 0,
                    "this1": 1
                }
            }
        ]
}

export const querySet: QuerySpec[] = [
    {
        name: 'createBooks',
        query: createBooksQuery,
        params: createBooksParams,
        output: createBooksOutput,
    }
]
Running the test again gives us a reassuring green message:
It is trivial to follow those steps for the other errors as well.
Final words
If you’ve done these steps, you know how to create an Apollo Server with a live Neo4j database and to create both integration and unit tests. That means that you can build an Apollo Server using TDD!
You probably would benefit from the tutorial on mocking calls to a neo4j database if you want to see more detail about using neo-forgery.
A good follow-up tutorial would be incorporating in auth if there’s enough interest in this one. So please clap if you would like to see more!
Create a TypeScript Apollo Server and Live Database with Unit Tests was originally published in Neo4j Developer Blog on Medium, where people are continuing the conversation by highlighting and responding to this story.
Share Article


Explore
Related Articles


SumoDB in Neo4j: Chaining Multiple Graph Algorithms in Snowflake — Part 3