Creating API in NestJS with @GraphQL/Neo4j and AWS Cognito

Full Stack Developer
10 min read
When I discovered Neo4j Graph Database, it was love at a first sight. It solves a lot of problems of highly relational databases. Besides, its visual representation of the data model is much easier to read and understand. I was looking for a solution that will allow me to quickly set up a safe backend, but I didn’t find anything mature enough and fast at the same time.
Then I discovered the @neo4j/graphql module, which allows you to have GraphQL API in your node application just by defining models and relationships between them. Additionally, I wanted my app to be secured with AWS Cognito. Luckily, @neo4j/graphql covers it all.
GraphQL, with all its flaws, seems to be a perfect tool to work with a graph database, even better than REST — it kind of uses graphs as an interface, which aligns ideally with Neo4j data model.
I‘m sharing my experience as a blog post so that anyone with a similar need will find something that can be used as a starting project (and which is included at the end of the article as link to Github repo).
What you’ll need:
– Any tool that makes HTTP requests to get JWT token (postman, curl etc)
– AWS Cognito account with a client without the secret
– Docker — for Neo4j db, or Neo4j Desktop installed
Step 1: Create NestJS application
Nest has a pretty powerful CLI, so we can use it to generate the app and later on to generate modules, controllers etc.
To install nest cli tool it run the command:
$ npm i -g @nestjs/cli
And then, just create new nest project (GANN is just pronounceable acronym for GraphQL+AWS+Neo4j+NestJS):
$ nest new gann
Then you need to set the preferred package manager and you’re ready to go. You may verify it by starting the server with npm start and visiting https://localhost:3000 — you should see Hello World!
Step 2: Install Neo4j on your local machine
If you’re using docker, you may run graph database container from official Neo4j docker image. It is super easy. The only thing that we need to take care of, is to run it with APOC library enabled.
To be sure that your docker container starts every time you work on your app, you may want to add this commands to npm scripts:
// package.json
// initialize the database with APOC plugins enabled
"db:init": "docker run -d --publish=7474:7474 --publish=7687:7687 -e NEO4J_apoc_export_file_enabled=true -e NEO4J_apoc_import_file_enabled=true -e NEO4J_apoc_import_file_use__neo4j__config=true -e NEO4J_AUTH=neo4j/password -e NEO4JLABS_PLUGINS='["apoc"]' --name neo4j --restart=always neo4j",

// start database container container
"db:start": "docker start neoj4"

// start database and run nest in watch mode
"start:dev": "npm run db:start && nest start — watch",
Then just start the app and check if database is running under port 7474 in your browser.
npm run start:dev
Of course, you can use Neo4j Desktop to start local database, or even use external provider like Neo4j AuraDB. We will stick with docker for the tutorial purposes.
Step 3: Add required Neo4j and GraphQL node modules
We need to add all modules required to run GraphQL API and connect to Neo4j database. Let’s start with
npm i @neo4j/graphql @nestjs/graphql @nestjs/apollo neo4j-driver
Step 4: Adding required modules
We will put everything related our GraphQL setup in a separate module, imported in app.module.ts. We will name it gql since graphql name is already taken by the official nest module.
nest g module gql
It needs to be imported in app.module.ts.
We want to use environment variables to provide database credentials. NestJS recommends to use @nestjs/config module to provide env variables in the process.env global scope. It need to be installed separately
npm i @nestjs/config
When adding it, just make sure that config module is on the top of every other modules — only after it bootstraps variables from .env file are accessible
// app.module.ts
...
imports: [
  ConfigModule.forRoot({ isGlobal: true }),
  GqlModule
]
...
Create .env file in the project root directory that contains:
NEO4J_USERNAME=neo4j
NEO4J_PASSWORD=password
NEO4J_URI=bolt://localhost:7687
We can’t run GraphQL without the model, so we need to define it — let’s create something very basic for now just to run the module. We will follow the example from Neo4j movie database so create type-defs.ts file in the gql module directory.
// type-defs.ts
import { gql } from "apollo-server-express";

export const typeDefs = gql`
type Movie {
  title: String!
  released: Int!
}`;
Then, we need to provide a factory method that will return the GraphQL configuration and use it in the GqlModule:
After server restart we should see GraphQL log entries. To verify it works, we can use GraphQL playground under localhost:3000/graphql and run a query to get all movies
query {
  movies {
    title
  }
}
As a result, we will see an empty movies array.
Step 5: Model definition
For this tutorial purposes, we will use a model definition taken from the official docs and update the type-defs.ts file.
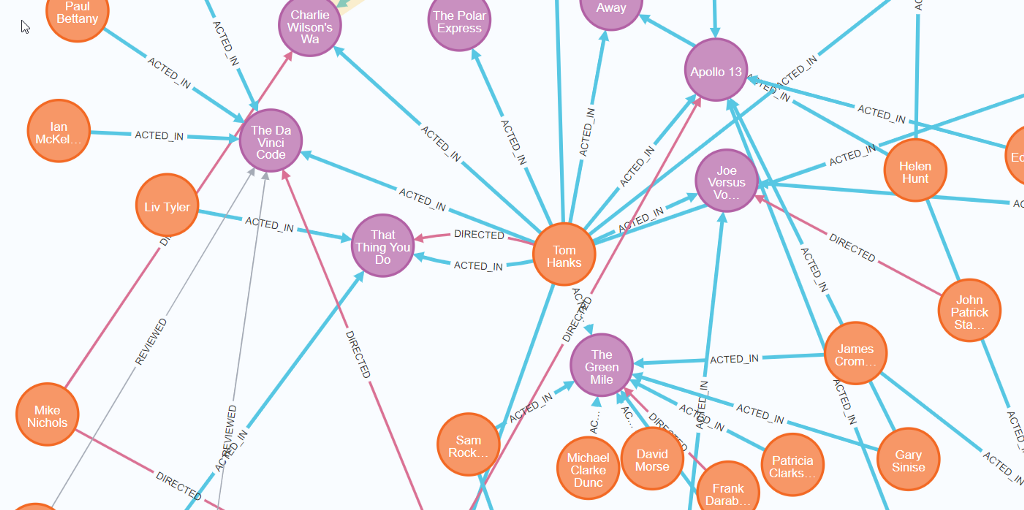
This allows us to create two node types: Person and Movie. Person can act in the movie, but also it may be a director of the movie.
We are ready to test GraphQL API. The sample mutation taken from the docs will create a “Forest Gump” movie with the release year property, as well as one Person who is director of the movie (Robert Zemeckis) and one actor (Tom Hanks), and it will connect them with proper relations (ACTED_IN and DIRECTED)
mutation CreateMovieAndDirector {
  createMovies(
    input: [
      {
        title: "Forrest Gump"
        released: 1994
        director: {
          create: {
            node: {name: "Robert Zemeckis", born: 1951}
          }
        }
        actors: {
          create: {
            node: {name: "Tom Hanks", born: 1956}
          }
        }
      }
    ]
  ) {
    movies {
      title
      released
      director {
        name
        born
      }
      actors {
        name
      }
    }
  }
}
And it should return response:
{
  "data": {
    "createMovies": {
      "movies": [
        {
          "title": "Forrest Gump",
          "released": 1994,
          "director": {
            "name": "Robert Zemeckis",
            "born": 1951
          },
          "actors": [
            {
              "name": "Tom Hanks"
            }
          ]
        }
      ]
    }
  }
}
Pretty neat, in my opinion 🙂
Step 6: JWT authorization
The setup is not ready yet — all mutations can be called by anyone. That’s why we will provide a basic JWT authentication/authorization mechanism. We will test it with one of the popular identity providers — AWS Cognito.
In this tutorial I’m skipping the step describing how to create proper AWS Cognito user pool. I just assume that you’ve created one pool with app, that has no client secret and you’ve got the required information: user poll id, region name and client id. We will put all of that in env variables:
// .env
COGNITO_USER_POOL_ID=<REGION>-<ID>
COGNITO_REGION=<REGION>
COGNITO_CLIENT_ID=<ID>
Step 7: Authentication endpoint
For the login we will use simple rest controller. We add /login endpoint, where user sends login credentials. We will use the amazon-cognito-identity-js module.
npm i amazon-cognito-identity-js
And now we create auth module and corresponding controller, service and config provider.
# generate module
nest g m auth

# generate controller
nest g co auth --project auth --no-spec

# generate service
nest g s auth --project auth --no-spec

# generate config
nest g --project auth --no-spec cl auth/auth.config
We will put required env variables into the config class:
Don’t forget to add the config class as module provider.
import { Module } from '@nestjs/common';
import { AuthController } from './auth.controller';
import { AuthService } from './auth.service';
import { AuthConfig } from './auth.config';

@Module({
  controllers: [AuthController],
  providers: [AuthConfig, AuthService],
})
export class AuthModule {}
Now, in controller, we create the login endpoint:
Finally, we create the authenticateUser method in the auth.service.ts that is responsible for the login flow
Now it’s time to test our endpoint. Make sure that at this point you’ve got an user in the Cognito user’s pool, since it’s is required to run this step.
Hint: If you created user, but you don’t know how to get rid of Force change password status just run this command (official aws cli with python is required):
aws cognito-idp admin-set-user-password --user-pool-id <your-user-pool-id> --username <username> --password <password> --permanent
Sending request like:
{
 "name": "[email protected]",
 "password": "password"
}
should return response like below.
{
  "idToken": {
    "jwtToken": <token-hash>,
    "payload": <user-id-data-json>
  },
  "refreshToken": {
    "token": <token-hash>
  },
  "accessToken": {
    "jwtToken": <token-hash>
    "payload": <user-access-data-json>
  },
  "clockDrift": 0
}
Step 8: Securing GraphQL
Having authentication in place, we can secure our GraphQL setup. We will use an @auth directive provided by @neo4j/graphql, we can extend our model and secure it. Let’s append below configuration to the type-defs.ts file:
extend type Person @auth(
  rules: [
    { operations: [READ], allowUnauthenticated: true }
    { operations: [CREATE, DELETE, UPDATE], isAuthenticated: true }
  ]
)
It says that for any read operation on the Person model we allow user to be unauthenticated. For CUD operations it’s expected that user is logged in.
We also need to provide the authentication information in the gql module somehow. For that, we will use auth plugin in Neo4jGraphQL configuration:
const {COGNITO_REGION, COGNITO_USER_POOL_ID} = process.env;

const jwksEndpoint = 'https://cognito-idp.' +
                     COGNITO_REGION +
                     '.amazonaws.com/' +
                     COGNITO_USER_POOL_ID +
                     '/.well-known/jwks.json`;

const neoSchema = new Neo4jGraphQL({
  typeDefs,
  driver,
  plugins: {
    auth: new Neo4jGraphQLAuthJWKSPlugin({jwksEndpoint}),
  },
});
Great, Let’s try it with query — we expect it to return some results.
query {
  people {
    name
    born
  }
}
It works, great. Now let’s try the mutation, the same that we’ve used before:
mutation {
  createPeople(
    input:{
      name:”Bob”,
      born:1982
    }
  )
  {
    people {
      name
    }
  }
}
As we expected, does not work — we get Unauthenticated response.
So now let’s try with the token and put in in Authorization header:
{
  "Authorization": "Bearer <access-token>"
}
And that’s it. Your GraphQL API is secured. From now the only thing you need to change to expose new models is to modify the type-defs.ts file.
I recommend reading the entire auth documentation, since it’s pretty powerful and customizable — you can create role based authentication, control access certain fields, combine with Cypher WHERE queries, combine with roles, and more.
Useful links:
– gann-starterkit epository (the starter project for the example above)
– @neo4j/graphql repository
– @neo4j/graphql (official documentation)
Creating API in NestJS with @graphql/neo4j and AWS Cognito was originally published in Neo4j Developer Blog on Medium, where people are continuing the conversation by highlighting and responding to this story.
Share Article


Explore
Related Articles
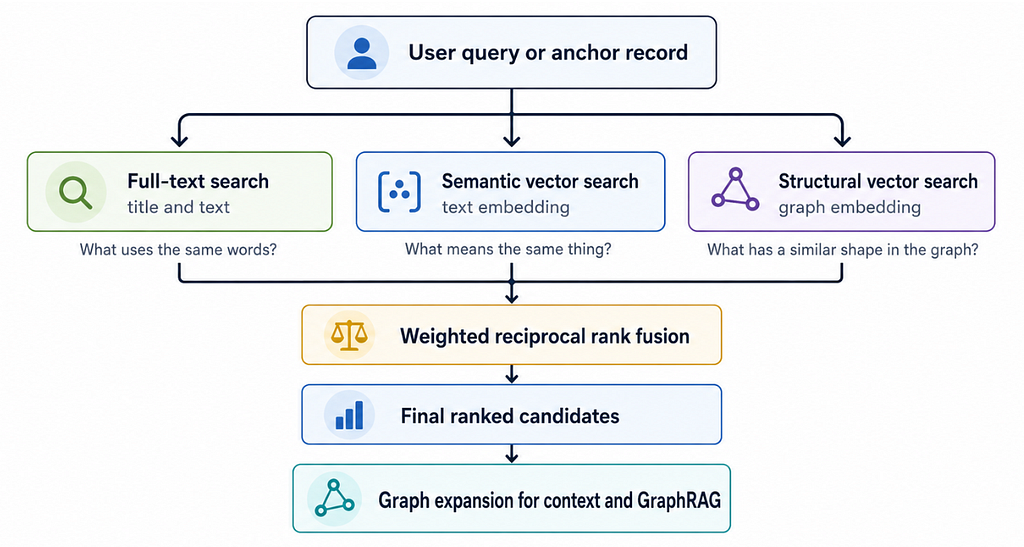
Hybrid Search in Neo4j: Full-Text, Vectors, and Graph Topology with Cypher