Discover AuraDB Free: Week 16 – The CSV Data Importer Tool

Head of Product Innovation & Developer Strategy, Neo4j
9 min read
This week we’re not focusing on a particular dataset but on an upcoming tool that will make getting CSV data into Neo4j, including AuraDB Free, much easier.
If you are looking for a guided experience for CSV data import, check out our brand new GraphAcademy Course.
The Neo4j Data Importer is a client-side Browser tool, that allows you to
- Load CSV files
- Create a graph model of labeled nodes and typed relationships
- Map CSV files to the elements of the graph model
- Run the import against local and remote
- Import and export the model (optionally including the CSV files) into shareable datasets
You can find the tool for the time being here.
It is also available for non-encrypted server connections (e.g. localhost) hosted on an http URL.
If you rather watch the recording of this week’s live-stream you can do so here:
Neo4j AuraDB Free
Neo4j AuraDB Free is the free tier of our hosted cloud service for Neo4j.
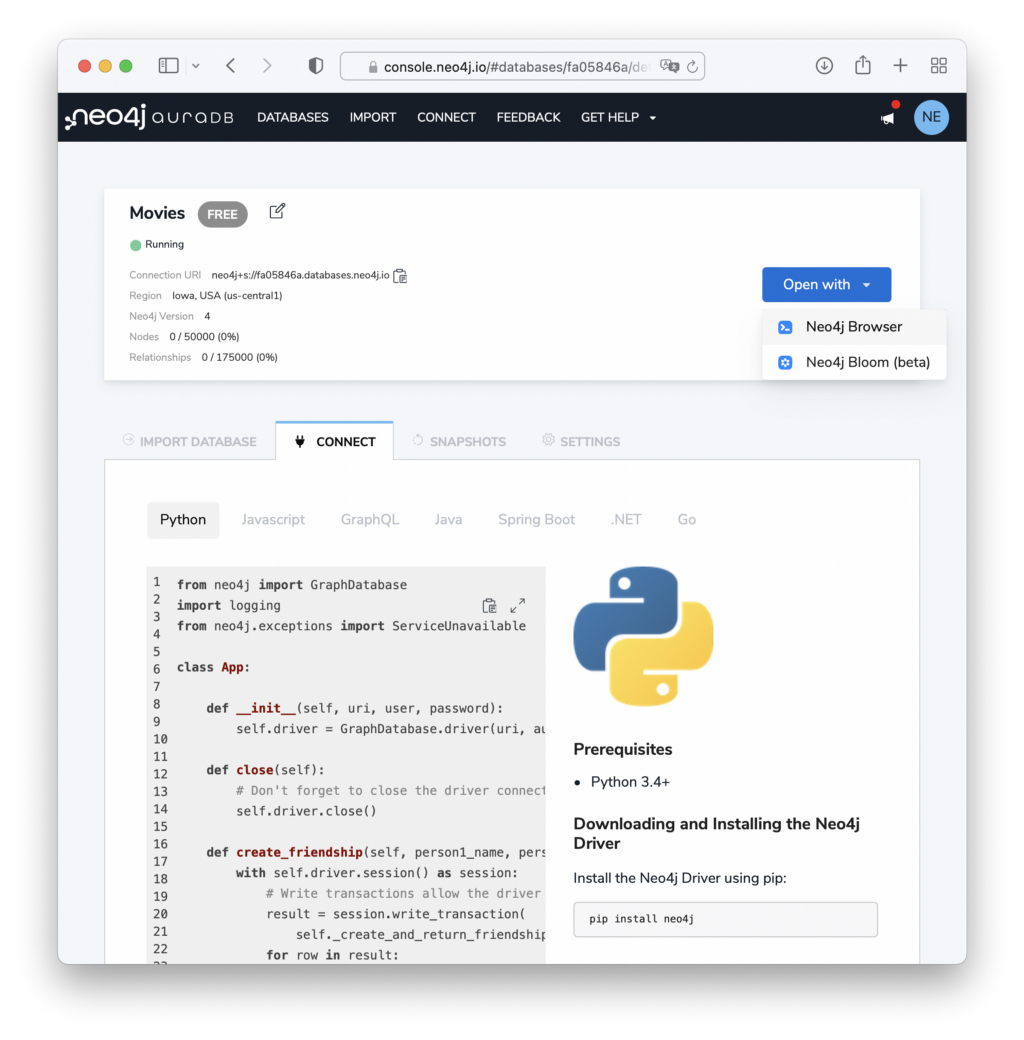
Go to neo4j.com/cloud/aura to log in and create a new empty AuraDB Free Database.
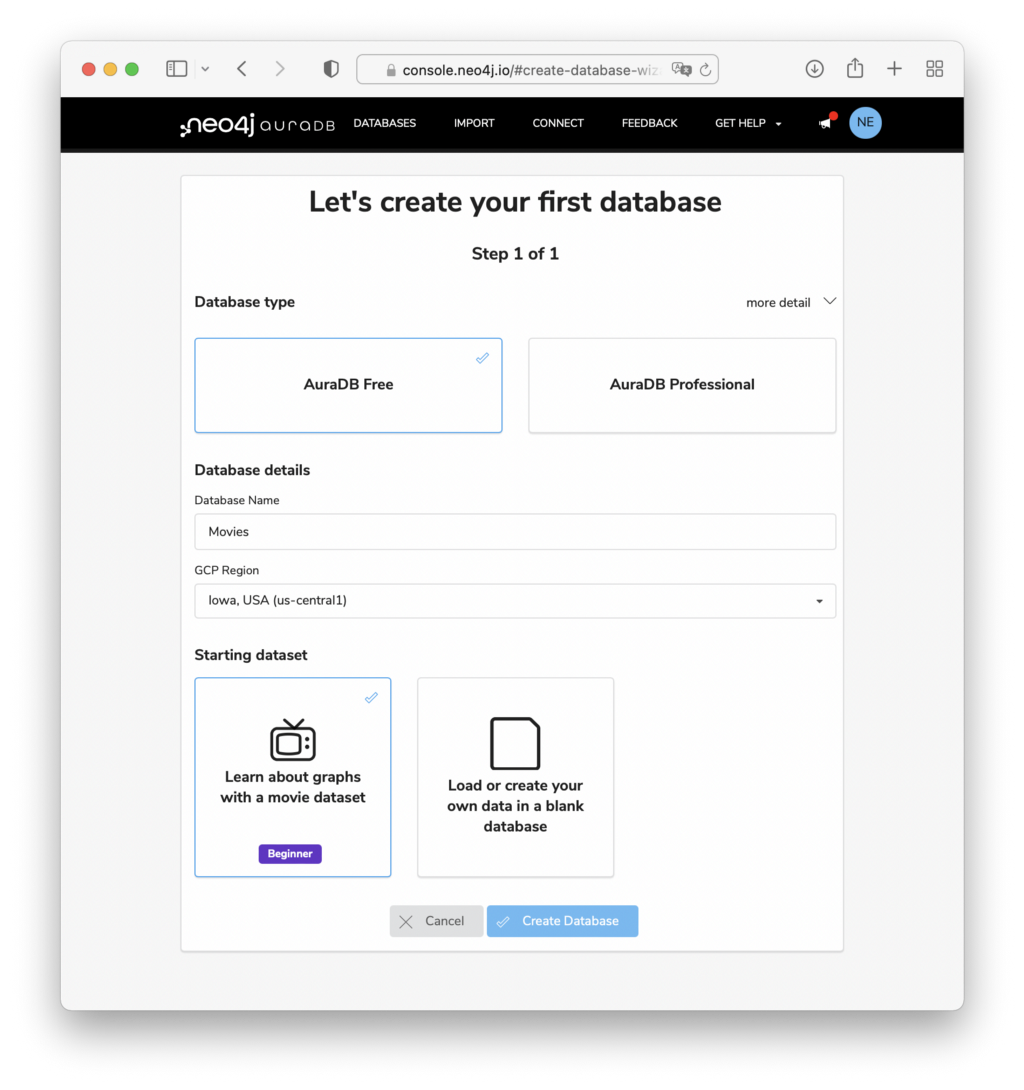
Copy the password, you need it later, your database should be ready to be used in 2–3 minutes.
The other thing you need is the connection URL that can be found with the running database.
Data Importer
The data importer is a pure browser-based tools, your data will not leave your computer, except to be imported into your Neo4j instance.
It is meant for initial data imports of medium complexity (10 node- and relationship-types) and medium size (100k to 1M elements).
Complex data transformations and id-mappings are currently out of scope, as well as production like ETL pipelines or recurring import runs.
Today we want to look at 3 examples:
- Small size movie graph
- Medium size movie graph with a single denormalized file
- More complex northwind dataset
Movie Dataset
The movie dataset is our often-used dataset of people acting in and directing movies.
Load CSV Files
You can find the CSV files in https://data.neo4j.com/importing/movieData.zip
Unzip the file and either drag and drop or Browse and select all the files in the left side of the app.
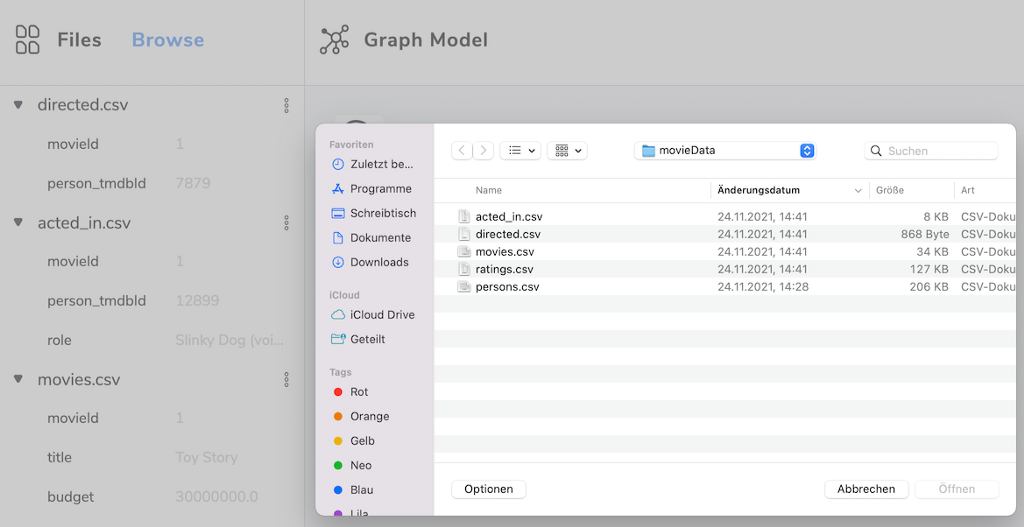
Each of the files shows the headers and the first row of data, which is useful for determining the datatype.
In the left pane you can also fold the files and remove them individually.
The individual columns get a green marker when they are mapped so you see your progress.
Create Model
In the Discover AuraDB Free live stream we’ve used the arrows.app frequently to model our data. The data importer currently embeds the same drawing UI, so you should be probably familiar.
You can add nodes with the icon, or drag out relationships to existing or new nodes from the halo of a node.
Labels and relationship types can be edited directly in the visualization or on the right in the mapping panel.
In the mapping panel you can also reverse the direction of relationships.
With the delete or backspace key on your keyboard you can delete selected nodes and relationships. You can also multi-select nodes and rels for moving or deletion.
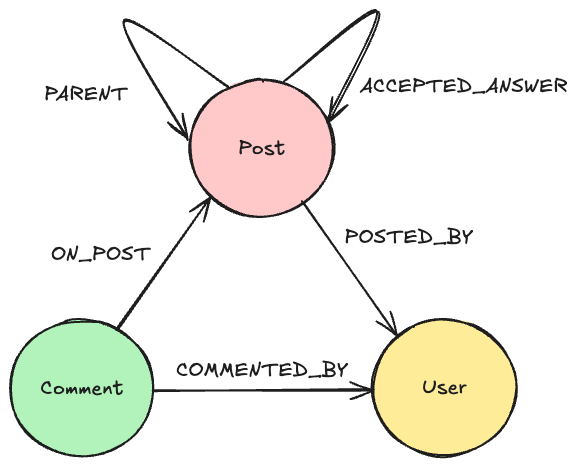
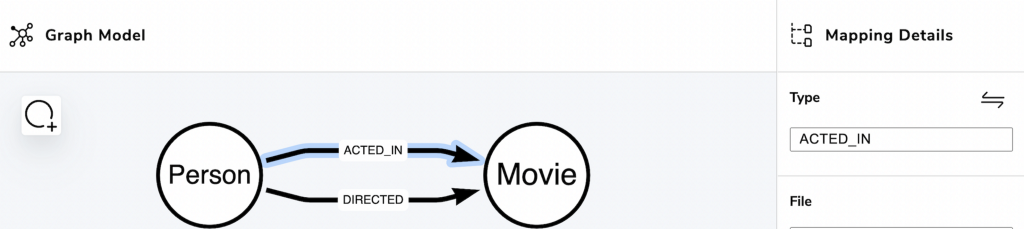
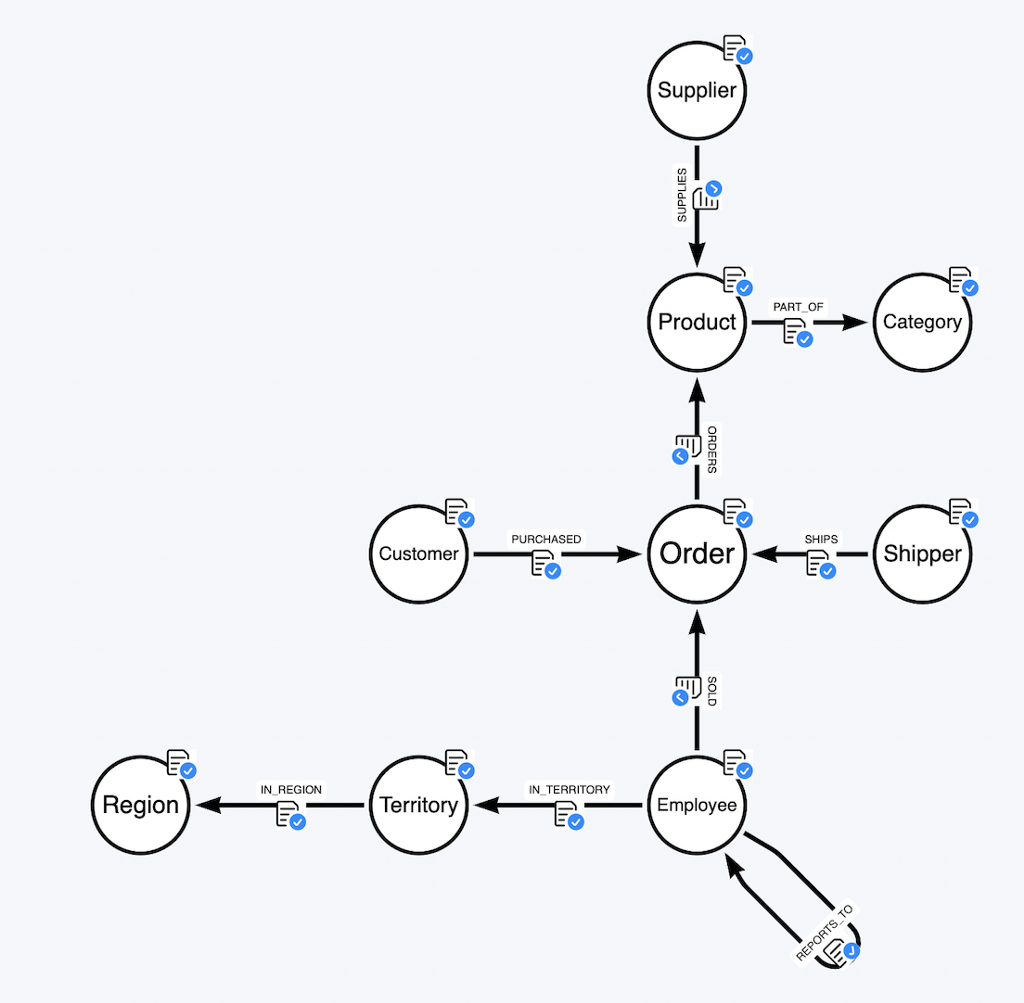
Our movies model should look like this:
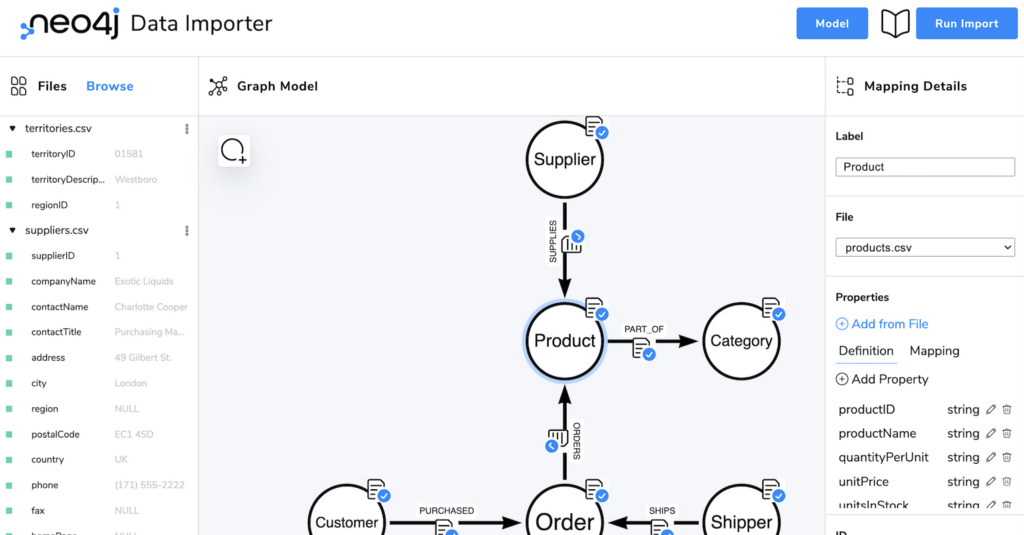
Map Data
In the next step you can map the data from CSV to the graph elements.
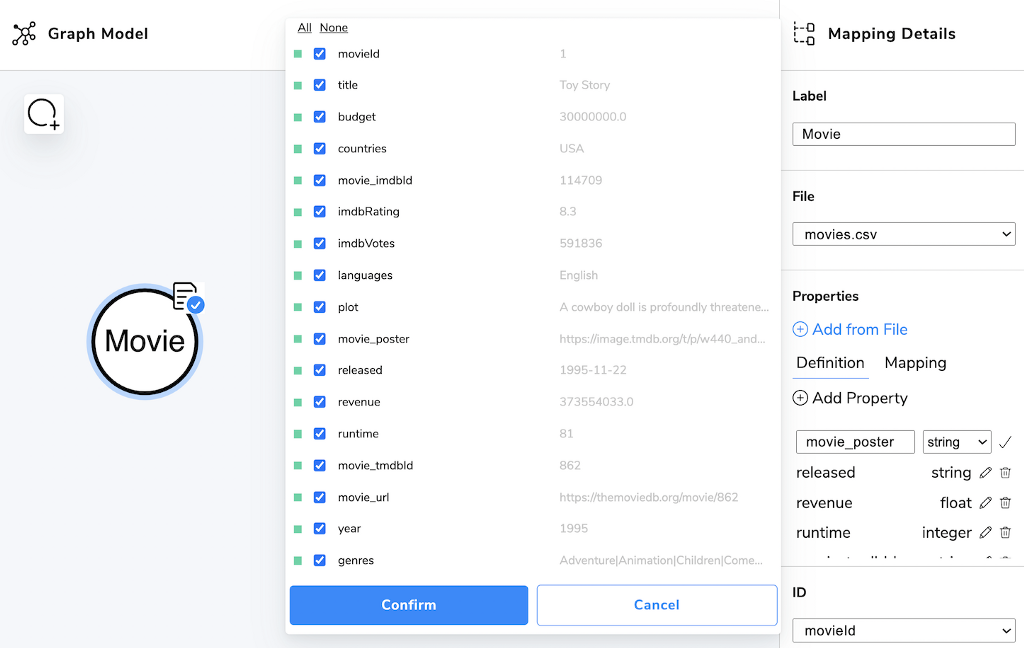
The fastest way to map a node is to
- Select a file to map
- Add from File
- Select all checkboxes via the All link on top
- Optionally deselect the ones you don’t want
- Change property name as needed with the edit icon
- Change the datatype (string, float, int, boolean) where necessary
- Select the id field (Don’t forget this part)
After you’ve done these things for a node it gets a blue checkmark in the visualization.
You can also create properties manually and map them individually in the Mapping tab.
For relationships you pick the the file and then select for the keys for each of the nodes the corresponding columns from the file — those show then already checked with the green box.
In our case that’s first from the acted_in.csv file the person_tmdbid column mapped to the :Person(tmbdId) key property and then second the movieId column to the :Movie(movieId) key.
Additionally you can also select further fields to be stored on the relationship (in our case role).

As you map the CSV files on the left side get green boxes for their columns you can see what’s left to do and fold files that are “finished”.
Export Model
The blue Model button contains some useful functionality.
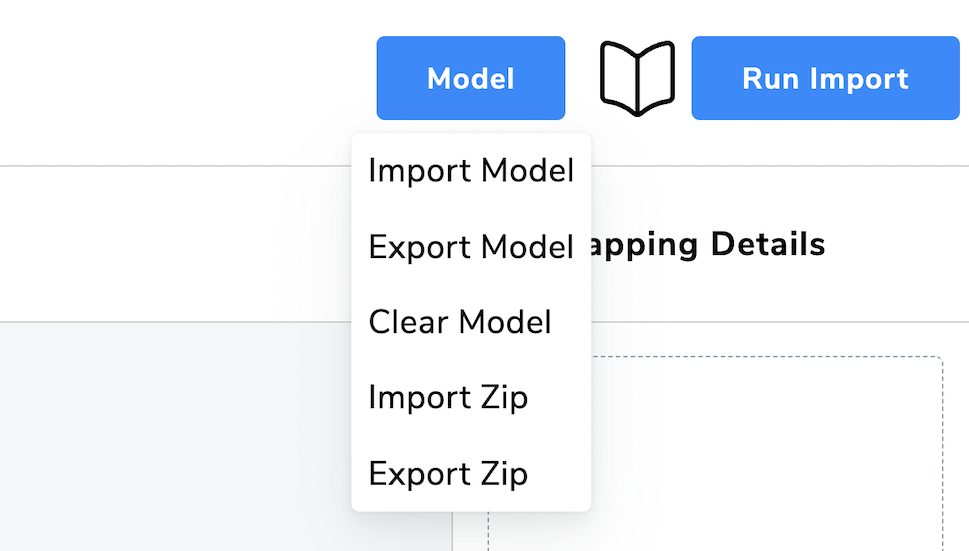
One nice feature is the ability to export both the model/mapping JSON file that can be shared with others.
Even better is the ability to export both the mapping and the CSV files as a compact zip archive that contains a “ready-to-import” dataset.
You can even use the ?model=url query parameter to share the data importer with a model-json and/or zip file to be used (see below with Northwind).
Data importer also stores the current mapping data in the browser storage, so if you open the app again later, the mapping is still there, you just need to reload the data files.
Run Import
After all the mapping is done and all nodes and relationships have their blue checkmarks, we can import the data.
Also check that the CSV files have mostly green boxes only leaving the fields that you don’t want to import.
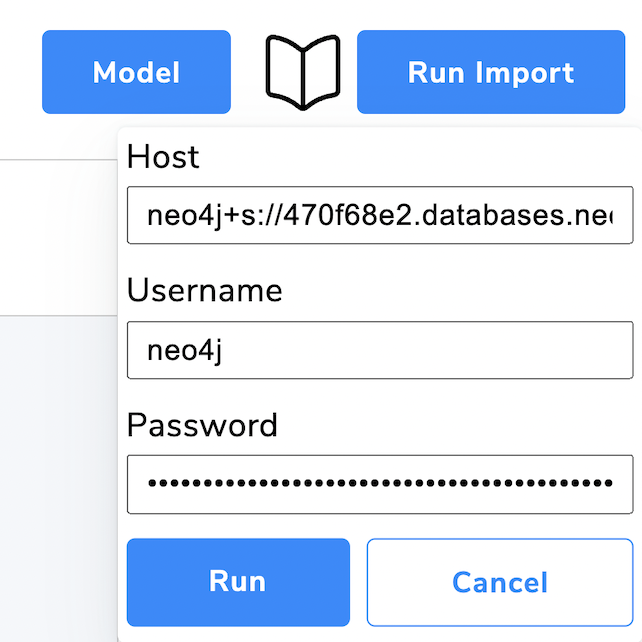
Hitting the “Run Import” button gives you the ability to provide the database connection URL (from the database information), username (usually neo4j) and password that you hopefully saved from your AuraDB Free credentials popup.
Make sure to use the right version of data importer, for secure database connections like Neo4j AuraDB use the https hosted version for other database connections that don’t use SSL certificates use the http hosted version.
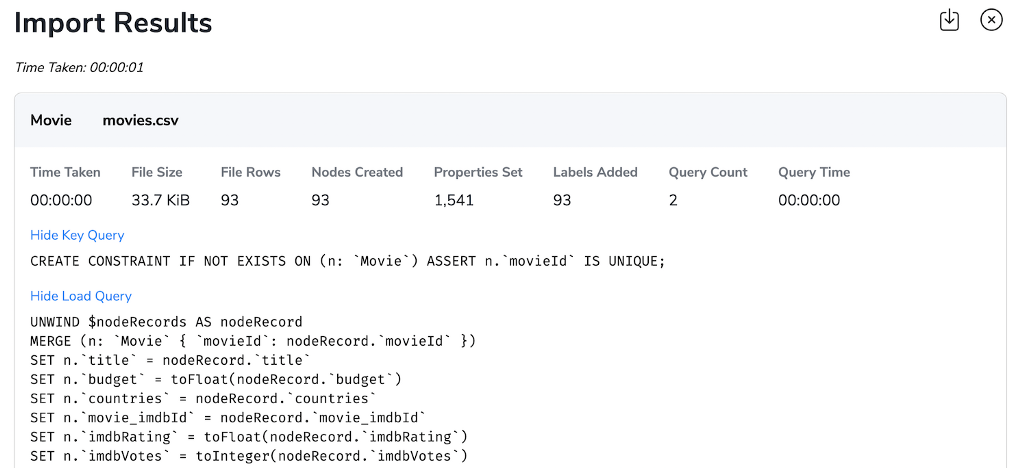
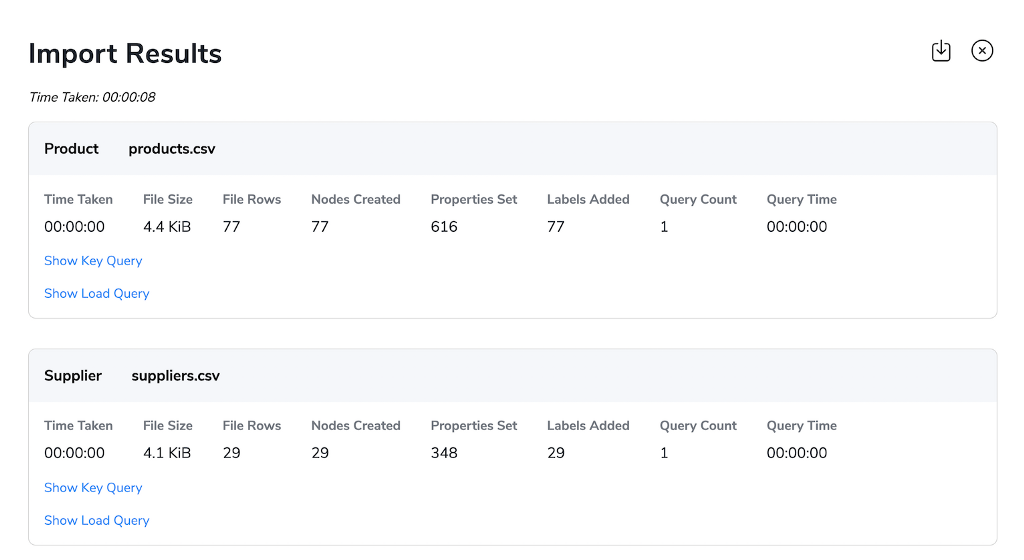
The import progress is shown in the little circle left of the Run Import button, that turns into a “Book” icon to show the results.
In the results popup you see:
- Total runtime
- Runtime per statement
- Data volume processed per statement
- Nodes / relationships / properties created per statement
- Option to show the constraint and create Cypher statement for each element
- You can also download the results as json file, for safekeeping or debugging purposes
The import processes batches of data from the CSV files streaming them through to Neo4j with the JavaScript bolt driver (via Websocket connection), so no large volume of data is kept in your browser or pushed to the server at once.
Each chunk is handled individually. Currently after the first failing statement a graph element is not further imported, control of that behavior will come in the future.
For idempotent and concurrently safe operation MERGE (on the id-property) is used for nodes and relationships. Currently relationships are only merged on the relationship-type for performance reasons, not on “key” rel-properties.
Post Processing
Some aspects that the data importer doesn’t cover can be handled with post-processing.
E.g. in our case the genres attribute of movies contains a pipe | separated list of genre names.
So we can open Neo4j Browser and run the following statement to extract Genre nodes and connect the movie to its genres.
// find all movies with genres property
MATCH (m:Movie) WHERE NOT m.genres IS NULL
// split string on pipe symbol
WITH m, split(m.genres, '|') as names
// remove unneeded property
REMOVE m.genres
WITH *
// turn list of names into rows
UNWIND names as genre
// uniquely create Genre node
MERGE (g:Genre {name:genre})
// uniquely create relationship between movie and genre
MERGE (m)-[:GENRE]->(g);
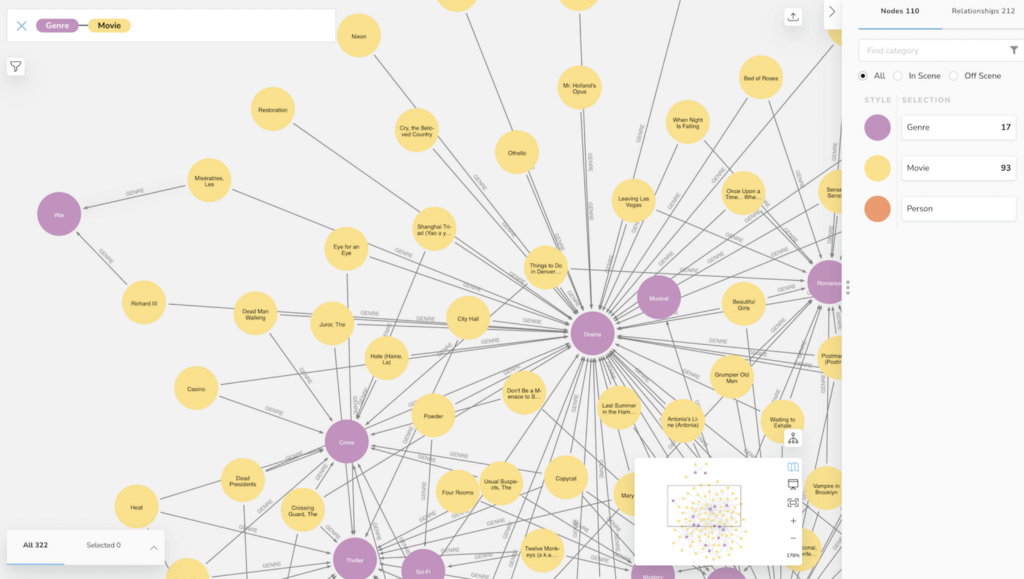
// Added 17 labels, created 17 nodes, set 110 properties,
// created 212 relationships, completed after 41 ms.
Now we can see the Movies and their Genres in full beauty in Browser or Bloom
Similarly if we forgot to transform a data-type during import we can still do it after the fact.
MATCH (m:Movie)
SET m.budget = toFloat(m.imdbRating)
SET m.budget = toInteger(m.budget)
SET m.year = toInteger(m.year);
Denormalized Movie Dataset
The denormalized dataset, contains all data in a single file.
Usually you get denormalized CSV files when a data export from a relational database joined all tables together in one file or a data scientist exported a single data-frame that joined all data together.
The CSV file can be found at this URL. It is the same model as before, just all data exported into one file and more data volume (20MB, 9486 people, 5549 movies, 22057 relationships).
As the file contains both ACTED_IN and DIRECTED relationships and our import tool doesn’t pre-process the data, we can filter out the CSV file on the command line with csvkit or xsv into two separate files.
xsv search -s work ACTED_IN 2-movieData.csv > 2-movieData-acted.csv
We need to map the same file repeatedly to our nodes (Movie, Person) and relationship (ACTED_IN).
Here is what the mapping looks like after we already mapped the Movie node and are about to map the Person node.
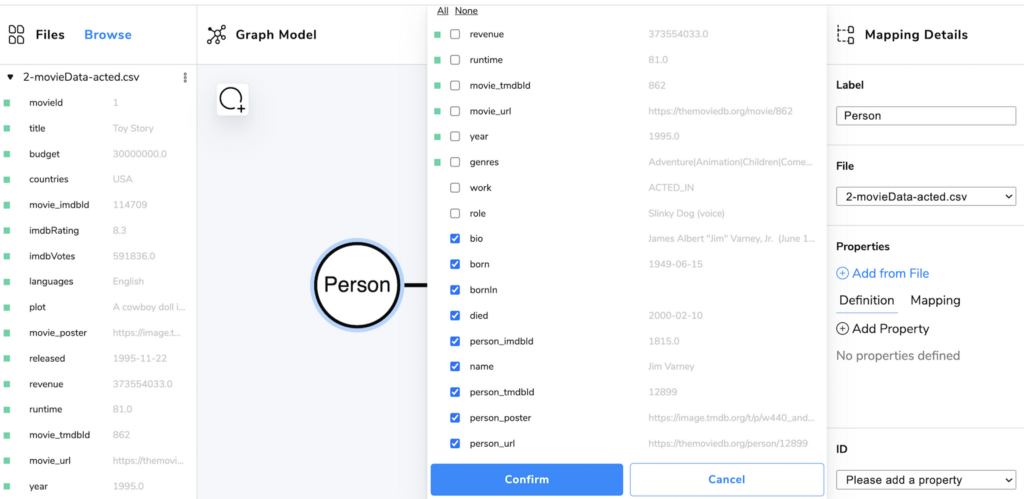
If you want to have a look, here is the mapping file.
Importing the data takes a bit longer (15–20 seconds) as we have much more data to send to the server, and also have to process the same file three times.
Northwind
The Northwind data model is like the movies dataset a normalized dataset.
You can find the CSV files in our Neo4j Graph Examples Repositories in the import folder of the northwind repository
https://github.com/neo4j-graph-examples/northwind/tree/main/import
There you can also find an already mapped model+csv zip file to be loaded directly into the tool, that you can import directly into your graph database.
If you directly want to point data importer to that zip file you can use the ?model=url query parameter, just make sure there are no redirects.
For GitHub that means to use the “raw”-urls for binary data, e.g. https://raw.githubusercontent.com/neo4j-graph-examples/northwind/main/import/northwind-data-importer-mode-data.zip
Otherwise the Northwind model is pretty straightforward, it took me roughly 10 minutes to map all 11 files to nodes and relationships while talking, explaining and discussing.
Some details that I want to call out.
Incremental Modeling
This time we didn’t model the graph upfront but went through the files identified, what belongs into a node, what is the key and what are relationships columns (1:n) pointing to other nodes.
Those we didn’t store on the current node but re-used the file to create the relationships.
We also had some “join-table” files, like employee_territories or order_details that we used directly on the relationships.
So step by step we evolved our graph model, discussed choices and checked off more and more of the CSV files.
Some modeling choices that could be different:
- pull out address information from order and employee, but there was no good key identifier
- create a line-item node for the oder-details
Data Types
You can convert units like
- unitPrice to float
- quantity to integer
- discontinued to boolean
by editing the data-type for the properties in the lower right panel.
Data on Rich-Relationships
We could have modeled the order-details.csv as a LineItem node, but this time we wanted to store these attributes on the relationship between Order and Product, so we had more attributes on that ORDERS relationship that usually.
We also converted them as shown above from string to numeric datatypes.
One to many relationships
If you want to map a CSV column to another node (e.g. categoryID) in Product, don’t store it on the product node but use that same file for the relationships between product and category
Self Relationships
Self relationships are also possible, just drag out the node and return it to the starting node.
In this example an employee reportsTo another employee so you would create an REPORTS_TO self-relationship.
Run Import
Running the import for Northwind takes just 8 seconds as the data volume is not high here, just the model complexity.
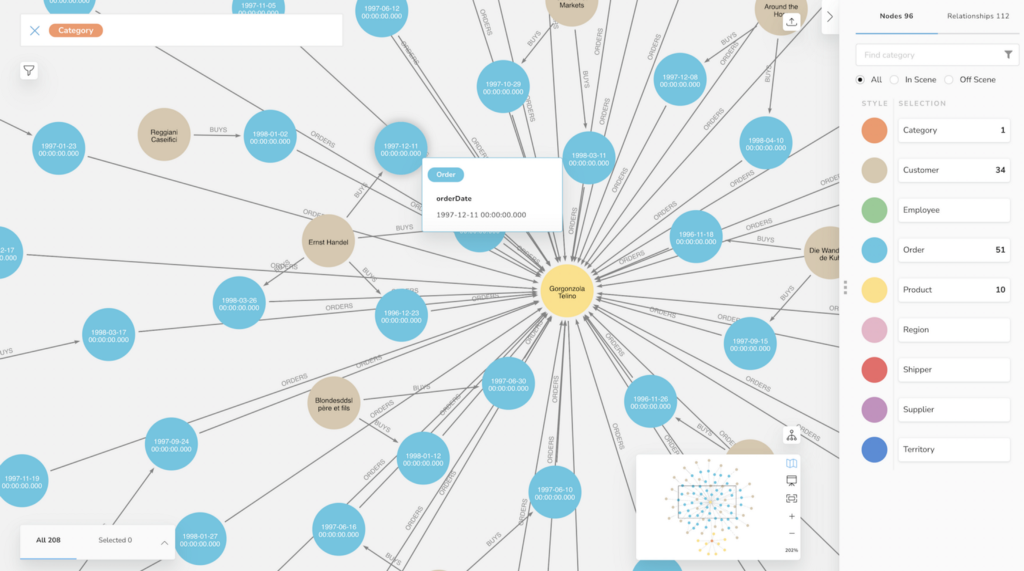
In the end we had a nice graph of retail data, that we could query with Neo4j Browser or visualize with Bloom, here the Customers that had ordered “Gorgonzola” in the “Dairy Products” Category.
Feedback
We would love to get feedback for the data importer, please share it here or ask in our Discord or Forums.
Please remember that some of the “missing” features are intentionally for the initial MVP.
Learn More in GraphAcademy
The dedicated course “Importing CSV Data into Neo4j” offers not just tips and tricks around manually importing CSV files but also has a detailed section with exercises on the data importer.
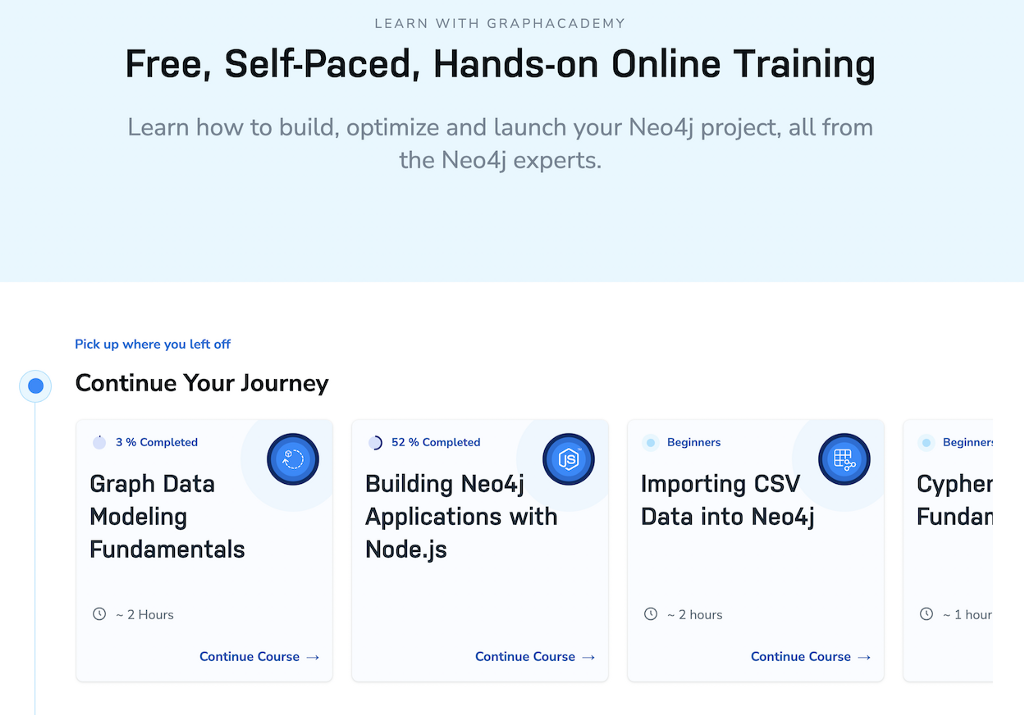
We can also recommend the newly released “Building Neo4j Applications with Node.js” course.
Happy learning, importing & exploring.
Discover AuraDB Free Week 16 — The CSV Data Importer Tool was originally published in Neo4j Developer Blog on Medium, where people are continuing the conversation by highlighting and responding to this story.
Share Article


Explore
Related Articles
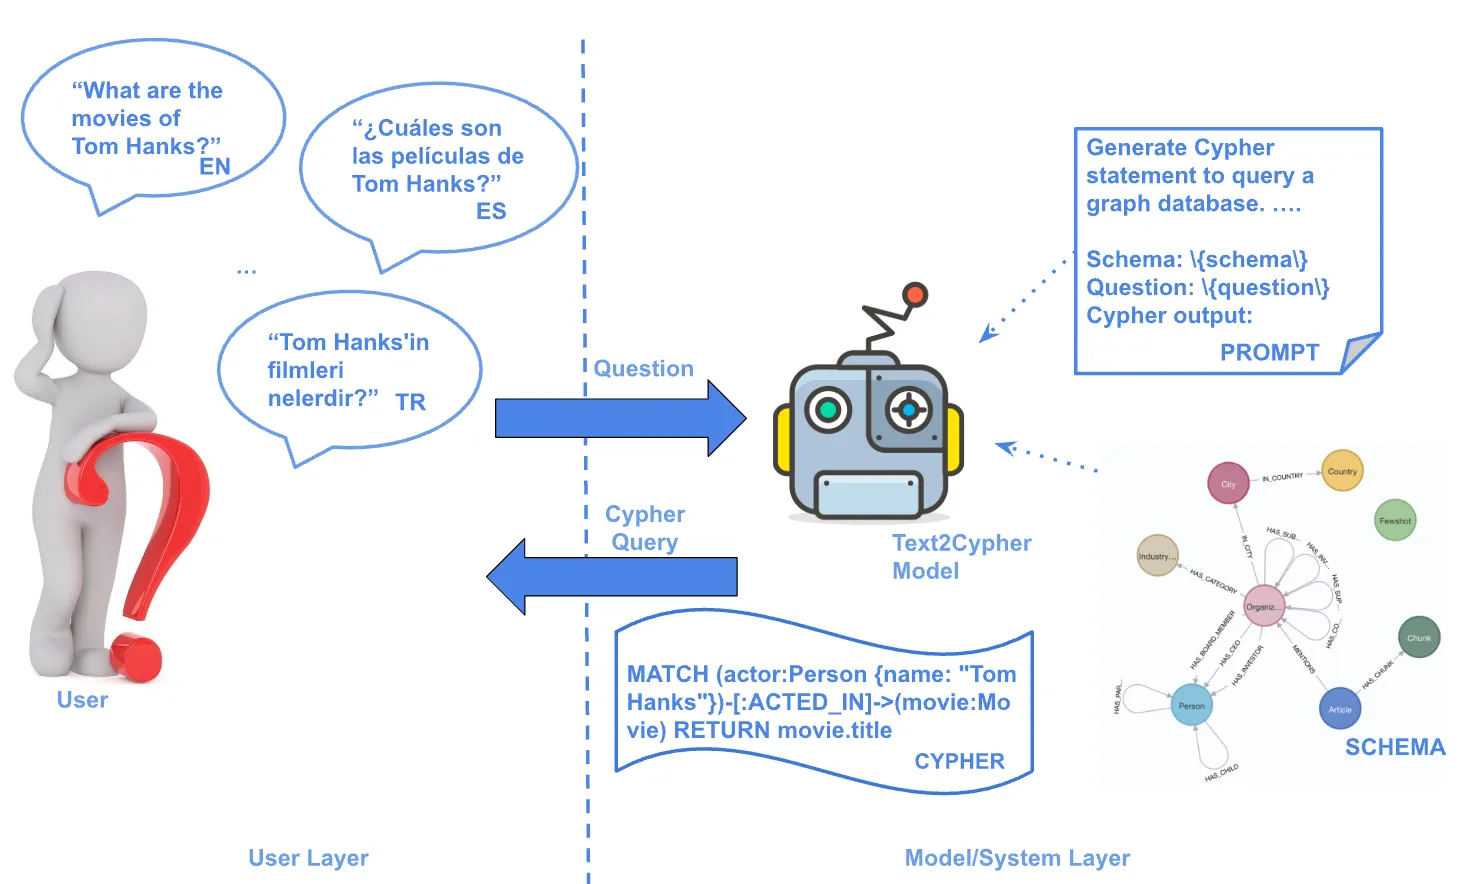
Text2Cypher Across Languages: Evaluating Foundational Models Beyond English