Ingesting Documents Simultaneously to Neo4j & Milvus
5 min read

This blog post details how to ingest data to later be used by a vector and GraphRAG agent using Milvus and Neo4j. This kind of agent combines the power of vector and graph databases to provide accurate and relevant answers to user queries. We will use LangChain and Llama 3.1 8B with Ollama.
Overview
Traditional RAG systems rely solely on vector databases to retrieve relevant documents. This approach goes further by incorporating Neo4j to capture relationships between entities and concepts, offering a more nuanced understanding of the information. Combining these allows us to create a more robust and informative RAG system.
Building the Ingest Process
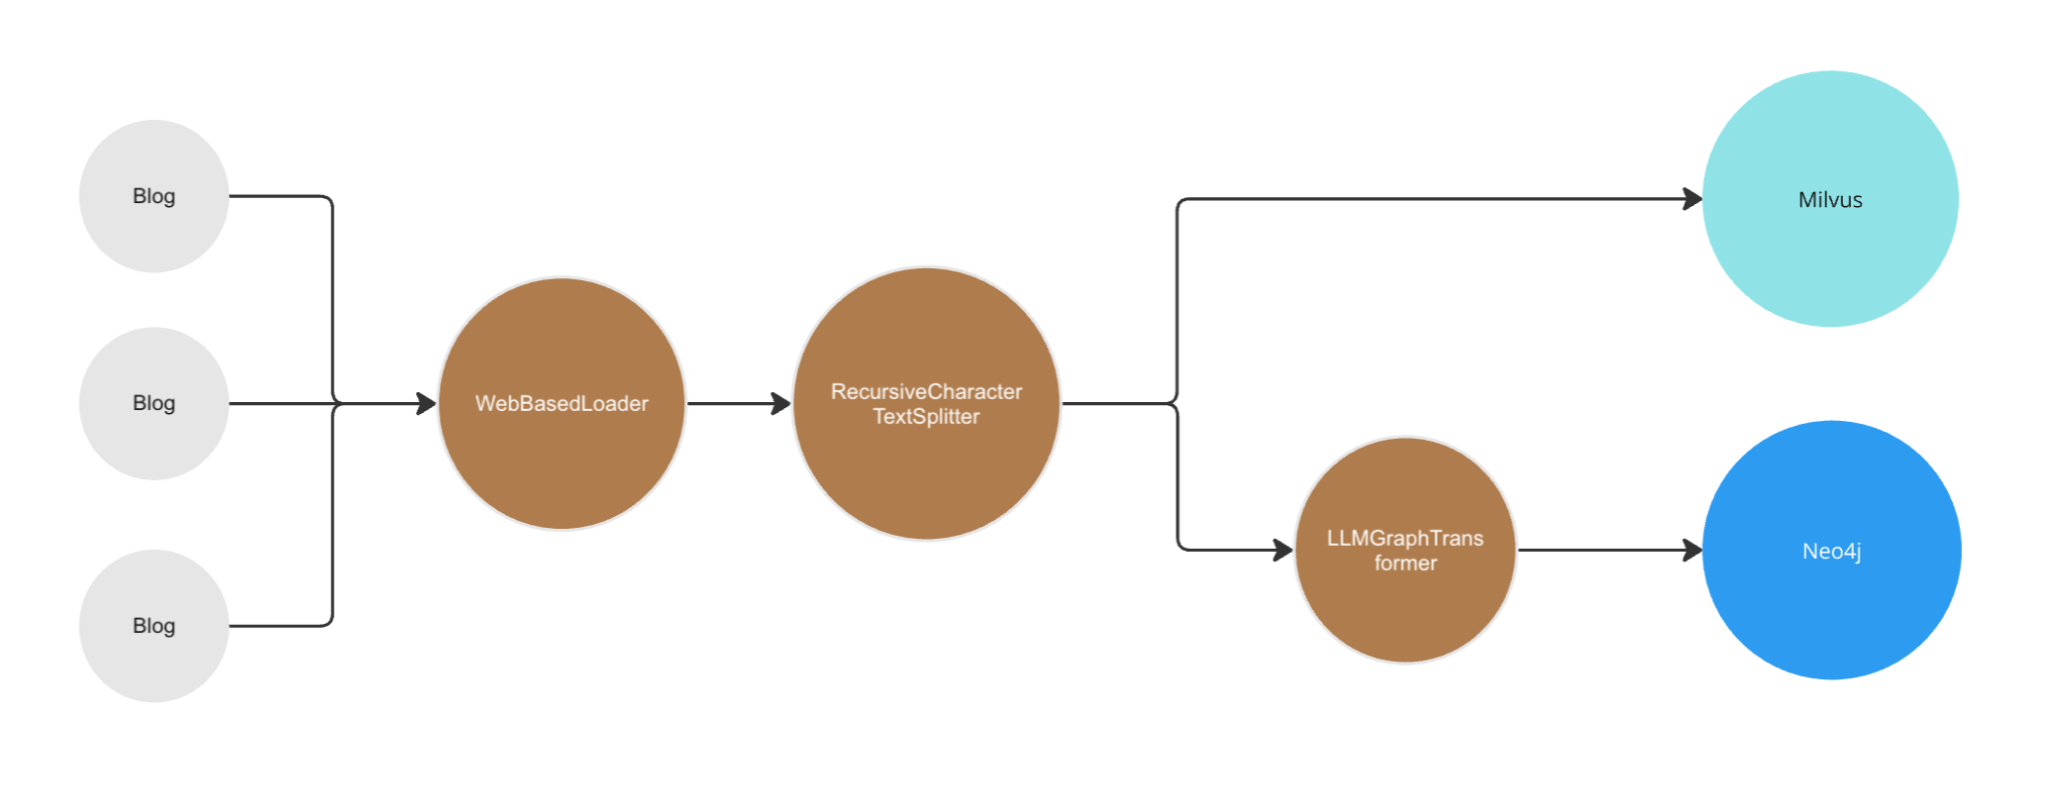
The agent will require retrieving information from both a Milvus Vectorstore and a Neo4j Graph Database. Before it can do so, unstructured data needs to be imported into both datastores into their respective formats.
Requirements
The following technologies are needed to run this ingestion process:
- Juypter Notebook – We’ll build a .ipynb file to run the Python code demonstrated in this article.
- LangChain – The agent will use LangGraph to coordinate the retrieval portion, but we only need to use LangChain for the ingest process.
- Ollama – This is a platform for running large language models (LLMs) on a local device, such as a laptop. Download the Ollama desktop client.
- Milvus – An open source vector database, the langchain_milvus package can make use of pymilvus, a local-running, embeddable Milvus Lite package. Get more information about Milvus Lite.
- Neo4j – A graph database that can be run locally or hosted. Creating a free hosted AuraDB instance is a quick way to get a database up and running. Check out the guide for a full list of options.
- Dotenv – A Python package for reading environment variables into our demo notebook.
Setup
1. After installing Ollama, use your CLI to pull the llama3.1 model to your system:
ollama pull llama3.1
2. Create a new folder on your system named `advanced_rag`. In that folder, create a .env file with the following content:
NEO4J_URI=NEO4J_USERNAME= NEO4J_PASSWORD=
3. Replace all the
4. Create a file named `langchain-graphrag-ingest-local.pynb`.
5. Using your preferred notebook editor, add a frame with the following import command, to bring in all the dependencies needed:
pip install -U beautifulsoup4 langchain langchain_community langchain-experimental langchain-huggingface langchain-milvus neo4j sentence_transformers tiktoken pymilvus
6. Add the following frame to load in the credentials from the .env file:
from dotenv import load_dotenv
load_dotenv()
Vector Ingestion
Now that all the supporting dependencies and files have been created, the first ingestion component will read our source data and put it into a local Milvus instance. The main steps:
- Source Data – A list of URLs pointing to web pages of text data to process.
- Reading – LangChain’s WebBaseLoader will read the content of the pages listed above and extract it into a list of LangChain Document objects.
- Chunking – LangChain’s RecursiveCharacterTextSplitter is used to break down the text content from the blogs into smaller elements. This is done for several reasons, including keeping data within the context length of most models and reducing error propagation.
- Upsert Vector Data – The langchain_milvus package makes use of pymilvus, a Python package that can create and run an embedded version of Milvus Lite. The HuggingFaceEmbeddings are used to create vector representations of the source chunks, and the connection_args specify where the local Milvus lite database should be stored in the host file system.
from langchain.text_splitter import RecursiveCharacterTextSplitter
from langchain_community.embeddings import HuggingFaceEmbeddings
from langchain_community.document_loaders import WebBaseLoader
from langchain_milvus import Milvus

#1.Source Documents
urls = [
    "https://lilianweng.github.io/posts/2023-06-23-agent/",
    "https://lilianweng.github.io/posts/2023-03-15-prompt-engineering/",
    "https://lilianweng.github.io/posts/2023-10-25-adv-attack-llm/",
]

#2.Reading data
docs = [WebBaseLoader(url).load() for url in urls]
docs_list = [item for sublist in docs for item in sublist]

#3.Chunking data
text_splitter = RecursiveCharacterTextSplitter.from_tiktoken_encoder(
    chunk_size=250, chunk_overlap=0
)
doc_splits = text_splitter.split_documents(docs_list)

print(f'Number of docs: {len(docs_list)}')
print(f'Number of chunks: {len(doc_splits)}')

#4.Add to Milvus
vectorstore = Milvus.from_documents(
    documents=doc_splits,
    collection_name="rag_milvus",
    embedding=HuggingFaceEmbeddings(),
    connection_args={"uri": "./milvus_graphrag.db"},
)
retriever = vectorstore.as_retriever()
Running this frame should output the following:
Number of docs: 3
Number of chunks: 194
Graph Ingestion
The next step will take the same source documents created earlier and convert them into GraphDocuments before uploading into a Neo4j database:
- Neo4j – The langchain_community package includes a Neo4j driver integration. Credentials for the target Neo4j database to access will be retrieved from the .env file created earlier.
- Function Calling LLM – The graph transformer object below requires an LLM that supports function calling to use some of its advanced options.
- LLMGraphTransformer – The LangChain LLMGraphTransformer converts text documents into structured graph documents using an LLM. Optionally, it can explicitly specify node labels and properties. This helps focus an LLM, reducing noise that can be generated by similar meanings or labels with different spellings or tenses.
- Upload Graph Data – Once default LangChain document objects have been converted to GraphDocuments by the graph transformer, they can be added to a Neo4j database instance.
from langchain_community.graphs import Neo4jGraph
from langchain_experimental.graph_transformers import LLMGraphTransformer
from langchain_core.documents import Document
from langchain_experimental.llms.ollama_functions import OllamaFunctions

#1.Initialize Neo4j
graph = Neo4jGraph()

#2.Initialize function calling LLM
graph_llm = OllamaFunctions(model="llama3.1", format="json")

#3.Filtered graph transformer
graph_transformer = LLMGraphTransformer(
    llm=graph_llm,
    allowed_nodes=["Person","Blog","Concept","Technology"],
    node_properties=["name","description","source"],
    allowed_relationships=["WROTE", "MENTIONS", "RELATED_TO"],
)

#4.Add to Neo4j
graph.add_graph_documents(graph_documents)

#Check documents
Running this frame should output something similar to:
Nodes from 1st graph doc:[Node(id='Llm Powered Autonomous Agents', type='Concept', properties={'description': 'Agent system overview', 'estimated_reading_time': '31 min'}), Node(id='Lilian Weng', type='Person', properties={'role': 'Author'})]
Relationships from 1st graph doc:[Relationship(source=Node(id='Llm Powered Autonomous Agents', type='Concept'), target=Node(id='Component One: Planning', type='Concept'), type='RELATED_TO'), Relationship(source=Node(id='Lilian Weng', type='Person'), target=Node(id='Llm Powered Autonomous Agents', type='Concept'), type='WROTE')]
O
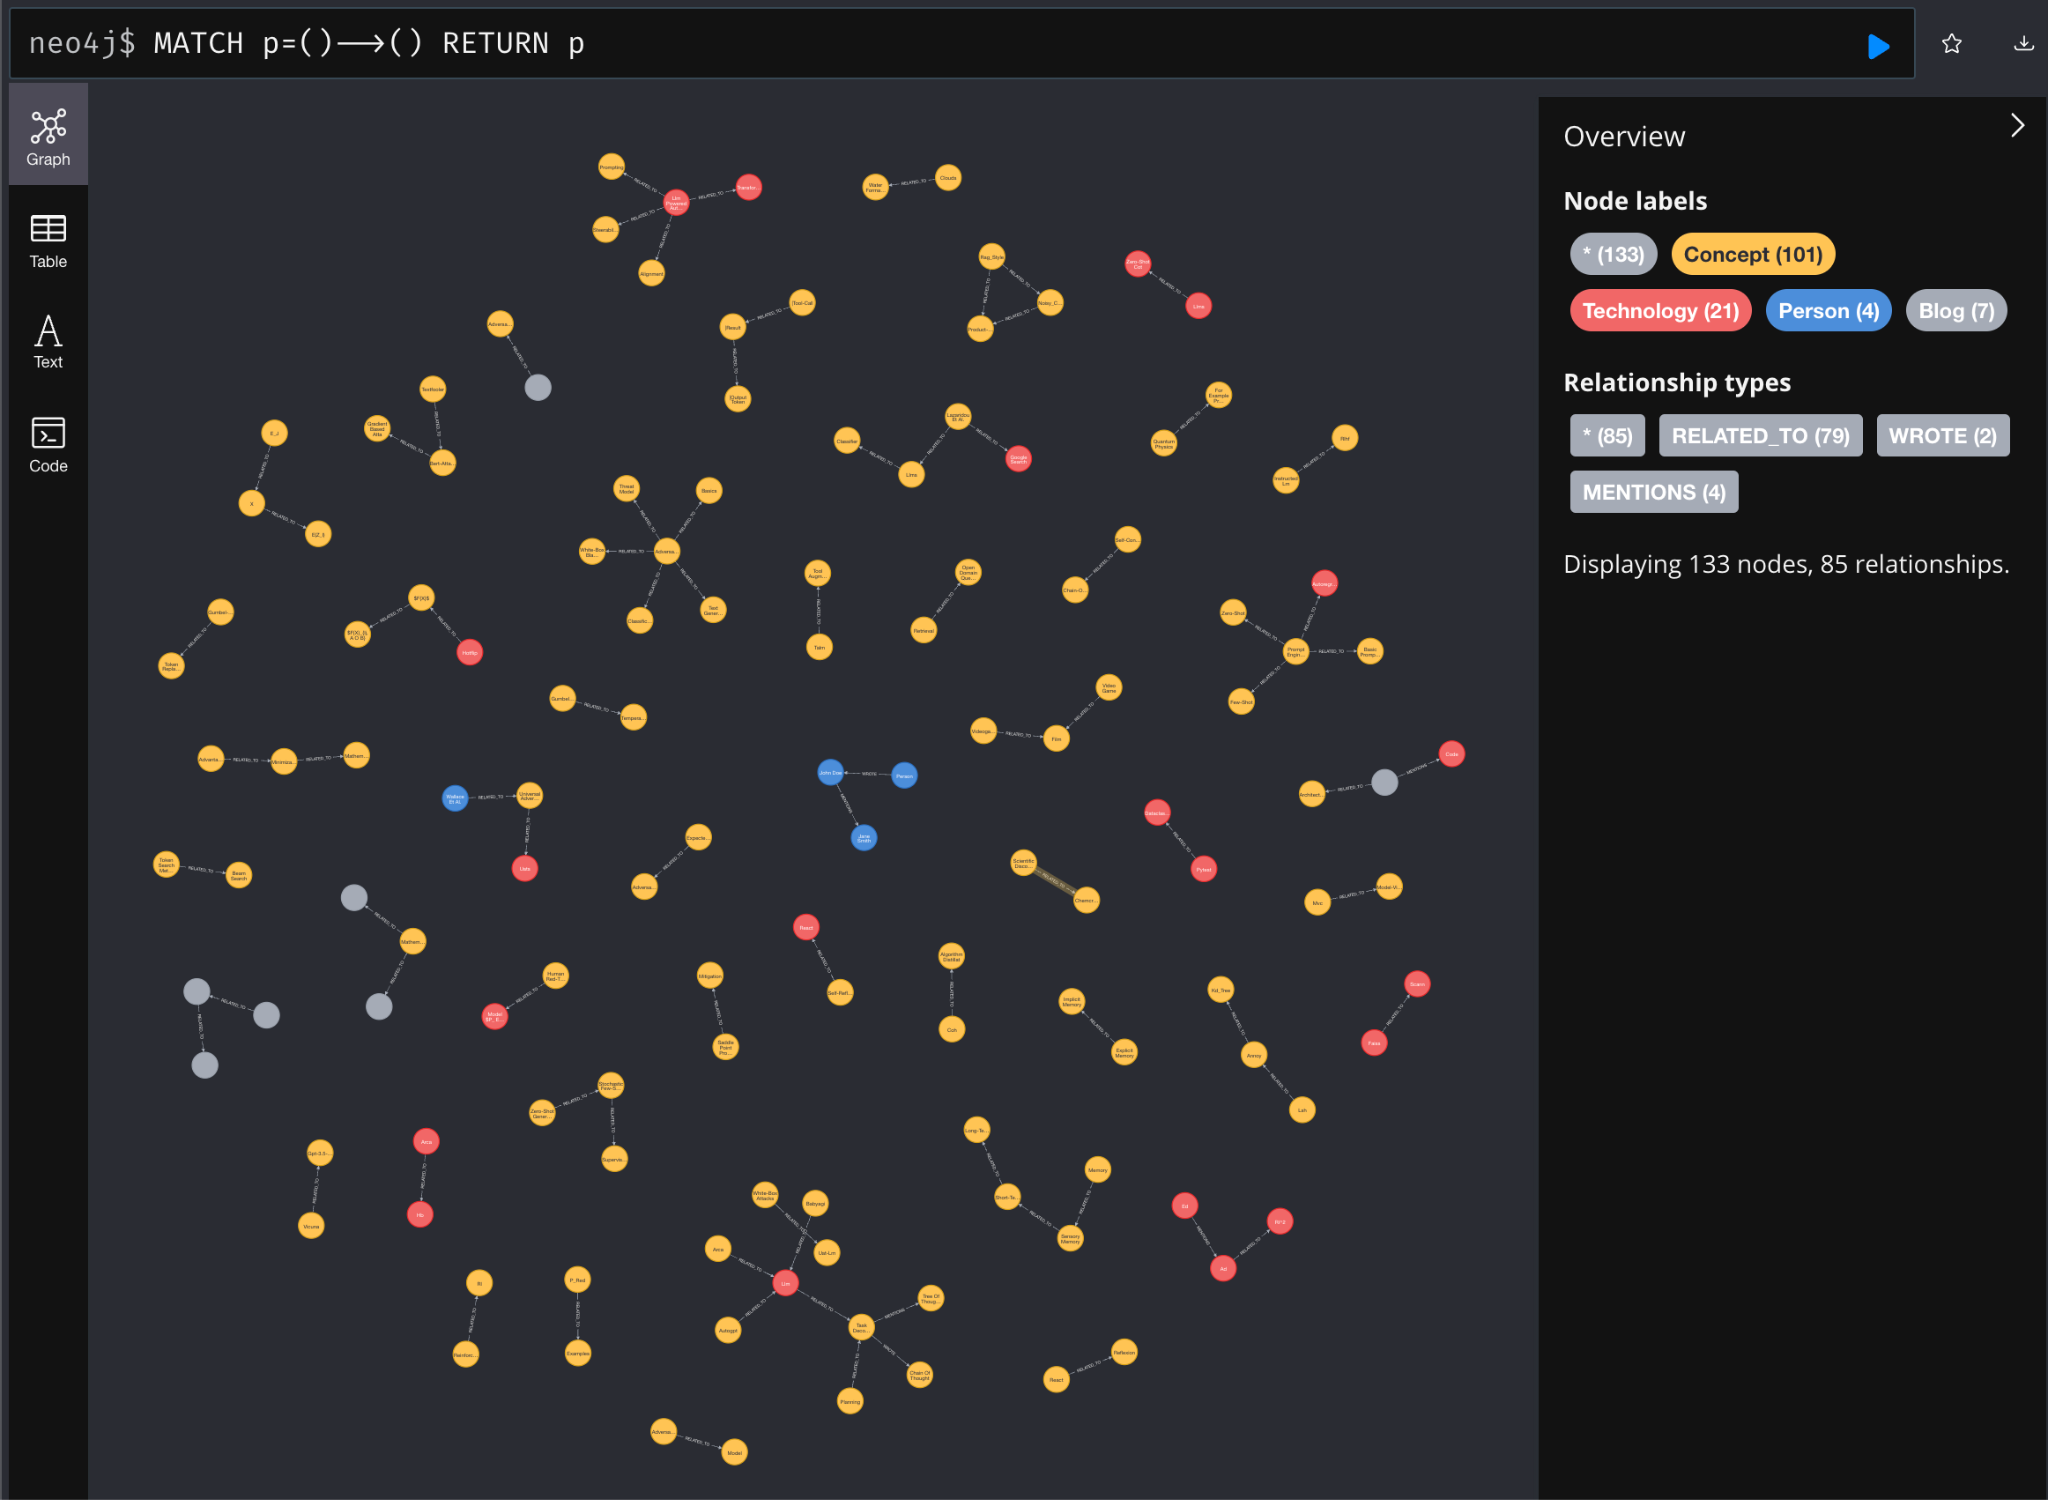
And if you were to inspect the data within Neo4j’s Browser:
Summary
In this blog post, we have seen how to ingest unstructured text data to both a vector and graph datastore using LangChain, Milvus, and Neo4j. In our next article, we will show how to create agents using LangGraph to query both of these datastores for answers.
All the code presented in this article can be found on GitHub.


