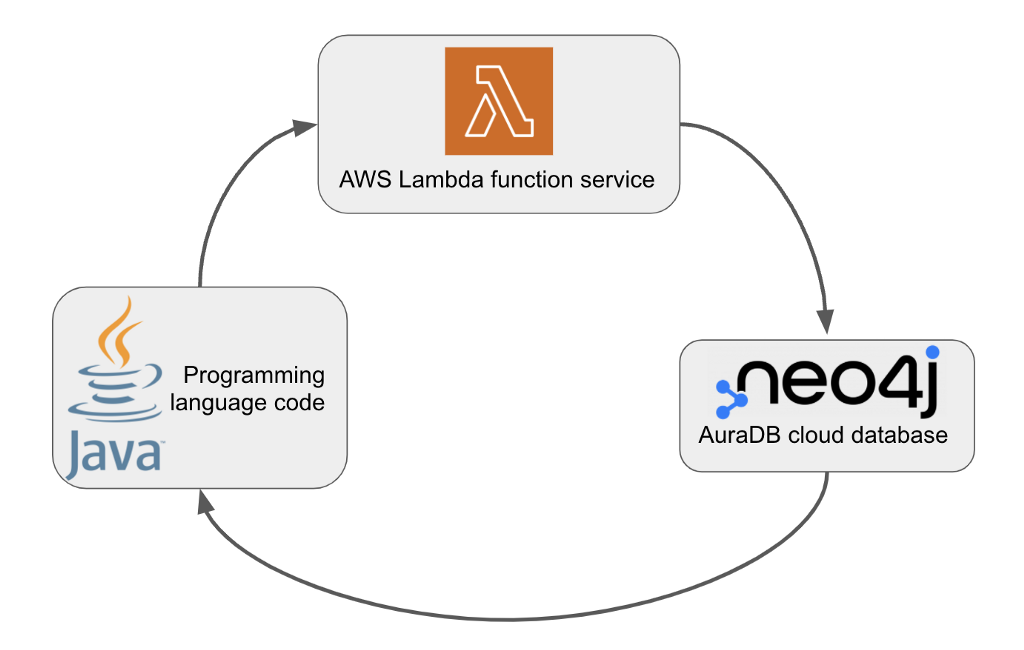
Toolbelt Trifecta: Connecting to Neo4j with Java and AWS Lambda
Developer Relations Engineer at Neo4j
14 min read
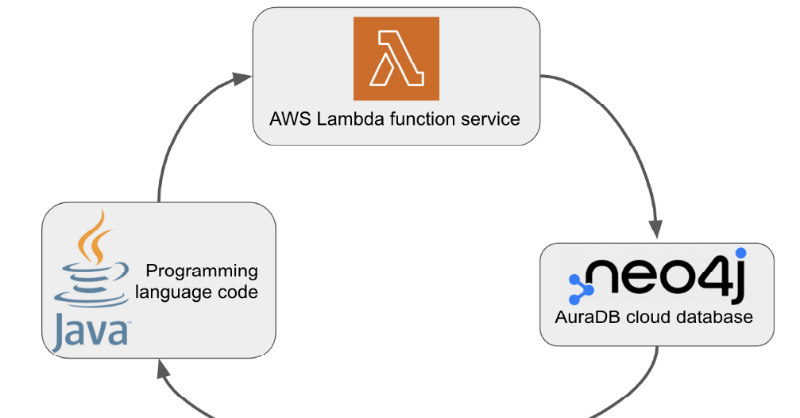

All three of these technologies – Neo4j, Java, and AWS Lambda – are familiar to me, and yet using them together was entirely new. There were plenty of challenges, lots of questions, some Googling, and colleague input that led me to a working solution.
I wanted to use existing code as much as possible and keep things as simple as possible. Hopefully, we accomplish those two goals.
In this blog post, we will write Java code to connect to Neo4j and run a query from AWS Lambda.
Technologies
Before we dive right in, a brief overview of the technologies involved can help us understand what we’re trying to accomplish and how to structure the code.
We are using the Java programming language, so it is more strict about input/output data types than Lambdas in a language like Python (my previous experience).
Next, we have AWS Lambda. As its product page states, AWS Lambda allows developers to write code without managing servers.
Finally, we want to use the previous two technologies to connect to a Neo4j graph database and execute queries to retrieve data from the database.
Now let’s talk a bit about code!
Setup
As you might imagine, we’ll need a few things in order to connect the pieces together. If you’re a Java developer, you probably already have a JDK and an IDE set up.
For the Neo4j side, we will need a Neo4j database instance. Thankfully, Neo4j provides a free cloud instance you can spin up in just a few minutes called AuraDB.
Details on how to get that set up are available in my colleague’s blog post (follow at least through “Explore the Sample Data” section).
Note: save the generated password in a place you can access it later. It will not be displayed again in the console.
The trickiest (and longest) piece is the AWS Lambda setup. If you don’t already have an AWS account, you’ll need to create that. AWS provides some sample Github projects that include code for various languages and scenarios, so I cloned the repo and used the java-basic example app.
The Github project for the java-basic example app provides a set of instructions on the README.md.
- Bash / Terminal
- Java 8
- Gradle 5 or Maven 3
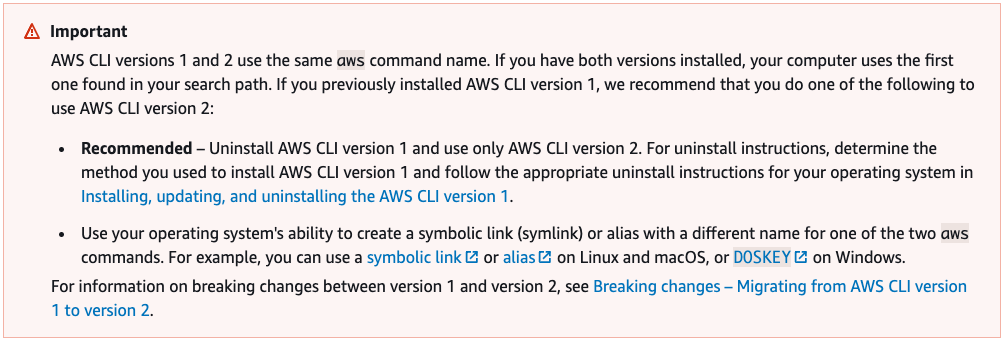
- AWS Cli v1.17 or newer
Following the instructions, I had all the requirements listed, but I had to check my AWS cli version, which turned out to be some yak shaving. I followed the link for the install/update the AWS cli item, chose the macOS dropdown, and skipped to the third step to see what version I already had on my machine.
However, because I had upgraded my laptop since the last time I did AWS stuff, I was getting a zsh: killed aws –version error. That page doesn’t really give you troubleshooting help, but I re-read the red box at the top of the AWS cli instruction page and decided to try an uninstall/reinstall.
The first bullet there links to the uninstall instructions, and then I came back to the install/update the AWS cli page for the install steps. It worked, so the first problem was solved!
Next, I needed to add the last part of the requirements steps to my AWS configuration file.
cli_binary_format=raw-in-base64-out
This step should just consist of copying/pasting the above code into the designated config file, but I ended up with a bit of confusion because I have multiple AWS account profiles. If you have the same situation, you’ll need to add that setting under a specific profile in the config file (see code below).
Ok, now we can charge on to the next steps in the Github readme instructions (Setup section).
I had already cloned the repository, so I moved to creating the S3 bucket by running the 1-create-bucket.sh script. This failed with error
make_bucket failed: s3://lambda-artifacts-e3b5b3e664aaf559 An error occurred (InvalidLocationConstraint) when calling the CreateBucket operation: The specified location-constraint is not valid”.
I realized that the script was running against the wrong profile (to use a non-default profile, you need an extra command-line argument). So, I needed to update my default profile with the needed settings or tweak the command in the script. I chose to update my default profile settings, so back to the ~/.aws/config file.
[default]
cli_binary_format=raw-in-base64-out
region = us-east-2
I hadn’t used this particular profile before, so I also needed to set up a key and config to deploy and run things from my local command line. Instructions for that are buried a bit in the related AWS docs page, but you can
- Click on your user in the right corner of the AWS console,
- Choose
Security credentialsfrom the options, - Then click the
Create access keybutton under theAWS IAM credentialstab. - Once that’s complete, you can copy the format of the credentials file from this AWS docs page.
With those fixes in place, going back to run the 1-create-bucket.sh script in the Github repo instructions yielded success! Yay!
Now, can we verify it actually created the S3 bucket? If you log into your AWS account via a web browser, we can choose the Services option in the upper left of the menu bar and choose Storage -> S3. At first, I didn’t see anything in the list under Buckets, but my AWS Console was pointing to the wrong AWS region.
To change the region view that you’re seeing, click on the Global option in right of the menu bar (next to your user option) and choose the region that you set in your cli settings. In my case, because I specified region=us-east-2 in my config file settings above, then that’s the region that the cli is interacting with. I chose us-east-2 (US East (Ohio)) in the browser, and I could then see the bucket was there (may require reloading the page).
Deploy
Next, I ran the script to deploy the project to AWS — 2-deploy.sh. This one failed for me the first time because the default uses Gradle (which wasn’t installed for me). Earlier in the instructions, the requirements stated that you need either Maven OR Gradle, and the next bit of code tells you to specify mvn in your command if you want to use Maven.
I missed this, so I installed Gradle. At least I have both now. 🙂
Note: to install Gradle, I followed the official install instructions. They offer SDKMan! and Homebrew installations, but I went with SDKMan!. Install: sdk install gradle 7.3.3 and check version of gradle: sdk list gradle.
After installing Gradle, I re-ran the 2-deploy.sh script, and everything was successful! The script packages the project and puts the packaged .jar file in the S3 bucket we created in the last script.
I can verify this by going to the AWS console in my browser, choosing the Services option in the menu bar, and clicking on Compute -> Lambda. Under the Functions section, you should see one named something like java-basic-function-<randomID>.
That looks good! Time to run the function itself!
Invoke the Function
The next set of instructions on the Github project readme tell us how to execute the function code. When I ran the 3-invoke.sh script, it executed successfully on the first attempt (to my relief!). I let it output the results three times, then terminated the script using Cmd+c.
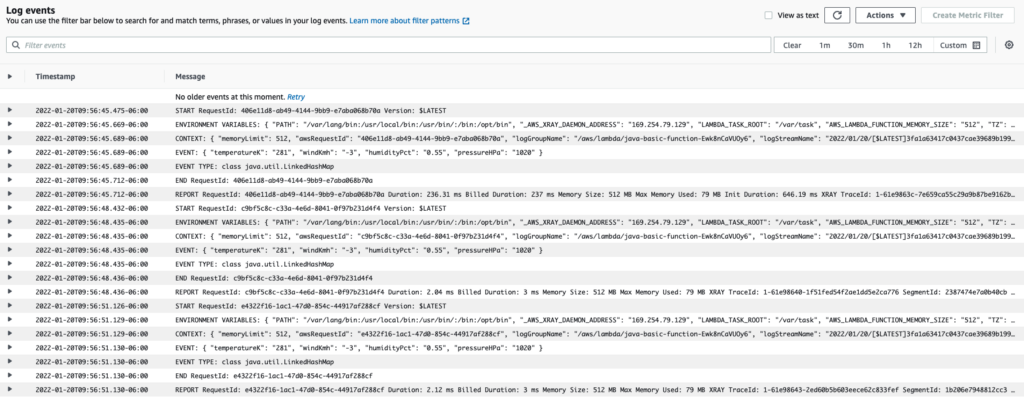
It was outputting expected results to the console, but was it also pushing logs to the CloudWatch AWS service, as expected?
In the AWS console, under our Lambda, we can choose the Monitor tab, then Logs tab. It will show a list of log streams from the times you have executed the function. The list should be sorted with latest on top, so you can click the top event and see the log output from the function!
Now that the plain, vanilla version of the code is operating as expected, we can make our adjustments to put Neo4j into the mix!
Combining Bits of Code
If you followed the article linked earlier to set up a free database with Neo4j AuraDB free tier, then you should have the database and the movies data set ready to go.
Reminder: you will need the password that gets generated when you create a database.
From the AuraDB console, if you click on your database, four tabs appear beneath it. The Connect tab shows examples of small applications for five different programming languages (Python, Javascript, Java, .Net, Go) and two higher level approaches (GraphQL, Spring Boot).
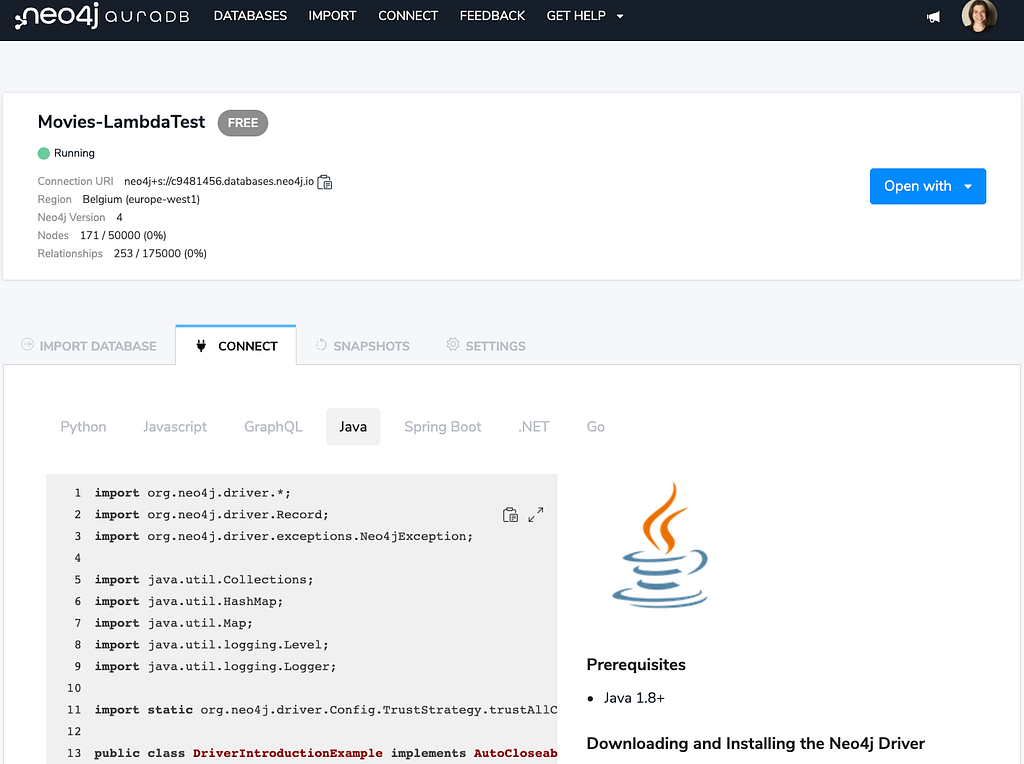
Since we want to connect Lambda and Neo4j using Java, I have the Java tab selected. This code gives us a good template that we can use to copy/paste the needed pieces into our Lambda code.
First, we need to add Neo4j as a dependency. Whether you put the dependency in the build.gradle or the pom.xml file will depend on whether you chose to run the Lambda using Gradle or Maven. Because I went with Gradle this round, I’ll add the following to the build.gradle file under the dependencies section:
dependencies {
  implementation 'org.neo4j.driver:neo4j-java-driver:4.4.0'
  //remaining dependencies
}
If you are working with Maven, the pom.xml file addition would be as follows in the dependencies section:
<dependencies>
  <dependency>
    <groupId>org.neo4j.driver</groupId>
    <artifactId>neo4j-java-driver</artifactId
    <version>4.4.0</version>
  </dependency>
  <!-— remaining dependencies -->
</dependencies>
Syntax for both of these is also available on Neo4j’s Java developer guide.
Using Neo4j from Java – Developer Guides
AWS Lambda Code
Before we start tweaking the code, let’s first understand what the existing Lambda code is doing. The default class that gets executed is the Handler.java class, as that’s what is specified in the template.yml file.
https://medium.com/media/a640544d36503638e1d6e6b44f5cc552/href
The repo mentions this under the Configure Handler Class section. The default worked great for our initial test, but the class implements RequestHandler, which expects an event of an input type of Map<String,String> and an output type of String. Since I wasn’t sure exactly what we’d be dealing with for the Neo4j database, it’s probably easiest to work with JSON objects both in and out.
In that case, we can use the HandlerStream.java to work with input and output stream objects. The input/output details are spelled out a bit better in the AWS documentation.
In order to run this code, we need to make a quick change to the template.yml file to execute the HandlerStream class, rather than the default Handler.
function:
  Type: AWS::Serverless::Function
  Properties:
    CodeUri: build/distributions/java-basic.zip
    Handler: example.HandlerStream
The HandlerStream class starts with a variable called gson that will serialize and deserialize JSON objects in input and output. Then, it creates a custom implementation of the handleRequest() method (using @Override annotation) with the expected input, output, and context parameters.
This Lambda uses a .json file for the input and output so that we don’t have to specify the literal JSON on the command line when we invoke the function. We can see this in the aws command at the end of the 3-invoke.sh script (--payload file://event.json out.json).
Because we’re reading and writing to files, we need to be able to read and write to them in the Java function. The first three lines of code in the handleRequest() method set up these variables, along with the logger that sends info to CloudWatch logs.
https://medium.com/media/79933fe62be50c505e5096ae2092e183/href
We use a try ...catch block to attempt the next set of commands.
In the try section, we first read the input stream into a Object and assign it to the variable event. Then, we output a couple messages to the logs to help us troubleshoot the input, if needed.
Note: I personally found using logger.log() messages to be super helpful when debugging Lambdas. I could print the input and output objects with any transformation steps to figure out what the data actually looked like.
We then write the event that we just read to the output stream with writer.write(gson.toJson(event)).
Then closes the try section, catches and logs any errors in the catch block and closes the streams.
Now that we understand what the existing Lambda code is doing, we can start adding in the Neo4j-relevant bits to connect to AuraDB and run a query.
Connecting to Neo4j
First, we need to set up the connection details to the database. The example code from the AuraDB console gives us some syntax (in main() method) that we can copy/paste for that. It’s easiest to create a global instance of the driver, so I put the connection code right below the gson variable assignment.
The uri variable should fill in your database’s URI, but you can also copy/paste that from the database information listed on your database instance in the console. Since the default username is neo4j, we can assign that to the user variable. You will need to copy/paste the password from when you created the database as the value for the password variable.
For a global instance of the driver, I changed the code a bit from what shows in the AuraDB console. I created a private final variable for the driver, then assigned it using the graph database driver method and passed in the database uri, auth details, and any config (defaults). Now we have an instance of the driver we can use to connect to Neo4j!
https://medium.com/media/c6b945057a02e05b3bc1209d56b84bca/href
*Note: ideally, you should store these values in environment variables for security and populate them from the config. More info: https://docs.aws.amazon.com/AWSCloudFormation/latest/UserGuide/aws-properties-lambda-function-environment.html
The next lines of Lambda code for the handleRequest method stay the same in the method signature and set up of logger, reader, and writer variables. The first lines of the try block also are consistent, since we want to read the input file, this time into a Map and log it before we do anything with the database. Now it’s time to write our Cypher query that we want to execute against Neo4j.
Our Neo4j database contains the movies data set, which has movies and persons who acted in/directed/etc particular movies. I want to reuse as much existing code as possible, so I used the query in the AuraDB console Java code (lines 57–61). 🙂
https://medium.com/media/c6b945057a02e05b3bc1209d56b84bca/href
Note the one change is the parameter that is passed (last line). In the AuraDB code, we pass a String value into the findPerson method, and that parameter is what we pass into the params variable here. However, since I wanted to avoid a separate method for now, I need to pass in a string value from our input JSON file. This means I need to change the input file (event.json) with a person’s name. Many of the Neo4j queries with the movies data set use Tom Hanks, so let’s search for him.
The event.json file already has the JSON structure we need, so we just need to modify the keys and values for our parameter. The JSON file should look like shown below:
{
  "name": "Tom Hanks"
}
I went back and added a logger.log message to verify that the JSON passed to the event matches the input file. Using my IDE’s code auto-completion, I typed in the event. and chose get(Object key) option so that I could specify a Map key.
Since I know I will be passing a name value as a string, I can type "name" for the key, then ensure the value is a string by using the toString() on the end. I checked that logger output in a test run and used that syntax to pass in as the Cypher query parameter.
It’s time to run the Cypher query against Neo4j now!
Back in the AuraDB console (line 63), the code wraps the call in a try...catch block, creates a session, sets up a Record variable, then uses a Java lambda expression to run the query in a read-transaction and return the results.
Keeping with our copy/paste theme, I inserted lines 63–73 from the AuraDB console into our function and tweaked a couple of things. First, I wanted to write results back to our function’s output stream, so I moved that bit of code into the try block right after the query gets executed. I also needed to change the logger in the catch block because I want to send any errors to the Lambda logger in CloudWatch with our other messages. Removing the exception throw for Neo4j means it will just get logged to CloudWatch, which aligns with our other errors.
Note: to get the output file format just right, I used a couple logger.log() messages to first output the whole record object, then format that using the record.asMap() method. This returns the pretty JSON output we see in the out.json file.
Our updated try...catch block looks like below:
https://medium.com/media/c6b945057a02e05b3bc1209d56b84bca/href
out.json file:
{
  "name": "Tom Hanks"
}
Note that this output also turns out the same as our input JSON! 🙂 Now we can test our solution by running the following scripts at the command line:
java-basic$ ./2-deploy.sh
java-basic$ ./3-invoke.sh
The first script re-packages and deploys the .jar file to our S3 bucket, then the next script calls the function. We should see some output in our console, and I waited until I got the output two or three times before terminating the script using ctrl+c.
Console output at the command line is as follows (repeated as many times as we let it run):
{
  "StatusCode": 200,
  "ExecutedVersion": "$LATEST"
}
{
  "name": "Tom Hanks"
}
Lastly, I checked the output in my AWS console through the CloudWatch service.
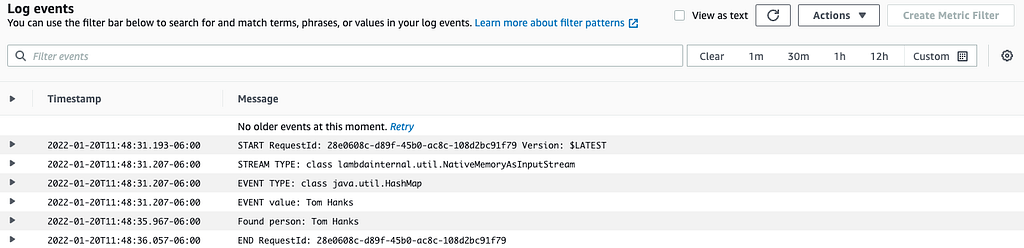
Wrapping Up
Congratulations! We have successfully written an AWS Lambda in Java to run a query and return results from a Neo4j graph database in the cloud.
We used the existing AWS Lambda example Java application with an existing Java program in the AuraDB console for connecting to Neo4j.
We used JSON in input and output files so that we could read custom parameters to the query and output the return results from the database.
We were able to copy/paste nearly everything with customizations on 5 lines (HandlerStream function in .yml, global driver instantiation, event value logger message, input .json file, and the value passed to the params query variable).
There are many things we could do from here, such as creating a whole event pipeline, passing input or output to/from other systems, creating functions to write to Neo4j, and more!
As always, if you have any questions or improvements, feel free to contact me/us through our community forum!
Happy coding!
Resources
- Github project: Java AWS Lambda with Neo4j
- AWS Lambda example app: Java-basic
- AWS Lambda docs: Working with Java
- Free cloud Neo4j database: AuraDB
- AuraDB code: Java example app
Toolbelt Trifecta: Connecting to Neo4j with Java and AWS Lambda was originally published in Neo4j Developer Blog on Medium, where people are continuing the conversation by highlighting and responding to this story.
Share Article


Explore
Related Articles
Text2Cypher Across Languages: Evaluating Foundational Models Beyond English