Getting Started with Neo4j using .NET
Welcome to your first steps in using Neo4j with a .NET application!
In this tutorial, we will walk through the first steps required to get up and running and how to start querying a Neo4j database using the Neo4j .NET driver. The focus will be on starting to use the .Net driver rather than delving into the wonderful world of Cypher, the Neo4j query language.

Setting Up Our Database Instance
To keep things as straightforward as possible, we will use a convenient demo database hosted by Neo4j.
In your browser, open https://demo.neo4jlabs.com:7473/browser/.
Then use the following credentials to connect to an instance:
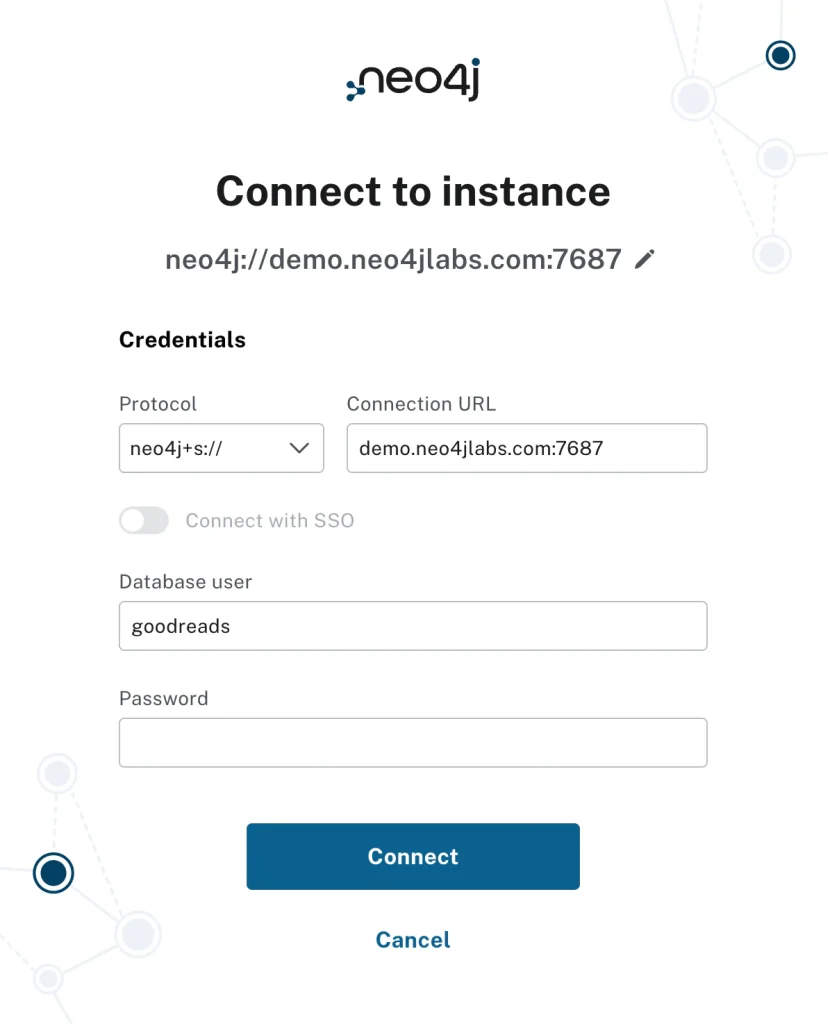
- Protocol: neo4j+s
- Connection URI: demo.neo4jlabs.com:7687
- Username: goodreads
- Password: goodreads
You will now find yourself in the Neo4j browser interface. You can verify that the dataset is running by calling the following Cypher in the command prompt.
goodreads$ CALL db.schema.visualization
You should see a visualization of the data model returned.

Please note that this database is read-only, so it is suitable for our purposes here. When you wish to start adding to and updating your graph, you can either make use of your own free Neo4j Aura cloud instance at: https://console.neo4j.io/. Or, if you wish to run locally on your machine, download Neo4j Desktop from https://neo4j.com/deployment-center/.
Let us now move on to our .NET development.
Requirements
There are two requirements for developing a .NET application to connect to Neo4j:
- A version of .NET installed on your computer. We recommend the latest for convenience.
- The latest version of the Neo4j .NET driver package installed as a dependency in your project.
There are many IDEs for .NET development, and most of them have the functionality to create and configure a project. Please feel free to use your favorite, whether that is Visual Studio Code, Ryder, or something else.
Setting Up The Project
To make this tutorial agnostic to the vagaries of differing IDEs, we will use the command line to set things up. This example was done on a Mac in the terminal, so the exact commands may vary depending on your OS.
First, we will create the directory and project for a console application. Navigate to where you want the project to live (my Git directory, in this instance) and then run the following command:
Me@My-MacBook-Pro Git % dotnet new console --output Neo4jTutorialCode language: Shell Session (shell)You will see the following output:
The template "Console App" was created successfully.
Processing post-creation actions...
Restoring /Users/andrewheap/Git/Neo4jTutorial/Neo4jTutorial.csproj:
  Determining projects to restore...
  Restored /Users/andrewheap/Git/Neo4jTutorial/Neo4jTutorial.csproj (in 23 ms).
Restore succeeded.Code language: Shell Session (shell)
Navigate to your project directory:
Me@My-MacBook-Pro git % cd Neo4jTutorialCode language: Shell Session (shell)If you run the ‘ls’ command, you will see the ‘.csproj’ Program.cs file and an obj directory:
Me@My-MacBook-Pro Neo4jTutorial % ls
Neo4jTutorial.csproj	obj			Program.csCode language: Shell Session (shell)
Now add the latest Neo4j Driver package to the project:
Me@My-MacBook-Pro Neo4jTutorial % dotnet add package Neo4j.DriverCode language: Shell Session (shell)This command adds an entry to the Neo4jTutorial.csproj file and downloads the necessary dependencies.
Our First Bit of Code
From here, it doesn’t take much code to get a driver pulling results from the database. The following code snippet is the minimum required.
using Neo4j.Driver;

var driverInstance = GraphDatabase.Driver(new Uri("neo4j+s://demo.neo4jlabs.com"),
AuthTokens.Basic("goodreads", "goodreads")); ①

string queryString = @"Match(b:Book)-[:AUTHORED]-(a:Author {name:'Stephen King'})
RETURN b.title AS Title"; ②

var records = await driverInstance.ExecutableQuery(queryString).ExecuteAsync(); ③
So what is this code doing?
- This is where the driver object instance is created, supplying it with the URI and some basic authentication details.
- Here we have a very simple Cypher query string. This will find all the books that are authored by Stephen King.
- This line is where the query is run, and the results are returned as records. When using the ExecutableQuery API, the results are returned in an EagerResult (See ref: Driver API Reference Documentation).
Let’s Expand It A Bit
In that code example, we have written the minimum lines necessary to keep the code succinct and easy to digest. However, there are a couple of best practices and nice-to-have elements that you should know and incorporate into the code.
using Neo4j.Driver;
using Neo4j.Driver.Mapping;

//Create a driver instance supplying where to connect to and the authentication details
var driverInstance = GraphDatabase.Driver(new Uri("neo4j+s://demo.neo4jlabs.com"),
AuthTokens.Basic("goodreads", "goodreads"));

string queryString = @"MATCH (r:Review)-[:WRITTEN_FOR]->(b:Book)<-[:AUTHORED]-(a:Author)
              	WHERE a.name = $name
               RETURN b.title AS Title, r.text AS ReviewText, r.rating As Rating
               ORDER BY r.rating DESC
            	LIMIT 20"; ①

//Run the Cypher query, supplying it with a target database, required parameters, and //receive back the results mapped to your application specific type.
var bookReviews = await driverInstance
.ExecutableQuery(queryString)
    	.WithConfig(new QueryConfig(database: "goodreads")) ②
    	.WithParameters(new {name = "Stephen King"}) ③
    	.ExecuteAsync()
    	.AsObjectsAsync<BookReview>(); ④

//Do something with the results
bookReviews.ToList().ForEach(br => Console.WriteLine($"Title = {br.Title}")); ⑤

//Domain type declaration
record BookReview(string Title, string ReviewText, int Rating); ⑥
- Here we have a slightly more complex query. The important thing to notice is that we have parameterized it. Always use query parameters instead of hardcoding or concatenating values into queries. This prevents Cypher injections and allows better leveraging of the database query cache.
- This line supplies configuration for executing the query. Through this, we can control several aspects of how the query will be run. In this case, it specifies the database name that should be queried against. This is a best practice as it prevents what we call ‘home database resolution’, which incurs an extra round-trip to the server and thus a performance penalty.
- This supplies the parameters that this query is using.
- Here is an example of a cool feature called object mapping. The driver can automatically take the records it receives and map them into an instance of an object type you declare and supply. In this case, for each record it receives, it will create and populate a BookReview object. This is a highly configurable and flexible system worth exploring.
- In this example, we’ve also added some output. What’s the point of it all if we don’t do something with our data?!
- The final line is where the custom domain type is declared to map the received records.
Retries and an Important Note
We should mention an important feature built into the driver’s ExecutableQuery interface here.
Under the hood, this method is performing retries. This means that if the query fails with a transient error, which can range from a connection failure to a server-side issue, the driver will retry the query. The query is wrapped in a transaction to do this, so normal rollback/commit semantics apply.
Because the query can potentially be run multiple times, it has to be idempotent. This means that the query result should remain unchanged, regardless of how often it is executed. For instance, if you were to generate a value for a node property (perhaps incrementing a counter), and the transaction were to commit successfully, but a connection error occurred, and the driver did not receive the success message for the commit, then a retry would occur, and the counter would be 1 larger than expected. This is not idempotent because the result can end up out of sync.
Summary
In this tutorial, we have introduced the ExecutableQuery API first, as it is designed to be the easiest to get up and running with, whilst also offering a lot of functionality and suiting a great many use cases. You created a starter application using Neo4j and .NET, ran a Cypher query against the database and received results, and then enhanced the application with best practices.
As you continue your development journey, there are a few important details to keep in mind when writing business applications for production:
- ExecutableQuery returns an EagerResult. As the name suggests, this means that all result records are eagerly fetched and stored in memory before being returned, which can have memory implications if your result set is large.
- This API also features several additional capabilities that enable you to perform actions on each record as it is received from the server. Two examples are WithStreamProcessor (which processes each record into a new type as it is received) and WithFilter (which allows a record to be excluded or included in the final EagerResult, depending on your requirements).
- You can specify read or write routing for the query. In a Neo4j clustered environment, such as in Aura, there are leader and follower servers. A write operation, where the query updates the database, will always be directed to the leader node. A read query, where no update is made, can be routed to the leader or the follower nodes. The default is set to write, but if you know it is a read query, then it is a good idea to specify that in the configuration so that you get better server utilization across the cluster.
In another tutorial, we will explore other areas of the driver API that offer more control and flexibility, albeit at the cost of some added complexity: the session and transaction interfaces.
Share Article