Tutorial
Introduction
Neo4j-OGM Movies is an example application that allows you to manage movies, person related to the movies and ratings.
Although the functionality is reduced to show the needed steps to work with Neo4j-OGM, it contains all the layers you would expect to exist in a real world application.
We intentionally decided to not depend on any external framework (like Spring or Quarkus) in this example and exclude e.g. the web part, to avoid the extra bit of complexity those bring with them. As a benefit, we can more focus on the behaviour of Neo4j-OGM.
The complete source code for the application is available on Github.
Building the domain model
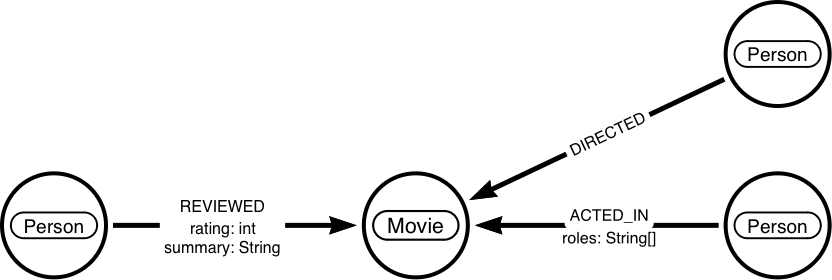
Before we get to any code, we want to whiteboard our graph model. We use https://arrows.app for this.
Our domain will contain Movies, each of it will have Persons in different relationships.
We have the Actors, Directors and Reviewers.
Defining the needed domain classes, results in the following code.
class Movie {
    String title;
    List<Actor> actors;
    List<Person> directors;
    List<Reviewer> reviewers;
}

class Person {
    String name;
}

class Actor {
	List<String> roles;

	Movie movie;
	Person person;
}

class Reviewer {
	String review;
	int rating;

	Movie movie;
	Person person;
}
Whenever a Person acted in a Movie, she or he played a certain or multiple characters (roles).
To model this, we add relationship entities to the model that are known as relationship entity, in this case Actor.
We prepare a similar relationship representation for the Person who reviewed a Movie and call it Reviewer.
Configuring Neo4j-OGM
Neo4j-OGM depends on the Neo4j Java driver for interactions with the database. The driver itself uses the Bolt protocol to communicate with the Neo4j instance.
Dependencies
To start with Neo4j-OGM we need to add the core and Bolt dependency to our project. Even though Neo4j-OGM 4+ only provides support for connections via Bolt, the explicit dependency definition is needed.
<dependencies>
    <dependency>
        <groupId>org.neo4j</groupId>
        <artifactId>neo4j-ogm-core</artifactId>
        <version>5.0.7</version>
    </dependency>
    <dependency>
        <groupId>org.neo4j</groupId>
        <artifactId>neo4j-ogm-bolt-driver</artifactId>
        <version>5.0.7</version>
    </dependency>
</dependencies>
If you are using Gradle or other systems, please do so accordingly.
Refer to Dependency Management for more information on dependencies.
Neo4j-OGM configuration
The configuration of Neo4j-OGM has two parts.
First the definition of the SessionFactory configuration is needed.
This is where you define the database connection.
The most common parameters here are the Neo4j uri and the credentials, you want Neo4j-OGM to use for the connection.
The second step is the application specific definition of the package(s), Neo4j-OGM should scan for eligible domain classes.
Configuration configuration = new Configuration.Builder()
    .uri("neo4j://localhost:7687")
    .credentials("neo4j", "verysecret")
    .build();

SessionFactory sessionFactory = new SessionFactory(configuration, "org.neo4j.ogm.example");
Annotating the domain model
Much like Hibernate or JPA, Neo4j-OGM allows you to annotate your POJOs in order to map them to nodes, relationships and properties in the graph.
Node Entities
POJOs annotated with @NodeEntity will be represented as nodes in the graph.
The label assigned to this node can be specified via the label property on the annotation;
if not specified, it will default to the simple class name of the entity.
Each parent class in addition also contributes a label to the entity.
This is useful when we want to retrieve collections of super types.
Let’s go ahead and annotate all our node entities in the code we wrote earlier.
@NodeEntity
public class Movie {
    String title;
    List<Actor> actors;
    List<Person> directors;
    List<Reviewer> reviewers;
}

@NodeEntity
public class Person {
    String name;
}
Relationships
Next up, the relationships between the nodes.
Every field in an entity that references another entity is backed by a relationship in the graph.
The @Relationship annotation allows you to specify both the type of the relationship and the direction.
By default, the direction is assumed to be OUTGOING and the type is the UPPER_SNAKE_CASE field name.
We’re going to be specific about the relationship type to avoid using the default and also make it easier to refactor classes later by not being dependent on the field name. Again, we are going to modify the code we saw in the last section:
@NodeEntity
public class Movie {
    String title;

    @Relationship(type = "ACTED_IN", direction = Relationship.Direction.INCOMING)
    List<Actor> actors;

    @Relationship(type = "DIRECTED", direction = Relationship.Direction.INCOMING)
    List<Person> directors;

    @Relationship(type = "REVIEWED", direction = Relationship.Direction.INCOMING)
    List<Reviewer> reviewers;
}
Relationship Entities
Sometimes something isn’t quite a Node entity.
In this demo the remaining classes to annotate are Actor and Reviewer.
As discussed earlier, this is a relationship entity since it manages the underlying ACTED_IN and REVIEWED relations between a Movie and Person.
They aren’t simple relationships because they hold properties like roles or summary and score.
A relationship entity must be annotated with @RelationshipEntity and also the type of relationship.
Additionally, it needs a definition of where it comes from (Person) and where it goes to (Movie).
We are also going to indicate to Neo4j-OGM the start and end node of this relationship.
@RelationshipEntity(type = "ACTED_IN")
public class Actor {

    List<String> roles;

	@StartNode
    Person person;

    @EndNode
    Movie movie;
}

@RelationshipEntity("REVIEWED")
public class Reviewer {

    @Property("summary")
    String review;

    int rating;

    @EndNode
    Movie movie;

    @StartNode
    Person person;
}
Identifiers
Every node and relationship persisted to the graph must have an id. Neo4j-OGM uses this to identify and re-connect the entity to the graph in memory. Identifier may be either a primary id or a native graph id.
-
primary id - any property annotated with
@Id, set by the user and optionally with@GeneratedValueannotation -
native id - this id corresponds to the id generated by the Neo4j database when a node or relationship is first saved, must be of type
Long
| Do not rely on native id for long-running applications. Neo4j will reuse deleted node id’s. It is recommended users come up with their own unique identifier for their domain objects (or use a UUID). |
See Node Entities for more information.
Our entities will now also define the @Id fields.
For the Movie we have chosen the title and for the Person the name property.
In a real-world scenario names and titles cannot be seen as unique, but for this example it is enough.
@NodeEntity
public class Movie {
    @Id
    String title;

    @Relationship(type = "ACTED_IN", direction = Relationship.Direction.INCOMING)
    List<Actor> actors;

    @Relationship(type = "DIRECTED", direction = Relationship.Direction.INCOMING)
    List<Person> directors;

    @Relationship(type = "REVIEWED", direction = Relationship.Direction.INCOMING)
    List<Reviewer> reviewers;
}

@NodeEntity
public class Person {
    @Id
    String name;
}
Also, we add the generated internal id references to the relationship entities.
@RelationshipEntity(type = "ACTED_IN")
public class Actor {

    @Id @GeneratedValue
    Long id;

    List<String> roles;

    @StartNode
    Person person;

    @EndNode
    Movie movie;
}

@RelationshipEntity("REVIEWED")
public class Reviewer {

    @Id @GeneratedValue
    Long id;

    @Property("summary")
    String review;

    int rating;

    @EndNode
    Movie movie;

    @StartNode
    Person person;
}Interacting with the model
So our domain entities are annotated, now we’re ready persist them to the graph!
Sessions
The smart object mapping capability is provided by the Session object.
A Session is obtained from a SessionFactory.
We’re going to set up the SessionFactory just once and have it produce as many sessions as required.
The Session keeps track of changes made to entities and relationships and persists ones that have been modified on save.
Once an entity is tracked by the session, reloading this entity within the scope of the same session will result in the session cache returning the previously loaded entity.
However, the subgraph in the session will expand if the entity or its related entities retrieve additional relationships from the graph.
For the purpose of this example application, we’ll use short living sessions - a new session per operation - to avoid stale data issues.
Our example application will use the following operations:
public class MovieService {

    Movie findMovieByTitle(String title) {
        // implementation
    }

    List<Movie> allMovies() {
        // implementation
    }

    Movie updateTagline(String title, String newTagline) {
        // implementation
    }
}
These CRUD interactions with the graph are all handled by the Session.
Whenever we want to run a unit of work, we open the session and do all operations with the same Session instance.
Let’s have a look at the implementations (and the constructor with the SessionFactory instantiation) of the service:
public class MovieService {

    final SessionFactory sessionFactory;

    public MovieService() {
        Configuration config = new Configuration.Builder()
            .uri("neo4j://localhost:7687")
            .credentials("neo4j", "verysecret")
            .build();
        this.sessionFactory = new SessionFactory(config, "org.neo4j.ogm.example");
    }

    Movie findMovieByTitle(String title) {
        Session session = sessionFactory.openSession();
        return Optional.ofNullable(
                session.queryForObject(Movie.class, "MATCH (m:Movie {title:$title}) return m", Map.of("title", title)))
            .orElseThrow(() -> new MovieNotFoundException(title));
    }

    public List<Movie> allMovies() {
        Session session = sessionFactory.openSession();
        return new ArrayList<>(session.loadAll(Movie.class));
    }

    Movie updateTagline(String title, String newTagline) {
        Session session = sessionFactory.openSession();
        Movie movie = session.queryForObject(Movie.class, "MATCH (m:Movie{title:$title}) return m", Map.of("title", title));
        Movie updatedMovie = movie.withTagline(newTagline);
        session.save(updatedMovie);
        return updatedMovie;
    }
}
As you can see in the updateTagline method, the Session gets opened right at the start to have the loading
and persisting operation within the same instance.
When the service fetches all Movies, the default load depth of 1 gets applied to the operation.
A higher value does not have any impact on our example because we are just loading Movies and their direct neighbours.
The chapter on load depth gives you more insights of the default behaviour
of relationship traversal.
Custom queries and mapping
As you have already seen, we have used custom queries with Session#query to fetch a Movie by title.
Sometimes you end up with data returning from your query that does not fit into one of the entities, you have defined previously.
Let’s say, we want to collect the average rating of a Movie joined with all reviewers.
Sure we could do this also in the application itself but preparing data on the database side has not only the benefit of
reducing the data over the wire, but also it’s something the database can do much faster in most of the cases.
public record MovieRating(String title, float rating, List<String> reviewers) {
}
Adding another method to our service including the custom query results in:
List<MovieRating> getRatings() {
    Session session = sessionFactory.openSession();
    List<MovieRating> ratings = session.queryDto(
        "MATCH (m:Movie)<-[r:REVIEWED]-(p:Person) RETURN m.title as title, avg(r.rating) as rating, collect(p.name) as reviewers",
        Map.of(),
        MovieRating.class);
    return ratings;
}
Conclusion
With not much effort, we’ve built all the services that tie together this application. All that is required is adding controllers and building the UI. The fully functioning application is available at Github.
We encourage you to read the reference guide that follows and apply the concepts learned by forking the application and adding to it.