Neo4j Browser User Interface Guide
Welcome to Neo4j Browser
This article demonstrates how to use the Neo4j Browser for querying, visualization, and data interaction.
Please have Neo4j downloaded and installed. It also helps if you have read the section on graph databases.
Install Neo4j Browser
If you haven’t already, download Neo4j.
Using the provided instructions (shown when downloading), follow Step 1 to install and start the Neo4j Desktop application.
Alternatively, after downloading the zipped server-only package, instructions can also be found in the readme (bin/neo4j start) after unzipping the downloaded file.
Step 2 on the download page instructions shows you how to set up your first project and database and how to open the Neo4j Browser.
Just to review, so far, we have shown two ways to interact with Neo4j.
1) From Neo4j Desktop, you can open Neo4j Browser. This is done by clicking <your project name> in the Desktop screen, then click Manage on your database.
2) You can also access this from a regular browser window by typing https://localhost:7474 and signing in with Username: neo4j, Password: <your database password (set up in Desktop)>.
Now that we can access the graph database, we can start working with data using our query language, Cypher.
For an introduction to Browser’s features and navigation as Neo4j’s user interface, you can type :play intro into the command-line and press Enter or click the play button (![]() ).
).
Feedback & Questions
If you have feedback or questions on how to use Neo4j Browser, there is a small messaging system in the configuration () drawer. You can provide your name and send us a message.
Neo4j Browser Sync
Neo4j Browser Sync is a feature that allows you to synchronize your favorites, styling, and settings to cloud storage, so you can share it across machines and browsers.
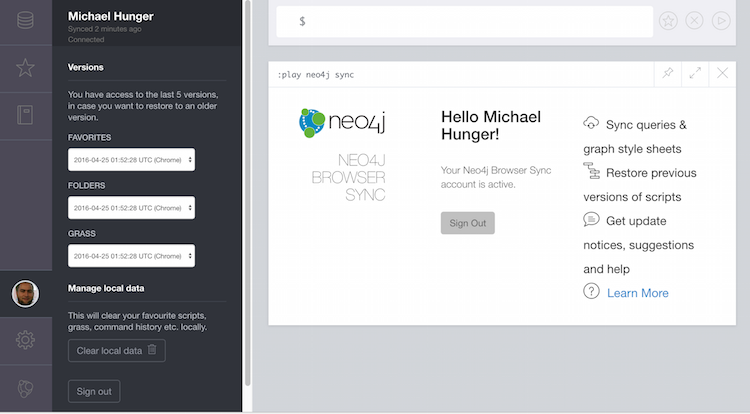
You just need to click the cloud icon in the left-side menu and log in with your GitHub, Twitter, or Google account and synchronize your workplace to the cloud.
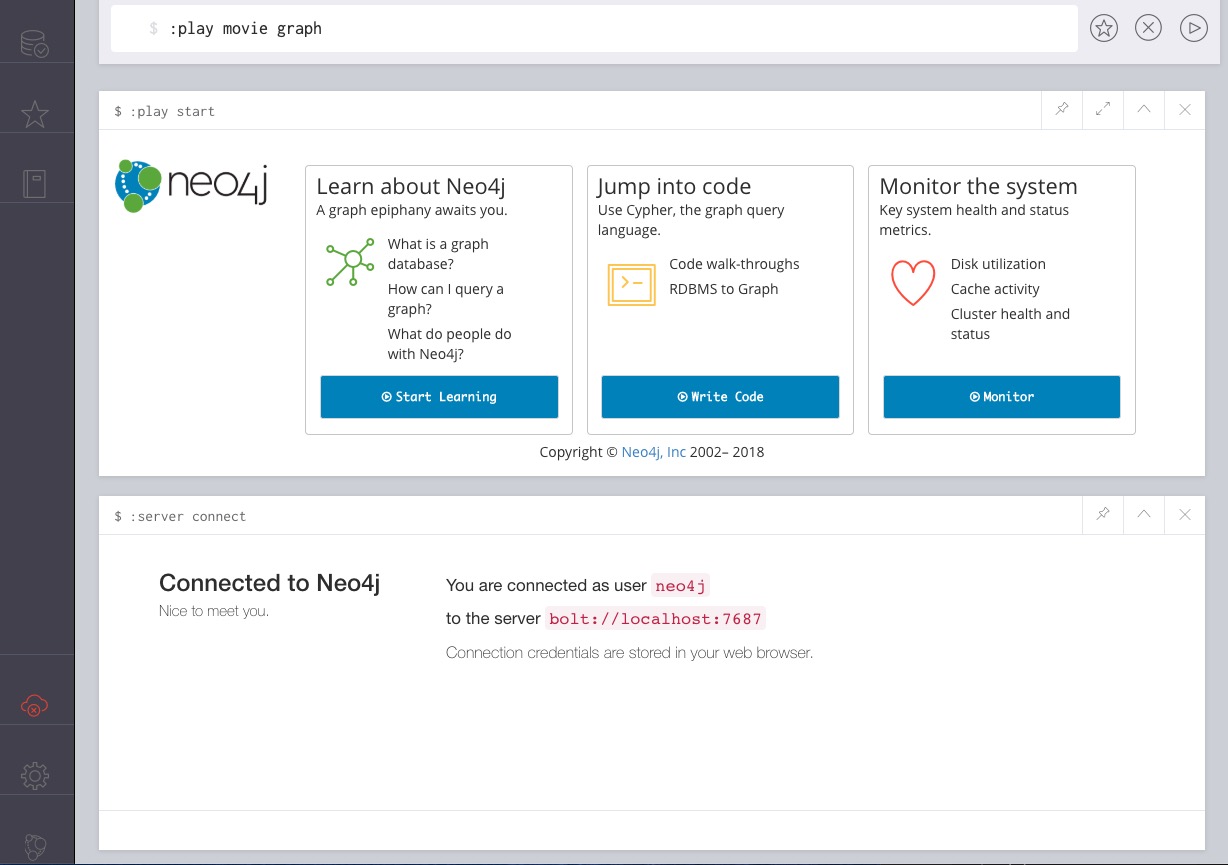
Built-in Guides
If you want to learn more about Neo4j, Cypher, or Neo4j Browser before diving in, click on any of the helpful links shown after startup (commands also shown below). These are quick guides that introduce the different concepts. You can find more helpful links in the left sidebar of Neo4j in the "Documents" tab ().
To pin a particular pane to the top of the window (under command line) so that it stays at the top when you run queries after it, just click the pushpin button (![]() ).
This is especially helpful for pinning guides to the top so they do not get pushed down to the bottom of the window as you run queries.
).
This is especially helpful for pinning guides to the top so they do not get pushed down to the bottom of the window as you run queries.
Title |
Description |
Command |
Intro |
A guided tour of Neo4j Browser |
|
Concepts |
Graph database basics |
|
Cypher |
Neo4j’s graph query language introduction |
|
The Movie Graph |
A mini graph model of connections between actors and movies |
|
The Northwind Database |
A classic use case of RDBMS to graph with import instructions and queries |
|
Custom Guides |
Use :play <url> to play a custom guide (custom guide documentation) |
|
All you have to do is enter any of the above commands in the Browser command line (at the top of the pane) and follow the accompanying guides to walk through the training or scenarios. Guides are presented as slideshows that can be navigated by clicking the forward and back arrows in the pane to progress to the next or previous slide. To execute any of the queries provided within a Browser guide, simply click on the query, and it will populate in the command line. Then, just press Enter or the Play button to execute the statement! Results of the query will populate in a panel right below the command line.
The full list of available browser guides is documented on another guide. You can also create your own custom browser guides to share learning with colleagues, students, and others in the community.
Styling Neo4j Browser Visualization
As mentioned above, any queries you run in Neo4j Browser will populate your results below the command line. Query results are rendered either as a visual graph, a table format, or an ascii-table result. You can switch between those with the icons on the left side of the result frame. If you cannot see the whole graph or the results display too close together, you can adjust by moving the visual view and dragging nodes to rearrange them. To move the view to see more parts of the graph, just click an empty spot within the graph pane and drag it. To rearrange nodes, you can click and drag them around.
The nodes will already have sensible captions assigned by the browser, which auto-selects a property from the property list to use as a caption. You can see all the properties of that element if you click on any node or relationship. Properties will appear below the visualization. Larger property sets might be collapsed into a subset, but there is a little triangle on the right to unfold them.
For example, if you click on one of the Movie nodes in the MovieGraph (:play movie graph), then you can see its properties below the graph visual.
The same applies for Actor nodes or the ACTED_IN relationships.
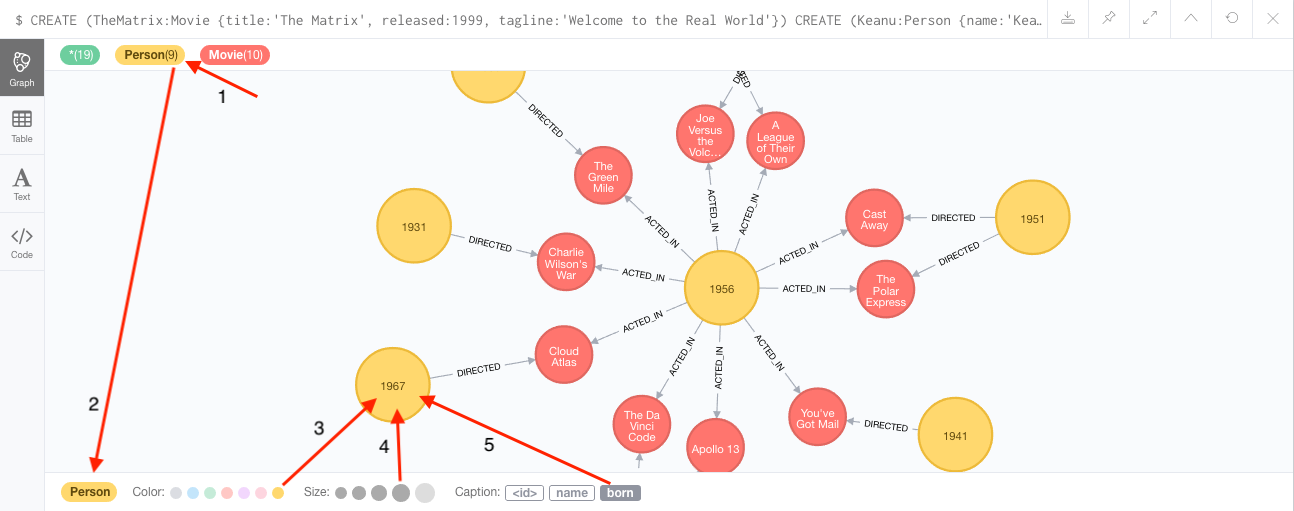
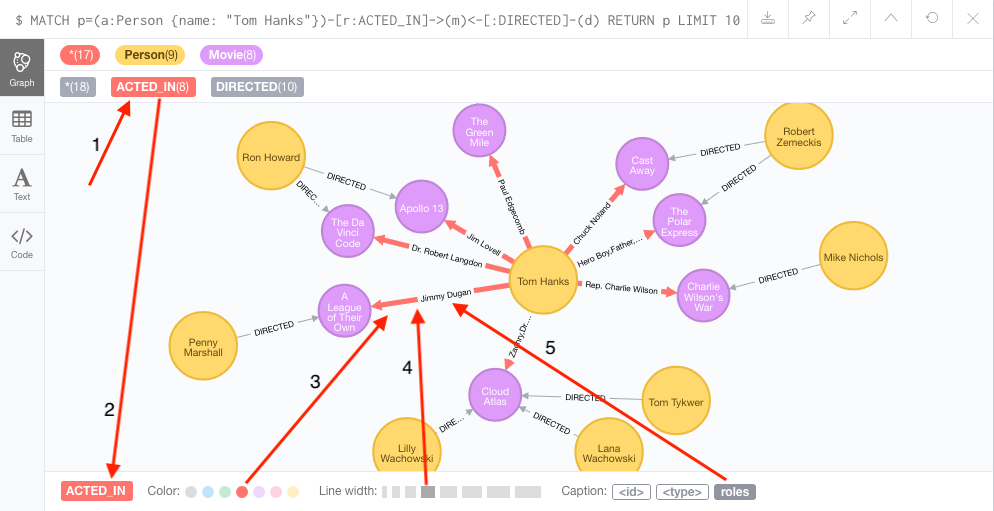
If you click on any label or relationship above the graph visualization, you can then choose its styling in the area below the graph.
Colors, sizes, and captions are selectable from there.
To see this for yourself, you can click on the Person label above the graph and change the color, size, and captions of all nodes labeled with Person.
The first image below shows changes to nodes labeled Person. The second image shows changes to relationships labeled ACTED_IN.
Useful Commands and Keyboard Shortcuts
| Shortcut | Purpose |
|---|---|
|
Help System |
|
Useful Commands |
|
Clear Frames |
|
Styling Popup & Reset |
|
Keyboard Help |
Ctrl+Enter or Cmd+Enter |
Execute Statement |
Ctrl+Up or Cmd+Up |
Previous Statement |
Shift+Enter |
Enter Multiline Mode |
/ |
Move Focus to Editor |
ESC |
Toggle Editor to Full Screen |
Query and Command-Line Tips
You can remove all accumulated output frames with :clear. The 'X' button at the top right of each pane removes that frame and aborts a (long-)running statement.
The maximum number of frames that are kept is configurable in the Browser Settings from the left-side menu.
If you want to review a past query, you can find the result pane and click the query above the graph visualisation to pull it back into the editor. The keyboard shortcuts listed above will help you work efficiently within the editor area.
You can also write and edit multi-line queries by switching to multi-line editing mode with Shift+Enter, then Enter will create newlines. You then need to run Ctrl+Enter or Cmd+Enter to run multi-line queries.
Ctrl+Up and Ctrl+Down (Mac users, use the Cmd key) allows you to navigate command history, and you can access all command history with :history.
The command history is persisted across Browser restarts.
You can put several Cypher statements into the command line input (with semicolons to separate statements) and run as a block by enabling the multi-statement query setting.
To do this, go to the Settings tab on your Neo4j Browser window and make sure the box is checked for Enable multi statement query editor.
These steps are shown in the image below.

You can switch between Graph, Table, Text, and Code views to see the results in various formats by clicking the icons on the left of each pane.
Query time is reported in the Table or Code views (don’t rely on that exact timing though), and it includes the latency and deserialization costs, not just the actual query execution time.
You can also download the results as a CSV from the Table, Text, and Code views or download the graph as an SVG or PNG from the Graph view, as shown below.


If you enter fullscreen mode of a graph visualization, you can zoom in and out. After a node is clicked, it gets a halo, where you can expand and remove nodes from the visualization. You can also turn previously dragged nodes loose again.
Graph Metadata
In the left-side menu, the top icon is the database section (), where you can find the currently used node labels, relationship types, and property keys. Clicking on any one of those options runs a quick query to show you a sample of the graph with those elements.
Setting Favorites
If you currently have an empty frame, you can display some nodes and relationships by using the Favorites () in the left-side menu.
Neo4j stores a few default favorites to get you started.
Just click on the Basic Queries, then choose Get Some Data and run the query.
This executes the statement MATCH (n) RETURN n limit 100, which fetches some nodes.
You can save your own queries as favorites by "starring" them. Just populate the Browser command line with the query you want to favorite, then click the Favorites () icon to the right of the command line. This will add the query to your Favorites list in the left-side menu. To run one of your Favorites, click on the left-side menu Favorites, choose the query, and run it.
To provide a title or helpful info, you can use a comment // comment above your query to provide a title.
The Favorites menu uses your comment as the query name.
Creating folders can help organize your favorites, and you can rearrange them by dragging or delete them if they are no longer useful.
| Your favorites, settings, and styles can be saved to the cloud with Neo4j Browser Sync. If you clear your Browser cache, your local favorites will be removed. |
Advanced Styling
For more advanced styling, you can bring up the style-viewer with :style and copy/paste the graph-style-sheet (GRASS) that is returned.
You can edit this stylesheet offline, save the file as a .grass file, and drag it back onto the drag-area of the viewer.
You can reset to the default styles with :style reset.
|
Within the GRASS file, you can change colors, fonts, sizes, outlines, and titles per node label and relationship type.
It is also possible to combine multiple properties into a caption with caption: '{name}, born in {born}';

Configuration
The defaults for all the settings can adjusted at any time by going to the configuration option on the left-side menu. Some possible config changes and views are listed below.
-
You can retrieve the current configuration with
:config. -
Individual settings are configured with the following defaults:
-
:config maxNeighbours:100- maxiumum number of neighbours for a node -
:config maxRows:100- maximum number of rows for the tabular result
-
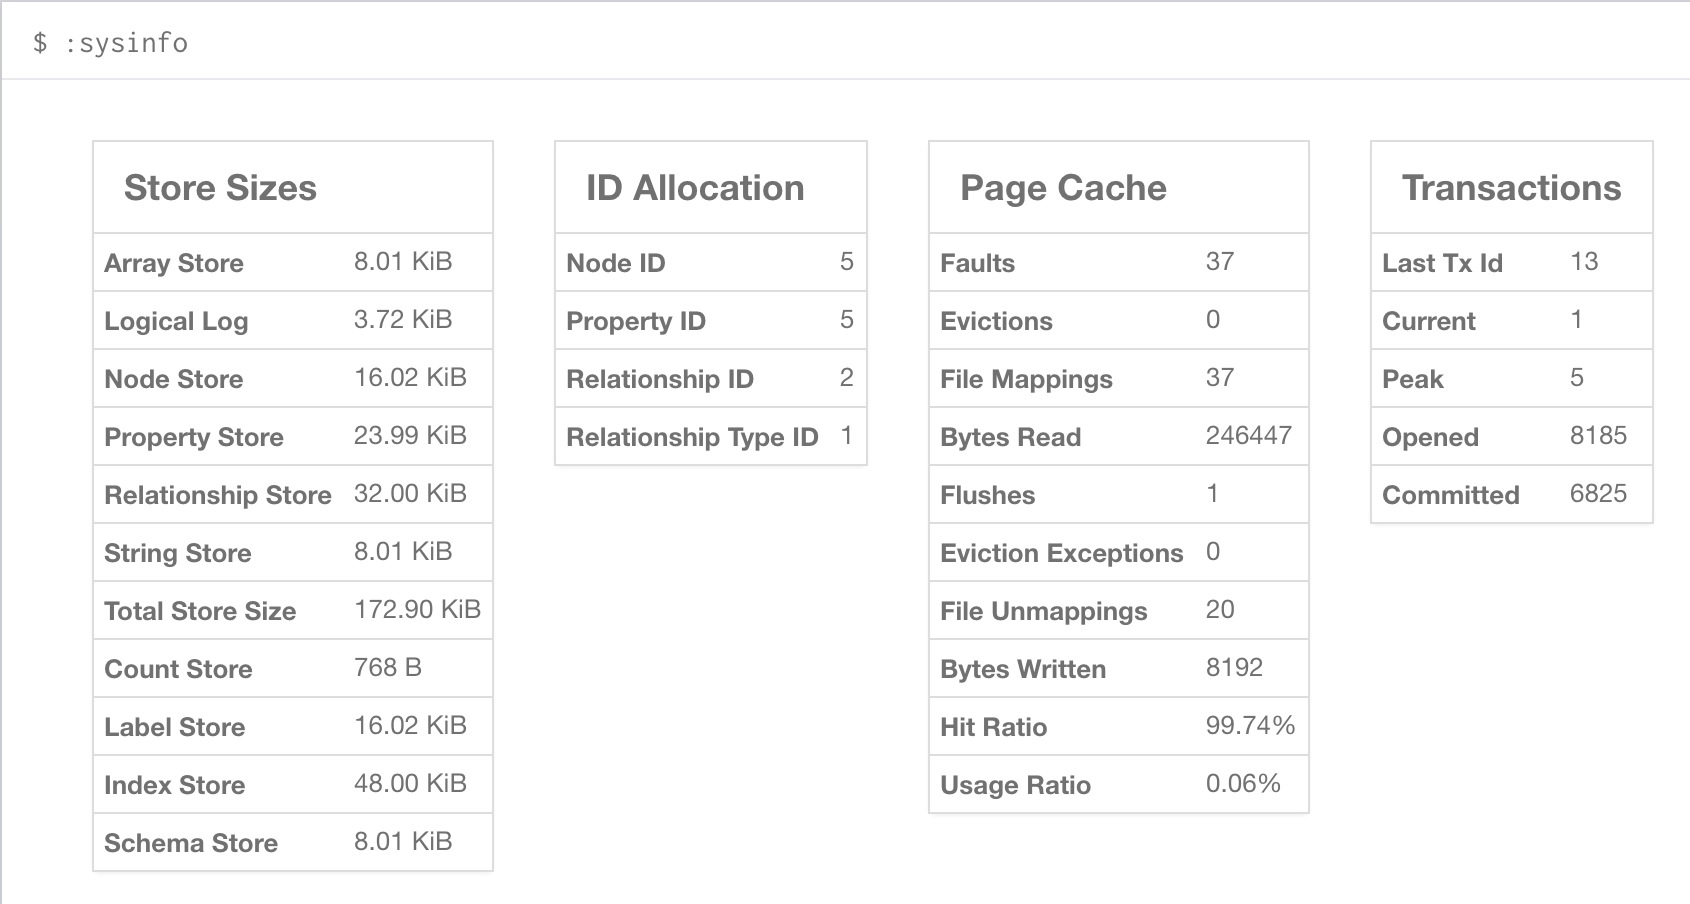
You can also see current stats on your database, such as store sizes, ID allocation, page cache, and transaction info.
To do this, just type the command :sysinfo on the command line.
Executing REST requests
You can also execute REST requests with Neo4j Browser. The command syntax is :COMMAND /a/path {"some":"data"}.
The available commands are :GET, :POST, :PUT and :DELETE.
A simple query like :GET /db/data/ inspects the available endpoints of the database, with the returned results formatted in JSON.
Then, you can retrieve all labels in the database with :GET /db/data/labels.
To execute a Cypher statement, you post to the transaction Cypher endpoint like this:
:POST /db/data/transaction/commit {"statements":[
     {"statement":"MATCH (m:Movie)  WHERE m.title={title} RETURN m.title, m.released, labels(m)",
      "parameters":{"title":"Cloud Atlas"}}]}
There are endless possibilities to send and retrieve data using REST. In a later guide, you can create an application to interact with Neo4j and use REST endpoints for interaction between you and the database. See the Language Guides section for more information.
Is this page helpful?