How to Set Up GitOps for a Full-Stack App with Flux & Helm on Kubernetes

DevOps Engineer, Neo4j
10 min read

Managing infrastructure can be a pain, so much so that there are many attempts to make configuring, provisioning, and managing infrastructure a breeze. But where they all fall short is simplicity. To make things easier to work with, we want our infrastructure to be immutable, idempotent, scalable, and represented declaratively for reproducibility.
We want our infrastructure to be immutable so that when we deploy our infrastructure definition, we understand if a specific configuration produces a healthy state or not. If you were to log in to a running production machine and make changes, you would have to make those changes every time you want to redeploy your service. That can cause many headaches if, for example, when people leave the company or go on vacation.
Having your infrastructure immutable helps to keep things isolated and separated. If a configuration is causing issues, you can roll back to a previous configuration easily.
Imagine having many developers dependent on making changes to the environment they are working in, and everyone is making changes to the environment. You can’t be sure that the current state of your development environment will align with the configuration your production environment is running.
Therefore, defining your environment declaratively, these changes can be managed and version-controlled like the rest of your code. Infrastructure changes you’ve done can be deployed alongside new features, bug fixes, etc. It also allows for a simple workflow among teams to have insight into the current state of the infrastructure.

GitOps have been making a lot of noise in the DevOps world the last couple of years and is giving us a lot of automation straight out of the box. One such tool is Flux.
What we want to accomplish:
- Set up a git repository to serve as our single source of truth.
- Setup a helm script to manage our templating for Kubernetes resources.
- Install a full-stack application.
Prerequisites:
- Helm
- Kubectl
- Docker CLI
- Flux
- Eksctl (optional)
- Github CLI (gh) (optional)
- Kompose (optional)
Set Up Your Repository
Most developers have at least once set up a repository from scratch once in their life, so for a change, we will use Github’s new CLI tool to accomplish this, but you can do it any way you please. Github CLI installation instructions can be found here, and how to log in here. So let’s set up a private repository:
$ mkdir fluxcapacitor
$ cd fluxcapacitor
$ gh repo create --private
# Follow the instructions, all defaults should do fine. And take a note of the remote address provided from the output we will use this later: git@github.com:<username>/fluxcapacitor.git
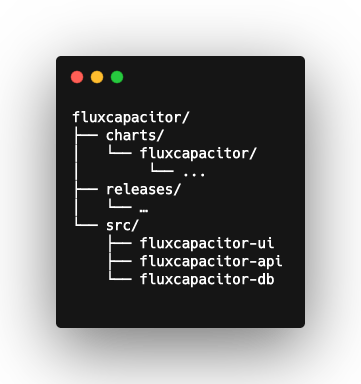
Now some people like to debate Monorepo vs. Multirepo, but I prefer a stack-based repo. So let’s have a look at how we will set up the folder structure.
The “charts” folder will hold our helm charts; in this case, we will make our own.
The “releases” folder will house our Flux releases, and this is where we tell Flux what to apply to Kubernetes. And finally, the “src” folder will host all of our source code for the full-stack application.
Set Up Your Cluster (Optional)
We will be using an EKS cluster for this example but, any Kubernetes cluster should do. We will use the eksctl tools to set up the cluster and Flux integration in one go, but you can find additional instructions on setting up Flux here.
Setting up the cluster:
$ eksctl create cluster -r <aws_region>
$ eksctl enable repo --git-url git@github.com <username>/<repo_name>.git --git-email <git_email> --cluster <cluster_name> --region <aws_region>
Tell Kubernetes Your Secrets
To enable us to access your private git repositories, we need to tell Kubernetes what credentials to use to access your repository. First, you must get a personal access token for Kubernetes. You can follow the instructions here to get one. Then we will embed our access token in a Kubernetes secret to allow Flux to access our repository over HTTPS.
$ kubectl create secret generic git-https-credentials
    --from-literal=username=<username>
    --from-literal=password=<personal_access_token>
Let’s Set Up the Application
We will deconstruct our GRANDstack to make it cloud-ready.
First, make sure you have node and npm installed and ready to go. Then we will use npx to install GRANDstack in our src directory. We will choose to react-ts for our frontend, but you are welcome to use any frontend of your choosing.
$ mkdir src
$ npx create-grandstack-app fluxcapacitor-app
? Please choose which project template to use React-TS
? Install dependencies? No
? Initialize a git repository? No
? Now let's configure your GraphQL API to connect to Neo4j. If you don't have a
Neo4j instance you can create one for free in the cloud at https://neo4j.com/sandbox
Hit <Return> When you are ready.
? Enter the connection string for Neo4j
(use neo4j+s:// or bolt+s:// scheme for encryption) bolt://localhost:7687
? Enter the Neo4j user neo4j
? Enter the password for this user letmein
GRANDstack is a composite project ready for development, but we want to deconstruct it to make it more accessible for our folder structure. So when you have gone through the setup process for the GRANDstack, move the following folders.
$ mv fluxcapacitor-app/neo4j fluxcapacitor-db
$ mv fluxcapacitor-app/api fluxcapacitor-api
$ mv fluxcapacitor-app/web-react-ts fluxcapacitor-ui
Let’s Prepare the Chart
Now you could build your chart from scratch or embed an existing chart, but GRANDstack comes with a docker-compose file that we can convert with a bit of help from a tool called Kompose.
Installing Kompose is quite simple.
# Linux
curl -L https://github.com/kubernetes/kompose/releases/download/v1.22.0/kompose-linux-amd64 -o kompose

# macOS
curl -L https://github.com/kubernetes/kompose/releases/download/v1.22.0/kompose-darwin-amd64 -o kompose

chmod +x kompose
sudo mv ./kompose /usr/local/bin/kompose
Now let’s convert the docker-compose file to a helm chart. First, navigate to the project root, then run:
kompose convert -c -o charts/fluxcapacitor -f src/fluxcapacitor-app/docker-compose.yml
Make Room in Your Registry
Now, Kompose handles a lot of our transformation in the previous step, but since we will not be running our docker images locally, we need a docker registry to host our images. In this example, we will create registries on AWS using its client.
$ aws ecr create-repository --repository-name fluxcapacitor-ui
$ aws ecr create-repository --repository-name fluxcapacitor-db
$ aws ecr create-repository --repository-name fluxcapacitor-api
When running one of these commands, you should get an output that looks something like below, and please take note of the “repositoryUri” for your respective repository.
{
    "repository": {
        "repositoryArn": "arn:aws:ecr:us-east-1:xxxxxxxxxx:repository/fluxcapacitor-ui",
        "registryId": "xxxxxxxxxx",
        "repositoryName": "fluxcapacitor-ui",
        "repositoryUri": "xxxxxxxxxx.dkr.ecr.us-east-1.amazonaws.com/fluxcapacitor-ui",
        "createdAt": "2021-03-10T13:11:20+01:00",
        "imageTagMutability": "MUTABLE",
        "imageScanningConfiguration": {
            "scanOnPush": false
        },
        "encryptionConfiguration": {
            "encryptionType": "AES256"
        }
    }
}
If your using ECR on AWS as we do in this example, don’t forget to log in to your docker client before the next step.
aws ecr get-login-password | docker login --username AWS --password-stdin <xxxxxxxxxx.dkr.ecr.us-east-1.amazonaws.com>
Note that if you have your private docker registry somewhere else, then on ECR, you will have to set up some pull secret or other way for Kubernetes to pull your images.
Now let’s build our services.
$ cd src/fluxcapacitor-api
$ docker build -t xxxxxxxxxx.dkr.ecr.us-east-1.amazonaws.com/fluxcapacitor-api .
$ docker push -t xxxxxxxxxx.dkr.ecr.us-east-1.amazonaws.com/fluxcapacitor-api
Repeat the same process for fluxcapacitor-uiand fluxcapacitor-db.
Refactoring the Chart
First, let’s add values.yaml to the root of the chart charts/fluxcapacitor/values.yamlwith the following structure and exchange the image string with your registry URI for the corresponding repository.
api:
  image: xxxxxxxxxx.dkr.ecr.us-east-1.amazonaws.com/fluxcapacitor-api
db:
  image: xxxxxxxxxx.dkr.ecr.us-east-1.amazonaws.com/fluxcapacitor-db
ui:
  image: xxxxxxxxxx.dkr.ecr.us-east-1.amazonaws.com/fluxcapacitor-ui
In the templates folder, you will find the three deployment templates where you will have to add the change the image string (template.spec.containers.image) to match your values in the templates. An example for the API may look something like below. Make sure also to update the deployment.yamlfiles for DB and the UI.
apiVersion: apps/v1
kind: Deployment
...
spec:
  ...
image: {{.Values.api.image}}
...
So now, let’s have a look at how Flux plays into what we have just set up.
Making It Work with Flux
Add and commit the repository changes and push upstream to the origin master branch.
$ git add .
$ git commit -m "initial commit"
$ git push --set-upstream origin master
Run the Flux precheck command to make sure all dependencies are available.
$ flux check --pre
► checking prerequisites
✔ kubectl 1.18.15 >=1.18.0-0
✔ Kubernetes 1.18.9-eks-d1db3c >=1.16.0-0
✔ prerequisites checks passed
Create a HelmRelease Object
$ flux create hr fluxcapacitor
--source=GitRepository/flux-system
--chart ./charts/fluxcapacitor
--export --values=charts/fluxcapacitor/values.yaml
--target-namespace default > releases/fluxcapcacitor-release.yaml
Now all you have to do is commit your GitHub changes, and Flux will provide your resources.
Here Are Some Pro Tips If You Get Stuck.
Tip 1: Flux checks your repo for changes with a 1–5 min interval. You can force Flux to reconcile directly by running;
$ flux reconcile source git flux-system && flux reconcile hr fluxcapacitor
Tip 2: Flux will only build a new distribution of your chart if you bump the version of the chart, so inside charts/fluxcapacitor/Chart.yaml , you will find the version to bump. Then rerun the command from tip #1 unless you want to wait.
Tip 3: To let the UI access the API, you can add an ingress or load balancer to your service to reach it from the internet. (also update the GRAPHQL_URI environmental variable to point to the URI)
Seeding the Database (Optional)
To seed the database we have deployed, we will use a proxy to our API.
$ kubectl port-forward service/api 4001:4001 &
$ cd src/fluxcapacitor-api
$ source .env
$ npm install
$ npm run seedDb
Accessing https://localhost:4001/graphqlyou can now start querying the endpoint.
Summary
So we finally managed to set up the infrastructure we need to provision templated resources on Kubernetes, and all we have to do is commit them to our repository, and we are good to go. This setup allows us to make sure infrastructure evolves in pace with your application. We can now easily make changes to our infrastructure and better understand how things are defined. Adding some build steps for our building and publishing our docker images, we would be on our way towards a fully automated pipeline. Check out Skaffold and how you can use it for continuous development.
How to Set Up GitOps for a Full-Stack App with Flux & Helm on Kubernetes was originally published in Neo4j Developer Blog on Medium, where people are continuing the conversation by highlighting and responding to this story.
Share Article


Explore
Related Articles
SumoDB in Neo4j: Chaining Multiple Graph Algorithms in Snowflake — Part 3