How to Deploy The Neo4j MCP Server to GCP Cloud Run

Consulting Engineer, Neo4j
14 min read

Learn strategies for deploying the Neo4j MCP server in development and production environments

Introduction
This walkthrough describes how to deploy the official Neo4j MCP server on a GCP Cloud Run instance and connect it to local MCP client applications. Throughout this article we will discuss strategies for production deployments and show a variety of methods for testing our server locally.
GitHub – neo4j/mcp: Neo4j official MCP Server
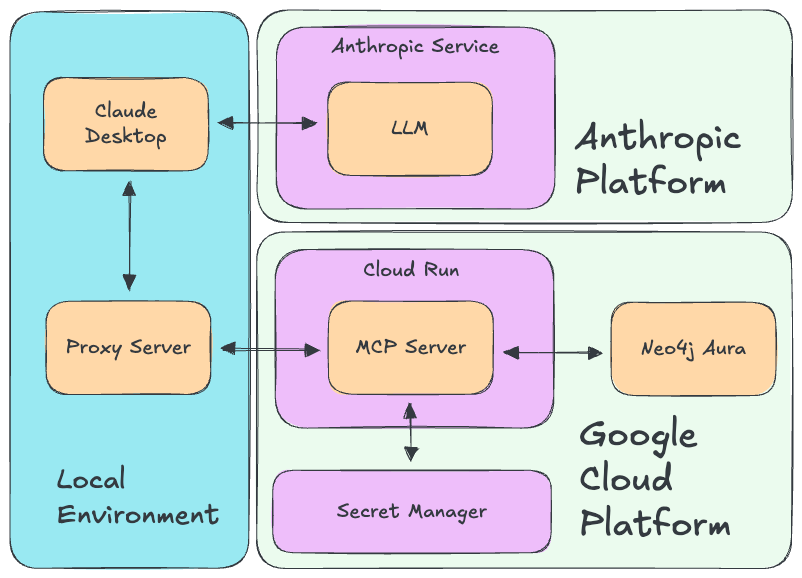
Our final deployment is detailed in the below diagram. This assumes that we will be using Claude Desktop and Anthropic LLMs to utilize our MCP server, but any MCP compatible client application or agent framework, such as Cursor IDE or LangGraph, and LLM service will work just fine. Our Neo4j database may be hosted external to our GCP environment as well, but it must not be a local machine database in order for our hosted MCP server to connect to it. Each component of this architecture will be explained throughout this article.
The Neo4j MCP server is now available on the Docker MCP Registry, so we can deploy it from there (previously you had to build and deploy the Docker image yourself).
This walkthrough was written and tested Jan 22, 2026 with Neo4j MCP v1.2.0
Requirements
There are a few requirements to deploy the Neo4j MCP server to Cloud Run. Please ensure that you have the proper libraries and GCP permissions. You will need a non-local running Neo4j database and the following…
Libraries
- Git
- gcloud CLI
- npm — Optional
GCP Permissions
- Billing enabled
- Cloud Run (Enable API, Create instances)
- Secret Manager — Optional (Enable API, Create secrets)
- Service Account — Optional (Create and update SA permissions)
Testing Application (At least one of the following)
- curl
- Claude Desktop or other MCP Client Application
- Postman
Neo4j Credentials
In order to deploy and connect to the MCP server, we will need the following connection credentials for your Neo4j database.
- Username
- Password
- Instance URI
- Database Name (if not the default neo4j database)
The username and password will be configured in our client application and sent via the auth header in each request. Our MCP server will be deployed and use environment variables to configure the Neo4j instance URI and database name. This means that the Neo4j MCP server will connect to a single Neo4j instance.
Set Up gcloud CLI
We will use the gcloud CLI to configure and deploy our MCP server. Follow these instructions to install the gcloud CLI on your system.
Once installed run gcloud init.
gcloud init
If you already have the gcloud CLI installed, then ensure you are logged in by running gcloud auth login.
gcloud auth login
Confirm you are using the proper GCP project.
gcloud config get-value project
Set the desired project by id.
gcloud config set project <PROJECT_ID>
Ensure that billing is enabled in the set GCP project. You may be prompted to install the billing gcloud CLI extension upon running the following command.
gcloud beta billing projects describe <PROJECT_ID>
Set Up GCP Secret Manager — Optional
We can use GCP Secret Manager to handle our sensitive MCP server configuration details. This step is recommended, but may be skipped and instead we can configure environment variables in a local YAML file that is used when we deploy our Cloud Run instance from the command line.
First ensure that Secret Manager is enabled in your GCP Project. You may enable it from the GCP console. Then we can begin creating our secrets.
You may use the following names for your secrets:
- URI_SECRET_NAME=”neo4j-uri-mcp-demo”
- DATABASE_SECRET_NAME=”neo4j-database-mcp-demo”
Note that we are only creating secrets for our URI and database name. The username and password will be sent with our MCP server requests via the auth header.
Create a secret for our Neo4j Aura URI.
echo -n <NEO4J_URI> |
gcloud secrets create <URI_SECRET_NAME>
 - project=<PROJECT_ID>
 - replication-policy="automatic"
 - data-file=-
You should receive the following message.
Created version [1] of the secret [<URI_SECRET_NAME>].
Now create a secret for the Neo4j database name.
echo -n "neo4j" |
gcloud secrets create <DATABASE_SECRET_NAME>
 - project=<PROJECT_ID>
 - replication-policy="automatic"
 - data-file=-
You should receive the following message.
Created version [1] of the secret [<DATABASE_SECRET_NAME>].
Our other environment variables are not sensitive and so we can configure them when we create the Cloud Run instance.
TLS Certificates
The Neo4j MCP server has a default TLS certificate. If you would like to configure your own TLS certificate for production deployments please see the documentation on the Neo4j MCP Github page.
Deploy to GCP Cloud Run
Create Service Account — Optional
Create a service account to manage the MCP server. While this is optional, it is recommended to use a service account.
gcloud iam service-accounts create mcp-server-sa — display-name=”MCP Server Service Account”
If we are using GCP Secret Manager, we also must grant our service account access to the secrets. Otherwise continue to the next section.
First, grant access to our uri secret.
gcloud secrets add-iam-policy-binding <URI_SECRET_NAME>
 - project=<PROJECT_ID>
 - member="serviceAccount:mcp-server-sa@<PROJECT_ID>.iam.gserviceaccount.com"
 - role="roles/secretmanager.secretAccessor"
You should receive the following message.
Updated IAM policy for secret [<URI_SECRET_NAME>].
And now grant access to our database name secret.
gcloud secrets add-iam-policy-binding <DATABASE_SECRET_NAME>
 - project=<PROJECT_ID>
 - member="serviceAccount:mcp-server-sa@<PROJECT_ID>.iam.gserviceaccount.com"
 - role="roles/secretmanager.secretAccessor"
You should receive the following message.
Updated IAM policy for secret [<DATABASE_SECRET_NAME>].
Deploy MCP Server
Now deploy the official MCP server image from the Docker MCP Registry to Cloud Run.
You may use the following names for this walkthrough. INSTANCE_NAME will be the name of our Cloud Run instance containing the MCP server.
- INSTANCE_NAME=neo4j-mcp-official
If we are not using GCP Secret Manager to handle our sensitive configuration, we can instead use a local YAML file.
Remember that we are not setting our Neo4j username and password as environment variables. These are instead passed in the auth header of a server request.
The env.yaml file is used to configure environment variables in our MCP server. Here we can configure the Neo4j instance and database the server connects to. This file should exist in the same directory you call the gcloud run deploy command from. Below we see example contents for the env.yaml file.
NEO4J_MCP_TRANSPORT: "http"
NEO4J_URI: "<URI>"
NEO4J_DATABASE: "<DATABASE_NAME>"
NEO4J_MCP_HTTP_PORT: "80"
NEO4J_MCP_HTTP_HOST: "0.0.0.0"
Now we can deploy the Cloud Run instance. We use the service account created in the previous step to manage our instance. We also set –no-allow-unauthenticated to prevent unwanted use of our MCP server. All clients attempting to connect to our server must authenticate with their GCP credentials. The minimum number of instances is 0 and max is 1. This may be changed according to your desired configuration.
To make this MCP server public, we may use –allow-unauthenticated to remove the GCP auth requirement. In this case we would want to handle our full auth flow in the MCP server code or other proxy server.
Use the below command to deploy your MCP server to Cloud Run if you are configuring environment variables with a YAML file. Remove the service-account argument if you are using the default service account.
gcloud run deploy <INSTANCE_NAME>
 - service-account=mcp-server-sa@<PROJECT_ID>.iam.gserviceaccount.com
 - no-allow-unauthenticated
 - region=<LOCATION>
 - image=docker.io/mcp/neo4j:latest
 - env-vars-file=env.yaml
 - min-instances=0
 - max-instances=1
 - port=80
Use this command if you are using the secret manager for sensitive environment variables.
gcloud run deploy <INSTANCE_NAME>
 - service-account=mcp-server-sa@<PROJECT_ID>.iam.gserviceaccount.com
 - no-allow-unauthenticated
 - region=<LOCATION>
 - image=docker.io/mcp/neo4j:latest
 - port=80
 - set-env-vars="NEO4J_MCP_TRANSPORT=http,NEO4J_MCP_HTTP_PORT=80,NEO4J_MCP_HTTP_HOST=0.0.0.0"
 - set-secrets="NEO4J_URI=<URI_SECRET_NAME>:latest,NEO4J_DATABASE=<DATABASE_SECRET_NAME>:latest"
 - min-instances=0
 - max-instances=1
Once complete you should get a message like this:
Deploying container to Cloud Run service [neo4j-mcp-official] in project [project-abc] region [us-central1]
✓ Deploying… Done.
✓ Creating Revision…
✓ Routing traffic…
✓ Setting IAM Policy…
Done.
Service [neo4j-mcp-official] revision [neo4j-mcp-official-123] has been deployed and is serving 100 percent of traffic.
Service URL: https://neo4j-mcp-official-123.us-central1.run.app
Connect to MCP Server
Create Local Proxy MCP Server
Now we must create a local proxy to the remote MCP server. This is necessary to connect with local applications since we require connections to be authorized with our –no-allow-unauthenticated flag. The proxy server will be authenticated with GCP via the glcoud CLI and will allow our local applications to connect to the Cloud Run hosted MCP Server. Run the below command to start up the proxy server using gcloud.
Note that you may be prompted to install the cloud-run-proxy extension for gcloud upon running this command.
gcloud run services proxy <INSTANCE_NAME> --region <LOCATION> --port=3000
In order to connect to our Cloud Run hosted MCP server, we will need our Neo4j username and password credentials.
Test with curl
The simplest way to test our MCP server is with curl. Below we send a request to get a list of all available tools.
curl -k -u <NEO4J_USERNAME>:<NEO4J_PASSWORD>
  -H "Content-Type: application/json"
  -d '{
    "jsonrpc": "2.0",
    "method": "tools/list",
    "id": 1
  }'
  http://127.0.0.1:3000/mcp
We should receive a response like this containing all available tools and their metadata.
{"jsonrpc":"2.0","id":1,"result":{"tools":[{"annotations":{"title":"Get Neo4j Schema","readOnlyHint":true,"destructiveHint":false,"idempotentHint":true,"openWorldHint":true},"description":"nttRetrieve the schema information from the Neo4j database, including node labels, relationship types, and property keys.nttIf the database contains no data, no schema information is returned.","inputSchema":{"type":"object"},"name":"get-schema"},{"annotations":{"title":"Read Cypher","readOnlyHint":true,"destructiveHint":false,"idempotentHint":true,"openWorldHint":true},"description":"read-cypher can run only read-only Cypher statements. For write operations (CREATE, MERGE, DELETE, SET, etc...), schema/admin commands, or PROFILE queries, use write-cypher instead.","inputSchema":{"properties":{"query":{"type":"string","description":"The Cypher query to execute","default":"MATCH(n) RETURN n"},"params":{"type":"object","description":"Parameters to pass to the Cypher query"}},"type":"object","required":["query"]},"name":"read-cypher"},{"annotations":{"title":"Write Cypher","readOnlyHint":false,"destructiveHint":true,"idempotentHint":false,"openWorldHint":true},"description":"write-cypher executes any arbitrary Cypher query, with write access, against the user-configured Neo4j database.","inputSchema":{"properties":{"query":{"type":"string","description":"The Cypher query to execute","default":"MATCH(n) RETURN n"},"params":{"type":"object","description":"Parameters to pass to the Cypher query"}},"type":"object","required":["query"]},"name":"write-cypher"}]}}
We can also test calling a tool with the below command. Here we are retrieving the Neo4j database schema via the MCP server get-schema tool.
curl -k -u <NEO4J_USERNAME>:<NEO4J_PASSWORD>
  -H "Content-Type: application/json"
  -d '{
  "jsonrpc": "2.0",
  "id": 2,
  "method": "tools/call",
  "params": {
    "name": "get-schema"
  }
}'
  http://127.0.0.1:3000/mcp
This should return the schema. Here is the returned schema from our test database.
{"jsonrpc":"2.0","id":2,"result":{"content":[{"type":"text","text":"[{"key":"TestNode","value":{"type":"node","properties":{"createdAt":"DATE_TIME","id":"INTEGER","name":"STRING"}}}]"}]}}
Test with Claude Desktop
Claude Desktop will allow you to use the MCP server to interactively explore your Neo4j graph. First create a base64 version of your Neo4j username and password to connect to the MCP server.
echo -n "{neo4j_username}:{neo4j_password}" | base64
Then add the following to your claude_desktop_config.json file, making sure to copy over the base64 string you just generated.
Note that you will need npm / npx installed to run the remote server proxy with the mcp-remote library.
{
  "mcpServers": {
    "cloud-run": {
      "command": "npx",
      "args": [
        "-y",
        "mcp-remote",
        "http://localhost:3000/mcp",
        "--header",
        "Authorization:Basic <BASE64_STRING>"
      ]
    }
  }
}
Restart Claude Desktop and it should now be connected to the Neo4j MCP server.
If you navigate to the Connectors page, you should see the name of the MCP server listed. Select the server to see the permission details.

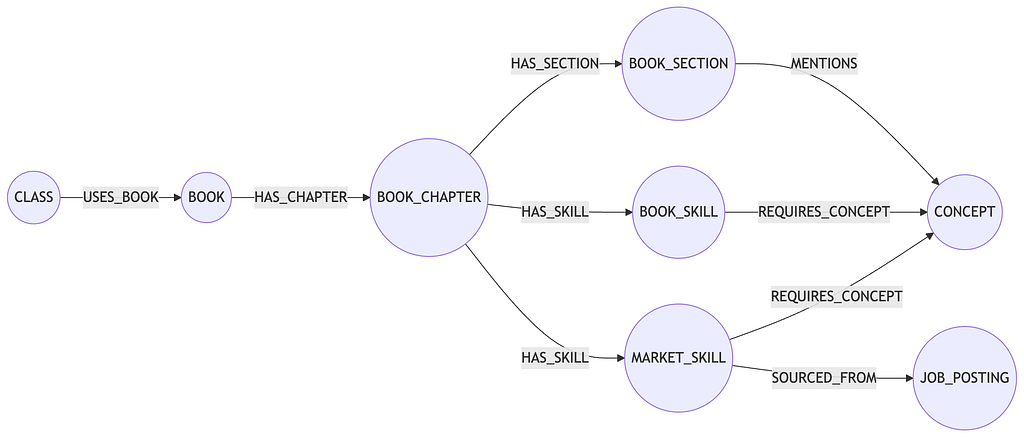
Ask Claude to read the Neo4j graph schema and then sample some data. It should be able to successfully execute tools and analyze the graph.

Test with Postman
We can also test our MCP server with Postman. We need to first configure our authorization by providing the Neo4j username and password and setting Auth Type to Basic Auth in the Authorization tab.

And then we can send a request to list our available tools. This will return a JSON object containing tools and their metadata.
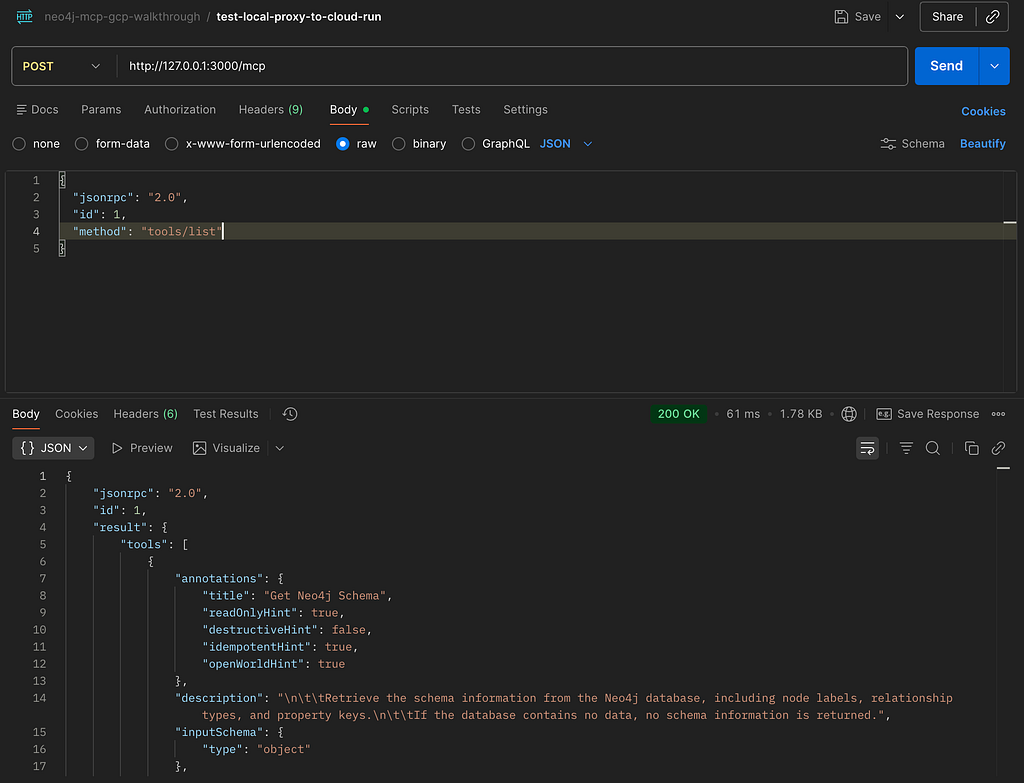
This POST request will return the list of tools available to us.
{
  "jsonrpc": "2.0",
  "id": 1,
  "method": "tools/list"
}
Here is the full JSON response from the MCP server listing the available tools.
{
    "jsonrpc": "2.0",
    "id": 1,
    "result": {
        "tools": [
            {
                "annotations": {
                    "title": "Get Neo4j Schema",
                    "readOnlyHint": true,
                    "destructiveHint": false,
                    "idempotentHint": true,
                    "openWorldHint": true
                },
                "description": "nttRetrieve the schema information from the Neo4j database, including node labels, relationship types, and property keys.nttIf the database contains no data, no schema information is returned.",
                "inputSchema": {
                    "type": "object"
                },
                "name": "get-schema"
            },
            {
                "annotations": {
                    "title": "Read Cypher",
                    "readOnlyHint": true,
                    "destructiveHint": false,
                    "idempotentHint": true,
                    "openWorldHint": true
                },
                "description": "read-cypher can run only read-only Cypher statements. For write operations (CREATE, MERGE, DELETE, SET, etc...), schema/admin commands, or PROFILE queries, use write-cypher instead.",
                "inputSchema": {
                    "properties": {
                        "query": {
                            "type": "string",
                            "description": "The Cypher query to execute",
                            "default": "MATCH(n) RETURN n"
                        },
                        "params": {
                            "type": "object",
                            "description": "Parameters to pass to the Cypher query"
                        }
                    },
                    "type": "object",
                    "required": [
                        "query"
                    ]
                },
                "name": "read-cypher"
            },
            {
                "annotations": {
                    "title": "Write Cypher",
                    "readOnlyHint": false,
                    "destructiveHint": true,
                    "idempotentHint": false,
                    "openWorldHint": true
                },
                "description": "write-cypher executes any arbitrary Cypher query, with write access, against the user-configured Neo4j database.",
                "inputSchema": {
                    "properties": {
                        "query": {
                            "type": "string",
                            "description": "The Cypher query to execute",
                            "default": "MATCH(n) RETURN n"
                        },
                        "params": {
                            "type": "object",
                            "description": "Parameters to pass to the Cypher query"
                        }
                    },
                    "type": "object",
                    "required": [
                        "query"
                    ]
                },
                "name": "write-cypher"
            }
        ]
    }
}
And now let’s test getting the database schema. We will use the get-schema tool to accomplish this.

Here is our MCP server POST request.
{
  "jsonrpc": "2.0",
  "id": 2,
  "method": "tools/call",
  "params": {
    "name": "get-schema"
  }
}
And below is the response containing our simple test database schema.
{
    "jsonrpc": "2.0",
    "id": 2,
    "result": {
        "content": [
            {
                "type": "text",
                "text": "[{"key":"TestNode","value":{"type":"node","properties":{"createdAt":"DATE_TIME","id":"INTEGER","name":"STRING"}}}]"
            }
        ]
    }
}
Conclusion
In this article we walked through how to easily deploy the official Neo4j MCP server to GCP Cloud Run and connect to it with local applications. This deployment demonstrates how we can use the Neo4j MCP server to allow many different users to access the same Neo4j instance with different roles based on their connection credentials.
References
Downloading and Installing Node.js and npm
Neo4j MCP Server Docker Hub Overview
Neo4j MCP TLS Setup Documentation
Quickstart: Install the Google Cloud CLI
How to Deploy The Neo4j MCP Server to GCP Cloud Run was originally published in Neo4j Developer Blog on Medium, where people are continuing the conversation by highlighting and responding to this story.
Share Article


Explore
Related Articles
Hey LLM, you’re using OPTIONAL MATCH wrong. Here’s the Cypher that actually works.