It is time for Part 3 of the Neo4j 4.3 technical blog series, where we explore deploying Neo4j with the new neo4j-standalone Helm Chart on Minikube Kubernetes running on a Windows 10 laptop with Docker Desktop.
This is our series so far:
- Relationship / Relationship Property Indexes
- Relationship Chain Locks: Don’t Block the Rock
- Deploying Neo4j on Kubernetes with Helm Charts (this blog)
- Server Side Routing
- Read Scaling for Analytics
Why Minikube on Windows 10?
Well the Neo4j documentation is packed full of quick start guides for deploying on the major cloud providers AWS, Azure and GKE and on Docker Desktop on Mac and I wanted to demonstrate how accessible Neo4j is to Windows users outside of the usual options.
Don’t worry, if you don’t want to use Windows then you can follow along with the instructions below and those provided in the product docs for your chosen environment. Minikube is optional too, you can skip it and still run with the Kubernetes provided by Docker Desktop.
What are Helm charts and what do they do for Neo4j?
For those of you who are unfamiliar with Helm Charts – they provide a prescriptive way of running products like Neo4j on Kubernetes.
The author of a Helm Chart has figured out the configuration (and the best way to configure) for the software to run on Kubernetes, exposing the right services for administrators and clients to connect. Essentially it is a “best practice” package and configuration management system that will pull down the required image, configure and deploy Neo4j on Kubernetes.

Neo4j-standalone Helm chart, what about clusters?
Please note that this first Chart to be released is for deploying Neo4j on a Kubernetes Cluster running a single Pod, it does not configure and deploy a Causal Cluster.
If you are looking to run Neo4j on a Cluster then you will need to continue to use the Chart provided by Neo4j Labs.
Installation – Neo4j-Helm User Guide
The standalone Helm Chart is for use in development / test environments and production deployments when fault tolerance isn’t required. Productized Helm Charts that support cluster deployments are still work in progress.
What’s the Difference Between neo4j-standalone and the Chart in Neo4j Labs?
On the surface there is little functional difference between the recently released Helm Chart and the lab version — both will deploy and run Neo4j on K8s. However, there are some very important differences when it comes to support as Helm Charts have matured from a Labs incubated innovation project to a fully supported product backed by Neo4j Support team’s SLAs.
Product wise there have been extensive changes under the hood too as there has been a substantial investment in making Neo4j more K8s friendly, and embedding best practices from deployments on the major cloud providers plus some great new documentation.
Kubernetes – Operations Manual
What about an Kubernetes operator for running Neo4j on K8s?
A Kubernetes operator is a controller that extends the Kubernetes API to provide a control interface that is specific to that application; it knows how to create, configure, and manage instances of complex applications on behalf of a Kubernetes.
There are no immediate plans to make an operator available for users who want to run self-managed instances of Neo4j.
Get ready to use Helm charts to deploy Neo4j on Kubernetes
- Windows x64 systems: Version 1903 or higher, with Build 18362 or higher (required on Windows)
- WSL — Windows Subsystem for Linux 2.0 (required on Windows)
- Docker for Desktop with Kubernetes integration enabled (required all for all operating systems)
- Minikube (optional)
I have introduced Minikube into the mix as well because the distro includes a great dashboard which is a handy way to explore Kubernetes if you are brand new to it.
Note: Neo4j doesn’t officially support Minikube as a platform.
First up, before you install Docker for Desktop, check that you are running the latest Windows Subsystem for Linux (WSL) 2.0 — if you have already installed Docker for Desktop don’t worry the order doesn’t matter you will just need to restart Docker after you have upgraded WSL.
Install/update WSL
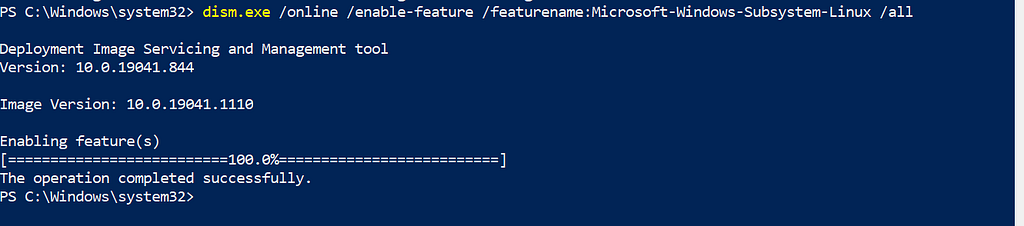
Launch a PowerShell command prompt as Administrator (required for all the command line software installs), and enable WSL
dism.exe /online /enable-feature /featurename:Microsoft-Windows-Subsystem-Linux /all
Run the wsl.exe -l -v command to check the version, in the screenshot below you can see that I am running version 2 for docker-desktop.
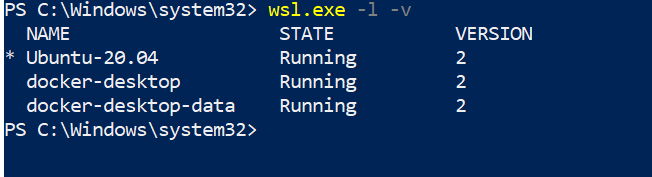
If it says version 1 (one) then you will need to upgrade, before you attempt to do this check the version of Windows 10 that you are running because WSL 2.0 only runs on the following versions
- For x64 systems: Version 1903 or higher, with Build 18362 or higher.
For builds prior to 18362 you must use the Windows Update Assistant to update your version of Windows first because WSL 2.0 isn’t supported.
Full details to upgrade to v2.0, links to downloads and commands to set WSL 2.0 as the default are available here.
Install Docker
To install Docker Desktop jump over here to download it. It is pretty straightforward, it has the usual UI based installer… just double click and run from your Downloads folder and accept all the defaults and start Docker Desktop.
Next you will need to configure WSL integration in Docker Desktop. Select Settings | Resources | WSL INTEGRATION to proceed.
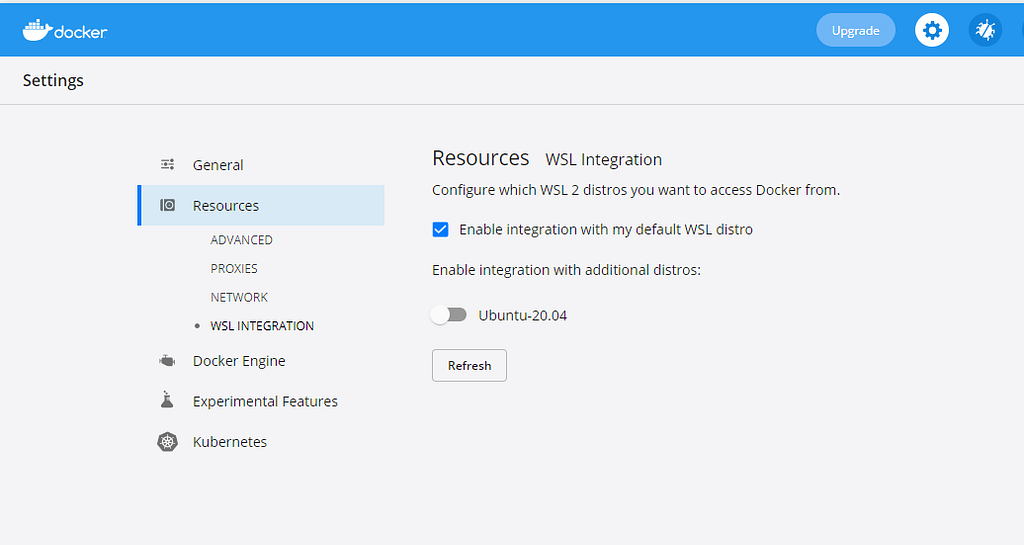
Again dont worry you won’t see Ubuntu displayed, that is only present because I have a specific distro installed, and it isn’t required for the blog.
Install Minikube
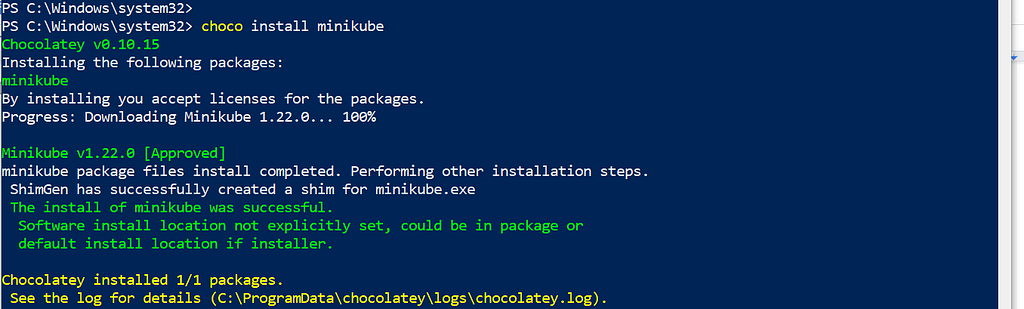
To install Minikube (optional if you want to use the dashboard to become more familiar with Kubernetes setup — more on this later) and Helm I used Chocolatey (choco) — a really handy package manager for Windows — feel free to use whatever one you prefer.
Chocolatey – The package manager for Windows
To install Minikube and Helm make sure you are still running the PowerShell command prompt as Admin.
Install Helm
Same steps for installing kubernetes-helm.
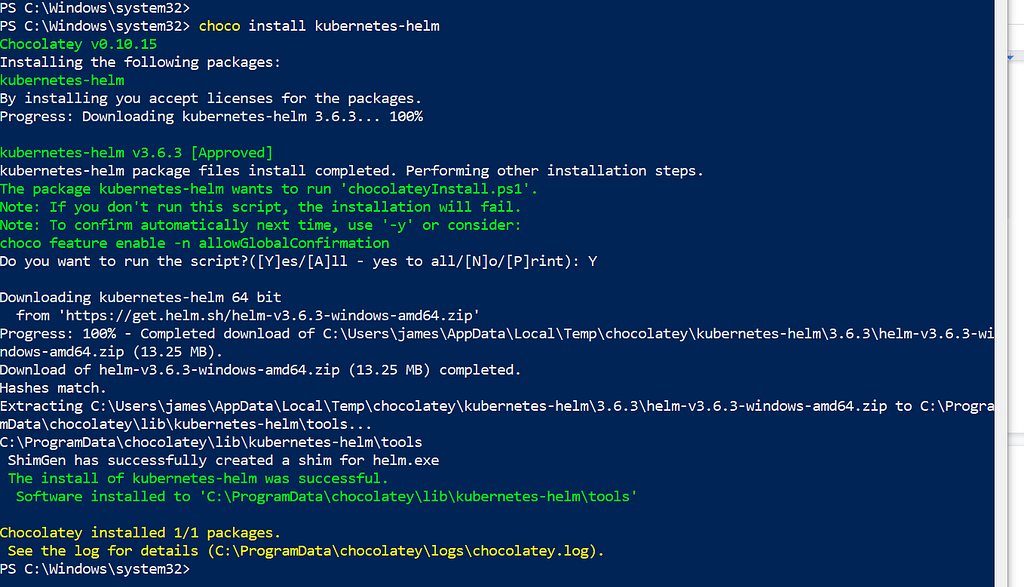
You can now exit from the Admin PowerShell, everything else should be run as a standard user.
Getting started
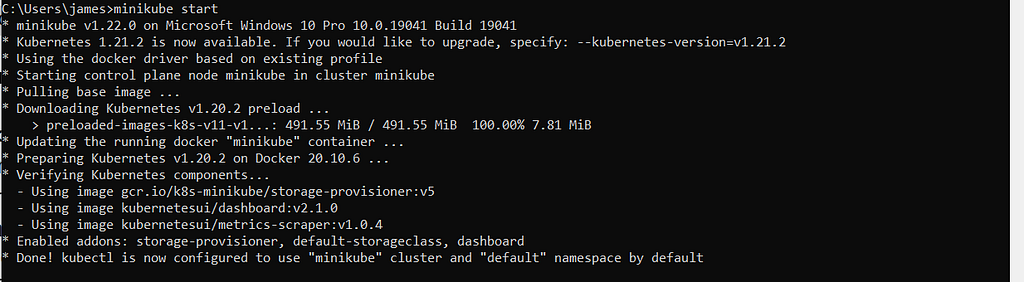
Start Minikube so that it configures Kubernetes’ kubectl to use the minikube cluster and the default namespace
start minikube
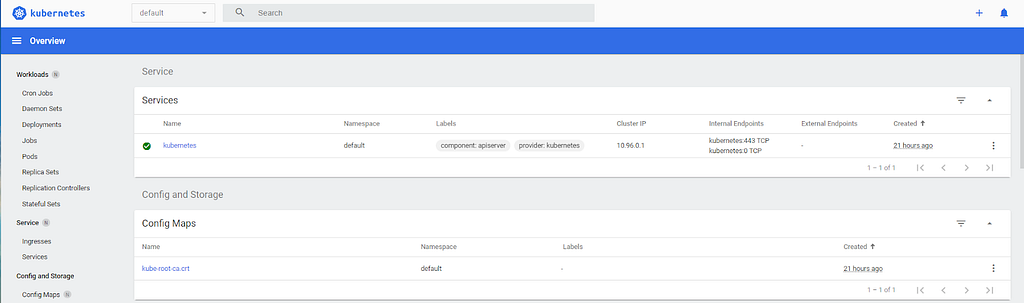
Launch the minikube dashboard to check out your new kubernetes environment, where you will find the default service for kubernetes, and the default config map.
minikube dashboard
Get set and deploy Neo4j using Helm charts on Kubernetes
First, add the Neo4j Helm charts repository.
helm repo add neo4j https://helm.neo4j.com/neo4j
Get the latest charts from the chart repository:
helm repo update

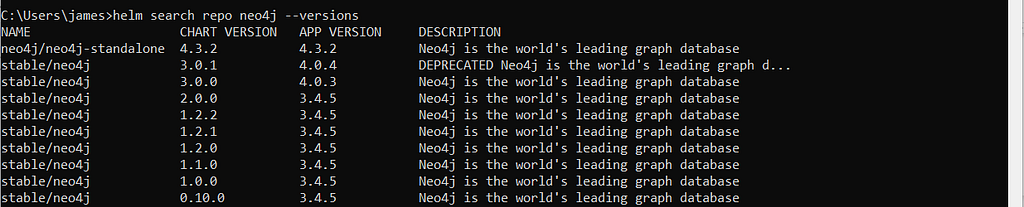
View the available charts:
helm search repo neo4j --versions
Each individual Neo4j instance in Helm is called a “release” and the objects created in Kubernetes are assigned a release name.
If Helm needs to create any other objects within the Kubernetes environment then it will derive the name from this release name. The release name must consist of lower case alphanumeric characters, — or ., and must start and end with an alphanumeric character.
Set the release name as an environment variable, so that it is available in the rest of the session:
set RELEASE_NAME=nebuchadnezzar
If you have an Enterprise license and care about performance then you will need to override the defaults provided in the Helm Chart to switch to Enterprise Edition with some custom settings specified in a YAML file (as expected).
Overriding defaults in the neo4j.conf using a custom YAML file is an important technique to be familiar with, so even if you don’t switch to Enterprise Edition, I recommend you try specifying your own password, or tune the memory / CPUs.
Caution! Watch the formatting in the YAML file, like Python it relies on the use spaces for each section.
Copy and paste the following into a file called custom-values.yaml
neo4j:
 password: “yourchosenpassword”
 resources:
  cpu: “2”
  memory: “5Gi”
  # Neo4j Edition to use (community|enterprise) the default is
  # community so only change this if you have a license
  edition: “enterprise”
  # set edition: “enterprise” to use Neo4j Enterprise Edition
  # To use Neo4j Enterprise Edition you must have a Neo4j license
  # agreement.
  #
  # More information is also available at: neo4j.com/licensing
  # Email inquiries can be directed to: [email protected]
  #
  # Set acceptLicenseAgreement: “yes” to confirm that you have a
  # Neo4j license agreement
  acceptLicenseAgreement: “yes”

volumes:
 data:
 mode: “defaultStorageClass”
 # Neo4j configuration (yaml format)
 config:
  dbms.default_database: “neo4j”
  dbms.config.strict_validation: “true”
Then install the release with helm and provide your config
helm install %RELEASE_NAME% neo4j/neo4j-standalone
--set volumes.data.mode=defaultStorageClass -f custom-values.yaml
The set volumes.data.node configures the persistent volume claim to use the default storage specification in the yaml — allocates 10GB of persistent storage.
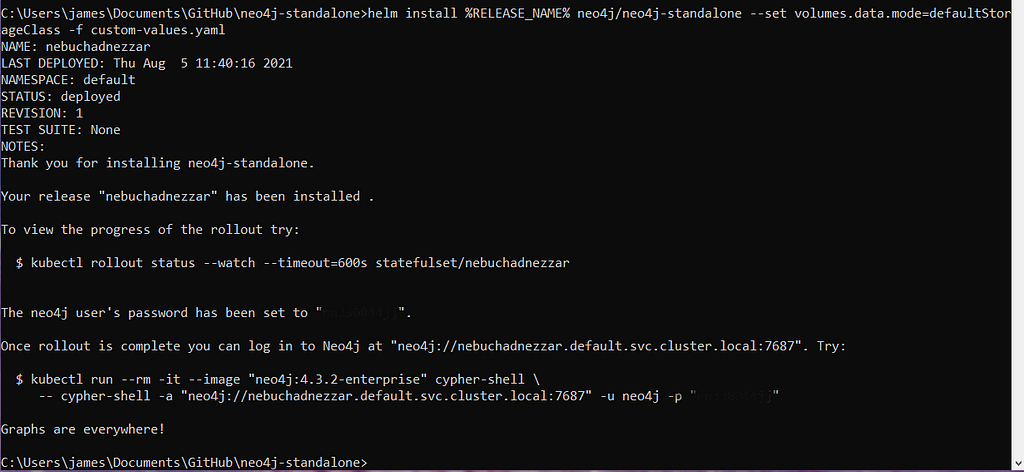
Caution! If you don’t specify your own password in the custom-values.yaml then the Helm Chart will create a secure random password for you. If it does please make a note of the password in your favourite password manager, or change it to something more memorable when you login for the first time.
That’s it! You are up and running on a single Kubernetes Pod. It will take a couple of minutes before you can log in so run the rollout status command suggested in the console output
kubectl rollout status --watch —-timeout=600s statefulset/nebuchadnezzar
This command will report back when the rollout is complete.
Neo4j pod deployment in Minikube dashboard
In the meantime switch back to the minikube dashboard to see that you have a workload status for pods and your stateful sets. Under Pods it will show your release name is running in the default namespace and that the stateful sets are managed by Helm.
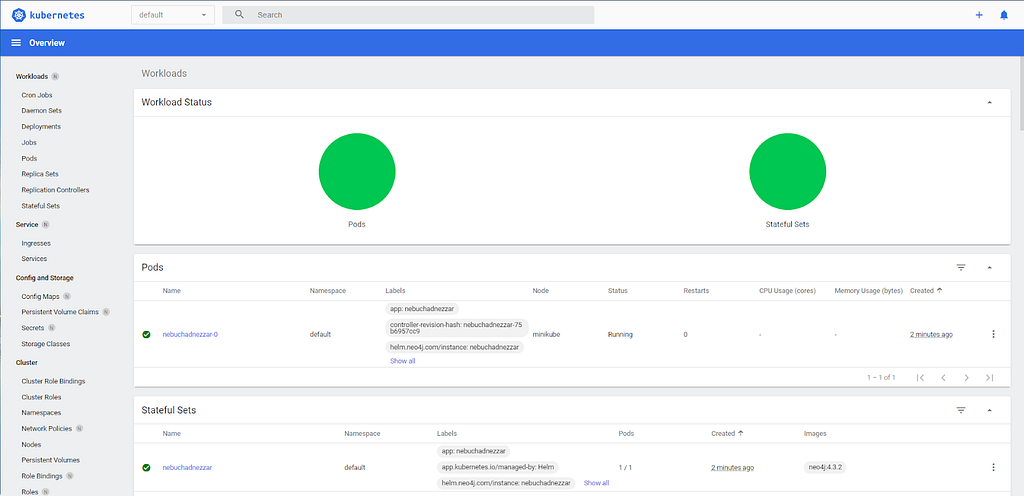
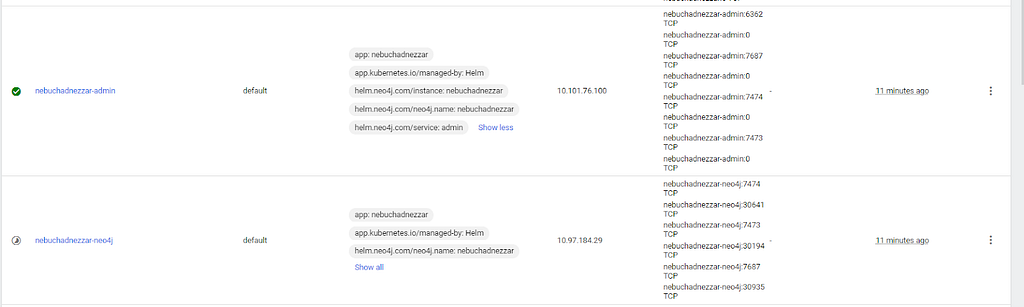
Scrolling down you can see a full list of the services (described here) show Neo4j running on a Kubernetes Pod that the Helm Chart has created for Neo4j some of them are available only from inside the Kubernetes cluster, others are accessible from outside the cluster.
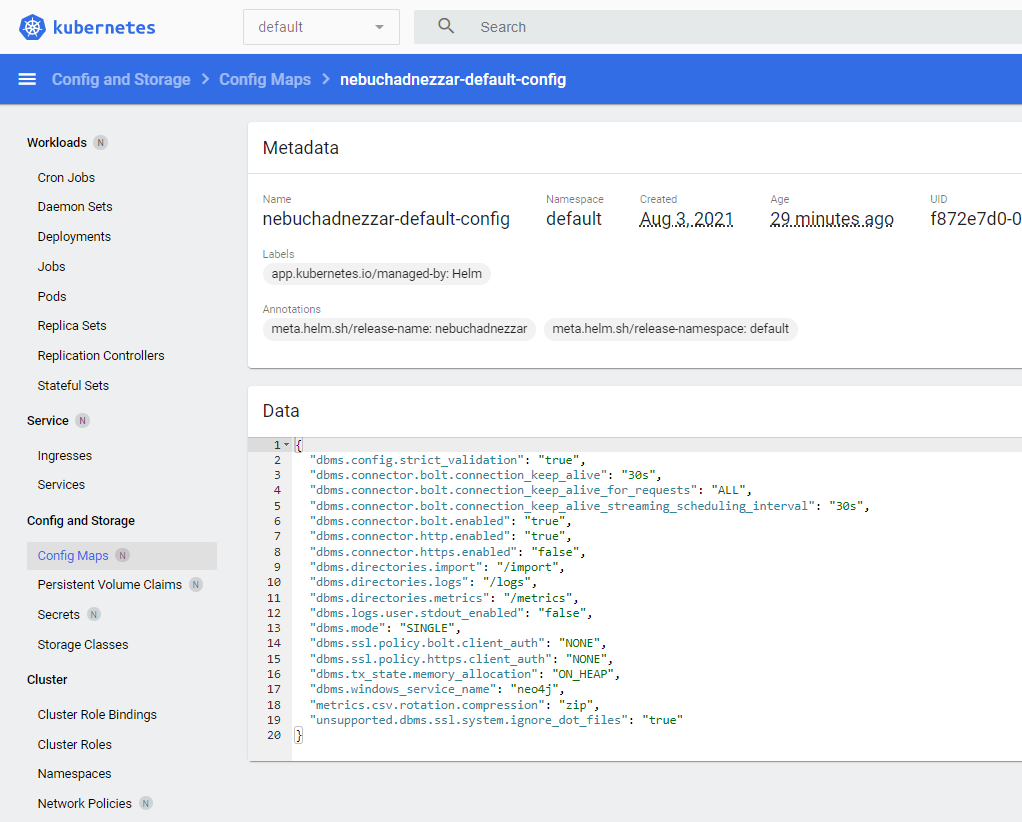
If you select the Config and Storage | Config Maps and the default-config & env you can see the configuration that has been passed in to set up Neo4j.
Access Neo4j on Kubernetes
I am going to show you a couple of different ways of accessing Neo4j, the first is from inside the Kubernetes cluster, the second is from outside the cluster.
From inside the cluster, running on another pod by running the cypher shell — execute the command shown in the output when Helm rolled out the pod running Neo4j
kubectl run -rm -it -image “neo4j:4.3.2-enterprise” cypher-shell
--cypher-shell -a “neo4j://nebuchadnezzar.default.svc.cluster.local:7687” -u neo4j -p “xxxxxxxx”

Note! the use of nebuchadnezzar.default.svc.cluster.local, this is because the Pod is running inside the cluster.
If we want to access the Neo4j service from outside of the cluster i.e. using localhost on your laptop you will need to set up port forwarding
kubectl port-forward svc/nebuchadnezzar tcp-bolt tcp-http tcp-https
Note! Remember to replace nebuchadnezzar with your chosen releasename.
Now you can launch Neo4j Browser on https://127.0.0.1:7474/browser/
Unfortunately we are unable to access the Neo4j service from outside of the cluster using a static IP on your home network this is because neither Docker Desktop or Minikube provide a load balancer that supports this — you will need to do this on Azure, AWS or GCP if you want to test out external access.
Loading up Neo4j
You can copy files from a local directory on your laptop into the import volume on the Pod running Neo4j using kubectl cp. The following example shows how to copy a backup dump file of the Neo4j database called network-management-4.3.dump available publicly here to the /import directory on a Neo4j instance with the release name nebuchadnezzar in the default namespace.
Note! You can copy in CSV files for use with neo4j-admin import, or with Cypher’s LOAD CSV as well.
Caution! The syntax for the file path isn’t the usual backslashes on Windows but forward slashes like in Linux and you need to append -0 (zero) on the release name to access the pod.
kubectl cp Documents/data/network-management-43.dump default/nebuchadnezzar-0:/import
You can check they are there with
kubectl exec nebuchadnezzar-0 -- ls /import/
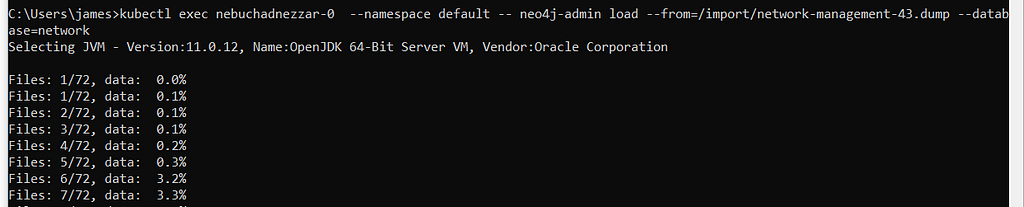
Now load up the dump into a database called network
kubectl exec nebuchadnezzar-0 --namespace default -- neo4j-admin load -from=/import/network-management-43.dump -database=network

If you are new to Neo4j it is worth pointing out that even though you have done the import and the files exist on disk the logical database does not technically exist yet.
You need to create the database with the create database network command in the system db using cypher-shell. To do this, create a pod using the enterprise image to run the cypher-shell (it gets thrown away when you exit)
kubectl run --rm -it --image "neo4j:4.3.2-enterprise" cypher-shell -- cypher-shell -a "neo4j://nebuchadnezzar.default.svc.cluster.local:7687" -u neo4j -p “xxxxxxxxx” -d system

show databases;

Now create the network database, which associates it with all the files that are on disk
create database network;

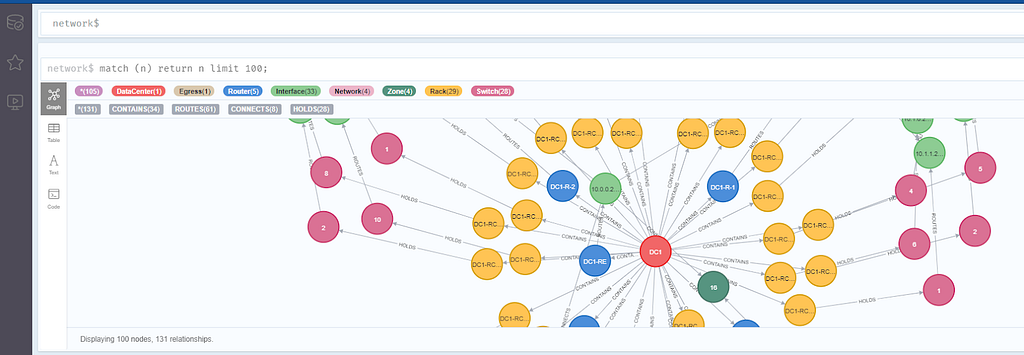
If we switch over to the browser you can run :use network
and then MATCH (n) RETURN n LIMIT 100 to see the data exists in your new database.
Thanks for sticking around to the end to load up your database, look out for the server side routing blog in a couple of weeks.
Debugging and troubleshooting tips
There are some great troubleshooting tips and tricks in the documentation including lots of commands for displaying the contents of the log.
Troubleshooting – Operations Manual
If you get errors while installing or setting up the environment then I would recommend just uninstalling the following and trying again making sure you have completed all the intermediate steps
- Docker for Desktop
- Helm
- Minikube
Don’t worry it really doesn’t take long… before you start reinstalling make sure you have WSL 2.0 installed and enabled at the OS level, after Docker Desktop is installed make sure it is selected within the Docker for Desktop configuration settings.
If you get as far as installing the Helm chart and you want to clean up and rebuild Neo4j on Kubernetes either because something went wrong or you just want to try a different Neo4j configuration then you need to uninstall the release AND delete the persistent volume which is storing the database.
helm uninstall nebuchadnezzar
Then you need to delete the persistent volume
kubectl delete pvc data-nebuchadnezzar-0
Unable to login with password?
If you receive the “The client is unauthorized due to authentication failure.” Then you have probably forgotten to delete the persistent volume claim (pvc) and the old database is hanging around.
Deploying Neo4j on Kubernetes with Helm Charts was originally published in Neo4j Developer Blog on Medium, where people are continuing the conversation by highlighting and responding to this story.
Share Article


Explore
Related Articles

SumoDB in Neo4j: Chaining Multiple Graph Algorithms in Snowflake — Part 3