GenAI Stack Walkthrough: Behind the Scenes With Neo4j, LangChain, and Ollama in Docker
13 min read
Many organizations want to build support agents that use GenAI. However, you can’t simply do it by developing a wrapper around an LLM API because of well-known challenges with inaccuracy and knowledge cutoff.
In this blog, you’ll see how you can use GraphRAG, a technique combining knowledge graphs and retrieval-augmented generation (RAG), to improve accuracy, relevance, and provenance in support agents. You’ll be able to follow along using an example support agent app that’s part of the GenAI Stack, a prebuilt development environment for GenAI applications that uses Docker, LangChain, Ollama, and Neo4j.
You’ll see two approaches to retrieving information:
- Relying on the internal knowledge of plain LLMs
- Augmenting LLMs with additional information by combining vector search and context from the knowledge graph
Understanding the Tools and Approaches
First, let’s explore the tools and techniques used in the example app and their benefits.
The GenAI Stack
The GenAI Stack is a set of Docker containers orchestrated by Docker Compose. It includes a management tool for local LLMs (Ollama), a database for grounding (Neo4j), and GenAI apps based on LangChain.
The GenAI Stack consists of:
- Application containers — the application logic in Python built with LangChain for the orchestration and Streamlit for the UI.
- A database container with vector index and graph search (Neo4j).
- An LLM container — Ollama — if you’re on Linux. If you’re on macOS, you can install Ollama outside of Docker.
These containers are tied together with Docker Compose. Docker Compose has a watch mode setup that rebuilds relevant containers anytime you make a change to the application code, allowing for fast feedback loops and a good developer experience.
Retrieval-Augmented Generation
The GenAI Stack allows you to use RAG to improve the accuracy and relevance of the generated results from the GenAI app.
Retrieval-augmented generation is a technique that combines retrieval mechanisms with generative AI models to improve the quality and relevance of generated content. Unlike traditional generative models that rely solely on the data they were trained on, RAG systems first retrieve relevant information from an external knowledge base or dataset and then use this information to inform and enhance the output generated.
The response generation process in a RAG system involves two steps:
- Retrieval – The system searches through a knowledge source, such as a database, to find the most relevant information related to the input query.
- Generation – The retrieved information is then fed into a generative model, which uses this context to produce a more accurate and contextually relevant response.
The information retrieval step of a RAG system involves the following:
- User query embedding – The RAG system transforms the user’s natural language query into a vector representation, known as an embedding. This embedding captures the semantic meaning of the query, enabling the system to understand nuances, context, and intent beyond simple keyword matching.
- Similar document retrieval – The system performs a vector search across a knowledge graph or a document repository using the embedded query. Since this search uses a vector representation of the query, it identifies documents that conceptually align with the query, not just those with exact keyword matches.
- Context extraction – The system optionally analyzes the relationships between different pieces of information in the documents (or in graph databases, nodes and relationships retrieved from the graph) to provide a more informed and contextually accurate answer.
- Enhanced prompt creation – The system combines the user query, the retrieved information, and any other specific instructions into a detailed prompt for the LLM.
In the generation step, the LLM generates a response using this enhanced prompt to produce an answer with more context compared to answering based on only its pre-trained knowledge.
RAG offers several benefits. It grounds LLM responses in factual data from external knowledge sources, which reduces the risk of generating incorrect information and improves factual accuracy. Because RAG retrieves and uses the most relevant information, it also increases the relevance of responses. Unlike LLMs, RAG has access to the relevant documents from where it sourced data during response generation. This means it can share the sources of information it uses, which allows users to verify the accuracy and relevance of the AI’s output.
Later in this blog, you’ll be able to see the difference in the quality of responses with and without RAG in the support agent.
Open Source Local LLMs
To avoid depending on third-party LLM providers like OpenAI and AWS, the GenAI Stack supports setting up and using open source LLMs like Llama and Mistral.
Open source LLM research has advanced significantly recently. Models like Llama and Mistral show impressive levels of accuracy and performance, making them a viable alternative to their commercial counterparts.
A significant benefit of open source LLMs is that you don’t have to depend on an external LLM provider. Deploying these models locally gives you complete control over your AI infrastructure, which reduces concerns about data privacy, vendor lock-in, and ongoing costs.
Another benefit is that you control data flow and storage. Organizations can manage sensitive information entirely in-house to ensure compliance with privacy regulations. It also reduces the risks associated with third-party data handling.
Tools like Ollama make it easier to set up and run these open source LLMs locally. Ollama simplifies deployment and management to such an extent that even those with limited AI expertise can use models like Llama and Mistral without extensive configuration or maintenance.
Overview of the Example Application: An Internal Support Agent Chatbot
The example app is based on the following fictional use case.
A technology company has human support agents who answer questions from end users. The organization has an internal knowledge base of existing questions and answers that uses keyword search.
Your developer team has been asked to build a prototype for a new natural language chat interface that either uses LLMs by themselves or combines them with data from the knowledge base.
As internal knowledge bases are not accessible for public demos, this article uses subsets of Stack Overflow data to simulate that database.
The demo applications that ship with the GenAI Stack showcase three things:
- Importing and embedding recent question-answer data from Stack Overflow via tags
- Querying the imported data via a chat interface using vector and graph search
- Generating new questions in the style of highly ranked existing ones
Here’s how the example system is designed:
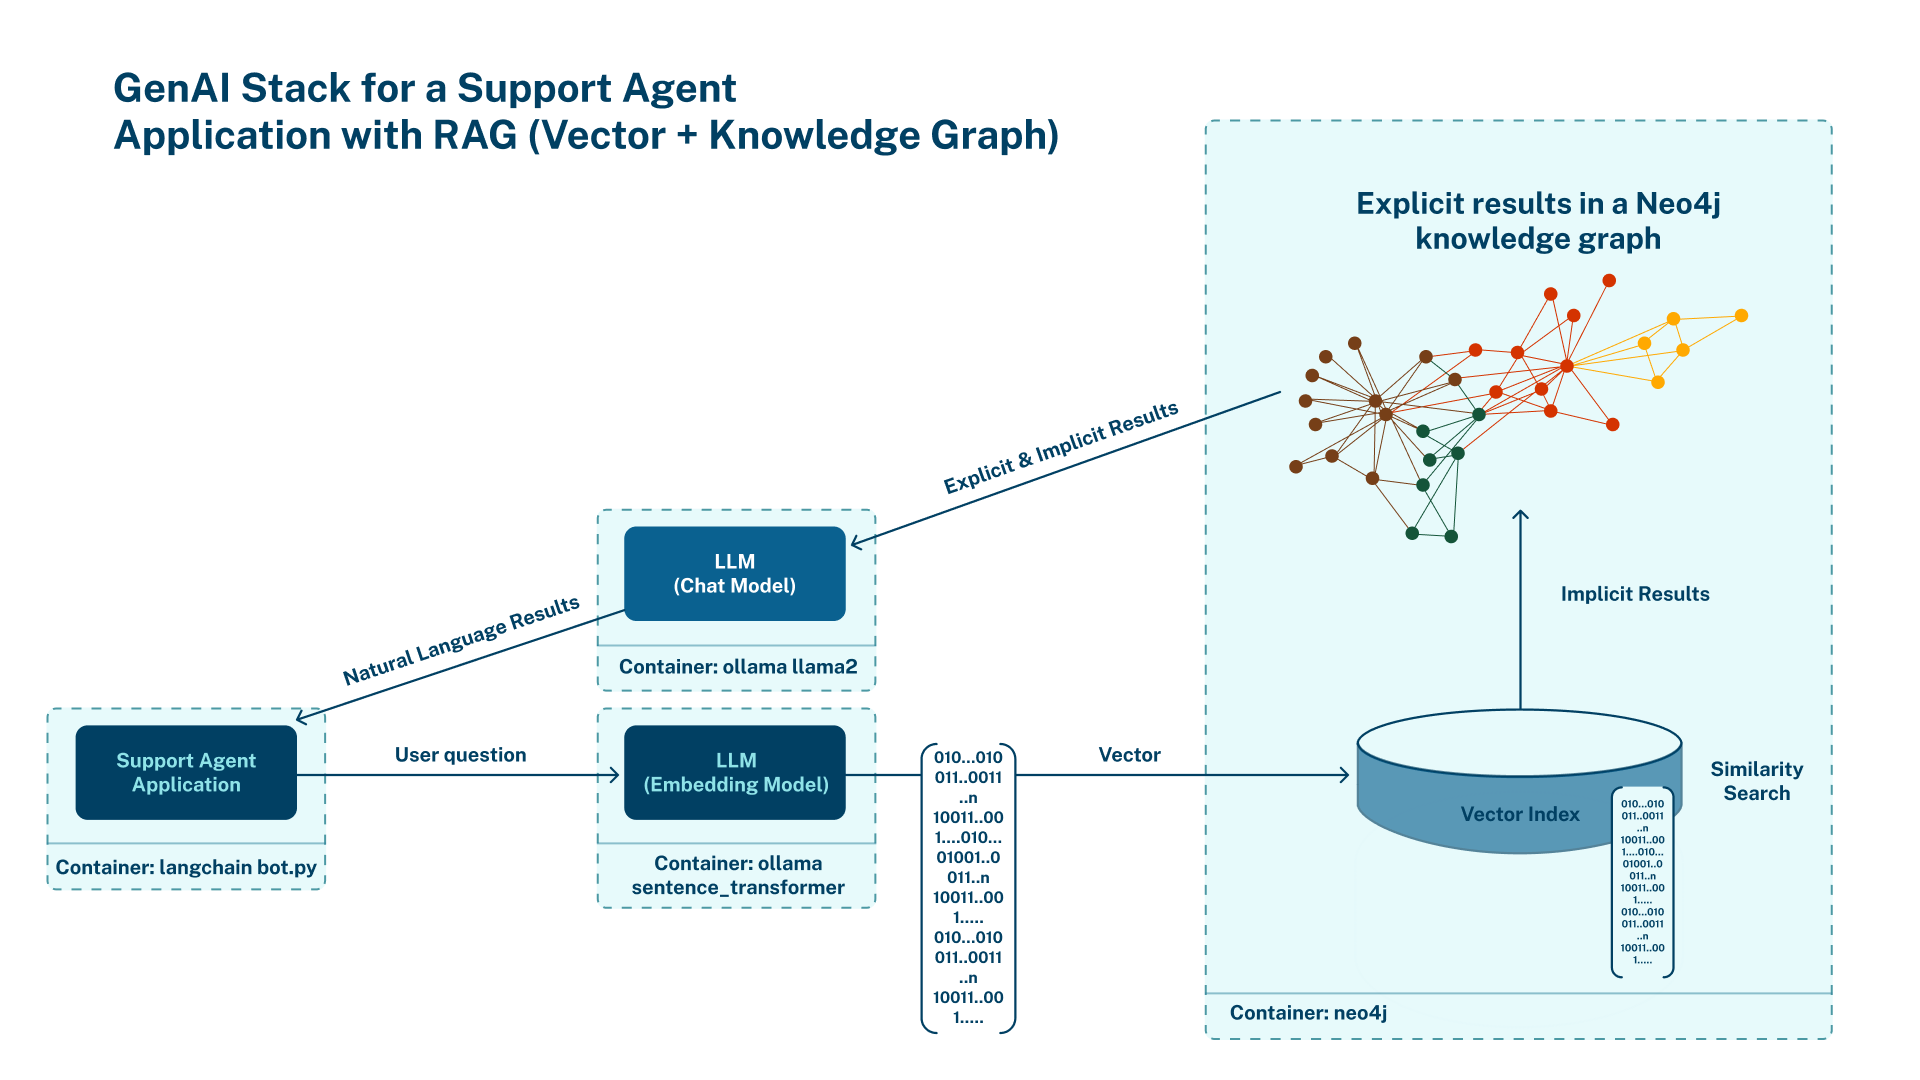
- When a user asks the support agent a question, the question first goes through an embedding model to calculate its vector representation.
- Next, the chatbot finds the most relevant nodes in the database by comparing the cosine similarity of the embedding values of the user’s question and the documents in the database.
- Once the relevant nodes are identified using vector search, the application retrieves additional information from the nodes and traverses the relationships in the graph.
- Finally, it combines the context information from the database with the user question and additional instructions into a prompt. It then passes this prompt to an LLM to generate the final answer, which it then sends to the user.
Setting Up the AI Support Agent With the GenAI Stack
With that in mind, let’s see the example app in action.
Setting Up the Repo
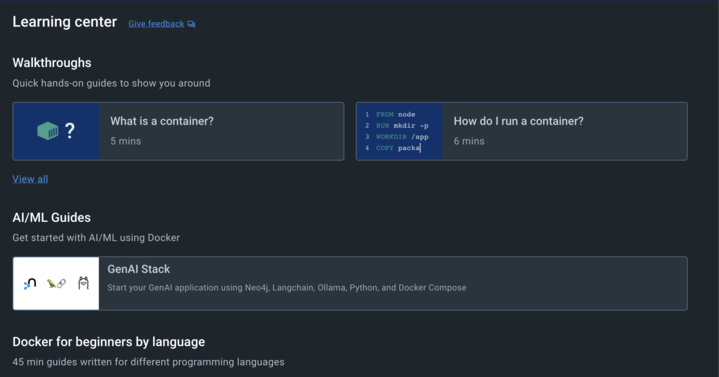
In the Learning center of Docker Desktop, click GenAI Stack to navigate to the GitHub repository of the example support chatbot:
Clone the repo locally.
Note: You need Docker installed on your machine to run the Docker containers in the repo.
On Linux, Ollama will run in a container as part of the example app, so you don’t need to install it manually. Simply create an .env file in the repo that you cloned and set the variable OLLAMA_BASE_URL=http://llm:11434 to configure it.
On Windows and macOS, download Ollama and start it by either using the GUI application or running ollama serve using the CLI.
Example Apps in the Repo
This tutorial uses apps 1 and 2 in the repo to demonstrate how the support agent and its data loading service work. However, you’ll see that the repo you cloned contains a few more apps built using the GenAI Stack.
The most notable is the PDF chatbot, which lets you upload any PDF document and ask questions about its content:
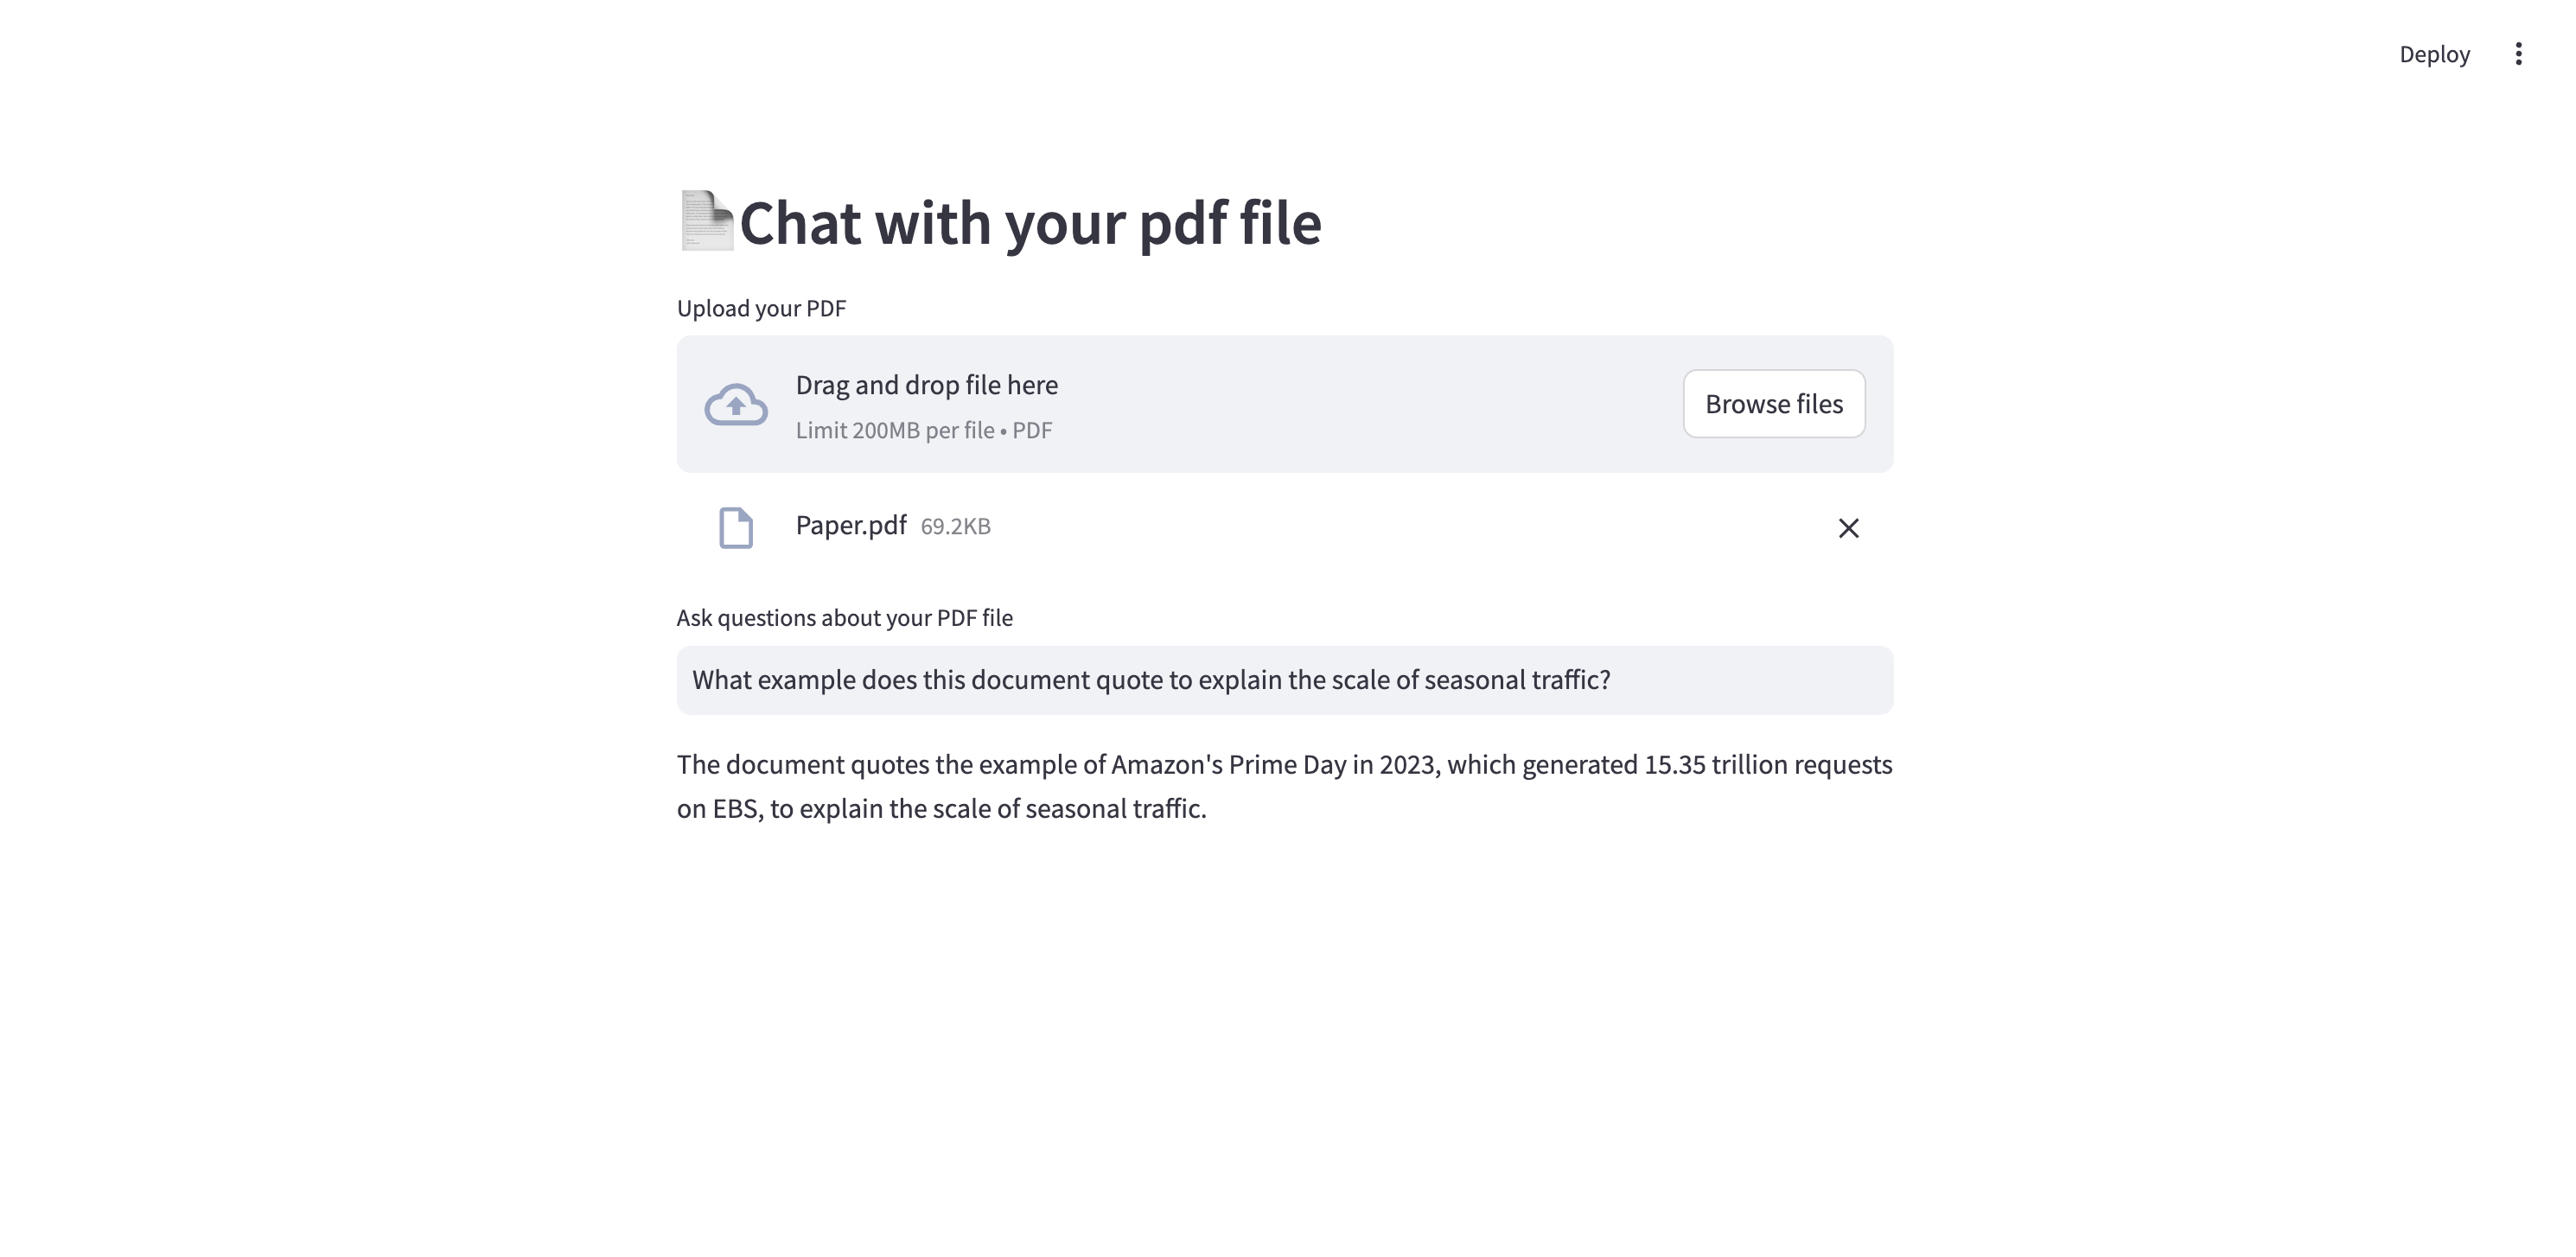
The bot splits the text from the PDF it’s given into chunks and embeds the chunks into the Neo4j database. You can then ask questions about the content and have the LLM reference the chunks using vector similarity search.
The repo also contains a standalone HTTP API at http://localhost:8504 that exposes the functionality to answer questions in the same way as the support agent you’ll build. The static front-end at http://localhost:8505 has the same features as the support agent you saw above, but it’s built separately from the backend code using modern best practices (Vite, Svelte, Tailwind).
Spinning Up the Example App Using Defaults
To get started, you’ll use the default configuration of the example app. It uses a locally downloaded Llama 2 model, the Sentence Transformer embedding model, and a local Neo4j database instance with the username neo4j and password password.
Invoke the following command in your terminal that uses the defaults in docker-compose.yml:
docker compose upAt the first run, it will download the required dependencies and then start all containers in dependency order.
The data import application for setting up the knowledge database will be running on http://localhost:8502 and the support chat interface on http://localhost:8501.
Importing and Embedding Data From Stack Overflow Via Tags
Before you can start asking the chatbot questions, you must load data into its knowledge store.
The application served on http://localhost:8502 is a data import application that lets you import Stack Overflow question-answer data into the Neo4j data store.
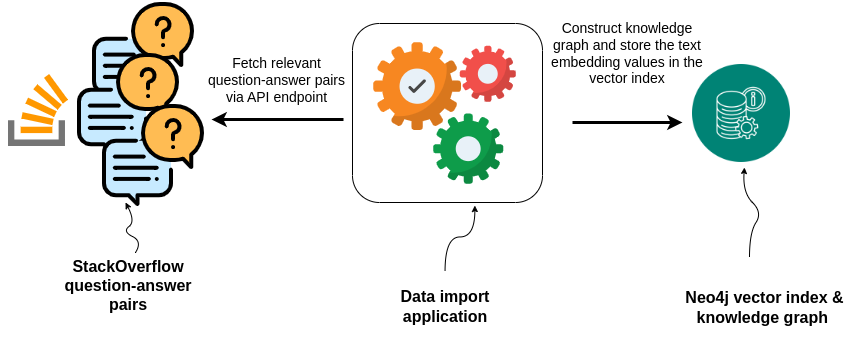
The data importer application fetches data from Stack Overflow via API requests, embeds the content using LangChain embeddings, and stores the question-answer data in Neo4j. It also creates a vector search index to make sure relevant information can be easily and quickly retrieved by the chat or other applications.
The data importer application allows users to specify a tag and the number of recent questions (in batches of 100) to import from the Stack Overflow API.
Pick any tag here and set the number of pages somewhere between 5 and 10, then click Import to start importing the data.
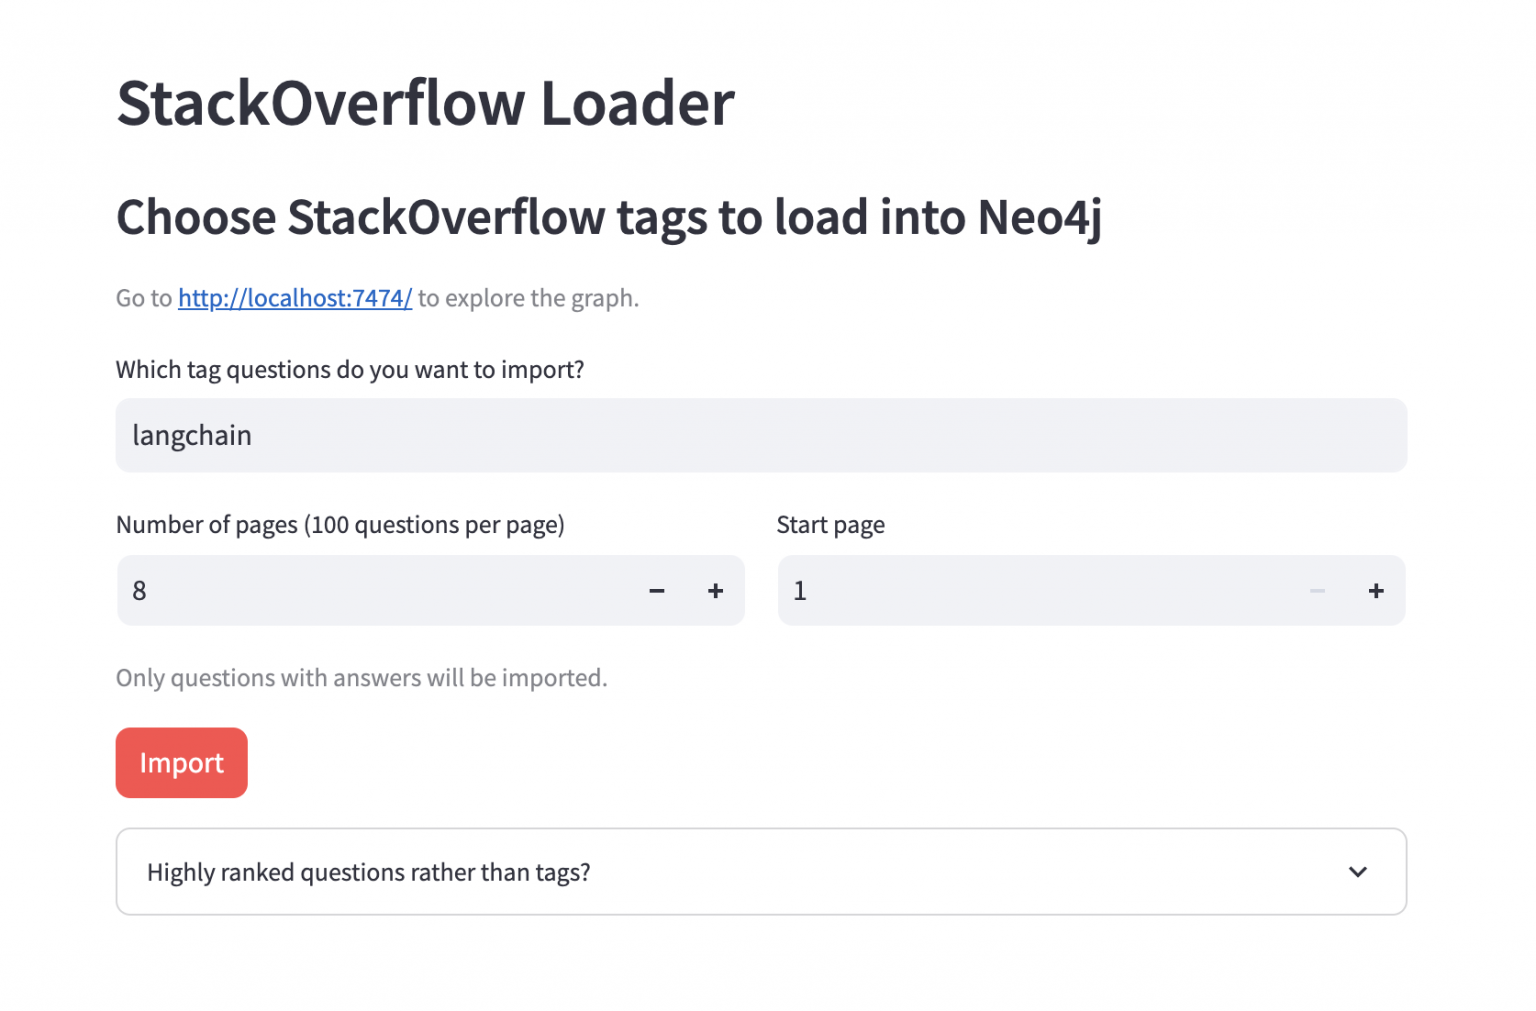
It will take a minute or two to run the import. Most of this time is spent generating the embeddings.
After or during the import, you can click the link to http://localhost:7474 and log in with username neo4j and password password, as configured in the Docker Compose file. Once logged in, you can see an overview in the left sidebar of the webpage and view some connected data by clicking the pill with the counts.
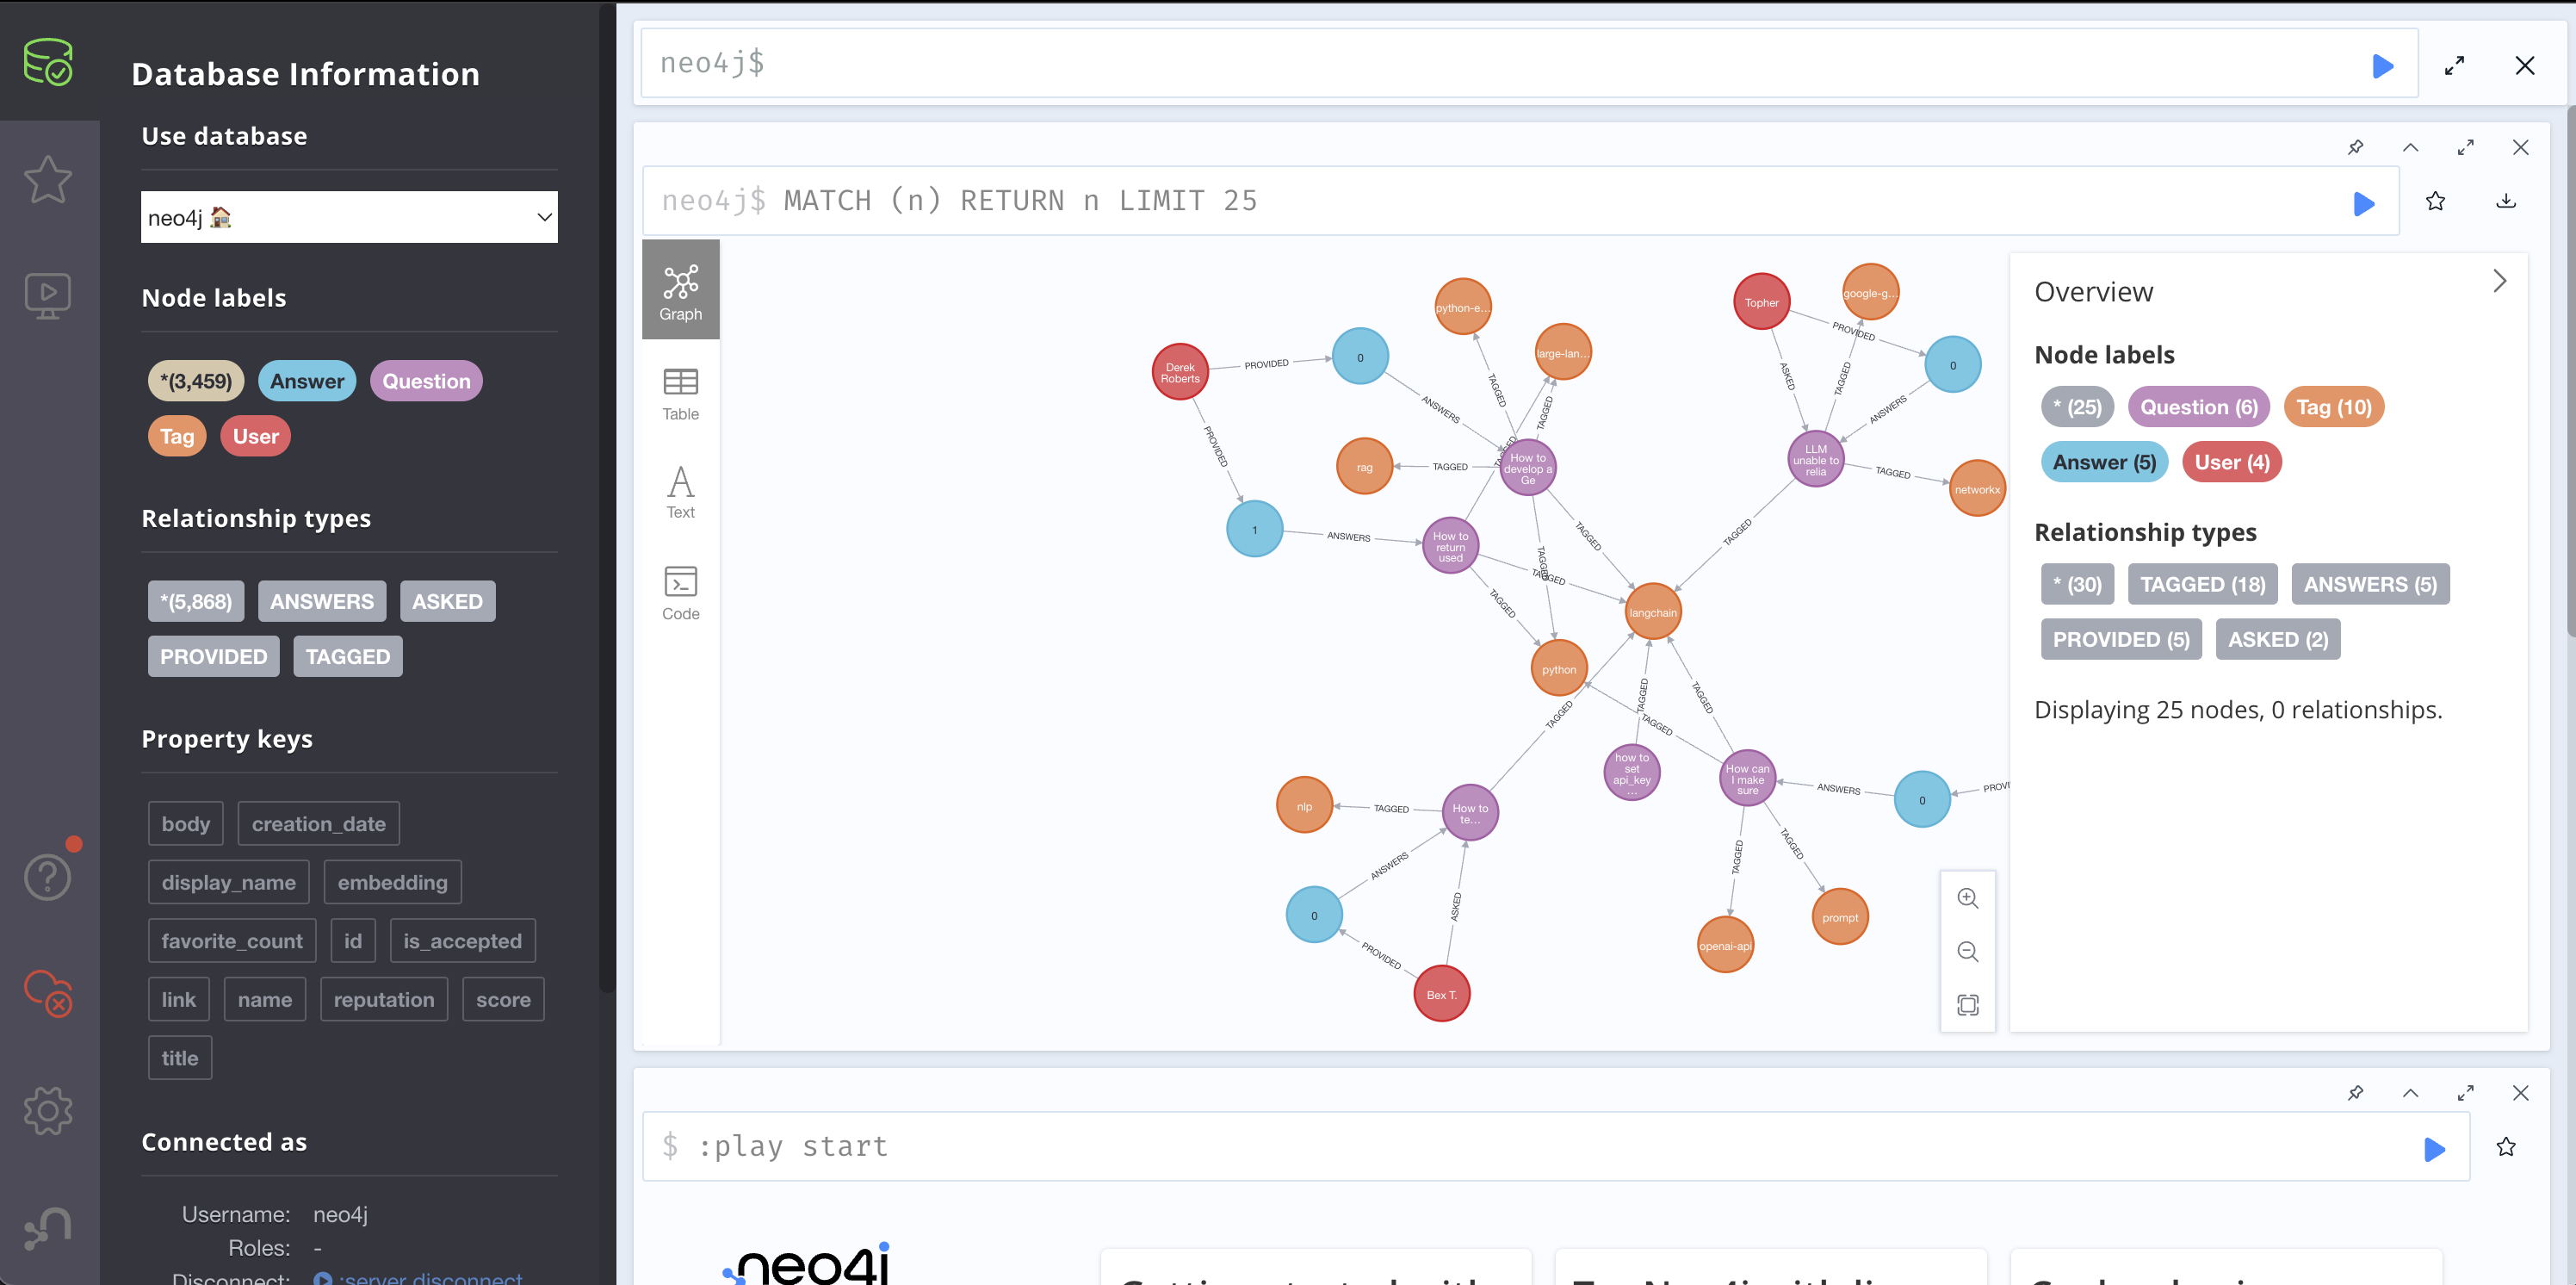
The data loader will import the graph using the following schema:
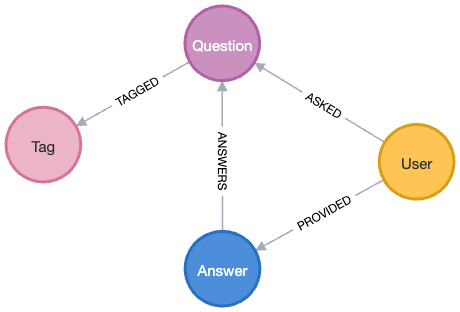
The graph schema for Stack Overflow consists of nodes representing questions, answers, users, and tags. Users are linked to questions they’ve asked via the ASKED relationship and to answers they’ve provided with the ANSWERS relationship. Each answer is also inherently associated with a specific question. Furthermore, questions are categorized by their relevant topics or technologies using the TAGGED relationship connecting them to tags.
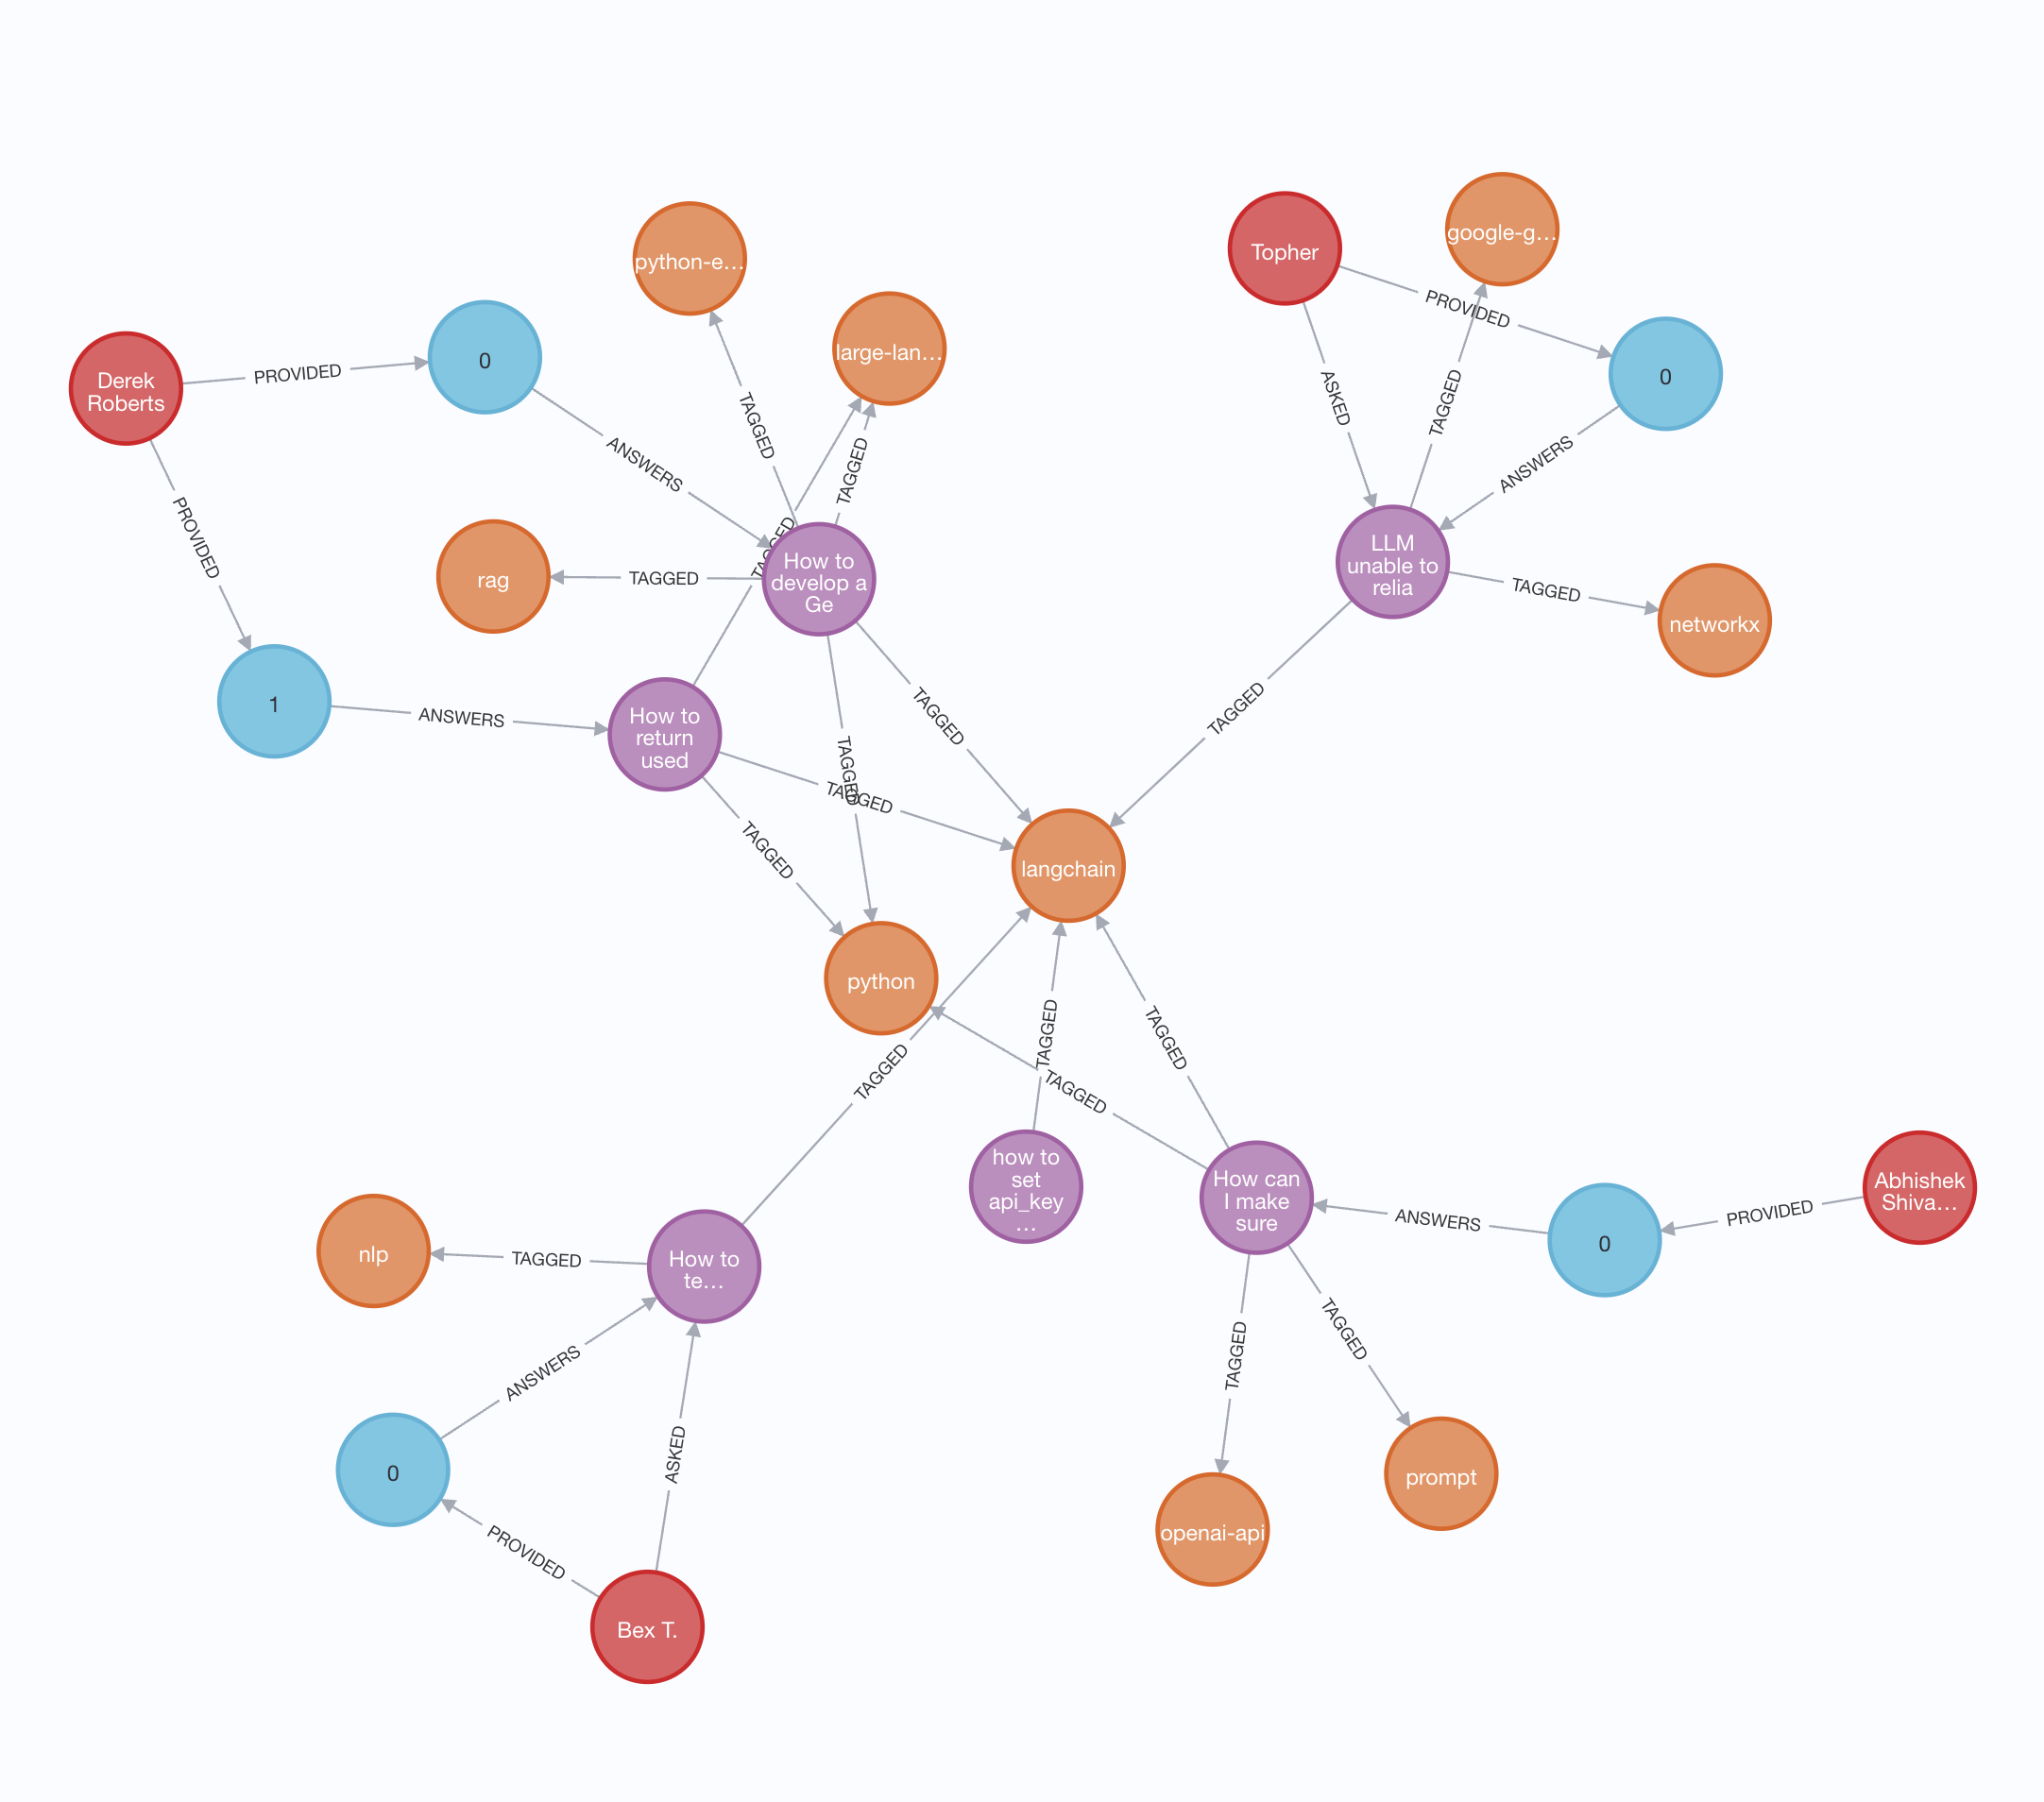
You can see a subset of the data imported as a graph below:
Querying the Imported Data Via a Chat Interface Using Vector and Graph Search
Now that the chatbot’s knowledge store has some data, you can start asking it questions.
The application served on http://localhost:8501 has a classic LLM chat UI that lets you ask questions and get answers.
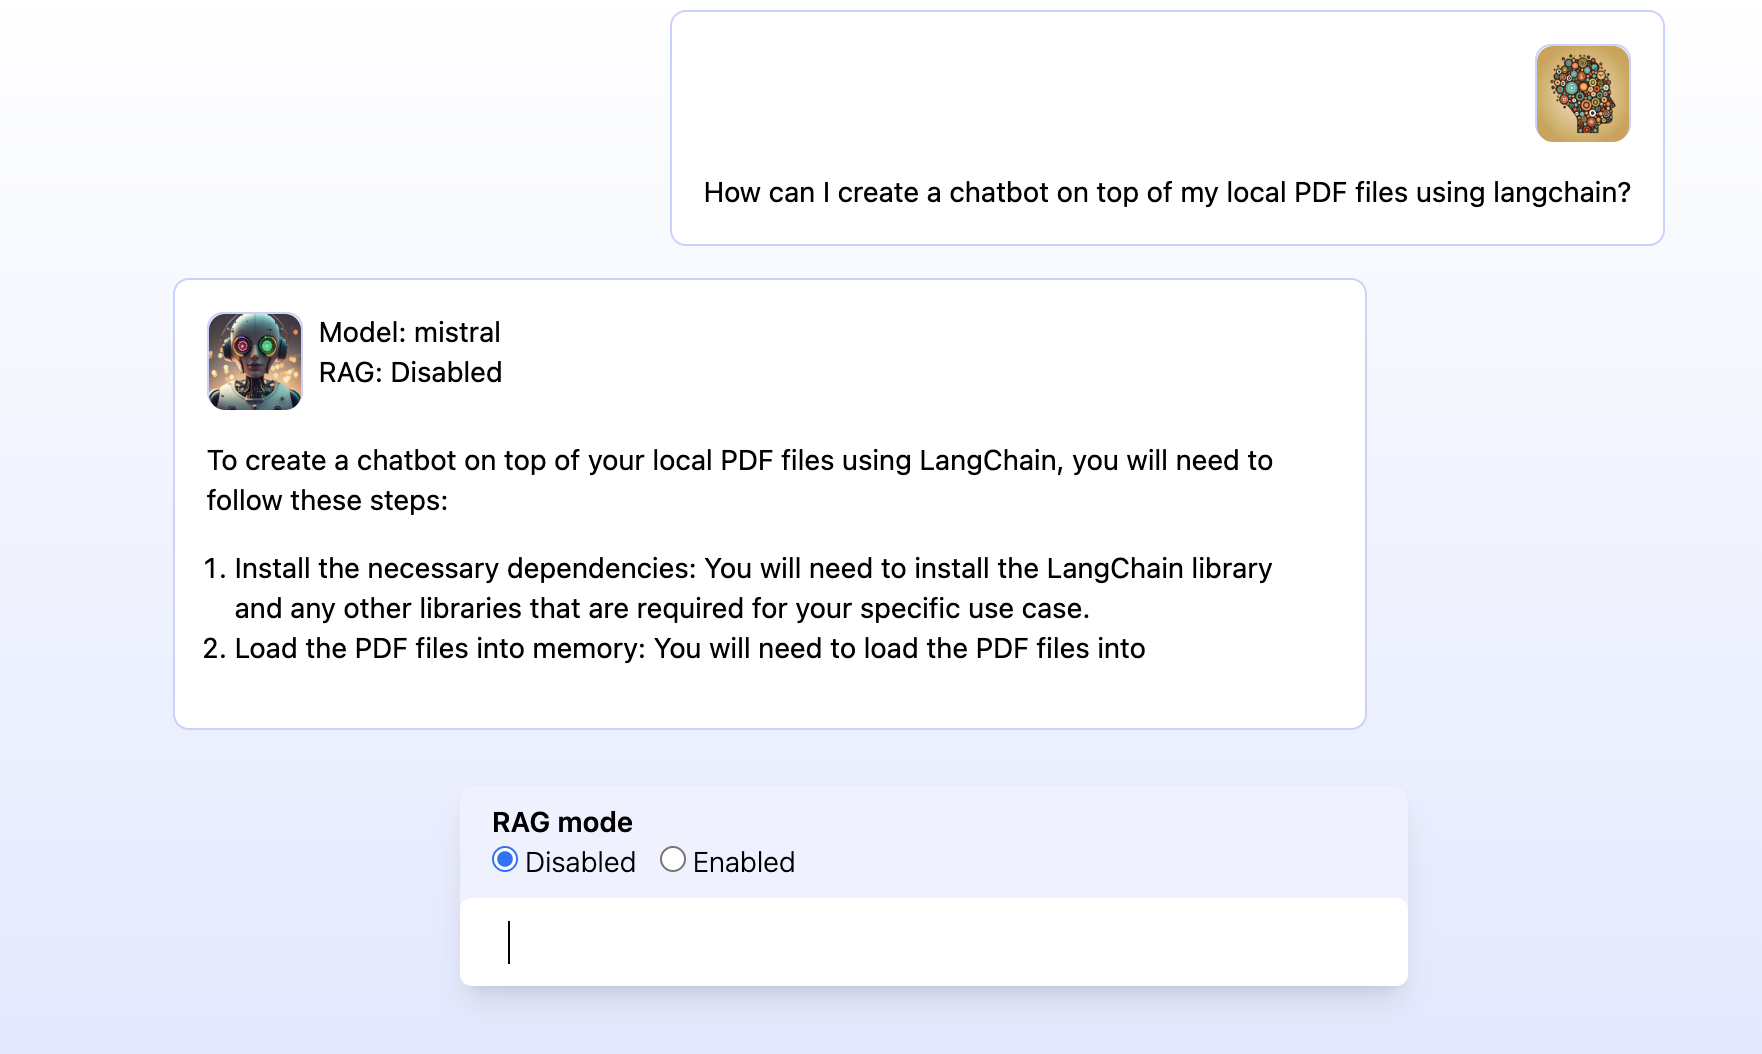
A switch called RAG mode lets the user choose whether they only want to rely on the trained knowledge of the LLM (RAG: Disabled) or whether the application should use similarity search with text embedding and graph queries to find the most relevant questions and answers in the database (RAG: Enabled).
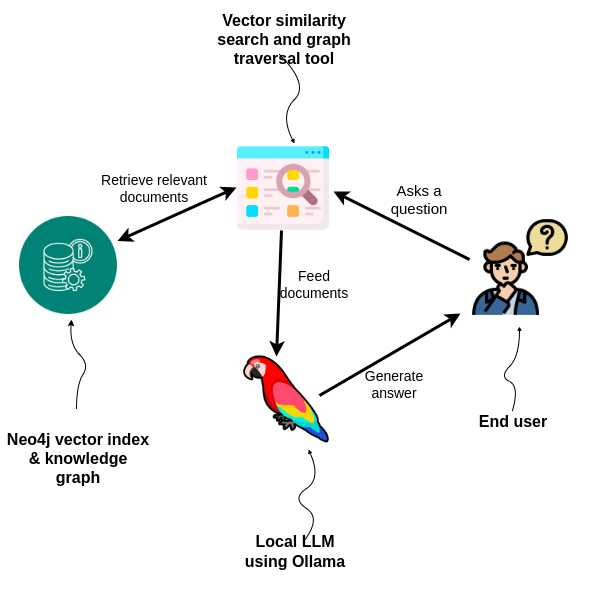
As the diagram above illustrates, the chat agent uses a vector similarity search and graph traversal tool to first retrieve relevant documents from the Neo4j graph database and then feeds the documents and the query to the LLM.
Traversing the data in the graph gives the LLM more context-rich and accurate information to answer the question than a pure vector lookup, which provides a better user experience. In this example, it helps the app find the most relevant (accepted and scored) answers for the questions returned from the similarity search. However, you could take this much further by taking relevant tags into account, for example.
Here is the Python code that uses LangChain to answer the user query with sources and information from the Neo4j graph database:
qa_chain = load_qa_with_sources_chain(n llm, n chain_type=u003cspan class=u0022hljs-stringu0022u003eu0022stuffu0022u003c/spanu003e, n prompt=qa_promptn)nn# Vector + Knowledge u003cspan class=u0022hljs-keywordu0022u003eGraphu003c/spanu003e responsenkg = Neo4jVector.from_existing_index(n embedding=embeddings, n url=url,n ..., n index_name=u003cspan class=u0022hljs-stringu0022u003eu0022stackoverflowu0022u003c/spanu003e,n retrieval_query=u003cspan class=u0022hljs-stringu0022u003eu0022u0022u003c/spanu003eu0022nCALL { with questionn MATCH (question)u0026lt;-[:ANSWERS]-(answer)n u003cspan class=u0022hljs-keywordu0022u003eRETURNu003c/spanu003e answern u003cspan class=u0022hljs-keywordu0022u003eORDERu003c/spanu003e u003cspan class=u0022hljs-keywordu0022u003eBYu003c/spanu003e answer.is_accepted u003cspan class=u0022hljs-keywordu0022u003eDESCu003c/spanu003e, answer.u003cspan class=u0022hljs-keywordu0022u003escoreu003c/spanu003e u003cspan class=u0022hljs-keywordu0022u003eDESCu003c/spanu003e LIMIT 2n}nu003cspan class=u0022hljs-keywordu0022u003eRETURNu003c/spanu003e question.title + ' ' + question.body + ' ' + collect(answer.body) u003cspan class=u0022hljs-keywordu0022u003eASu003c/spanu003e text, similarity, {source: question.link} u003cspan class=u0022hljs-keywordu0022u003eASu003c/spanu003e metadatanu003cspan class=u0022hljs-keywordu0022u003eORDERu003c/spanu003e u003cspan class=u0022hljs-keywordu0022u003eBYu003c/spanu003e similaritynu003cspan class=u0022hljs-stringu0022u003eu0022u0022u003c/spanu003eu0022,n)nnkg_qa = RetrievalQAWithSourcesChain(n combine_documents_chain=qa_chain,n retriever=kg.as_retriever(search_kwargs={u003cspan class=u0022hljs-stringu0022u003eu0022ku0022u003c/spanu003e: 2})n)
LangChain and Neo4j also support pure vector search.
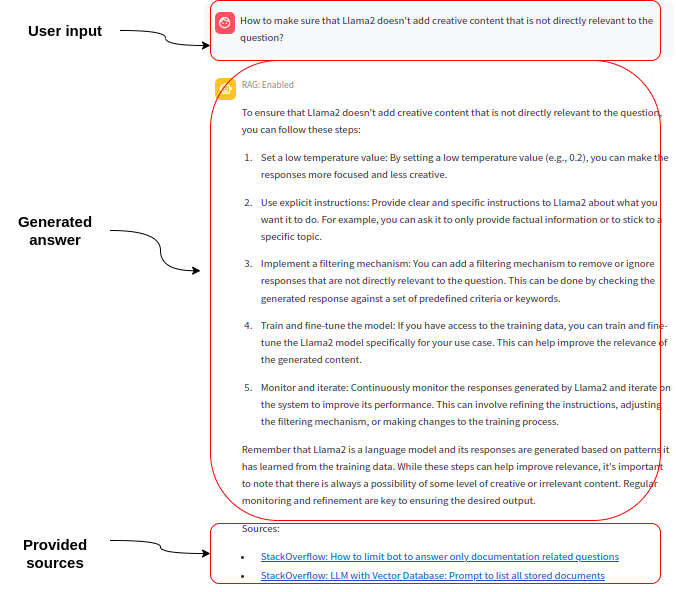
Because RAG applications can provide the sources used to generate an answer, they allow the user to trust and verify answers. In RAG mode, the example app instructs the LLM to provide the source of the information it uses to create a response. The sources it provides are links to Stack Overflow questions the LLM used for its response:
Generating New Questions in the Style of Highly Ranked Existing Ones
The demo application also allows the LLM to generate a new question in the style of highly ranked questions already in the database.
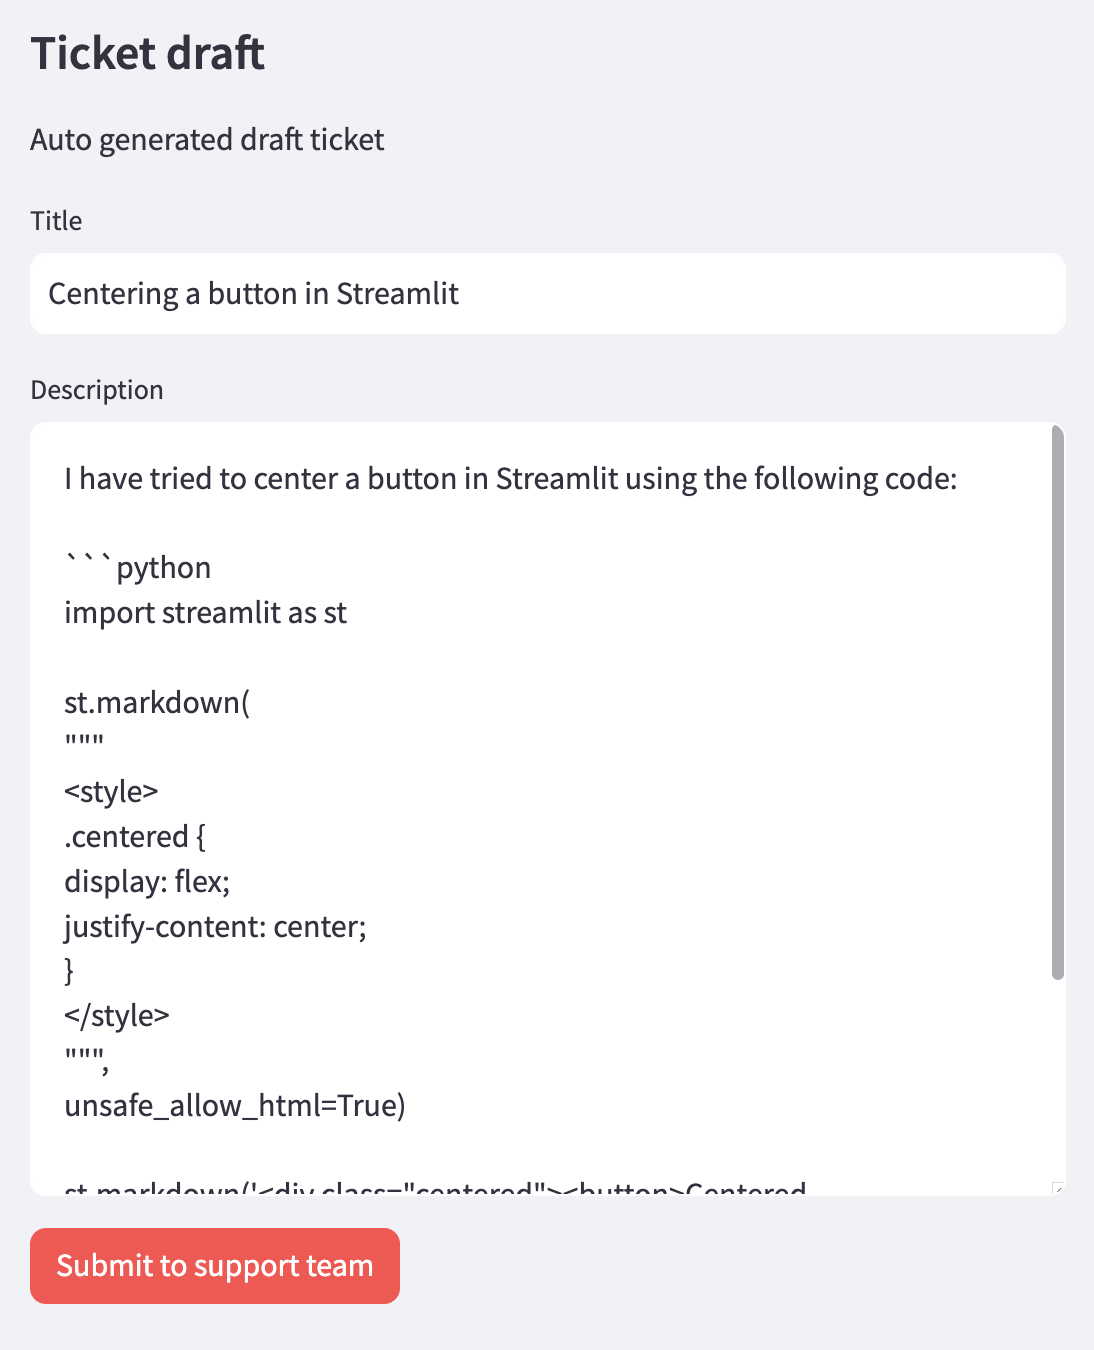
The imaginary situation here is that a support agent cannot find an answer to the end-user question in the existing knowledge base and wants to post a new question to the internal engineering support team.

When the user clicks the Generate ticket button, the LLM is fed high-ranking questions from the database with the user question. It’s then asked to create a new ticket based on the original user question with the same tone, style, and quality as the high-ranking ones.
Customizing Your App
Here’s how to make changes to these apps to adapt them to your use cases.
Customizing the Default Configuration
You can customize the default configuration of the example apps in the repo by creating a .env file in the repo and configuring the following environment variables:
| Variable name | Default value | Description |
|---|---|---|
OLLAMA_BASE_URL | http://host.docker.internal:11434 | REQUIRED – URL to Ollama LLM API |
NEO4J_URI | neo4j://database:7687 | REQUIRED – URL to Neo4j database |
NEO4J_USERNAME | neo4j | REQUIRED – Username for Neo4j database |
NEO4J_PASSWORD | password | REQUIRED – Password for Neo4j database |
LLM | llama2 | REQUIRED – Can be any Ollama model tag, or gpt-4 or gpt-3.5 or claudev2 |
EMBEDDING_MODEL | sentence_transformer | REQUIRED – Can be sentence_transformer, openai, aws, ollama, or google-genai-embedding-001 |
AWS_ACCESS_KEY_ID | REQUIRED – Only if LLM=claudev2 or embedding_model=aws | |
AWS_SECRET_ACCESS_KEY | REQUIRED – Only if LLM=claudev2 or embedding_model=aws | |
AWS_DEFAULT_REGION | REQUIRED – Only if LLM=claudev2 or embedding_model=aws | |
OPENAI_API_KEY | REQUIRED – Only if LLM=gpt-4 or LLM=gpt-3.5 or embedding_model=openai | |
GOOGLE_API_KEY | REQUIRED – Only required when using the Google GenAI LLM or embedding_model=google-genai-embedding-001 | |
LANGCHAIN_ENDPOINT | "https://api.smith.langchain.com" | OPTIONAL – URL to LangChain Smith API |
LANGCHAIN_TRACING_V2 | false | OPTIONAL – Enable LangChain Tracing V2 |
LANGCHAIN_PROJECT | OPTIONAL – LangChain project name | |
LANGCHAIN_API_KEY | OPTIONAL – LangChain API key |
You can change which local LLM to use by changing the value of the LLM variable. For other local LLMs via Ollama, specify the model you want to use by its tag, such as llama2:7b or mistral. To use any of the OpenAI LLMs, set the LLM variable to gpt-4 or gpt3.5 and set an OpenAI API key in the OPENAI_API_KEY variable.
For the embedding model of the app, you can choose from sentence_transformer, openai, aws, ollama, and google-genai-embedding-001.
If you want to use a local containerized instance of Neo4j, you don’t have to specify any of the Neo4j-related keys in the .env file. A default password (password) is specified in the docker-compose.yml file.
For using a remote Neo4j instance (for example, in Neo4j Aura), add values to the Neo4j-related variables (NEO4J_URI, NEO4J_USERNAME, and NEO4J_PASSWORD). You get these credentials as a text file download when you spin up your cloud instance.
If you want to observe and debug this LangChain application using LangSmith, log in to your LangChain account, create a project and API key, and add them as environment variables.
Once you have configured the .env file, start the applications by invoking docker compose up in a terminal.
Customizing the Code
You can also customize the code of the example app to your liking. Here’s how to edit each component.
Python
To make changes to the Python code (loader.py or bot.py) and have the affected containers automatically rebuild when your changes are saved, open a new terminal window and invoke docker compose alpha watch.
Any changes you make to the Python files will now rebuild the container it’s included in for a good developer experience.
Database
For any data changes, go to http://localhost:7474 to load Neo4j Browser (the password is password, configured in docker-compose.yml or in the .env file) to explore, edit, add, and delete any data in the database.
The configuration uses a local data folder in your current working directory to keep the database files across container rebuilds and restarts. To reset from scratch, delete that folder.
Other Changes
You can make any UI changes to the example app using the Streamlit framework. To serve the capabilities as an API instead, you can install FastAPI or Flask, expose chat endpoints, and build your UI using any front-end technology.
If you have private internal data like Obsidian Markdown notes, Slack conversations, or a real knowledge base, you can embed them and start asking them questions. LangChain has several integrations if you want to add and combine multiple data sources or other LLM providers in the GenAI application.
Next Steps
Building GenAI apps gets tricky quickly. If you’ve been struggling with inaccuracy and knowledge cutoff, we hope this demonstration of the example apps and how RAG can address these issues helps you.
If you want to work specifically with GraphRAG, Neo4j has also introduced GraphRAG Ecosystem Tools to enhance GenAI applications. These tools help you create a knowledge graph from unstructured text and use graphs to retrieve relevant information for generative tasks via both vector and graph search.


