Managing a Neo4j Database
About this module
Now that you have installed the Neo4j Enterprise Edition, you will learn how to perform some administrative tasks with the Neo4j instance.
At the end of this module, you will be able to:
-
Start a Neo4j instance.
-
Stop the Neo4j instance.
-
Set the password for the neo4j user.
-
Copy a Neo4j database.
-
Modify the location for a Neo4j database.
-
Check the consistency of a Neo4j database.
-
Create scripts for modifying a Neo4j database.
-
Manage plugins for a Neo4j database.
-
Configure ports used by the Neo4j instance.
-
Perform an online backup of a Neo4j database.
-
Create a database with the import tool.
Neo4j instance files
Depending on your platform, a Neo4j instance’s files are, by default, placed as described here. Here is a brief overview of the default folders you will frequently use for managing the Neo4j instance.
| Purpose of folder | Description |
|---|---|
Tools |
The /usr/bin folder contains the tooling scripts you will typically run to manage the Neo4j instance. |
Configuration |
Neo4j.conf is the primary configuration file for the Neo4j instance and resides in the /etc/neo4j folder. |
Logging |
The /var/log/neo4j folder contains log files that you can monitor. |
Database(s) |
The /var/lib/neo4j/data folder contains the database(s). |
Post-installation preparation
In this training, all screenshots and examples are shown using Neo4j Enterprise Edition installed as a Debian package. If your system is different, you will need to adjust file locations as described later in this module.
When you are setting up a production environment, you want to control who can manage the Neo4j instance. You will also want to control when the Neo4j instance starts as you will performing some configuration changes and database operations that may require that the instance to be stopped.
When Neo4j is installed as a Debian package, the neo4j service is enabled and the Neo4j instance is automatically started. Other platforms do not start the Neo4j instance automatically.
Post-install: Changing the neo4j password (non-Debian)
After you install Neo4j and before you start the Neo4j instance, a best practice is to change the default password for the user neo4j. You do this on all platforms, except when you have installed a Debian package. You will learn about changing the neo4j password on Debian later in this module.
You change the password for the neo4j user by executing the following command:
[sudo] bin/neo4j-admin set-initial-password newPasswordwhere newPassword is a password you will remember.
Post-install: Debian
Initially and on Debian, you will disable neo4j as a service that is started automatically when the system starts. You do this with this command:
[sudo] systemctl disable neo4jIn addition, you must create the folder /var/run/neo4j that is owned by neo4j:neo4j. This is where the PID for the currently running Neo4j instance is placed.
Managing the Neo4j instance
When the instance is started, it creates a database named graph.db in the default location which is a folder under /var/lib/neo4j/data/databases. You can start and stop the instance regardless of whether the neo4j service is enabled.
You start, stop, restart, and check the status of the Neo4j instance on Debian as follows:
-
[sudo] systemctl start neo4j -
[sudo] systemctl stop neo4j -
[sudo] systemctl restart neo4j -
[sudo] systemctl status neo4j
You start, stop, restart and check the status of the Neo4j instance on non-Debian systems as follows:
-
[sudo] bin/neo4j start -
[sudo] bin/neo4j stop -
[sudo] bin/neo4j restart -
[sudo] bin/neo4j status
When the Neo4j instance starts, it opens the database, and writes to the folders for the database and to the log file.
Checking the status of the instance
At any time, you can check the status of the Neo4j instance.
You check the status of the instance as follows:
systemctl status neo4jHere is an example where we check the status of the Neo4j instance:

Here we see that the instance is started. Notice that the service is disabled as well. After the instance is started you can identify the process ID (Main PID) from the status command on Debian. It is sometimes helpful to know the process ID of the Neo4j instance (JVM) in the event that it is unresponsive and you must kill it.
However, knowing whether the instance is started (active) is generally not sufficient, especially if you have made some configuration changes. You can view details of the Neo4j instance by examining the log file.
Viewing the neo4j log
The status command gives you a short glimpse of the status of the Neo4j instance. In some cases, although the instance is active, it may not have started successfully. You may want to examine more information about the instance, such as the folders it is using at runtime and information about activity against the instance, and especially if any errors occurred during startup. As an administrator, you will become familiar with the types of records that are written to the log files for the Neo4j instance.
You can view the log file for the instance on Debian as follows:
-
journalctl -u neo4jto view the entire neo4j log file. -
journalctl -e -u neo4jto view the end of the neo4j log file. -
journalctl -u neo4j -b > neo4j.logwhere you can view neo4j.log in an editor.
Here is the result from journalctl:
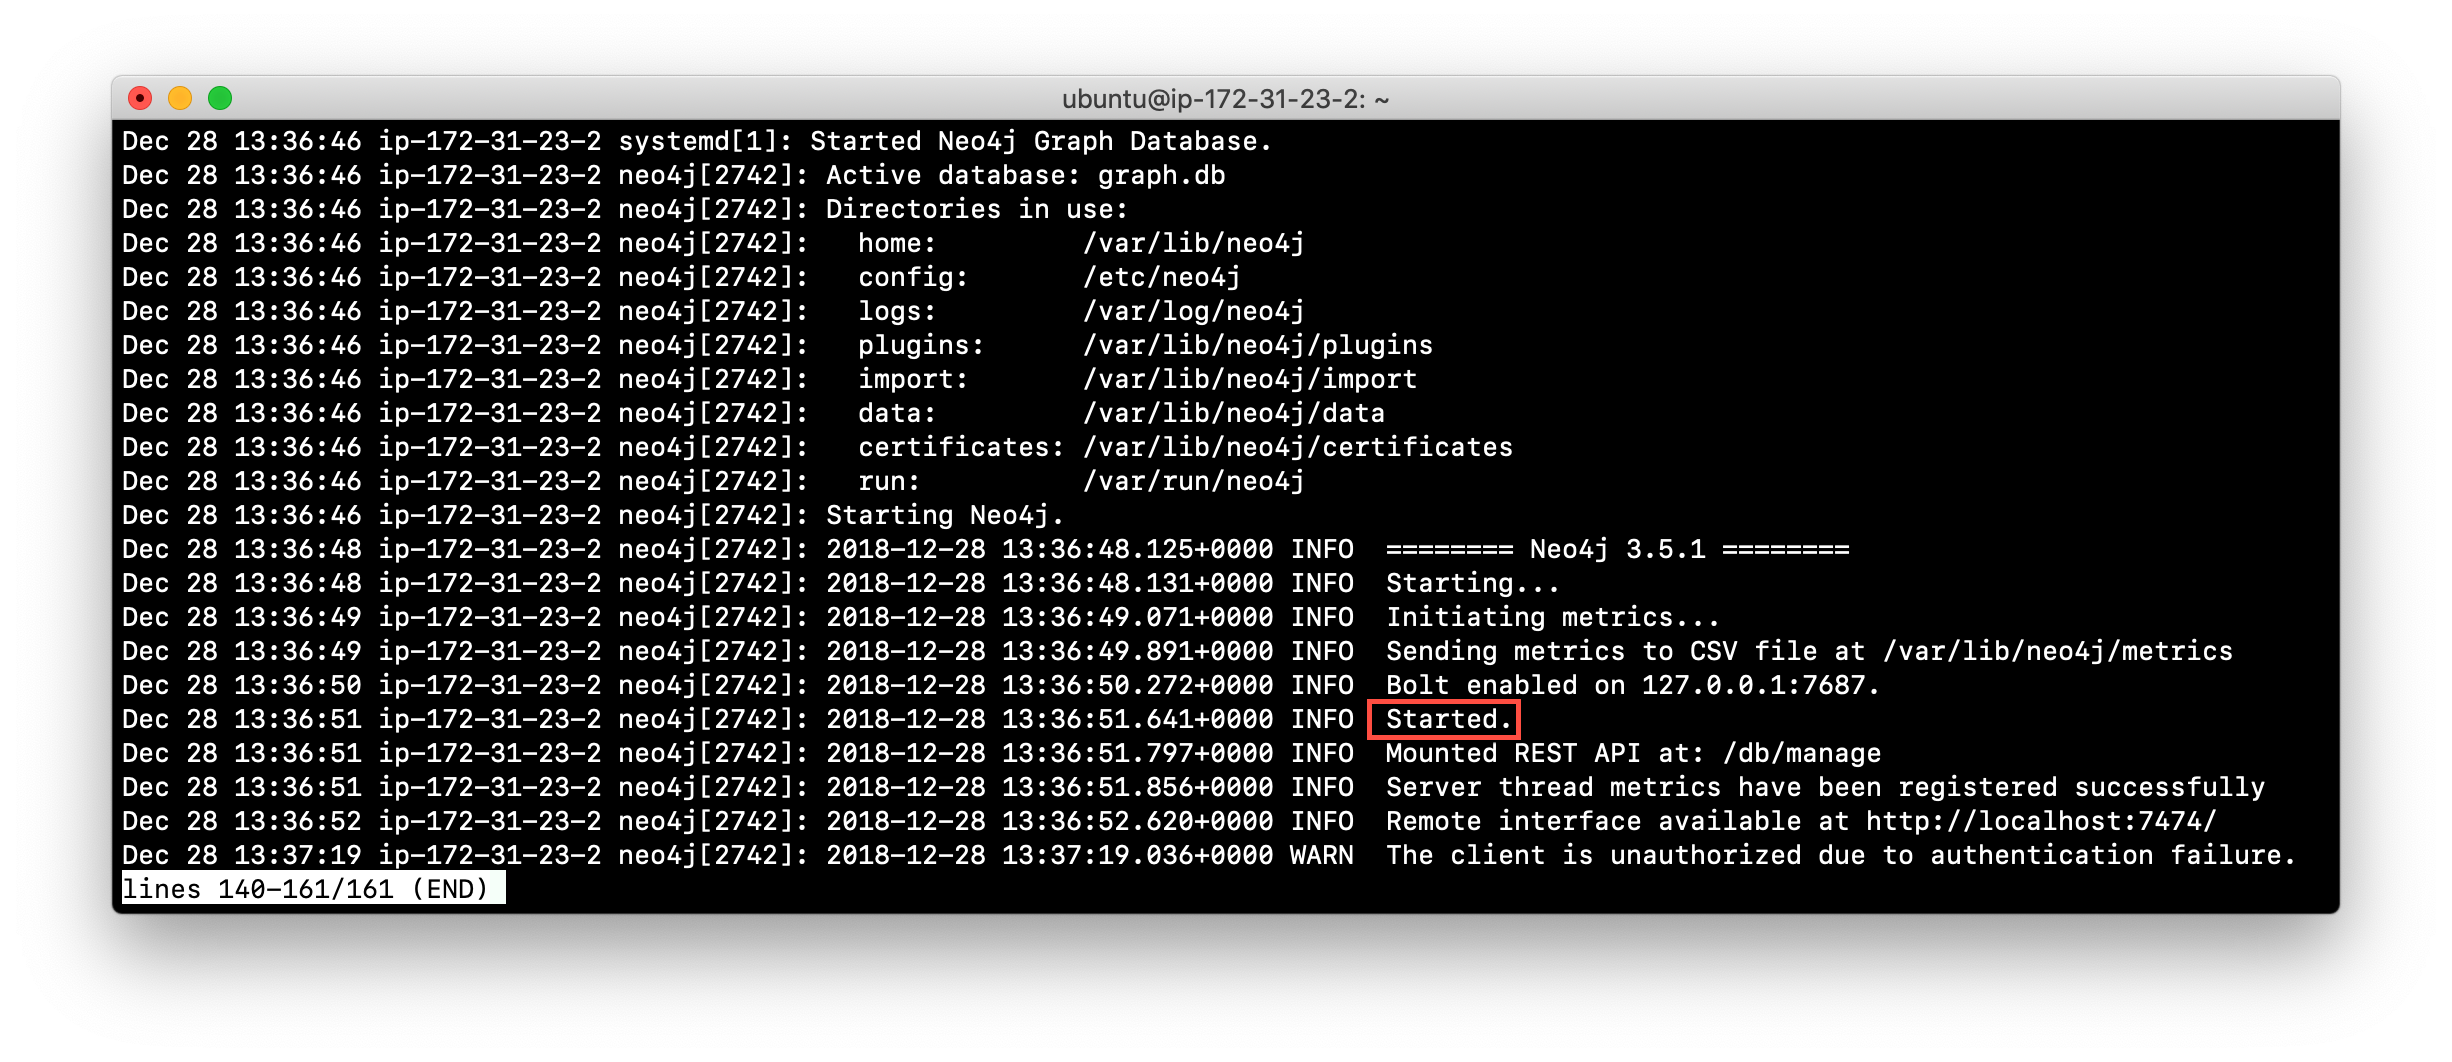
When the Neo4j instance starts, you can also confirm that it is started by seeing the Started record in the log file.
| You can also view the log file in the logs folder on all platforms. |
Exercise #1: Managing the Neo4j instance
In this Exercise, you will stop and start the Neo4j instance and view its status and log file.
Before you begin
You must disable the neo4j service [sudo] systemctrl disable neo4j, if you are using a system that utilizes the neo4j service (for example, Debian).
Exercise steps:
-
Open a terminal on your system.
-
View the status of the Neo4j instance.
-
Stop the Neo4j instance.
-
View the status of the Neo4j instance.
-
Examine the Neo4j log file.
-
Examine the files and folders created for this Neo4j instance.
Using cypher-shell
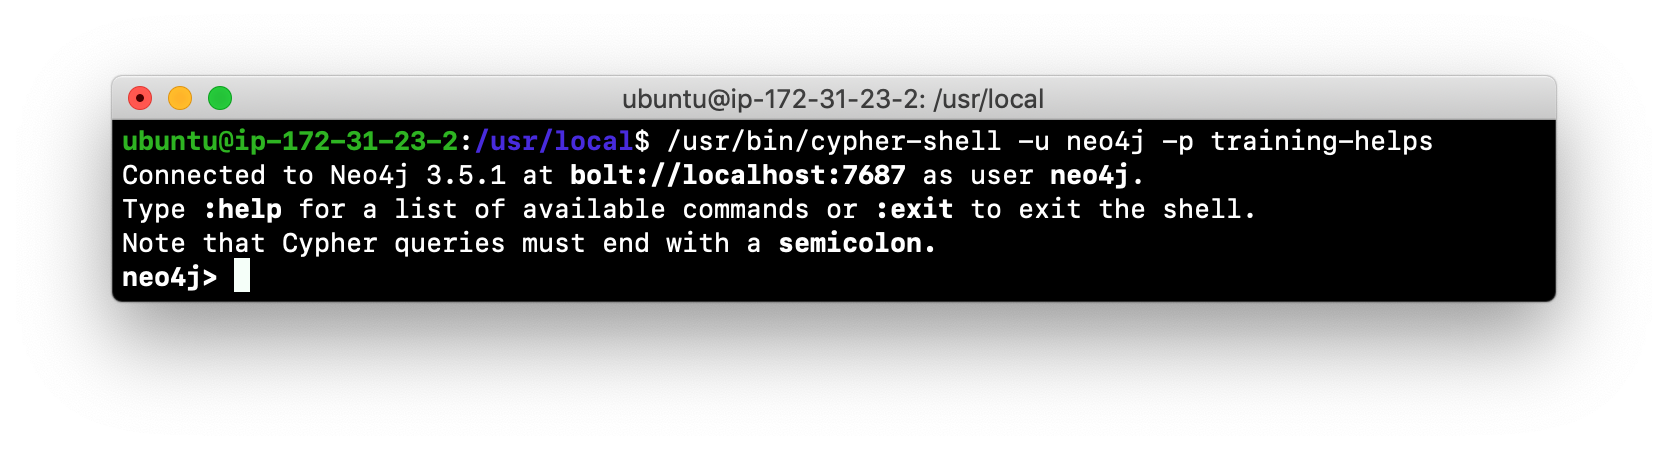
cypher-shell enables you to access the Neo4j database from a terminal window. You simply log into the database using cypher-shell with your credentials:
/usr/bin/cypher-shell -u <username> -p <password>Once authenticated, you enter Cypher statements to execute just as you would in a Neo4j Browser session. One caveat with cypher-shell, however is that all Cypher commands must end with ;. You exit cypher-shell with the command :exit.
Example: Using cypher-shell
Here is an example showing that we can successfully log in to the database for the Neo4j instance, providing the default credentials neo4j/neo4j:
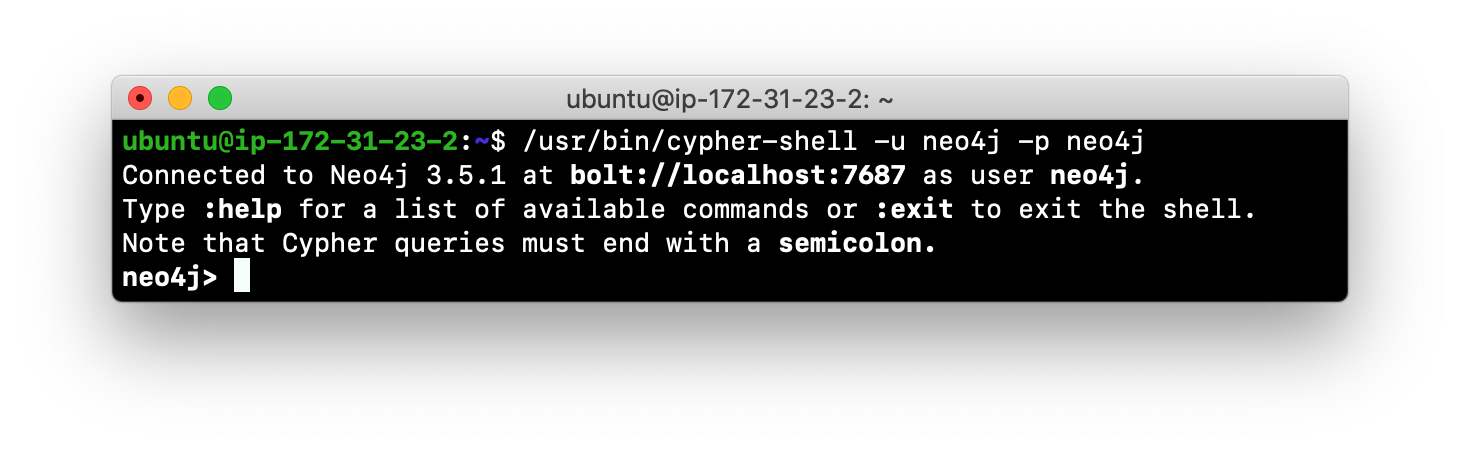
If you set the environment variables NEO4J_USER and NEO4J_PASSWORD with their respective values, then you need not enter your credentials when logging into cypher-shell.
|
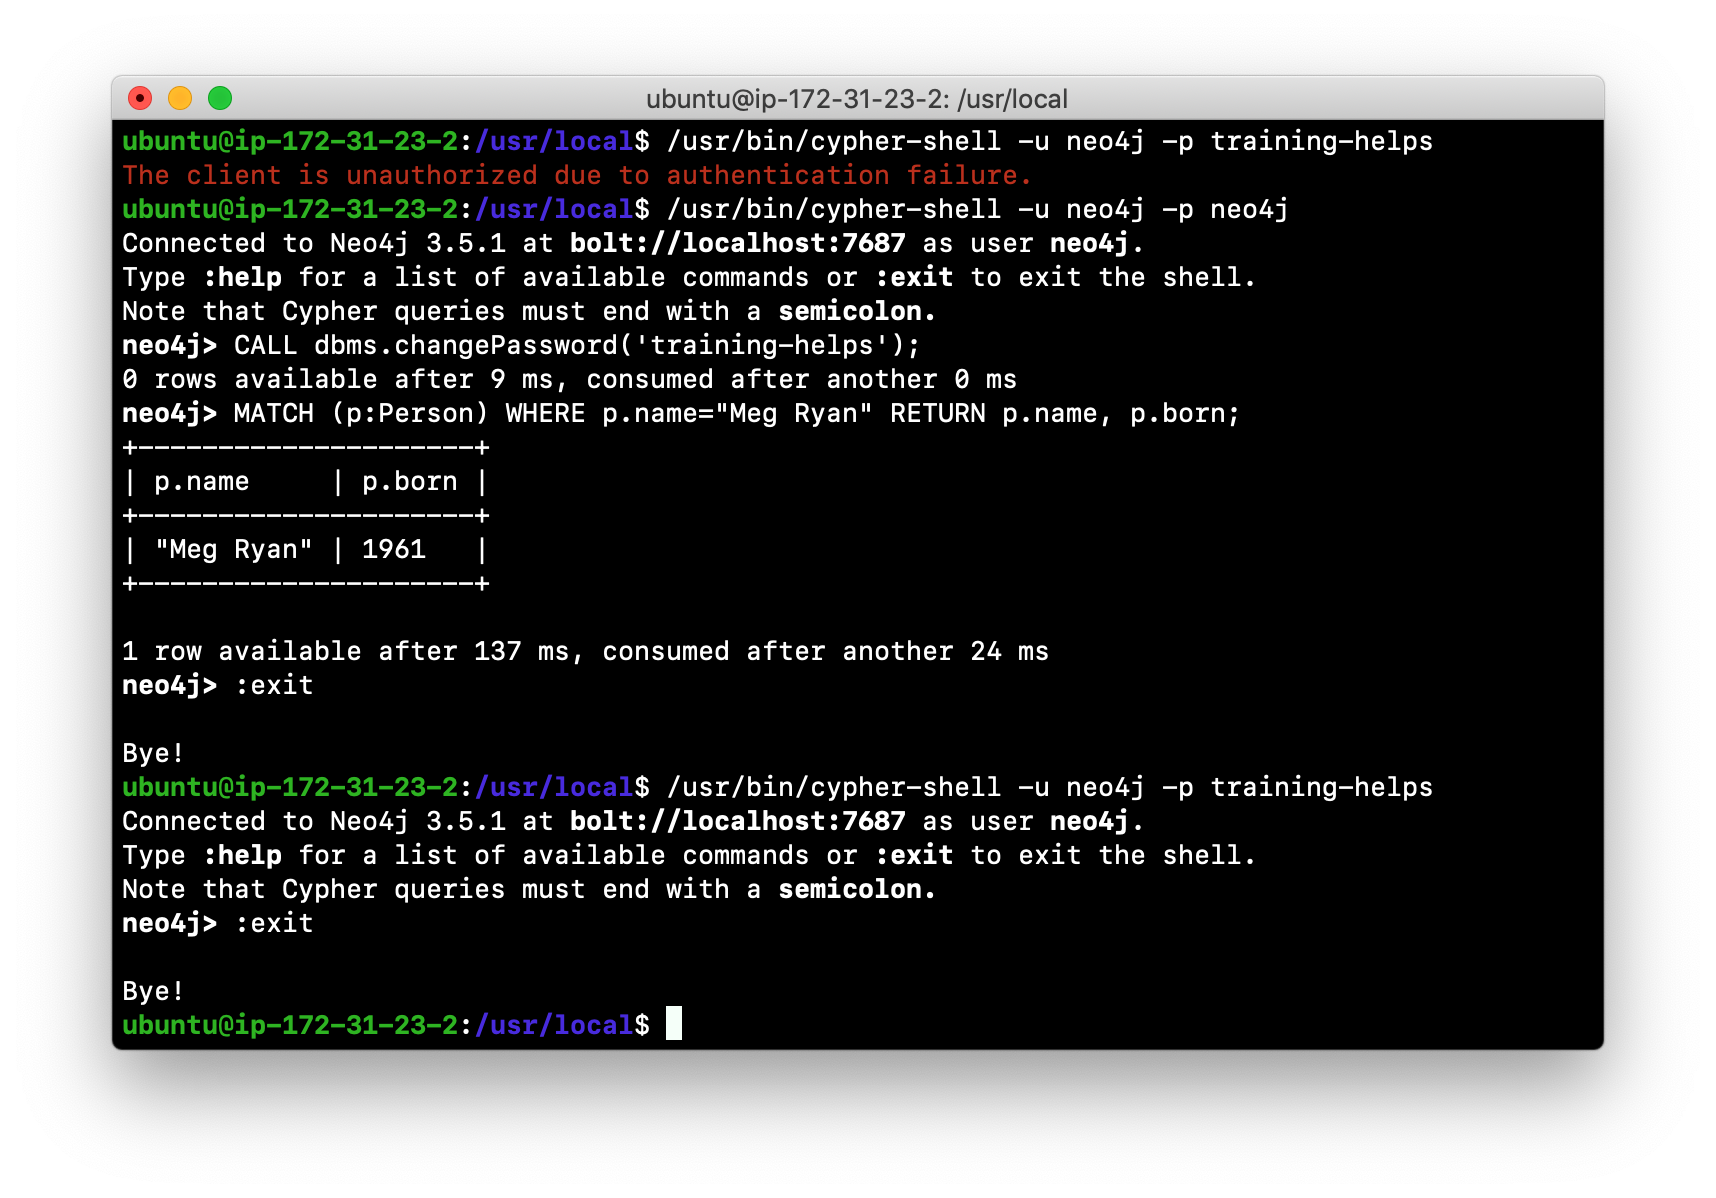
Changing the default password (Debian only)
If we were to attempt to access the database for the first time, we would receive an error. This is because the default credentials neo4j/neo4j must be changed. As an administrator, you want to control who can manage this Neo4j instance and its database. To do so, you change the default password for the neo4j user. Later in this training, you will learn more about securing Neo4j by managing users and their access.
While logged into the database in cypher-shell, you execute the procedure to change the password:
CALL dbms.changePassword('newPassword');In this example, we log into cypher-shell with our credentials. Then we execute the Cypher command to change the password. Finally, we specify :exit to log out of cypher-shell.
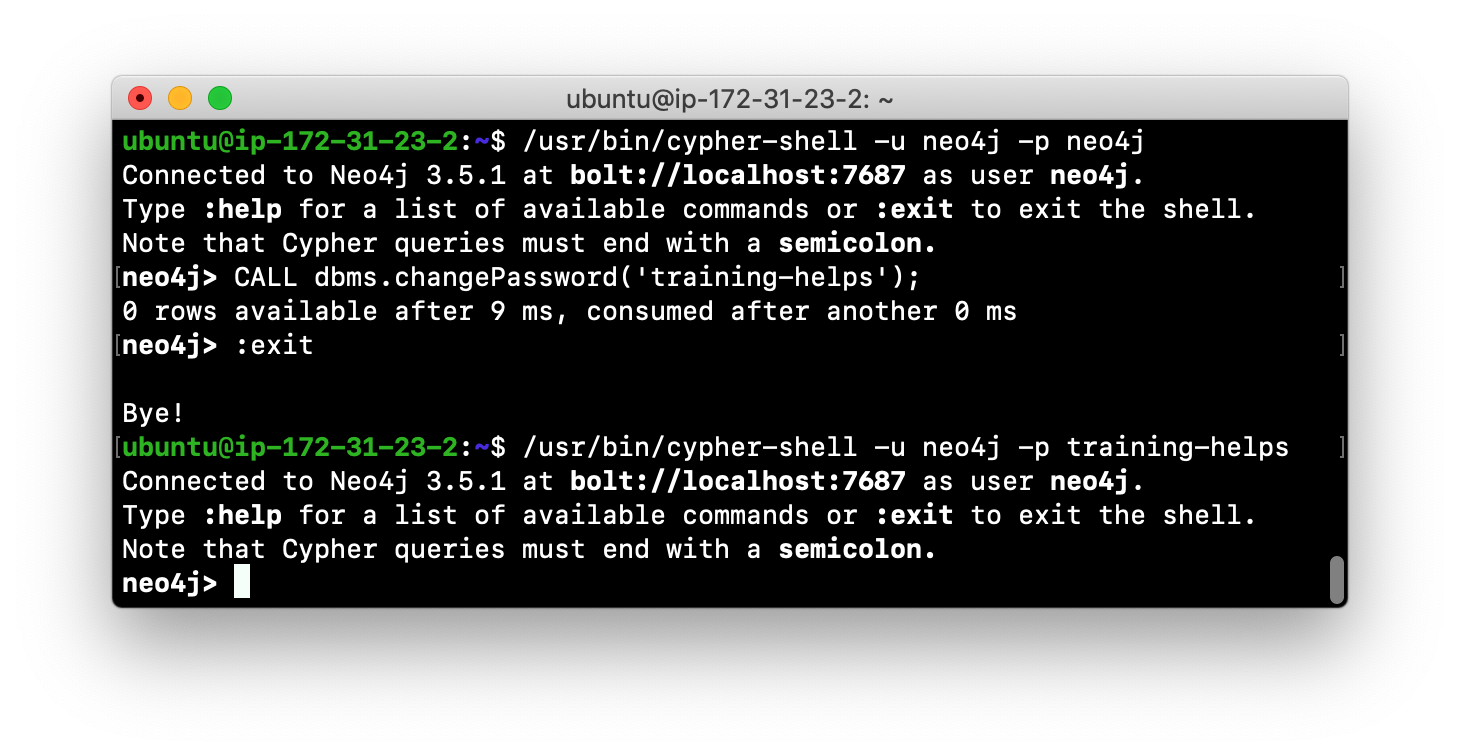
After changing the default password for the Neo4j instance (database), we are now able to access the database after logging in with the new credentials.
Accessing the database
Here is an example where we execute a Cypher statement against the empty database where we list all active queries:
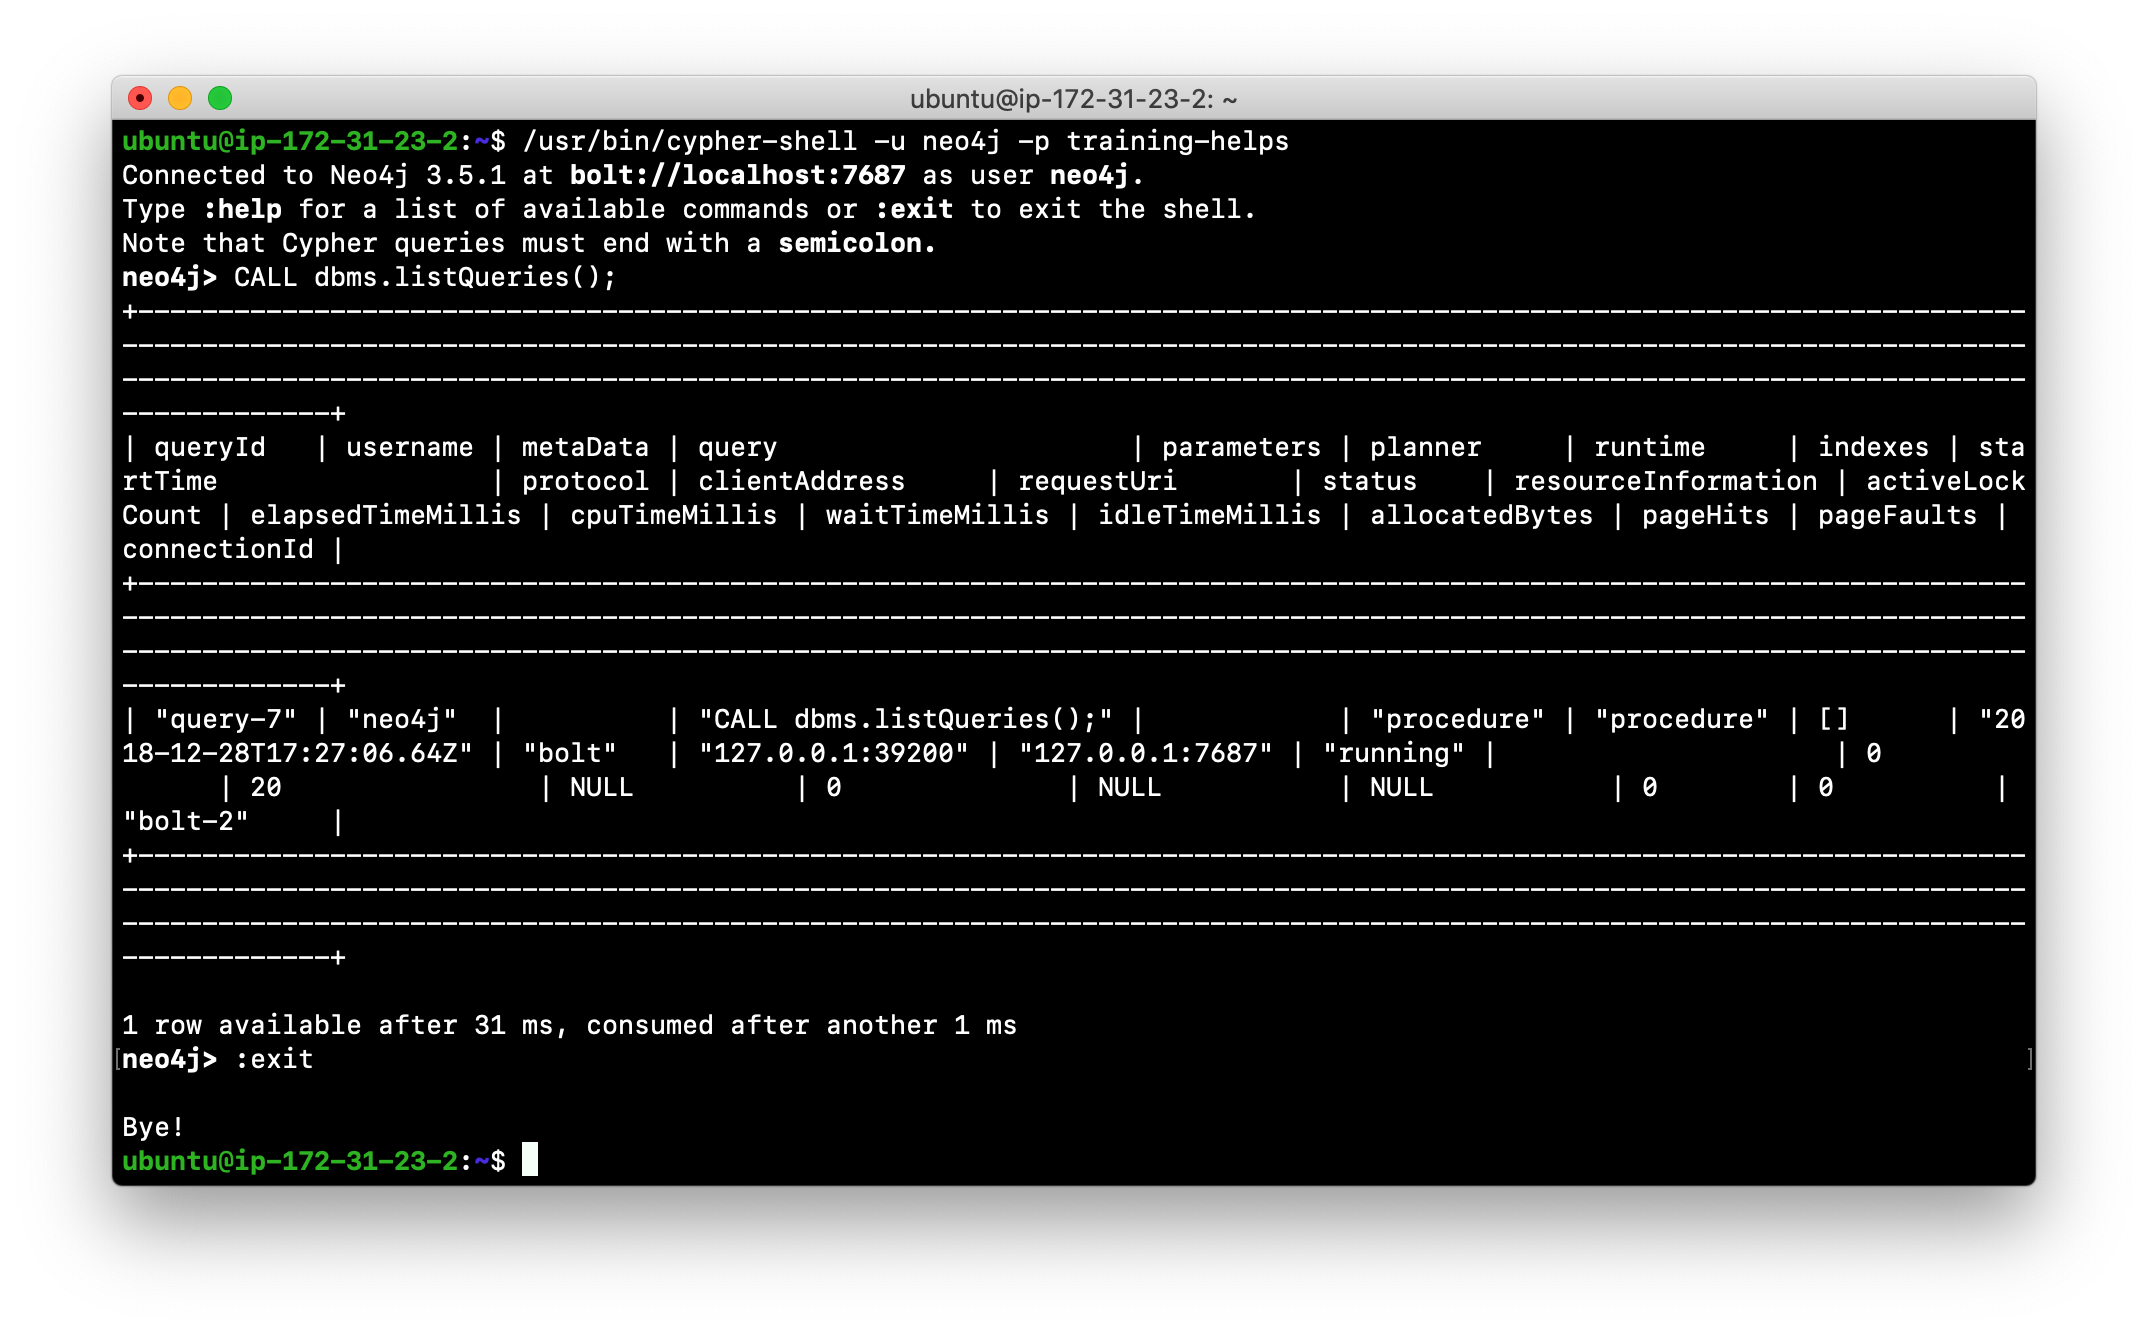
When you are done with cypher-shell, you enter :exit to exit.
Exercise #2: Using cypher-shell to change the password
In this Exercise, you will log in to the database with cypher-shell, change the password for the database, and execute a Cypher statement to load the database. You can perform this Exercise regardless of the type of system you are using.
Before you begin
Ensure that the Neo4j instance is started.
Exercise steps:
-
Open a terminal on your system.
-
Log into the database with
cypher-shellusing the default credentials of neo4j/neo4j. (or different credentials if you changed the password previously with )neo4j-admin set-initial-password) -
Execute the Cypher statement,
CALL dbms.listQueries();. Do you get an error? Note you will not get an error if you previously changed the password. -
Execute the Cypher statement to change the password to something you will remember.
-
Exit out of
cypher-shell. -
Log into the database with
cypher-shellusing the new credentials. -
Execute the Cypher statement,
CALL dbms.listQueries();. -
Exit out of
cypher-shell. -
Download this file. This file contains the Cypher statements to load the database with movie data.
-
Invoke
cypher-shellsending movieDB.cypher as input. You will see something like the following:
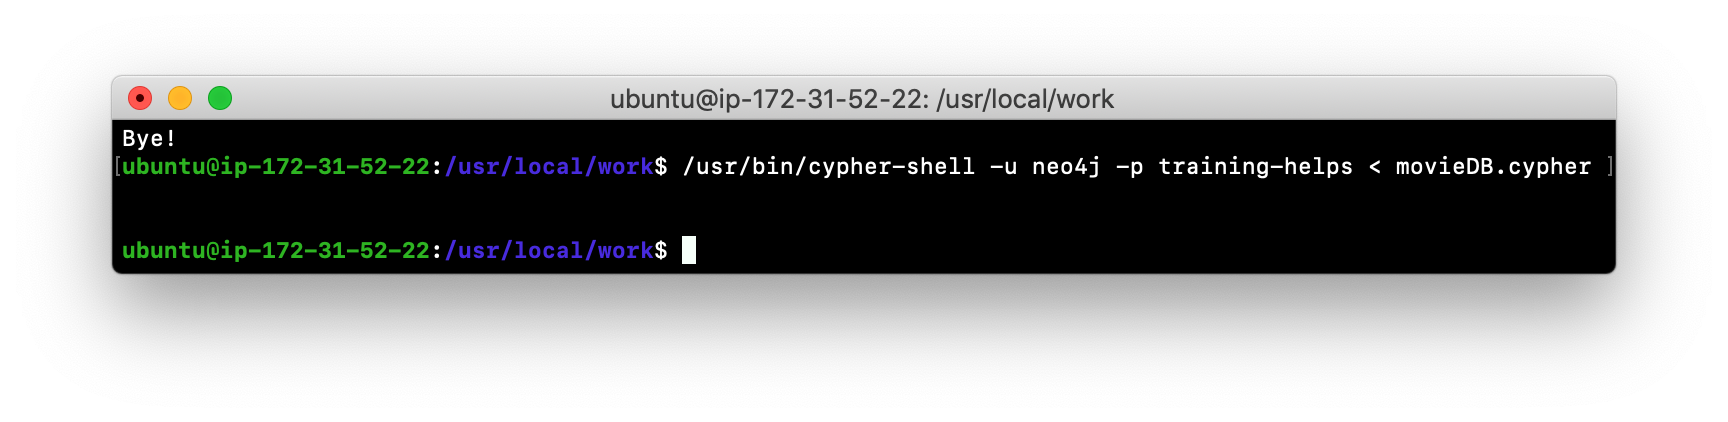
-
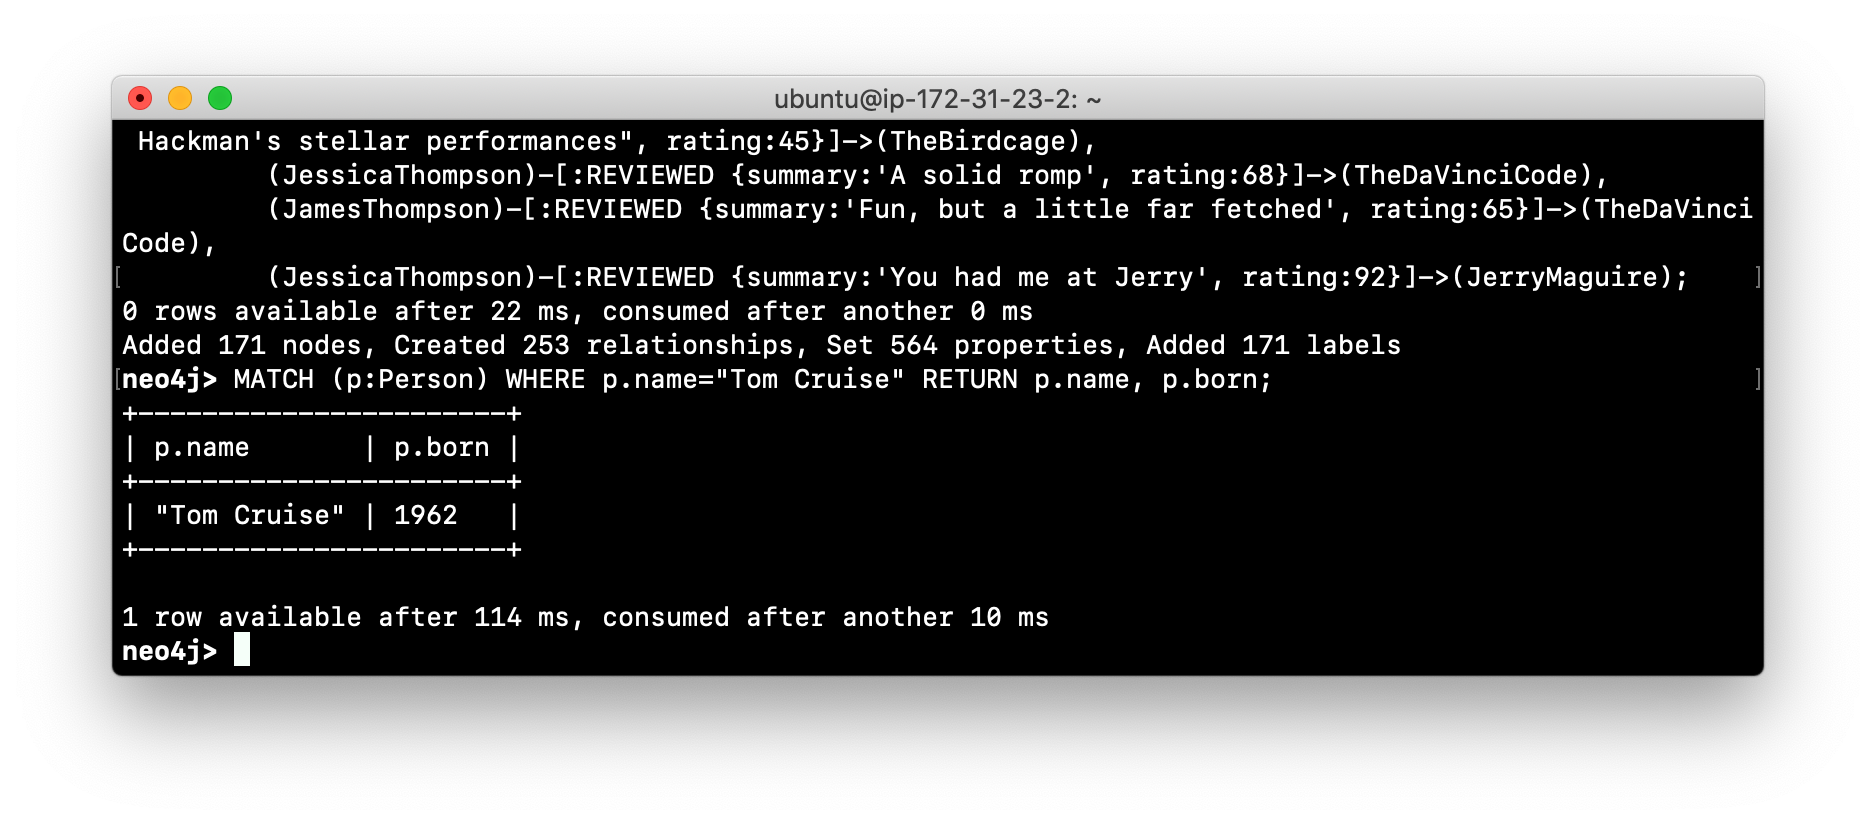
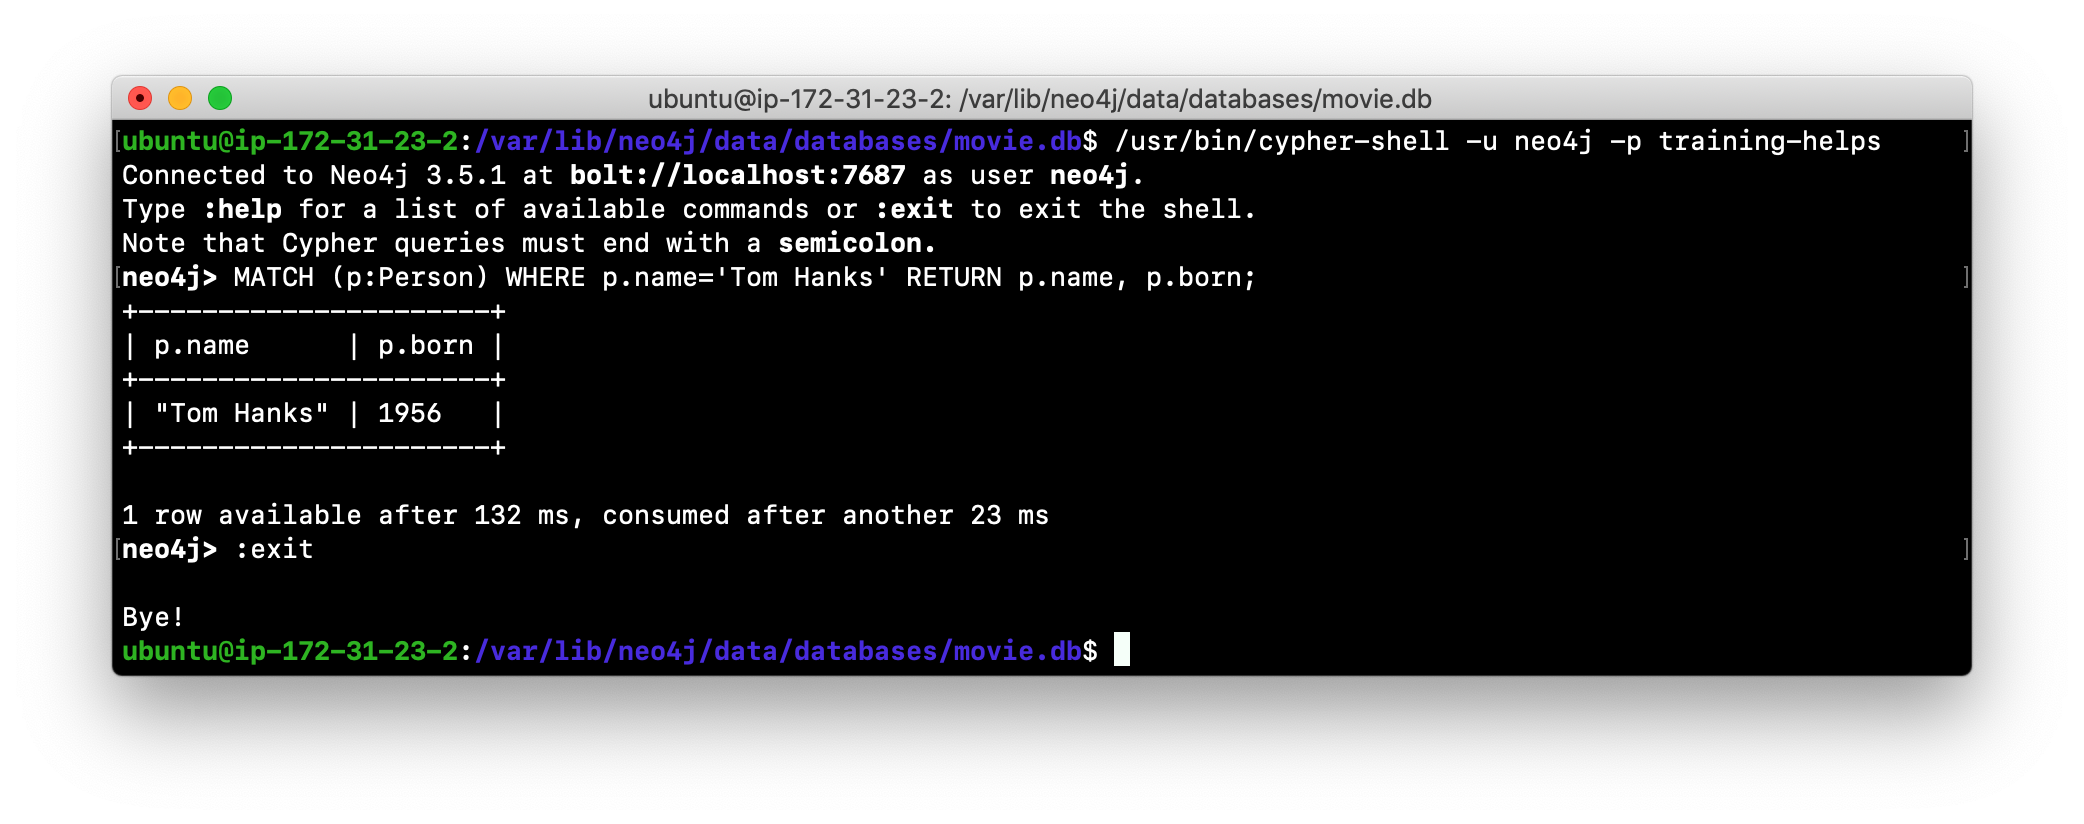
The database is now populated with the Movie data. Log in to
cypher-shelland execute a Cypher statement to retrieve data from the database, for example:MATCH (p:Person) WHERE p.name='Tom Cruise' RETURN p.name, p.born;You will see the following:
-
Exit
cypher-shell.
Renaming a Neo4j database
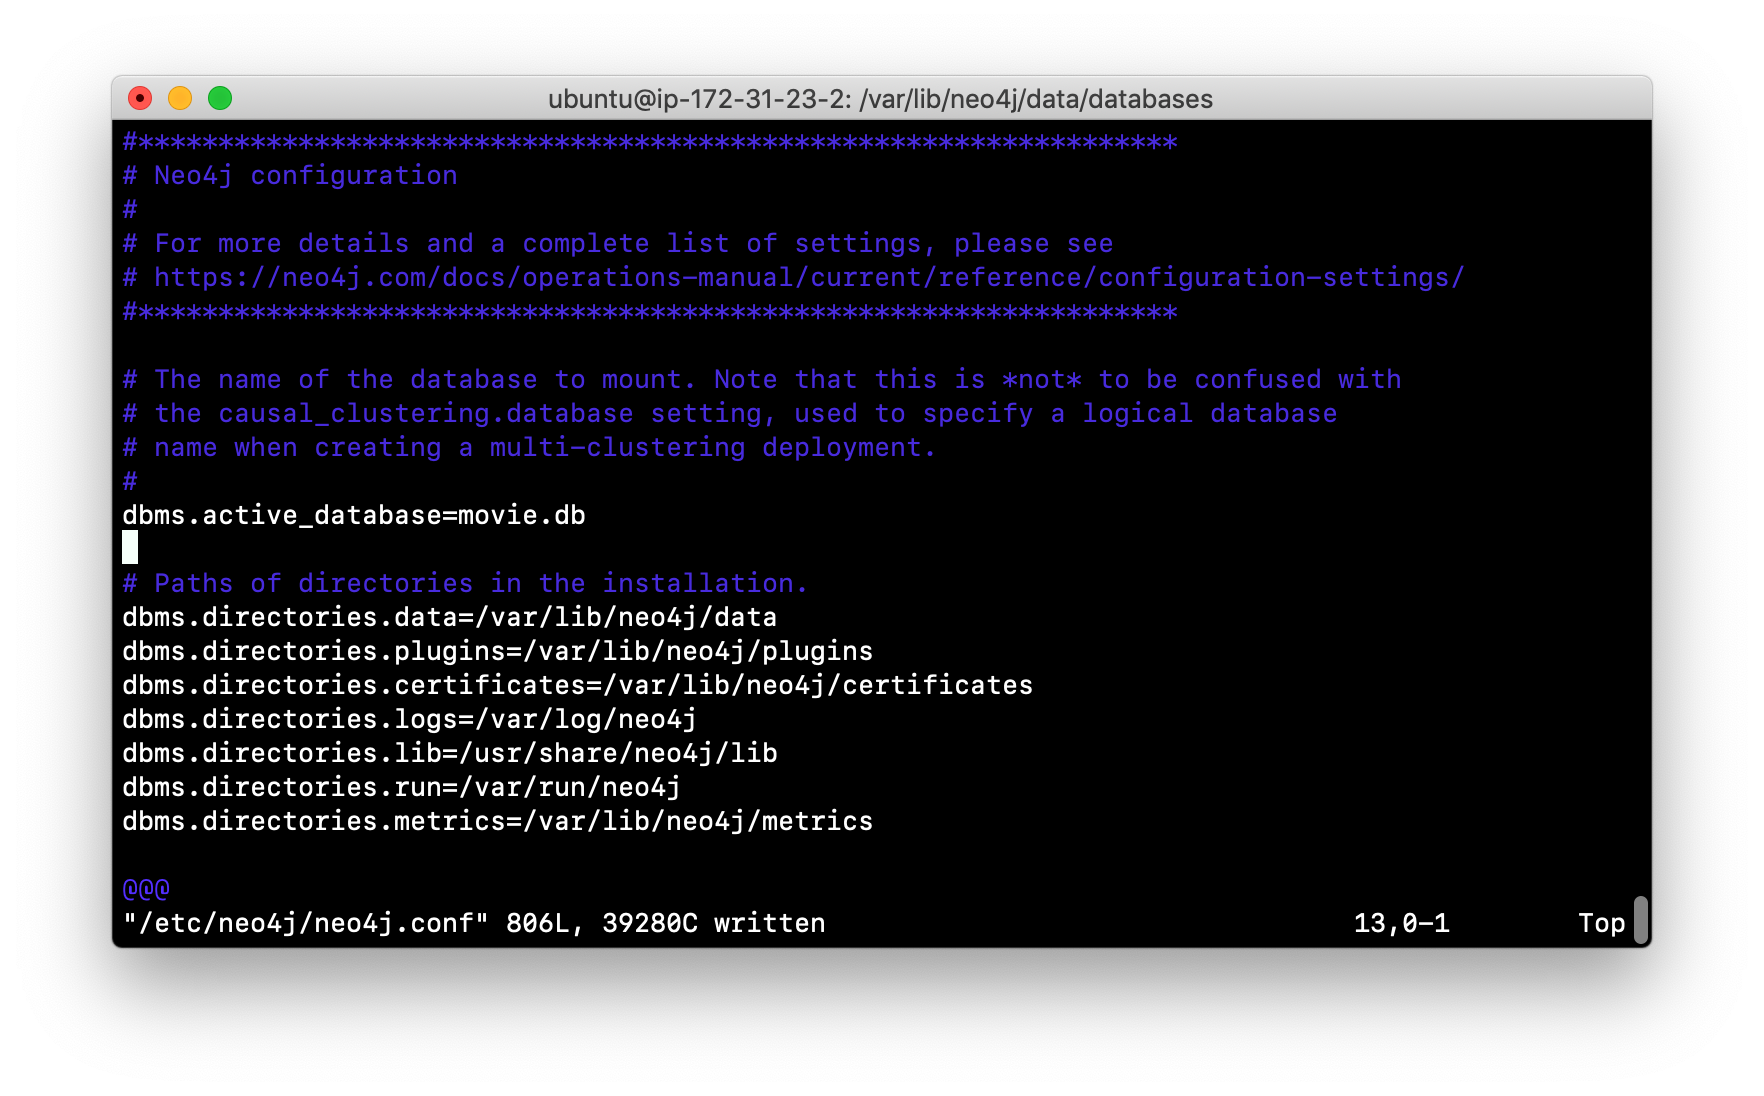
By default, the Neo4j database (on Debian) is located in the /var/lib/neo4j/data/databases folder. The database is represented by a subfolder with the default name, graph.db. You must never modify, copy, or move any files or folders at or under graph.db.
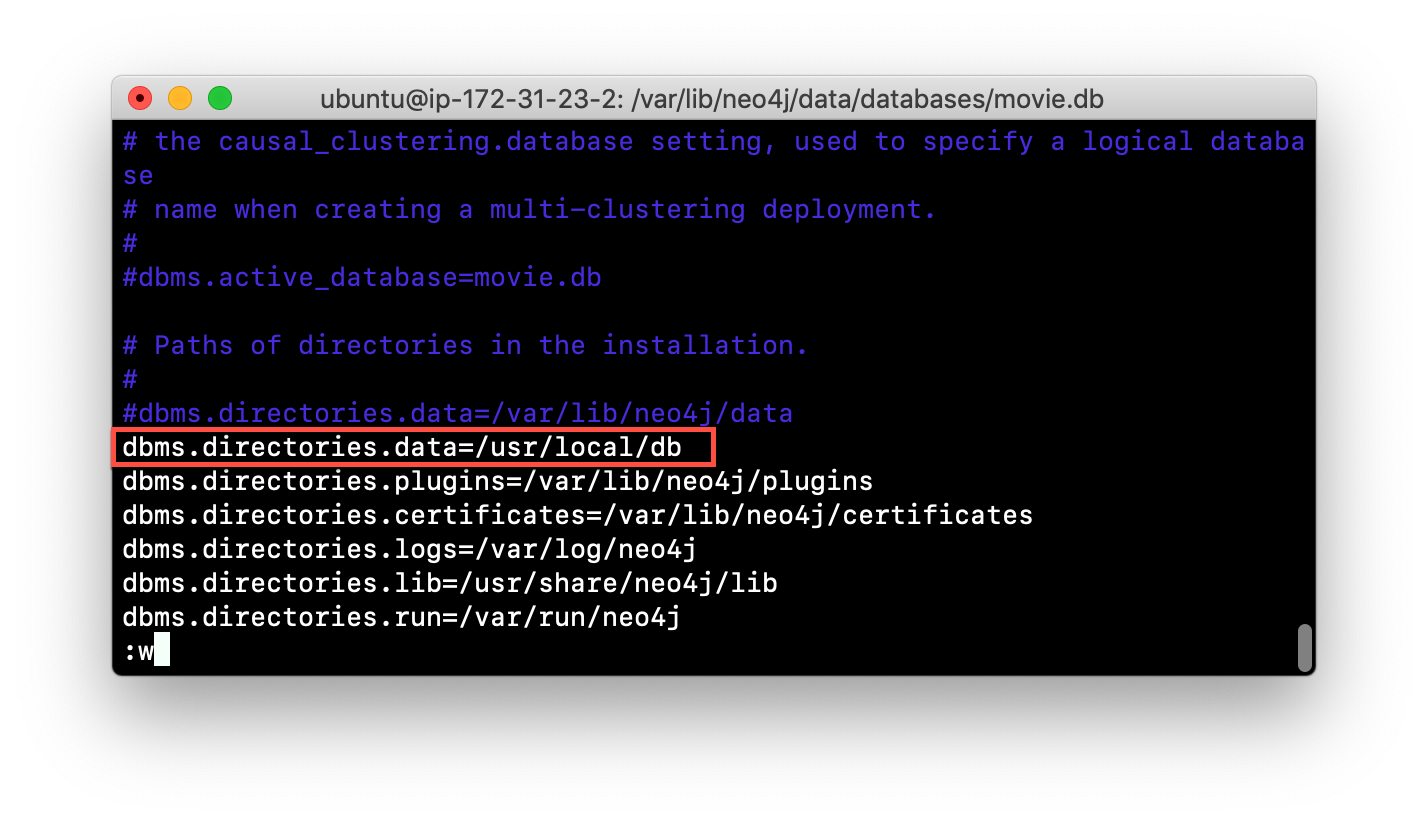
A key file for a Neo4j instance is /etc/neo4j/neo4j.conf. This file contains all settings used by the Neo4j instance at runtime. Here is a portion of the default neo4j.conf file that is installed with Neo4j. The setting for the name of the database is the property dbms.active_database, which, by default, is graph.db. Since this is the default configuration as installed, this setting is commented out in the configuration file because Neo4j uses the default at runtime.
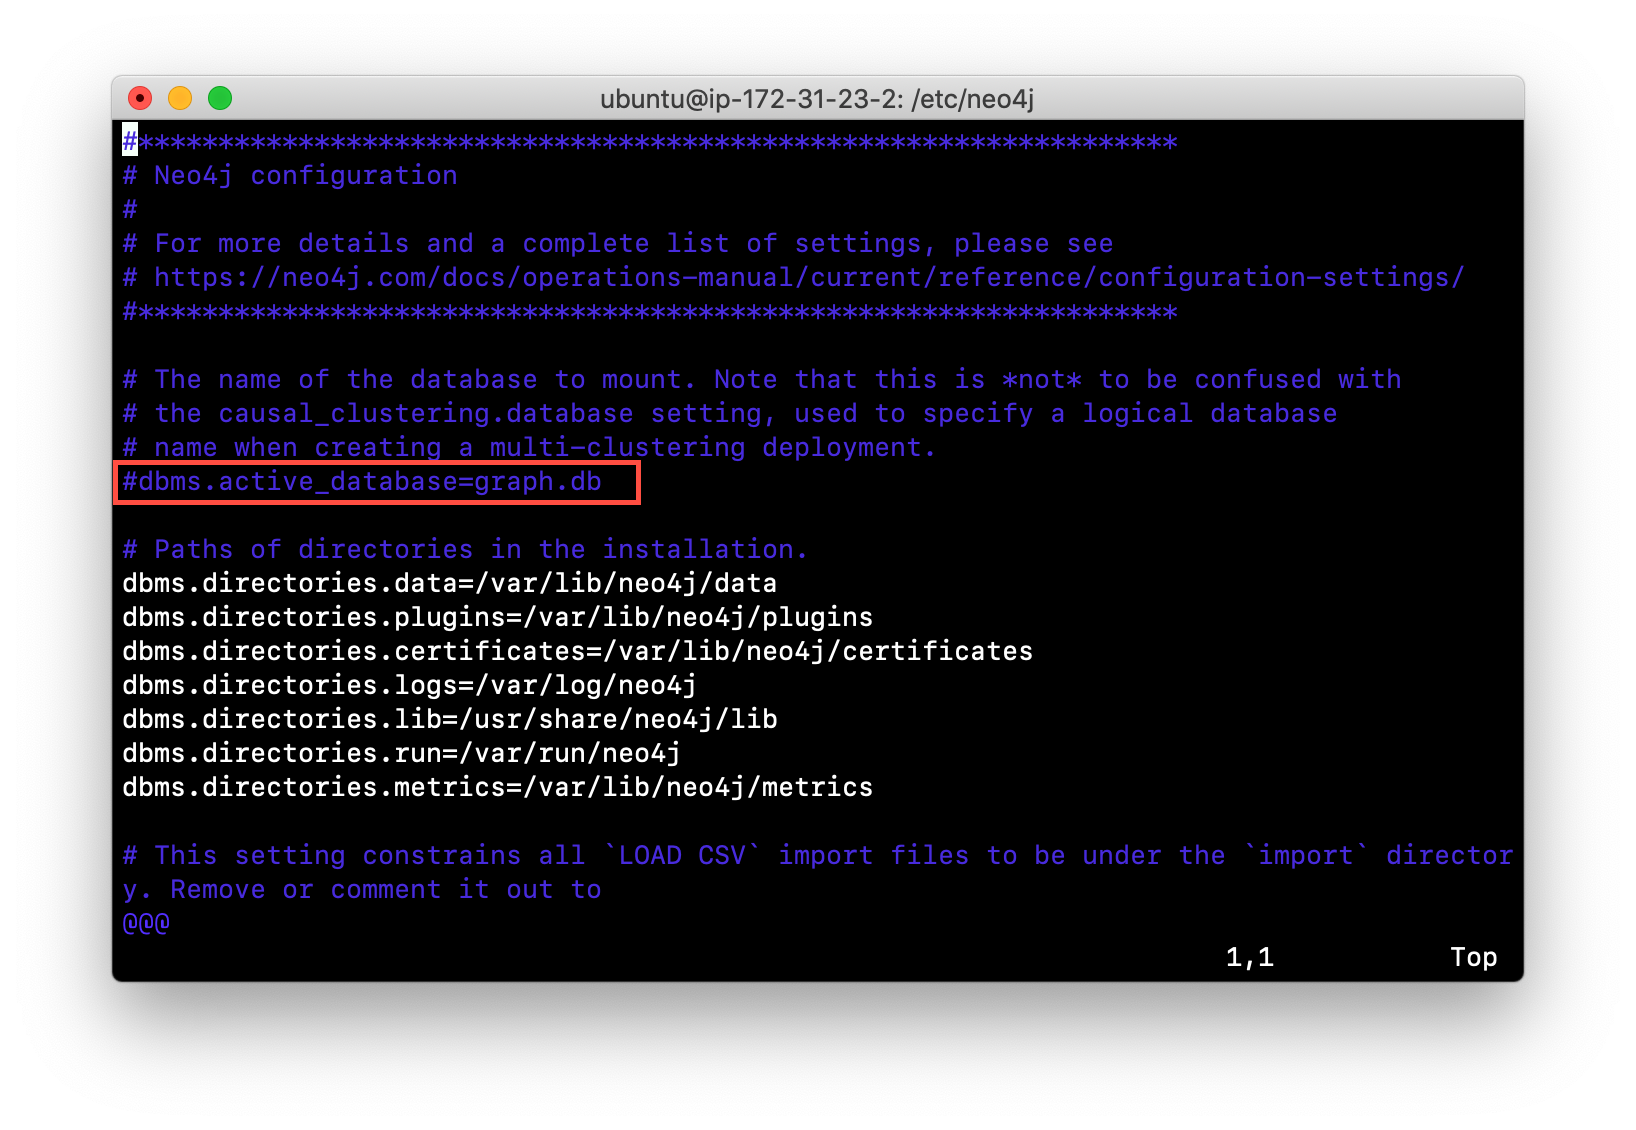
If you wanted to change the name of the Neo4j database, you could change the folder name graph.db to another name, but if you do so, you must uncomment the line in neo4j.conf for dbms.active_database to match what you have renamed the database folder to. You must make this type of change in the configuration when the Neo4j instance is stopped.
Deleting a Neo4j database
You would want to delete a Neo4j database for a couple of reasons:
-
The database is no longer needed or usable and you want to recreate a fresh database.
-
The database is no longer needed and you want to remove it so that a new database can be used. To do this you would load a new database which you will learn about next in this module.
To delete a Neo4j database used by a Neo4j instance you must:
-
Stop the Neo4j instance.
-
Remove the folder for the active database.
For example, delete the graph.db database:
[sudo] rm -rf /var/lib/neo4j/data/databases/graph.dbAfter deleting the Neo4j database, if you were to start the Neo4j instance, it would recreate an empty database. If you want to copy an existing database for use with this Neo4j instance, you dump and load an existing database to be used as the active database. Then you can start the Neo4j instance. You will learn about dumping and loading a database next.
Copying a Neo4j database
The structure of a Neo4j database is proprietary and could change from one release to another. You must never copy the database from one location in the filesystem/network to another location. You copy a Neo4j database by creating an offline backup.
To create an offline backup of a database that, perhaps you want to have as an additional copy or you want to give to another user for use on their system, you must:
-
Stop the Neo4j instance.
-
Ensure that the folder where you will dump the database exists.
-
Use the
dumpcommand of theneo4j-admintool to create the dump file. -
You can now copy the dump file between systems.
Then, if you want to create a database from any offline backup file to use for a Neo4j instance, you must:
-
Stop the Neo4j instance.
-
Determine what you will call the new database and adjust neo4j.conf to use this database as the active database.
-
Use the
loadcommand of theneo4j-admintool to create the database from the dump file using the same name you specify in the neo4j.conf file. -
Start the Neo4j instance.
| Dumping and loading a database is done when the Neo4j instance is stopped. Later in this module, you will learn about online backup and restore. Offline backup is typically done for initial setup and development purposes. Online backup and restore is done in a production environment. |
Creating and offline backup
To create an offline backup, the Neo4j instance must be stopped.
Here is how to use the dump command of the neo4j-admin tool to dump a database to a file:
[sudo] neo4j-admin dump --database=db-folder --to=db-target-folder/db-dump-filewhere:
db-folder |
is the name of the folder representing source database to be dumped. |
db-target-folder |
is the folder in the filesystem where you want to place the dumped database. This folder must exist. |
db-dump-file |
is the name of the dump file that will be created. |
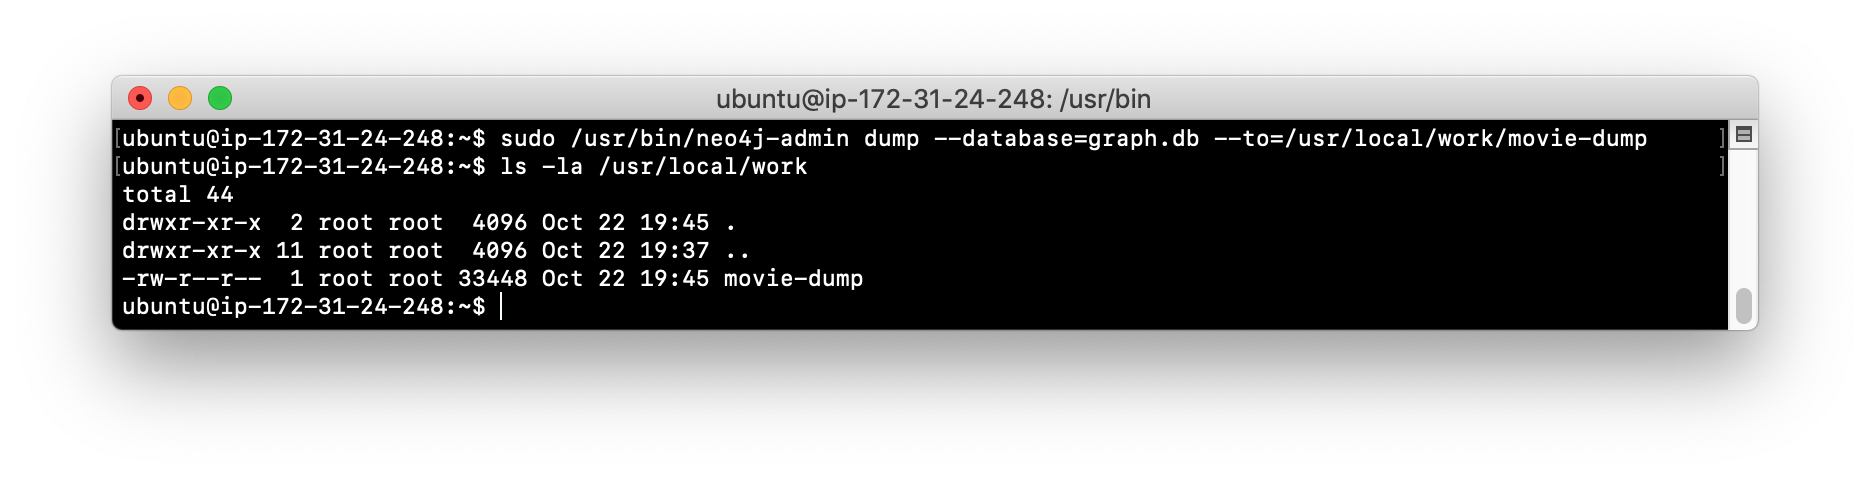
Here is an example where we have previously renamed the database to be movie.db and we have created a folder named dumps. We dump the movie.db using neo4j-admin:
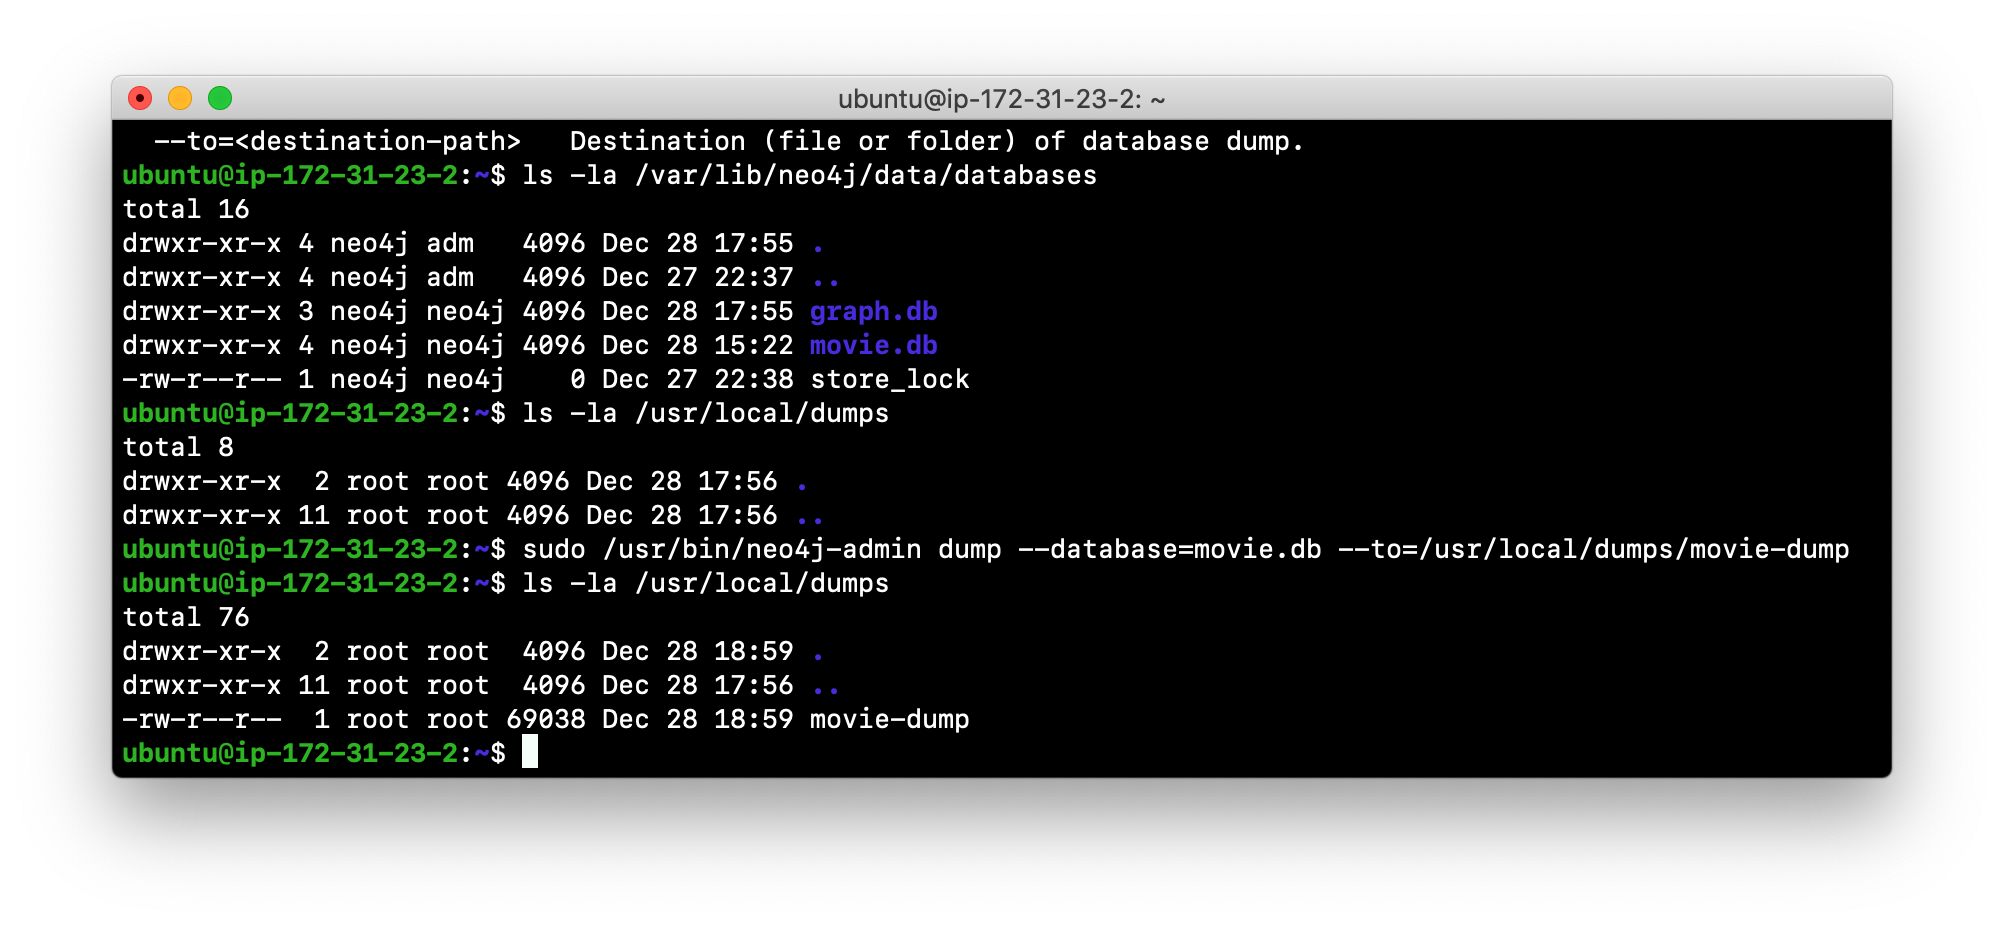
After the dump file, movie-dump is created, you can move it anywhere on the filesystem or network.
Creating a database from an offline backup
Assuming that you have a dump file to use, you must first determine what the name of the target database will be. If you use an existing database name, the load command, can overwrite the database. If you want to create a new database, then you specify a database name that does not already exist. To perform the load command, the Neo4j instance must be stopped. In addition, the user:group permissions of the files created must be neo4j:neo4j.
You must either perform the load operation as the neo4j user, or after the load, you must change the owner of all files and folders created to neo4j:neo4j.
|
Here is how to use the load command of the neo4j-admin tool to load a database from a file:
[sudo] neo4j-admin load --from=path/db-dump-file --database=db-folder [--force=true]where:
path |
is a folder in the filesystem where the dump file resides. |
db-dump-file |
is the file previously created with the |
db-folder |
is the name of the database that will be created. The database is overwritten if --force is specified as |
Here is an example where we load the contents of movie-dump into a database named movie2.db.
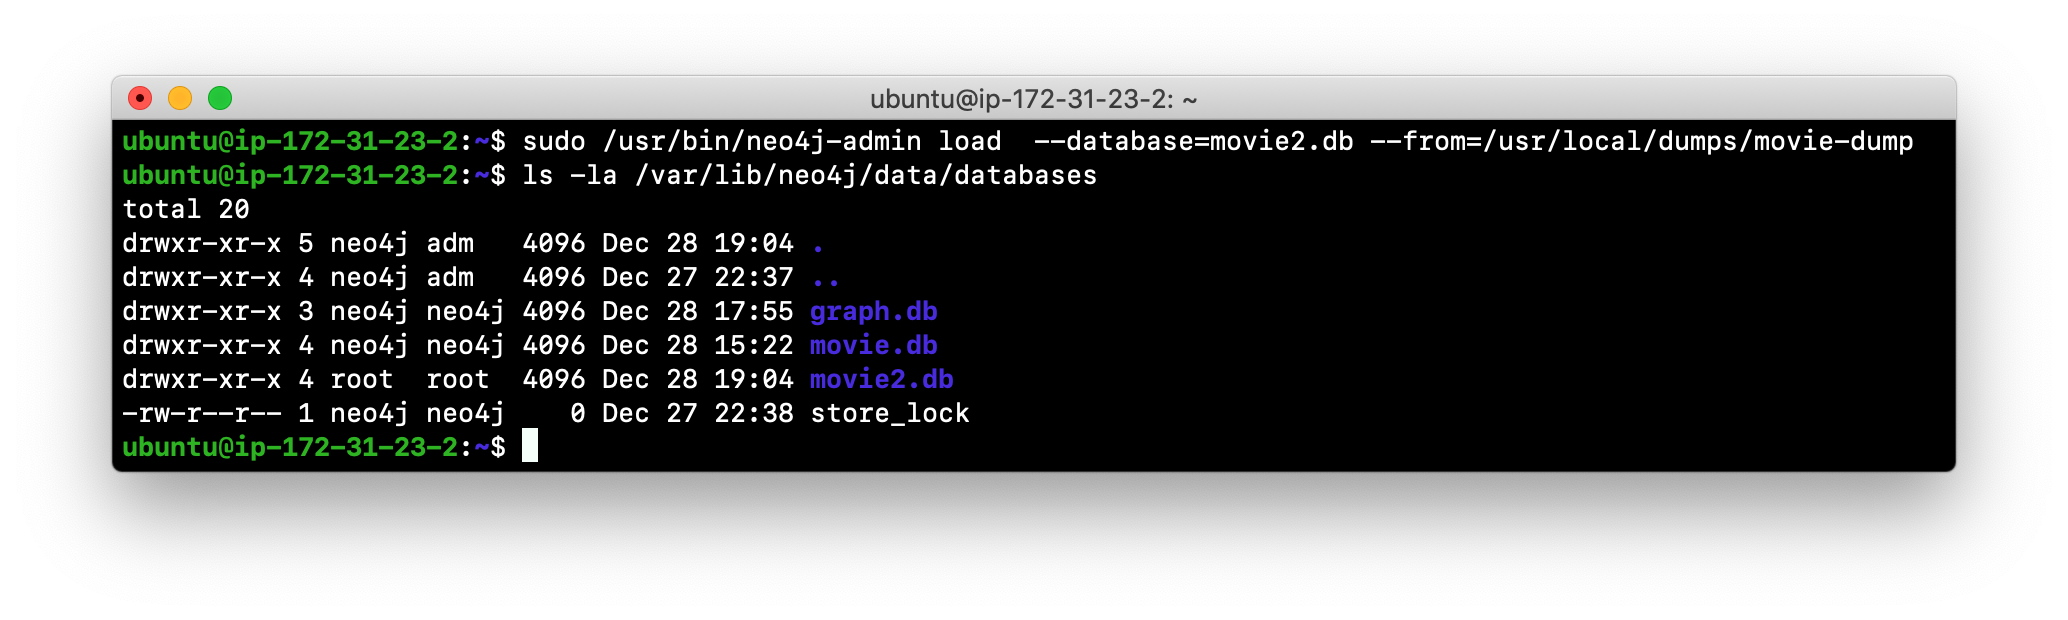
Modifying config for new database
In order to access this newly created and loaded database, we must modify neo4j.conf to use movie2.db as the active database before starting the Neo4j instance:
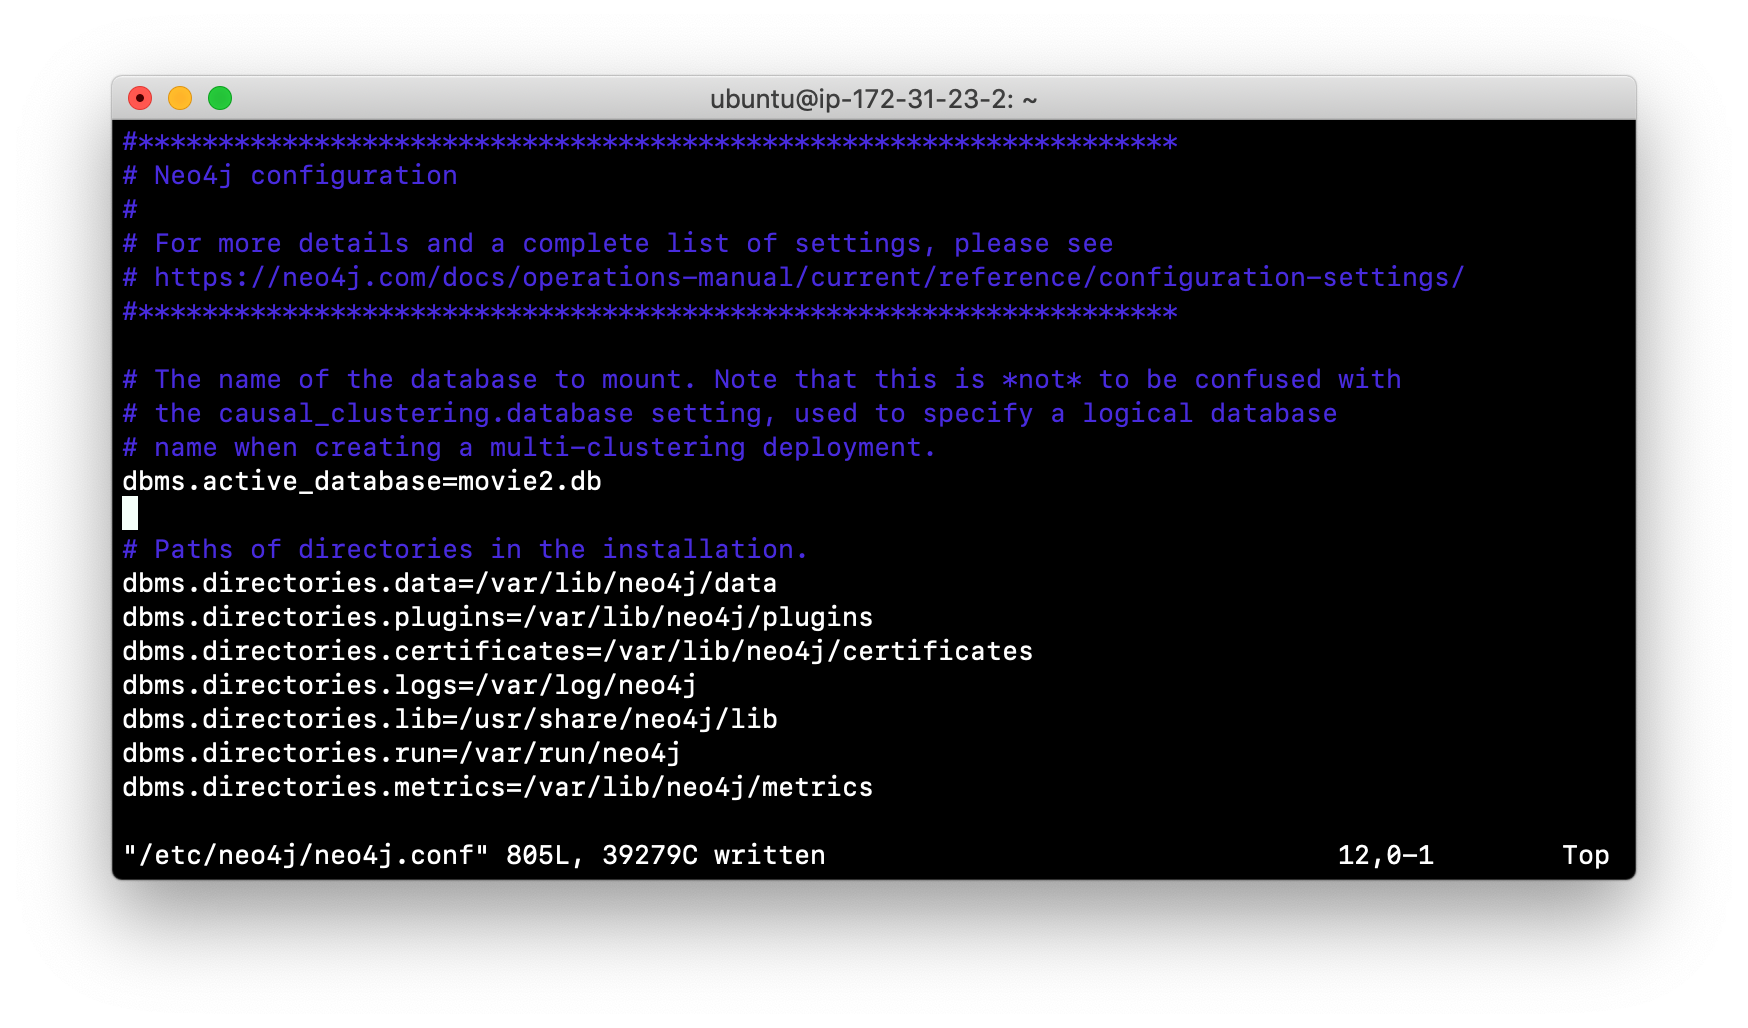
In addition, we must change the owner:group for the database folder and its sub-folders to neo4j:neo4j before we start the Neo4j instance.
A best practice is to examine the log file for the Neo4j instance after you have made any configuration changes to ensure that the instance starts with no errors.
Exercise #3: Copying a database
In this Exercise, you will make a copy of your active database that has the movie data in it and use the dump file to create a database.
Before you begin
You will have loaded the graph.db database with the movie data (Exercise #2) and stopped the Neo4j instance.
Exercise steps:
-
Open a terminal on your system.
-
Create a folder named /usr/local/work.
-
Use the
neo4j-adminscript to dump the graph.db database to the work folder. You will do something like this:
-
Notice that this dump file is simply a file that can be copied to any location.
-
Delete the graph.db database by removing the graph.db folder and its subfolders.
-
Use the
neo4j-adminscript to load the database from the dump file you just created. Name the database movie.db. You will do something like this:

-
Modify neo4j.conf to use movie.db as the active database.
-
If you did not perform the load as the user neo4j, you must change the owner:group of all files and folders under movie.db to be neo4j:neo4j. For example, change directory to the movie.db folder and then enter the command:
[sudo] chown -R neo4j:neo4j movie.dbThis will recursively change the owner and group to all files and folders including and under the movie.db folder.
-
Start the Neo4j instance.
-
Examine the log file to ensure that the instance started with no errors.
-
Access the database using
cypher-shell. Can you see the movie data in the database?
Modifying the location of the database
If you do not want the database used by the Neo4j instance to reside in the same location as the Neo4j installation, you can modify its location in the neo4j.conf file. If you specify a new location for the data, it must exist in the filesystem and the folder must be owned by neo4j:neo4j.
Here we have specified a new location for the data in the configuration file:
Starting Neo4j instance with a new location
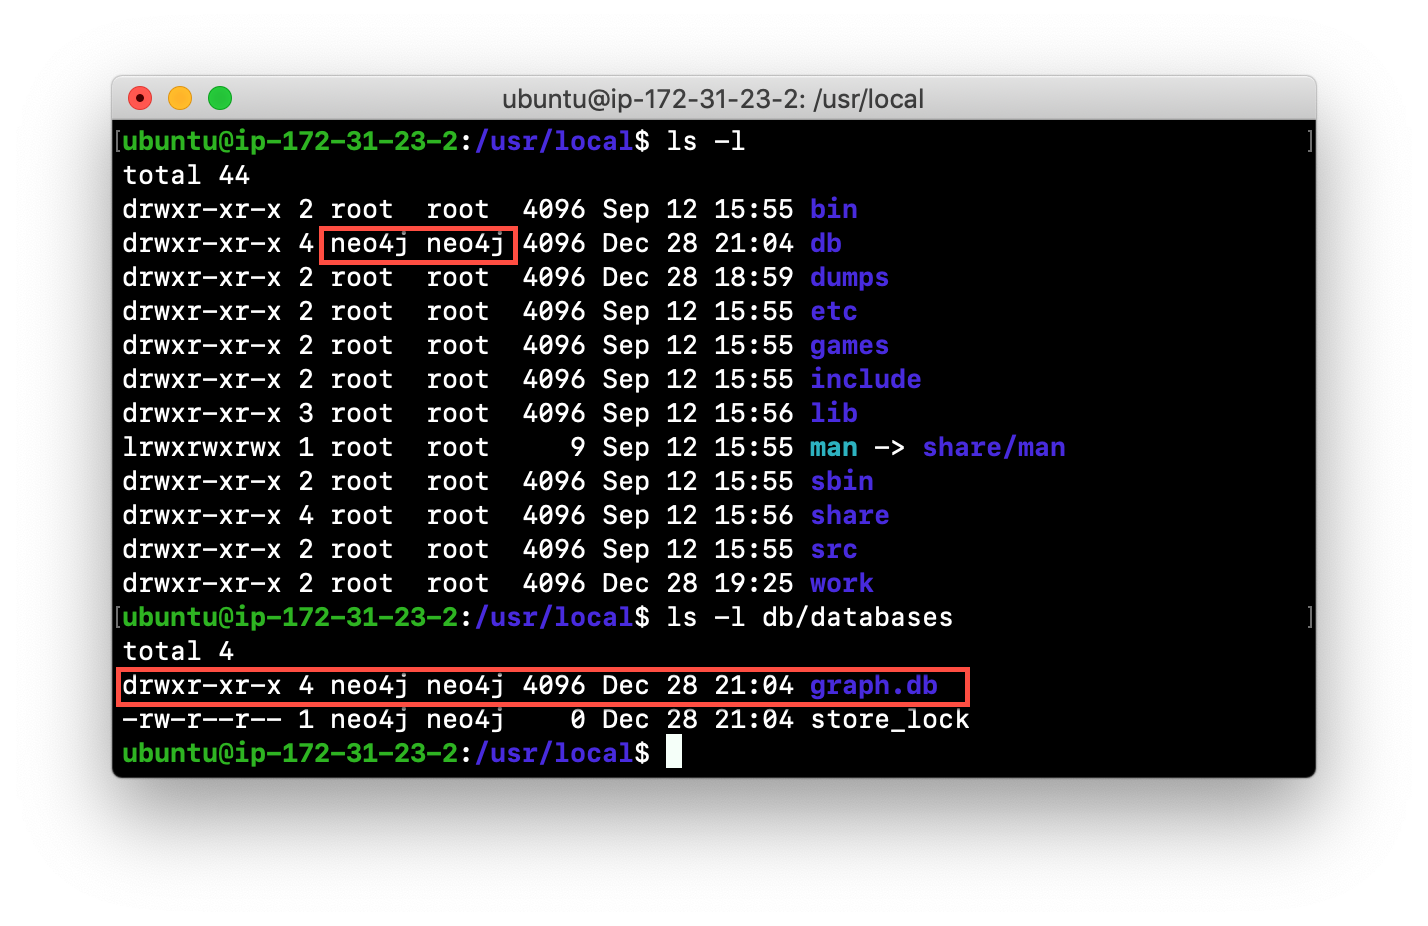
We ensure that the location for the data exists and then we can start the Neo4j instance. If this is the first time Neo4j has been started for this location, a new database named graph.db will be created. This is because we are using the default database name in the configuration file.
If you have an existing database that you want to reside in a different location for the Neo4j instance, remember that you must dump and load the database to safely copy it to the new location.
Using a different location for the database
If you are starting the Neo4j instance with a new location and do not want to use the default graph.db database, you must follow these steps to ensure that the folders for the database are set up properly:
-
Specify the new location in the configuration file, but do not specify the active database name.
-
Start or restart the Neo4j instance. A new graph.db folder will be created as well as the dbms folder required by the instance (contains important authentication information).
-
Examine the log file to ensure that it started without errors.
-
Stop the Neo4j instance.
-
Specify the name of the active database in the configuration file.
-
Load the data into the database name that will be the active database.
-
Ensure that the database folder and its subfolders are owned by neo4j:neo4j.
-
Start the Neo4j instance.
-
Examine the log file to ensure it started without errors.
-
Optionally, you can remove the graph.db folder as you will be working with a different database you loaded.
Exercise #4: Modifying the location of the database
In this Exercise, you will set up a different location for the database in your local filesystem and start the Neo4j instance using the database at this new location.
Before you begin
-
You created the dump file for the movie database (Exercise #3).
-
Stop the Neo4j instance.
Exercise steps:
-
Open a terminal on your system.
-
Create a folder named /usr/local/data. This is the folder where the database will reside which is different from the default location used by Neo4j.
-
Make sure that this data folder is owned by neo4j:neo4j. For example, navigate to the /usr/local folder and enter
[sudo ]chown neo4j:neo4j data. -
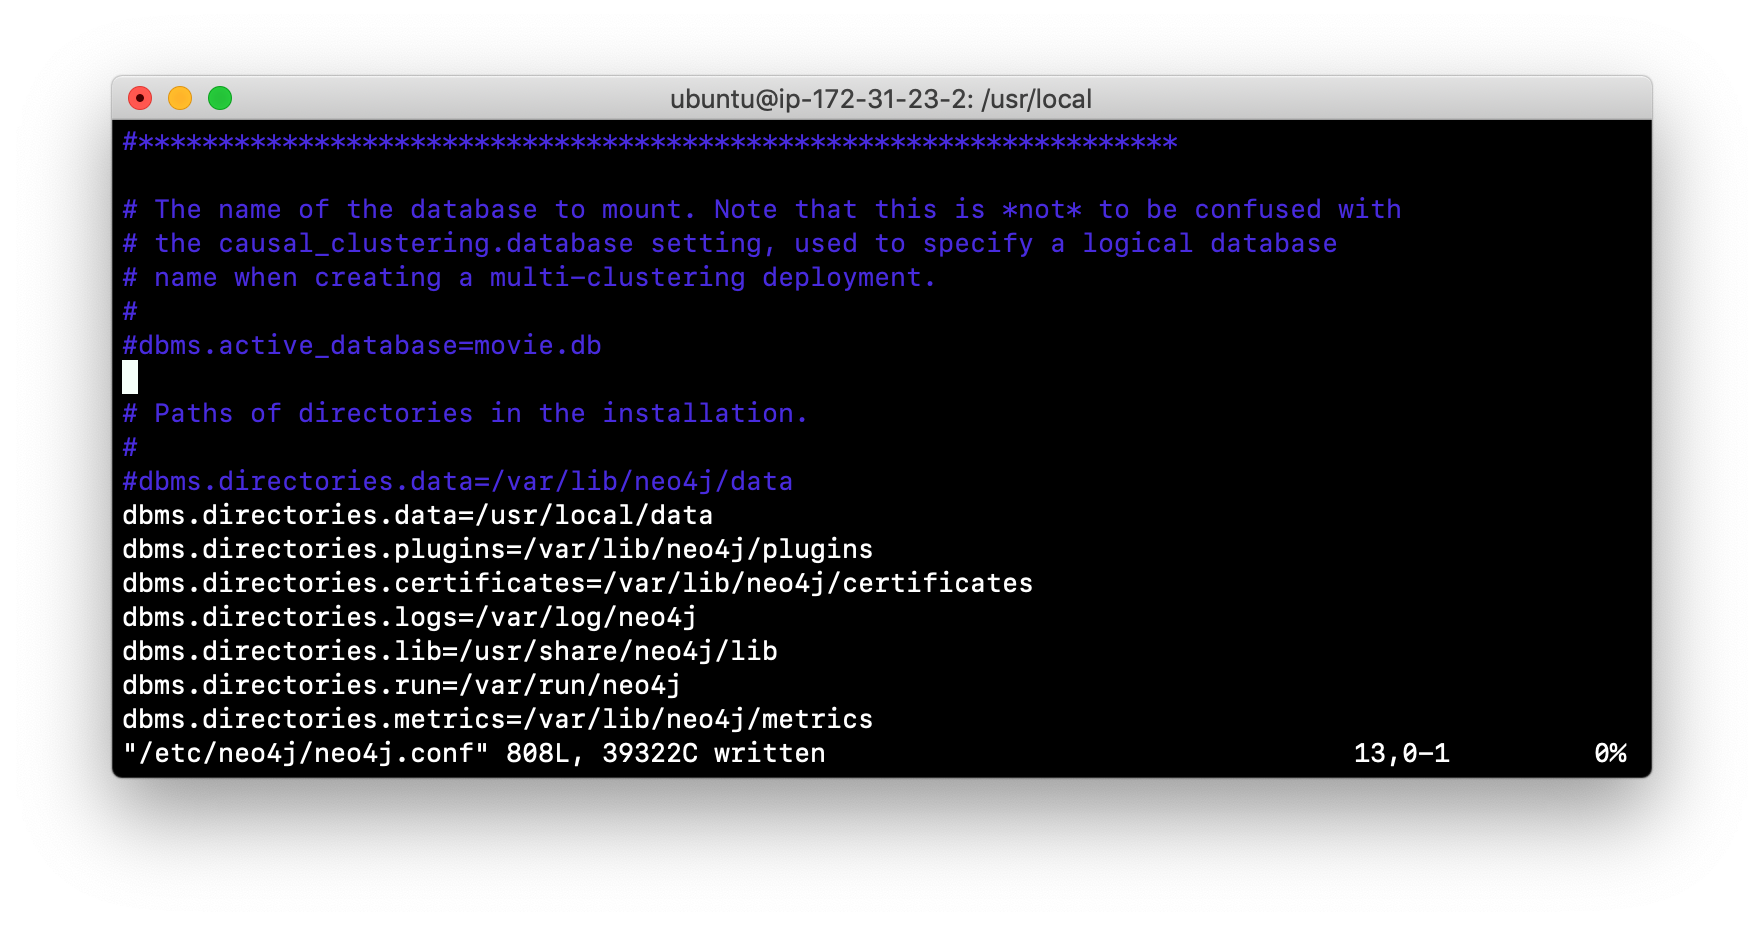
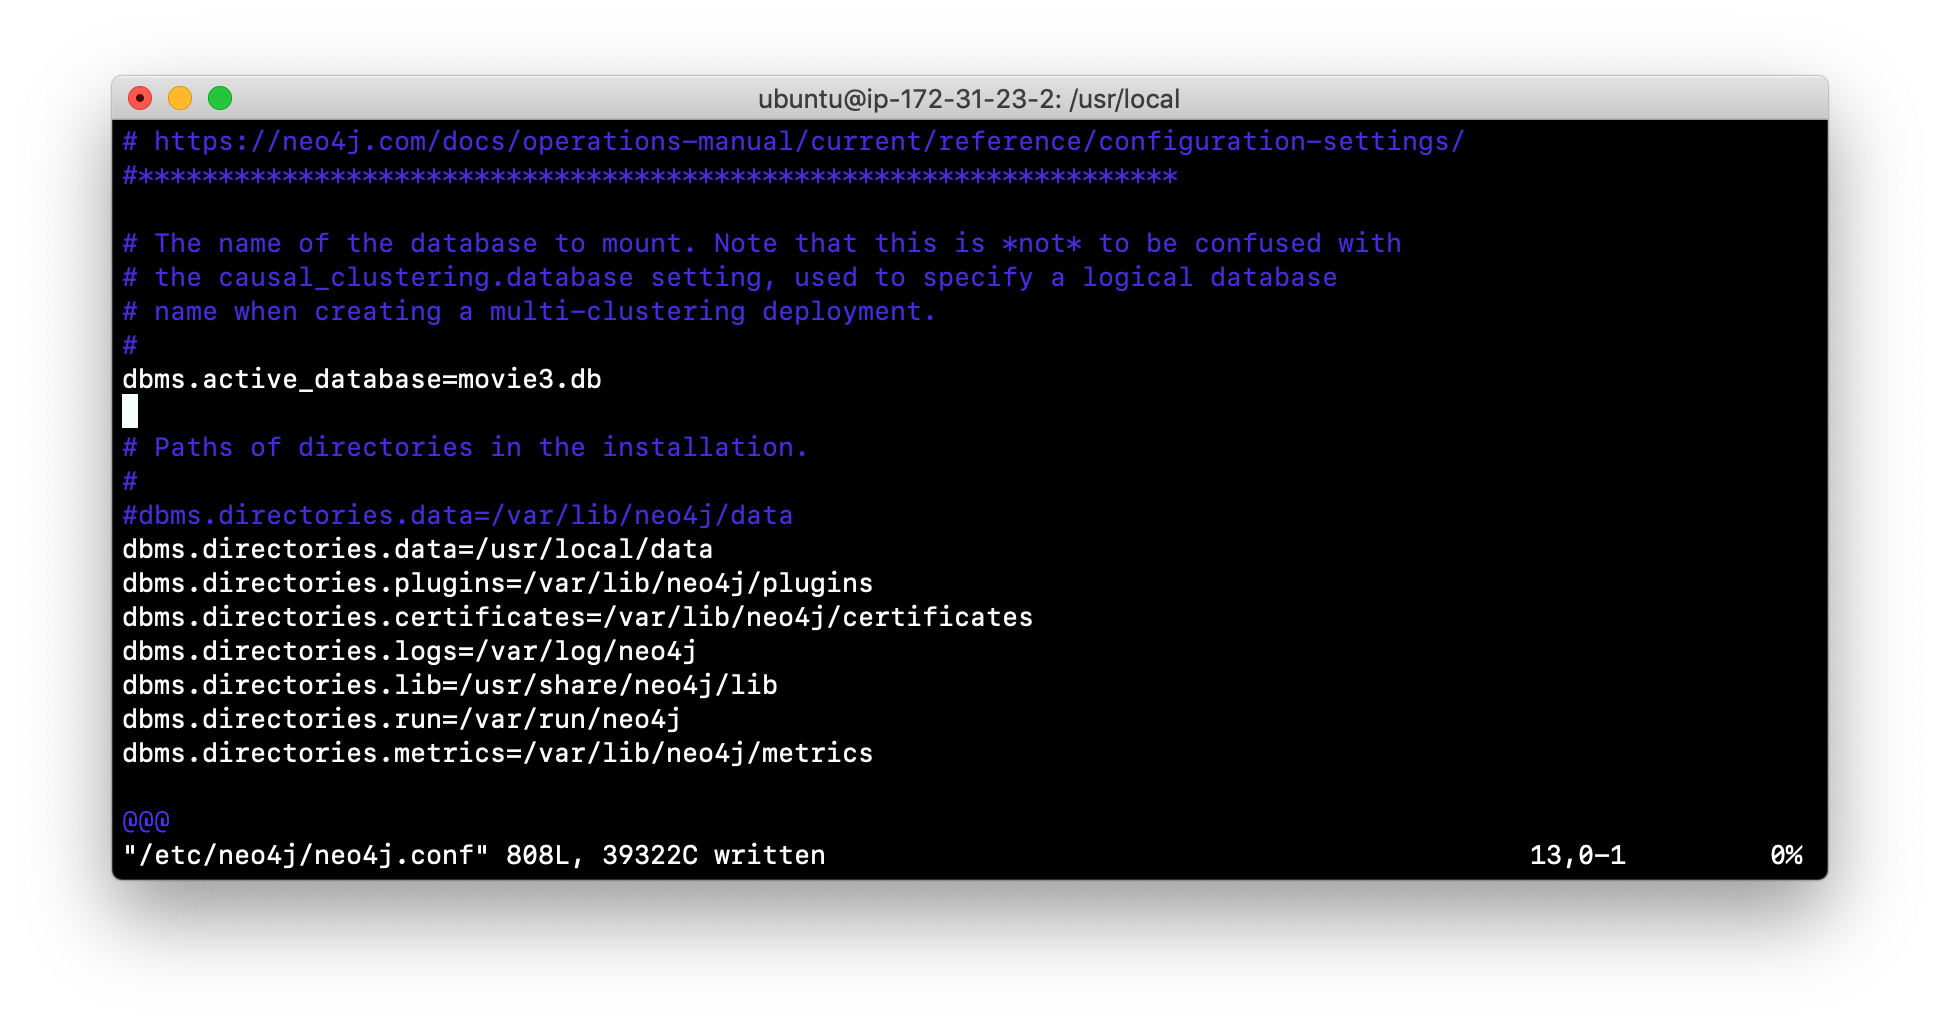
Modify the neo4j.conf file to use /usr/local/data as the data directory. Also ensure that there is no active database specified. Your neo4j.conf file will look something like this:
-
Start the Neo4j instance.
-
Examine the log file to ensure that the instance started without errors.
-
Examine the files in the /usr/local/data location. The instance created the databases and dbms folders. They will look as follows:
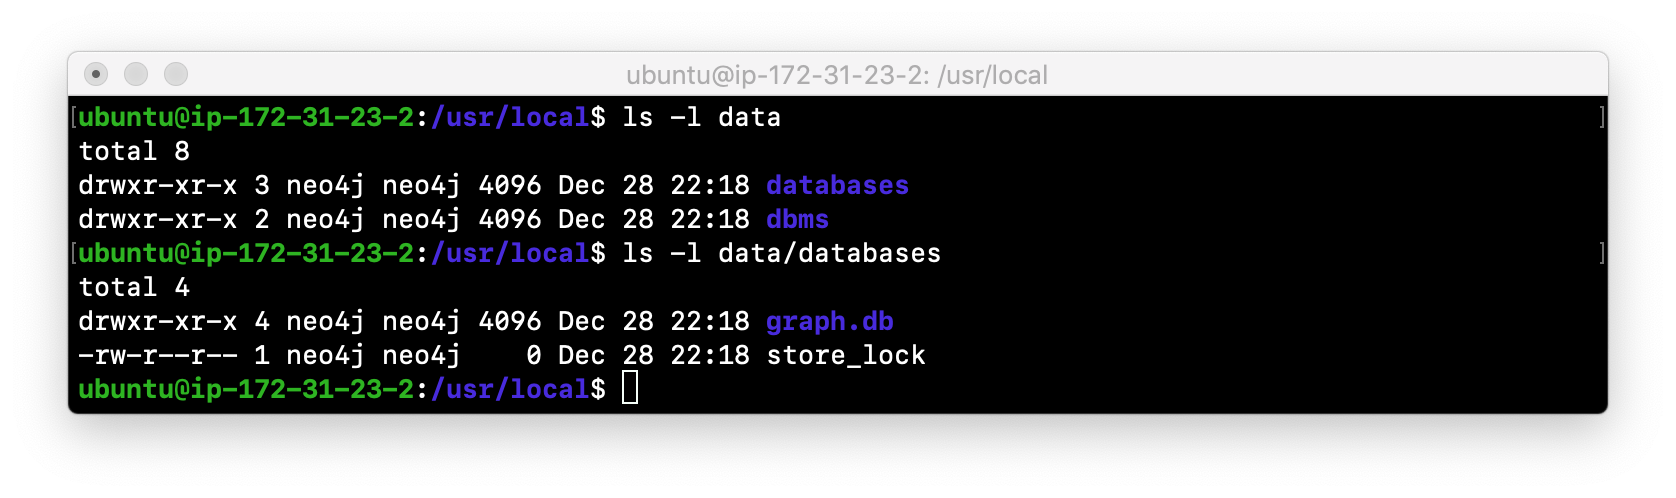
-
Stop the Neo4j instance.
-
Modify the neo4j.conf file to use movie3.db as the active database. Your neo4j.conf file will look something like this:
-
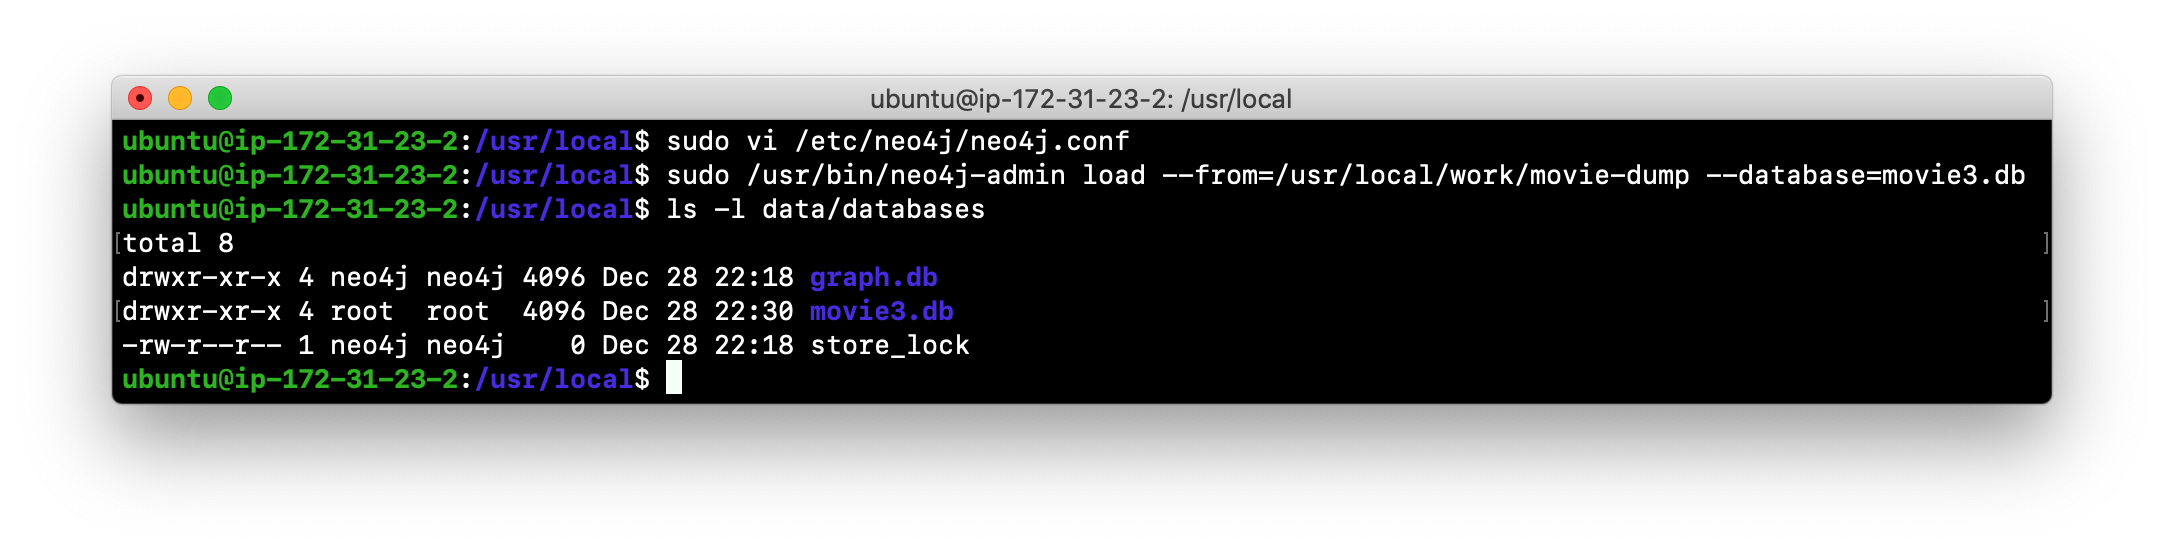
Use the
neo4j-adminscript to load the database from the dump file you created in Exercise 3. Name the database movie3.db You will do something like this:
-
Ensure that all files and folders including and under movie3.db are owned by neo4j:neo4j. For example, change directory to the databases folder and then enter the command:
[sudo] chown -R neo4j:neo4j movie3.dbThis will recursively change the owner and group to all files and folders under movie3.db.
-
Start the Neo4j instance.
-
Examine the log file to ensure that no errors occurred.
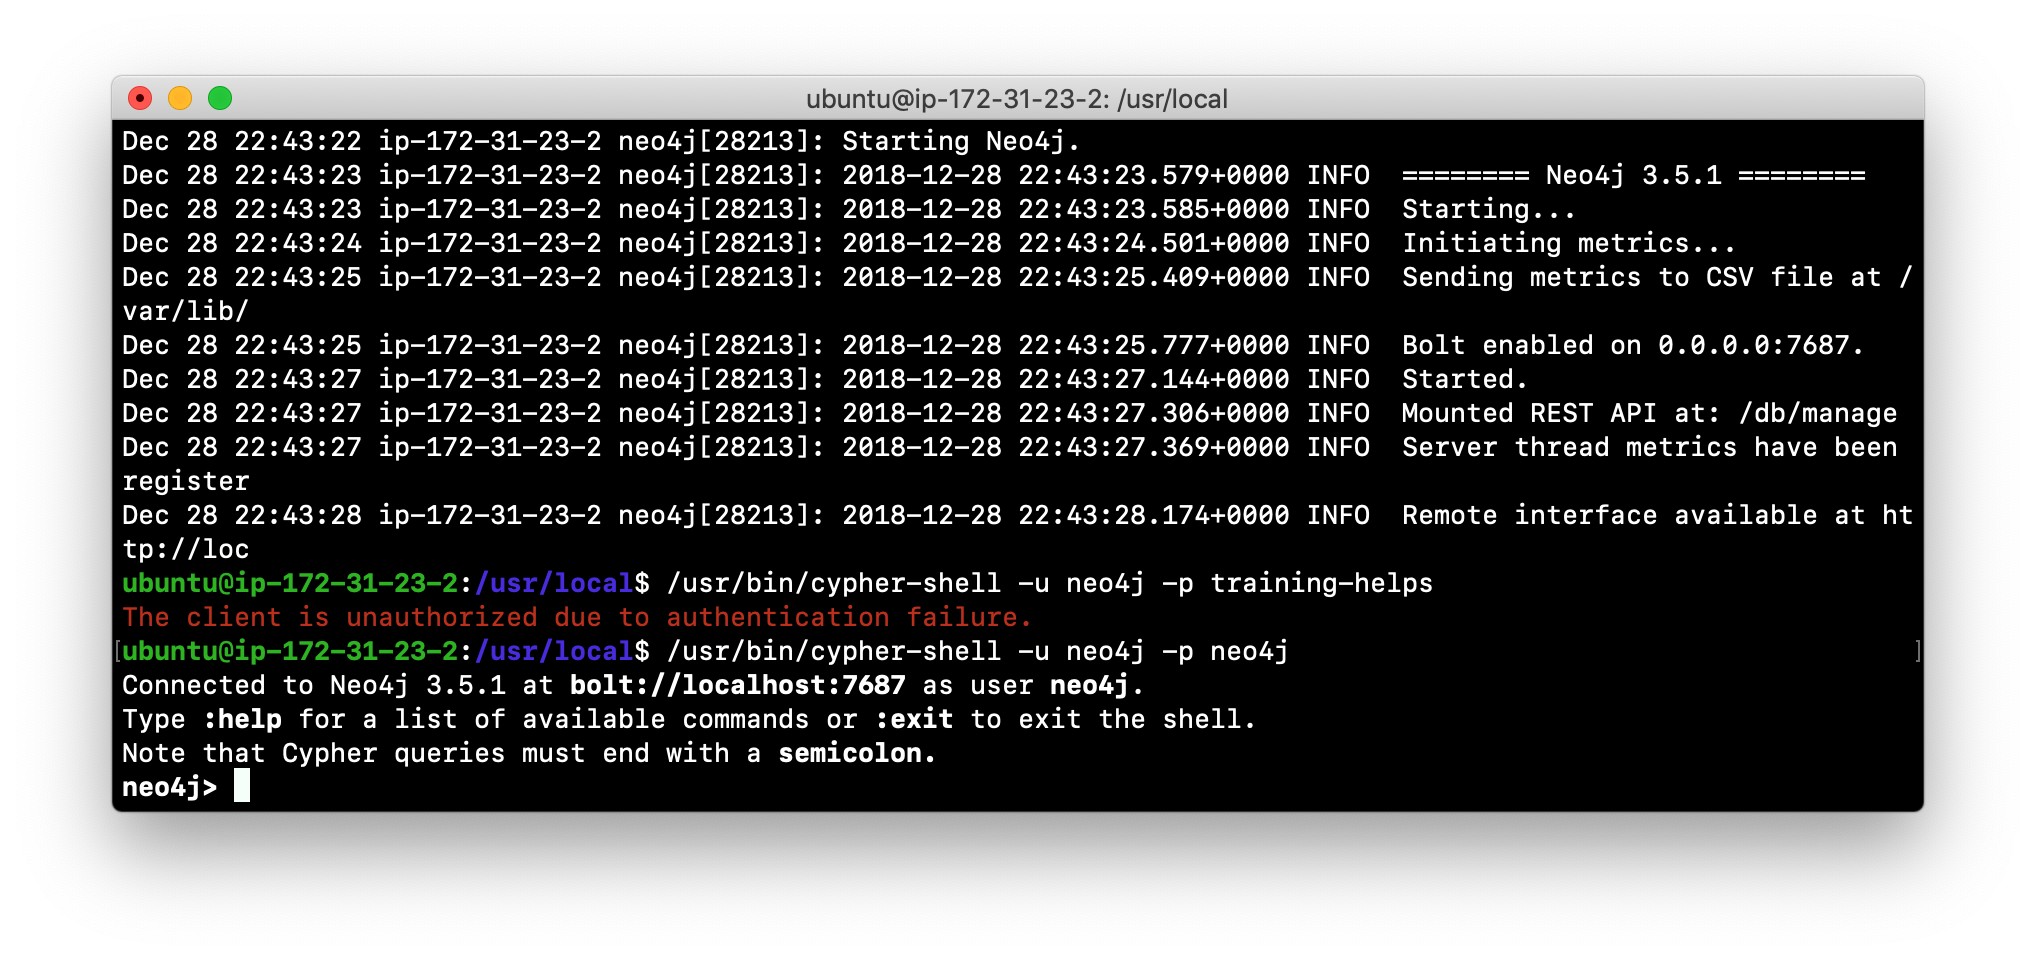
-
Access the database using
cypher-shell. Do you get an authentication error? This is because the database is now located in a different location and the default credentials of neo4j/neo4j are used.
-
Enter the Cypher statement to change the password:
CALL dbms.changePassword('newPassword'); -
Enter a Cypher statement to retrieve some data:
MATCH (p:Person) WHERE p.name='Meg Ryan' RETURN p.name, p.born;
-
Exit
cypher-shell.
Checking the consistency of a database
A database’s consistency could be compromised if a software or hardware failure has occurred that affects the Neo4j instance. You will learn later in this module about live backups, but if you have reason to believe that a specific database has been corrupted, you can perform a consistency check on it.
The Neo4j instance must be stopped to perform the consistency check.
Here is how you use the neo4j-admin tool to check the consistency of the database:
[sudo] neo4j-admin check-consistency --database=db-name --report-dir=report-location [--verbose=true]The database named db-name is found in the data location specified in neo4j.conf file. If the tool comes back with no error, then the database is consistent. Otherwise, an error is returned and a report is written to report-location. You can specify verbose reporting. See the Neo4j Operations Manual for more options. For example, you can check the consistency of a backup which is a best practice.
Suppose we had loaded the movie4.db database with neo4j-admin. Here is what a successful run of the consistency checker will produce:
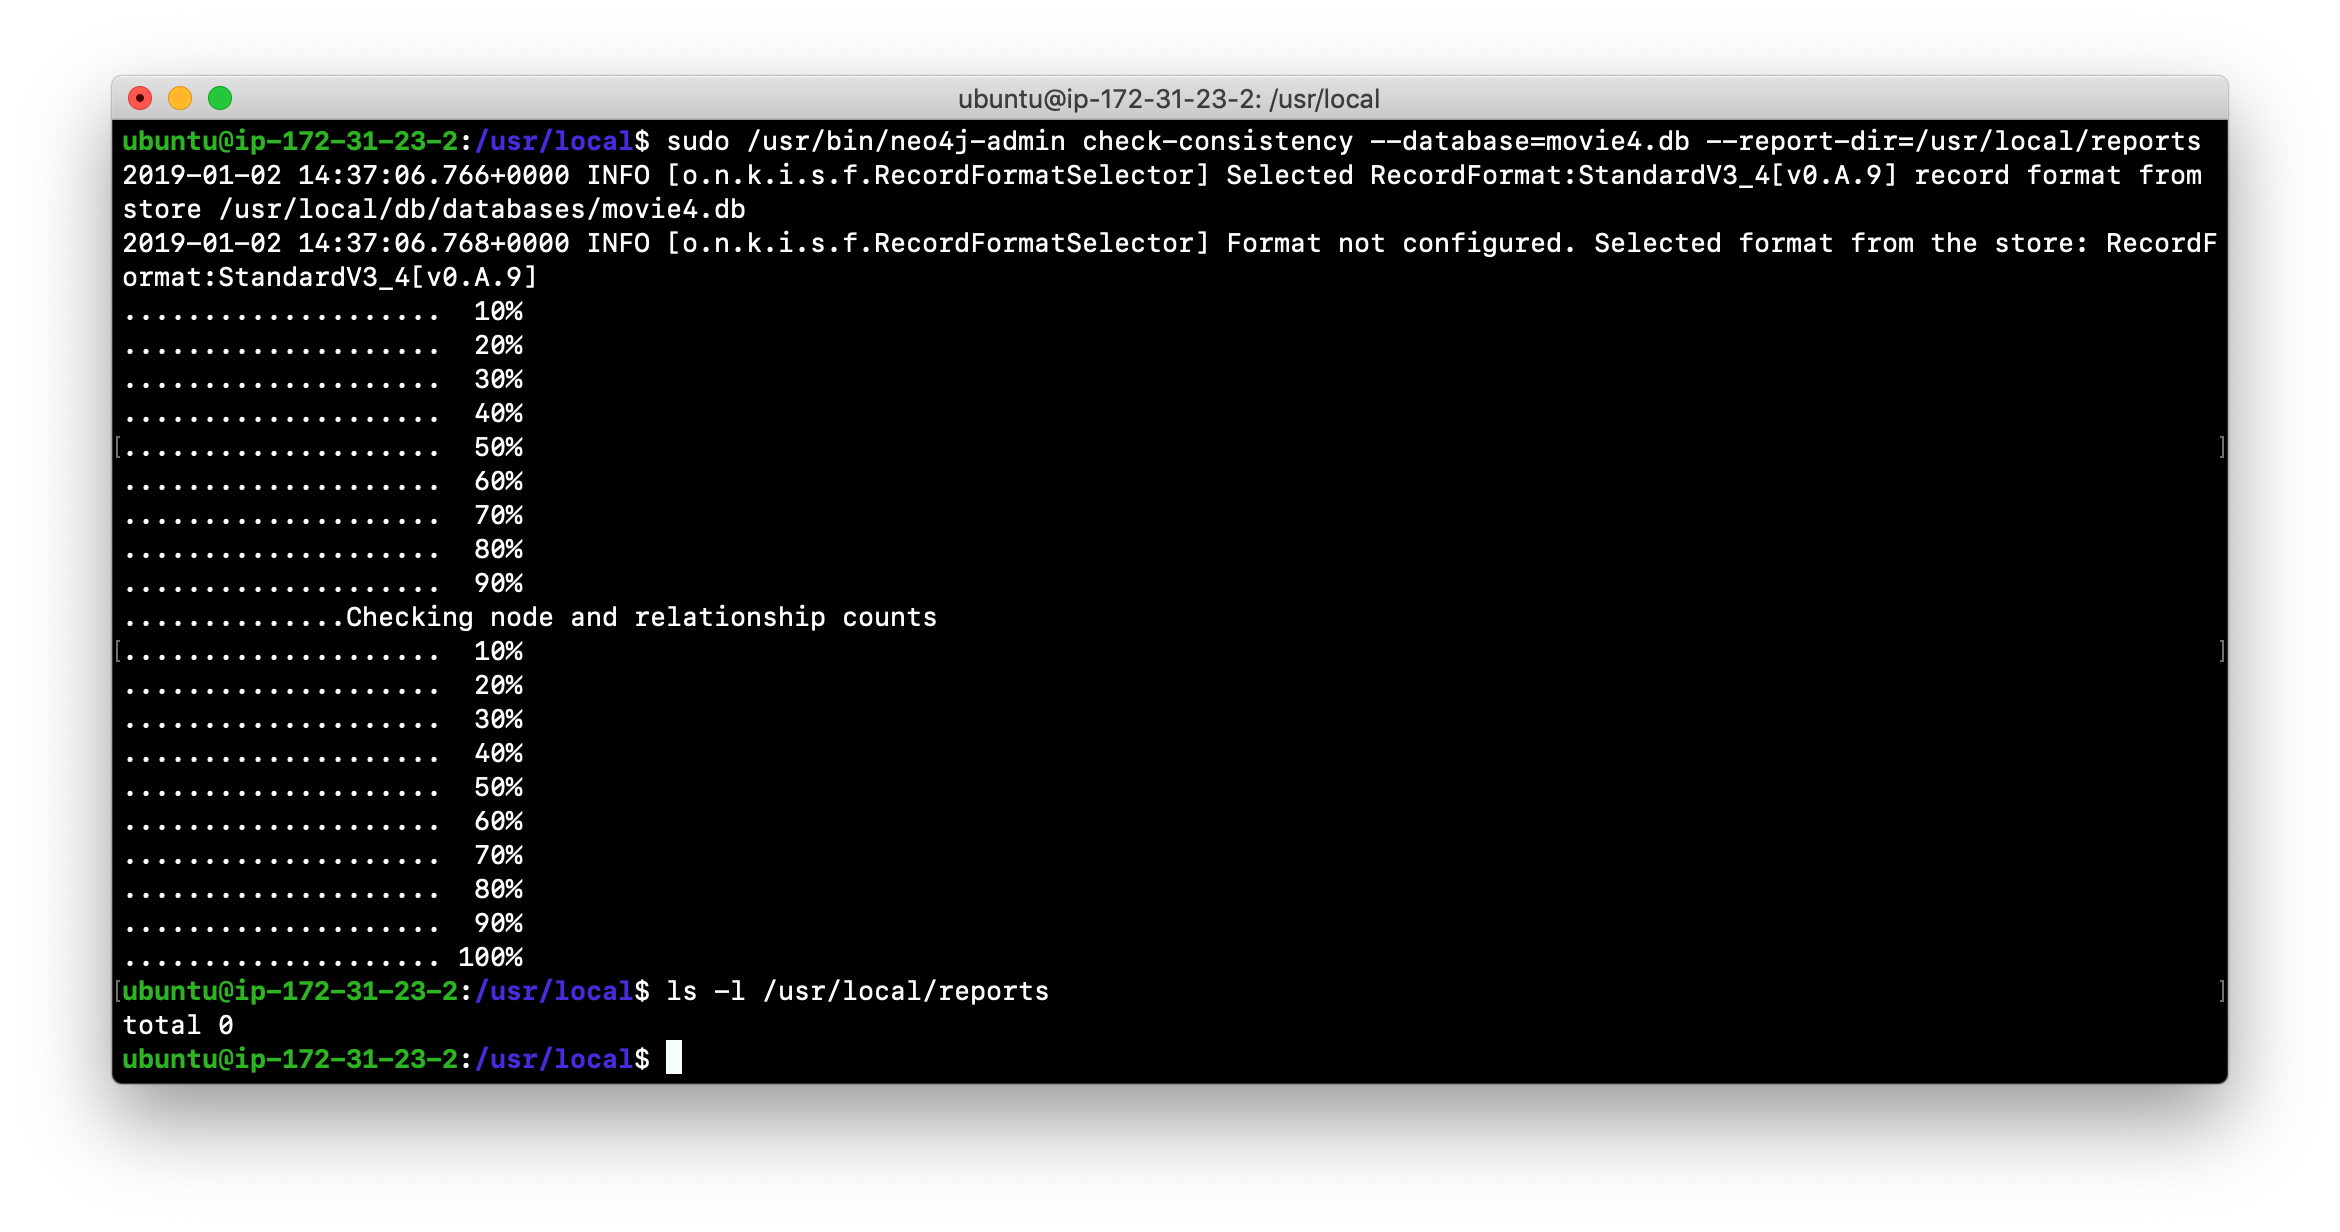
No report is written to the reports folder because the consistency check passed.
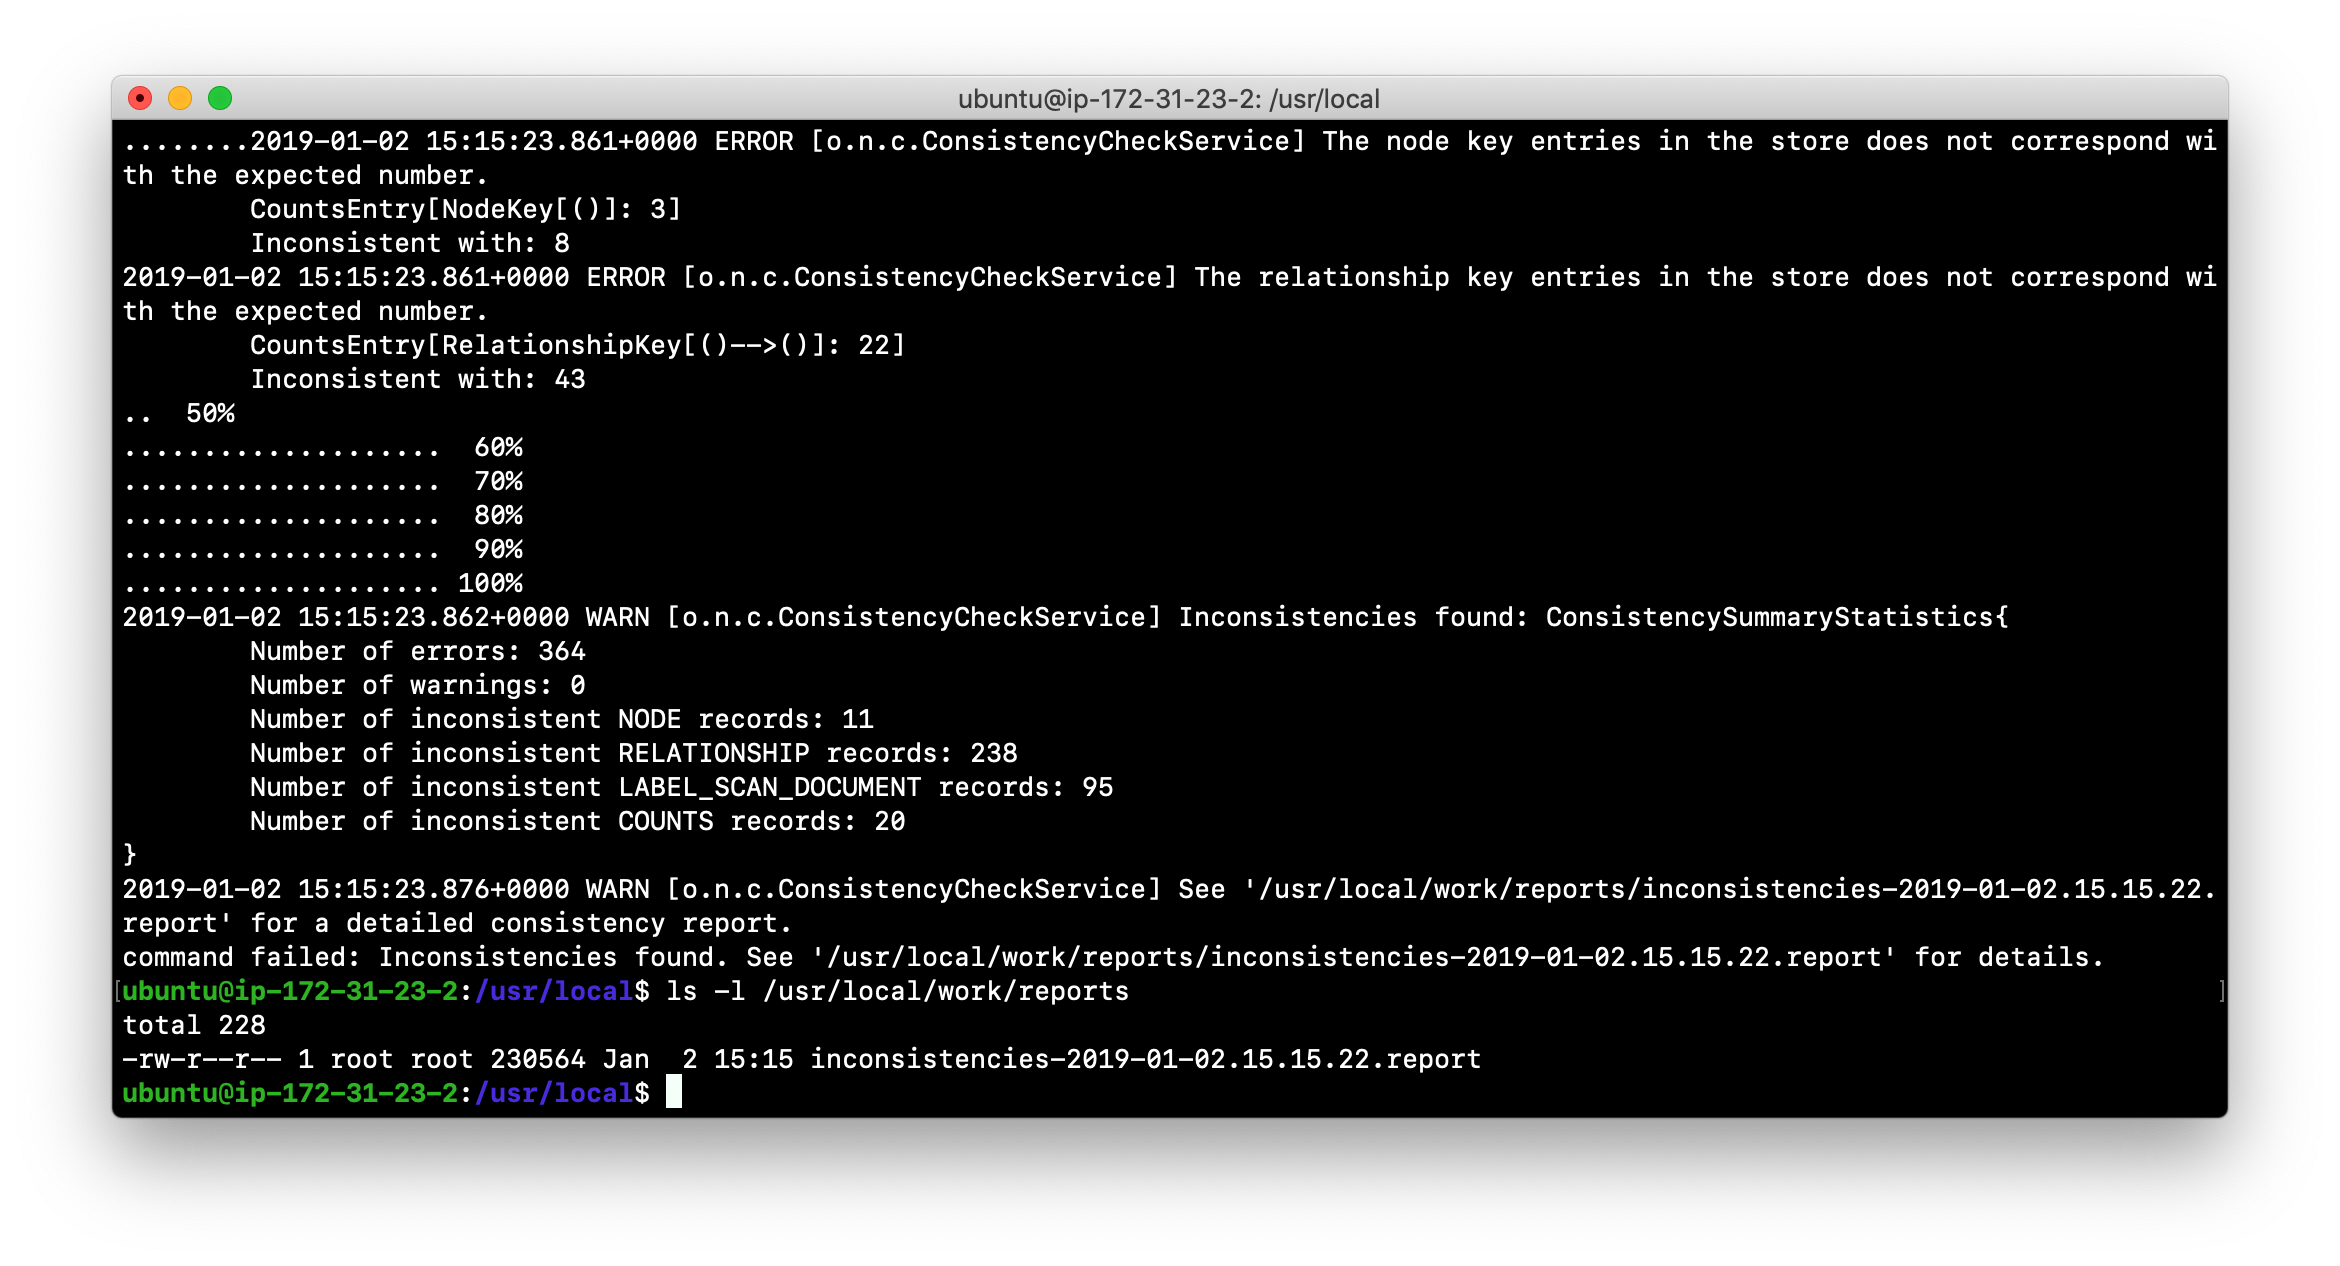
Inconsistencies found
Here is an example of what an unsuccessful run of the consistency checker will produce:
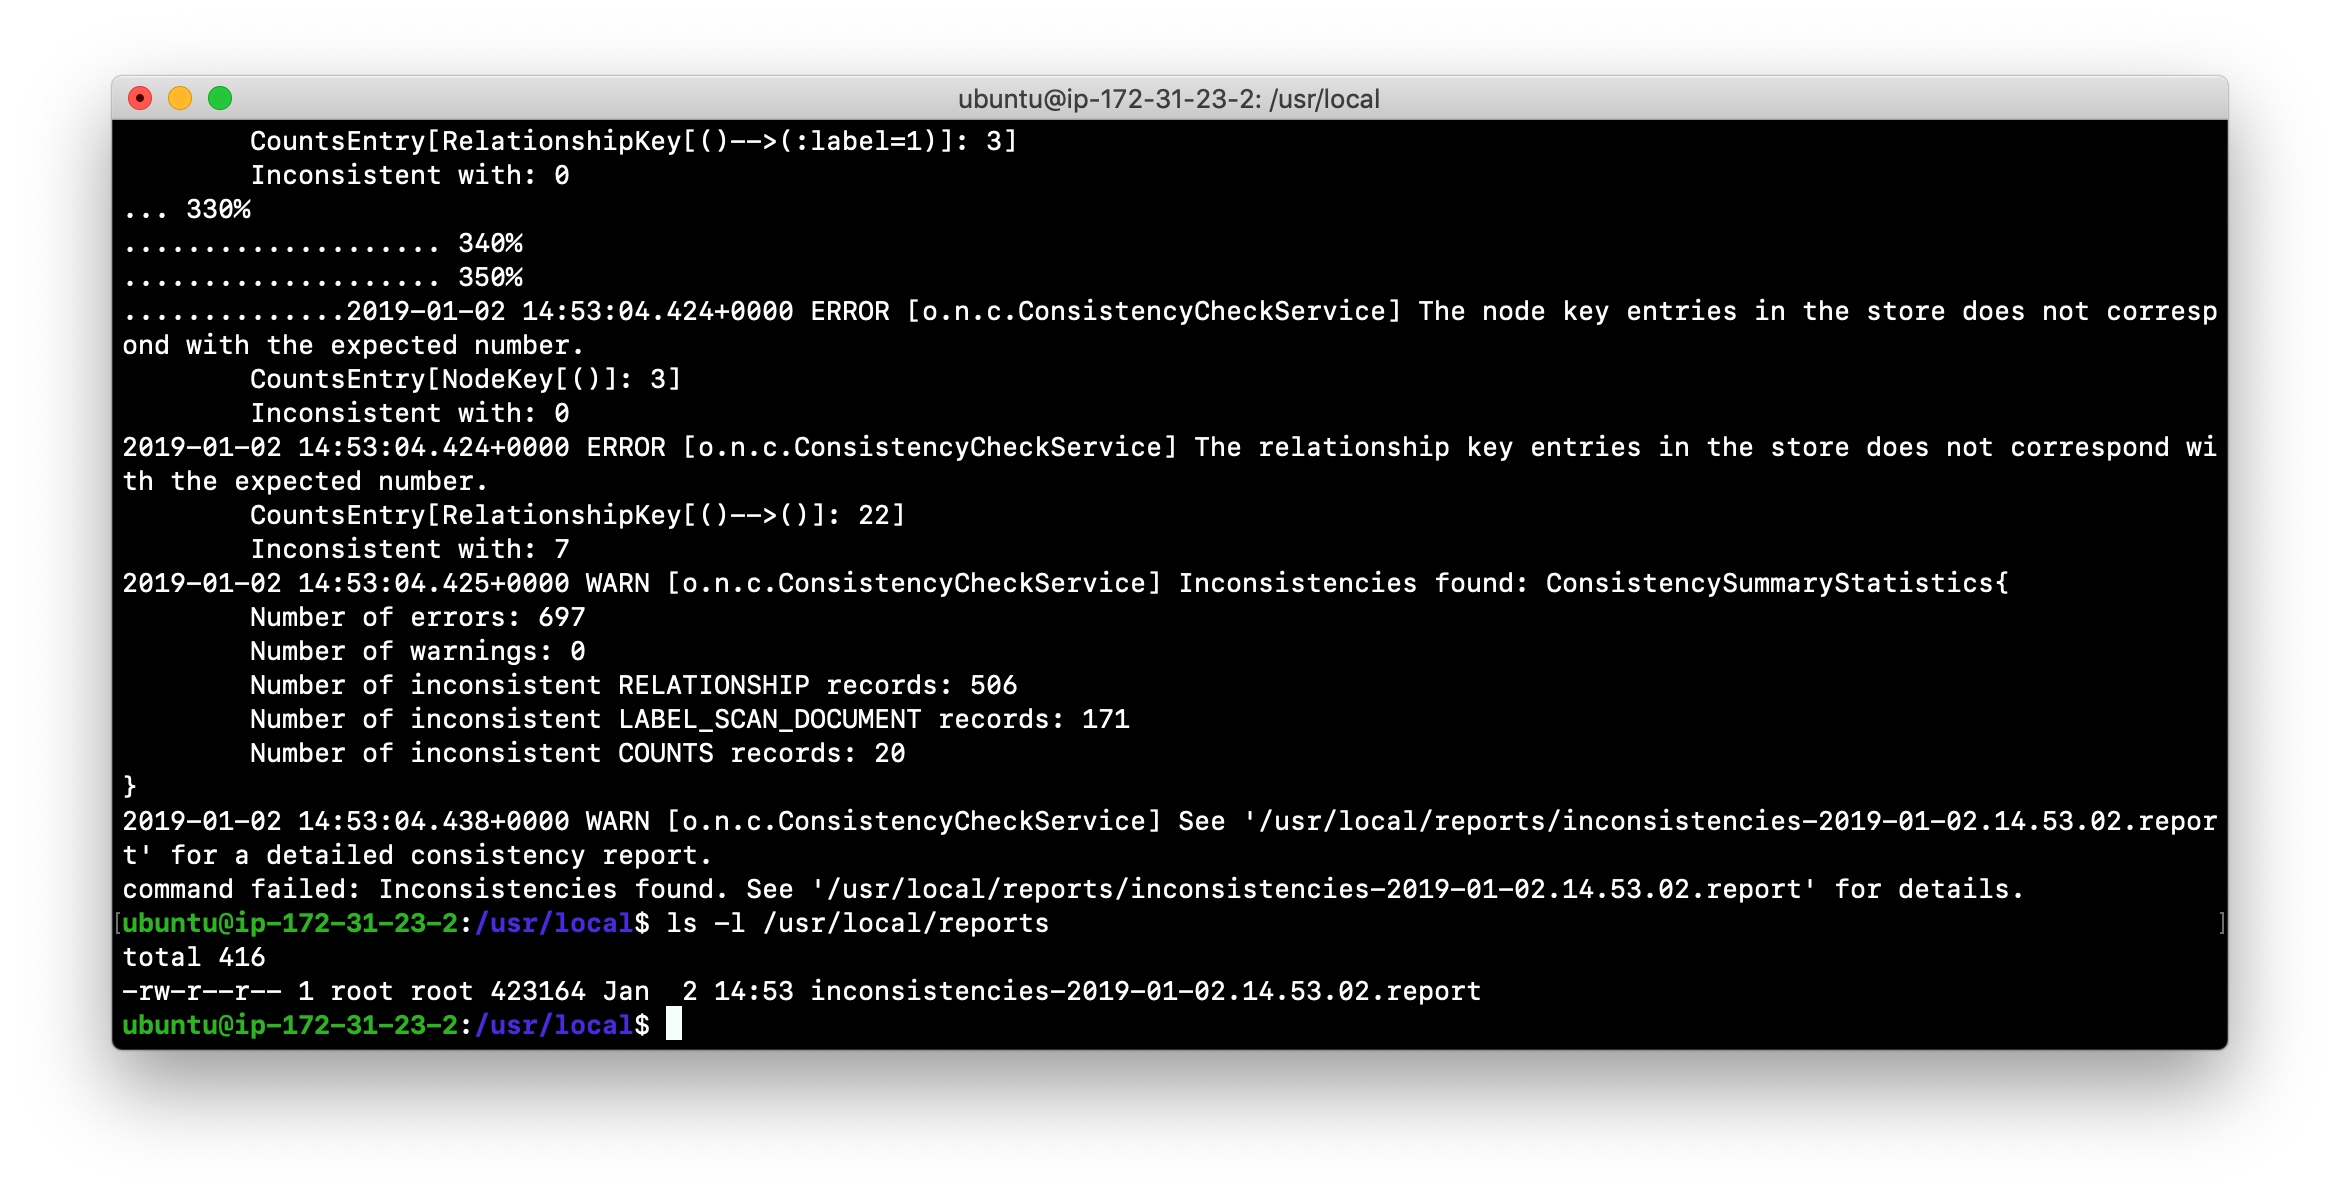
If inconsistencies are found, a report is generated and placed in the folder specified for the report location.
Inconsistencies in a database are a serious matter that must be looked into with the help of Neo4j Technical Support.
Exercise #5: Checking consistency of a database
In this Exercise, you check the consistency of a database that is consistent. Then you modify a file that causes the database to become corrupt and then check its consistency.
Before you begin
-
You have created and started the movie3.db database (Exercise #4).
-
Stop the Neo4j instance.
-
Create a folder named /usr/local/work/reports.
Exercise steps:
-
Open a terminal on your system.
-
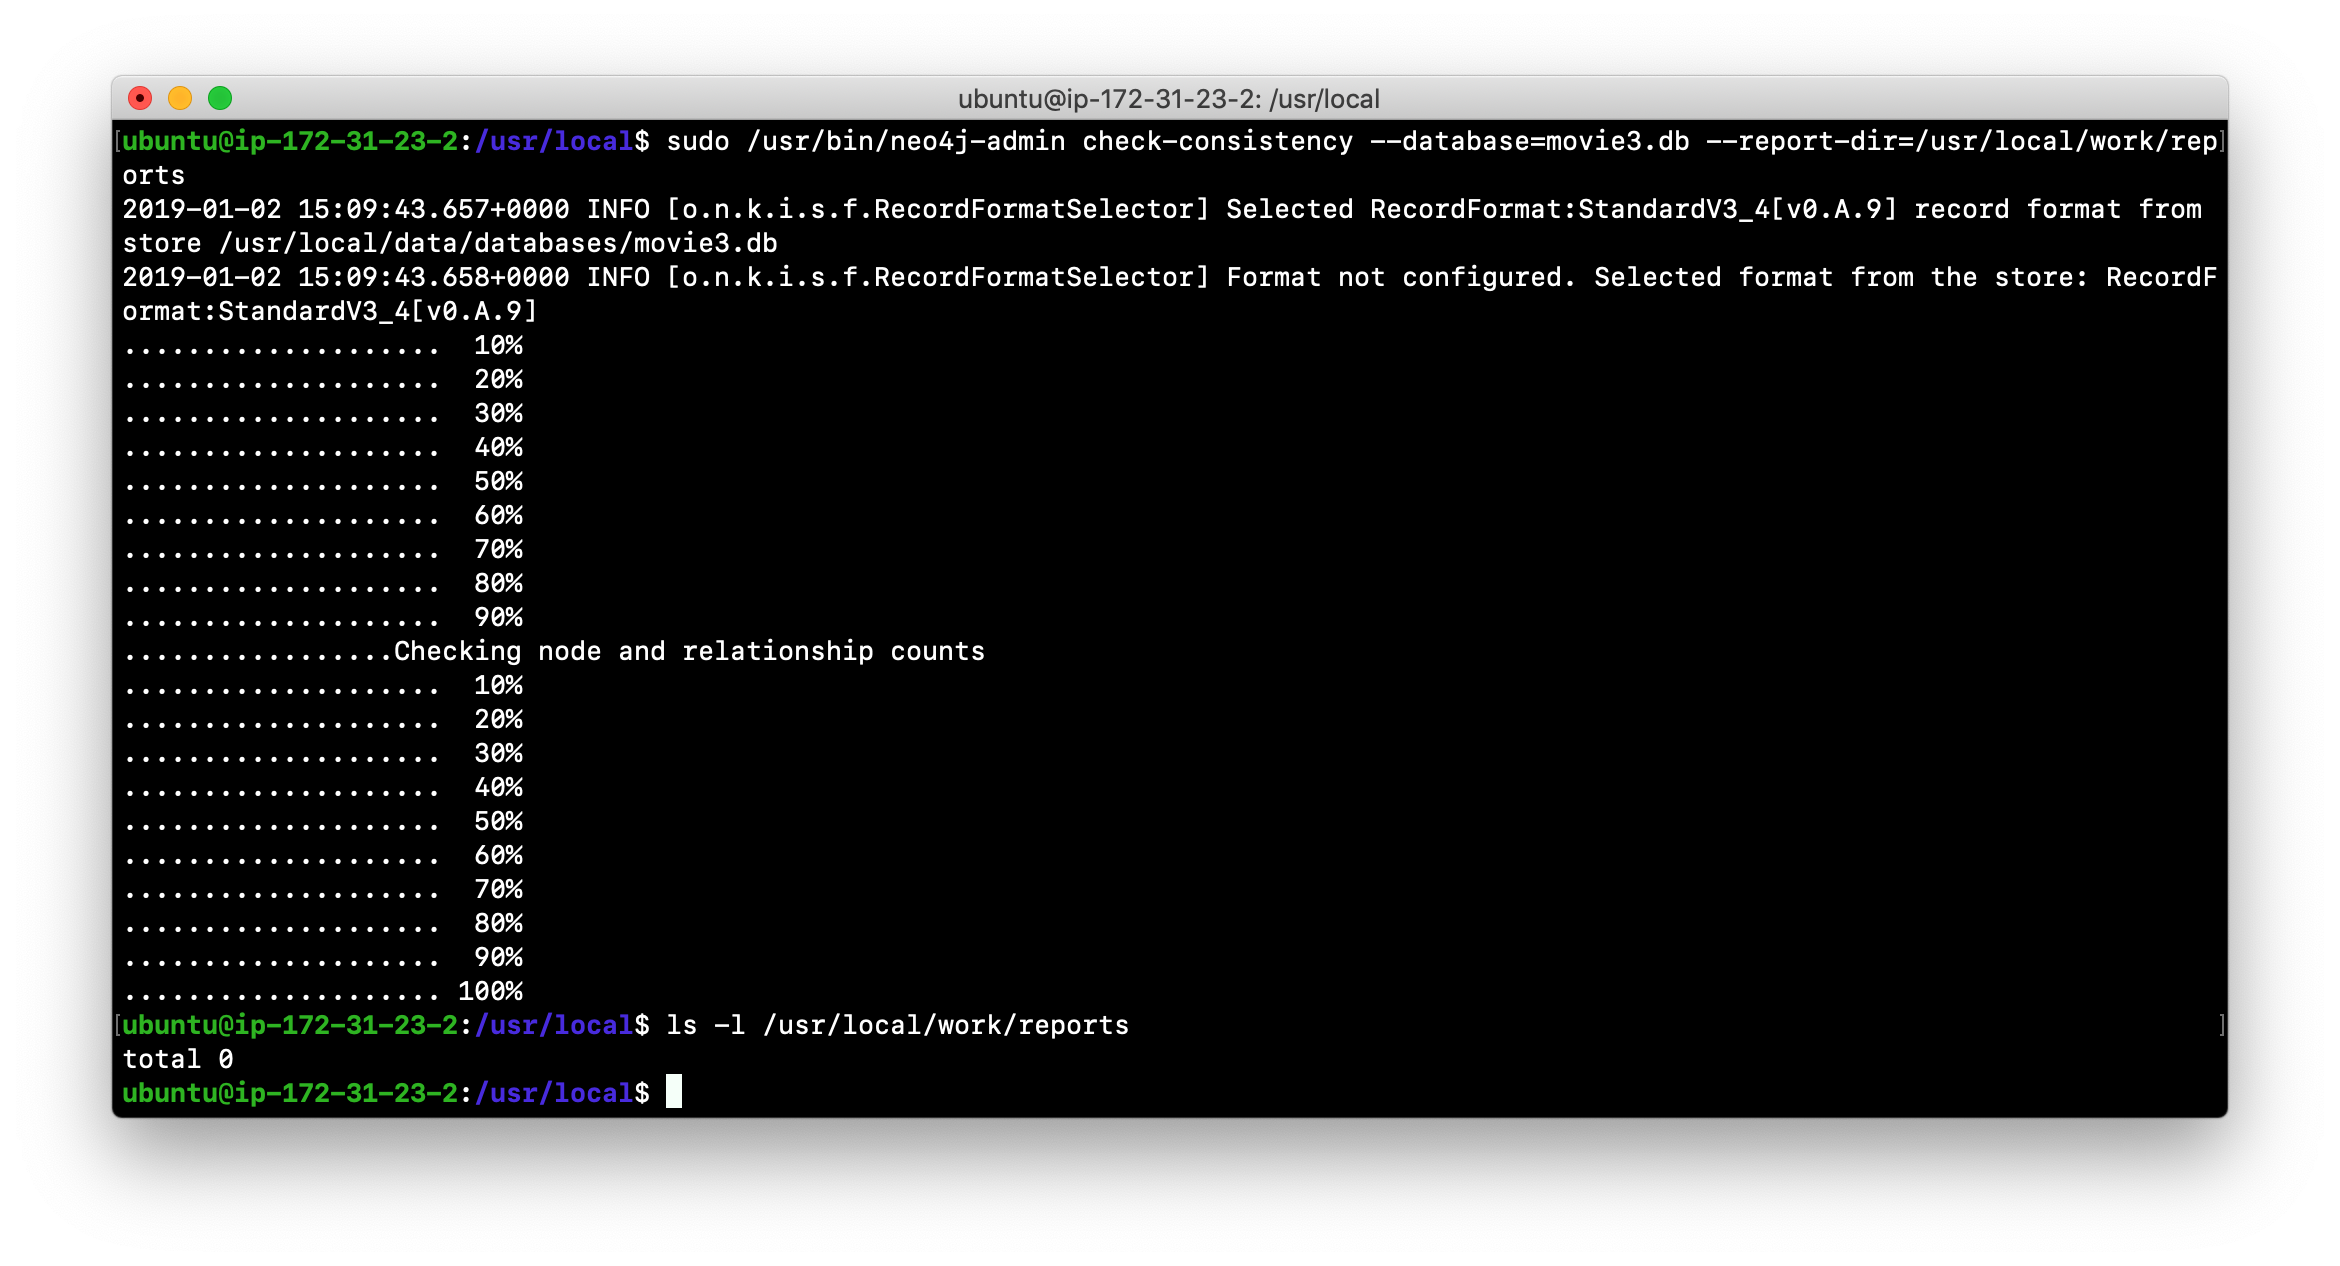
Run the consistency check tool on movie3.db using
neo4j-adminspecifying reports as the folder where the report will be written. The consistency check tool will return the following:
-
Modify the Neo4j configuration to use a database named movie3-copy.db, rather than movie3.db.
-
Use
neo4j-adminto create and load movie3-copy.db from the movie dump file you created earlier. -
Ensure that the owner of the movie3-copy.db is neo4j:neo4j.
-
Next, you will corrupt the database. Modify the file movie3-copy.db/neostore.nodestore.db by adding some text to the file.
-
Run the consistency check tool on movie3-copy.db using
neo4j-adminspecifying /usr/local/work/reports as the folder where the report will be written. The consistency check tool will return something like the following:
Scripting with cypher-shell
As a database administrator, you may need to automate changes to the database. The most common types of changes that administrators may want to perform are operations such as adding/dropping constraints or indexes. Note that you will need to work with the developers and architects of your application to determine what indexes must be created. You can create scripts that forward the Cypher statements to cypher-shell. The number of supporting script files you create will depend upon the tasks you want to perform against the database.
Examples: Adding constraints
Suppose that we use bash. We create 3 files:
1. AddConstraints.cypher that contains the Cypher statements to execute in cypher-shell:
CREATE CONSTRAINT ON (m:Movie) ASSERT m.title IS UNIQUE;
CREATE CONSTRAINT ON (p:Person) ASSERT p.name IS UNIQUE;
CALL db.constraints();
Each Cypher statement must end with a ;.
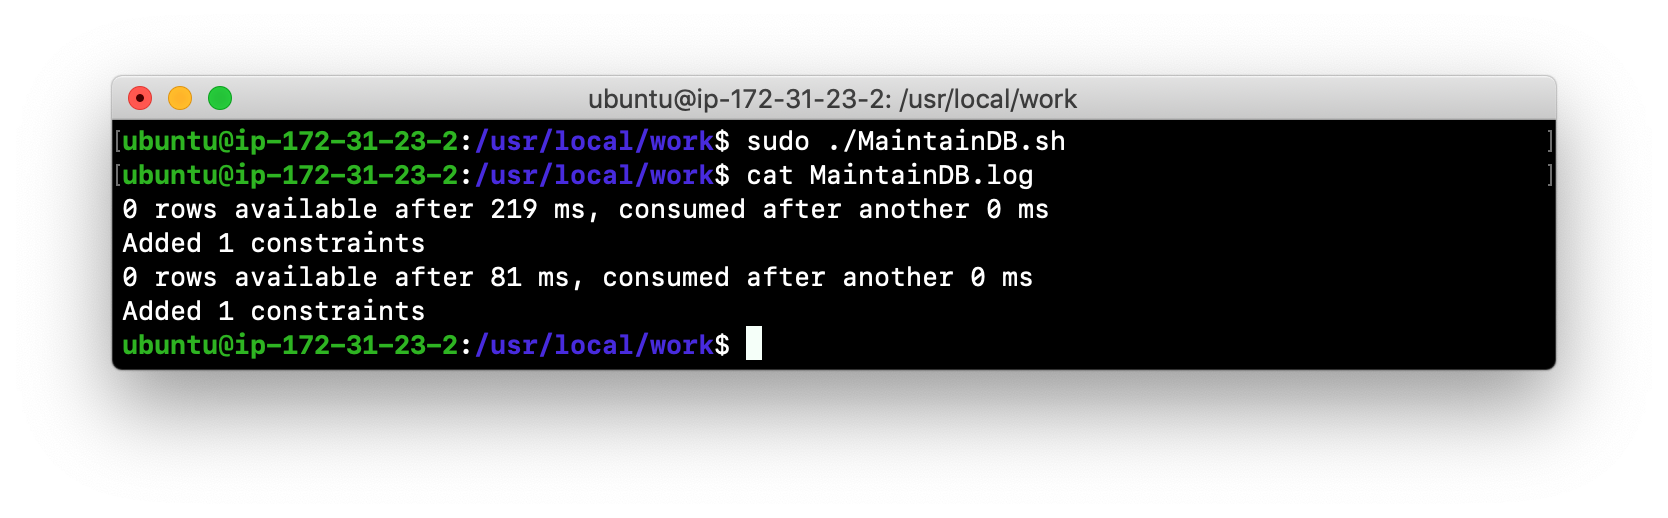
2. AddConstraints.sh that invokes cypher-shell using a set of Cypher statements and specifies verbose output:
cat /usr/local/work/AddConstraints.cypher | /usr/bin/cypher-shell -u neo4j -p training-helps --format verbose3. PrepareDB.sh that initializes the log file, PrepareDB.log, and calls the script to add the constraints:
rm -rf /usr/local/work/PrepareDB.log/usr/local/work/AddConstraints.sh 2>&1 >> /usr/local/work/PrepareDB.log
# Other scripts hereWhen the PrepareDB.sh script runs its scripts, all output will be written to the log file, including error output. Then you can simply check the log file to make sure it ran as expected.
Exercise #6: Scripting changes to the database
In this Exercise, you will gain experience scripting with cypher-shell. You will create three files in the /usr/local/work folder:
-
AddConstraints.cypher
-
AddConstraints.sh
-
MaintainDB.sh
Before you begin
-
Remove the databases/movie3-copy.db folder as this database is now corrupt.
-
Ensure that the Neo4j configuration uses movie3.db for the database.
-
Start or restart the Neo4j instance.
Exercise steps:
-
Open a terminal on your system.
-
Start
cypher-shell, providing the credentials for the neo4j user.
-
Enter some simple Cypher statements to confirm that you can access the database. For example:
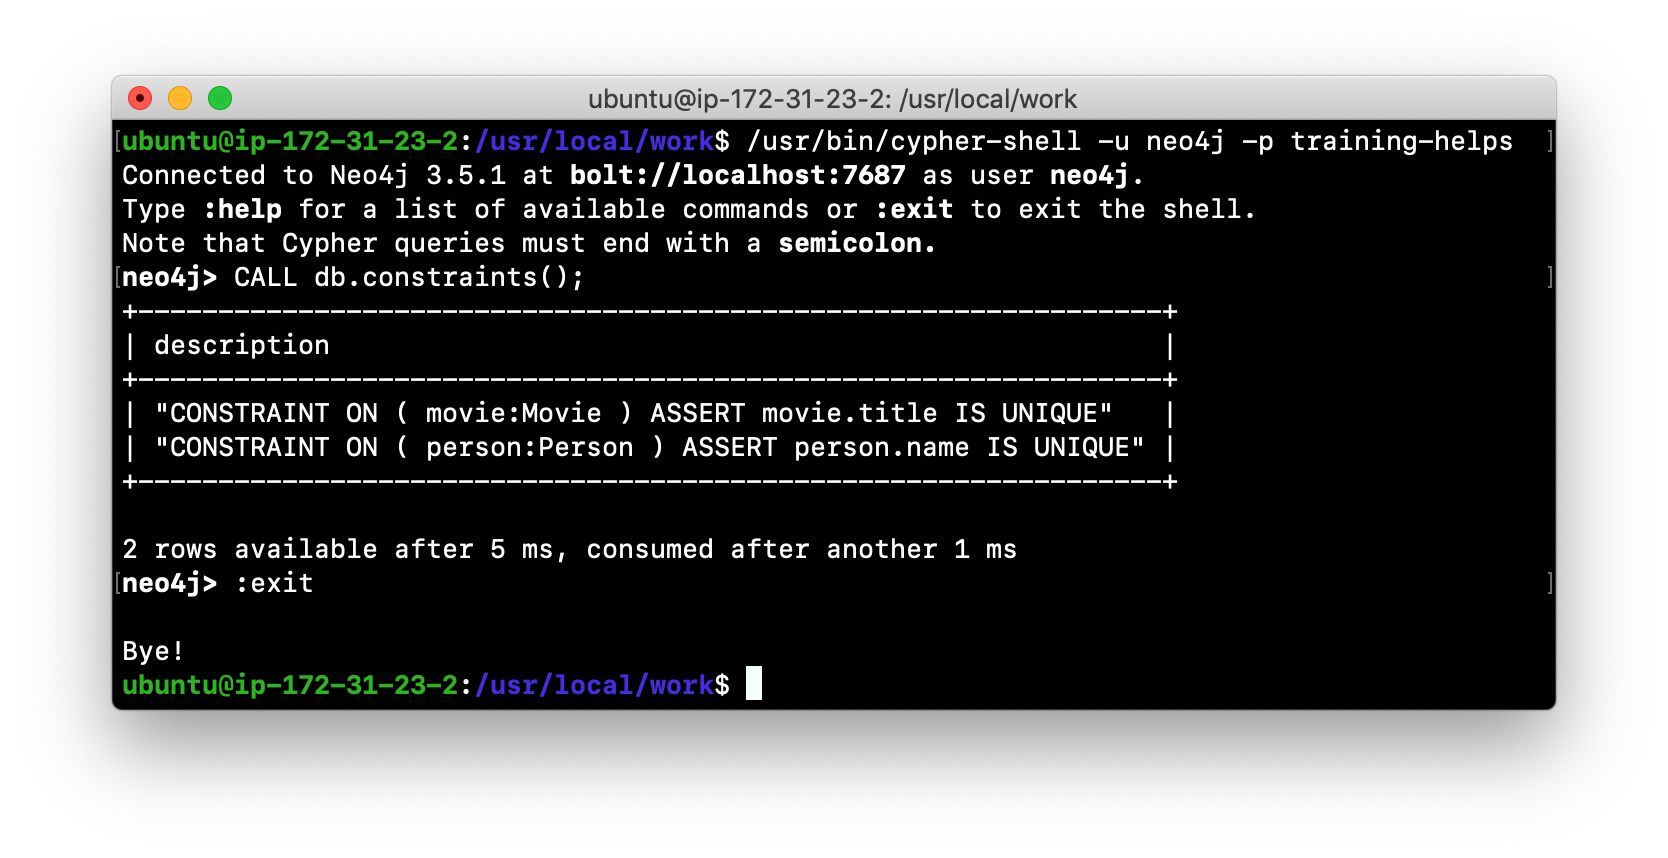
CALL db.schema(); CALL db.constraints(); -
Exit Cypher-shell by typing
:exit. -
Create a Cypher script in the /usr/local/work folder named AddConstraints.cypher with the following statements:
CREATE CONSTRAINT ON (m:Movie) ASSERT m.title IS UNIQUE;
CREATE CONSTRAINT ON (p:Person) ASSERT p.name IS UNIQUE;
-
Create a shell script in the /usr/local/work folder named AddConstraints.sh that will forward AddConstraints.cypher to
cypher-shell. This file will have the following contents:cat /usr/local/work/AddConstraints.cypher | /usr/bin/cypher-shell -u neo4j -p training-helps --format verbose
-
Create a shell script in the /usr/local/work folder named MaintainDB.sh that will initialize the log file and then call AddConstraints.sh. This file will have the following contents:
rm -rf /usr/local/work/MaintainDB.log/usr/local/work/AddConstraints.sh 2>&1 >> /usr/local/work/MaintainDB.log
-
Ensure that the scripts you created have execute permissions.
-
Run the MaintainDB.sh script and view the log file.
-
Confirm that it created the constraints in the database. (Check using cypher-shell (
CALL db.constraints();))
Managing plugins
Some applications can use Neo4j out-of-the-box, but many applications require additional functionality that could be:
-
A library supported by Neo4j such as GraphQL or GRAPH ALGORITHMS.
-
A community-supported library, such as APOC.
-
Custom functionality that has been written by the developers of your application.
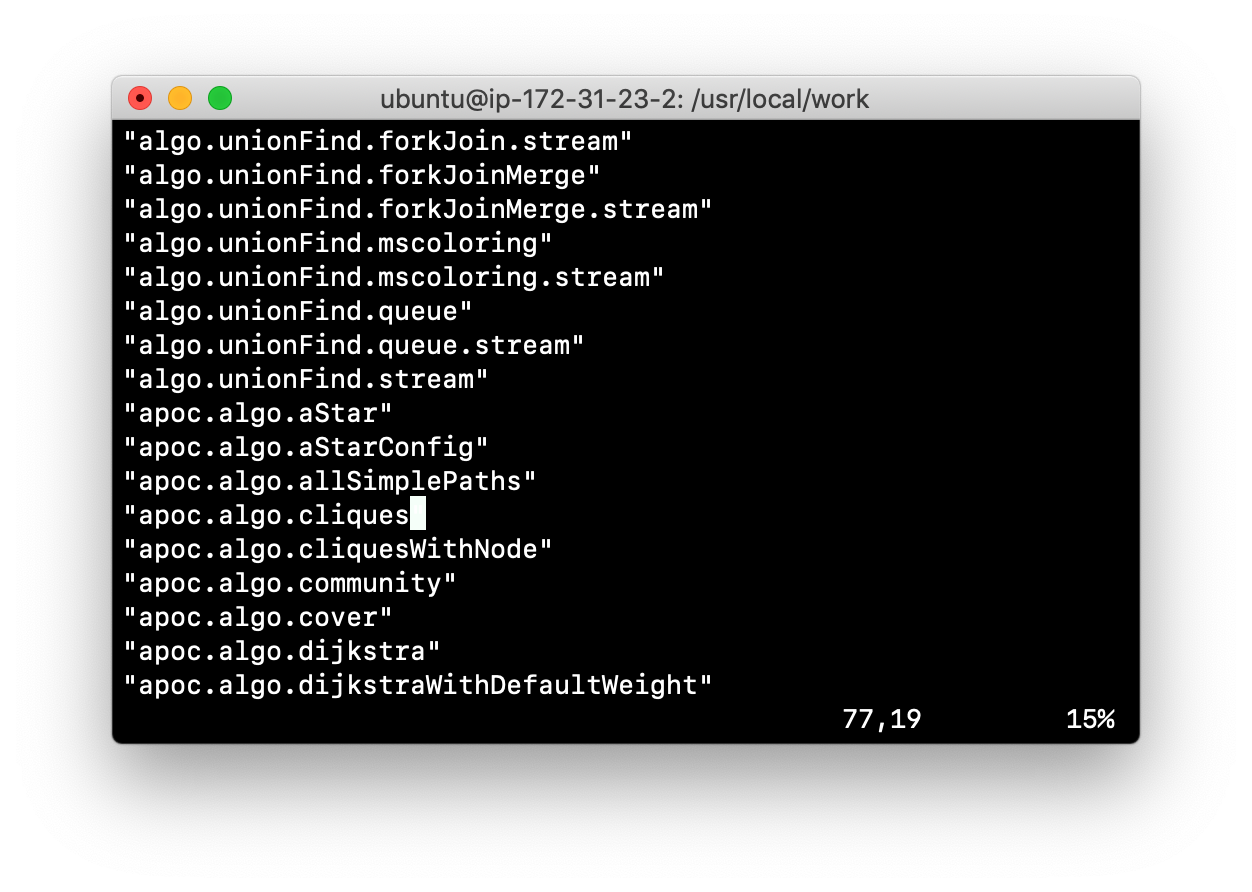
We refer to this additional functionality as a plugin that contains specific procedures. A plugin is typically specific to a particular release of Neo4j. In many cases, if you upgrade to a later version of Neo4j, you may also need to install a new plugin. First, you must understand how to view the procedures available for use with the Neo4j instance. You do so by executing the Cypher statement CALL db.procedures();.
Retrieving available procedures
Here is an example of a script you can run to produce a file, Procedures.txt that contain the names of the procedures currently available for the Neo4j instance:
echo "CALL dbms.procedures() YIELD name;" | /usr/bin/cypher-shell -u neo4j -p training-helps --format plain > /usr/local/work/Procedures.txtThis script calls dbms.procedures() to return the name of each procedure in the list returned.
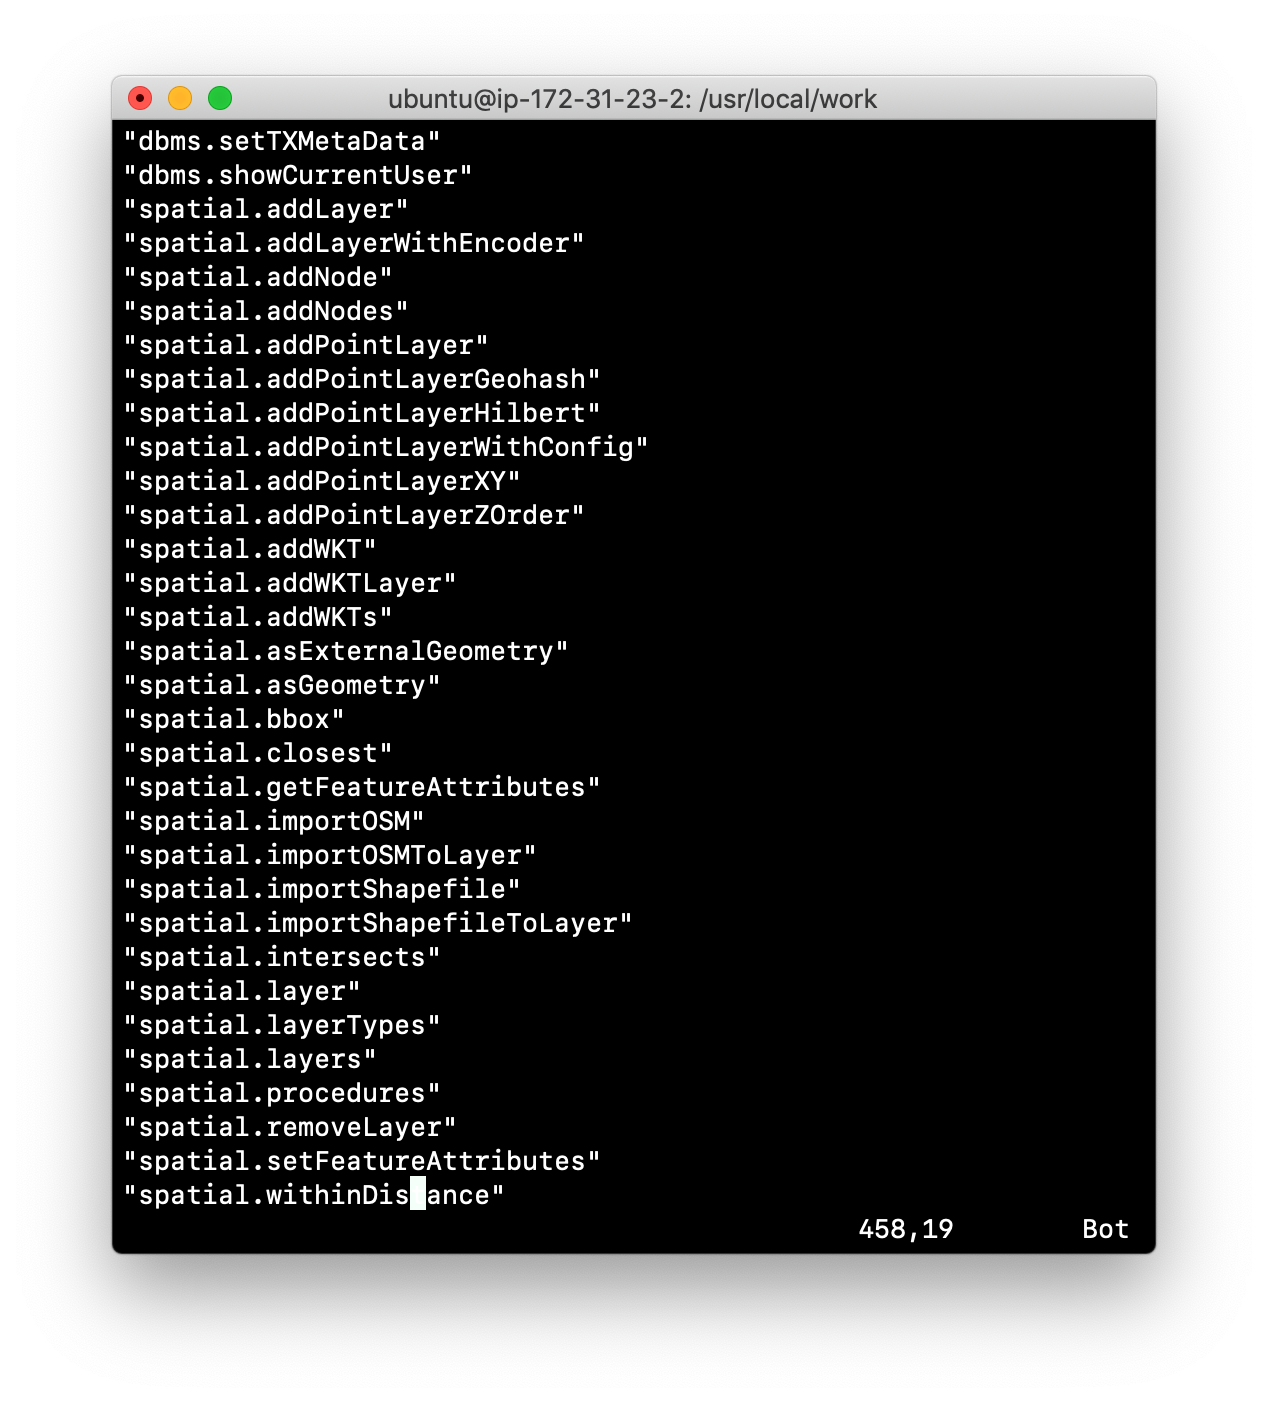
Here is a view of Procedures.txt:
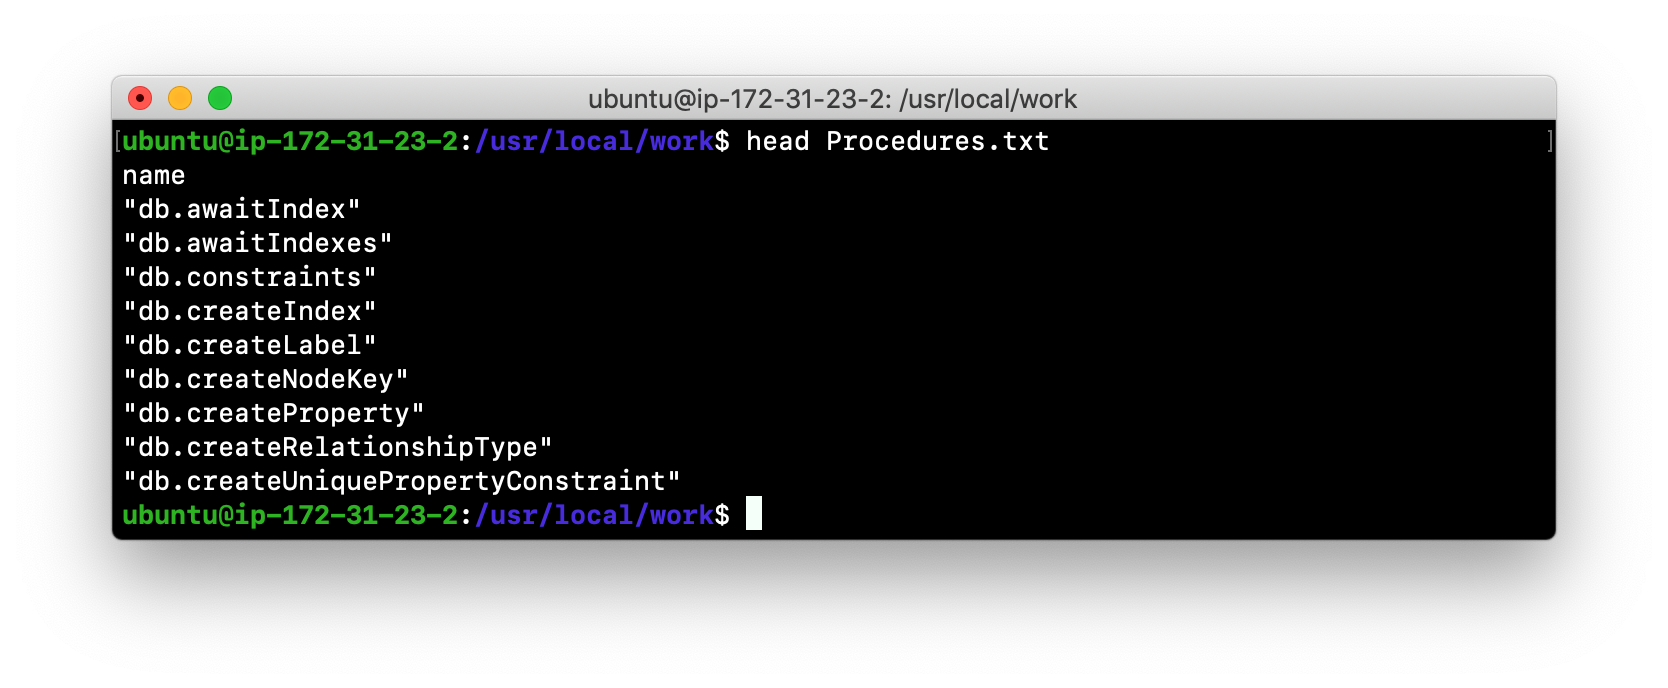
By default, the procedures available to the Neo4j instance are the built-in procedures that are named db.* and dbms.*.
Adding a plugin to the Neo4j instance
To add a plugin to your Neo4j instance, you must first obtain the .jar file. It is important to confirm that the .jar file you will use is compatible with the version of Neo4j that you are using. For example, a plugin released for release 3.4 of Neo4j can be used by a Neo4j 3.5 instance, but the converse may not be true. You must check with the developers of the plugin for compatibility.
Some plugins require a configuration change. You must understand the configuration changes required for any plugin you are installing.
| When you install Neo4j, the plugins folder contains a README.txt folder that contains instructions related to sandboxing and whitelisting. These instructions will change in future releases of Neo4j. |
Sandboxing and whitelisting
Neo4j provides sandboxing to ensure that procedures do not inadvertently use insecure APIs. For example, when writing custom code it is possible to access Neo4j APIs that are not publicly supported, and these internal APIs are subject to change, without notice. Additionally, their use comes with the risk of performing insecure actions. The sandboxing functionality limits the use of extensions to publicly supported APIs, which exclusively contain safe operations, or contain security checks.
Neo4j whitelisting can be used to allow loading only a few extensions from a larger library. The configuration setting dbms.security.procedures.whitelist is used to name certain procedures that will be available from a library. It defines a comma-separated list of procedures that are to be loaded. The list may contain both fully-qualified procedure names, and partial names with the wildcard *.
Example: Installing the Graph Algorithms plugin
Suppose we wanted to install the Graph Algorithms library that is compatible with Neo4j 3.5. We find the library in GitHub and simply download the .jar file. Here is the release area in GitHub for the graph algorithms library:
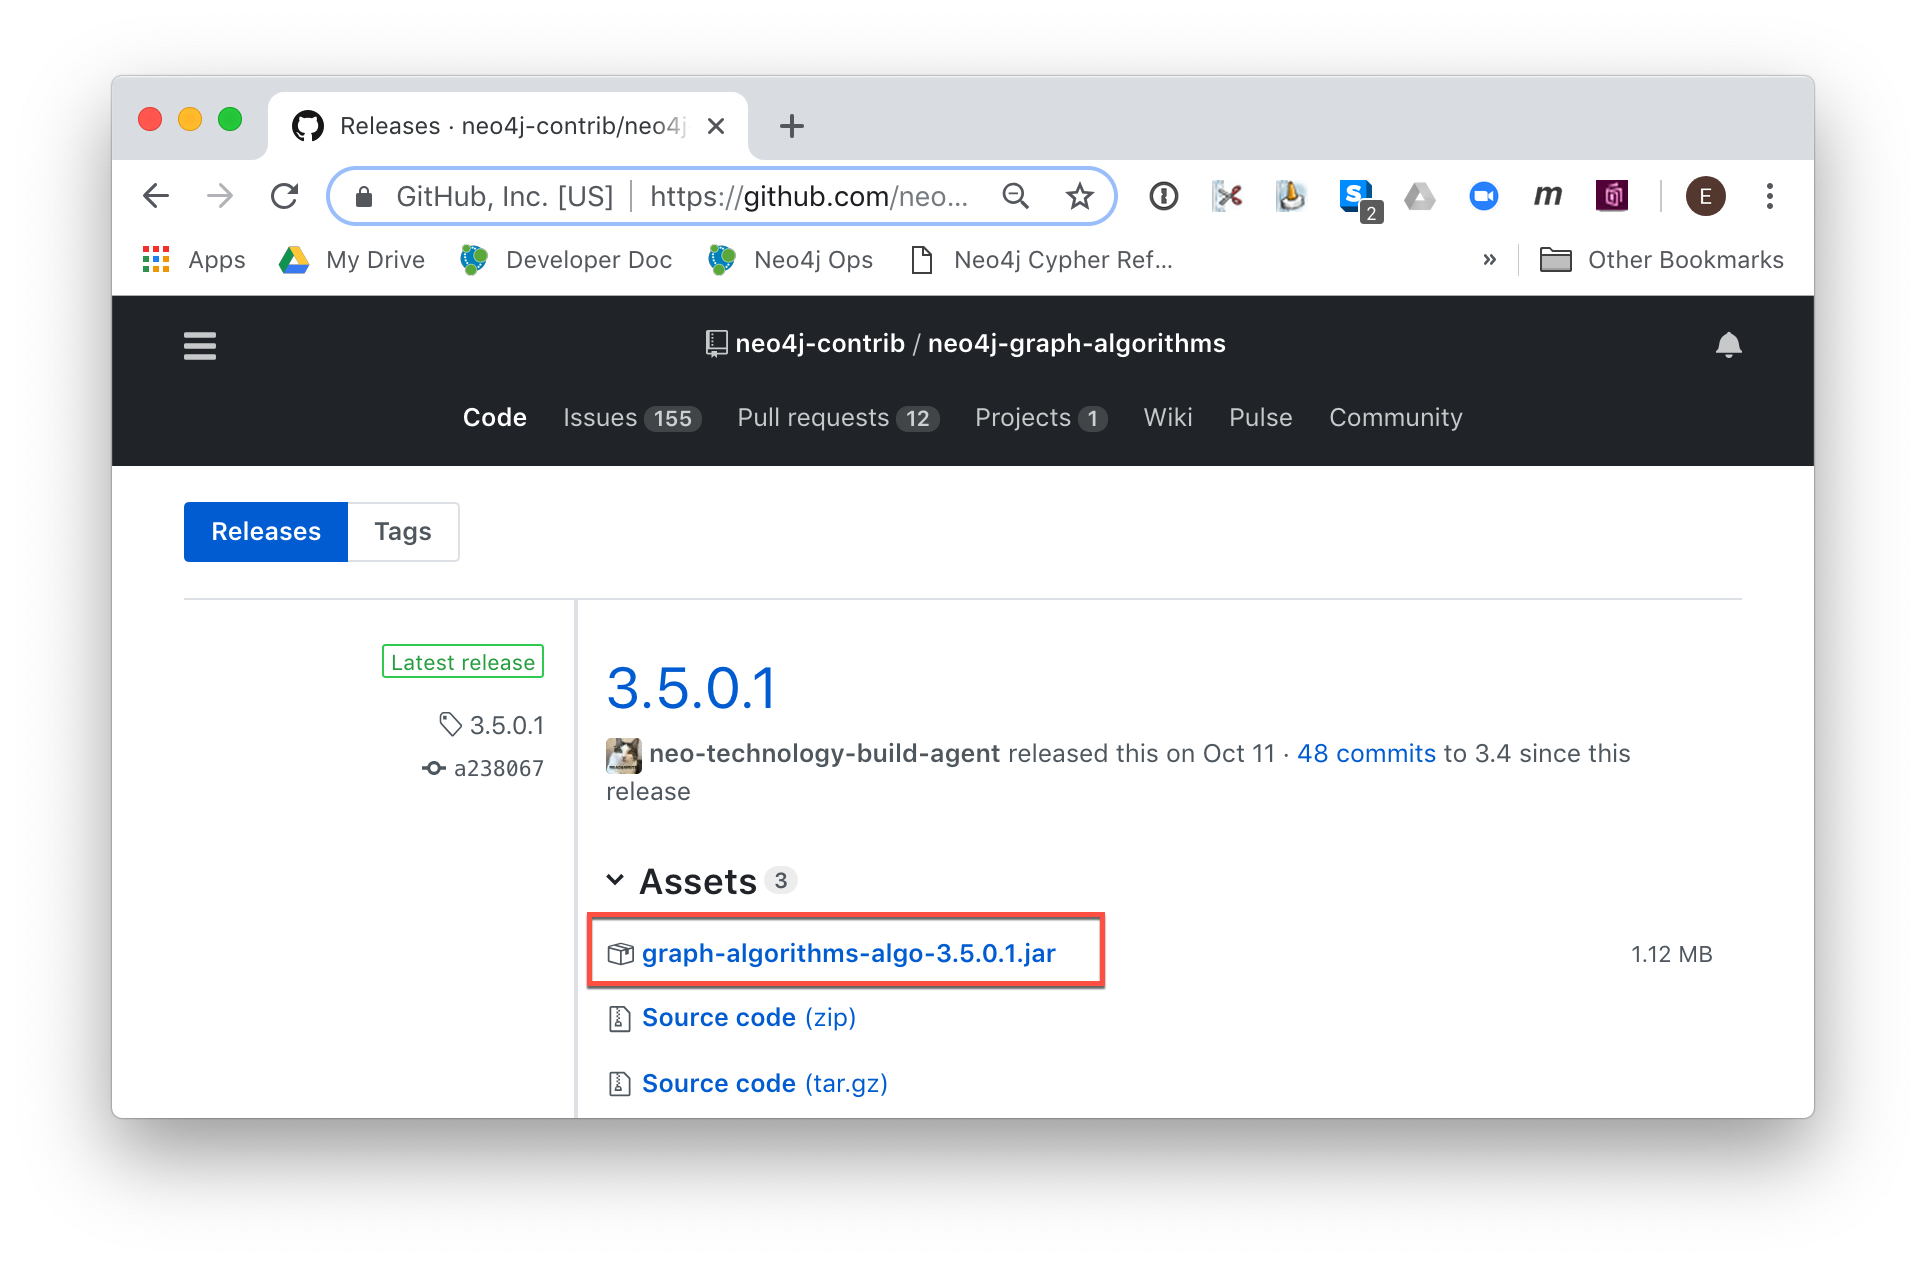
The main page for Graph Algorithms in GitHub contains details about the plugin and instructions for installing it.
Example: Download and ownership of plugin
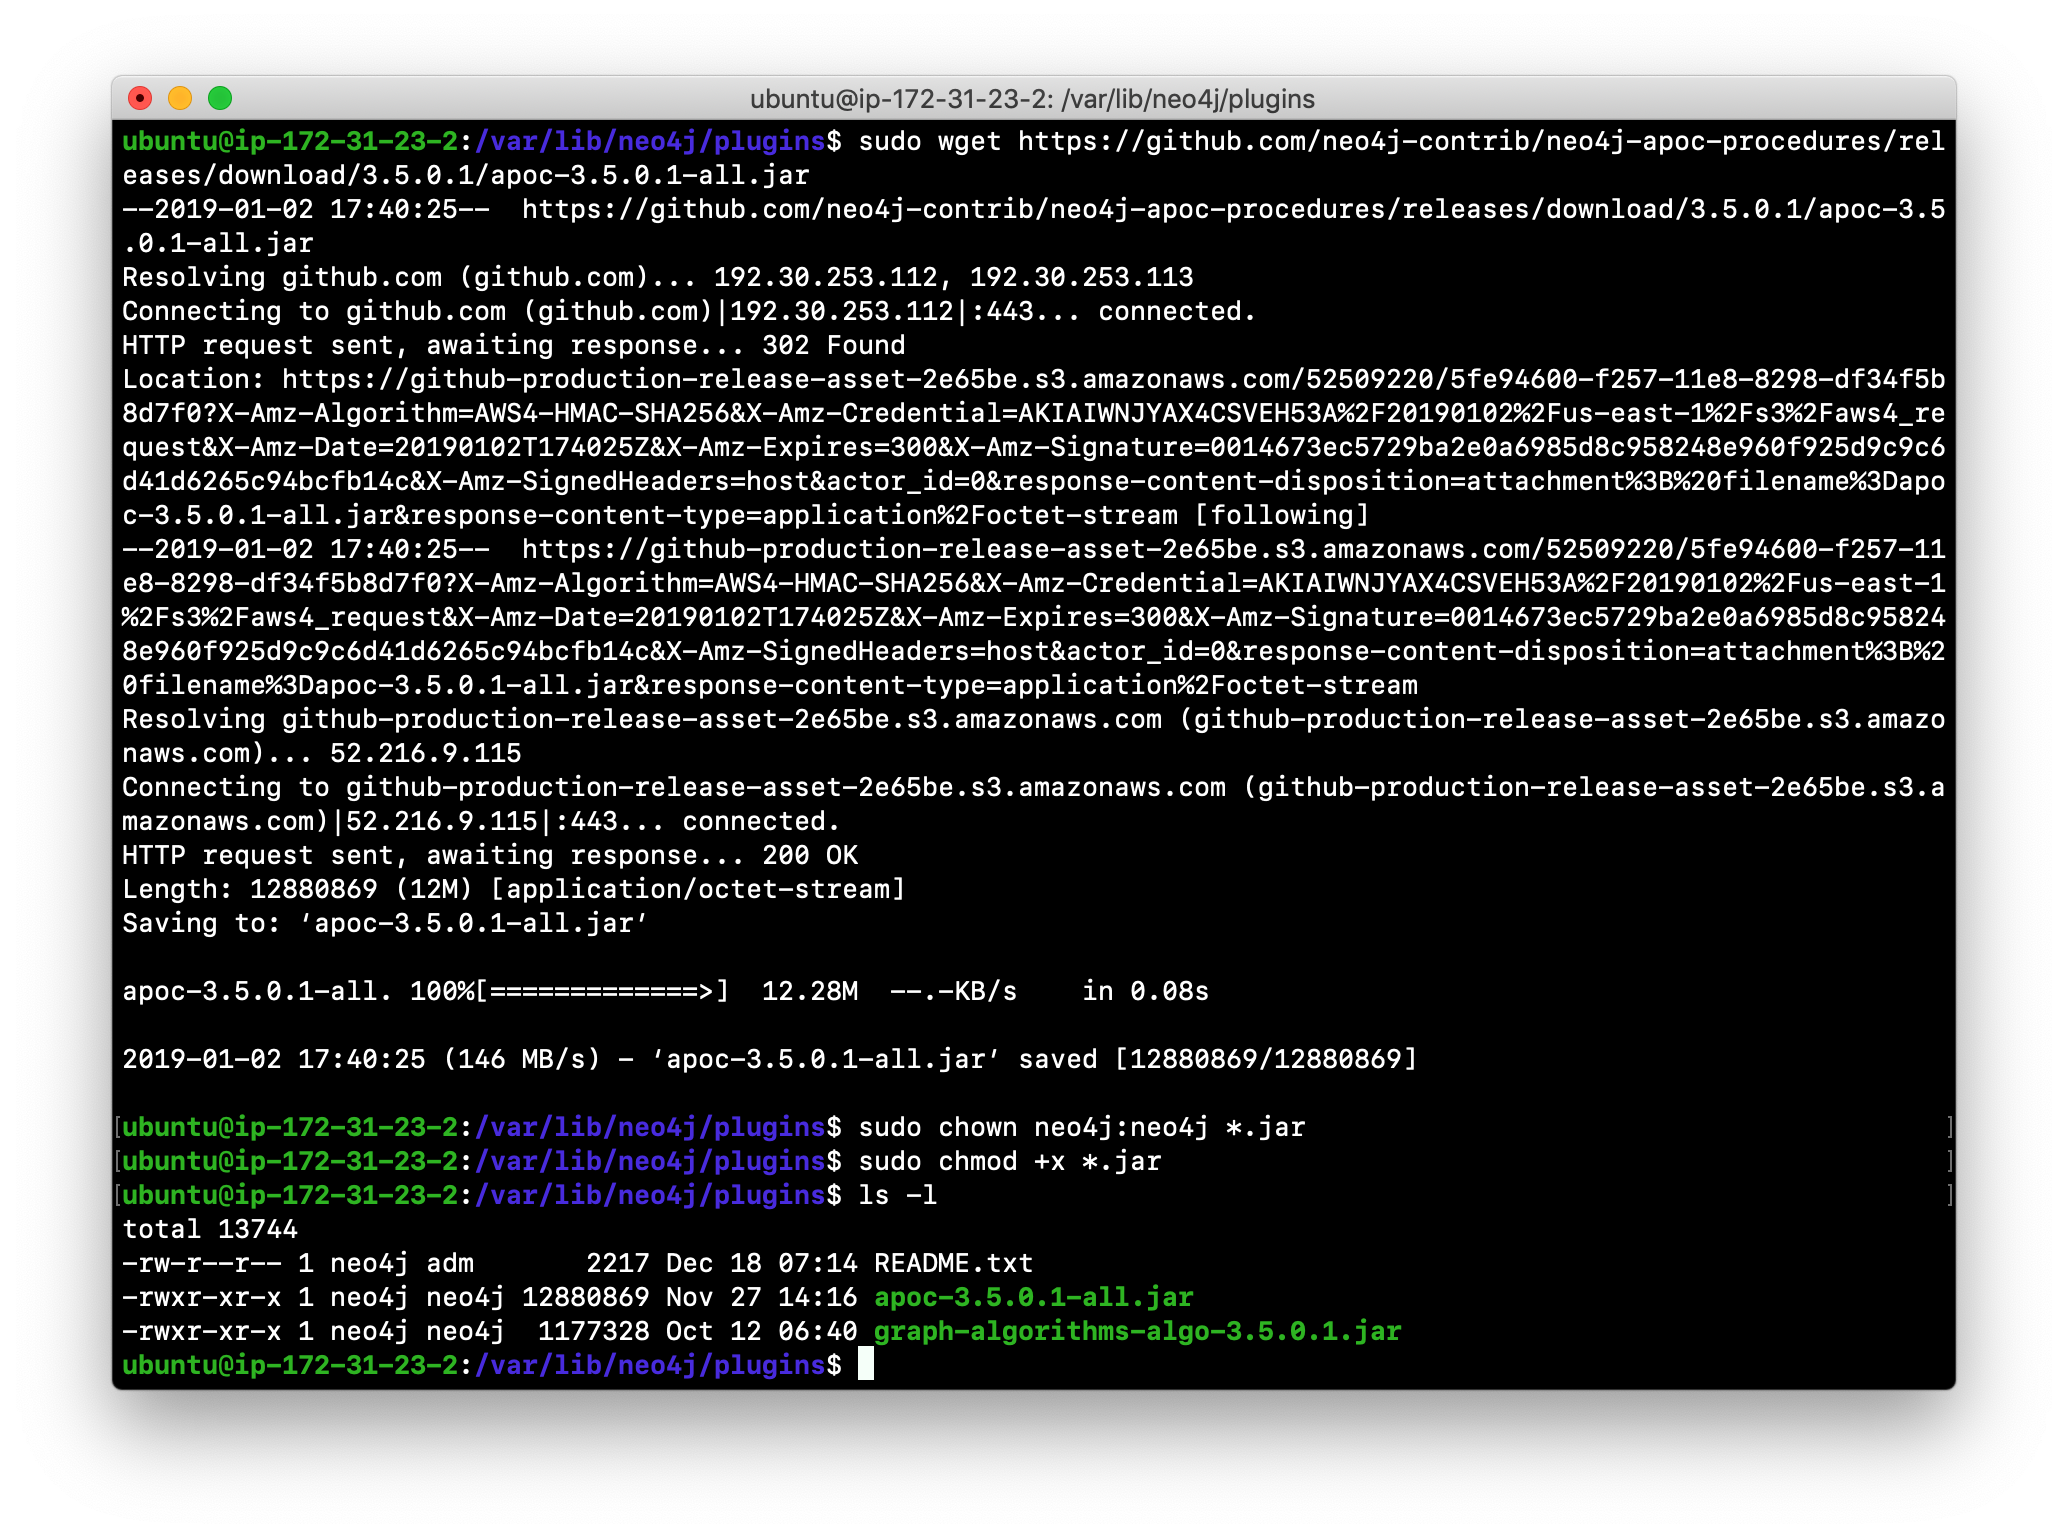
You download any plugins that your application will use to the /var/lib/neo4j/plugins folder:
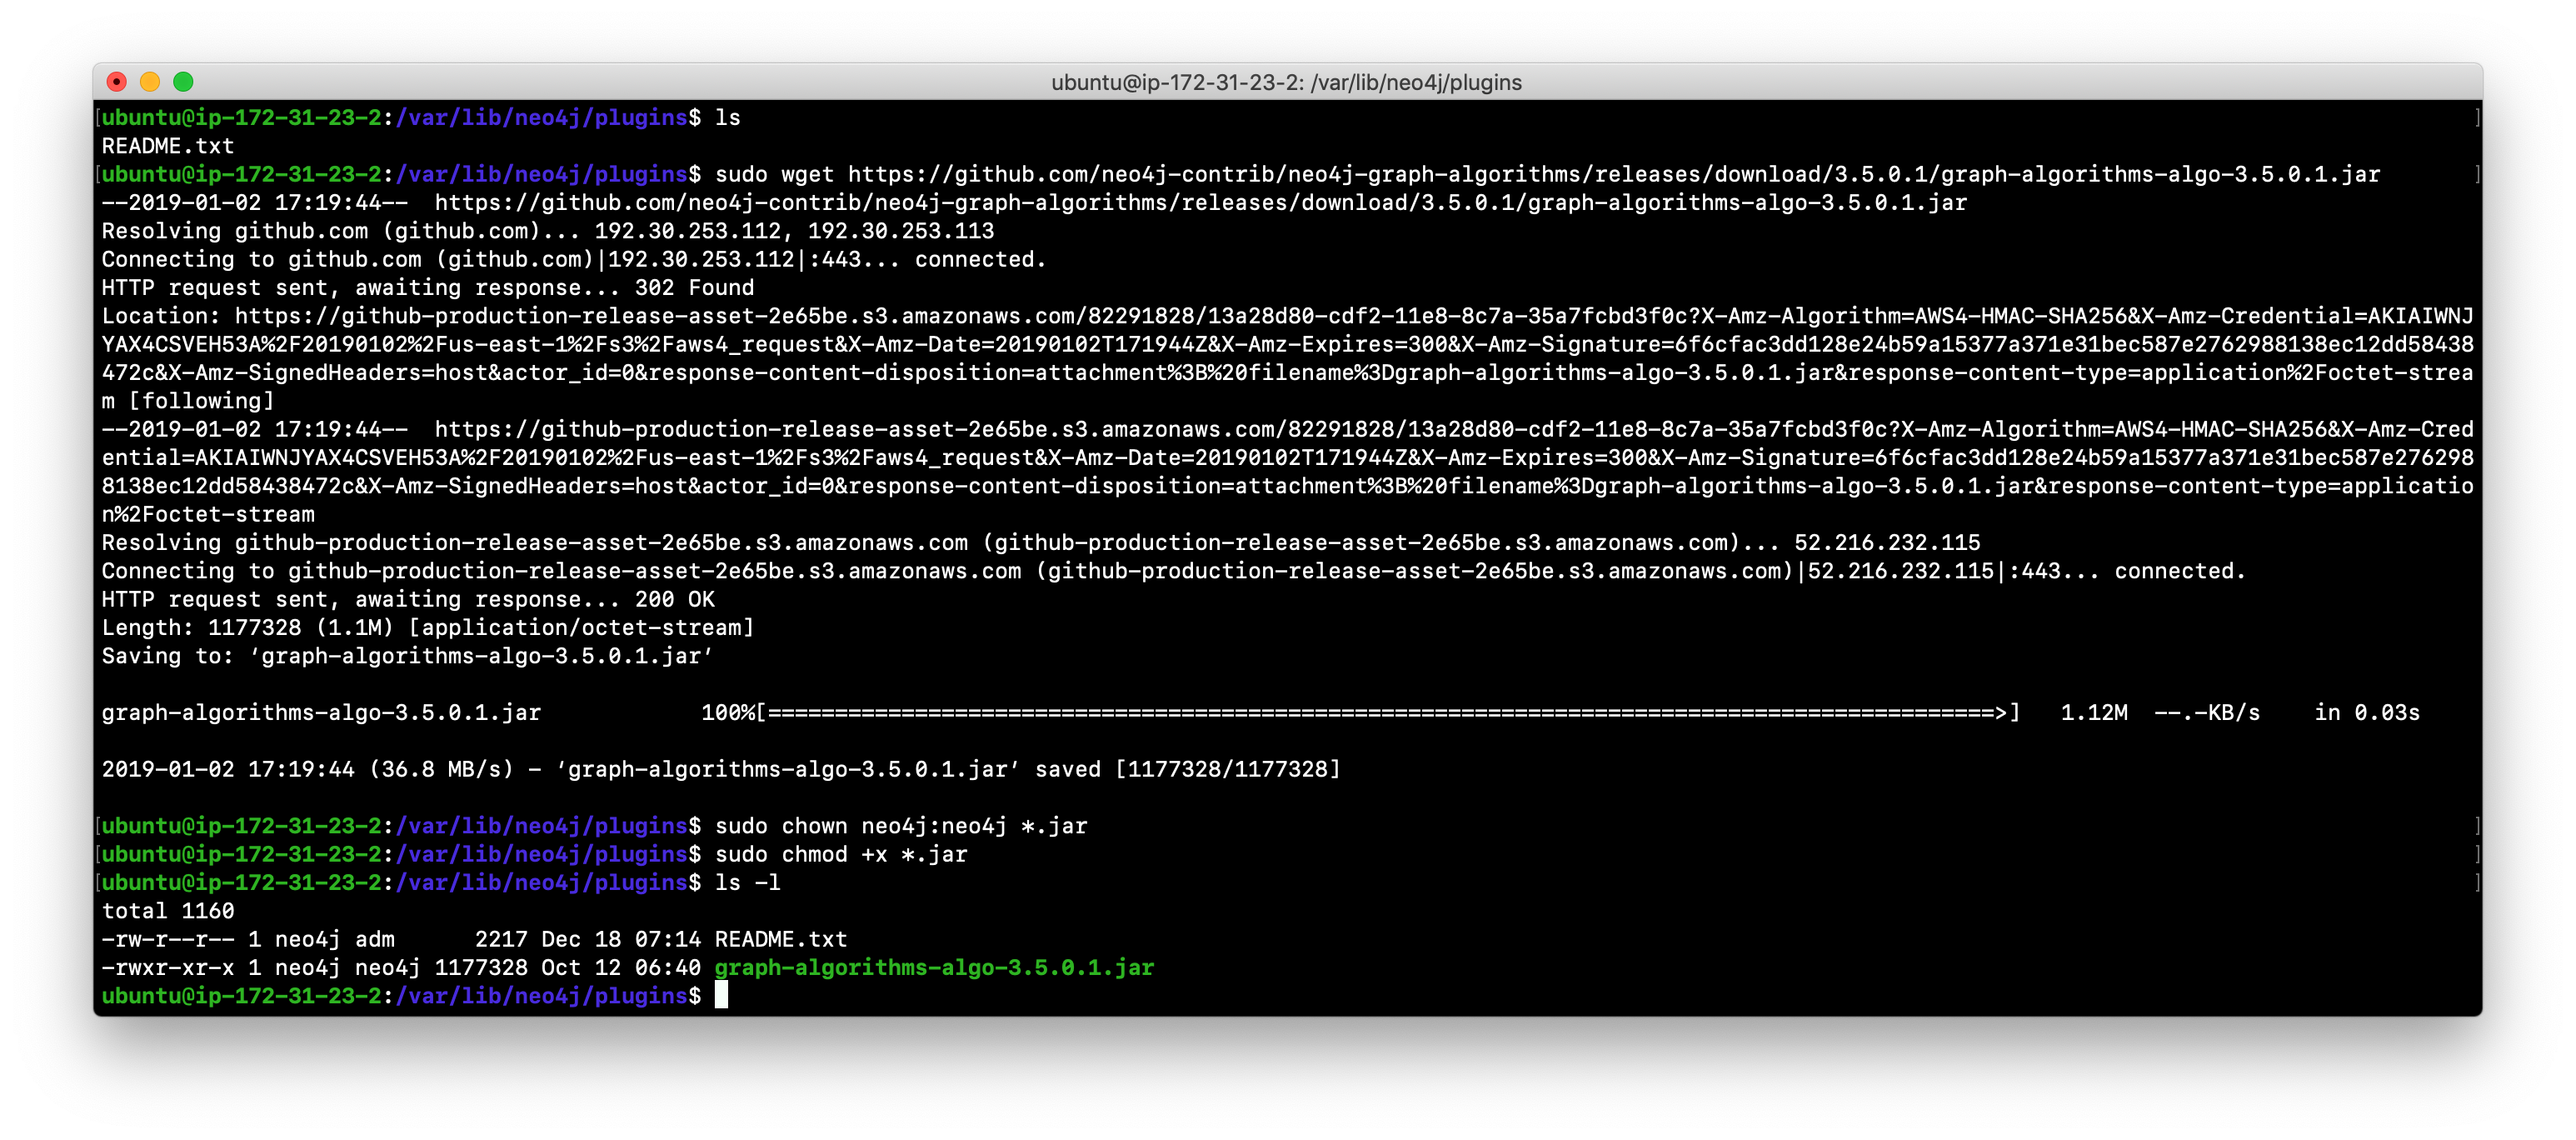
Ensure that the .jar file is owned by neo4j:neo4j and that it has execute permissions.

Example: Installing the APOC plugin
APOC (Awesome Procedures on Cypher) is a very popular plugin used by many applications. It contains over 450 user-defined procedures that make accessing a graph incredibly efficient and much easier than writing your own Cypher statements to do the same thing.
You obtain the plugin from the APOC releases page:
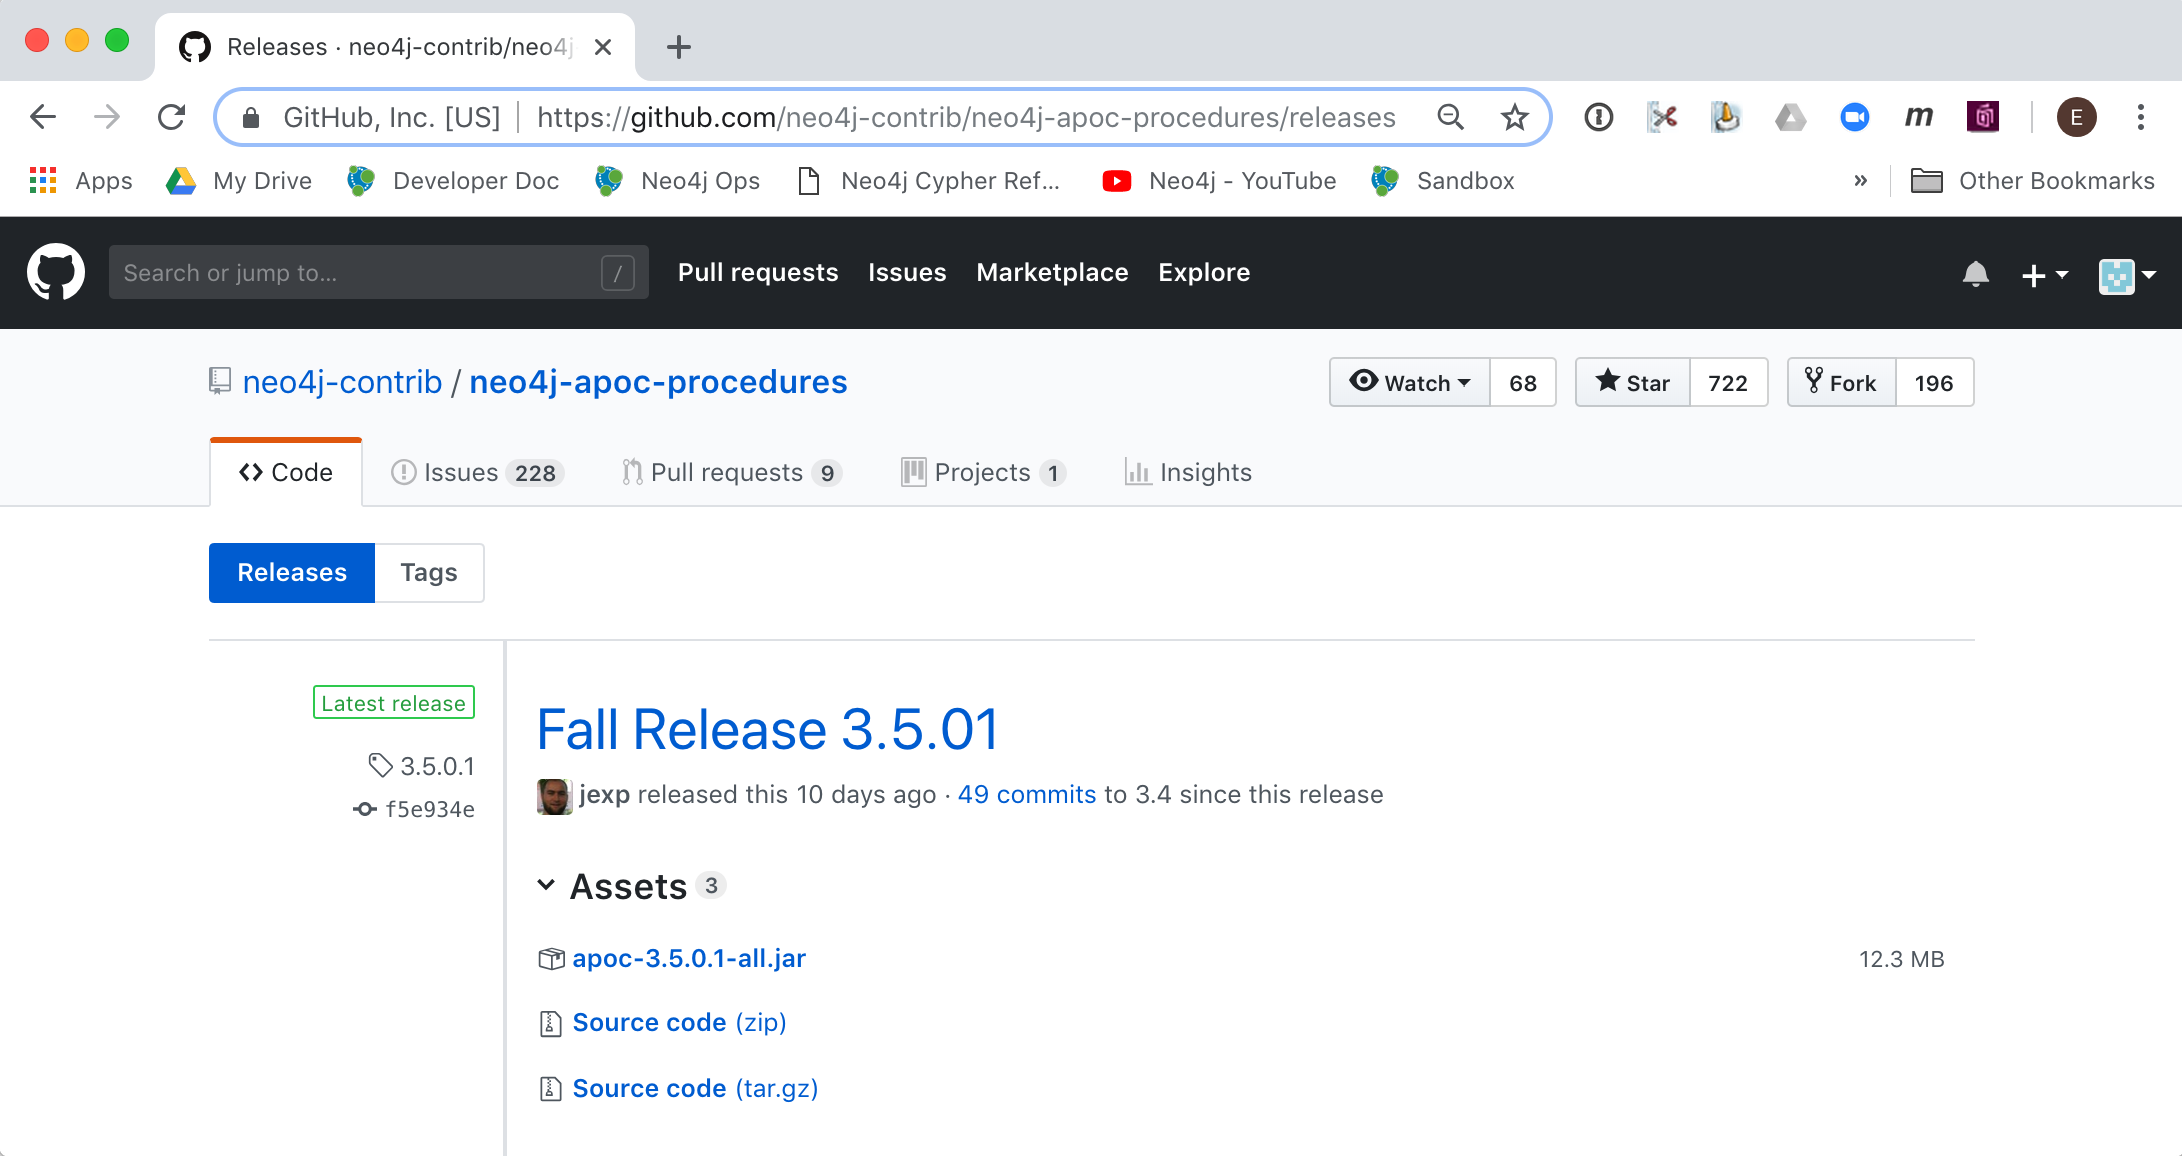
Example: Download and ownership of plugin
Here we download the .jar file, change its permissions to execute, and change the owner to be neo4j:neo4j.
Example: Sandboxing
After you have placed the .jar file into the plugins folder, you must modify the configuration for the instance as described in the main page for APOC. As described on this page, you have an option of either sandboxing or whitelisting the procedures of the plugin. How much of the APOC library is used by your application is determined by the developers so you will use them as a resource for this type of configuration change.
Suppose we want to allow all APOC procedures to be available to this Neo4j instance. We would sandbox the plugin in the neo4j.conf file as follows, similar to how we sandboxed the graph algorithms where we specify dbms.security.procedures.unrestricted=algo.,apoc..
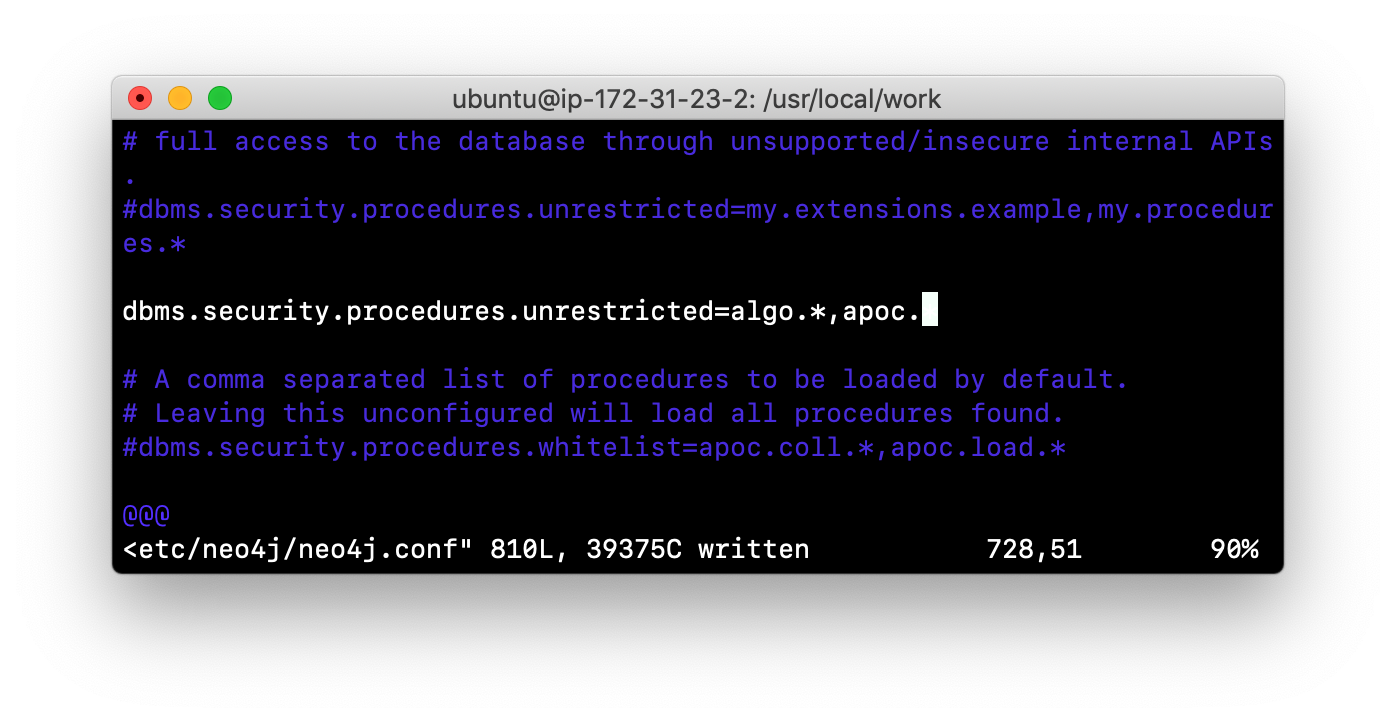
Since APOC is large, you will most likely want to whitebox specific procedures so that only the procedures needed by the application are loaded into the Neo4j instance at runtime.
Exercise #7: Install a plugin
In this Exercise, you will install the Spatial library for use by your Neo4j instance and you will create and execute a script to report all of the procedures available to the Neo4j instance.
Before you begin:
-
Stop the Neo4j instance.
-
Make sure you have a terminal window open for executing test commands.
Exercise steps:
-
In a Web browser, go to the GitHub repository for the Neo4j Spacial Library.
-
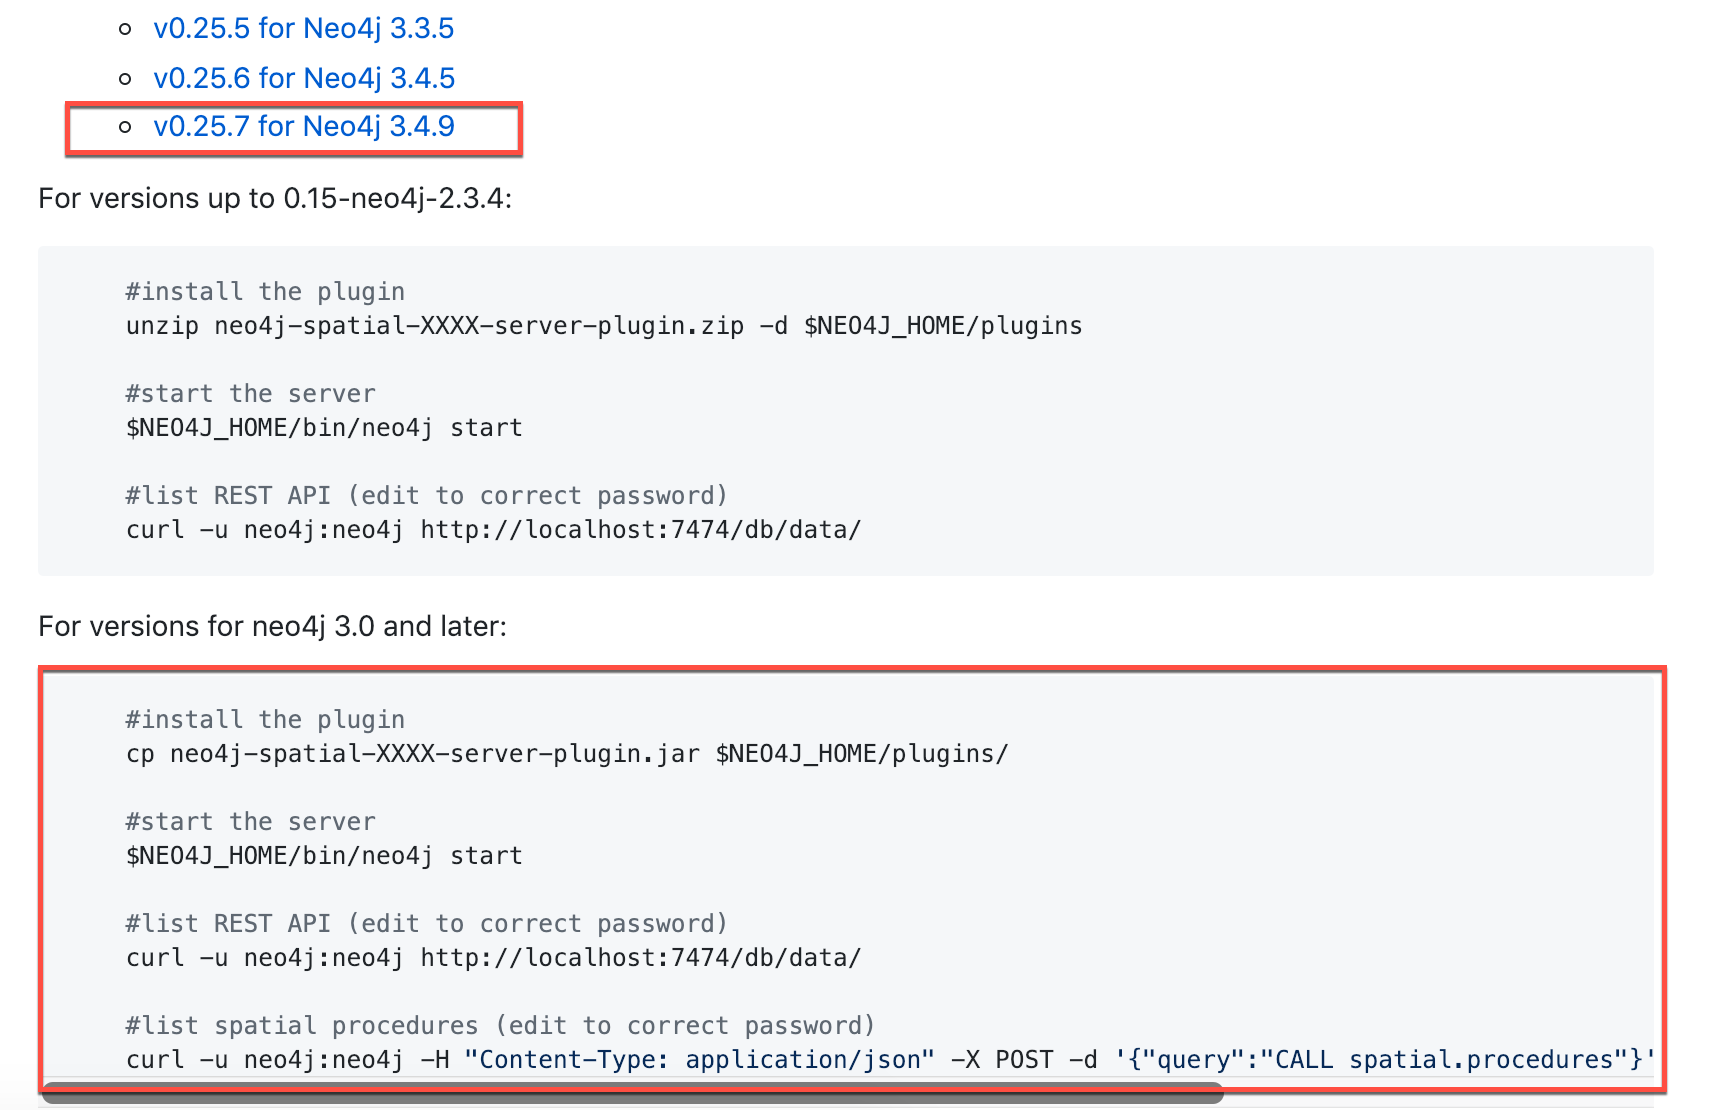
On the main page for this repository, find the latest release of the library that is compatible with your version of Neo4j Enterprise Edition.
-
Download the already-built .jar file into the /var/lib/neo4j/plugins folder.
-
Ensure that the file size is correct and that the file name ends with .jar.
-
Change the owner of the .jar file to neo4j:neo4j and add execute permissions to the file.
-
Restart the Neo4j instance.
-
Follow the steps on the GitHub page for testing the library.
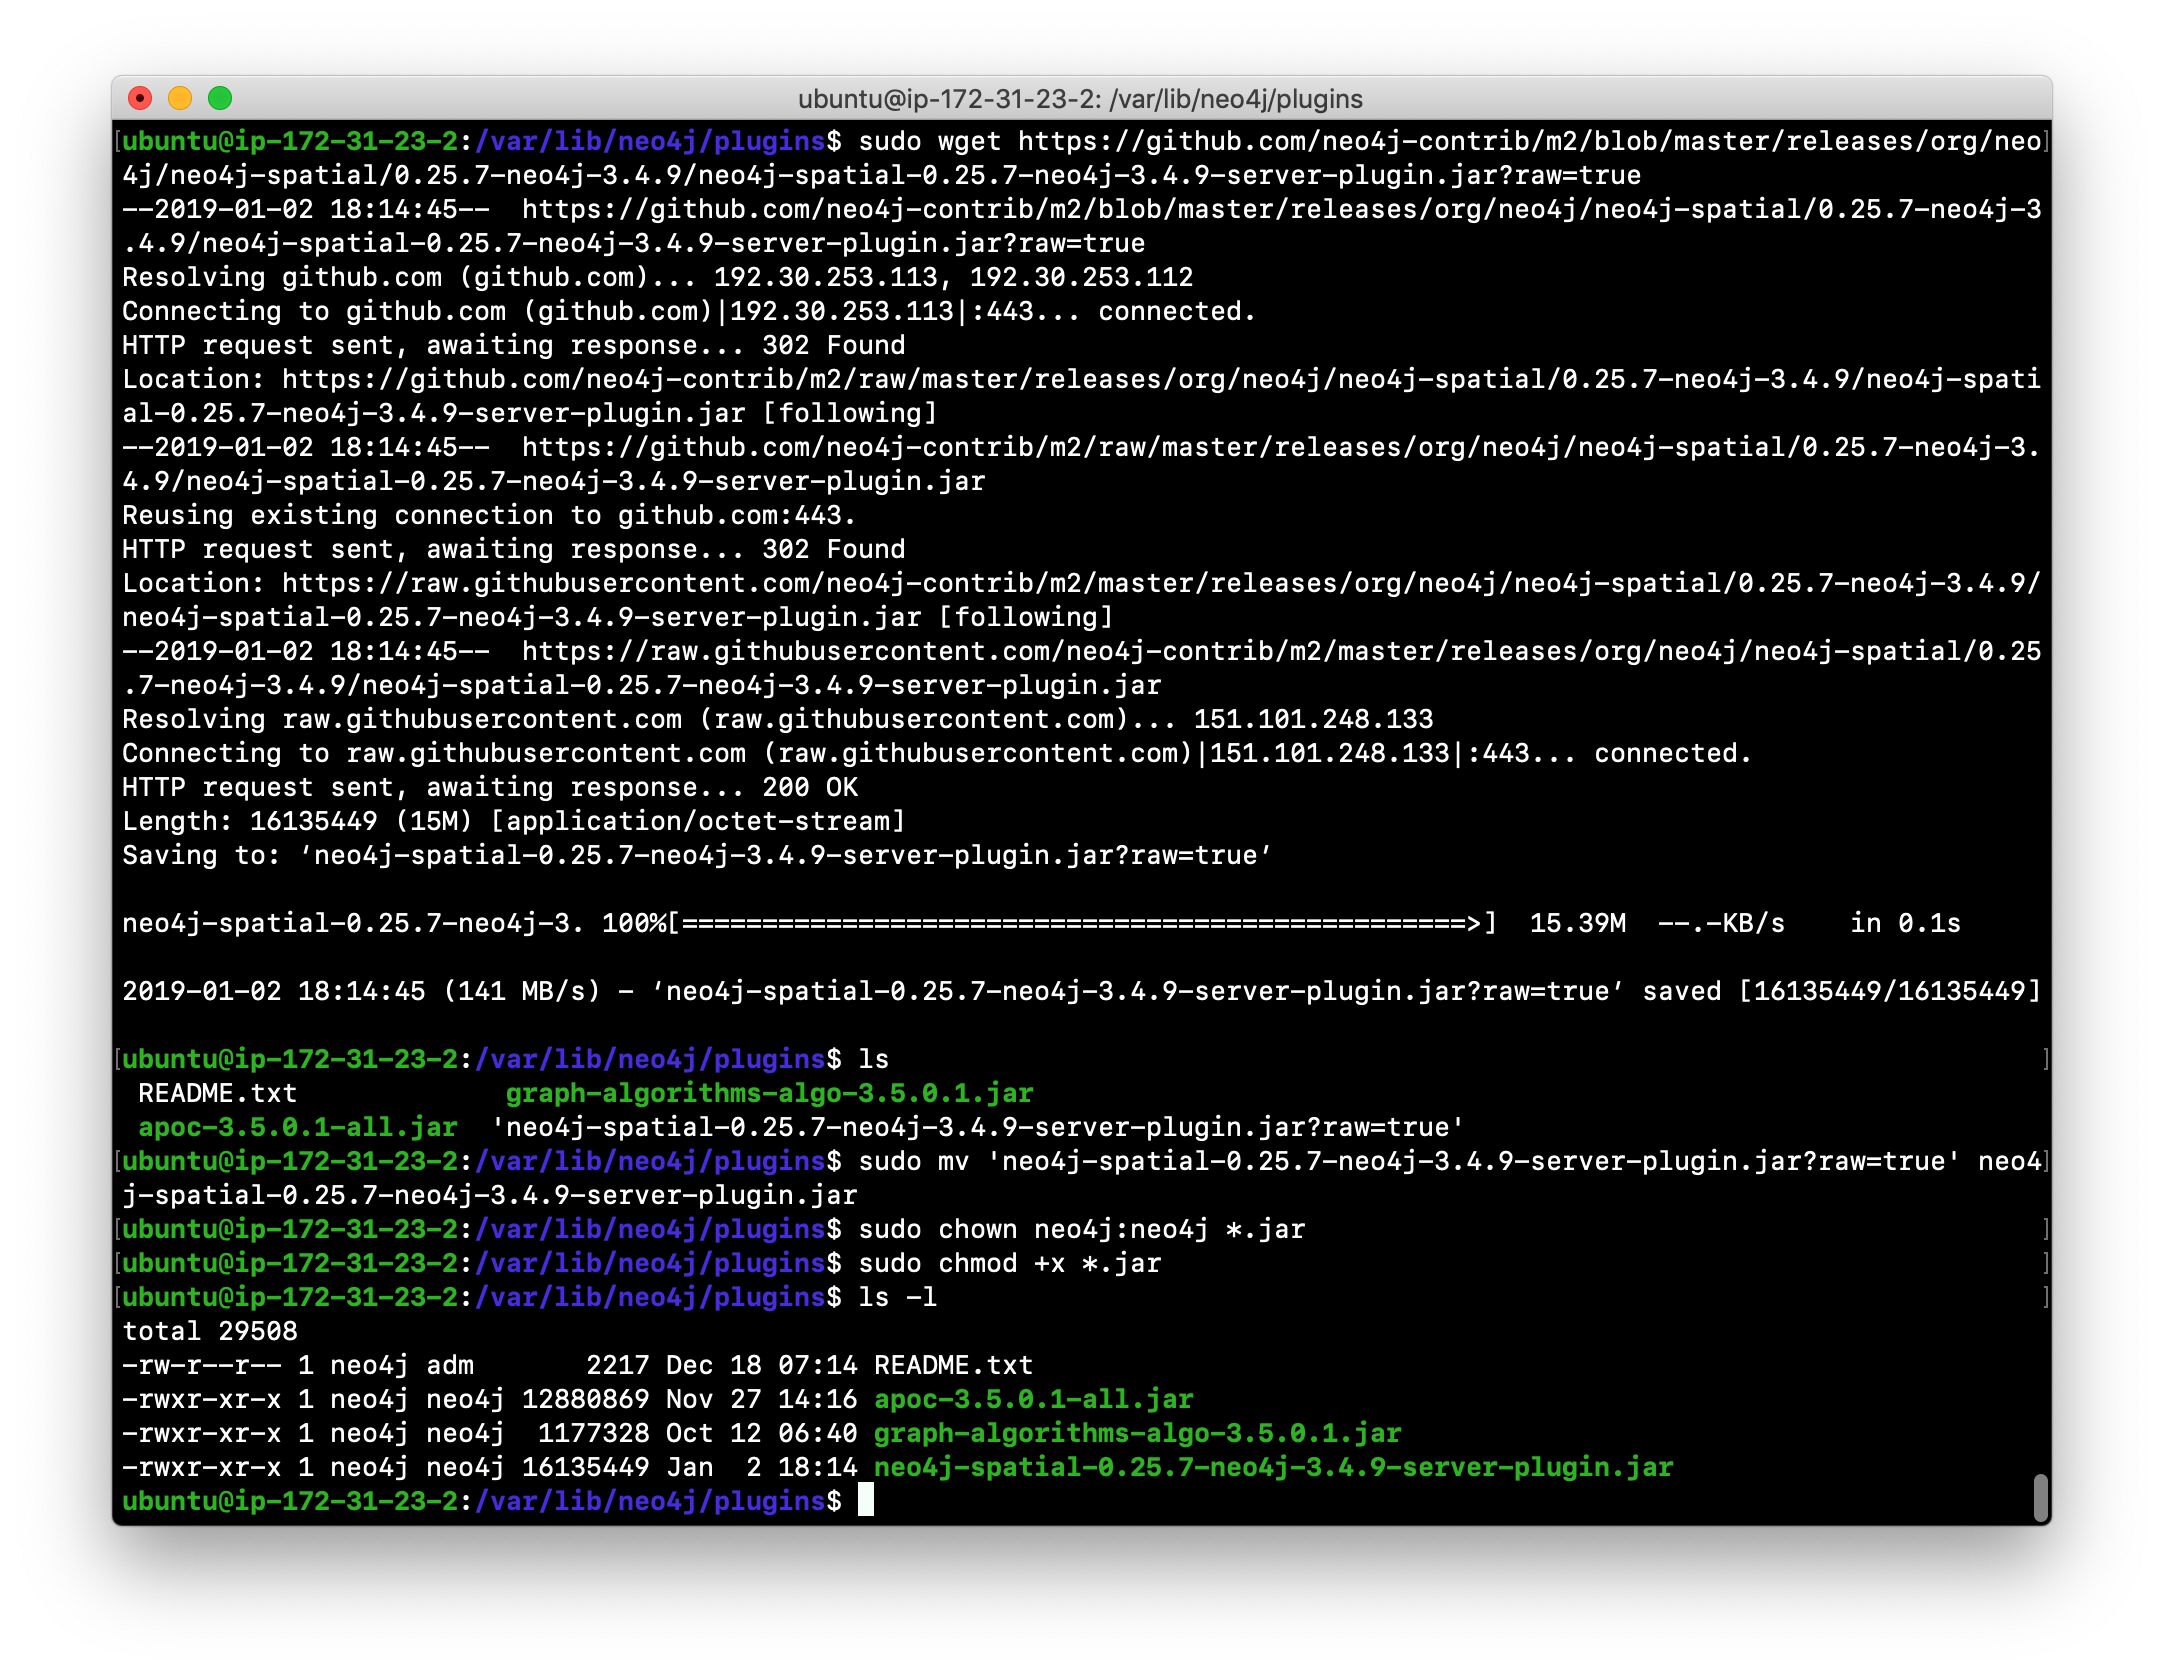
For example, you will see the following in the repository main page:
Here is how you download the .jar file into the /var/lib/neo4j/plugins folder. You must confirm that the file size is correct and that the owner is neo4j:neo4j with execute permissions.
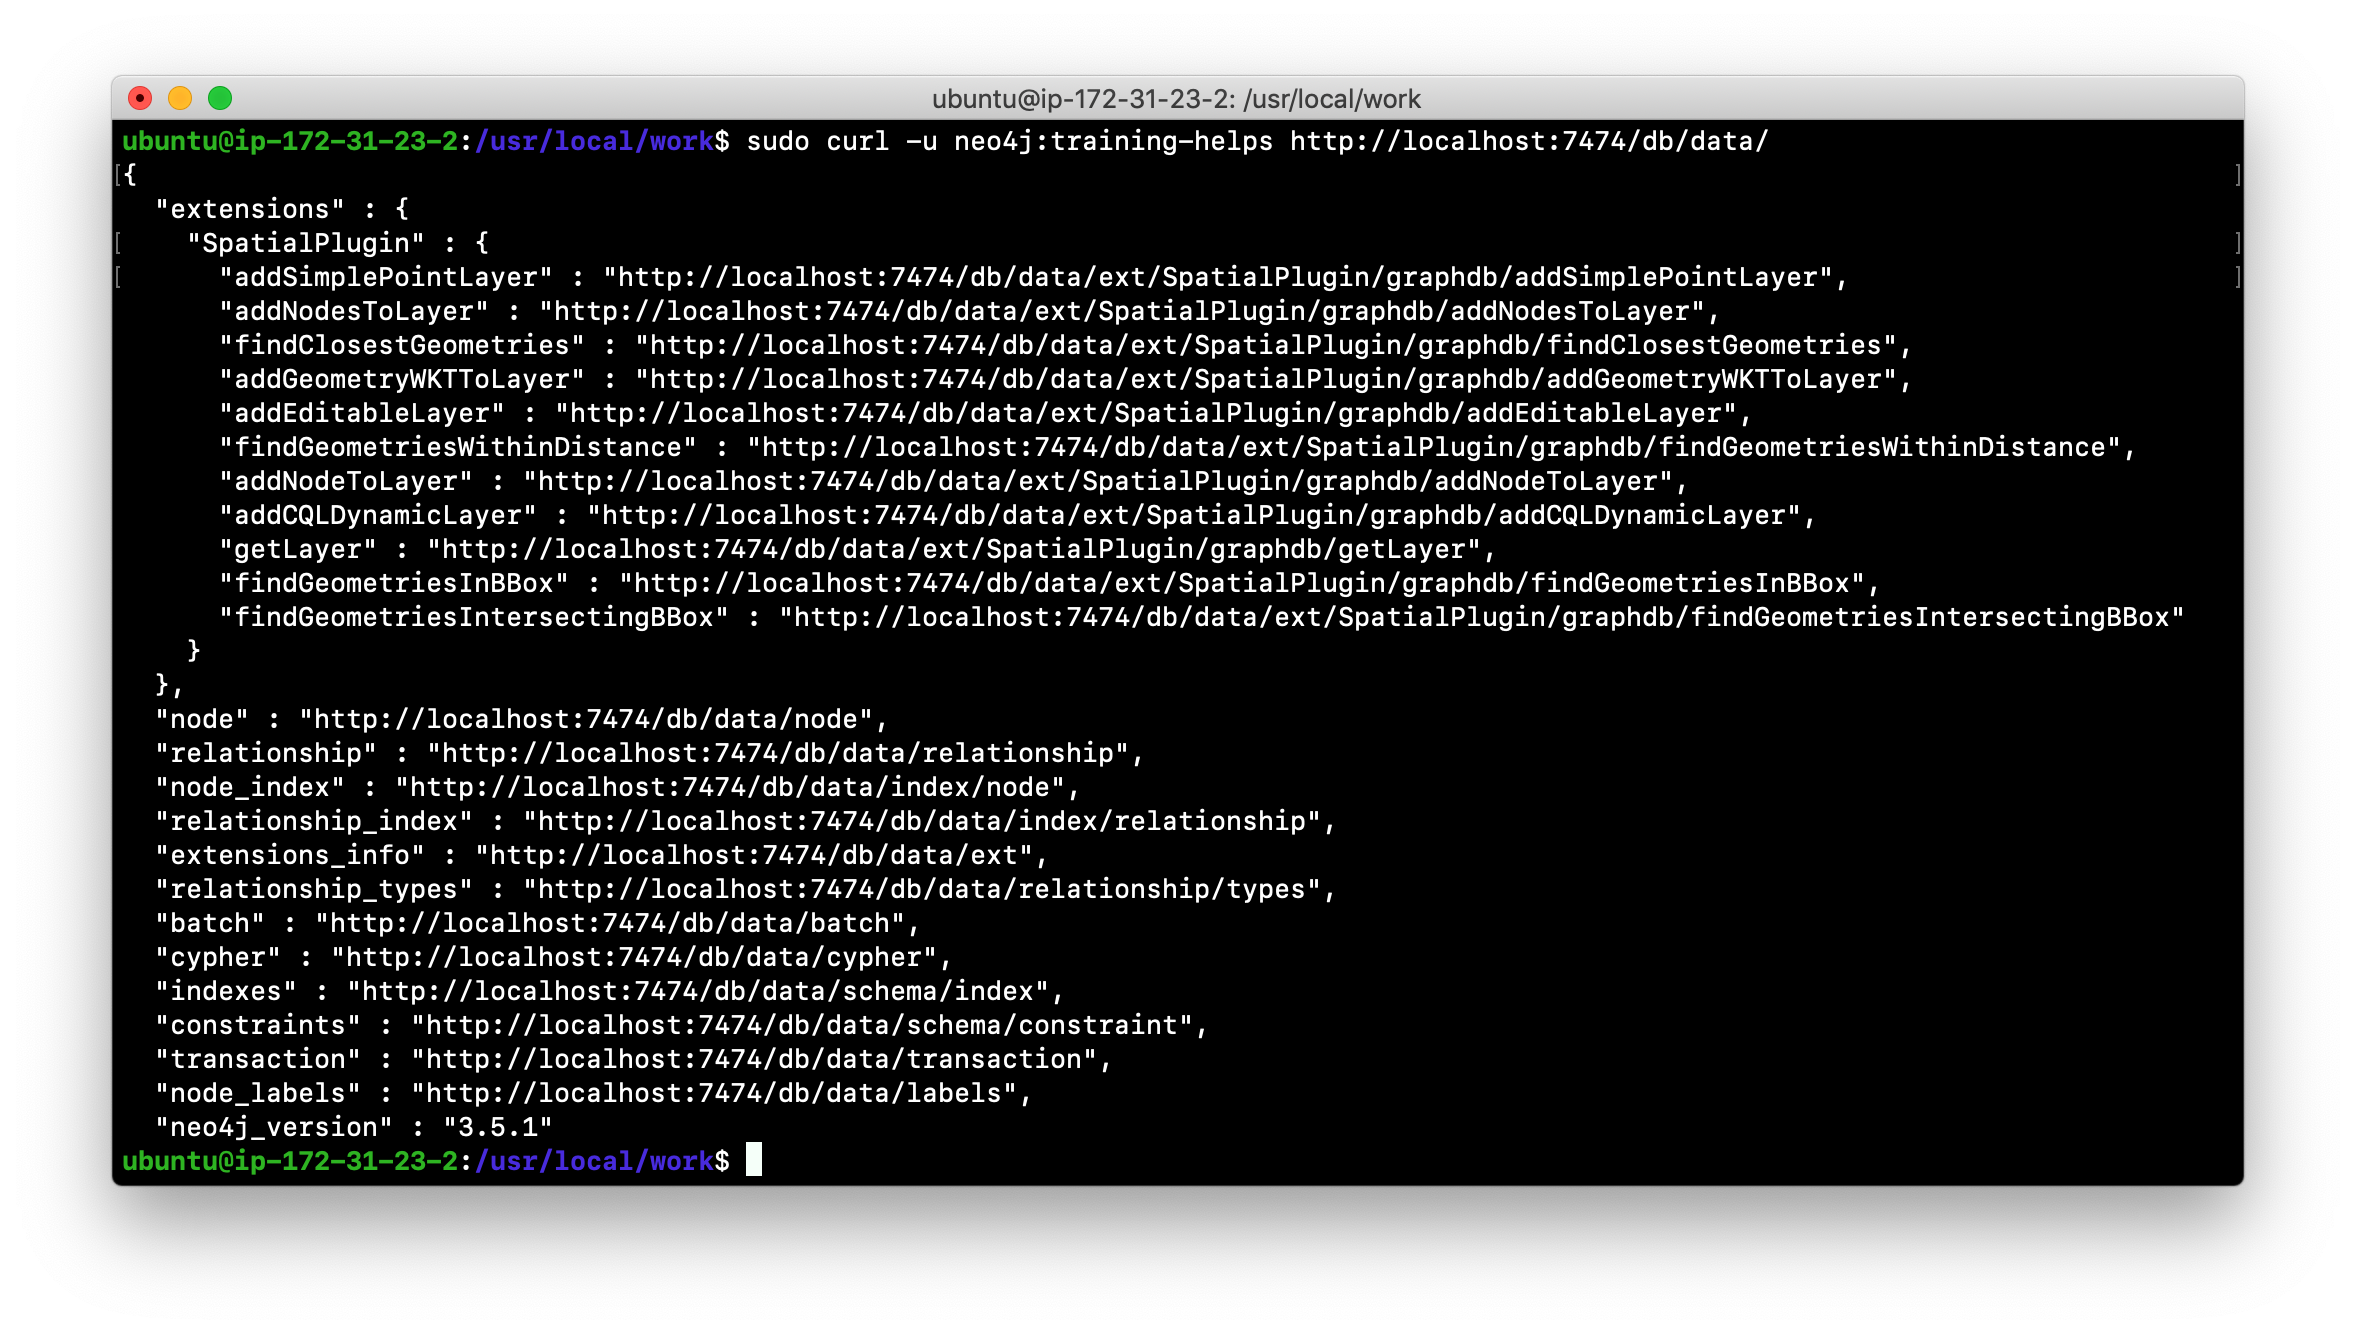
Here is what you will see when you execute the first curl command:
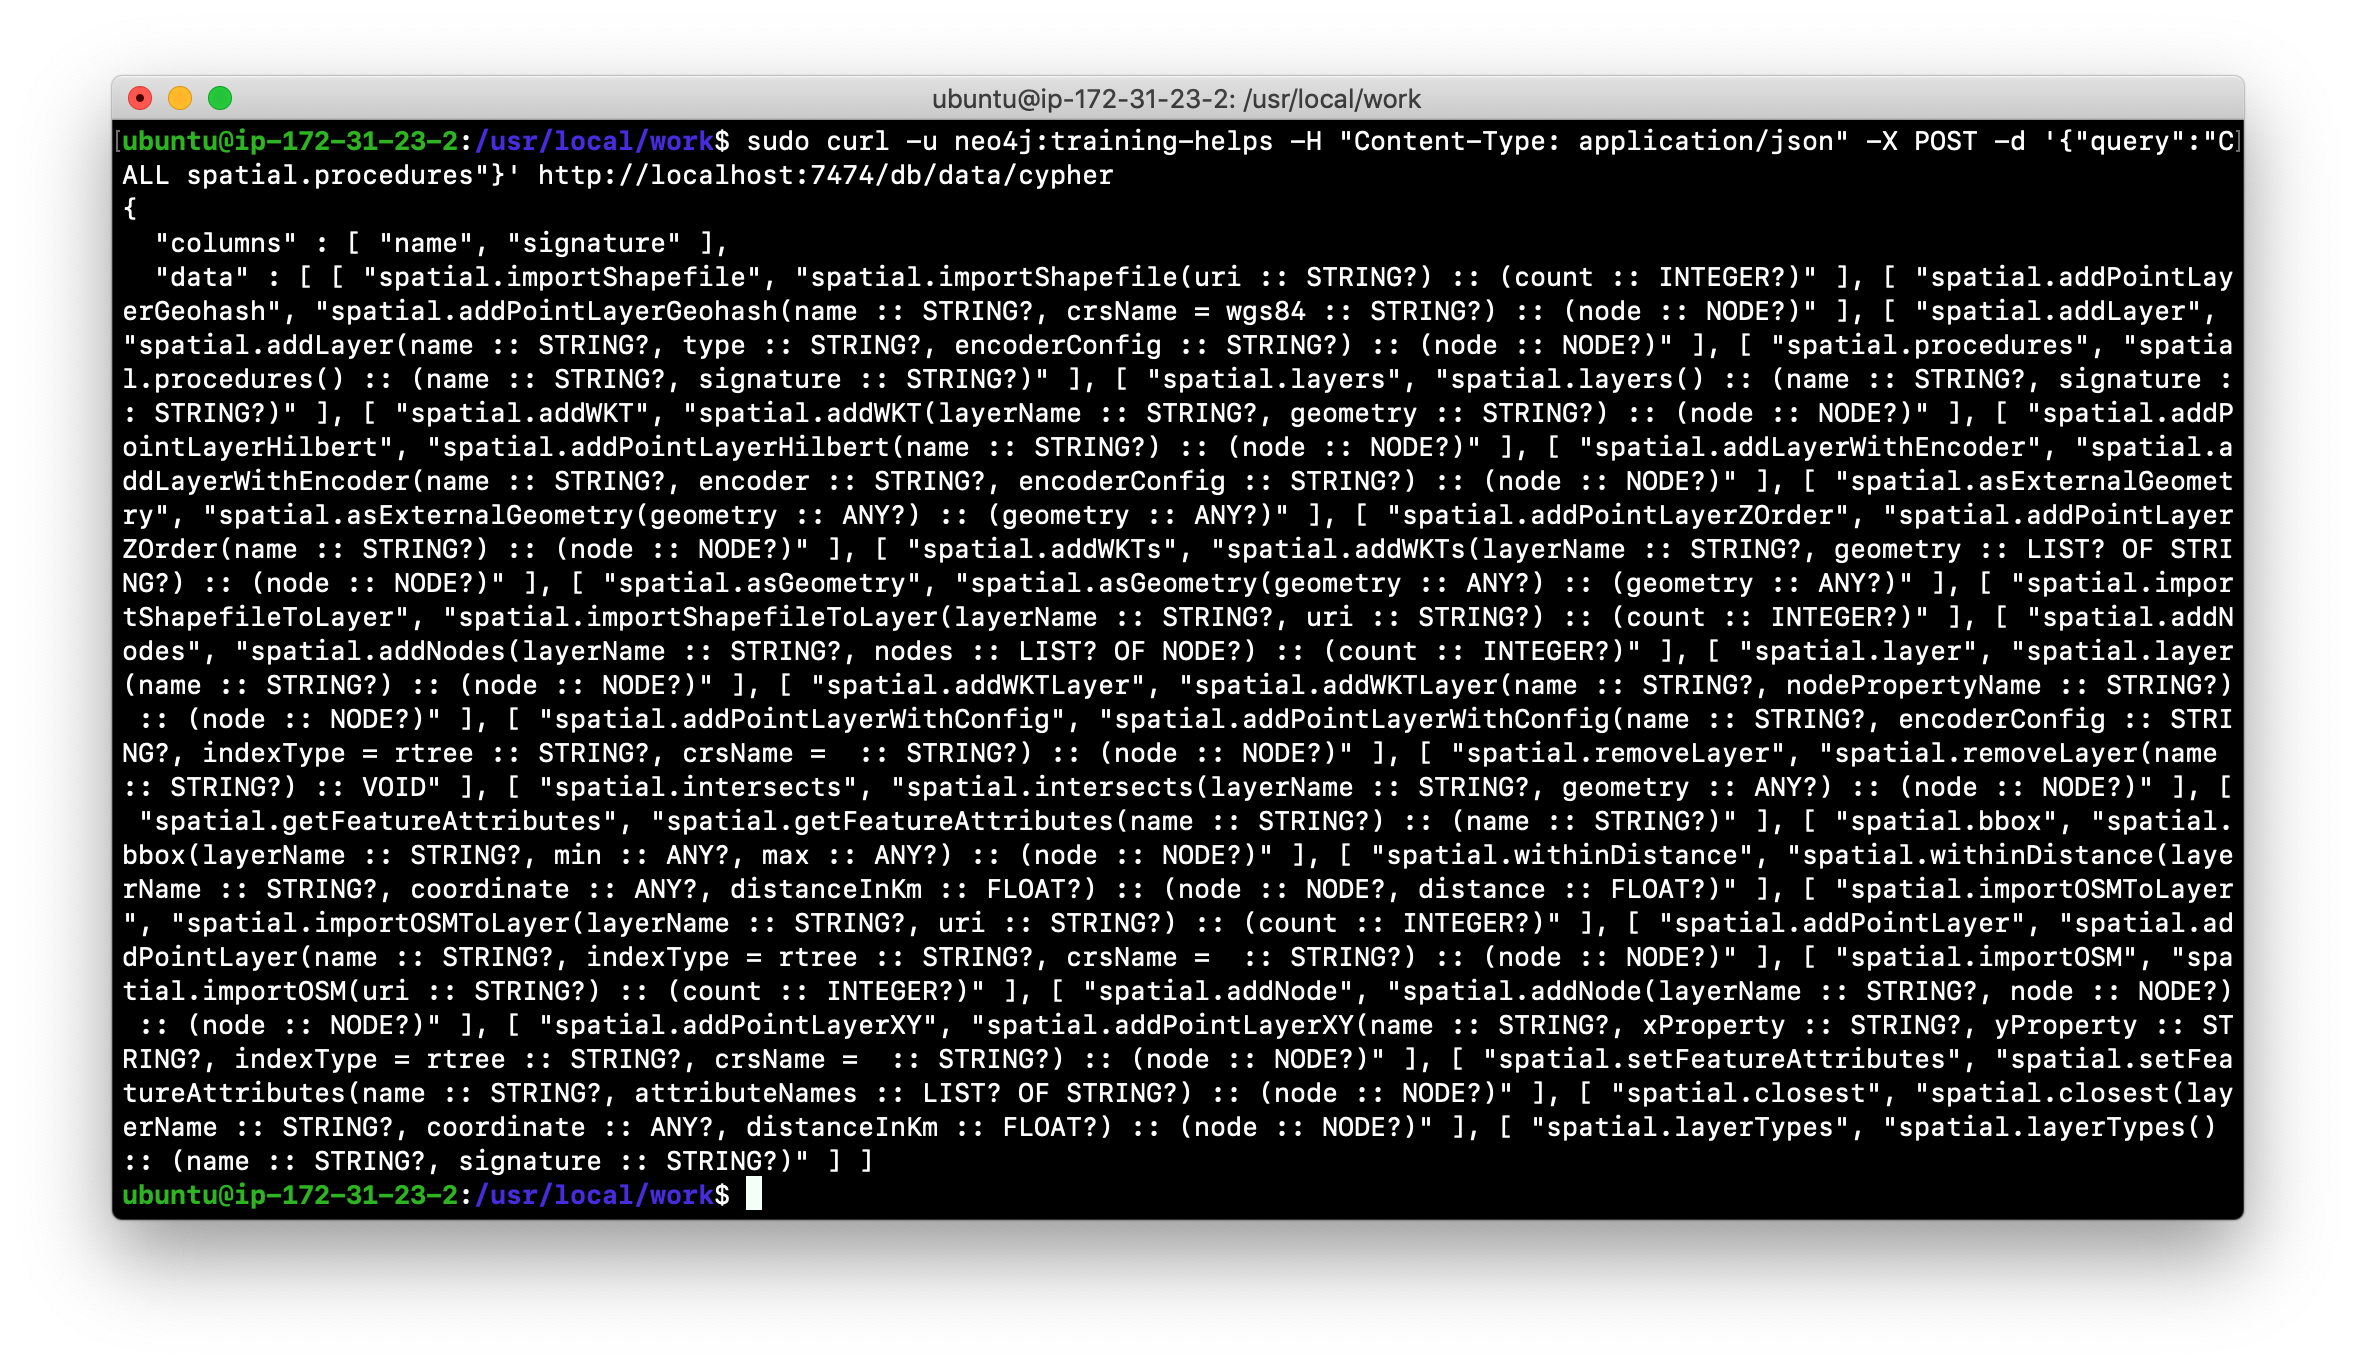
Here is what you will see when you execute the second curl command:
-
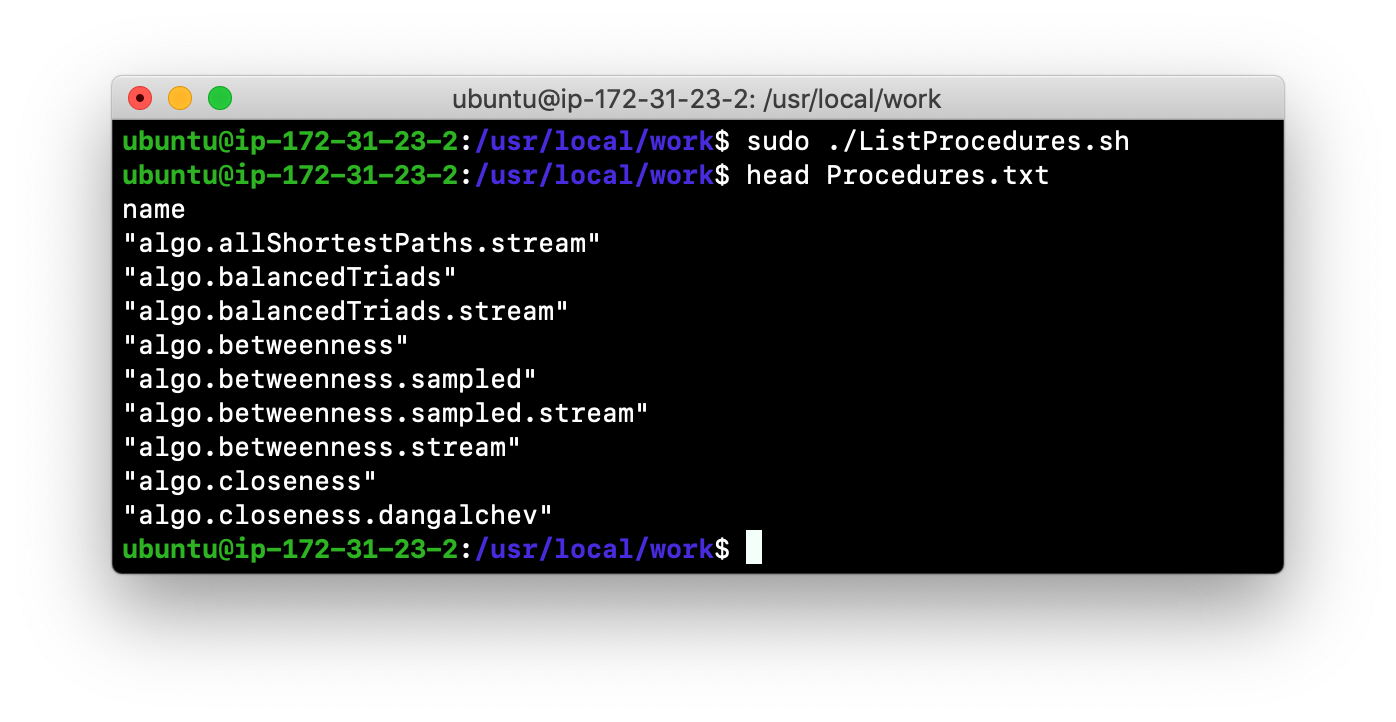
In the /usr/local/work folder, create a script named ListProcedures.sh that will write the list of procedures available to the Neo4j instance to the /usr/local/work/Procedures.txt file.
-
Run the ListProcedures.sh script and examine the contents to also verify that the plugin has been installed. The Procedures.txt file will contain these items:
Configuring connector ports for the Neo4j instance
The Neo4j instance uses default port numbers that may conflict with other processes on your system. The ports frequently used are the connector ports:
| Name | Port Number | Description |
|---|---|---|
HTTP |
7474 |
Used by Neo4j Browser and REST API. It is not encrypted so it must never be exposed externally. |
HTTPS |
7473 |
Used by REST API. Requires additional SSL configuration. |
Bolt |
7687 |
Bolt connection used by Neo4j Browser, cypher-shell, and client applications. |
Modifying the default connector ports
If any of these ports conflict with ports already used on your system, you can change these connector ports by modifying these property values in the neo4j.conf file:
# Bolt connector
dbms.connector.bolt.enabled=true
#dbms.connector.bolt.tls_level=OPTIONAL
#dbms.connector.bolt.listen_address=:*7687*

# HTTP Connector. There can be zero or one HTTP connectors.
dbms.connector.http.enabled=true
#dbms.connector.http.listen_address=:*7474*

# HTTPS Connector. There can be zero or one HTTPS connectors.
dbms.connector.https.enabled=true
#dbms.connector.https.listen_address=:*7473*
As you learn more about some of the other administrative tasks for a Neo4j instance, you will work with other ports.
| The REST API will be deprecated in Neo4j 4.0. |
Exercise #8: Modify the HTTP port
In this Exercise, you will modify the default HTTP port used by the HTTP instance and use the new port.
Exercise steps:
-
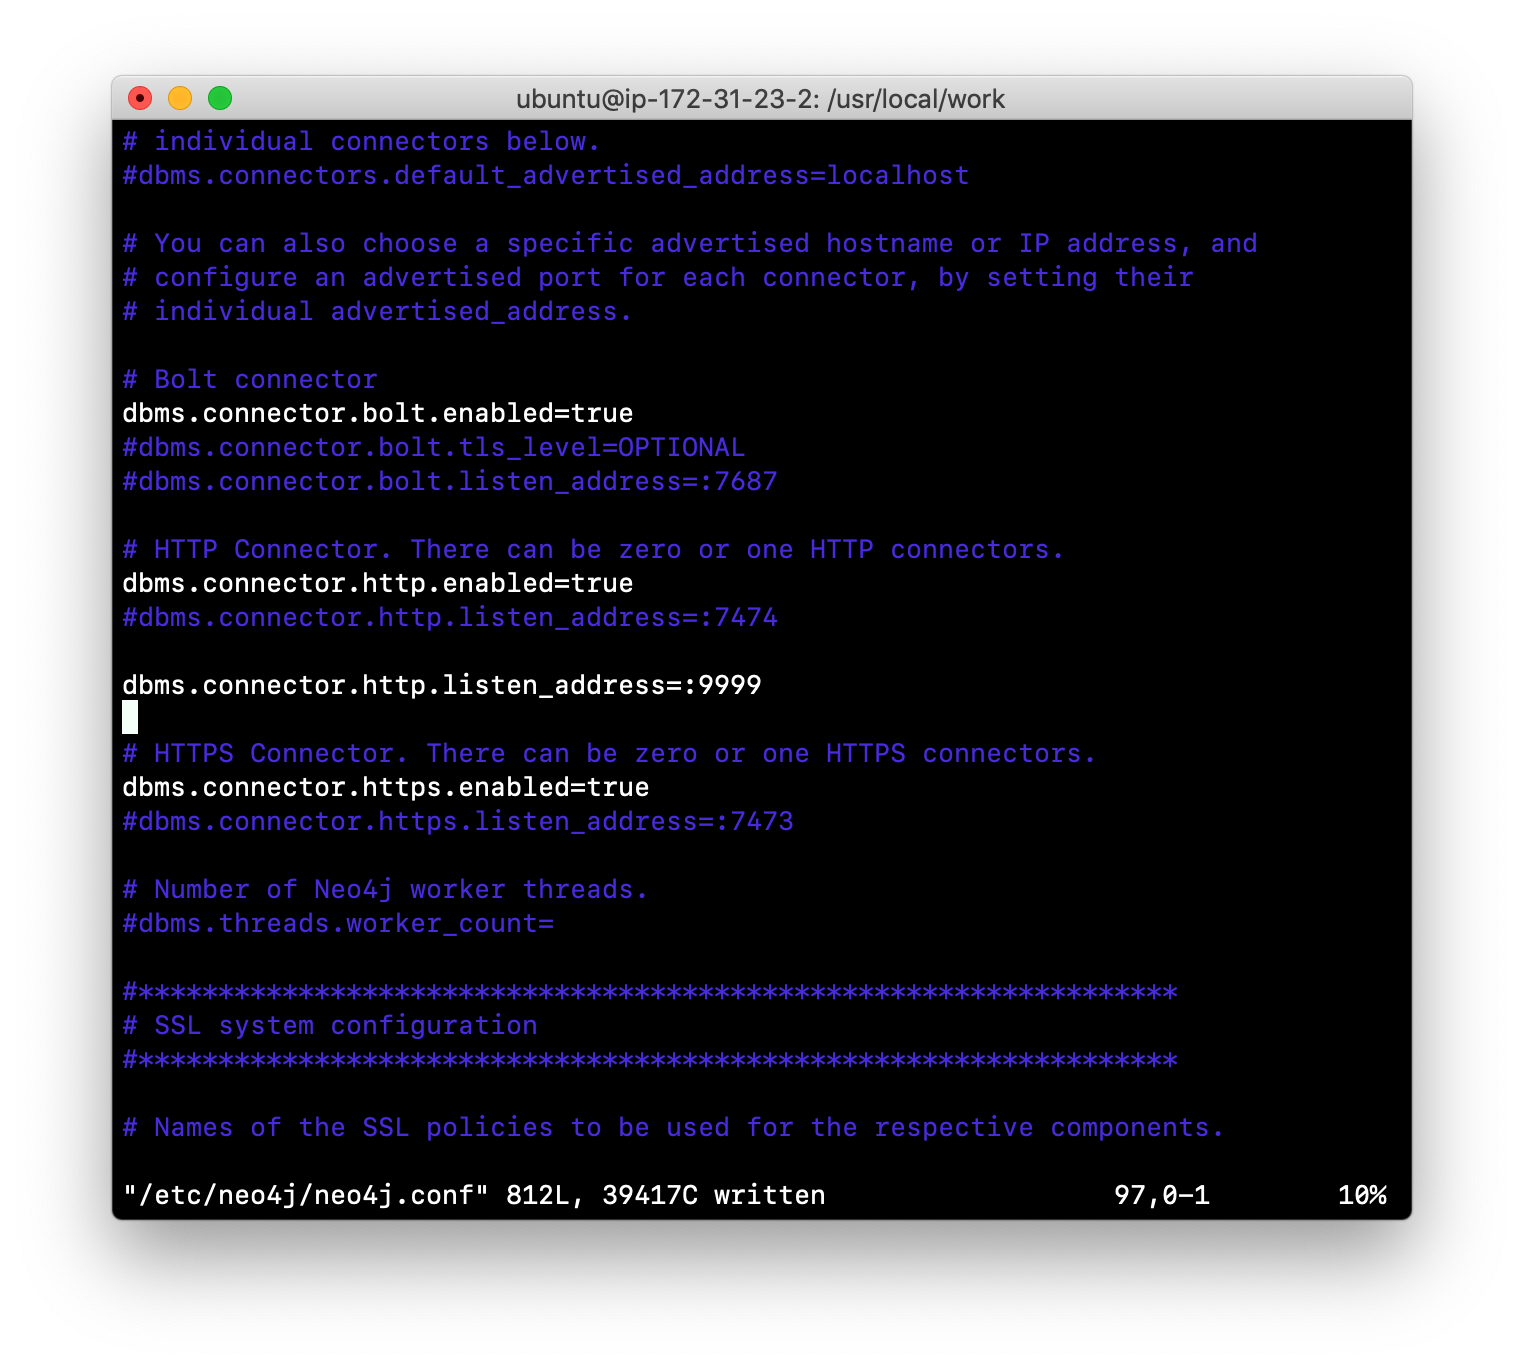
Change the HTTP port to a value that is not in use on your system, for example 9999. For example, your neo4j.conf file will look something like this:
-
Restart the Neo4j instance.
-
Confirm that the port works by entering the following
curlcommand that uses the Neo4j HTTP API to create a node, where it will ask you for the password the neo4j user:curl -v -H "Content-Type: application/json" -d '{ "statements" : [ { "statement" : "CREATE (n) RETURN id(n)" }]}' http://localhost:9999/db/data/transaction/commit -u neo4j
-
Change the HTTP port back to its default (7474).
-
Restart the Neo4j instance.
Performing online backup and restore
Online backup is used in production where the application cannot tolerate the database being unavailable. In this part of the training, you will learn how to back up and restore a stand-alone Neo4j database. Later in this training, you will learn about backup and restore in a Neo4j Causal Cluster environment.
Enabling online backup
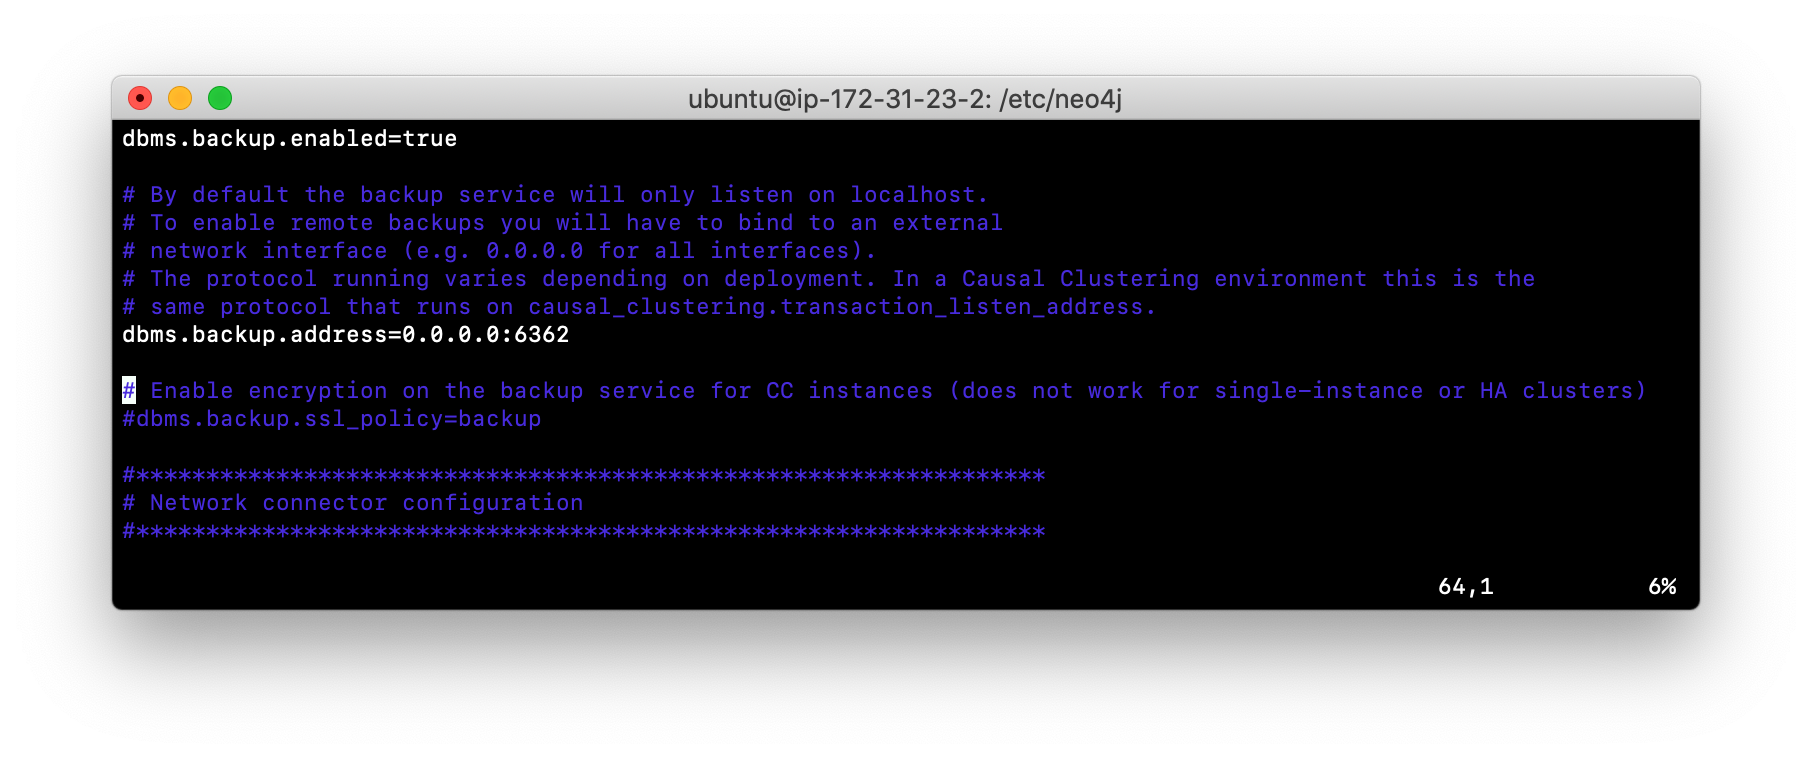
To enable a Neo4j instance to be backed up online, you must add these two properties to your neo4j.conf file:
dbms.backup.enabled=true
dbms.backup.address=<host-address>:<6362-6372>
Where host-address is the address of a server from which you will run the backup tool from. You must specify a port number that will not conflict with existing ports used on the backup server.
A best practice for online backup of a stand-alone production database is to perform the backup on a different server. This is because the backup process and consistency checking is expensive and you want to offload this to another server.
A common practice for many enterprises is to back up their databases to Amazon S3 sites. In addition, if any backups are to be stored in S3, they must be encrypted as well as the channel used to create send the backup to S3.
Performing the backup
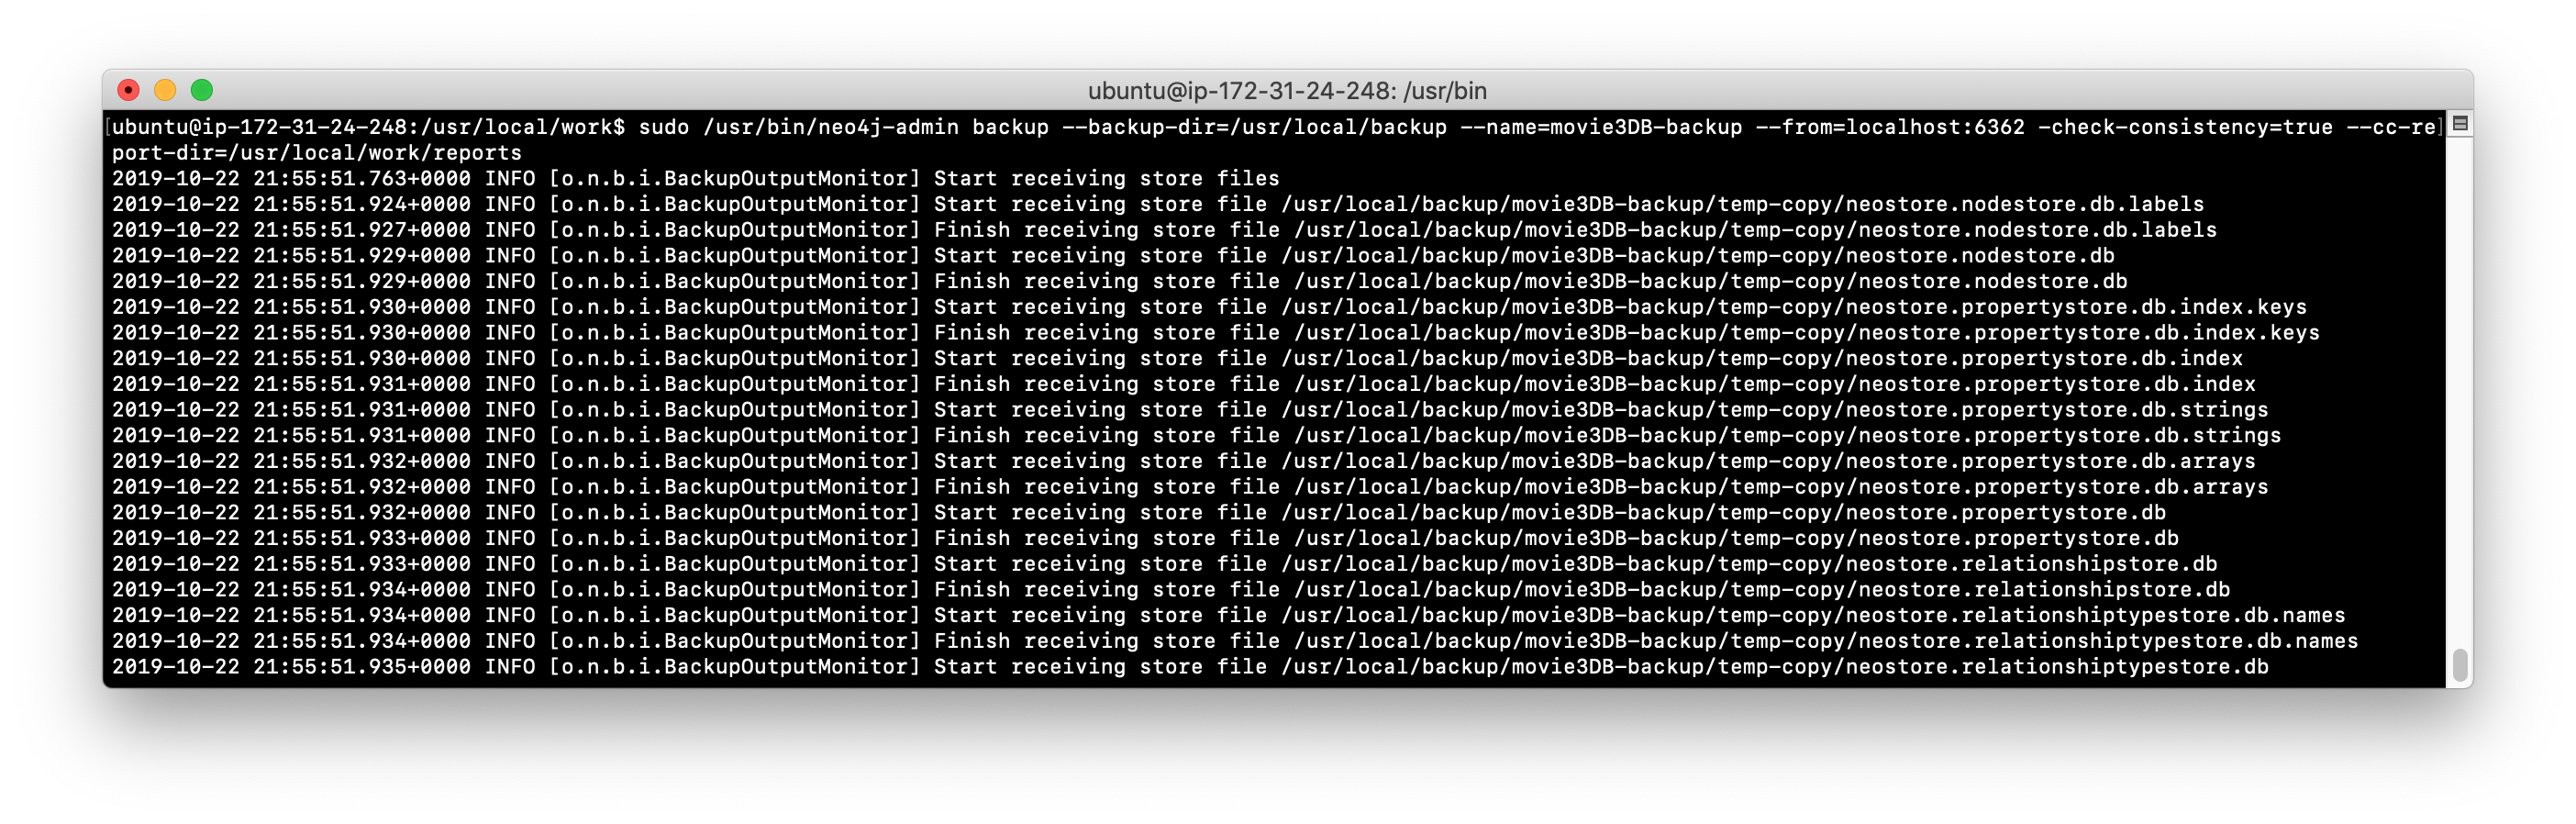
After you restart the Neo4j instance, you can then perform the backup on the server you specified in host_address as follows with consistency checking:
neo4j-admin backup --backup-dir=<backup-folder>
                   --name=<backup-instance-folder-name>
                   --from=<Neo4j-instance-host-address:<port>
                   --check-consistency=true
                   --cc-report-dir=<report-directory>
This will perform a full backup to backup-instance-folder-name for the Neo4j instance running on Neo4j-instance-host-address.
Restoring from a backup
If you need to restore a database from a backup, you must first stop the Neo4j instance. Since the instance is down, you can restore the database on the same server that runs the instance, provided the server has access to the backup location in the network.
Here is how you restore the database from a backup:
neo4j-admin restore
          --from=<absolute-path-to-backup-instance-folder-name>
          --database=<database-name>
          --force=true
You specify true for force so that the existing database will be replaced.
| If you restore a database as root, make sure that you change the ownership (recursively) of the database directory to neo4j:neo4j before starting the Neo4j instance. |
There are many ways for performing online backups, including incremental backups. See the Neo4j Operations Manual for details.
Exercise #9: Performing online backup and restore
In this Exercise, you will perform an online backup of your database where you use the same host for the backup process. Then you will modify the database. Finally, you will restore the database from the backup.
| In your real application, if you were to back up a production stand-alone Neo4j instance, you would use a different host from the host that is running the Neo4j instance. |
Exercise steps:
-
Stop the Neo4j instance.
-
Modify the Neo4j configuration so that online backup is enabled and will be done on this same host. For example, your neo4j.conf file will look something like this:
-
Restart the Neo4j instance.
-
Create a folder named /usr/local/backup and ensure that it is owned by neo4j:neo4j.
-
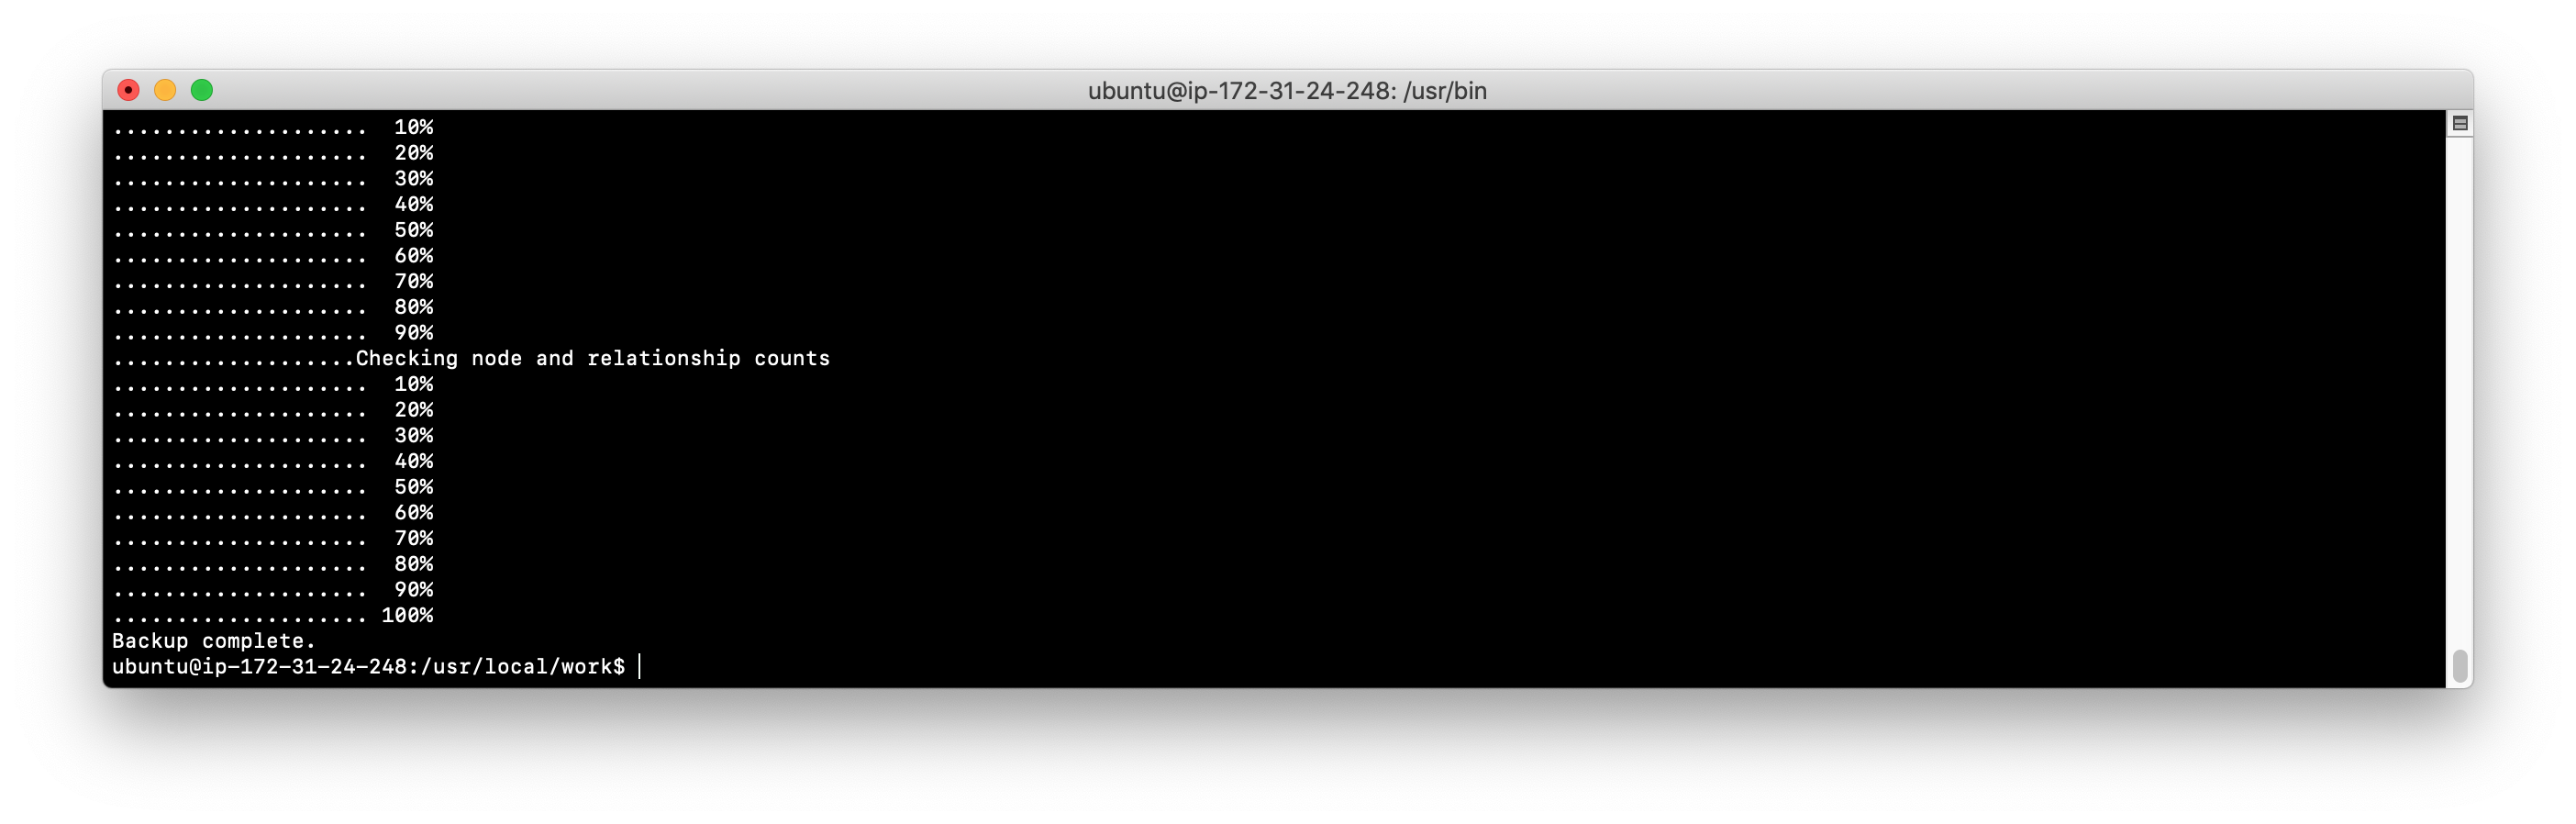
Perform an online backup of the active database (movie3.db). The result of the backup will look something like this:
-
Stop the Neo4j instance.
-
Corrupt the database like you did earlier in this module. Modify the file movie3.db/neostore.nodestore.db by adding some text to the file.
-
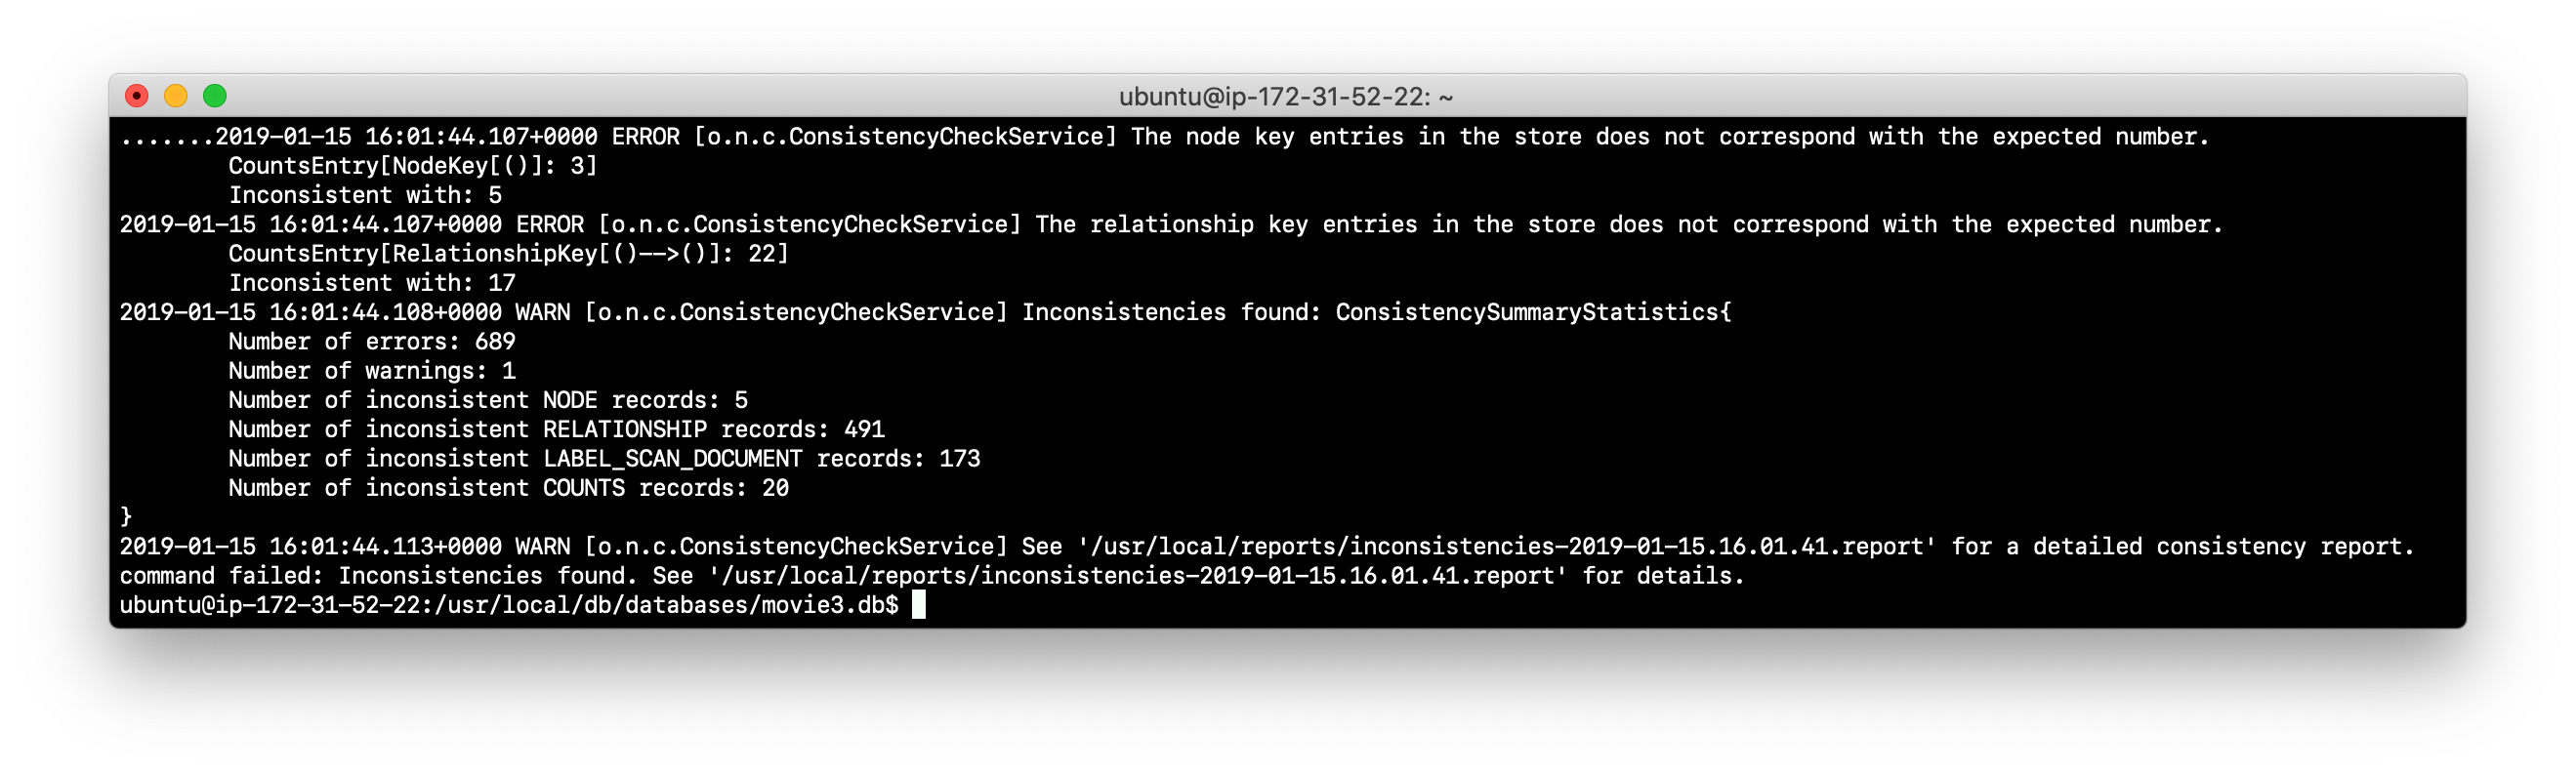
Run the consistency check tool on movie3.db using
neo4j-adminspecifying /usr/local/work/reports as the folder where the report will be written.neo4j-admin check-consistency --database=movie3.db --report-dir=/usr/local/reports --verbose=true -
The consistency check tool will return that inconsistencies were found.
-
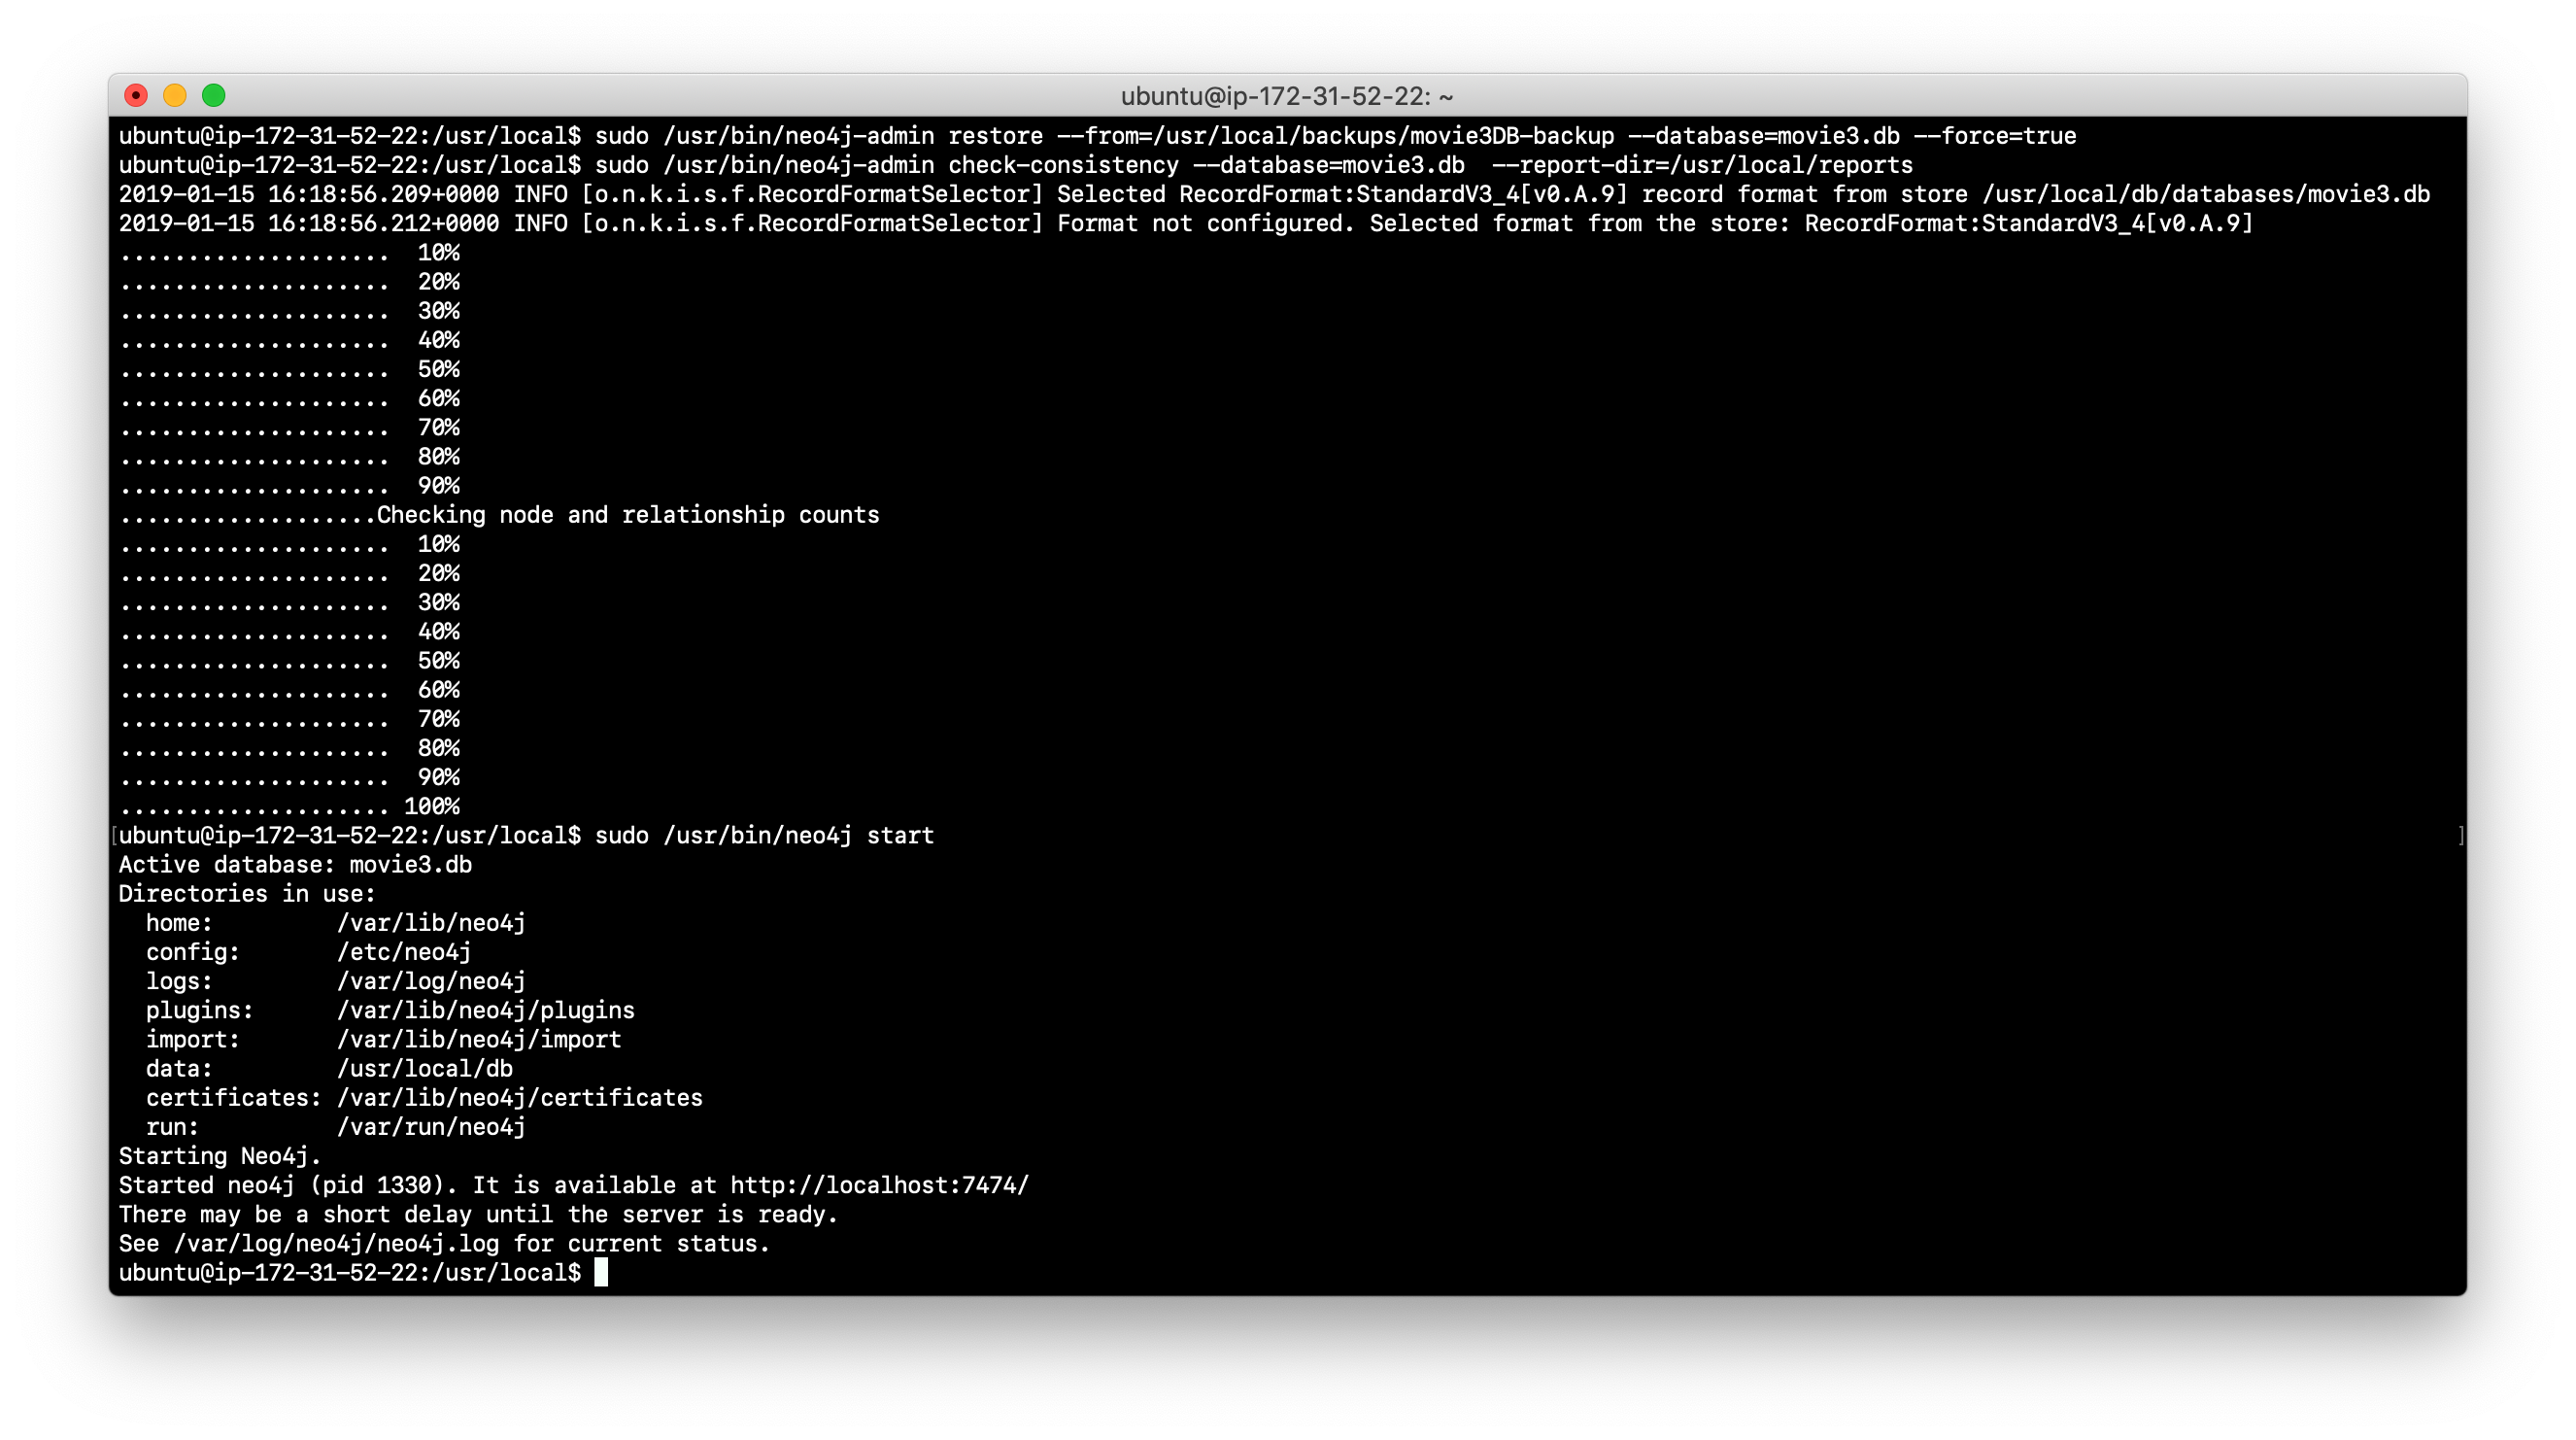
Restore the movie3.db database from the backup.
-
Check its consistency.
-
Confirm that the Neo4j instance starts without error.
Using the import tool to create a database
The course, Introduction to Neo4j, teaches you how to import .csv data using LOAD CSV in Cypher. LOAD CSV works fine for datasets containing fewer than 10M nodes. For large datasets, it may also be possible to import the data with some of the APOC procedures.
Data import for a graph database is resource-intensive because it needs to pre-compute joins (relationships) between records (nodes). For large datasets, a best practice is to import the data using the import command of the neo4j-admin tool. This tool creates the database from a set of .csv files.
You can read details about using the import tool in the Neo4j Operations Manual.
Creating CSV files for the import
The format of the .csv files is important. For both nodes and relationships, header information must be associated with the data. Header information contains an ID to uniquely identify the record, optional node labels or relationship types, and names for the properties representing the imported data. A .csv can have a header row, or you can place the header information in a separate file.
In this training, you will use data that has been created for you that represents crimes.
CSV files for nodes
Here is portion of the beats.csv file with embedded header information for loading nodes of type Beat:
:ID(Beat),id,:LABEL
1132,1132,Beat
0813,0813,Beat
0513,0513,Beat
The beats.csv records represent data that will be loaded into a node with the label Beat. In this example the record ID is the same as the id property value that will be used to create the node in the graph.
Here is an example of the crimes_header.csv header file for loading nodes of type Crime:
:ID(Crime),id,:LABEL,date,descriptionThe nodes loaded with Crimes_header.csv will have the label, :LABEL. In addition, the data in the associated crimes.csv file will have values for the ID of the record, and property values for id, date, and description.
And here is a portion of the associated crimes.csv file for loading nodes of type Crime:
8920441,8920441,Crime,12/07/2012 07:50:00 AM,AUTOMOBILE
4730813,4730813,Crime,05/09/2006 08:20:00 AM,POCKET-PICKING
7150780,7150780,Crime,09/28/2009 01:00:00 AM,CHILD ABANDONMENT
4556970,4556970,Crime,12/16/2005 08:39:24 PM,POSS: CANNABIS 30GMS OR LESS
9442492,9442492,Crime,12/28/2013 12:15:00 PM,OVER $500
In addition, this dataset includes information about the types of crimes. These nodes are created without a label for the node, but their ID, PrimaryType will be used to link them to Crime nodes. Here is a portion of the primaryTypes.csv file for loading these nodes:
:ID(PrimaryType),crimeType
ARSON,ARSON
OBSCENITY,OBSCENITY
ROBBERY,ROBBERY
THEFT,THEFT
CRIM SEXUAL ASSAULT,CRIM SEXUAL ASSAULT
BURGLARY,BURGLARY
CSV files for relationships
.csv files for loading relationships contain a row for every relationship where the ID for the starting and ending node is specified, as well as the relationship type. If you do not specify the relationship in the file, then you must specify it in the arguments to the import tool.
Here is a portion of the crimesBeats.csv file that will be used to create the :ON_BEAT relationships between Crime and Beat nodes:
:START_ID(Crime),:END_ID(Beat),:TYPE
6978096,0911,ON_BEAT
3170923,2511,ON_BEAT
3073515,1012,ON_BEAT
8157905,0113,ON_BEAT
Here is a portion of a portion of the crimesPrimaryTypes.csv file that will be used to create the relationships between the Crime nodes and the nodes that contain the CrimeType data:
:START_ID(Crime),:END_ID(PrimaryType)
5221115,NARCOTICS
4522835,DECEPTIVE PRACTICE
3432518,BATTERY
6439993,CRIMINAL TRESPASS
The relationship, :TYPE is not specified in this file so it will be specified in the arguments when you load the data from this file.
Importing the data
After you have created or obtained the .csv files for the data, you import the data. The data import creates a database and you must run the import tool with the Neo4j instance stopped.
Here is the simplified syntax for creating a database from .csv files:
neo4j-admin import  --database <database-name>
                    --nodes[:Label1:Label2] [<rheader-csv-file-1>,]<csv-file-1>
					--nodes[:Label1:Label2] [<rheader-csv-file-2>,]<csv-file-2>
					--nodes[:Label1:Label2] [<rheader-csv-file-n>,]<csv-file-n>
					--relationships[:REL_TYPE] [<jheader-csv-file-1>,]<join-csv-file-1>
					--relationships[:REL_TYPE] [<jheader-csv-file-2>,]<join-csv-file-2>
					--relationships[:REL_TYPE] [<jheader-csv-file-n>,]<join-csv-file-n>
					--report-file <report-file-path>
Here is the result of using the import command of neo4j-admin to create a database and import .csv files.

Exercise #10: Importing data with the import command
In this Exercise, you create a new database by importing data using .csv files. Data import is very common when preparing a database for production where the data originally comes from relational tables.
Exercise steps:
-
Stop the Neo4j instance.
-
In a terminal window, create the /usr/local/import folder.
-
Navigate to the import folder and download this file: https://s3-us-west-1.amazonaws.com/data.neo4j.com/admin-neo4j/crime-data.zip. Hint: use
curl -Oorwget. -
Unzip the file. You will have six .csv files.
-
Examine the contents of the files to become familiar with their format and data.
-
Use the
importcommand to import the data into a new database named crimes.db, using these guidelines:
--nodes crimes_header.csv,crimes.csv
--nodes beats.csv
--nodes primaryTypes.csv
--relationships crimesBeats.csv
--relationships:PRIMARY_TYPE crimesPrimaryTypes.csv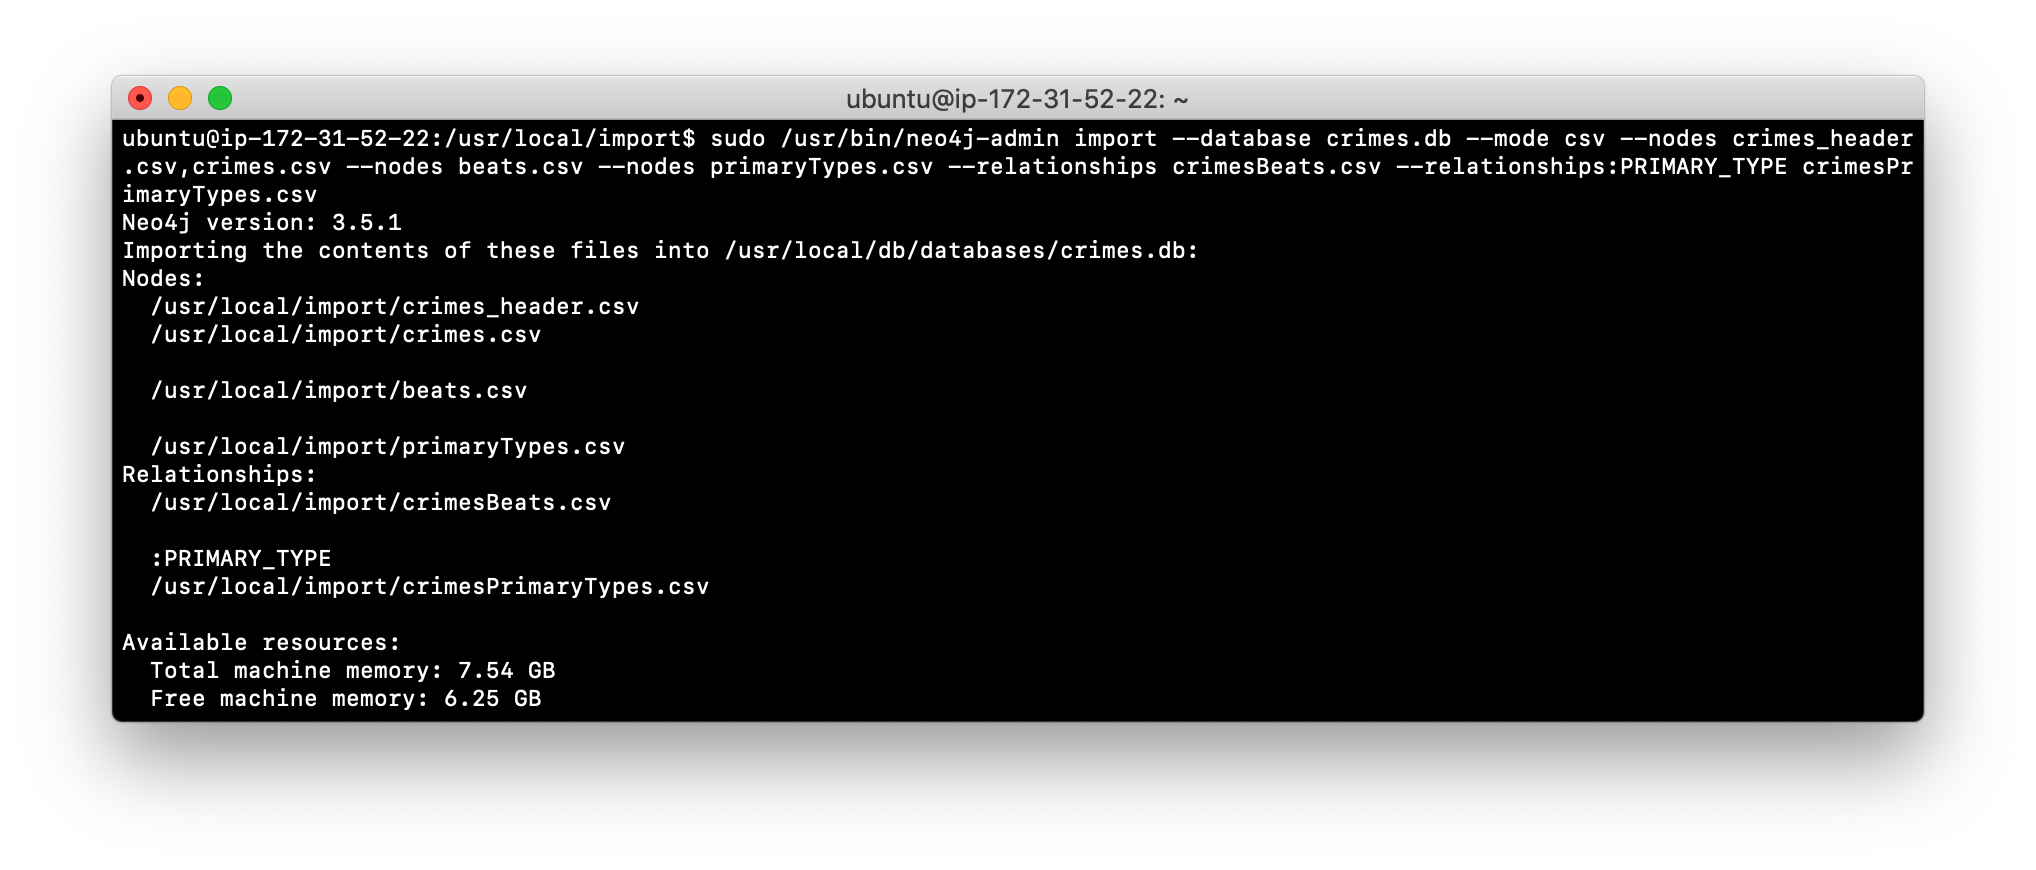

-
Modify the neo4j.conf file to use crimes.db as the active database.
-
Ensure that the ownership of the crimes.db directory and everything under it is owned by neo4j:neo4j.
-
Start the Neo4j instance.
-
Run
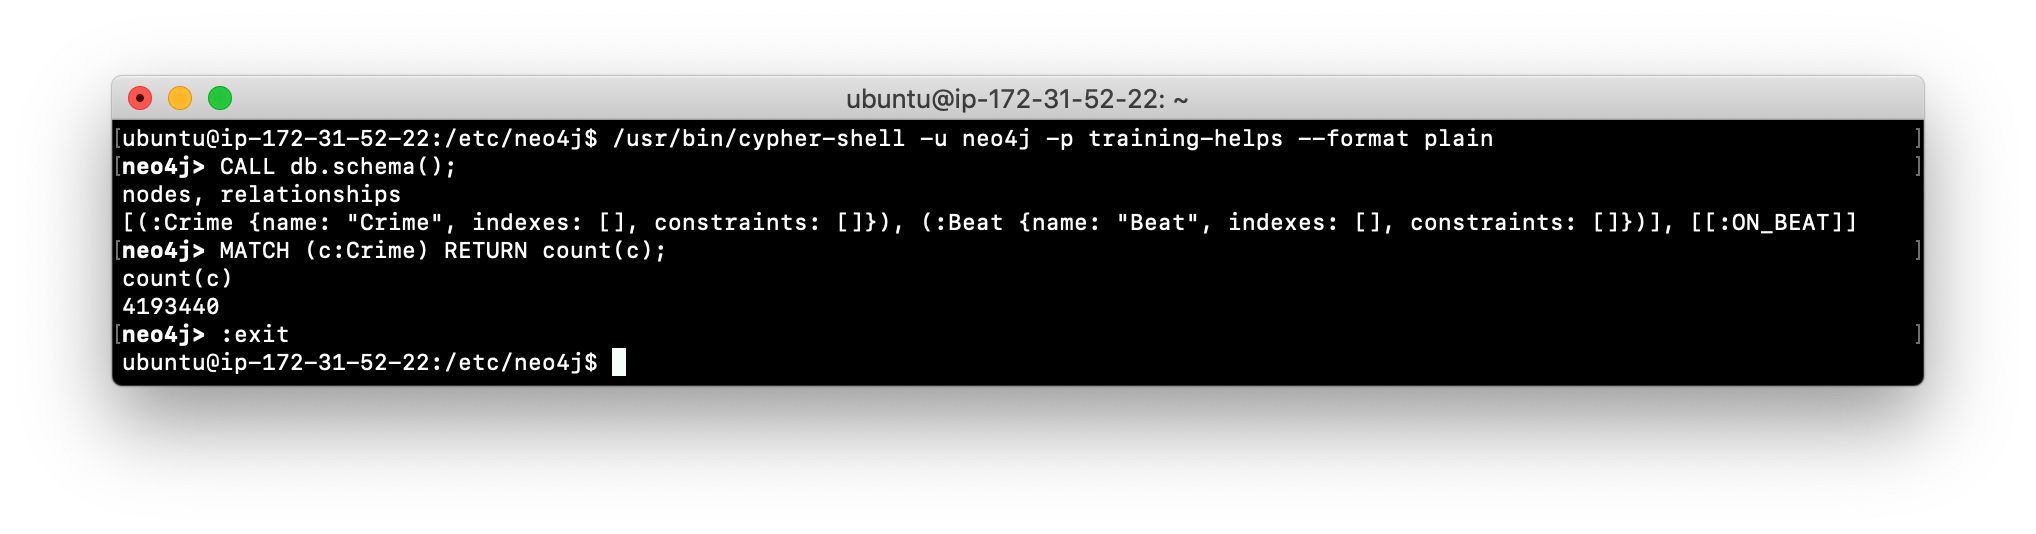
cypher-shellto retrieve the schema of the database and also count the number of Crime nodes in the graph.
Check your understanding
Question 1
Suppose that you have installed Neo4j Enterprise Edition and have modified the name of the active database in the Neo4j configuration file. What tool and command do you run to create the new database?
Select the correct answer.
-
neo4j-admin create-database -
neo4j-admin initialize -
neo4j create-database -
neo4j start
Question 2
Suppose that you want the existing Neo4j database to have the name ABCRecommendations.db. Assuming that you have stopped the Neo4j instance, what steps must you perform to modify the name of the database, which currently has a default name of graph.db?
Select the correct answers.
-
Rename the NEO4J_HOME/graph.db folder to NEO4J_HOME/ABCRecommendations.db.
-
Modify neo4j.conf to use dbms.active_database=ABCRecommendations.db.
-
Run
neo4j-admin rename graph.db ABCRecommendations.db. -
Run
neo4j-admin move graph.db ABCRecommendations.db.
Question 3
How do you copy a database that you want to give to another user?
Select the correct answer.
-
With the Neo4j instance started, run
neo4j-admin copyproviding the location where the copy will be created. -
With the Neo4j instance stopped, run
neo4j-admin copyproviding the location where the copy will be created. -
With the Neo4j instance started, run
neo4j-admin dumpproviding the location where the dump file will be created. -
With the Neo4j instance stopped, run
neo4j-admin dumpproviding the location where the dump file will be created.
Summary
You can now:
-
Start a Neo4j instance.
-
Stop the Neo4j instance.
-
Set the password for the neo4j user.
-
Copy a Neo4j database.
-
Modify the location for a Neo4j database.
-
Check the consistency of a Neo4j database.
-
Create scripts for modifying a Neo4j database.
-
Manage plugins for a Neo4j database.
-
Configure ports used by the Neo4j instance.
-
Perform an online backup of a Neo4j database.
-
Create a database with the import tool.
Need help? Ask in the Neo4j Community