Causal Clustering in Neo4j
About this module
Now that you have gained experience managing a Neo4j instance and database , you will learn how to get started with creating and managing Neo4j Causal Clusters.
At the end of this module, you will be able to:
-
Describe why you would use clusters.
-
Describe the components of a cluster.
-
Configure and use a cluster.
-
Seed a cluster with data.
-
Monitor and manage core servers in the cluster.
-
Monitor and manage read replica servers in the cluster.
-
Back up a cluster.
This module covers the basics of clusters in Neo4j. Later in this training, you will learn more about security and encryption related to clusters.
What is Clustering?
Neo4j’s clustering architecture enables an enterprise to utilize a Neo4j database in production. First, it provides a high-available solution whereby if a Neo4j instance has a failure, another Neo4j instance can take over automatically. Secondly, it provides a highly-scalable database whereby some parts of the application update the data, but other parts of the application are widely distributed and do not need immediate access to new or updated data. That is, read latency is acceptable. Causal consistency in Neo4j means that an application is guaranteed to be able to consistently read all data that it has written.
Most Neo4j applications use clustering to ensure high-availability. The scalability of the Neo4j database is used by applications that utilize multiple data centers.
Cluster architecture
There are two types of Neo4j instances in a cluster architecture: core servers and read replica servers.

Core servers
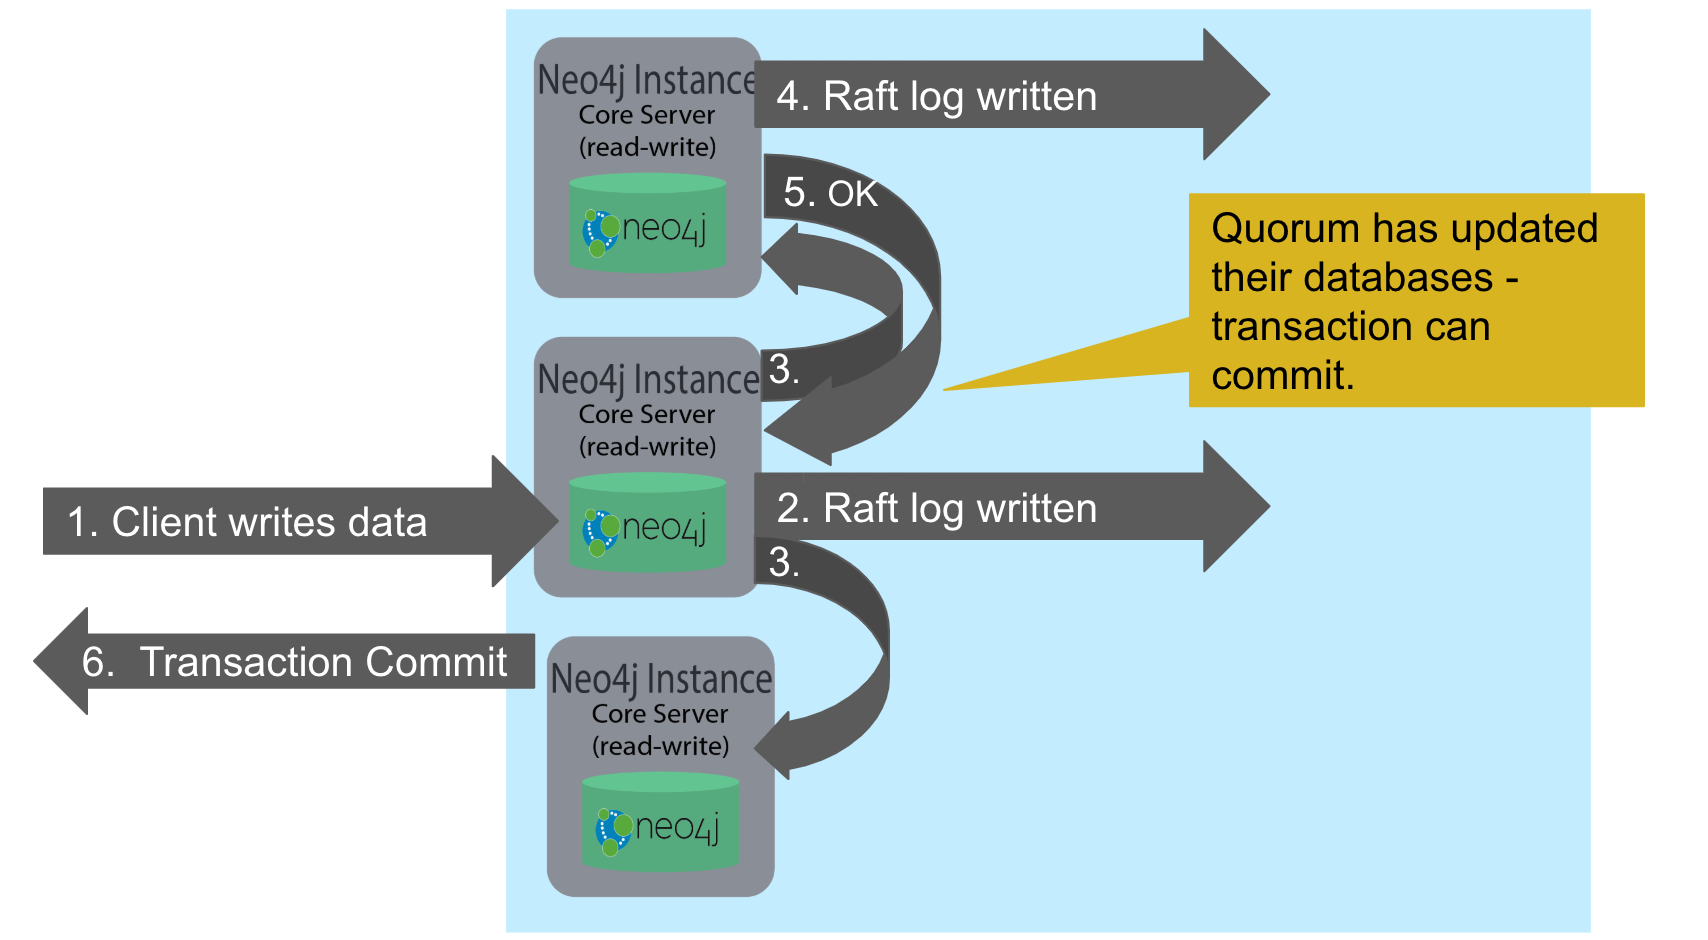
Core servers are used for read and write access to the database. The core servers are used to synchronize updates to the database, regardless of the number and physical locations of the Neo4j instances. By default, in a cluster architecture, a transaction is committed if a majority (quorum) of the core servers defined as the minimum required for the cluster have written the data to the physical database. This coordination between core servers is implemented using the Raft protocol. You can have a large number of core servers, but the more core servers in the application architecture, the longer a "majority" commit will take. At a minimum, an application will use three core servers to be considered fault-tolerant. If one of the three servers fail, the cluster is still operable for updates to the database. If you want an architecture that can support two servers failing, then you must configure five core servers. You cannot configure a cluster with two core servers because if one server fails, the second server is automatically set to be read-only, leaving your database to be inoperable for updates.
Read replica servers
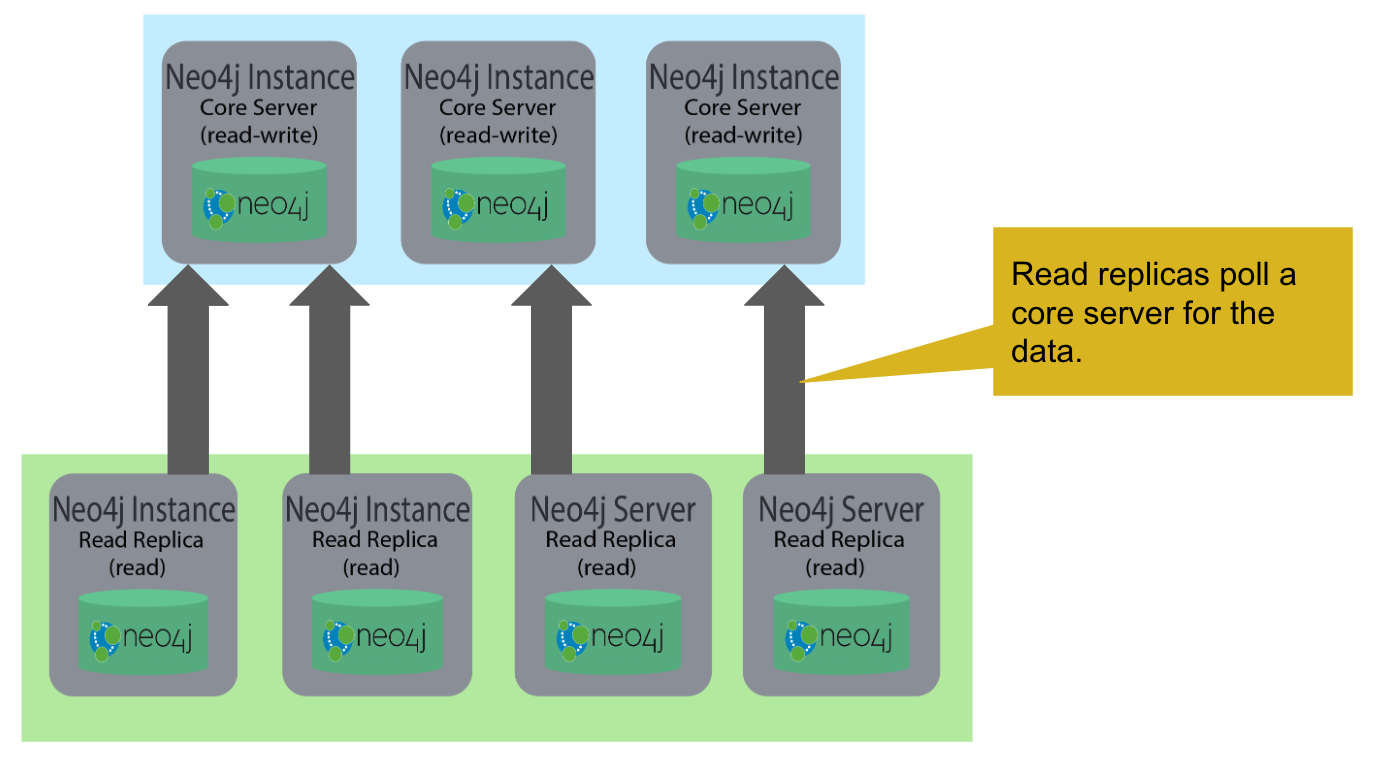
Read replica servers are used to scale data across a distributed network. They only support read access to the data. The read replica servers regularly poll the core servers for updates to the database by obtaining the transaction log from a core server. You can think of a read replica as a highly scalable and distributed cache of the database. If a read replica fails, a new read replica can be started with no impact on the data and just a slight impact for the application that can be written to reconnect to a different read replica server.
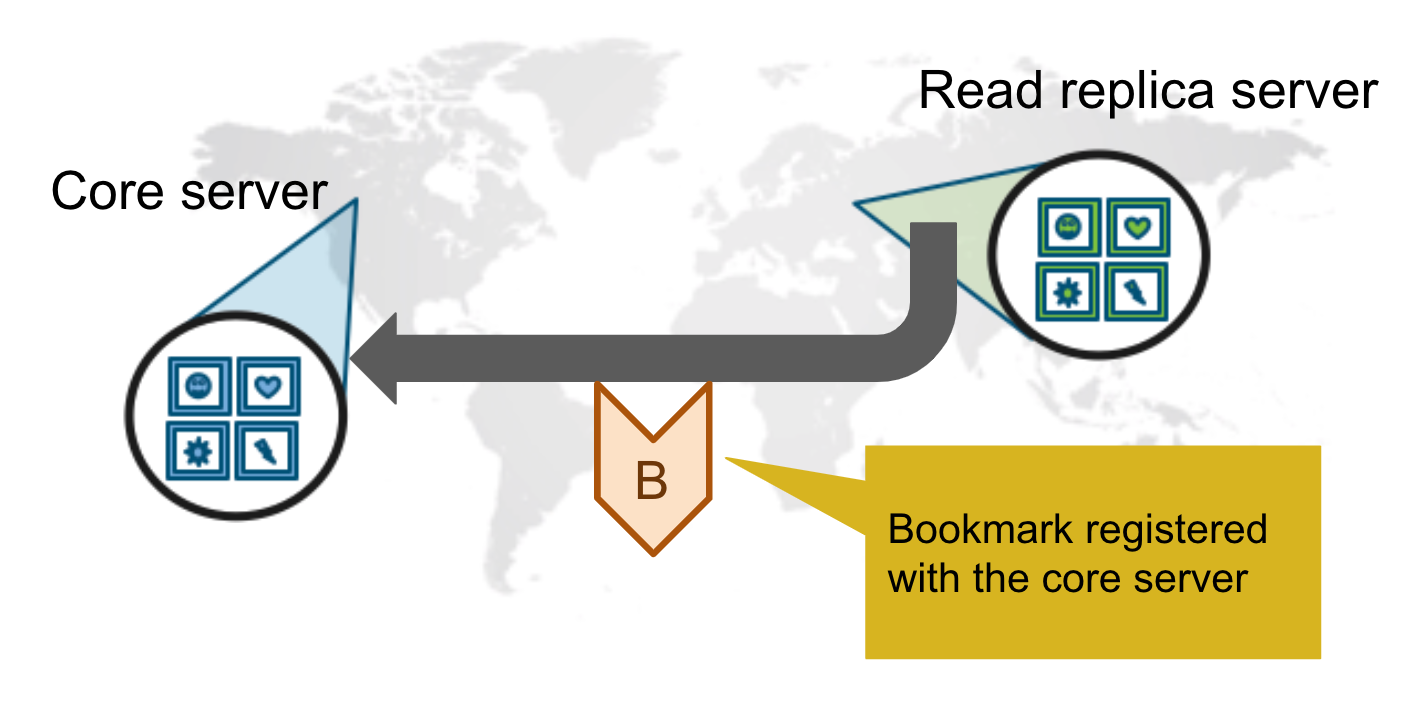
Bookmarks with Causal Clustering
An application can create a bookmark that is used to mark the the last transaction committed to the database. In a subsequent read, the bookmark can be used to ensure that the appropriate core servers are used to ensure that only committed data will be read by the application.
Configuring clustering
As an administrator, you must determine the physical locations of the servers that will be used as core servers and read replica servers. You configure the casual cluster by updating the neo4j.conf file on each server so that they can operate together as a cluster. The types of properties that you configure for a cluster include, but are not limited to:
-
Whether the server will be a core server or a read replica server
-
Public address for the server
-
Names/addresses of the servers in the core server membership
-
Ports used for communicating between the members
-
Published ports for bolt, http, https (non-conflicting port numbers)
-
Number of core servers in the cluster
Core server startup
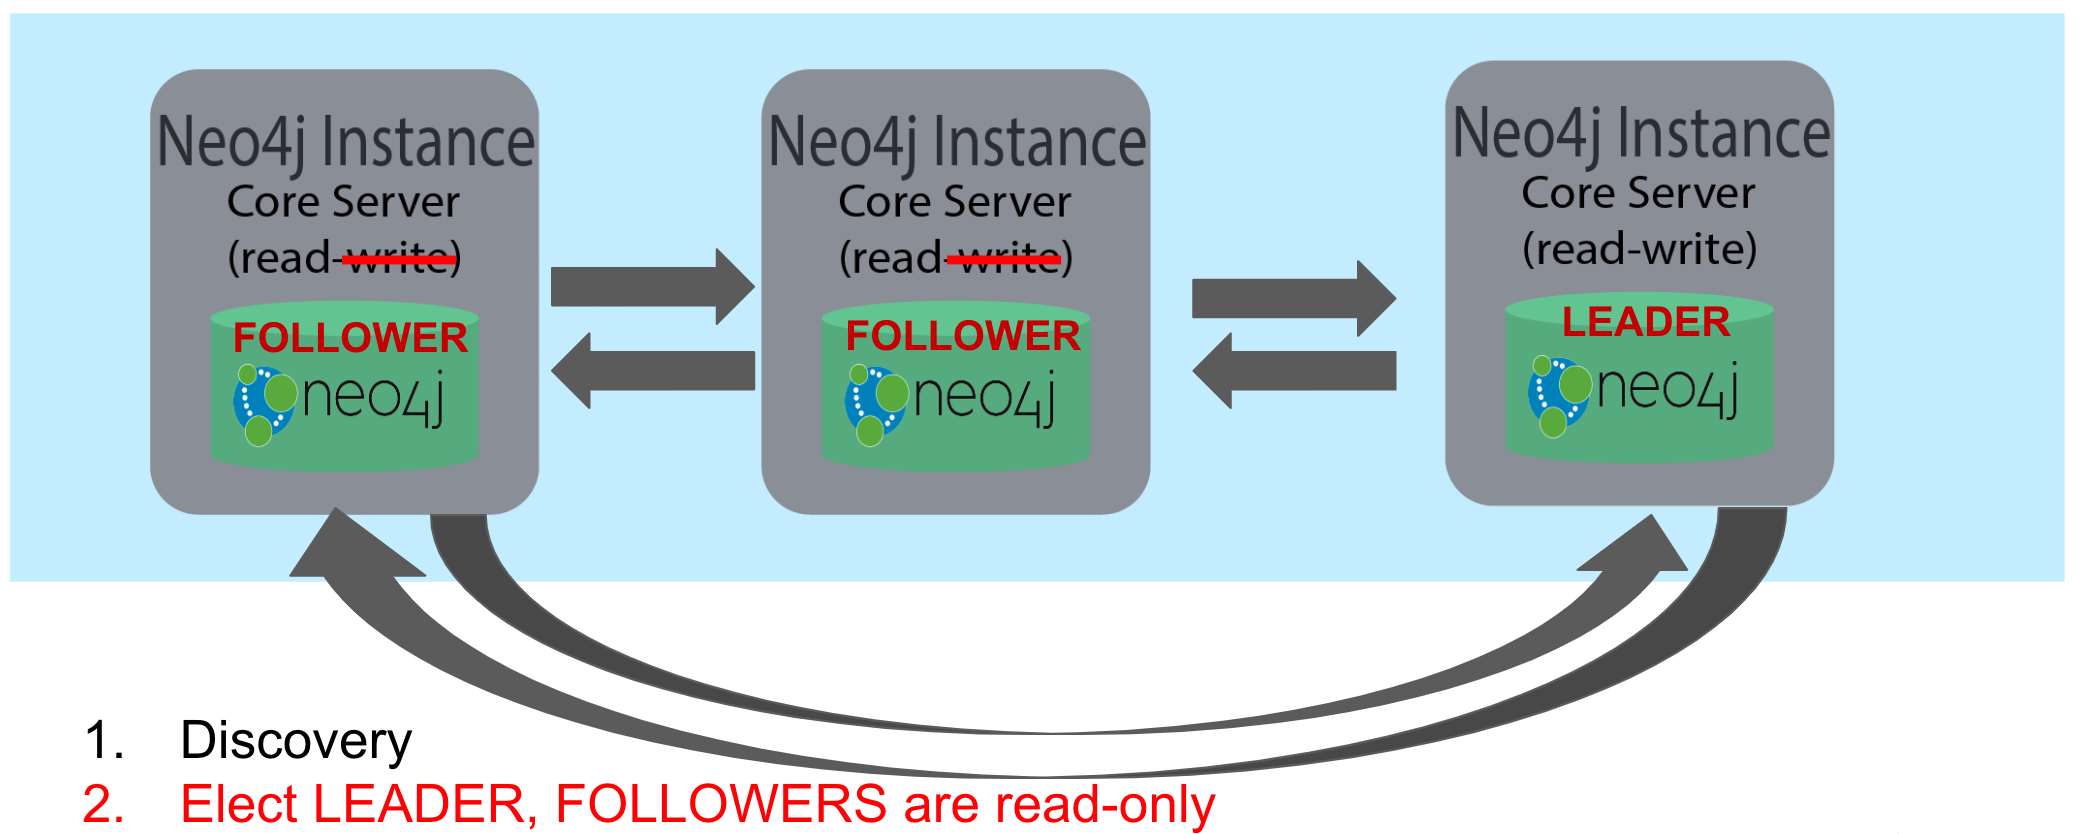
When a core server starts, it first uses a discovery protocol to join the network. At some point it will be running with the other members of the core membership. In a cluster, exactly one core server is elected to be the LEADER. The LEADER is the coordinator of all communication between the core servers. All of the other core servers are FOLLOWERS as the servers in the cluster use the Raft protocol to synchronize updates. If a core server joins the network after the other core servers have been running and updating data, the late-joining core server must use the catchup protocol to get to a point where it is synchronized as the other FOLLOWERS are.
Core server shutdown
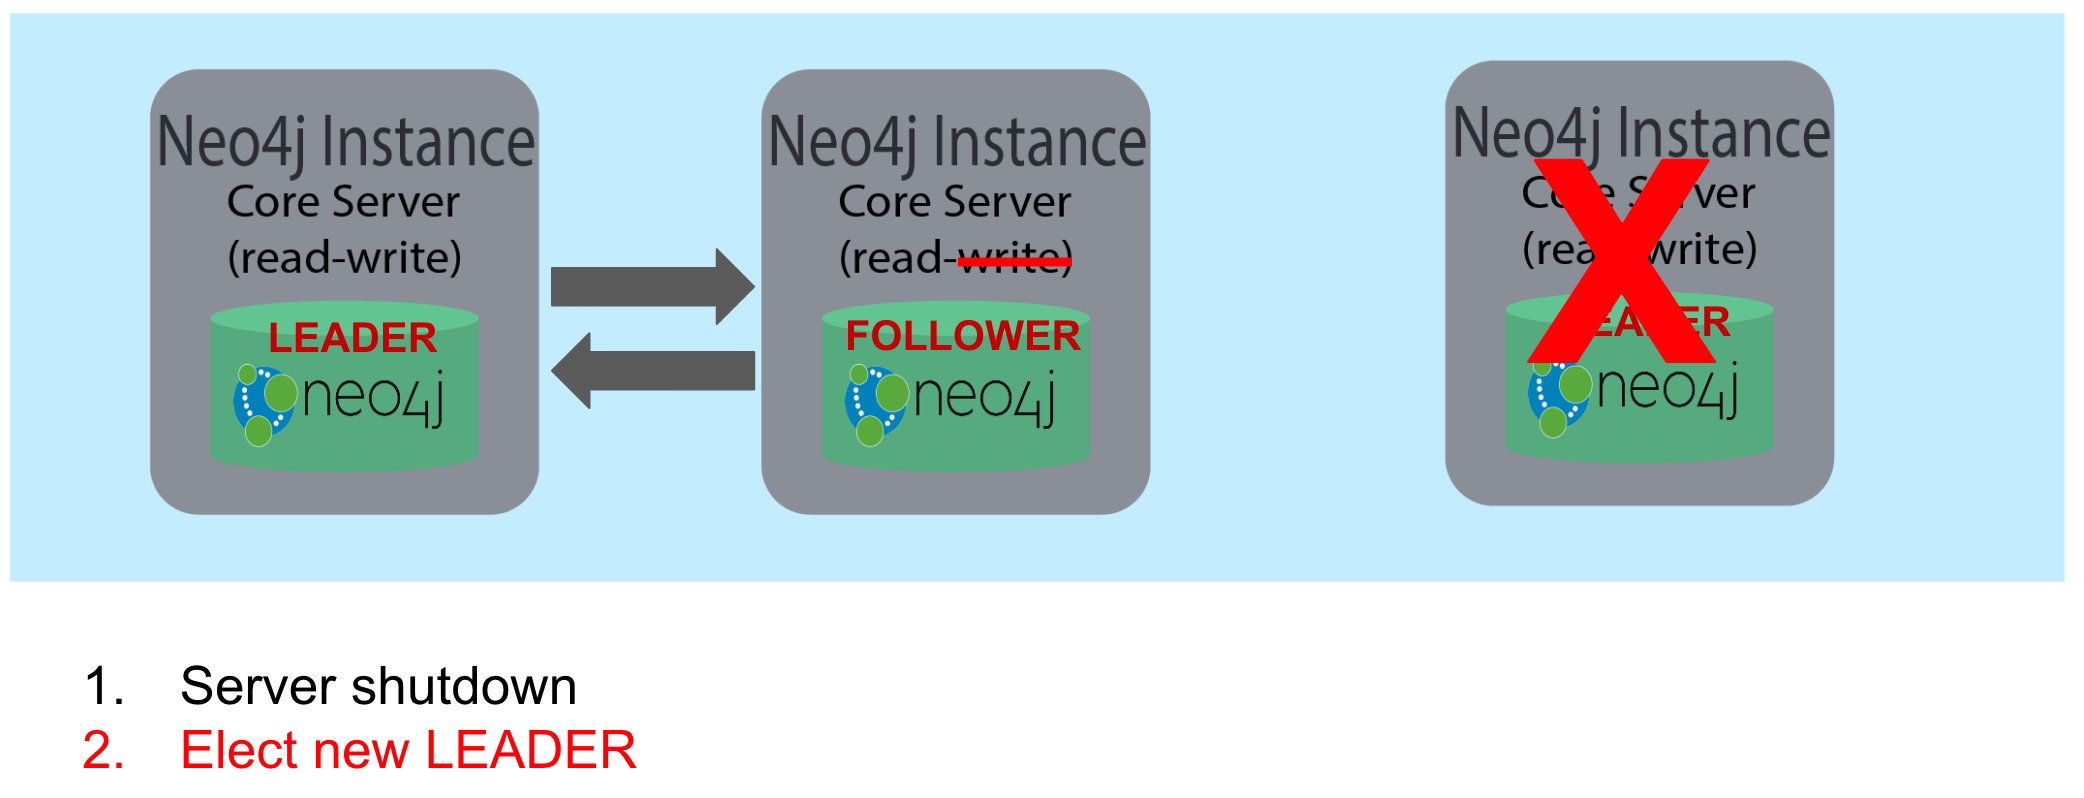
When a core server shuts down, the shutdown may be initiated by an administrator, or it may be due to a hardware or network failure. If the core server that is a FOLLOWER shuts down, the LEADER detects the shutdown and incorporates this information into its operations with the other core servers. If the core server that is the LEADER shuts down, the remaining core servers communicate with each other and an existing FOLLOWER is promoted to the LEADER.
Core server updates database
A core server updates its database based upon the requests from clients. The client’s transaction is not complete until a quorum of core servers have updated their databases. Subsequent to the completion of the transaction, the remaining core servers will also be updated. Core servers use the Raft protocol to share updates. Application clients can use the bolt protocol to send updates to a particular core server’s database, but the preferred protocol for an cluster is the bolt+routing protocol. With this protocol, applications can write to any core server in the cluster, but the LEADER will always coordinate updates.
Administrative tasks for clustering
Here are some common tasks for managing and monitoring clustering:
-
Modify the neo4j.conf files for each core server.
-
Start the core servers in the cluster.
-
Seed the core server (add initial data).
-
Ensure each core server has the data.
-
Modify the neo4j.conf files for each read replica server.
-
Start the read replica servers.
-
Ensure each read replica server has the data.
-
Test updates to the database.
In your real application, you set up the core and read replica Neo4j instances on separate physical servers that are networked and where you have installed Enterprise Edition of Neo4j. In a real application, all configuration for clustering is done by modifying the neo4j.conf file.
Configuring core servers
Please refer to the Neo4j Operations Manual for greater detail about the settings for configuring clustering.
Identify core servers
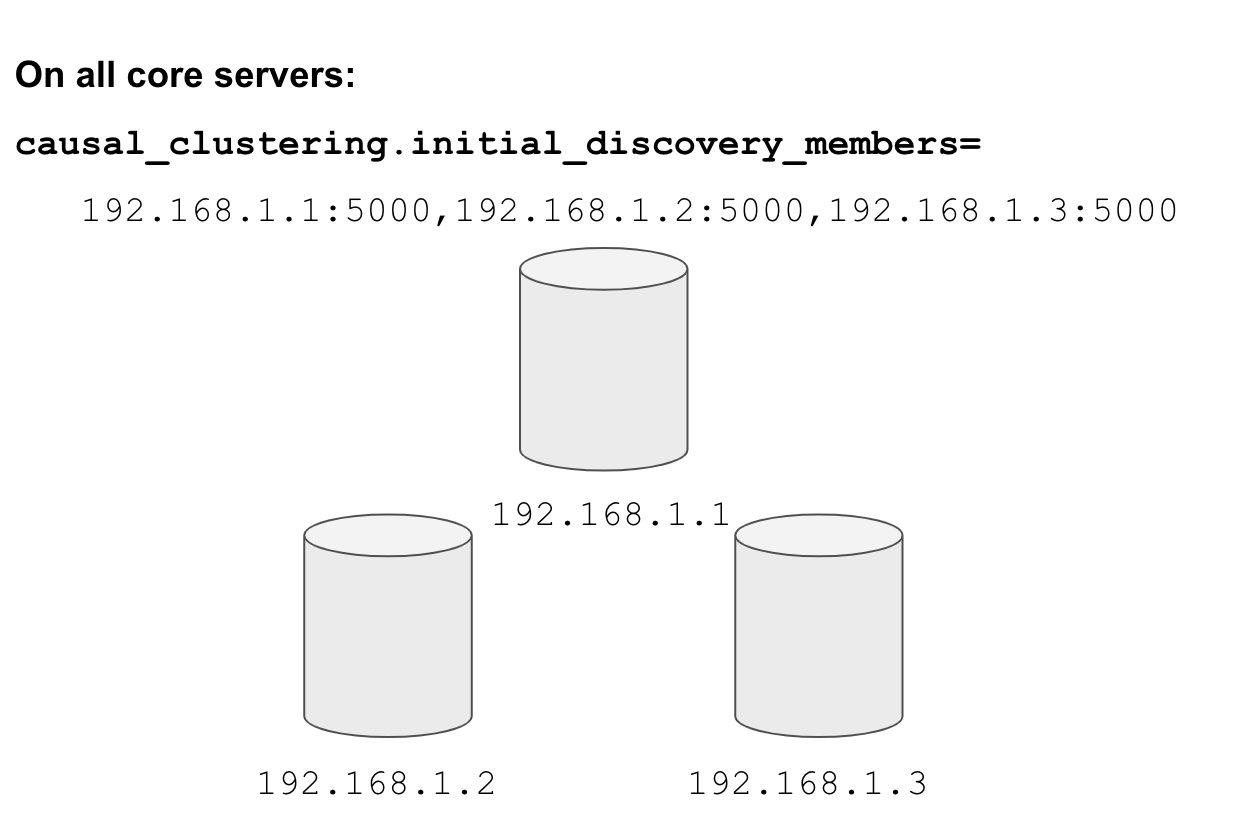
When setting up clustering, you will first identify at least three machines that will host core servers. For these machines, you make sure these properties are set in neo4j.conf where XXXX is the IP address of the machine on the network and XXX1, XXX2, XXX3 are the IP addresses of the machines that will participate in the cluster. These machines must be network accessible.

Specify cluster membership
The machines that you designate to run core servers must be reachable from each other. This means that the core machines are part of the membership of the cluster:
Example: Configuration properties
Here are some of the settings that you may use for your core servers, depending on whether the addresses are known in the network. You may have to specify advertised addresses in addition to the actual addresses.
# set this if you want to ensure the host can be accessed from external browsers
dbms.connectors.default_listen_address=0.0.0.0

# these are the default values used for virtually all configs
dbms.connector.https.listen_address=0.0.0.0:7473
dbms.connector.http.listen_address=0.0.0.0:7474
dbms.connector.bolt.listen_address=0.0.0.0:7687

# used by application clients for accessing the instance
dbms.connector.bolt.advertised_address=localhost:18687

causal_clustering.transaction_listen_address=0.0.0.0:6000
causal_clustering.transaction_advertised_address=XXXX:6000

causal_clustering.raft_listen_address=0.0.0.0:7000
causal_clustering.raft_advertised_address=XXXX:7000

causal_clustering.discovery_listen_address=0.0.0.0:5000
causal_clustering.discovery_advertised_address=XXXX:5000

# all members of the cluster must have this same list
causal_clustering.initial_discovery_members=XXX1:5000,XXX2:5000,XXX3:5000,XXX4:5000,XXX5:5000

# 3 is the default if you do not specify these properties
causal_clustering.minimum_core_cluster_size_at_formation=3
causal_clustering.minimum_core_cluster_size_at_runtime=3

dbms.mode=CORE
Minimum cluster sizes
The minimum_core_cluster_size_at_formation property specifies the number of core servers that must be running before the database is operable for updates. These core servers, when started, ensure that they are caught up with each other. After all core servers are caught up, then the cluster is operable for updates.
The minimum_core_cluster_size_at_runtime property specifies the number of servers that will actively participate in the cluster at runtime.
How runtime minimum is used for a cluster
If the number of core servers started at formation is greater than the number required at runtime, then some started core servers are not considered essential and the cluster can still be operable if some of the core servers stop running. In this example, the size at formation and the runtime minimum are different. Most deployments set these two properties to be the same.

The minimum number of core servers at runtime in a fault-tolerant cluster is three, which is the default setting for clustering. If you require more than three core servers, you must adjust the values in the clustering configuration section where you specify the size and the members of the cluster.
Starting the core servers
After you have modified the neo4j.conf files for the cluster, you start each Neo4j instance. When you start a set of core servers, it doesn’t matter what order they are started. The cluster is not considered started until the number of core servers specified in causal_clustering.minimum_core_cluster_size_at_formation have started. One of the members of the core group will automatically be elected as the LEADER. Note that which core server is the LEADER could change at any time. You must observe the log output for each core server instance to ensure that it started with no errors.
| There is a configuration property (causal_clustering.refuse_to_be_leader) that you can set to true in the neo4j.conf file that specifies that this particular core server will never be a leader. It is not recommended that you set this property. |
Viewing the status of the cluster
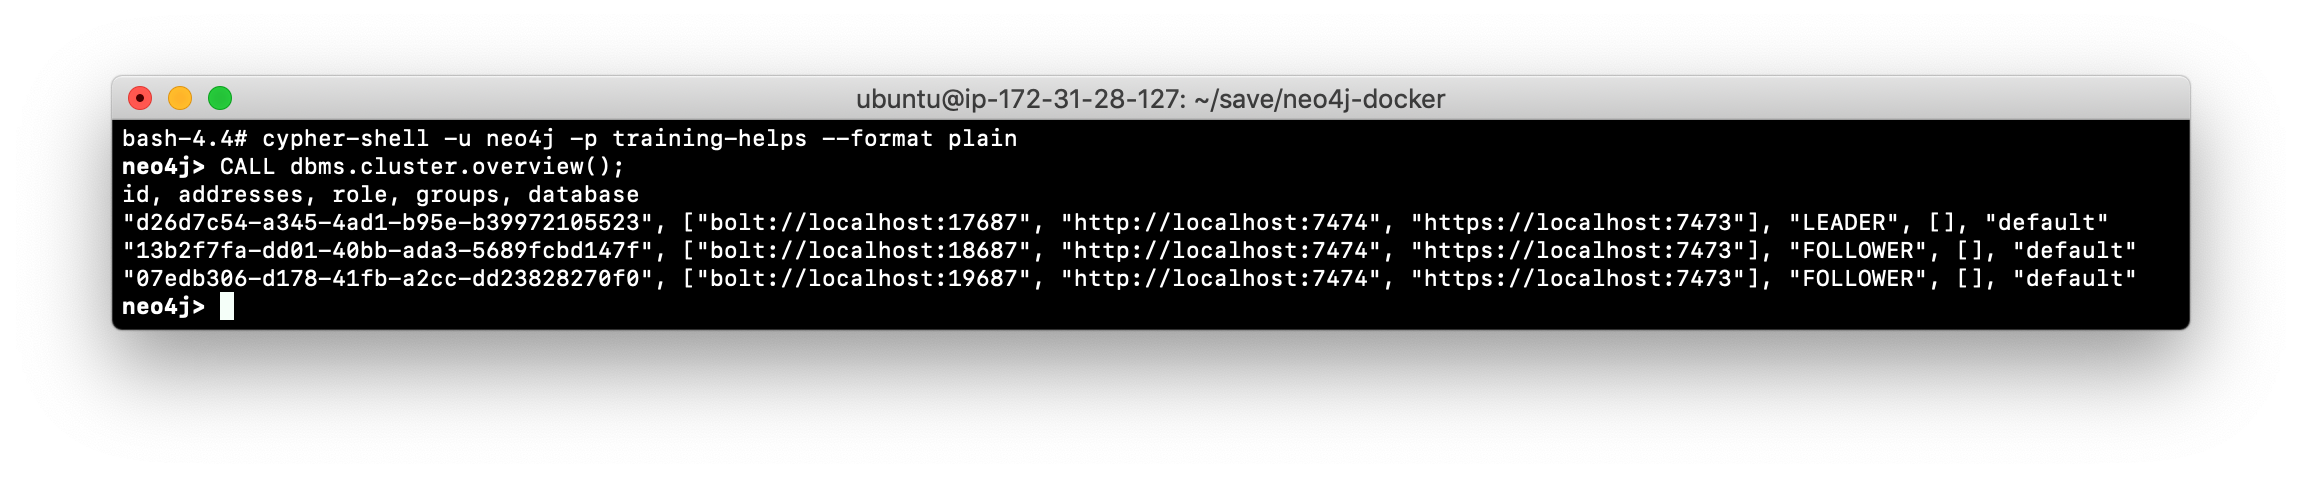
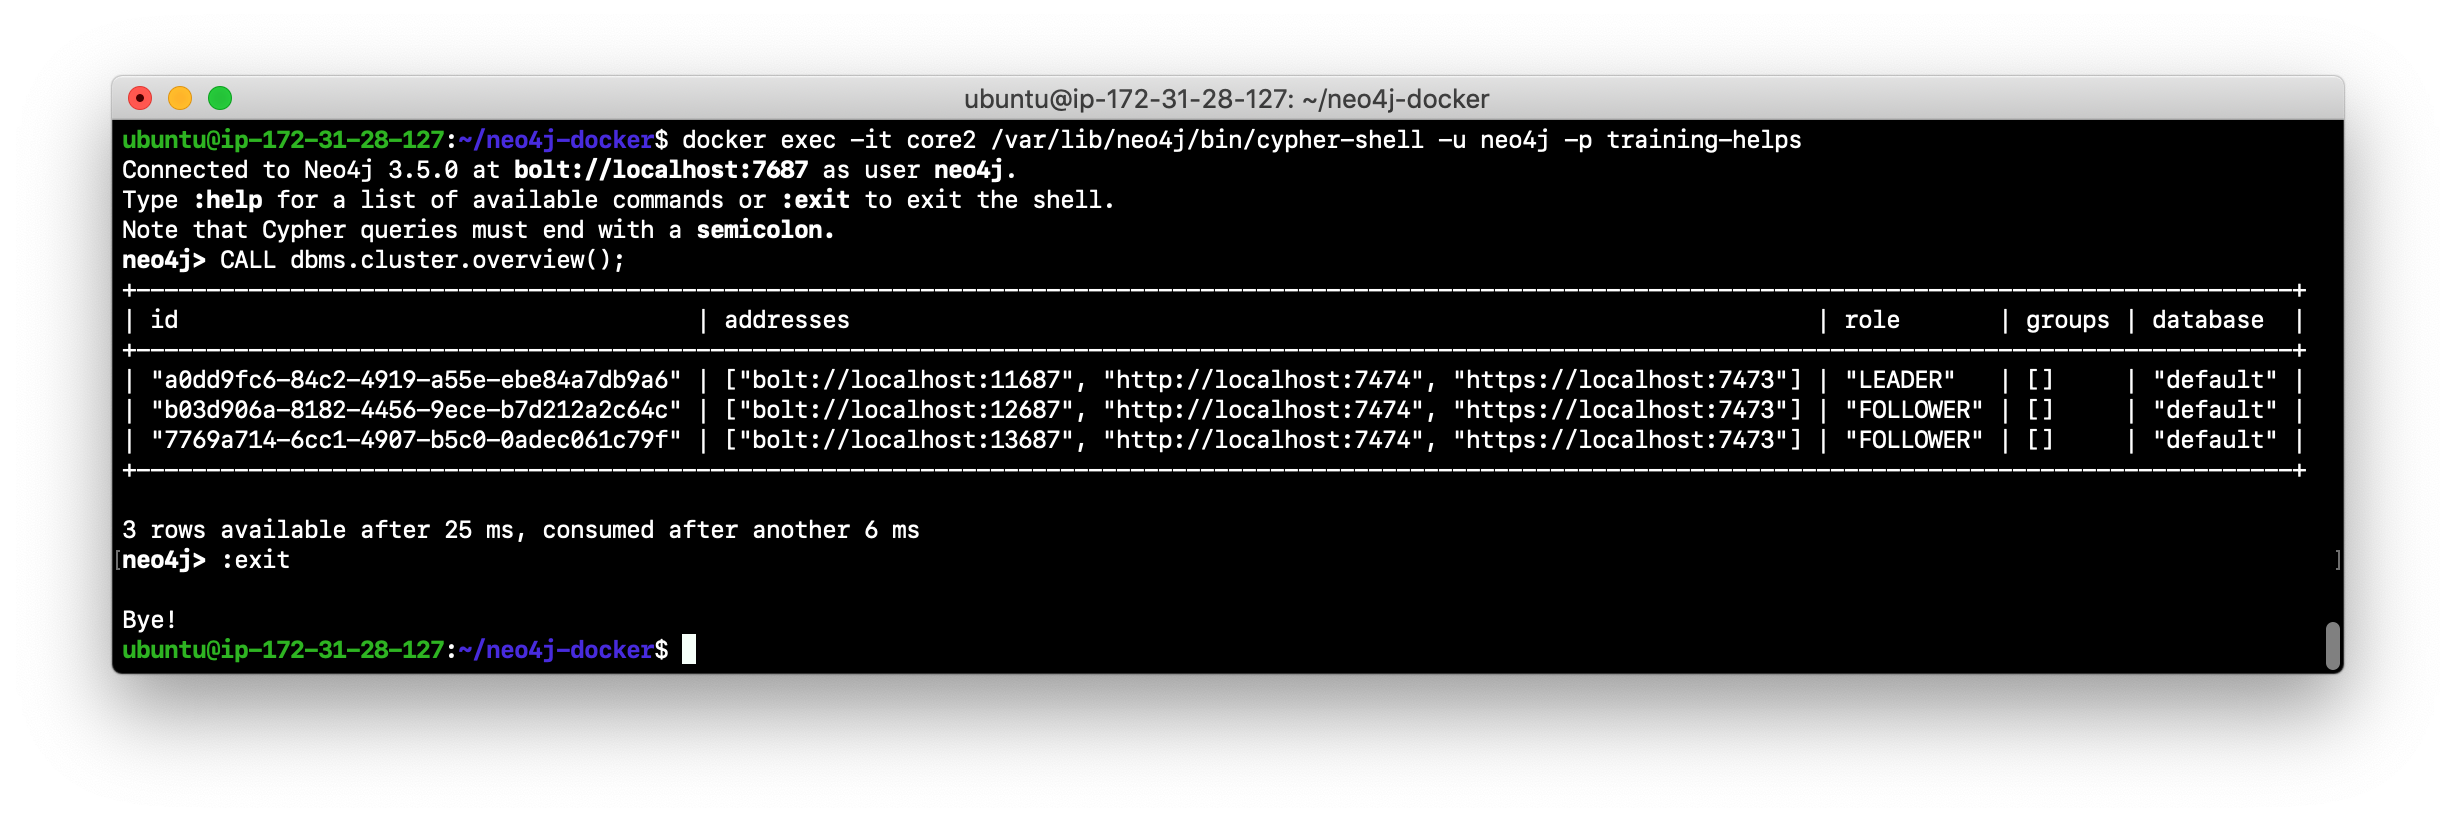
After you have started the core servers in the cluster, you can access status information about the cluster from cypher-shell on any of the core servers in the cluster. You simply enter CALL dbms.cluster.overview(); and it returns information about the servers in the cluster, specifically, which ones are FOLLOWERS and which one is the LEADER.
Neo4j Enterprise Edition Docker image
For this training, you will gain experience managing and monitoring a Neo4j Causal Cluster using Docker. You will create and run Docker containers using a Neo4j Enterprise Docker image. This will enable you to start and manage multiple Neo4j instances used for clustering on your local machine. The published Neo4j Enterprise Edition 3.5.0 Docker image (from DockerHub.com) is pre-configured so that its instances can be easily replicated in a Docker environment that uses clustering. Using a Docker image, you create Docker containers that run on your local system. Each Docker container is a Neo4j instance.
For example, here are the settings in the neo4j.conf file for the Neo4j instance container named core3 when it starts as a Docker container:
#********************************************************************
# Other Neo4j system properties
#********************************************************************
dbms.jvm.additional=-Dunsupported.dbms.udc.source=tarball
wrapper.java.additional=-Dneo4j.ext.udc.source=docker
ha.host.data=core3:6001
ha.host.coordination=core3:5001
dbms.tx_log.rotation.retention_policy=100M size
dbms.memory.pagecache.size=512M
dbms.memory.heap.max_size=512M
dbms.memory.heap.initial_size=512M
dbms.connectors.default_listen_address=0.0.0.0
dbms.connector.https.listen_address=0.0.0.0:7473
dbms.connector.http.listen_address=0.0.0.0:7474
dbms.connector.bolt.listen_address=0.0.0.0:7687
causal_clustering.transaction_listen_address=0.0.0.0:6000
causal_clustering.transaction_advertised_address=core3:6000
causal_clustering.raft_listen_address=0.0.0.0:7000
causal_clustering.raft_advertised_address=core3:7000
causal_clustering.discovery_listen_address=0.0.0.0:5000
causal_clustering.discovery_advertised_address=core3:5000
EDITION=enterprise
ACCEPT.LICENSE.AGREEMENT=yes
Some of these settings are for applications that use the high availability (ha) features of Neo4j. With clustering, we use the core servers for fault-tolerance rather than the high availability features of Neo4j. The setting dbms.connectors.default_listen_address=0.0.0.0 is important. This setting enables the instance to communicate with other applications and servers in the network (for example, using a Web browser to access the http port for the server). Notice that the instance has a number of causal_clustering settings that are pre-configured. These are default settings for clustering that you can override when you create the Docker container for the first time. Some of the other default settings are recommended settings for a Neo4j instance, whether it is part of a cluster or not.
Creating Docker containers
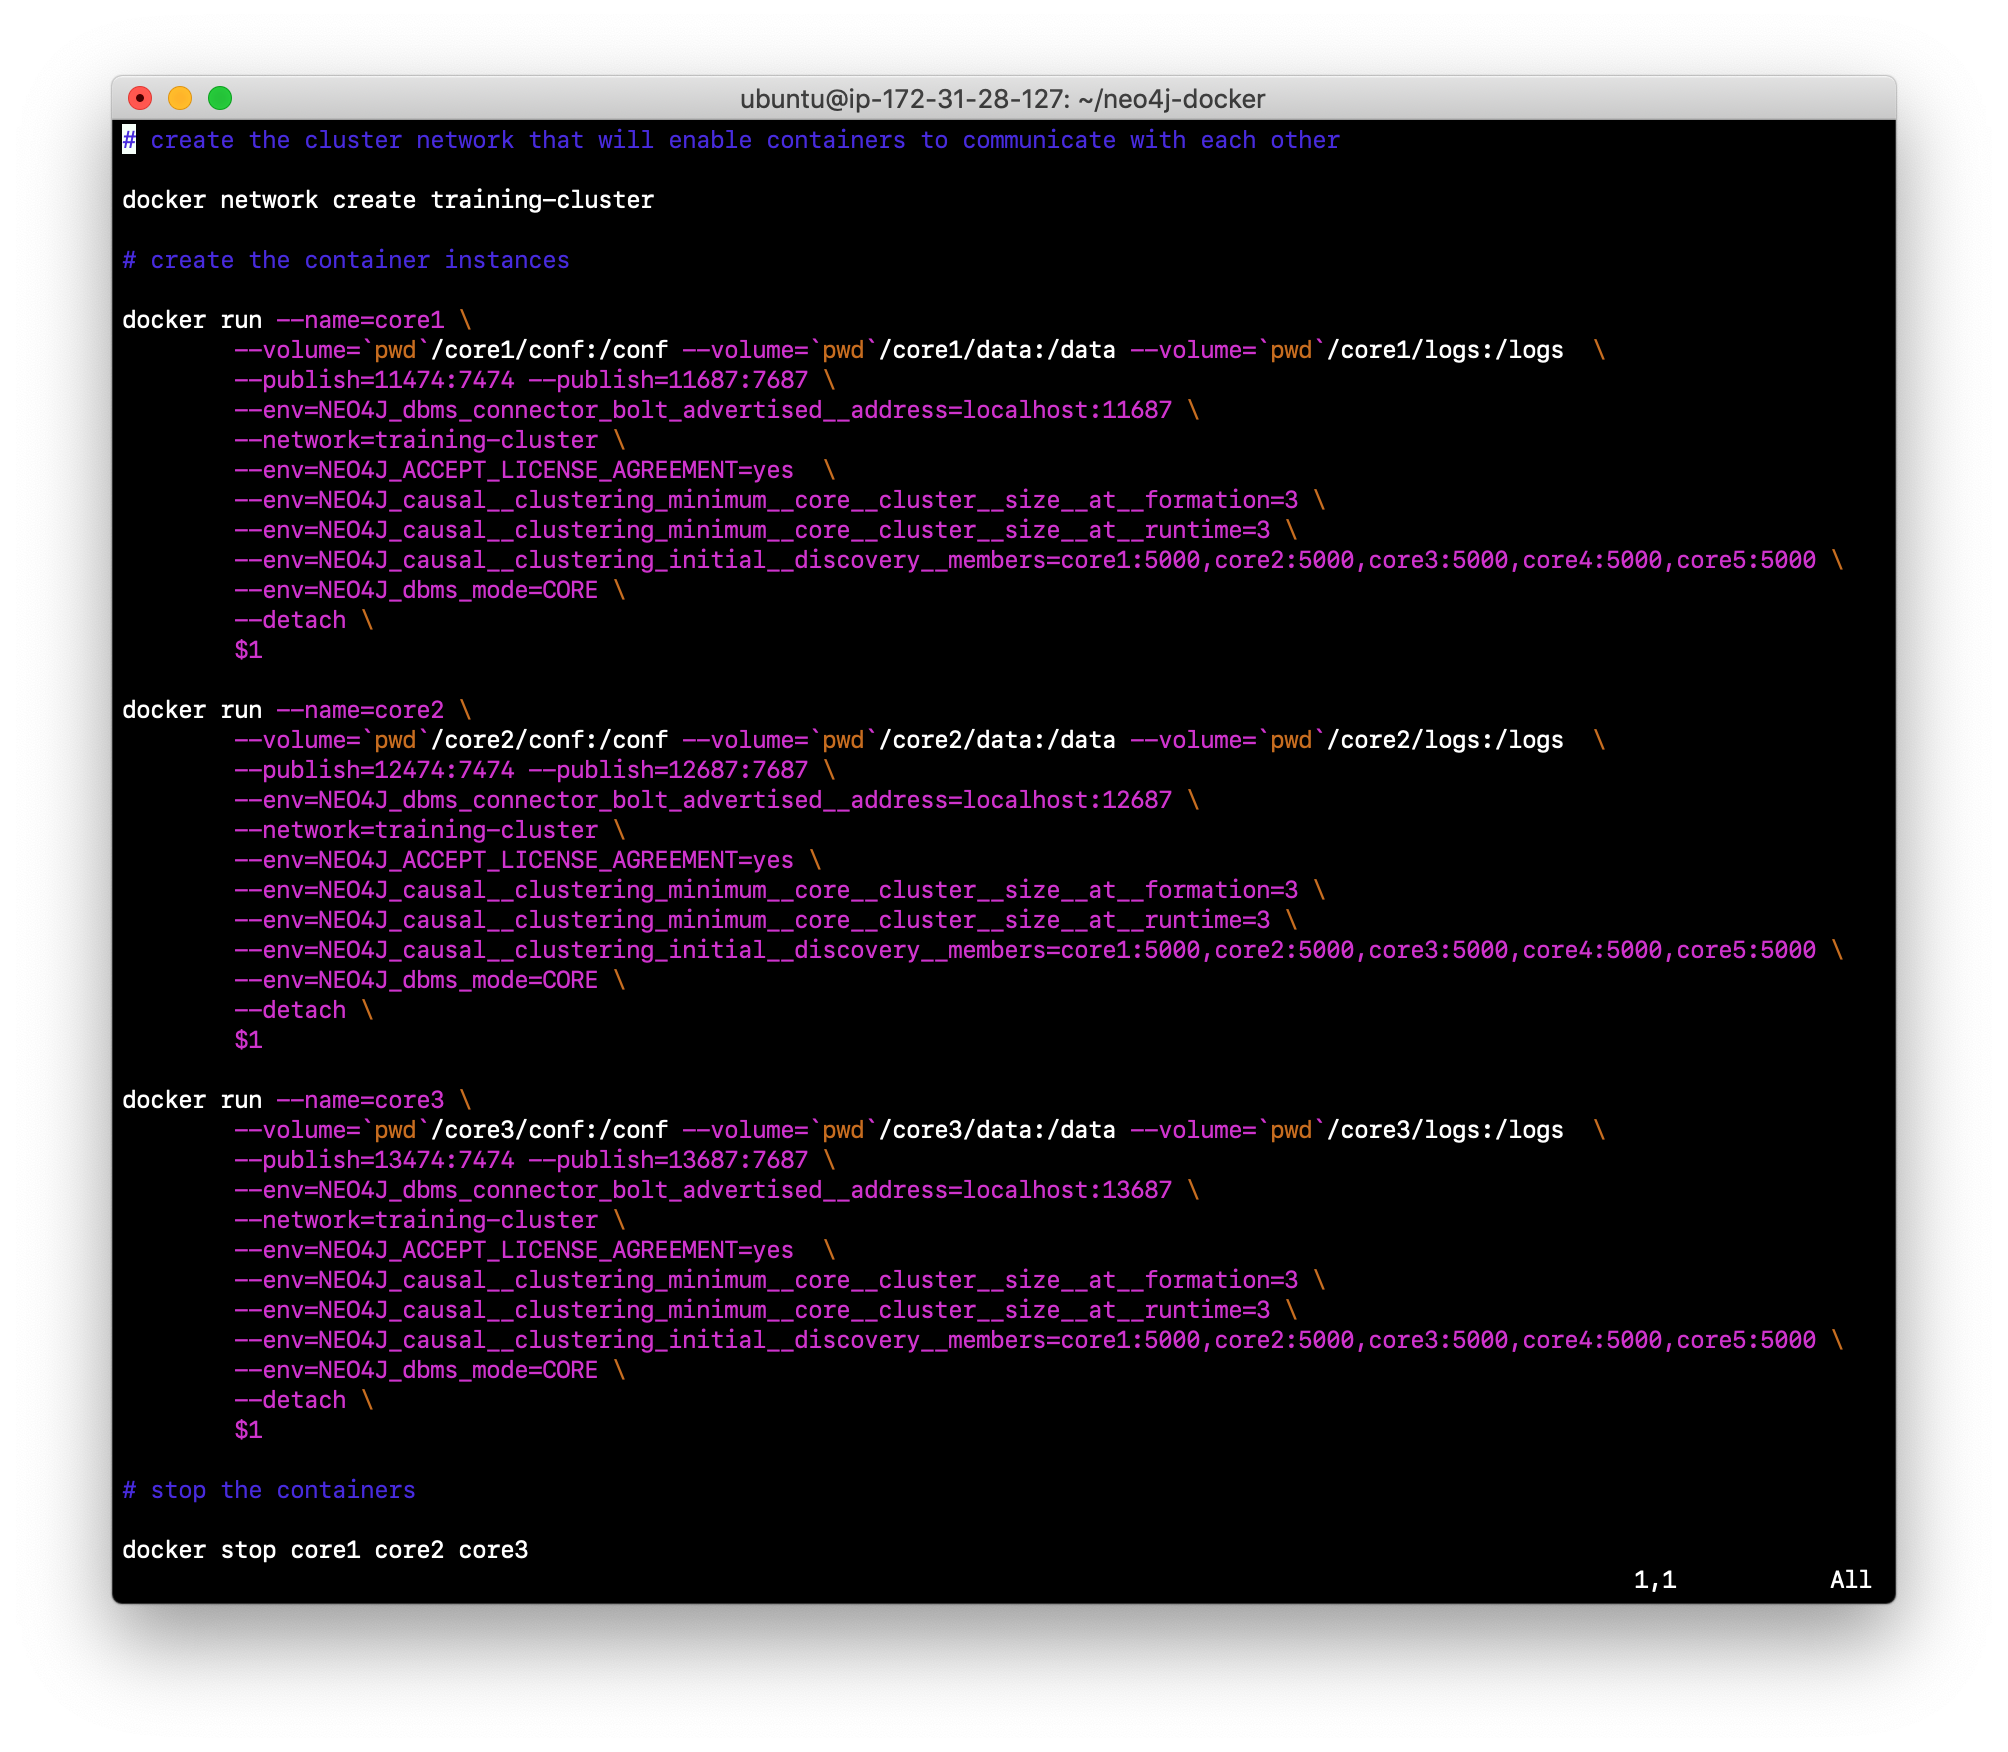
When you create Docker Neo4j containers using docker run, you specify additional clustering configuration as parameters, rather than specifying them in the neo4j.conf file. Here is an example of the parameters that are specified when creating the Docker container named core3:
docker run --name=core3 \
        --volume=`pwd`/core3/conf:/conf --volume=`pwd`/core3/data:/data --volume=`pwd`/core3/logs:/logs  \
        --publish=13474:7474 --publish=13687:7687 \
 	    --env=NEO4J_dbms_connector_bolt_advertised__address=localhost:13687 \
        --network=training-cluster \
        --env=NEO4J_ACCEPT_LICENSE_AGREEMENT=yes  \
	    --env=NEO4J_causal__clustering_minimum__core__cluster__size__at__formation=3 \
        --env=NEO4J_causal__clustering_minimum__core__cluster__size__at__runtime=3 \
        --env=NEO4J_causal__clustering_initial__discovery__members=\
                  core1:5000,core2:5000,core3:5000,core4:5000,core5:5000 \
        --env=NEO4J_dbms_mode=CORE \
	   --detach \
        b4ca2f886837
In this example, the name of the Docker container is core3. We map the conf, data, and logs folders for the Neo4j instance when it starts to our local filesystem. We map the http and bolt ports to values that will be unique on our system (13474 and 13687). We specify the bolt address to use. The name of the Docker network that is used for this cluster is training-cluster. ACCEPT_LICENSE_AGREEMENT is required. The size of the cluster is three core servers and the names of the [potential] members are specified as core1, core2, core3, core4, and core5. These servers use port 5000 for the discovery listen address. This instance will be used as a core server (dbms.mode=CORE). The container is started in this script detached, meaning that no output or interaction will be produced. And finally the ID of the Neo4j Enterprise 3.5.0 container is specified (b4ca2f886837). When you specify the Neo4j parameters for starting the container (docker run), you always prefix them with "--env=NEO4J_". In addition, you specify the underscore character for the dot character and a double underscore for the single underscore character instead of what you would use in the Neo4j configuration file.
| When using the Neo4j Docker instance, a best practice is to specify more members in the cluster, but not require them to be started when the cluster forms. This will enable you to later add core servers to the cluster. |
Exercise #1: Getting started with clustering
In this Exercise, you will gain experience with a simple cluster using Docker containers. You will not use Neo4j instances running on your system, but rather Neo4j instances running in Docker containers where you have installed Docker on your system.
Before you begin
-
Ensure that Docker Desktop (MAC/Windows) or Docker CE (Debian) is installed (
docker --version). Here is information about downloading and installing Docker. -
Download the file neo4j-docker.zip and unzip it to a folder that will be used to saving Neo4j configuration changes for clusters. This will be your working directory for the cluster Exercises in this training. Hint:
curl -O https://s3-us-west-1.amazonaws.com/data.neo4j.com/admin-neo4j/neo4j-docker.zip -
Download the Docker image for Neo4j (
docker pull neo4j:3.5.0-enterprise). -
Ensure that your user ID has docker privileges:
sudo usermod -aG docker <username>. You will have to log in and log out to use the new privileges.
Exercise steps:
-
Open a terminal on your system.
-
Confirm that you have the Neo4j 3.5.0 Docker image:
docker images. Note that you will have a different Image ID.
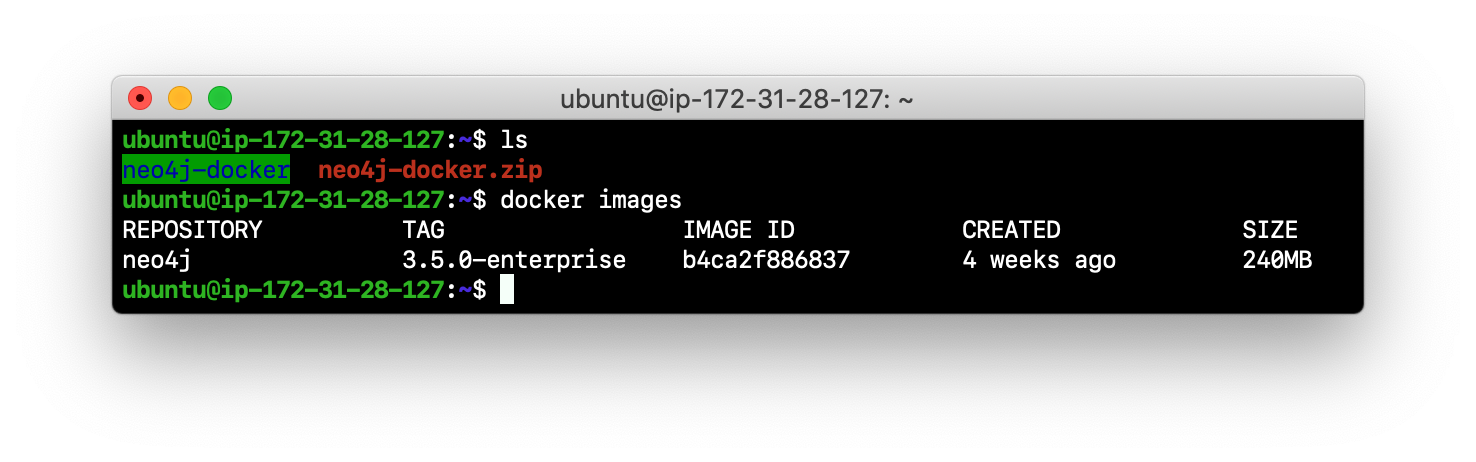
-
Navigate to the neo4j-docker folder. This is the folder that will contain all configuration changes for the Neo4j instances you will be running in the cluster. Initially, you will be working with three core servers. Here you can see that you have a folder for each core server and each read replica server.
-
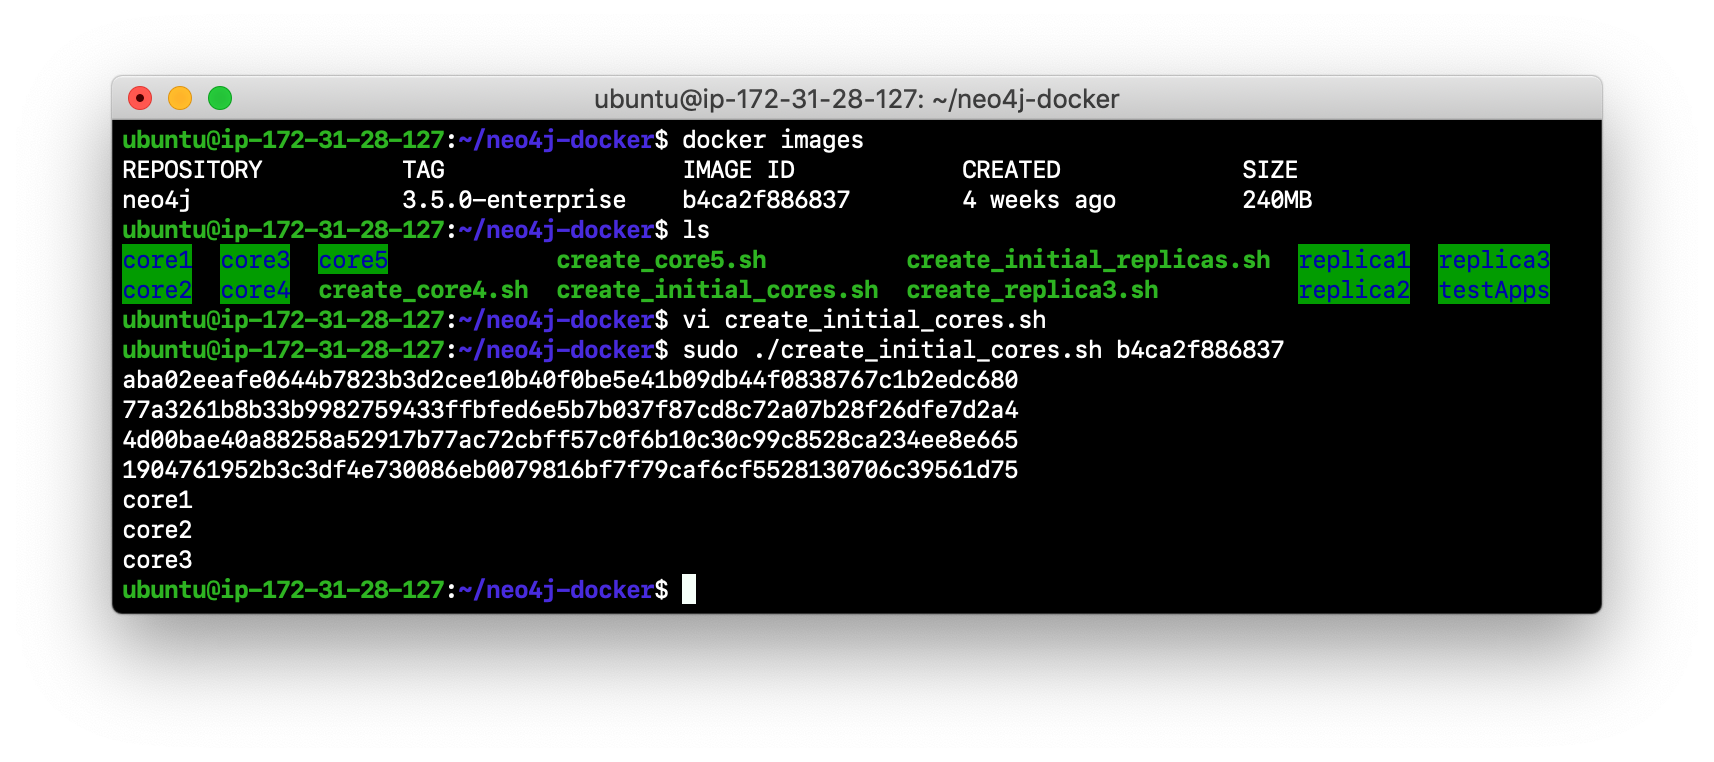
Examine the create_initial_cores.sh file. This script creates the network that will be used in your Docker environment and then creates three Docker container instances from the Neo4j image. Each instance will represent a core server. Finally, the script stops the three instances.
-
Run create_initial_cores.sh as root
sudo ./create_initial_cores.sh <Image ID>providing as an argument the Image ID of the Neo4j Docker image.
-
Confirm that the three containers exist:
docker ps -a
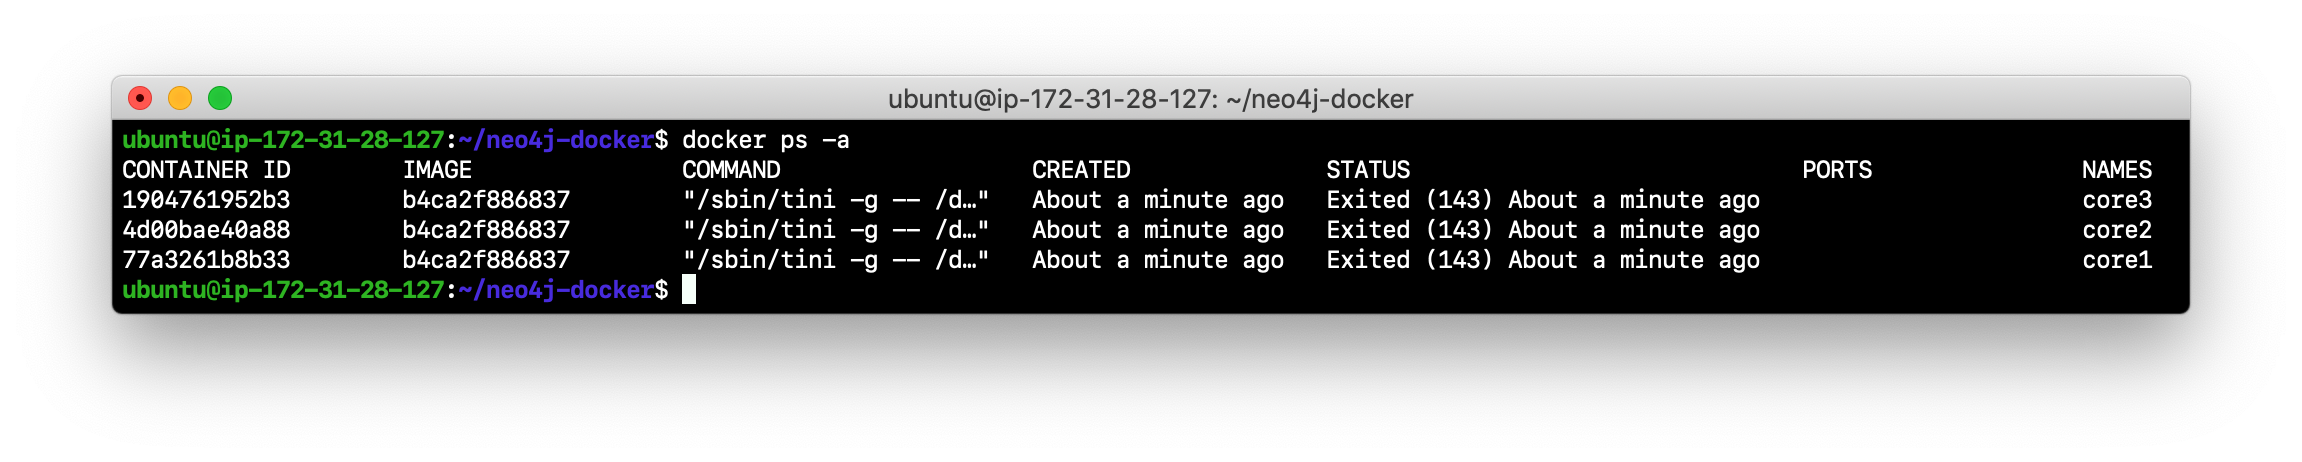
-
Open a terminal window for each of the core servers. (three of them).
-
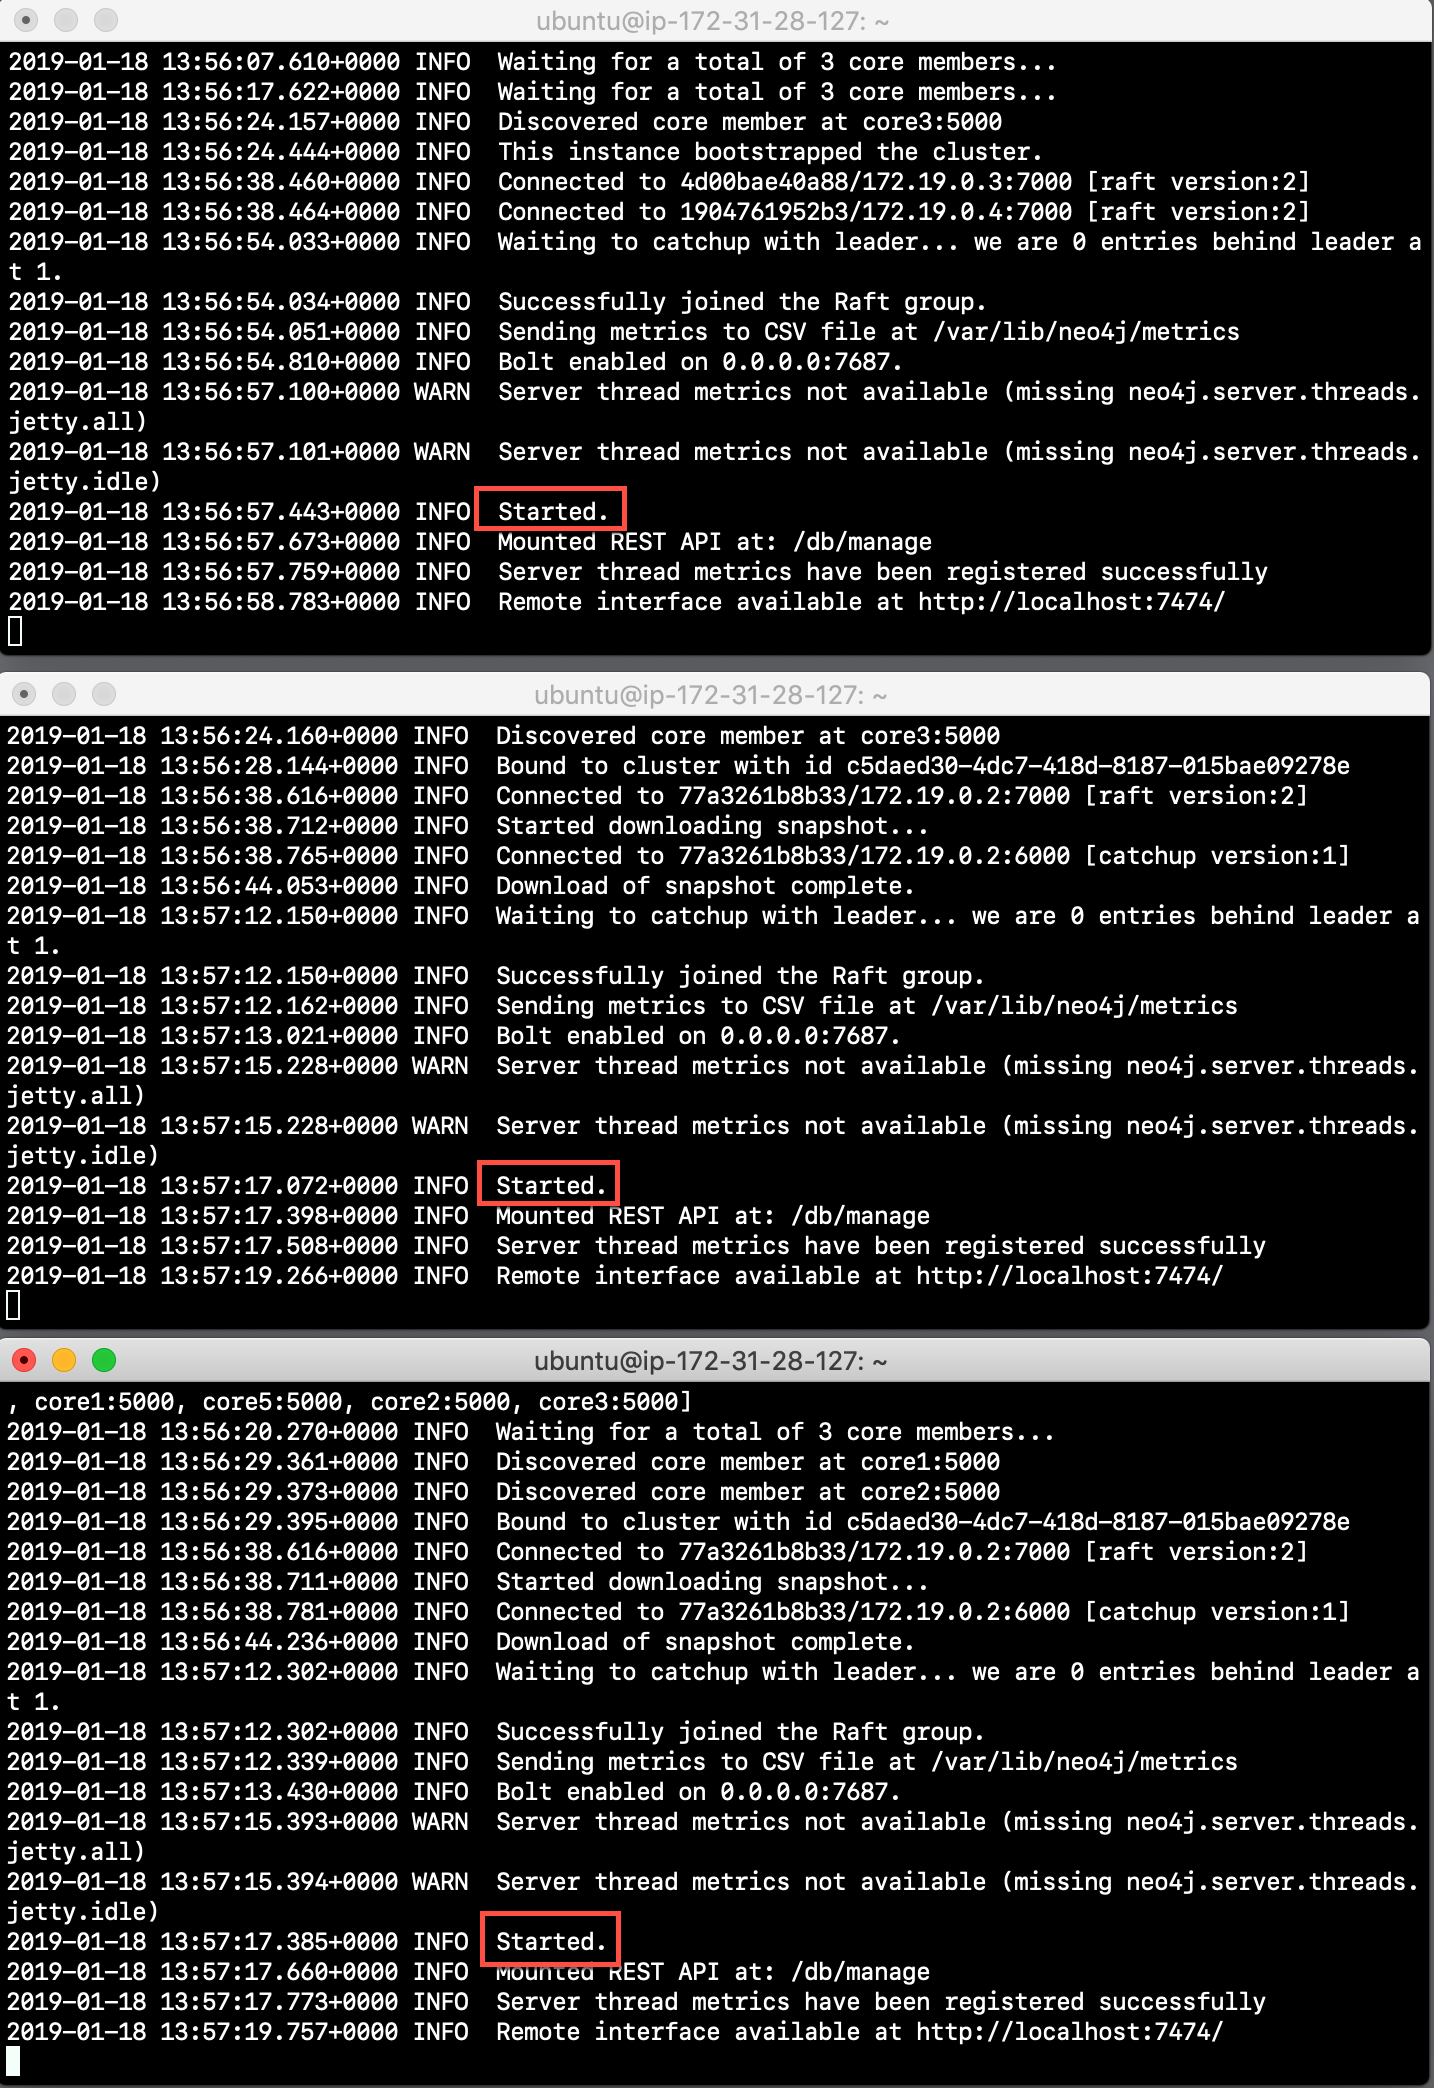
In each core server window, start the instance:
docker start -a coreX. The instance will be started. These instances are set up so that the default browser port on localhost will be 11474, 12474, and 13474 on each instance respectively. Notice that each instance uses it’s own database as the active database. For example, here is the result of starting the core server containers. Notice that each server starts as part of the cluster. The servers are not fully started until all catchup has been done between the servers and the Started record is shown. The databases will not be accessible by clients until all core members of the cluster have successfully started.
-
In your non-core server terminal window, confirm that all core servers are running in the network by typing
docker ps -a.

-
In your non-core server terminal window, log in to the core1 server with
cypher-shellas followsdocker exec -it core1 /var/lib/neo4j/bin/cypher-shell -u neo4j -p neo4j -
Change the password. Here is an example where we change the password for core1:
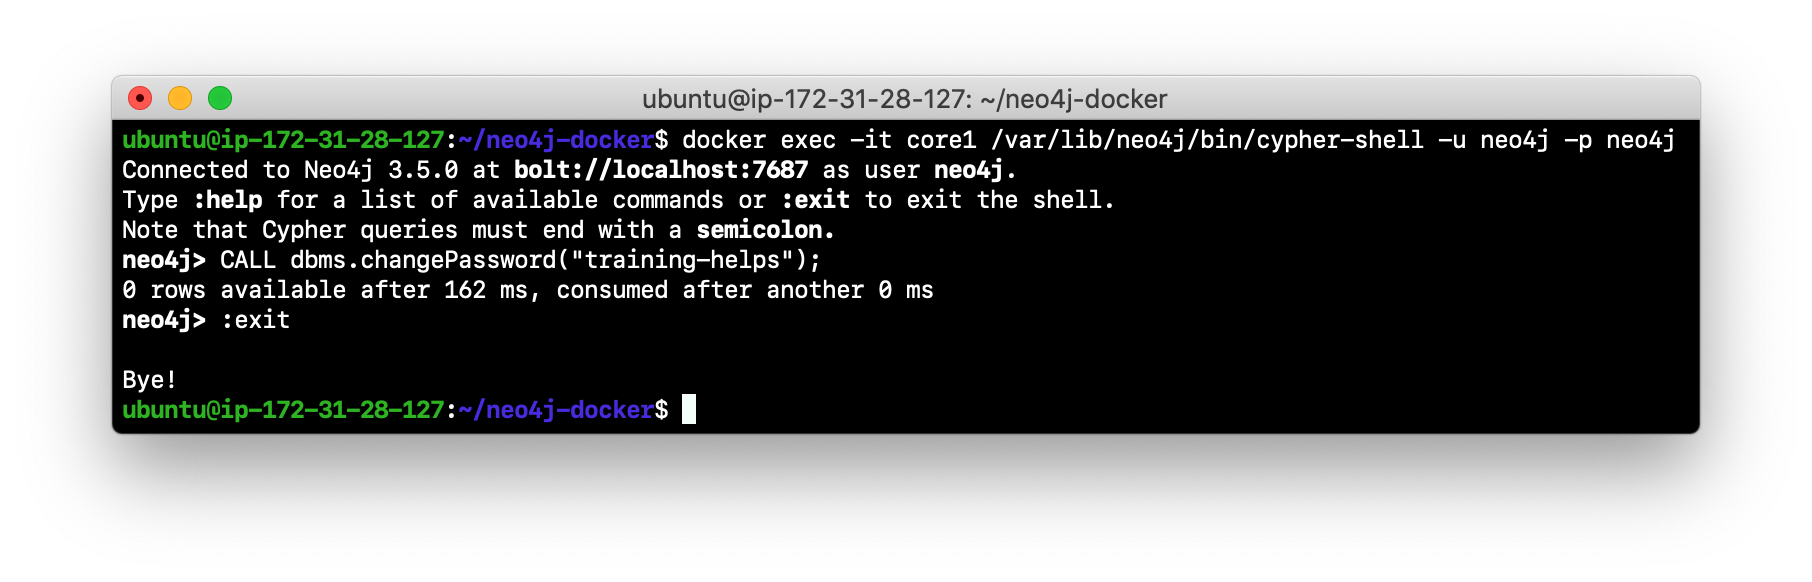
-
Repeat the previous two steps for core2 and core3 to change the password for the neo4j user.
-
Log in to any of the servers and get the cluster overview information in
cypher-shell. In this image, core1 is the LEADER:
-
Shut down all core servers by typing this in a non-core server terminal window:
docker stop core1 core2 core3
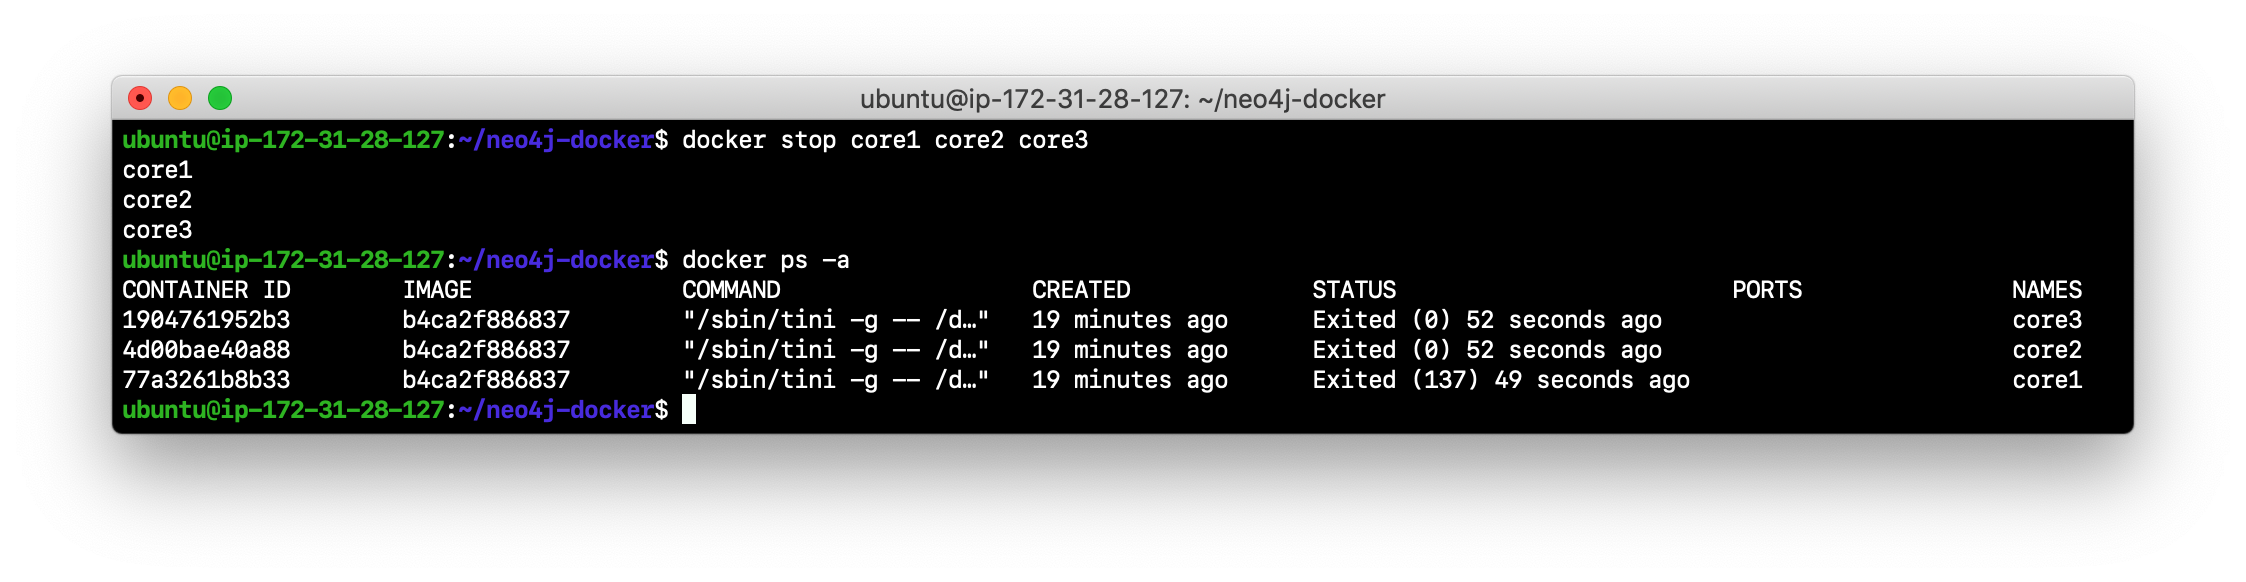
-
You can now close the terminal windows you used for each of the core servers, but keep the non-core server window open.
You have now successfully configured, started, and accessed core servers (as Docker containers) running in a causal cluster.
Seeding the data for the cluster
When setting up a cluster for your application, you must ensure that the database that will be used in the cluster has been populated with your application data. In a cluster, each Neo4j instance has its own database, but the data in the databases for each core server that is actively running in the cluster is identical.
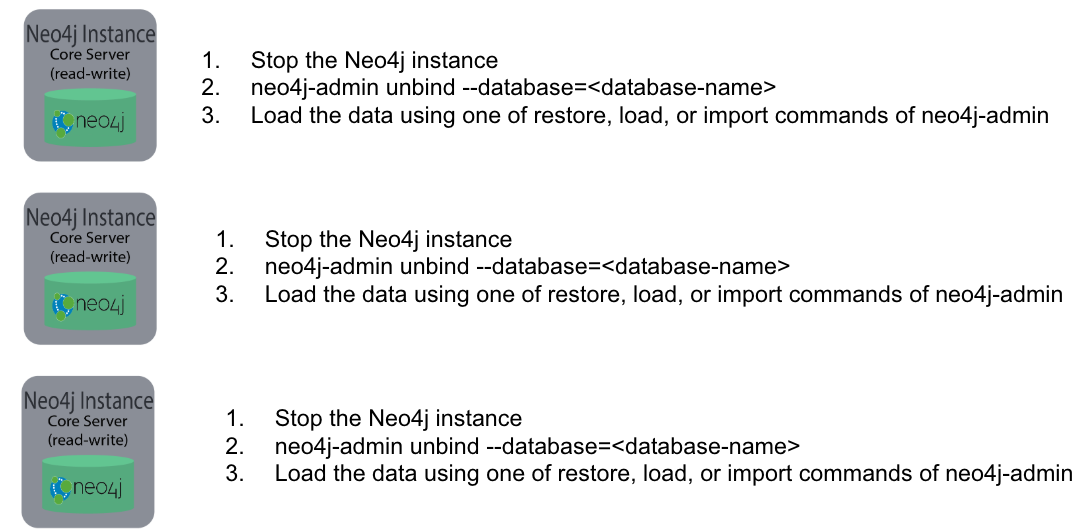
Before you seed the data for each core server that is part of a cluster, you must unbind it from the cluster. To unbind the core server, the instance must be stopped, then you run neo4j-admin unbind --database=<database-name>.
Loading the data
When you seed the data for the cluster, you can do any of the following, but you must do the same on each of the core servers of the cluster to create the production database. Note that the core servers must be down for these tasks. You learned how to do these tasks in the previous module.
-
Restore data using an online backup.
-
Load data using an offline backup.
-
Create data using the import tool and a set of .csv files.
If the amount of application data is relatively small (less than 10M nodes) you can also load .csv data into a running core server in the cluster where all core servers are started and actively part of the cluster. This will propagate the data to all databases in the cluster.
Exercise #2: Seeding the cluster databases
In this Exercise, you will populate the databases in the cluster that you created earlier. Because you are using Docker containers for learning about clustering, you cannot perform the normal seeding procedures as you would in your real production environment because when using the Neo4j Docker containers, the Neo4j instance is already started when you start the container. Instead, you will simply start the core servers in the cluster and connect to one of them. Then you will use cypher-shell to load the Movie data into the database and the data will be propagated to the other core servers.
Before you begin
Ensure that you have performed the steps in Exercise 1 where you set up the core servers as Docker containers. Note that you can perform the steps of this Exercise in a single terminal window.
Exercise steps:
-
In a terminal window, start the core servers:
docker start core1 core2 core3. This will start the core servers in background mode where the log is not attached to STDOUT. If you want to see what is happening with a particular core server, you can always view the messages in <coreX>/logs/debug.log. -
By default, all writes must be performed by the LEADER of the cluster. Determine which core server is the LEADER. Hint: You can do this by logging in to any core server that is running (
docker exec -it <core server> /bin/bash) and entering the following command:echo "CALL dbms.cluster.overview();" | /var/lib/neo4j/bin/cypher-shell -u neo4j -p training-helps. In this example, core1 is the LEADER:

-
Log in to the core server that is the LEADER.
-
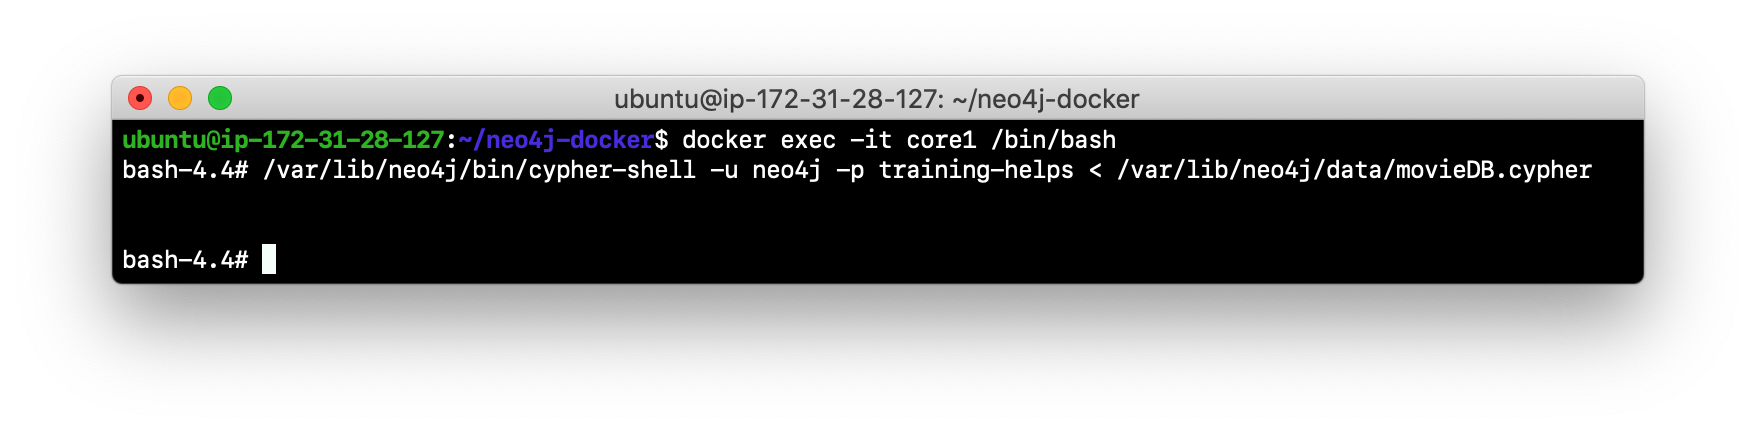
Run
cypher-shellspecifying that the movie.cypher statements will be run. Hint: You can do this with a single command line:/var/lib/neo4j/bin/cypher-shell -u neo4j -p training-helps < /var/lib/neo4j/data/movieDB.cypher
-
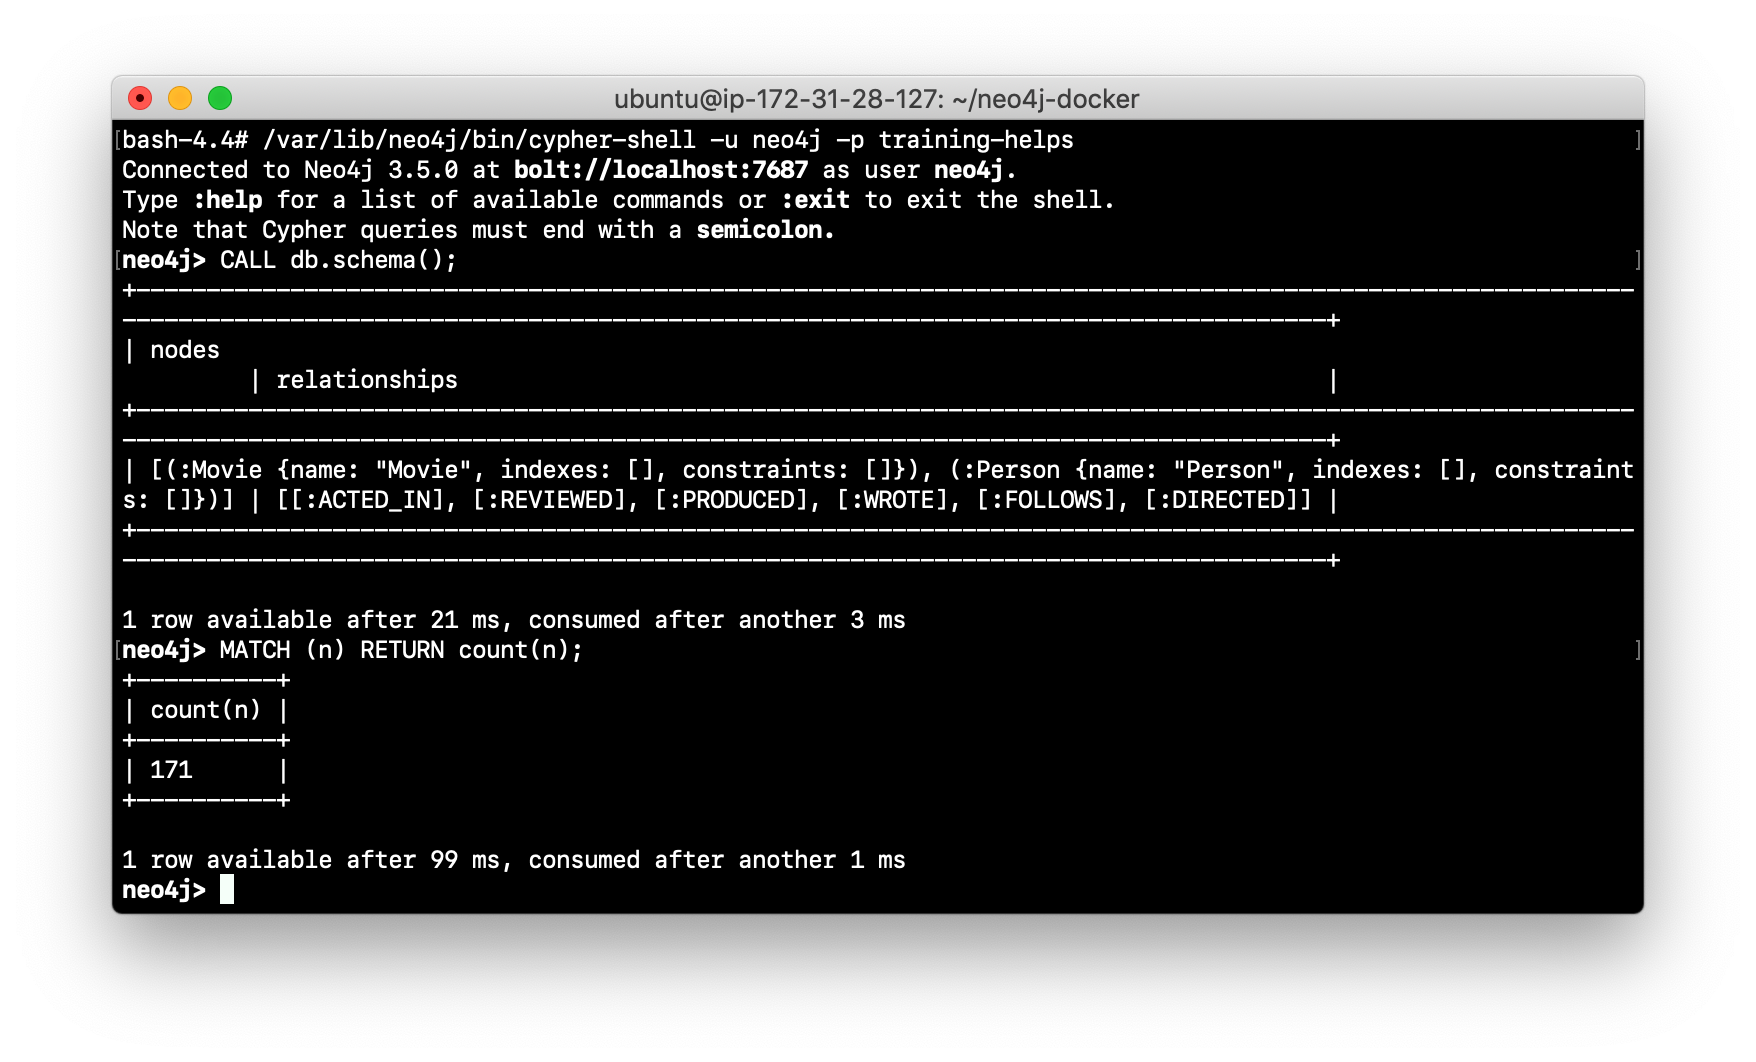
Log in to
cypher-shelland confirm that the data has been loaded into the database.
-
Log out of the core server.
-
Log in to a FOLLOWER core server with
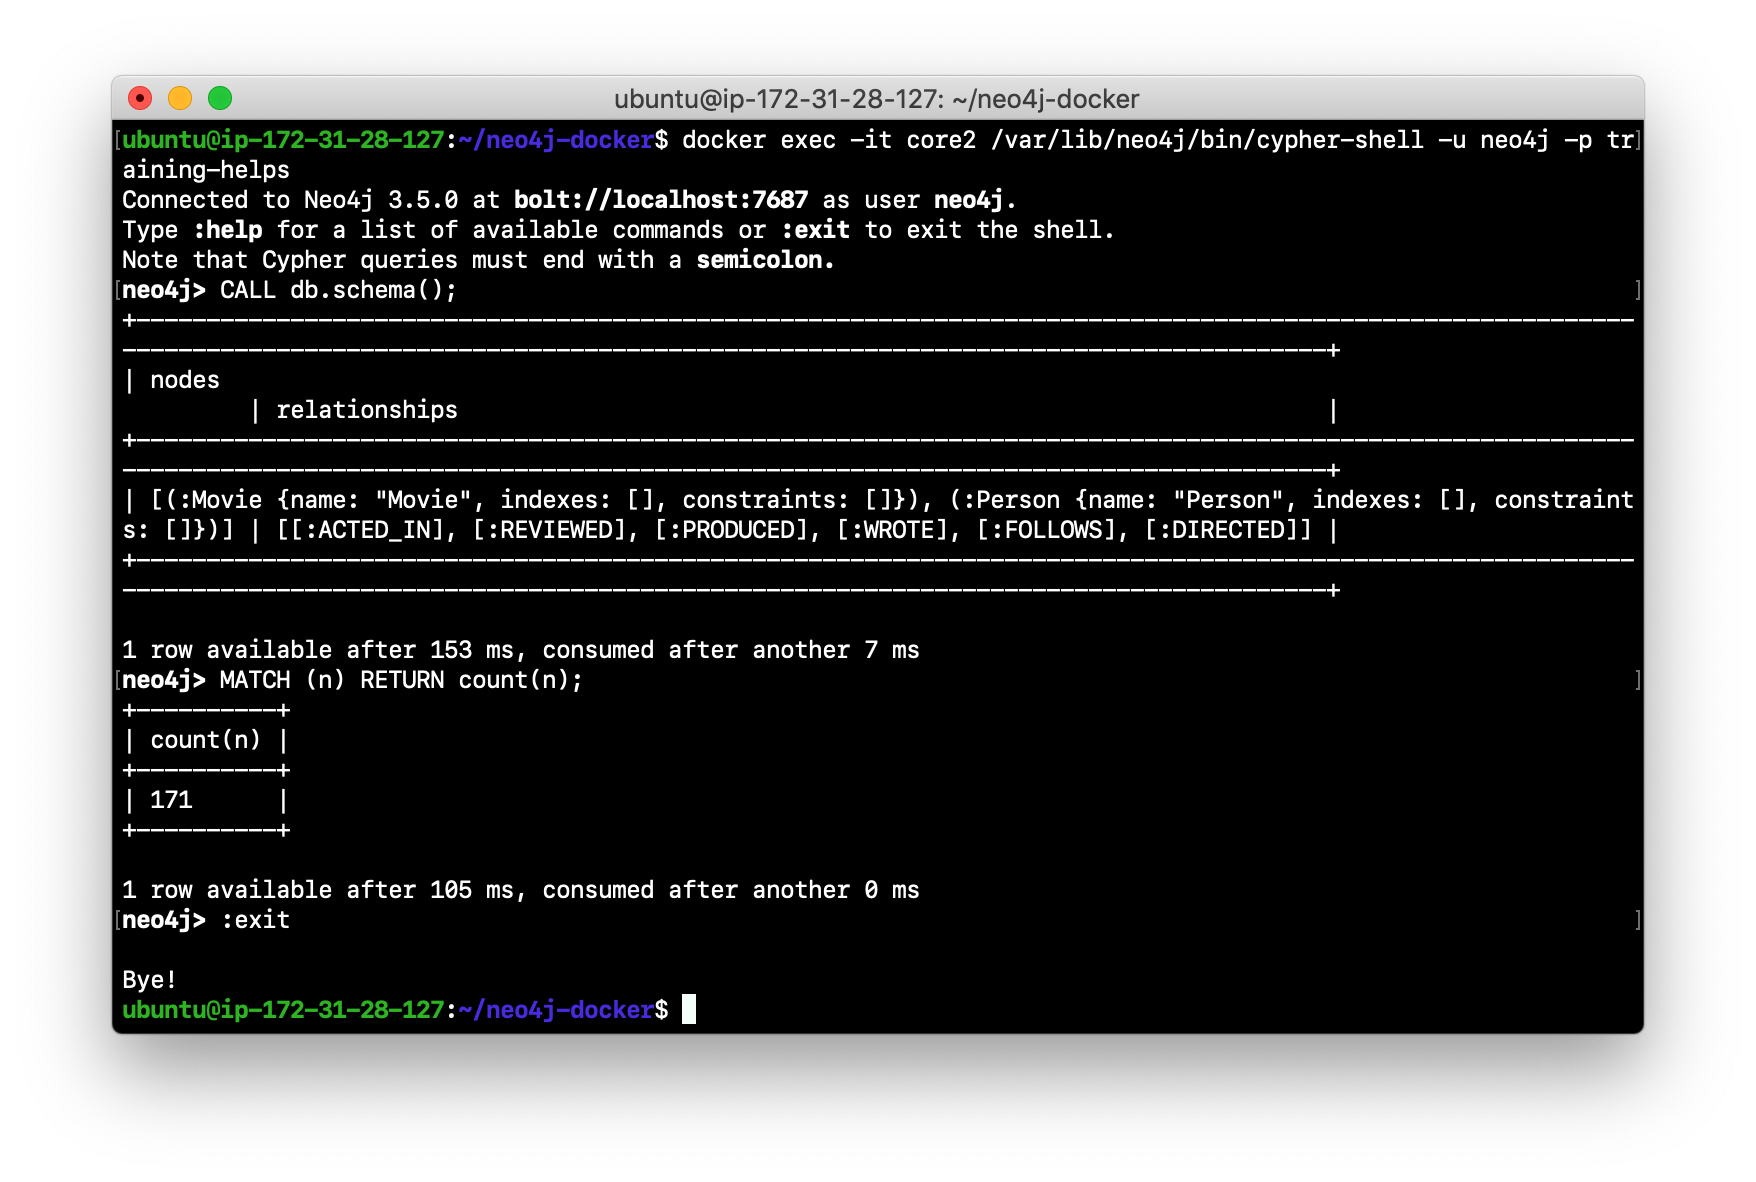
cypher-shell. Hint: For example, you can log in to core2 withcypher-shellwith the following command:docker exec -it core2 /var/lib/neo4j/bin/cypher-shell -u neo4j -p training-helps
-
Verify that the Movie data is in the database for this core server.
-
Log out of the core server.
-
Log in to the remaining core server that is the FOLLOWER with
cypher-shell.
-
Verify that the Movie data is in the database for this core server.

-
Log out of the core server.
You have now seen the cluster in action. Any modification to one database in the core server cluster is propagated to the other core servers.
Basic routing in a cluster
In a cluster, all write operations must be coordinated by the LEADER in the cluster. Which core server is designated as the LEADER could change at any time in the event of a failure or a network slowdown. Applications that access the database can automatically route their write operations to whatever LEADER is available as this functionality is built into the Neo4j driver libraries. The Neo4j driver code obtains the routing table and automatically updates it as necessary if the endpoints in the cluster change. To implement the automatic routing, application clients that will be updating the database must use the bolt+routing protocol when they connect to any of the core servers in the cluster.
bolt+routing
Applications that update the database must always use bolt+routing when accessing the core servers in a cluster. Using this protocol, applications gain:
-
Automatic routing to an available server.
-
Load balancing of requests between the available servers.
-
Automatic retries.
-
Causal chaining (bookmarks).
bolt and bolt+routing at runtime
For example, if you have a cluster with three core servers and core1 is the LEADER, your application can only write to core1 using the bolt protocol and bolt port for core1. An easy way to see this restriction is if you use the default address for cypher-shell on the system where a FOLLOWER is running. If you connect via cypher-shell to the server on core2 and attempt to update the database, you receive an error:

When using clustering, all application code that updates the application will use the bolt+routing protocol which will enable applications to be able to write to the database, even in the event of a failure of one of the core servers. Applications must be written with the understanding that transactions are automatically retried.
Exercise #3: Accessing the core servers in a cluster
In this Exercise, you gain some experience with bolt+routing by running two stand-alone Java applications: one that reads from the database and one that writes to the database.
Before you begin
-
Ensure that you have performed the steps in Exercise 2 where you have populated the database used for the cluster and all three core servers are running. Note that you can perform the steps of this Exercise in a single terminal window.
-
Ensure that the three core servers are started.
-
Log out of the core server if you have not done so already. You will be in a terminal window where you manage Docker.
Exercise steps:
-
Navigate to the neo4j-docker/testApps folder.
-
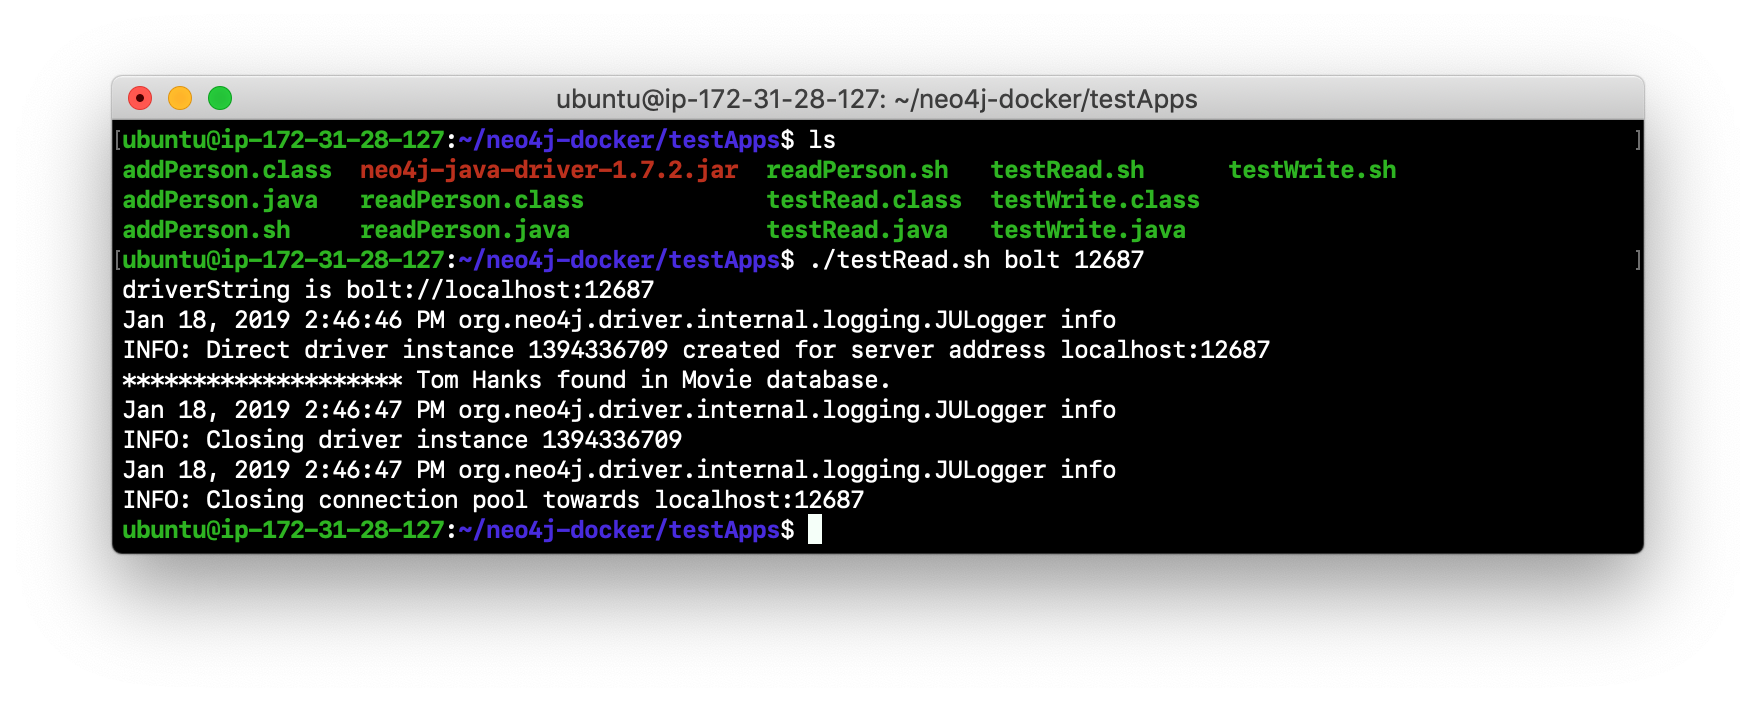
There are three Java applications as well as scripts for running them. These scripts enable you to run a read-only client or write client against the database where you specify the protocol and the port for connecting to the Neo4j instance. Unless you modified port numbers in the create_initial_cores.sh script when you created the containers, the bolt ports used for core1, core2, and core3 are 11687, 12687, and 13687 respectively. What this means is that clients can read from the database using these ports using the bolt protocol. Try running testRead.sh, providing bolt as the protocol and one of the above port numbers. For example, type
./testRead.sh bolt 12687. You will successfully read from each server. Here is an example of running the script against the core2 server which currently is a FOLLOWER in the cluster:
-
Next, run the script against the other servers in the network. All reads will be successful.
-
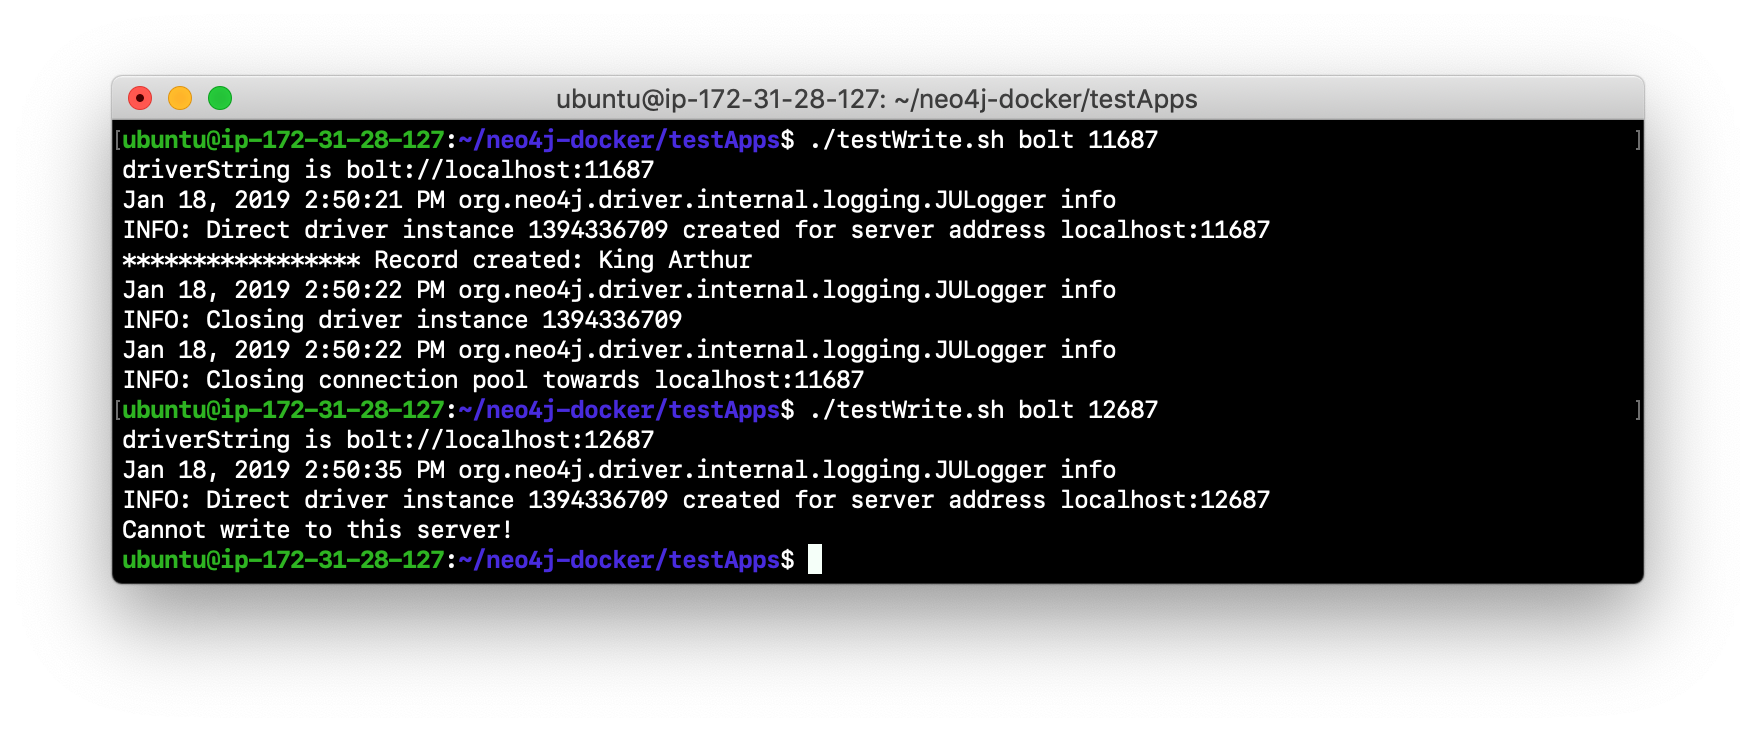
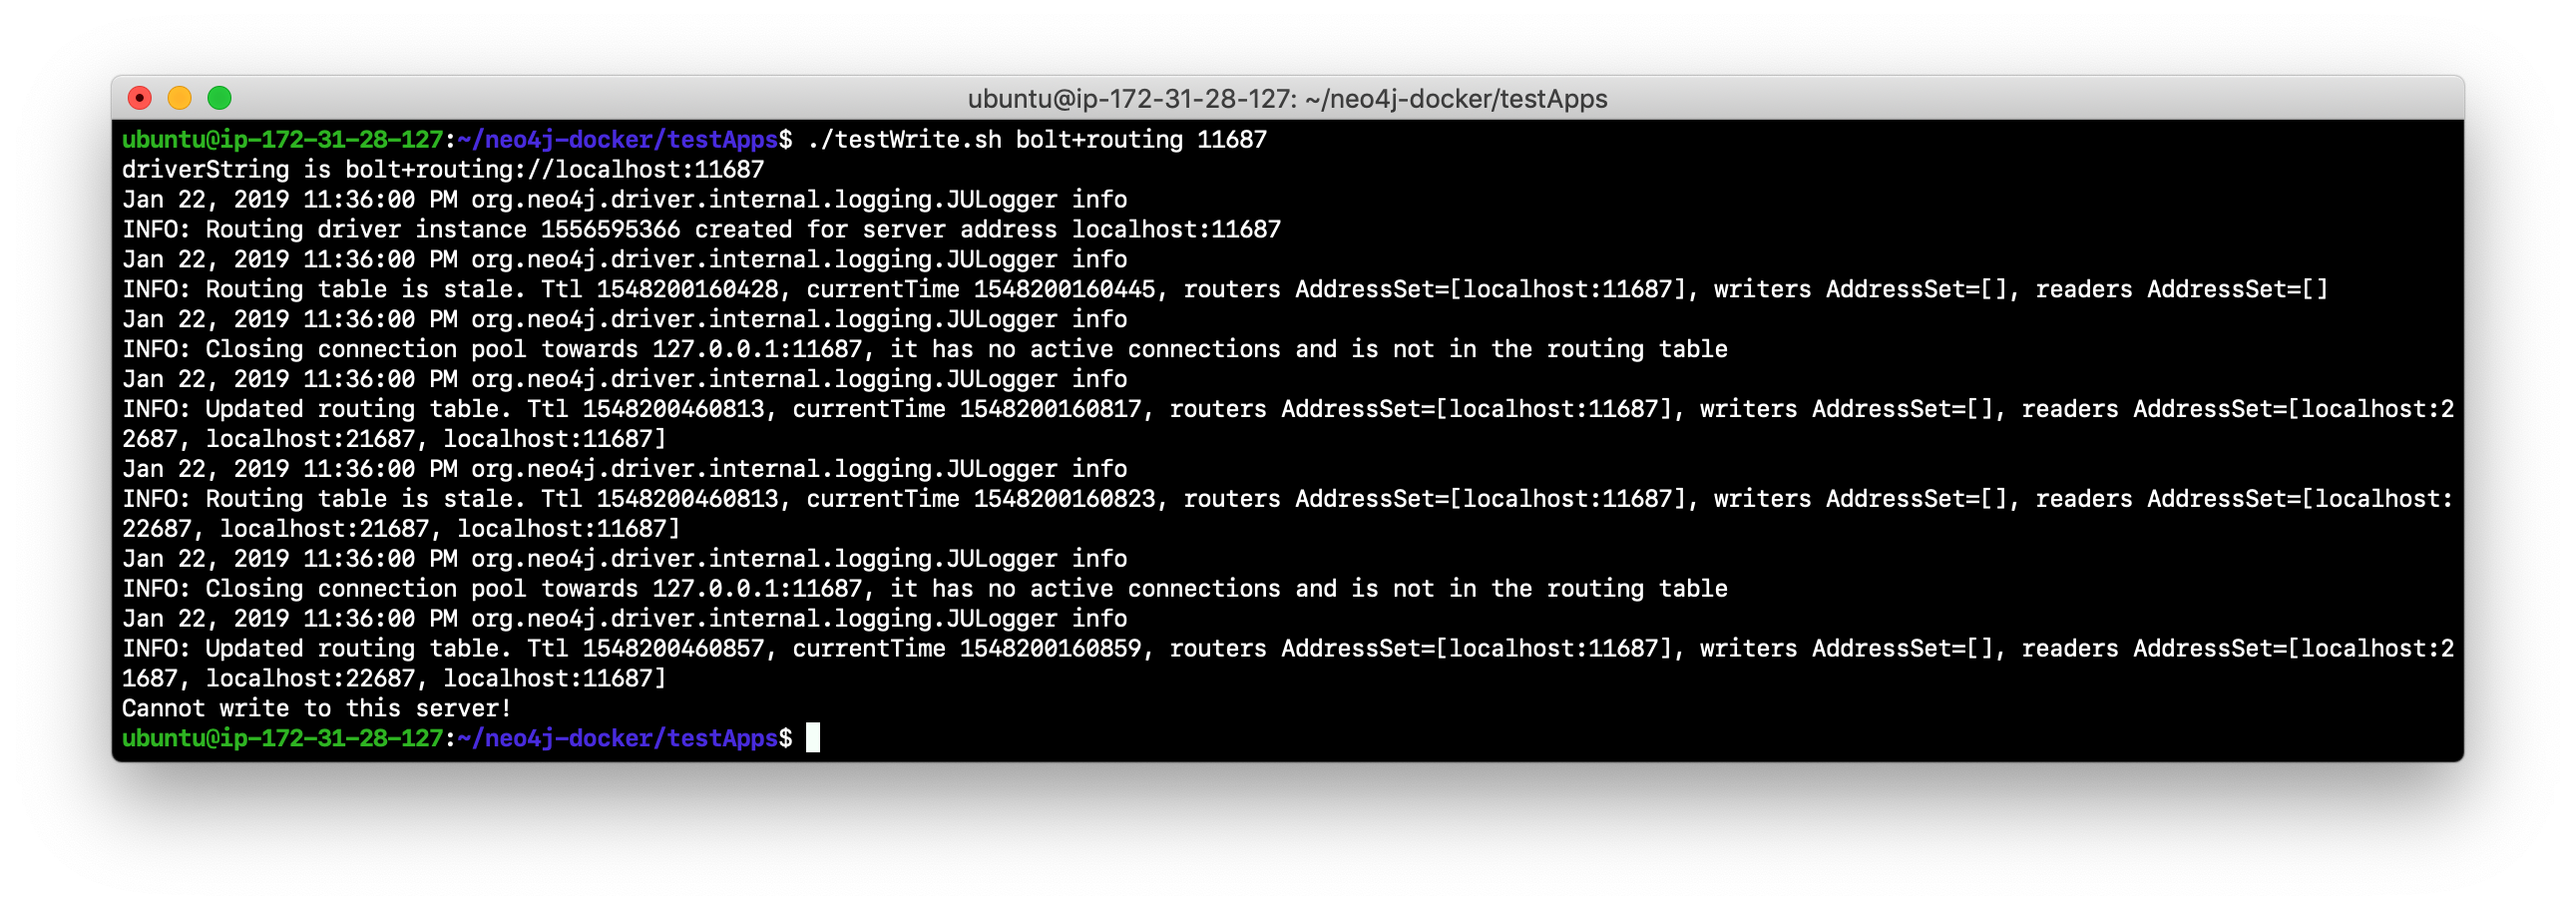
Next, run the testWrite.sh script against the same port using the bolt protocol. For example, type
./testWrite.sh bolt 11687. What you will see is that you can only use the bolt protocol for writing against the LEADER.
-
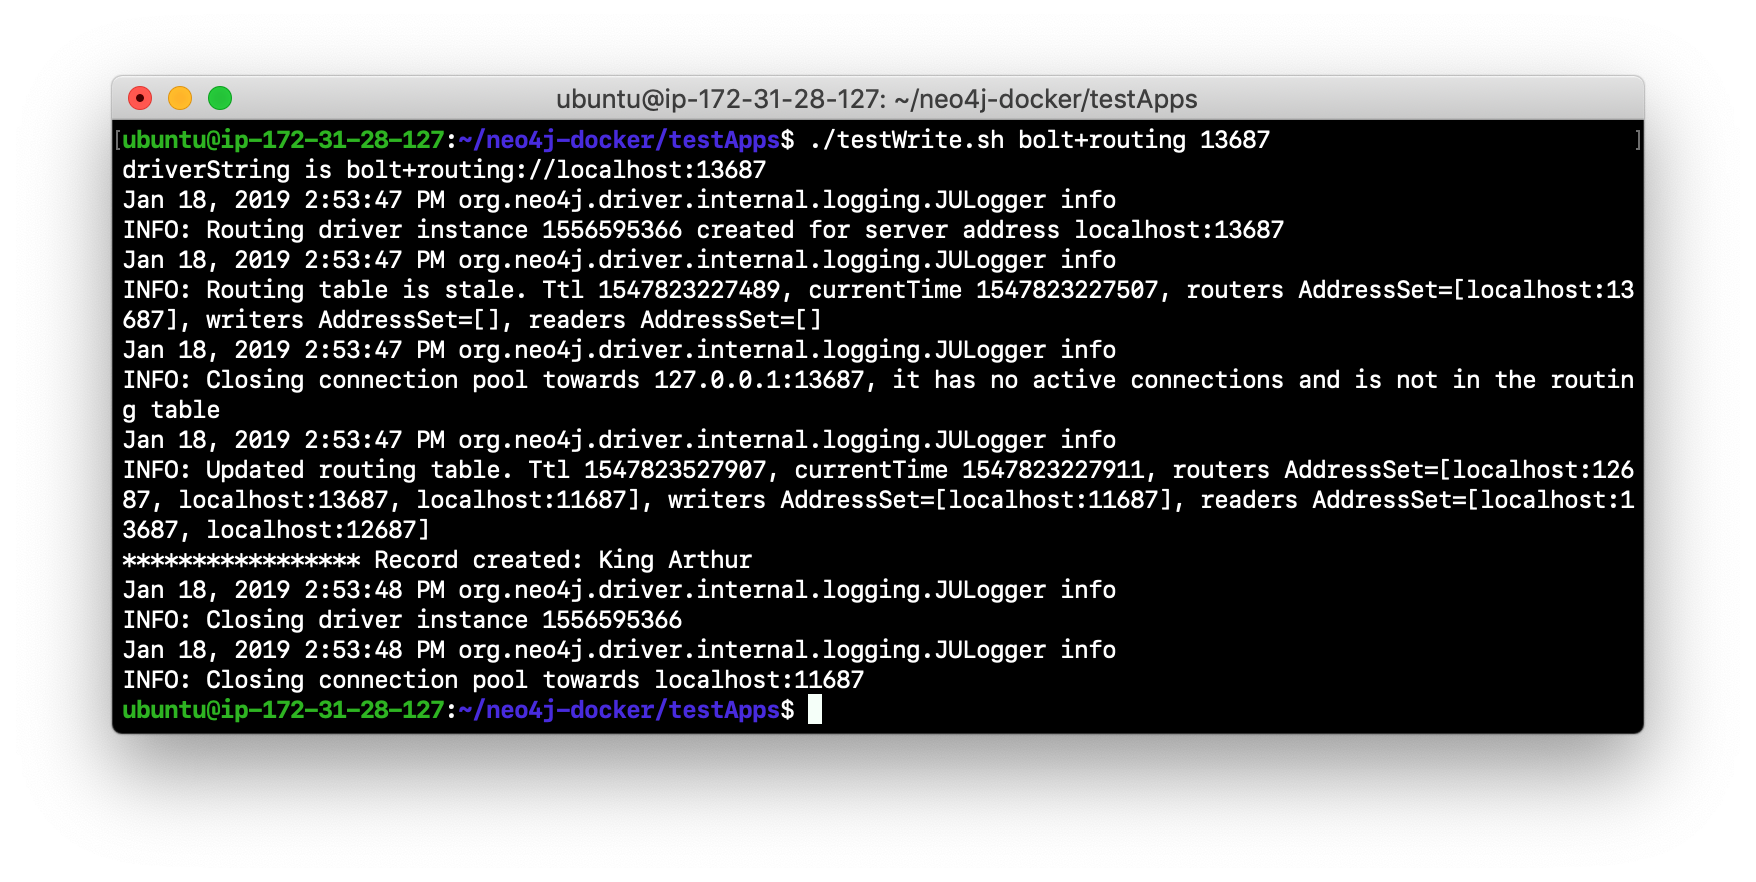
Next, change the protocol from bolt to bolt+routing and write to the core servers that are FOLLOWER servers. For example, type
./testWrite.sh bolt+routing 12687. With this protocol, all writes are routed to the LEADER and the application can write to the database.
-
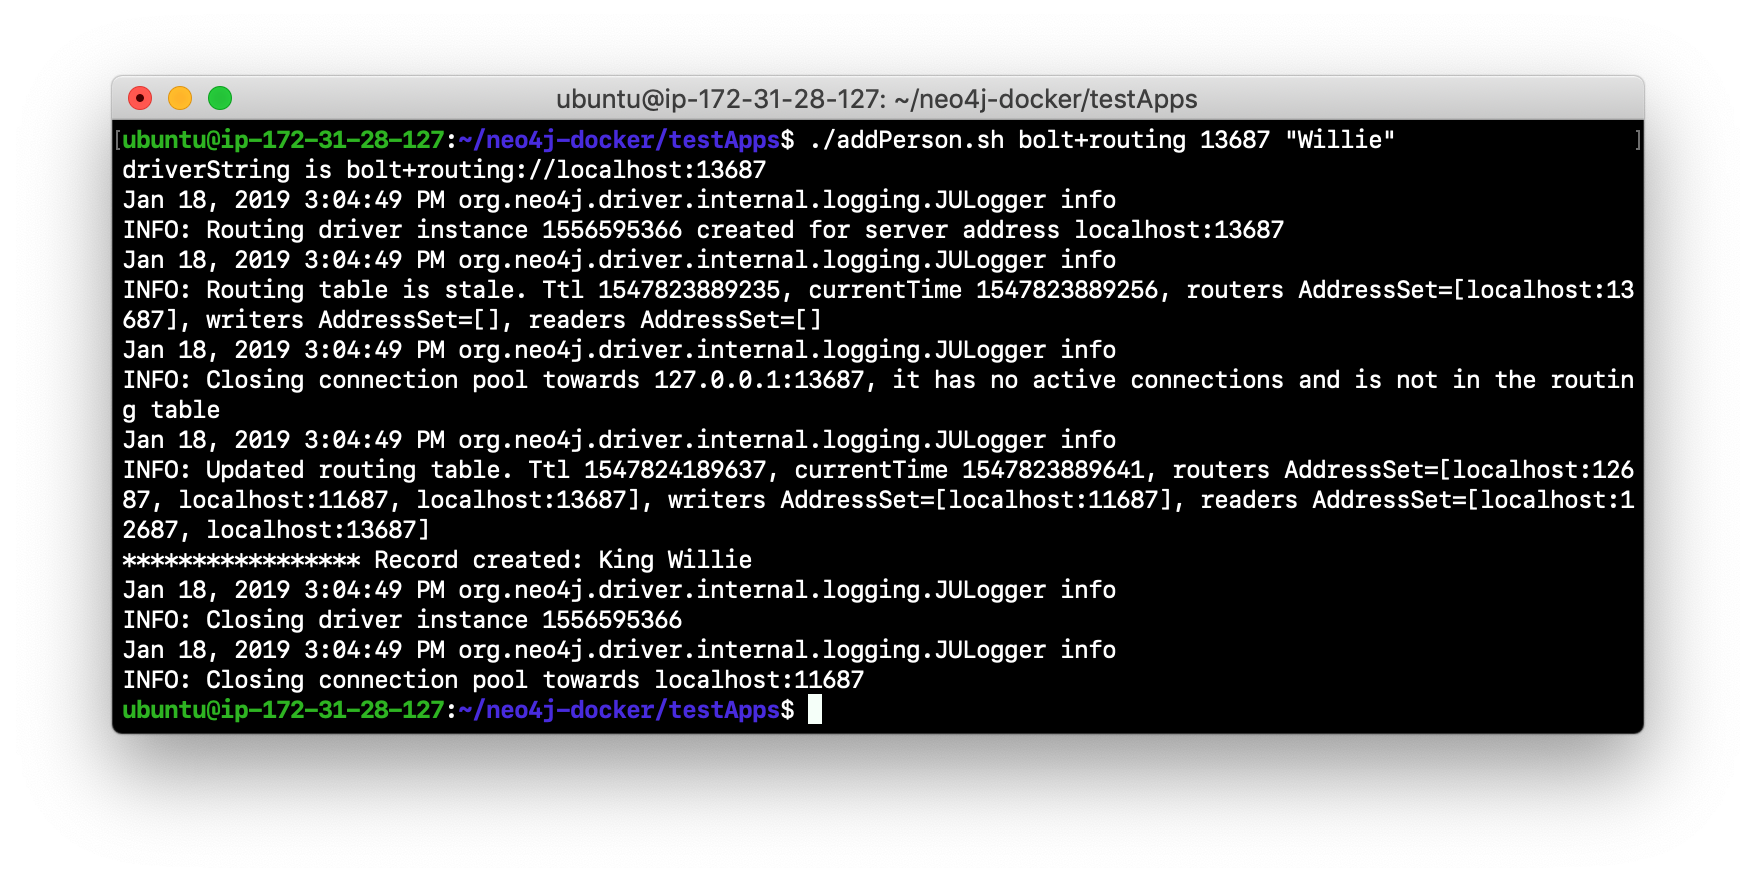
Next, you will add data to the database with a client that sends the request to a FOLLOWER core server. Run the addPerson.sh script against any port representing a FOLLOWER using the bolt protocol. For example, type
./addPerson.sh bolt+routing 13687 "Willie". This will add a Person node to the database for core3.
-
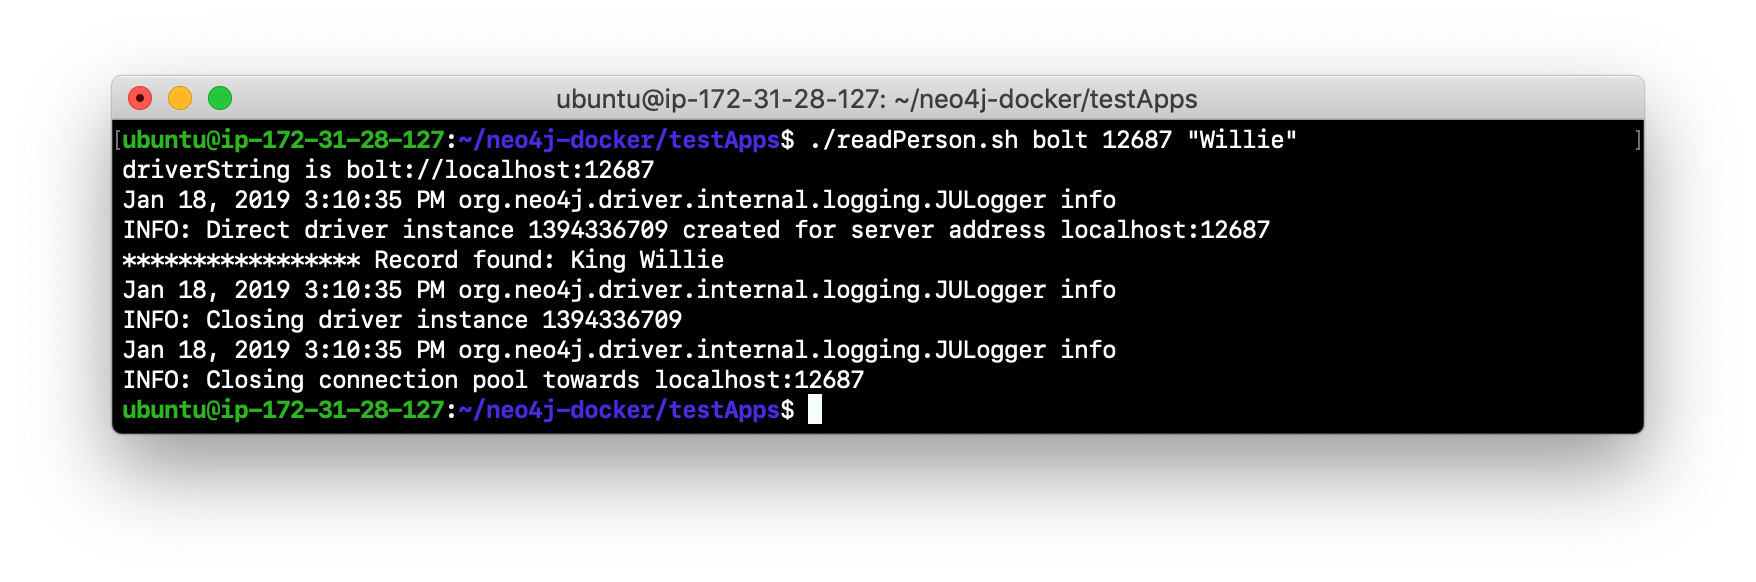
Verify that this newly-added Person node is written to the other servers in the cluster by using the bolt protocol to request specific servers. For example, type
./readPerson.sh bolt 12687 "Willie"to confirm that the data was added to core2.
You have now seen how updates to the core servers in a cluster must be coordinated by the server that is currently the LEADER and how reads and writes are performed in a cluster using the bolt and bolt+routing protocols.
Configuring read replica servers
You configure read replica servers on host systems where you want the data to be distributed. Read replica servers know about the cluster, but whether they are running or not has no effect on the health of the cluster. In a production environment, you can add many read replicas to the cluster. They will have no impact on the performance of the cluster.
Configuration settings for read replica servers
Here are the configuration settings you use for a read replica server:
dbms.connectors.default_listen_address=0.0.0.0

dbms.connector.https.listen_address=0.0.0.0:7473
dbms.connector.http.listen_address=0.0.0.0:7474
dbms.connector.bolt.listen_address=0.0.0.0:7687

dbms.connector.bolt.advertised_address=localhost:18687

causal_clustering.initial_discovery_members=XXX1:5000,XXX2:5000,XXX3:5000,XXX4:5000,XXX5:5000

dbms.mode=READ_REPLICA
Just like the configuration for a core server, you must specify the bolt advertised address, as well as the addresses for the servers that are the members of the cluster. However, you can add as many read replica servers and they will not impact the functioning of the cluster.
Read replica server startup
There can be many read replica servers in a cluster. When they start, they register with a core server that maintains a shared whiteboard (cache) that can be used by multiple read replica servers. As part of the startup process, the read replica catches up to the core server. The read replicas do not use the Raft protocol. Instead, they poll the core servers to obtain the updates to the database that they must apply locally.
Here is what you would see if you had a cluster with three core servers and two read replica servers running:
Unlike core servers where applications use bolt+routing to access the database, clients of read replica servers use bolt.
Read replica server shutdown
Since the read replica servers are considered "transient", when they shut down, there is no effect to the operation of the cluster. Of course, detection of a shutdown when it is related to a hardware or network failure must be detected so that a new read replica server can be started as clients depend on read access can continue their work.
Exercise #4: Accessing the read replica servers in a cluster
In this Exercise, you will see how read replica servers can be used to retrieve changed data from the core servers.
Before you begin
-
Ensure that the three core servers are started.
-
Open a terminal window where you will be managing Docker containers.
Exercise steps:
-
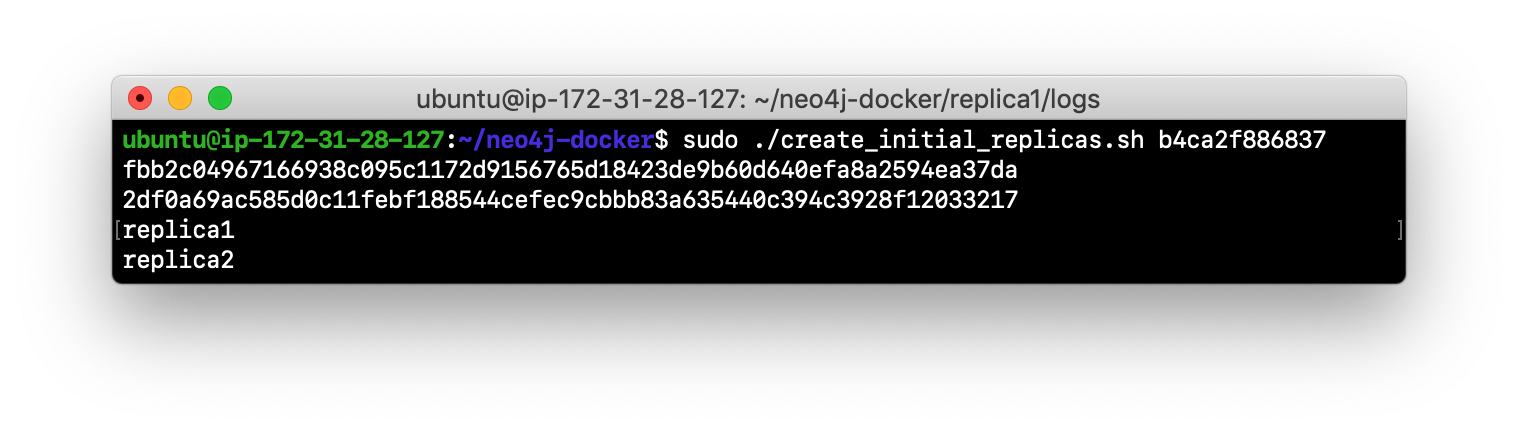
Navigate to the neo4j-docker folder.
-
Run the script to create the initial replica servers, providing the Image ID of the Neo4j Docker image.
-
Start replica1 and replica2:
docker start replica1 replica2. -
Log in to each of read replica servers and change the password.
-
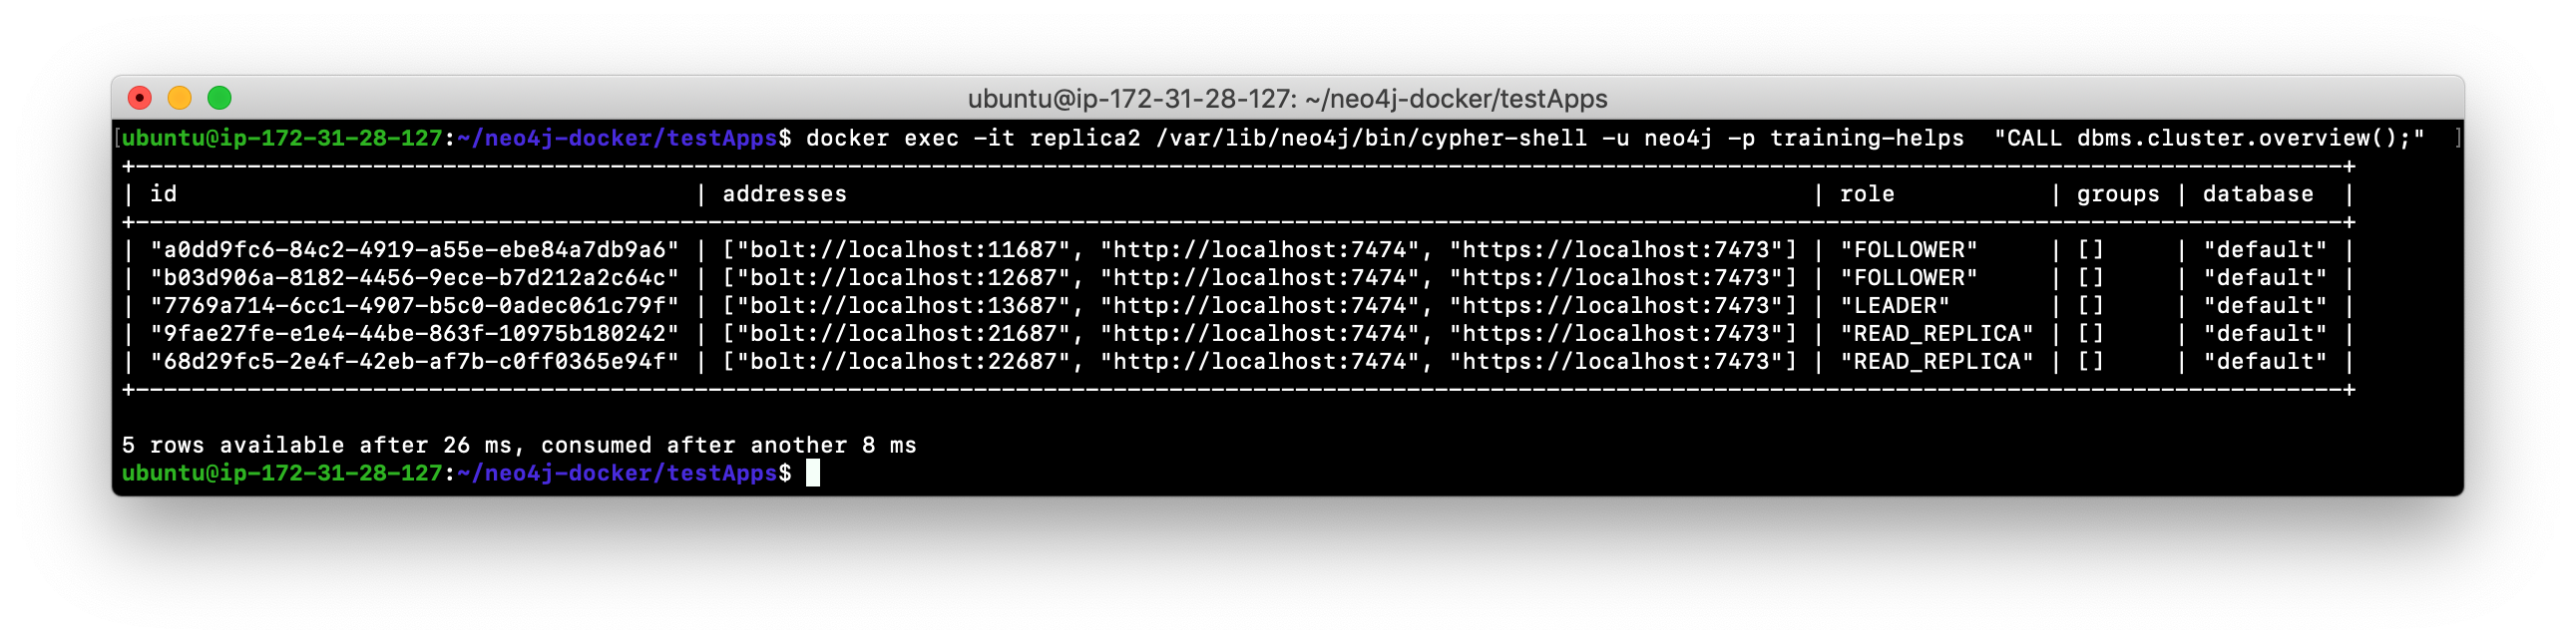
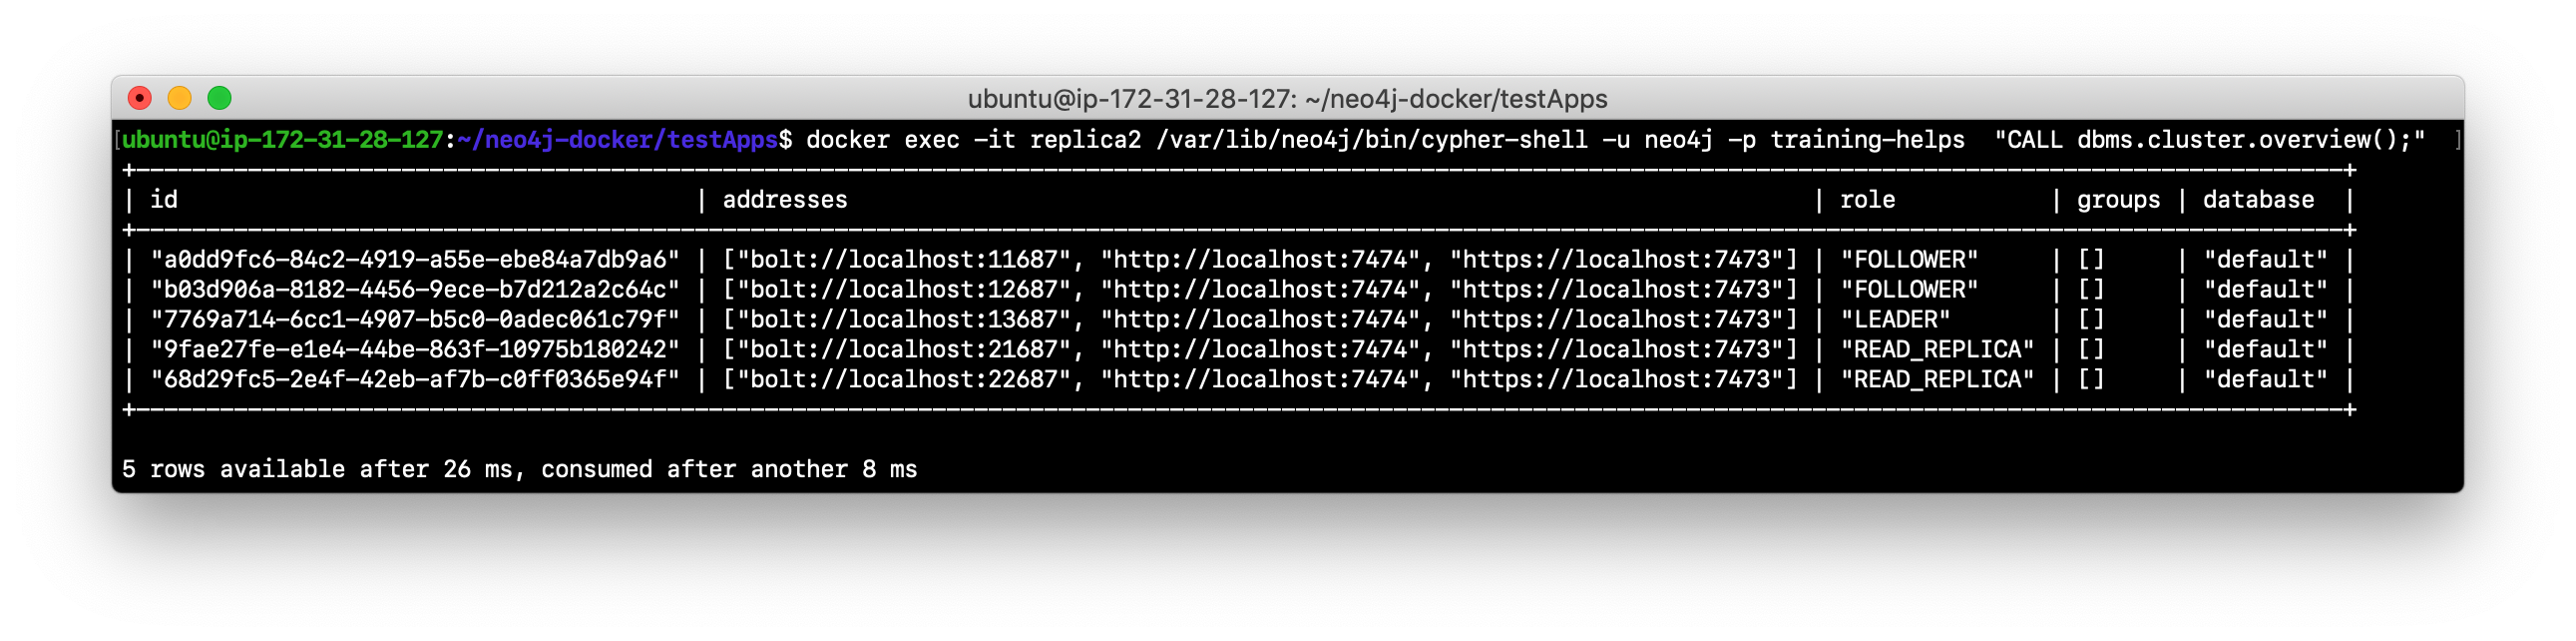
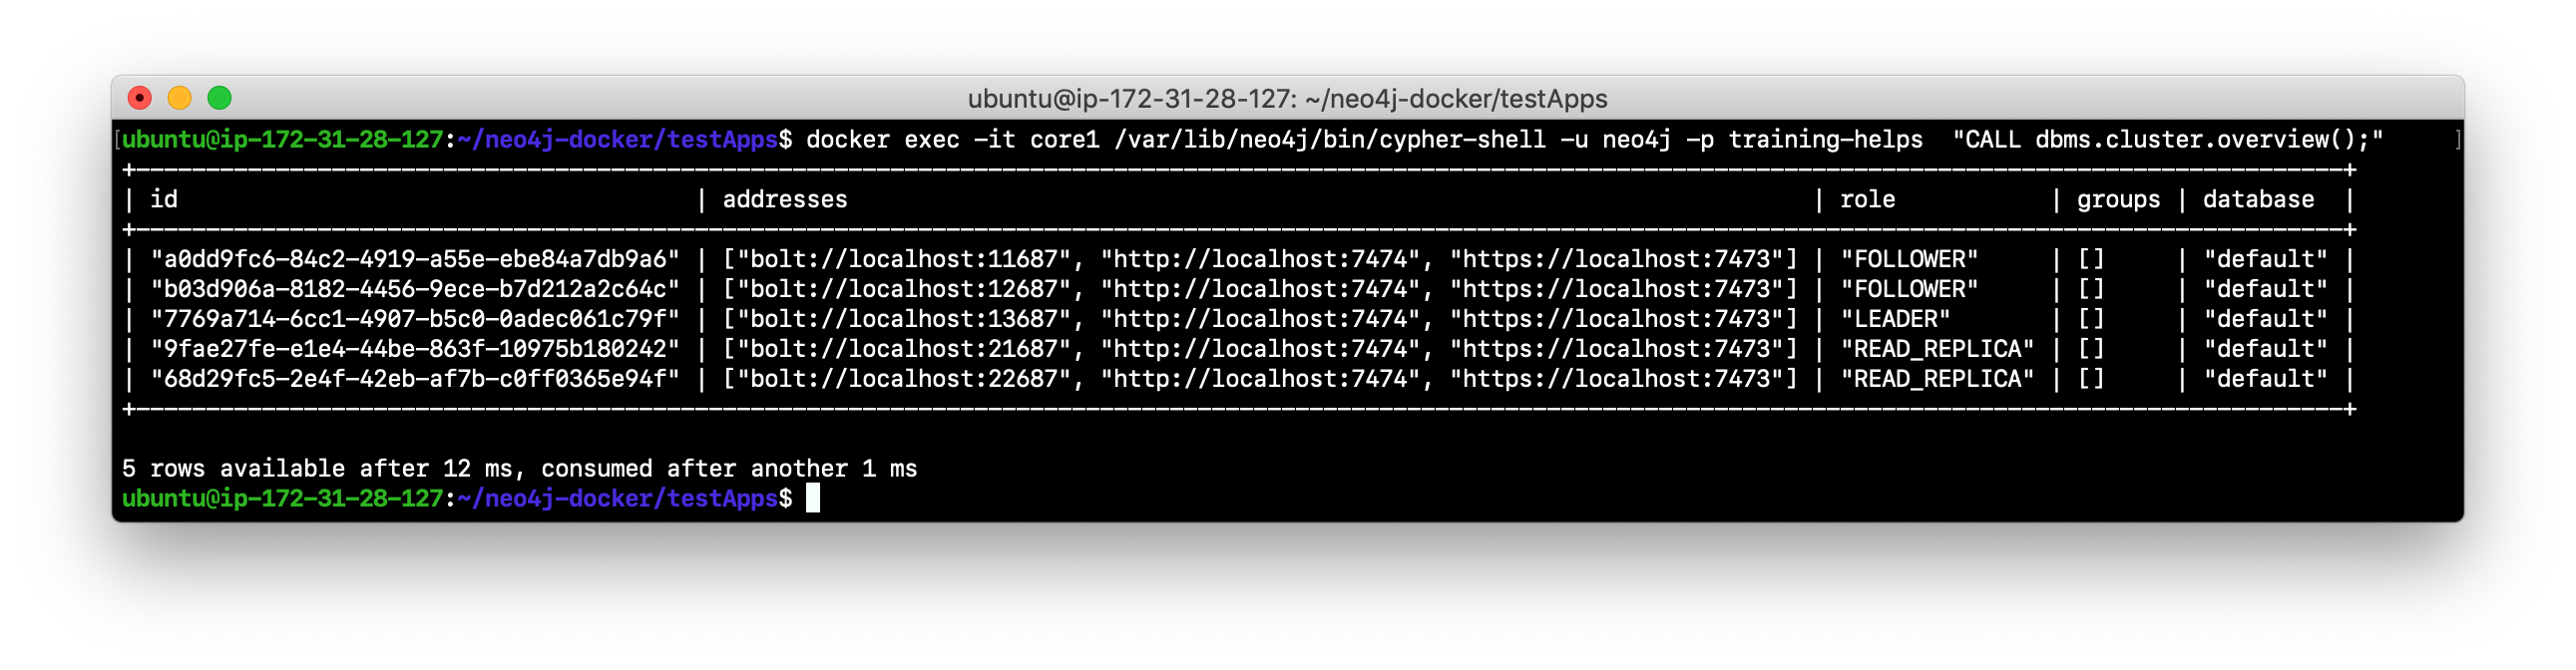
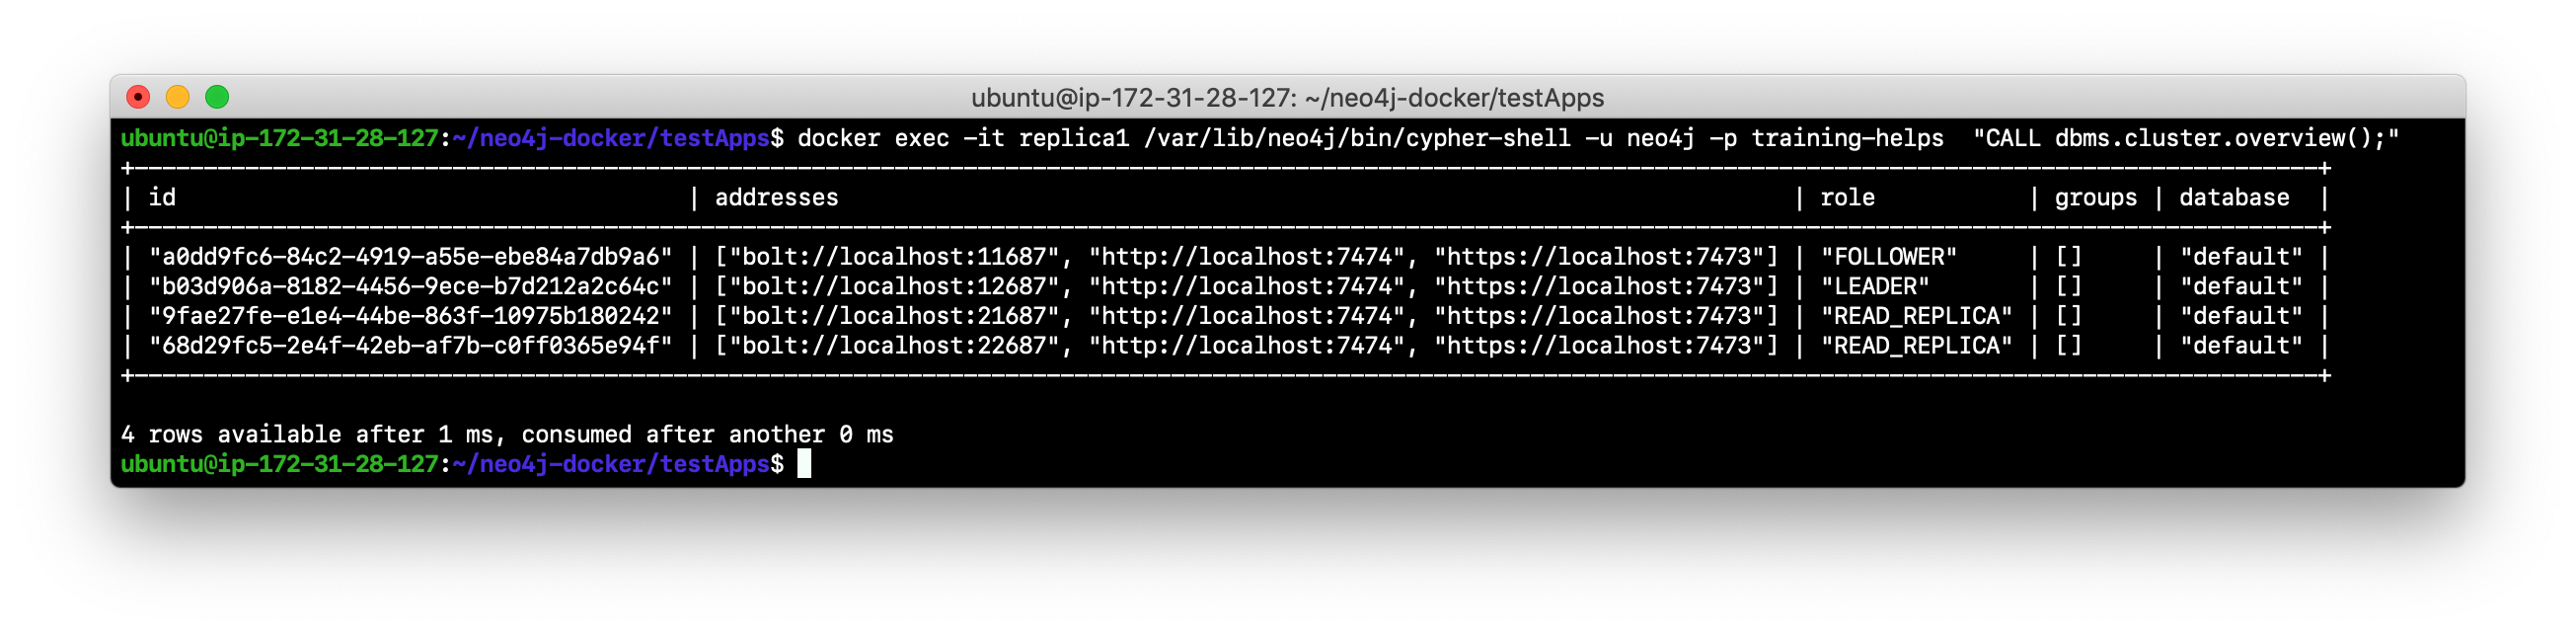
Use Cypher to retrieve the cluster overview. For example in a terminal window type:
docker exec -it replica2 /var/lib/neo4j/bin/cypher-shell -u neo4j -p training-helps "CALL dbms.cluster.overview();". Do you see all three core servers and the two read replica servers?
-
Navigate to the neo4j-docker/testApps folder.
-
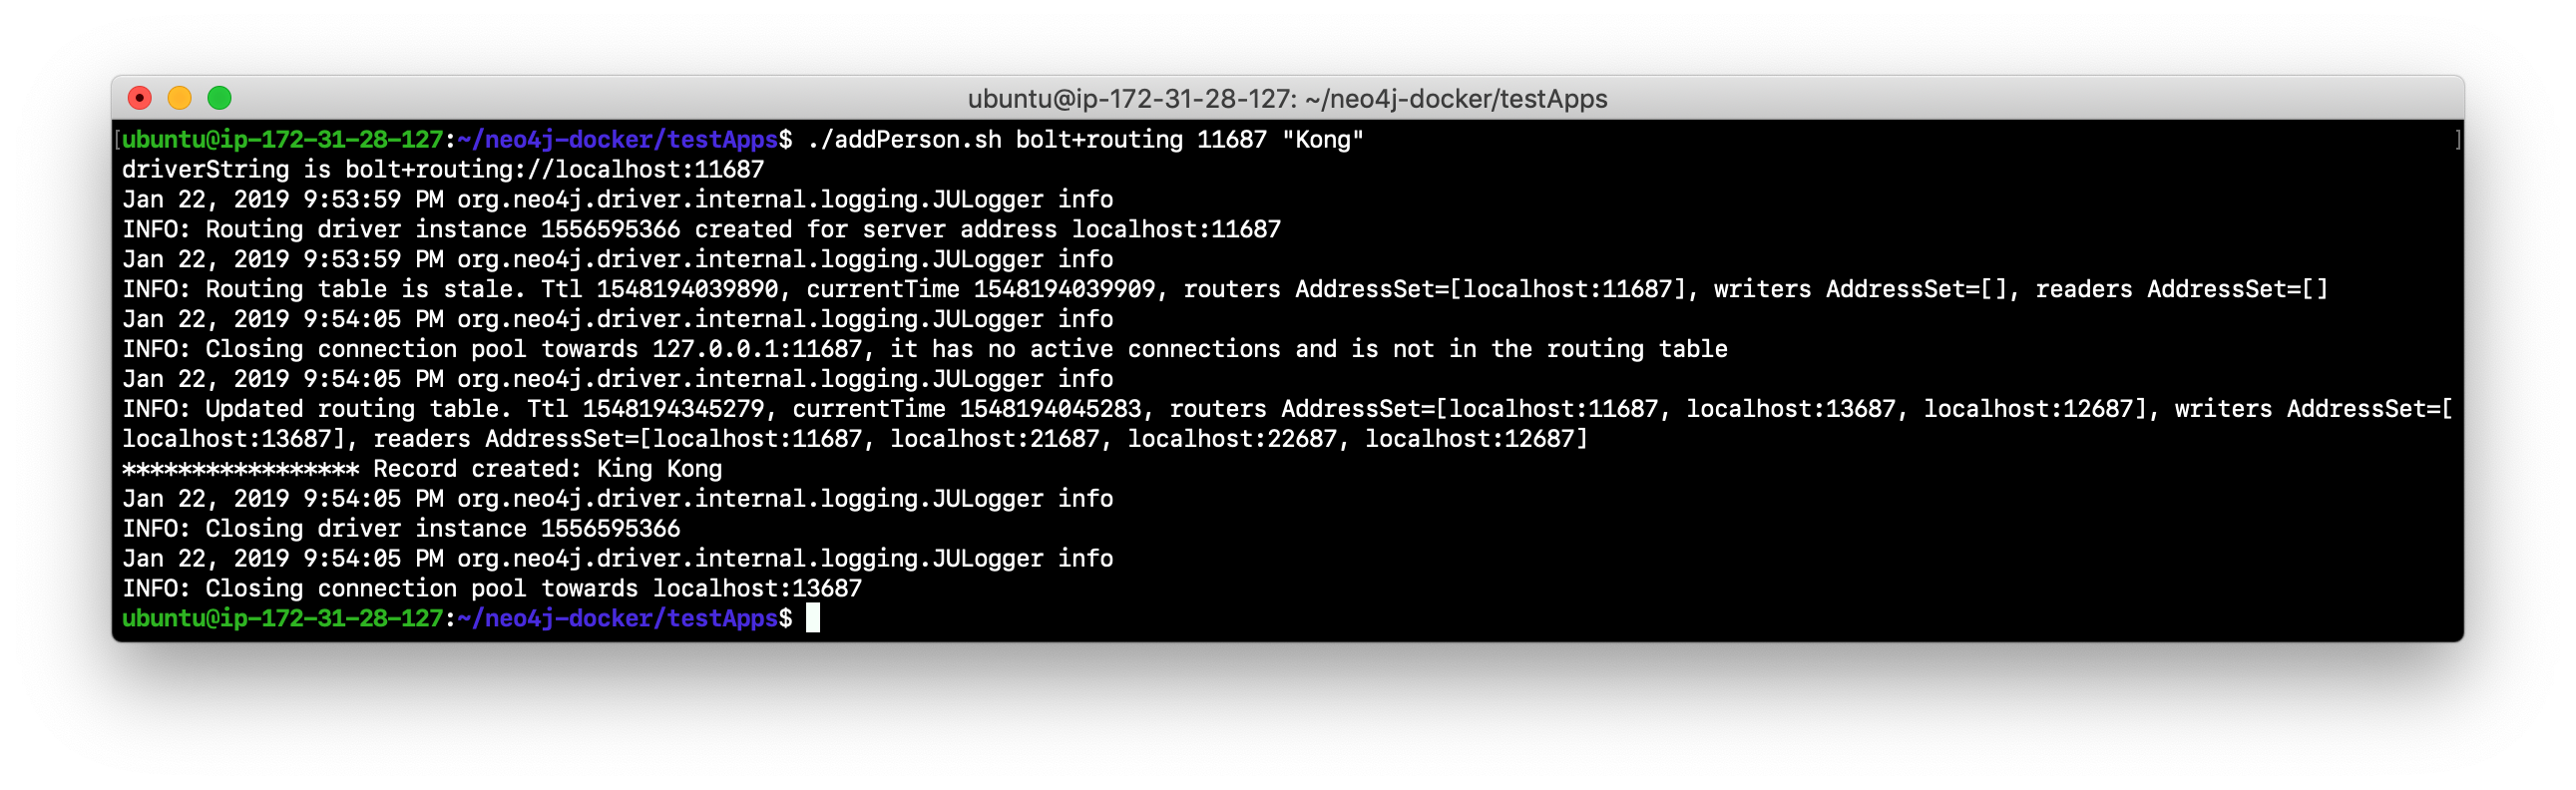
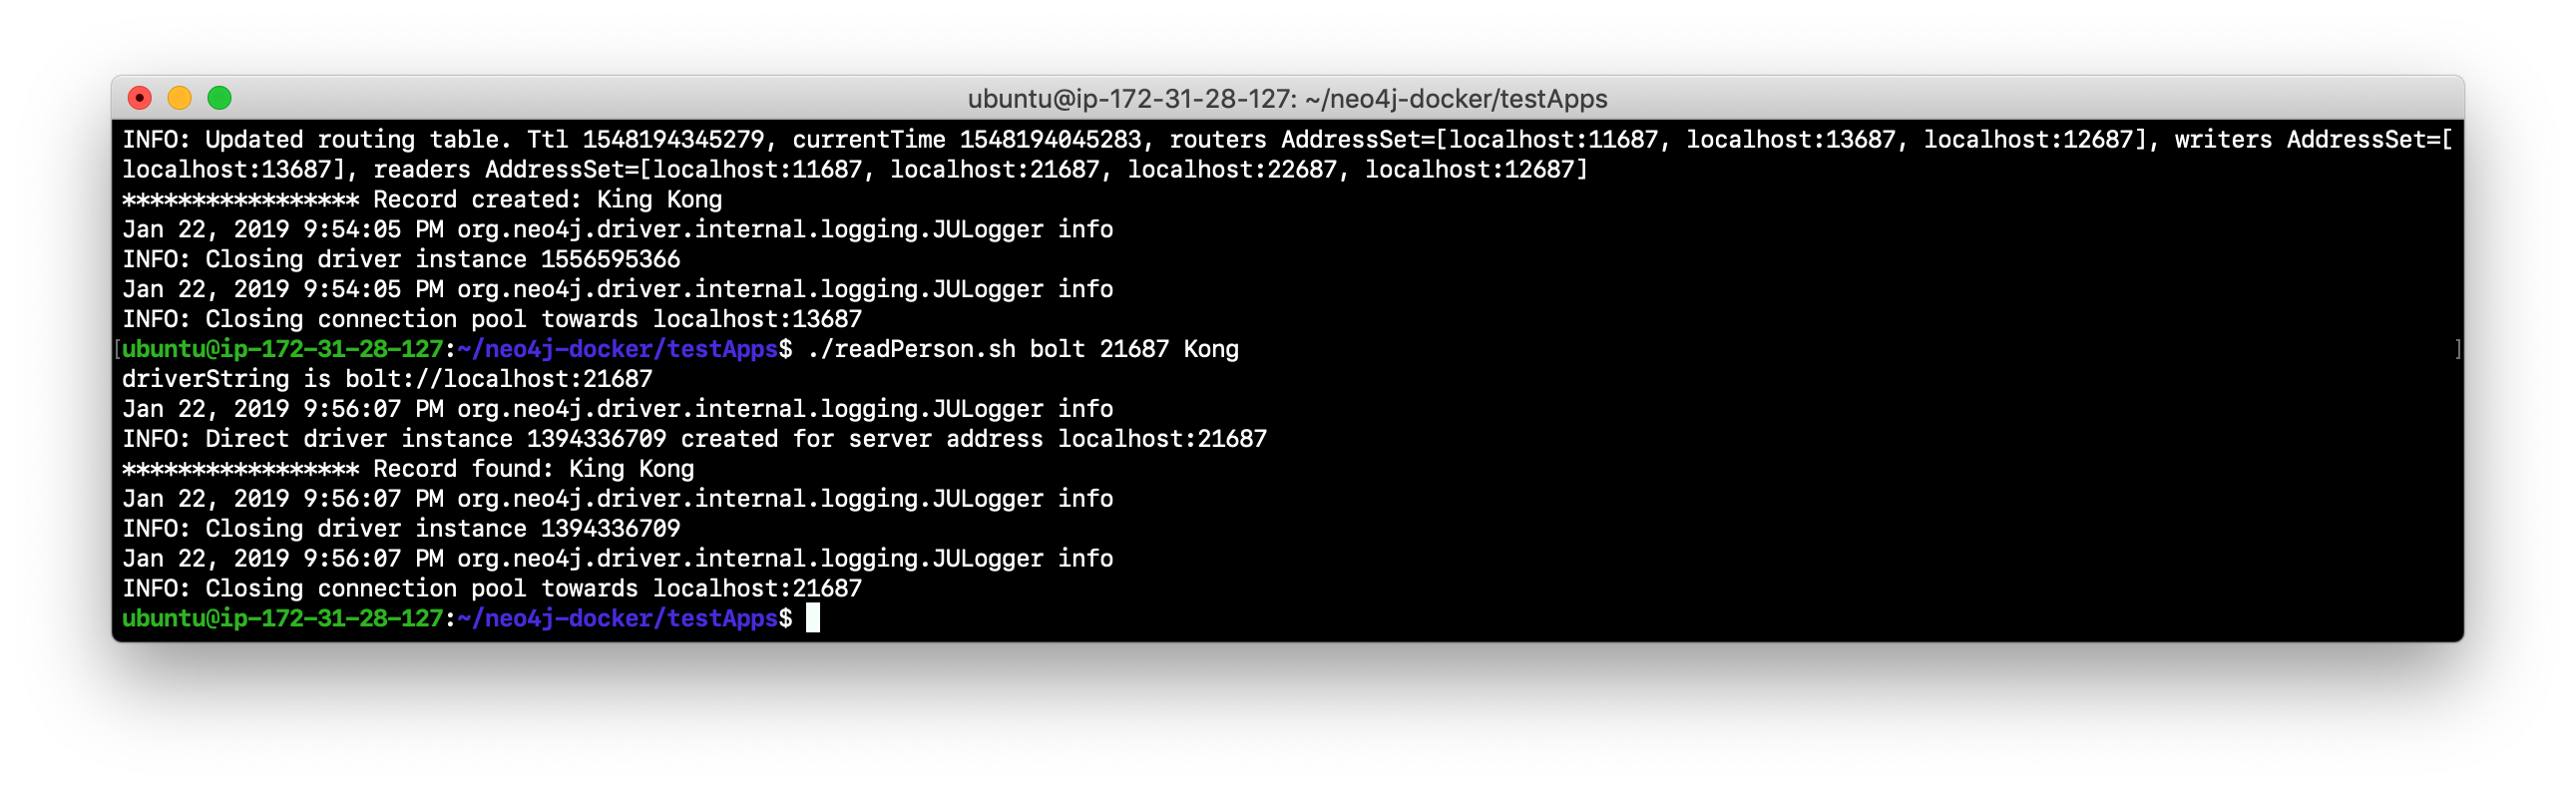
Run the addPerson.sh script against any port for a core server using the bolt+routing protocol. For example, type
./addPerson.sh bolt+routing 13687 "Kong". This will add a Person node to the database.
-
Verify that this newly-added Person node is readable by a read replica server in the cluster by using the bolt protocol to request specific servers. For example, type
./readPerson.sh bolt 22687 "Kong"to confirm that the data is available.
You have now seen how updates to the core servers in a cluster must be coordinated by the server that is currently the LEADER and how reads and writes are performed in a cluster using the bolt and bolt+routing protocols against the core servers and reads are performed in a cluster using the bolt protocol against the read replica servers.
Core server lifecycle
The minimum_core_cluster_size_at_runtime property specifies the number of servers that will actively participate in the cluster at runtime. The number of core servers that start and join the cluster is used to calculate what the quorum is for the cluster. For example, if the number of core servers started is three, then quorum is two. If the number of core servers started is four, then quorum is three. If the number of core servers started is five, then quorum is three. Quorum is important in a cluster as it dictates the behavior of the cluster when core servers are added to or removed from the cluster at runtime.
As an administrator, you must understand which core servers are participating in the cluster and in particular, what the current quorum is for the cluster.
How quorum is used
If a core server shuts down, the cluster can still operate provided the number of core servers is equal to or greater than quorum. For example, if the current number of core servers is three, quorum is two. Provided the cluster has two core servers, it is considered operational for updates. If the cluster maintains quorum, then it is possible to add a different core server to the cluster since a quorum must exist for voting in a new core server.
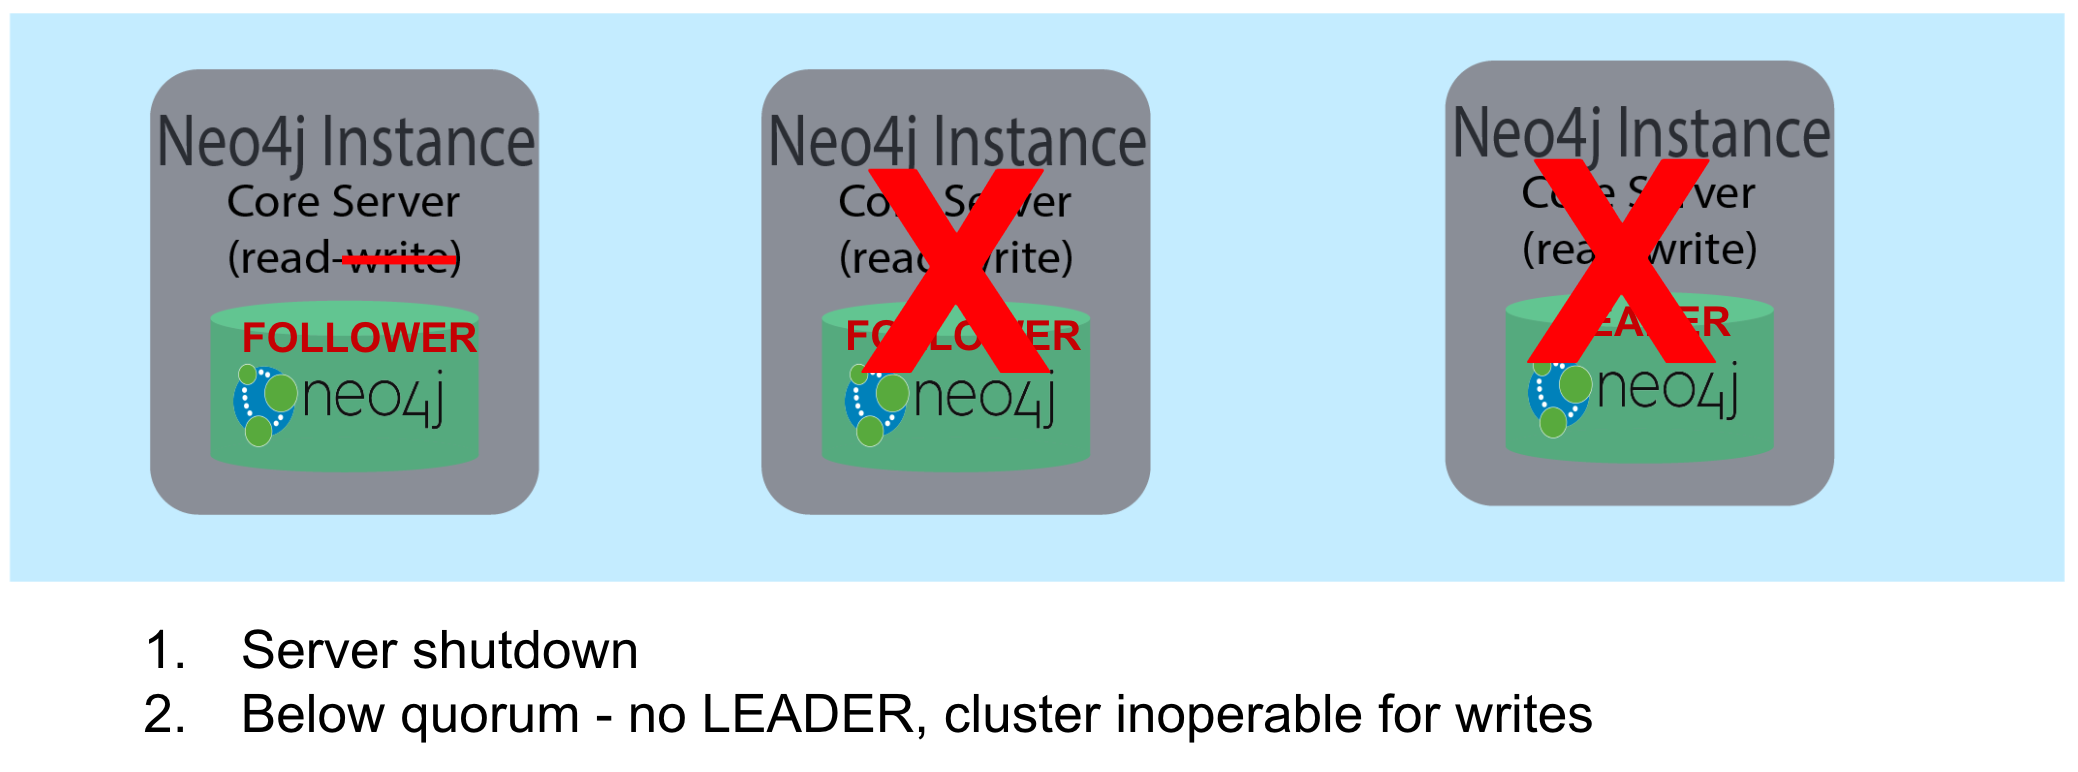
If the LEADER core server shuts down, then one of the other FOLLOWER core servers assumes the role of LEADER, provided a quorum still exists for the cluster. If a cluster is left with only FOLLOWER core servers, this is because quorum no longer exists and as a result, the database is read-only. As an administrator, you must ensure that your cluster always has a LEADER.
The core servers that are used to start the cluster (membership) are important. Only core servers that originally participated in the cluster can be running in order to add a new core server to the cluster.
Follow this video to understand the life-cycle of a cluster and how quorum is used for fault-tolerance for a cluster:
Recovering a core server
If a core server goes down and you cannot restart it, you have two options:
-
Start a new core server that has not yet been part of the cluster, but is specified in the membership list of the cluster. This will only work if the cluster currently has a quorum so the existing core servers can vote to add the core server to the cluster.
-
Start a new parallel cluster with backup from current read only cluster. This requires that client applications must adjust port numbers they use.
Option (1) is much easier so a best practice is to always specify additional hosts that could be used as replacement core servers in the membership list for a cluster. This will enable you to add core servers to the cluster without needing to stop the cluster.
Monitoring core servers
In addition to using Cypher to retrieve the overview state of the cluster, there are also REST APIs for accessing information about a particular server. For example, you can query the status of the cluster as follows: curl -u neo4j:training-helps localhost:11474/db/manage/server/causalclustering/status where this query is made against the core1 server:

Is the core server writable?
Or, if you want to see it a particular server is writable (part of a "healthy" cluster). For example, you can get that information as follows: curl -u neo4j:training-helps localhost:11474/db/manage/server/causalclustering/writable where this query is made against the core1 server:

Using the REST API enables you as an administrator to script checks against the cluster to ensure that it is running properly and available to the clients.
Helpful configuration settings
The Neo4j Operations Manual documents many properties that are related to clusters. Here are a few you may want to consider for your deployment:
-
causal_clustering.enable_prevoting set to
TRUEcan reduce the number of LEADER switches, especially when a new member is introduced to the cluster. -
causal_clustering.leader_election_timeout can be set to a number of seconds (the default is 7s). The default is typically sufficient, but you may need to increase it slightly if your cluster startup is slower than normal.
Exercise #5: Understanding quorum
In this Exercise, you gain some experience monitoring the cluster as servers shut down and as servers are added.
Before you begin
Ensure that you have performed the steps in Exercise 4 and you have a cluster with core1, core2, and core3 started, as well as replica1 and replica2.
Exercise steps:
-
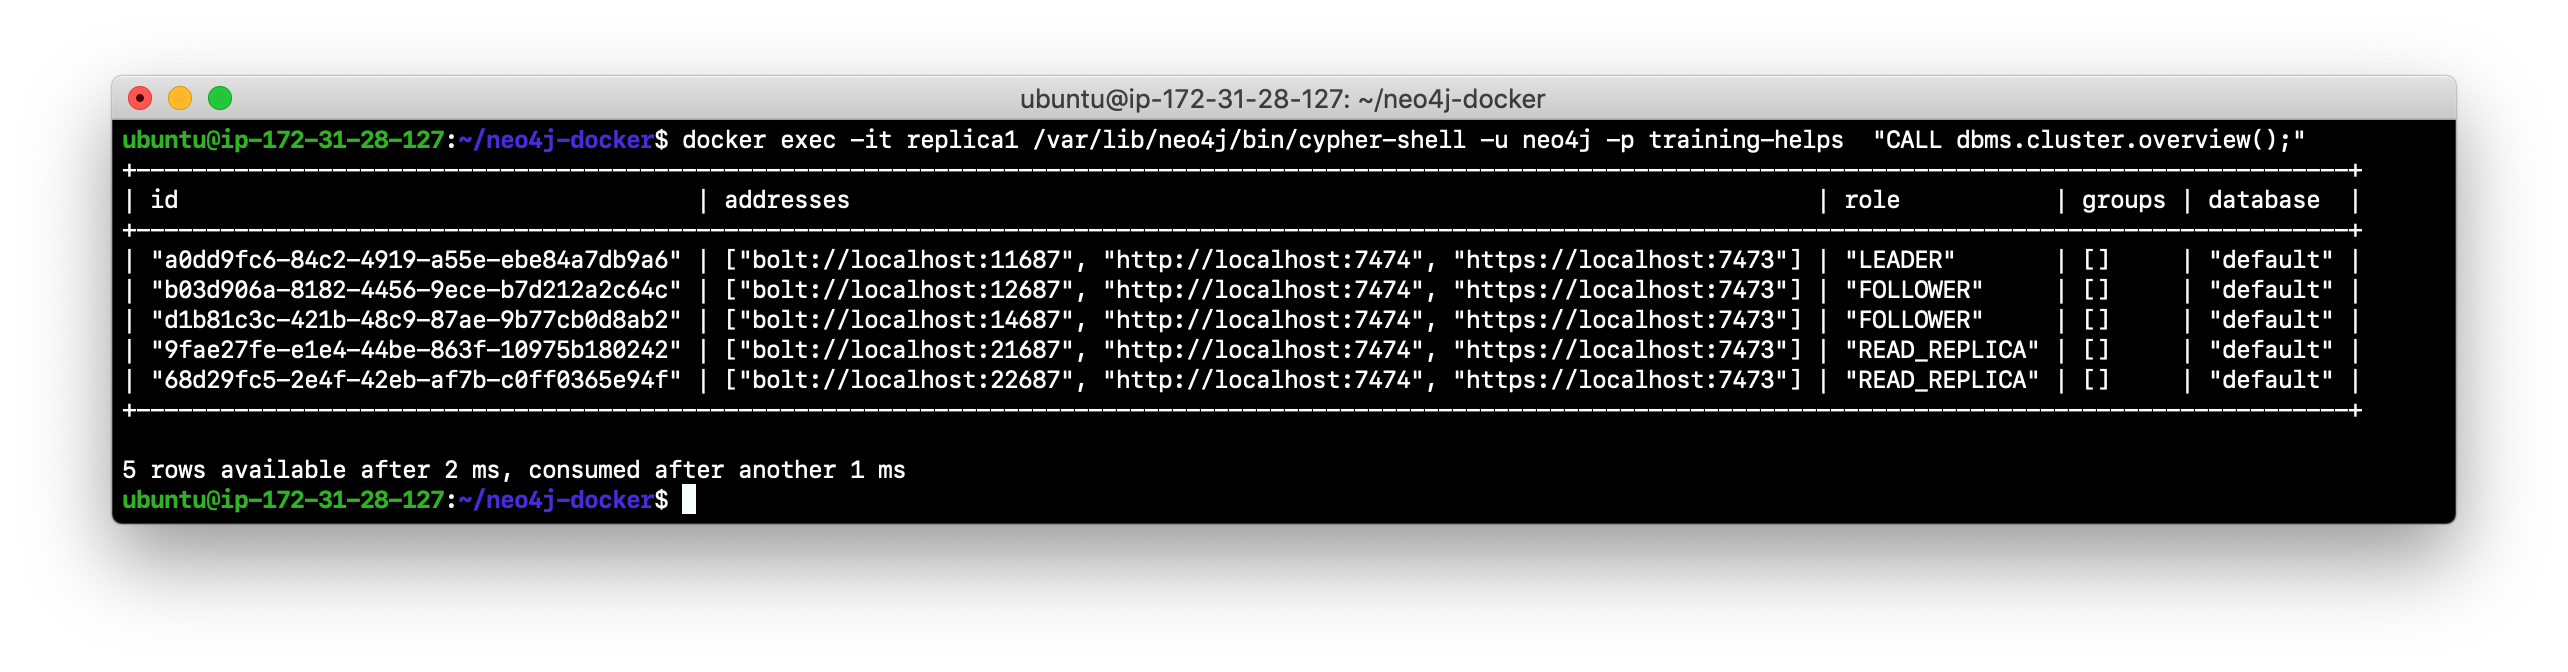
View the cluster overview using core1:
docker exec -it core1 /var/lib/neo4j/bin/cypher-shell -u neo4j -p training-helps "CALL dbms.cluster.overview();". Make a note of which core server is the LEADER. In this example, core3 is the LEADER.
-
Stop the core server that is the LEADER.
-
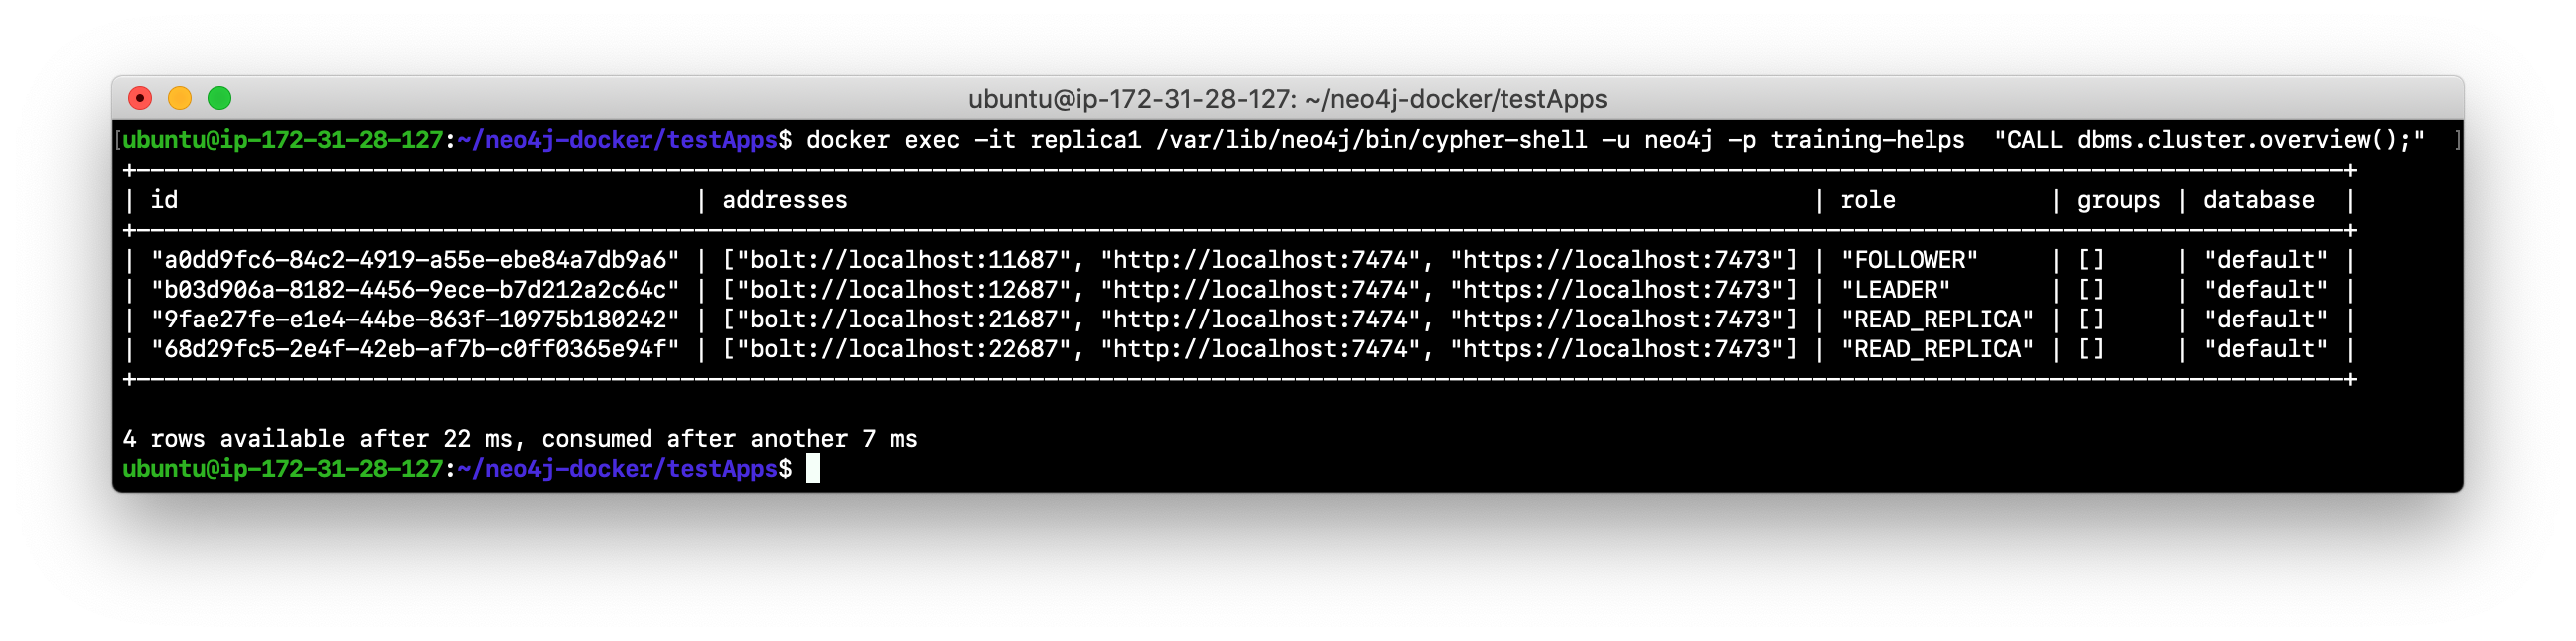
View the cluster overview using replica1:
docker exec -it replica1 /var/lib/neo4j/bin/cypher-shell -u neo4j -p training-helps "CALL dbms.cluster.overview();". Do you see that another core server has assumed the LEADER role?
-
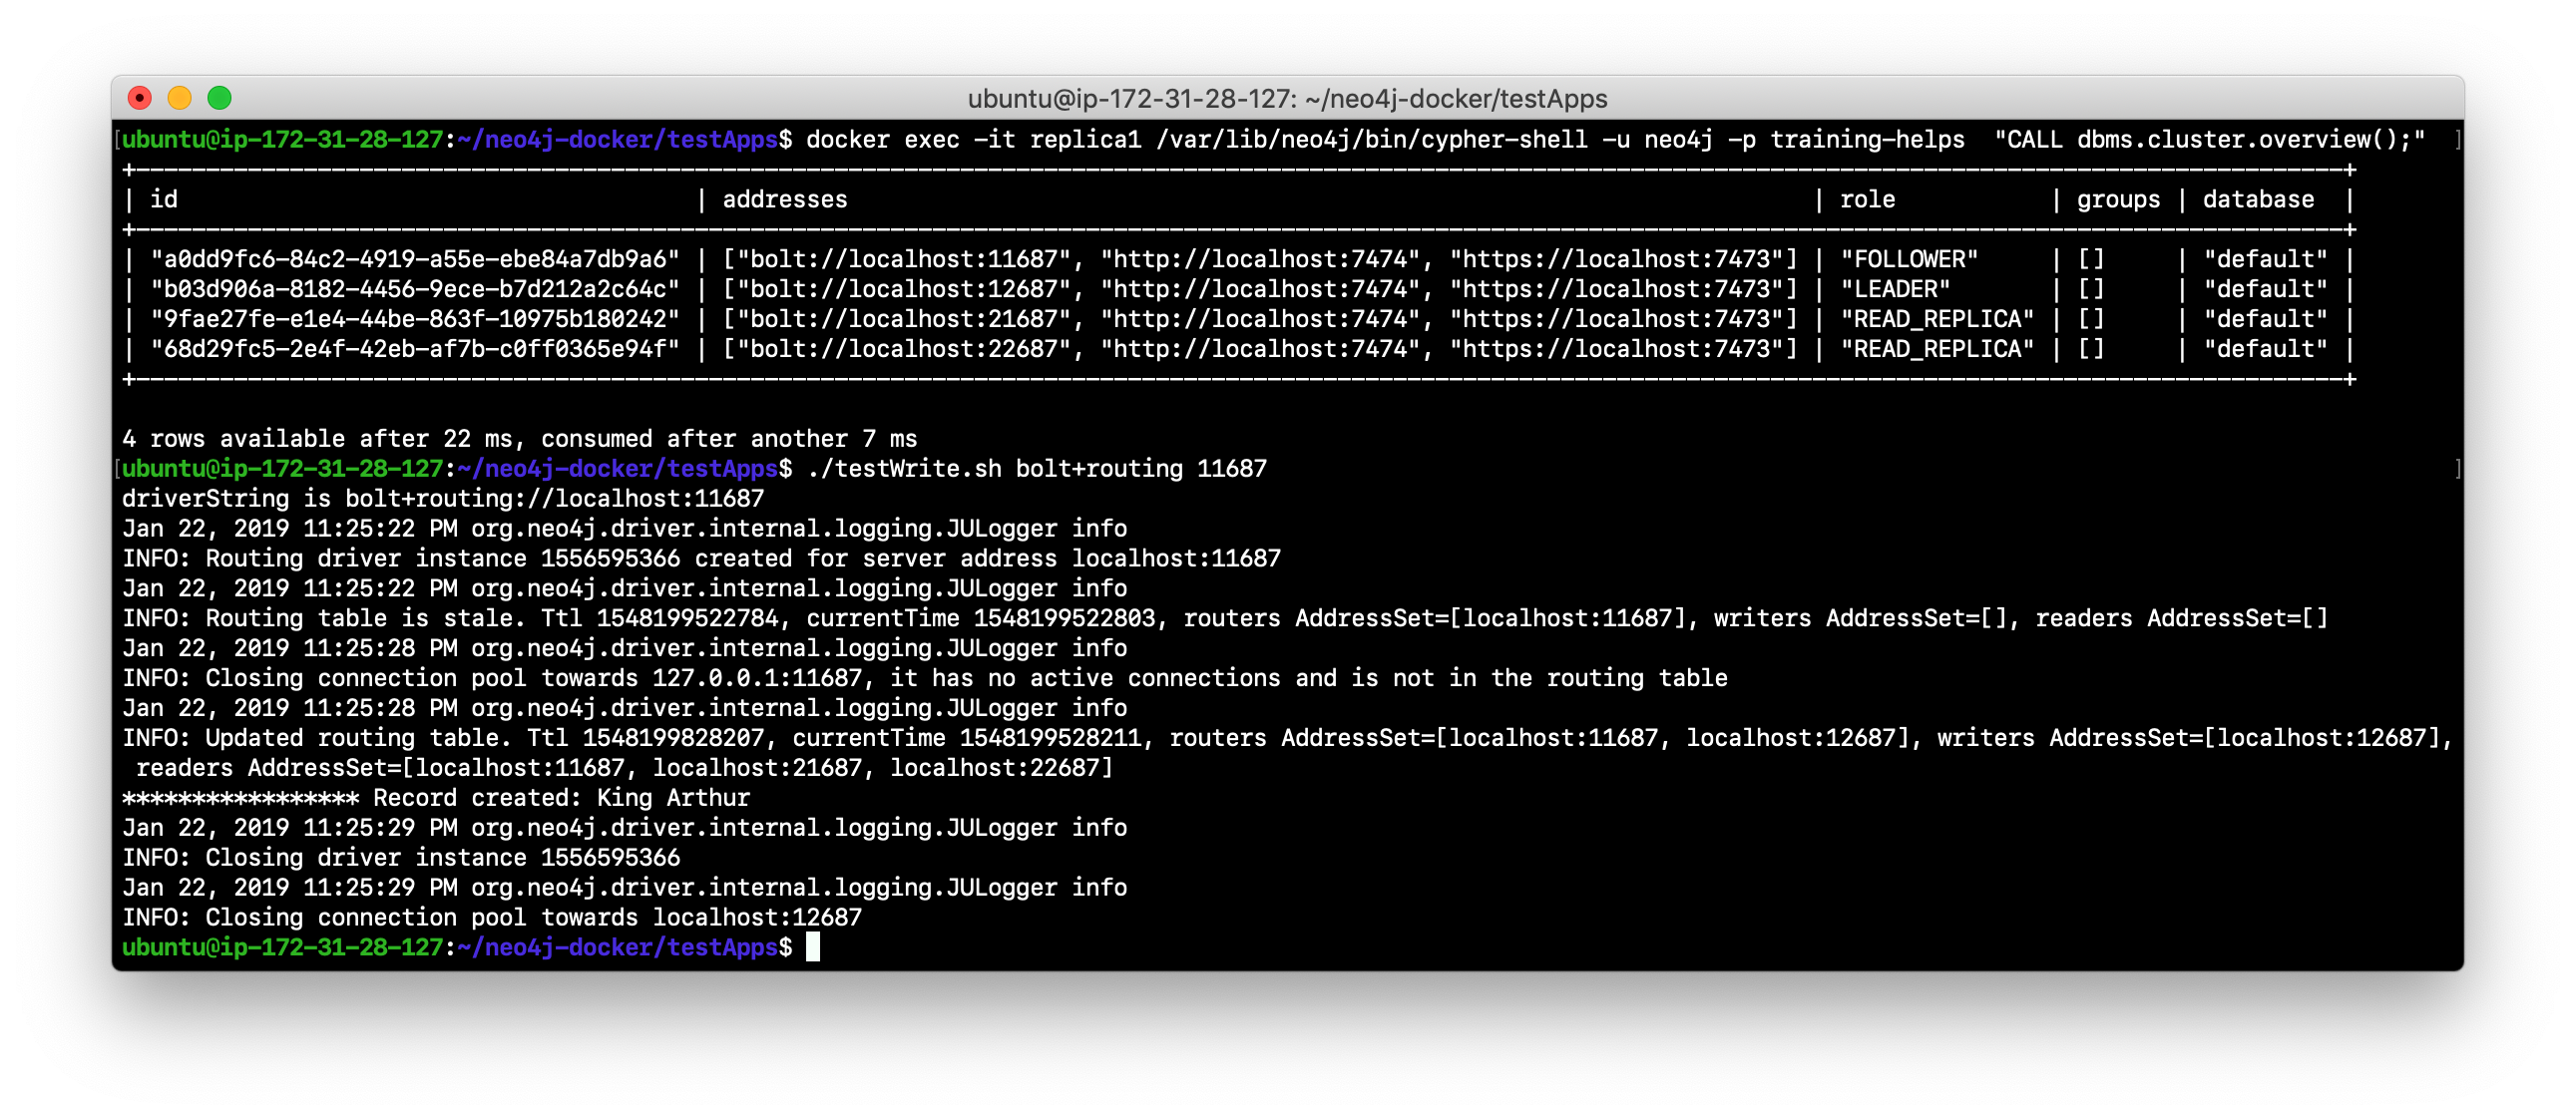
In the testApps folder, run the script testWrite.sh providing the protocol of bolt+routing and a port for one of the core servers that is running. Can the client write to the database?
-
Stop the core server that is the LEADER.
-
Confirm that the only core server running is now a FOLLOWER.

-
Run the script to write to the database using bolt+routing and the port number for the remaining core server. Can you write to the database?
-
Start a core server that you previously stopped.
-
View the cluster overview. Is there now a LEADER? This cluster is operational because it now has a LEADER
-
The cluster is now back to quorum. What this means is that a new core server can be added (elected) that was not part of the original cluster.
-
Navigate to neo4j-docker and run the script to create core4, providing the Image ID of the Neo4j Docker image.
-
Start the core4 server.
-
Change the password of the core4 server.
-
Retrieve the overview information for the cluster. Does it have two FOLLOWERS and one LEADER? It was possible to add a new core server to the cluster because the cluster had a quorum and the core5 server was specified in the original configuration of the member list of the cluster.
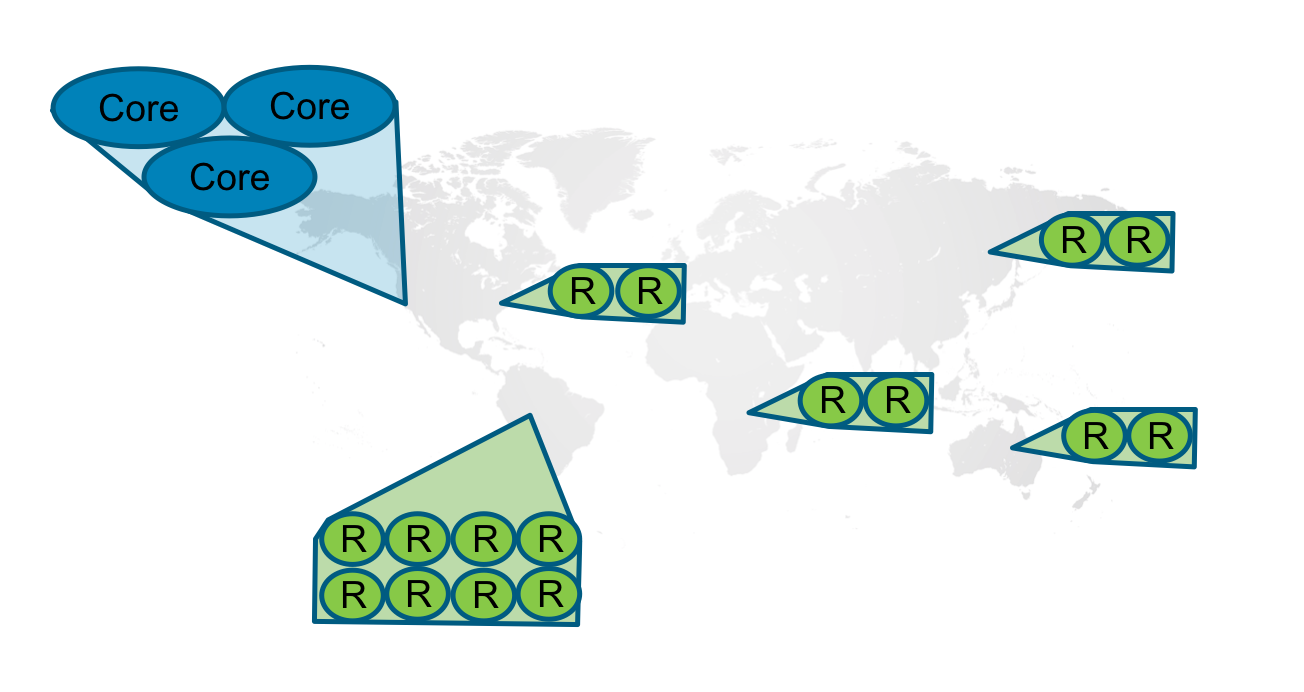
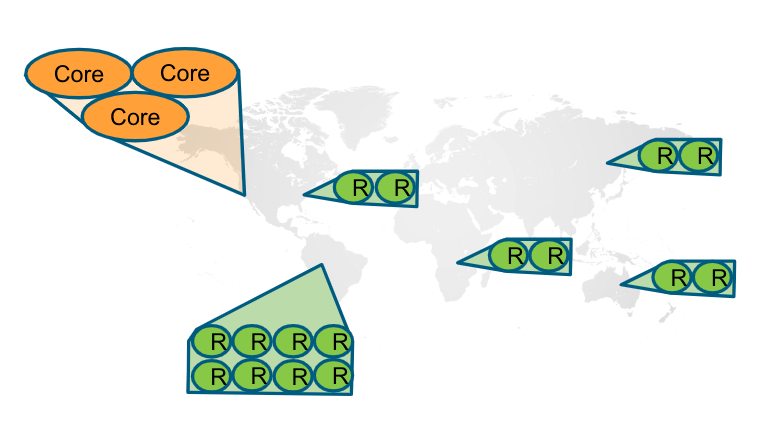
Clusters in many physical locations
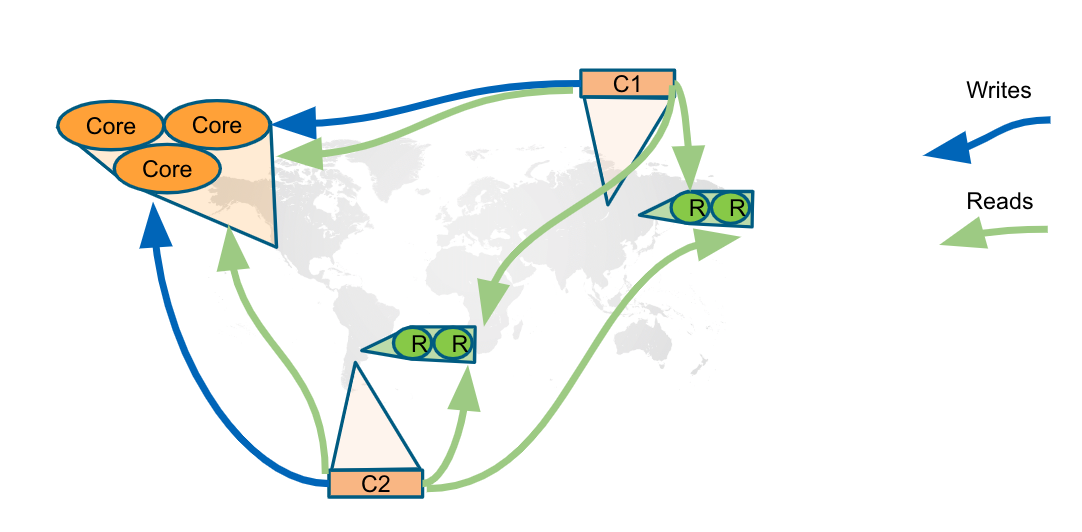
Many large enterprises deploy large datasets that need to be distributed to many physical locations. To deploy a cluster to more than one physical location, a best practice is to host the core servers in one data center, and host the read replicas in another data center. Neo4j also supports hosting core servers in multiple locations. To host Neo4j servers that are geographically distributed, you need a multi-data center license and you must configure it in your neo4j.conf file by setting the multi_dc_license property to true. When doing so, there is more configuration that you must do to ensure that clients are routed to the servers that are physically closest to them. You do this by configuring policy groups for your cluster. If policy groups have been configured for the servers, the application drivers instances must be created to use the policy groups. With policy groups, writes are always routed to the LEADER, but reads are routed to any FOLLOWER that is available. This enables the cluster and driver to automatically perform load balancing.
Here is a video that shows you why you might want to configure a Causal Cluster to operate in multiple data centers:
Read more about configuring clusters for multi-data center in the Neo4j Operations Manual
Bookmarks
Both read and write client applications can create bookmarks within a session that enable them to quickly access a location in the database. The bookmarks can be passed between sessions. See the Neo4j Developer Manual for details about writing code that uses bookmarks.
Backing up a cluster
The database for a cluster is backed up online. You must specify dbms.backup.enabled=true in the configuration for each core server in the cluster.
The core server can use its transaction port or the backup port for backup operations. You typically use the backup port. Here is the setting that you must add to the configuration:
dbms.backup.address=<server-address>:6362`Using a read replica for the backup
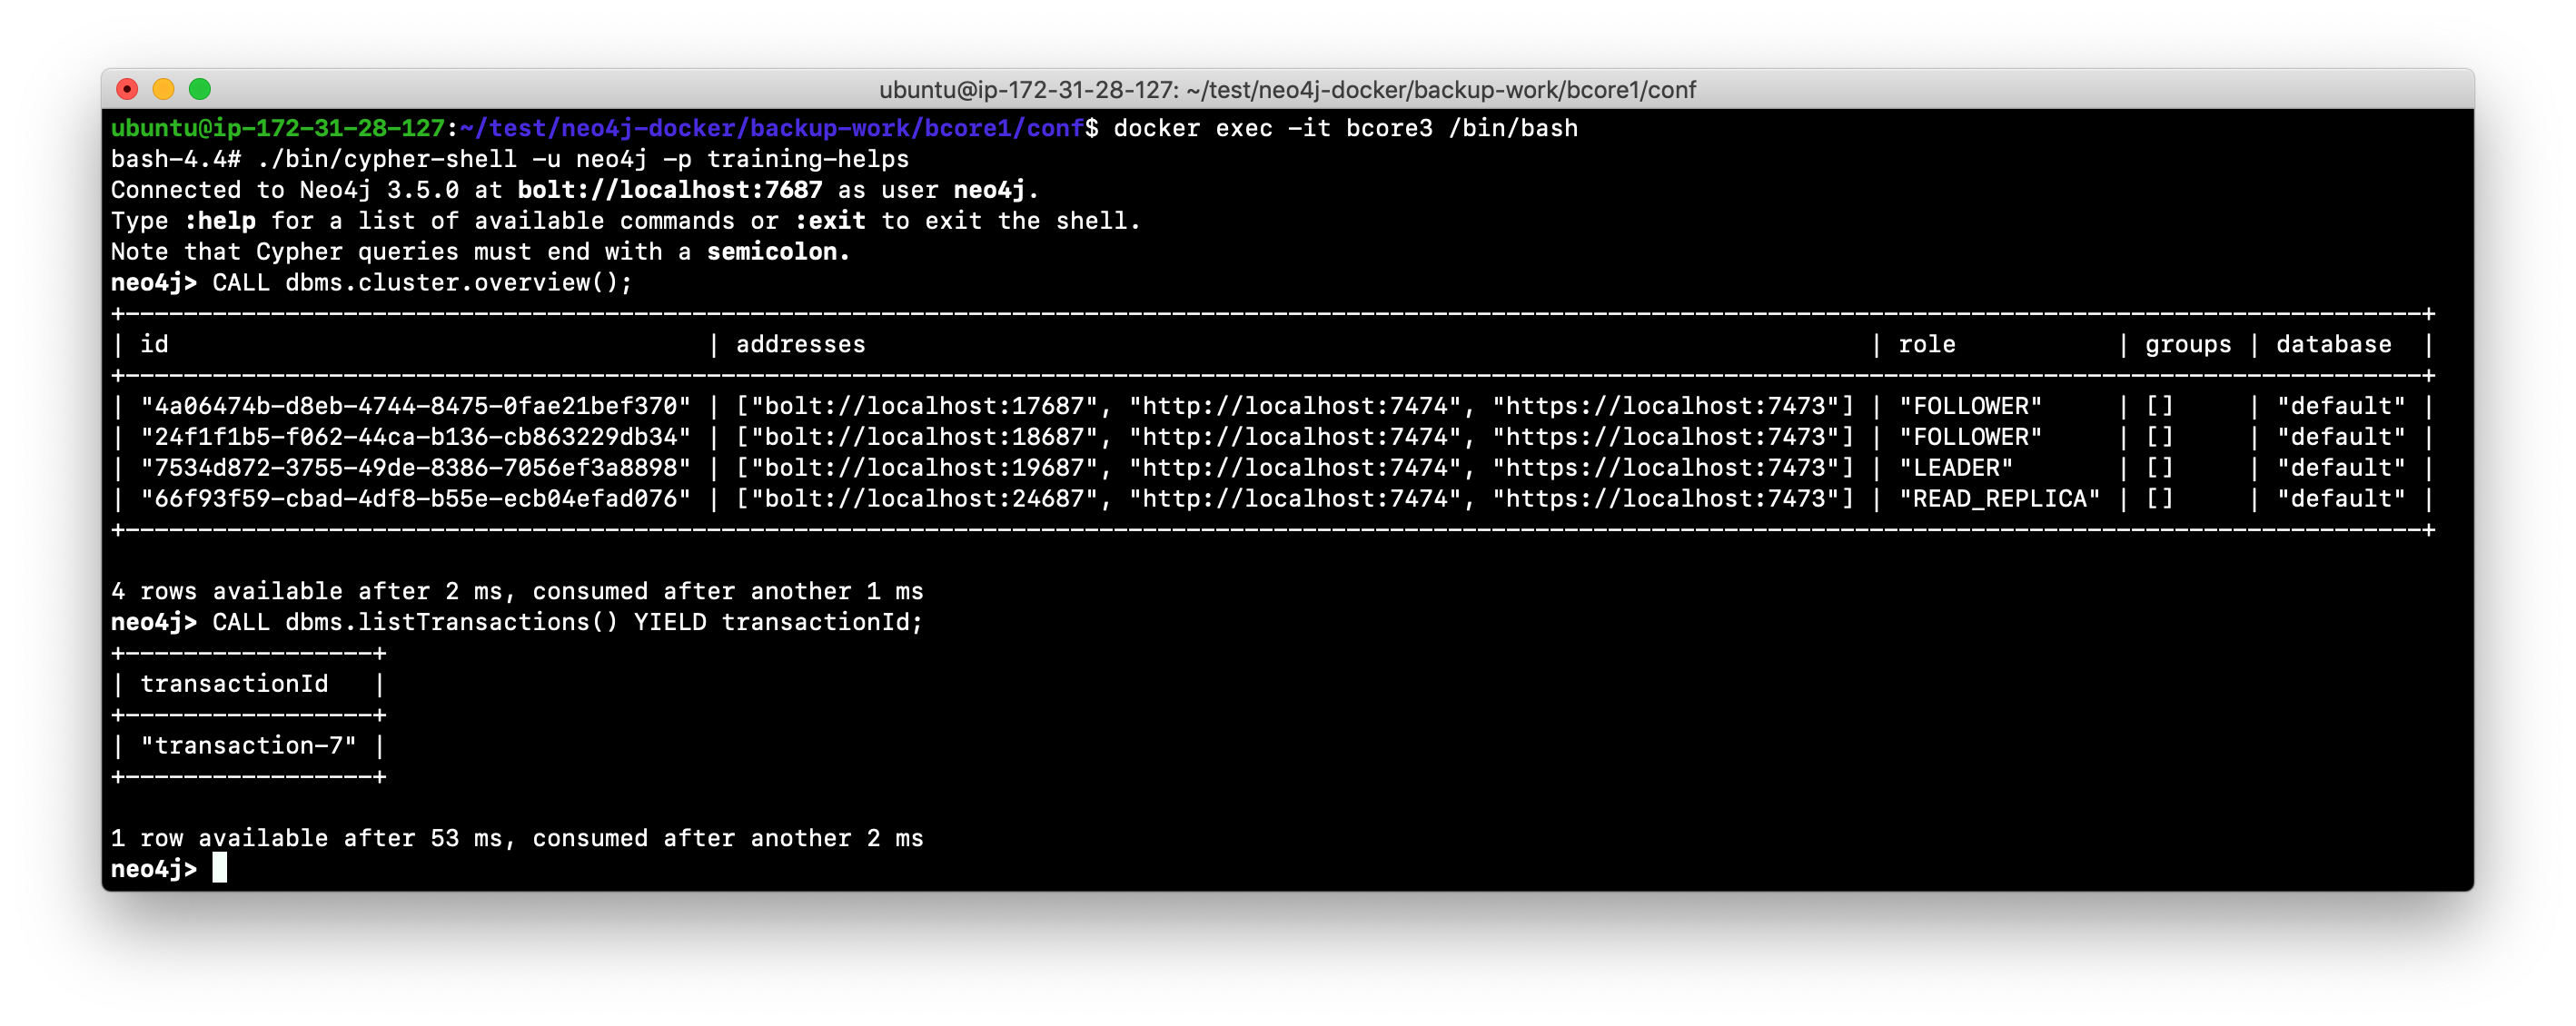
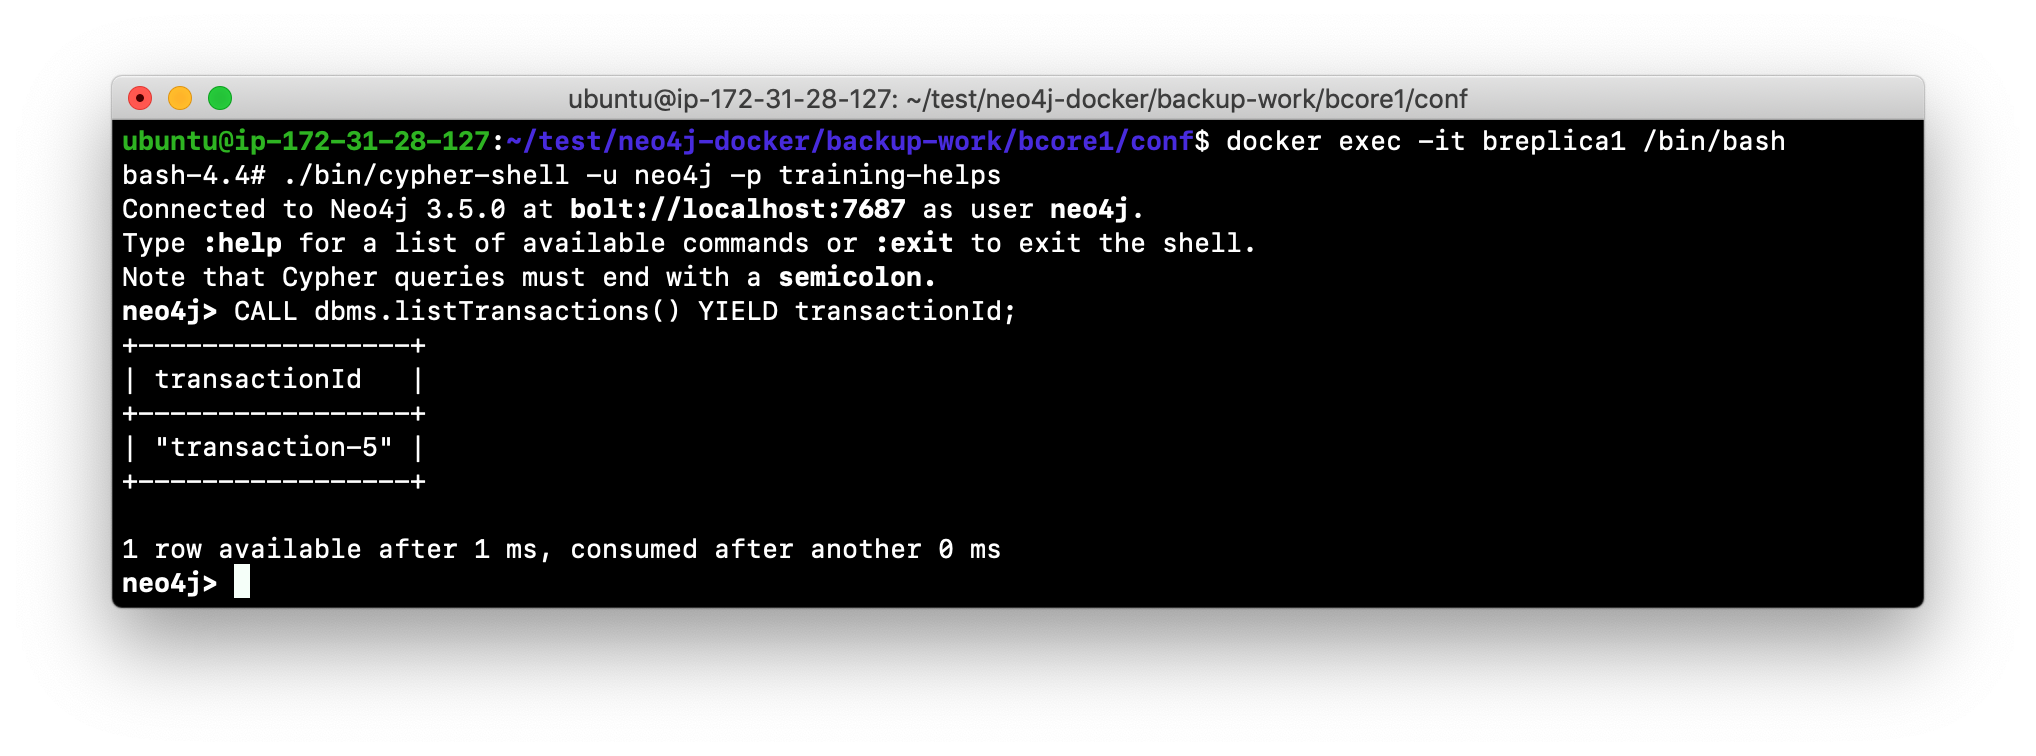
A best practice is to create and use a read replica server for the backup. In doing so, the read replica server will be in catchup mode with the core servers but can ideally keep up with the committed transactions on the core servers. You can check to see what the last transaction ID is on a core server vs. a read replica by executing the Cypher statement: CALL dbms.listTransactions() YIELD transactionId; on each server. Each server will have a different last transaction ID, but as many transactions are performed against the cluster, you will see these values increasing at the same rate. If you find that the read replica is far behind in catching up, you may want to consider using a core server for the backup. If you use a core server for a backup, it could degrade performance of the cluster. If you want to use a core server for backup, you must increase the number of core servers in the cluster, for example from three to five.
Performing the backup
For backing up a cluster, you must first decide which server and port will be used for the backup (backup client). You can backup using either a backup port or a transaction port. In addition, in a real application you will want the backup to be encrypted. For this you must use SSL. Security and encryption is covered later in this training.
You log in to the server from where you will be performing the backup (typically a read replica server) and then you perform the backup with these suggested settings:
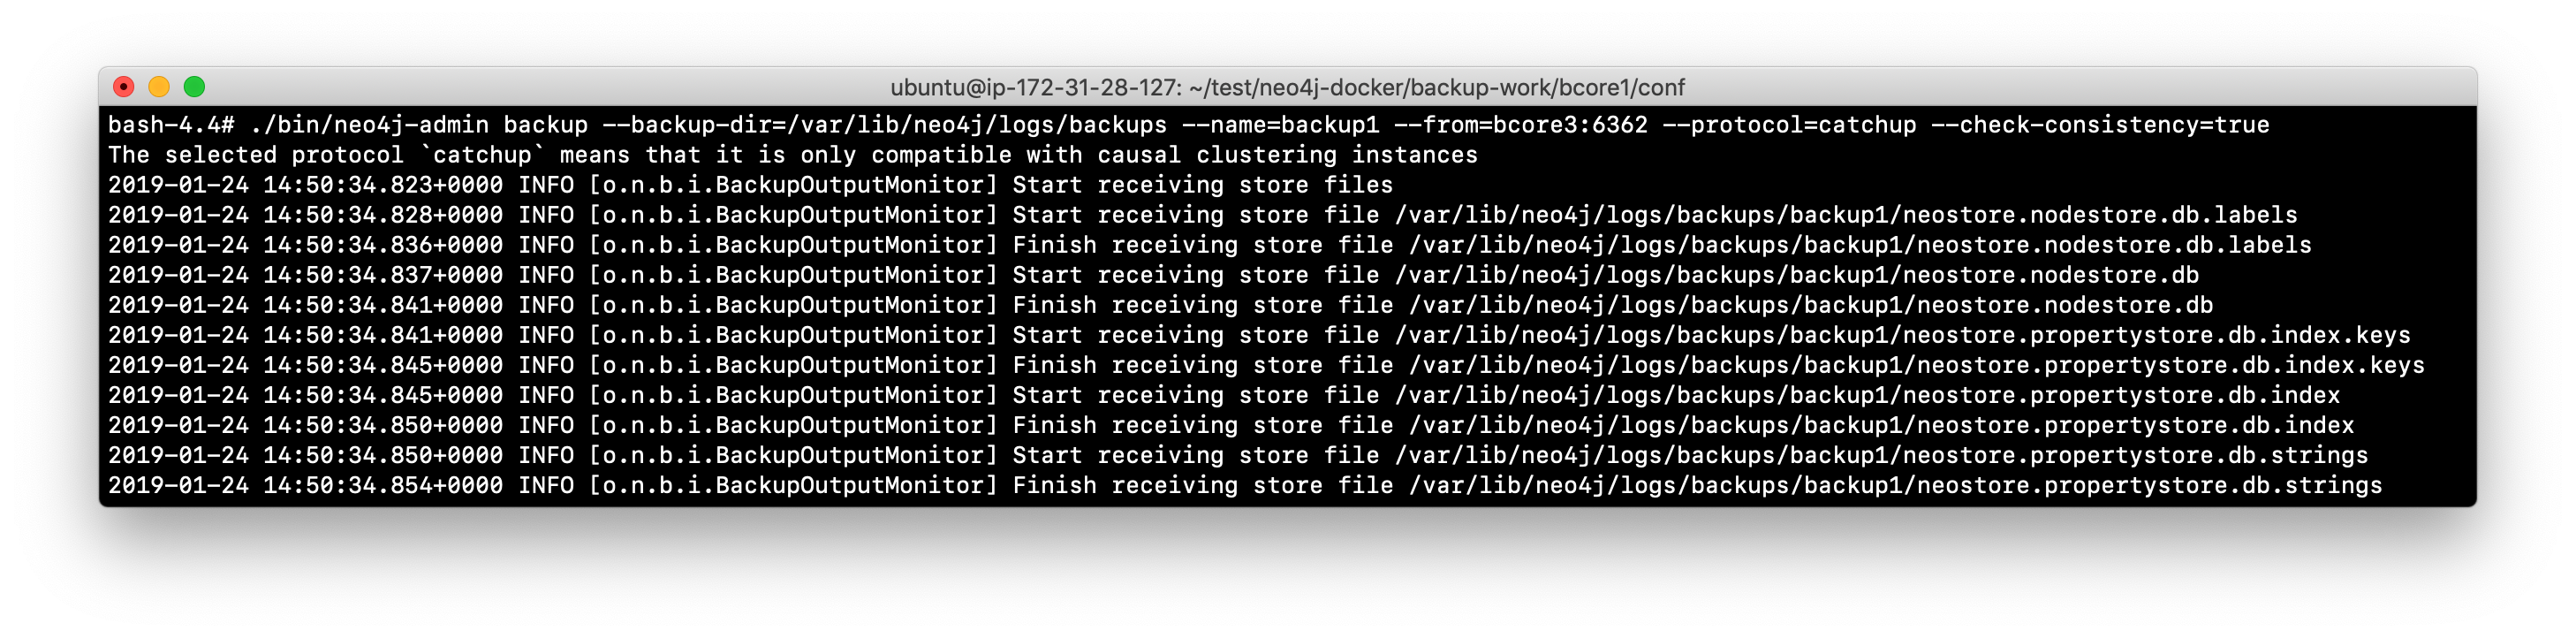
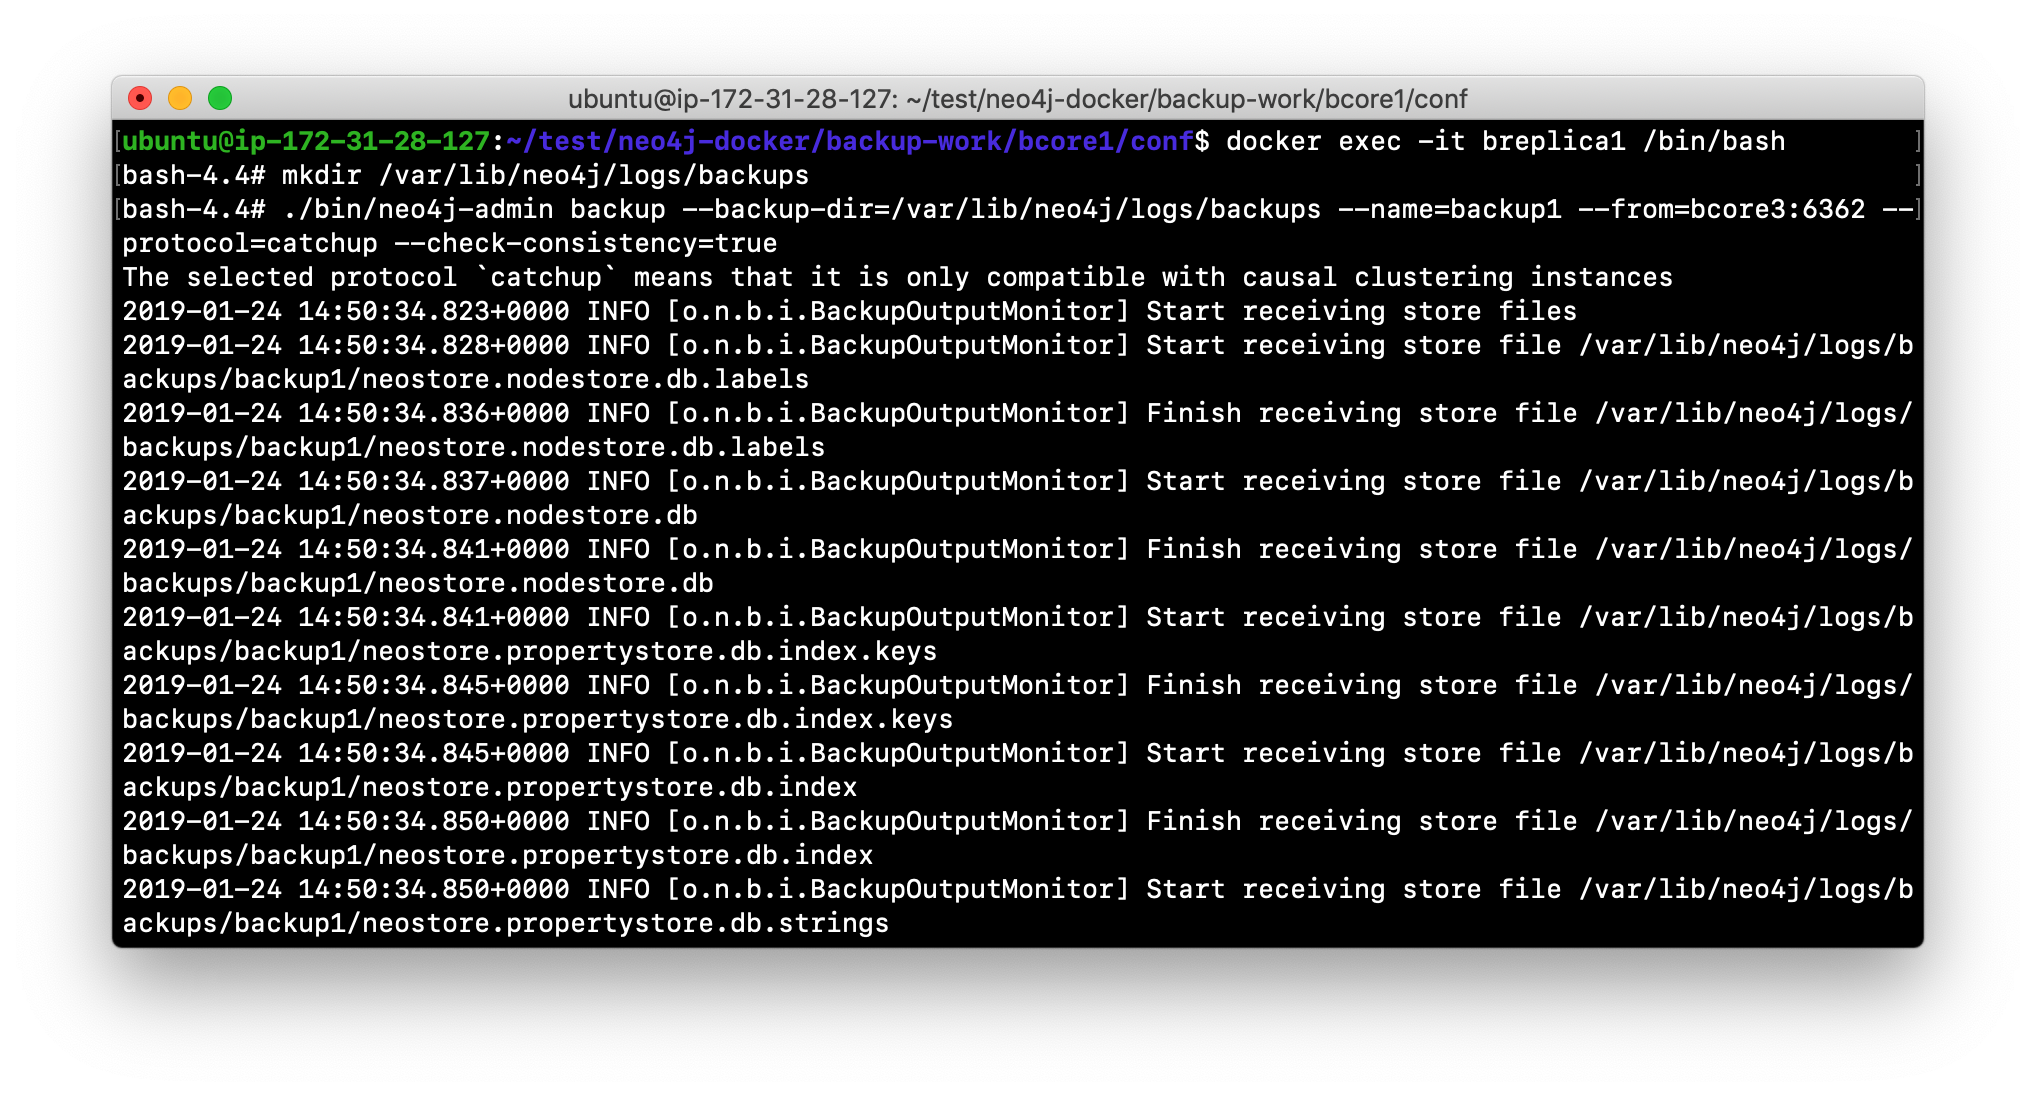
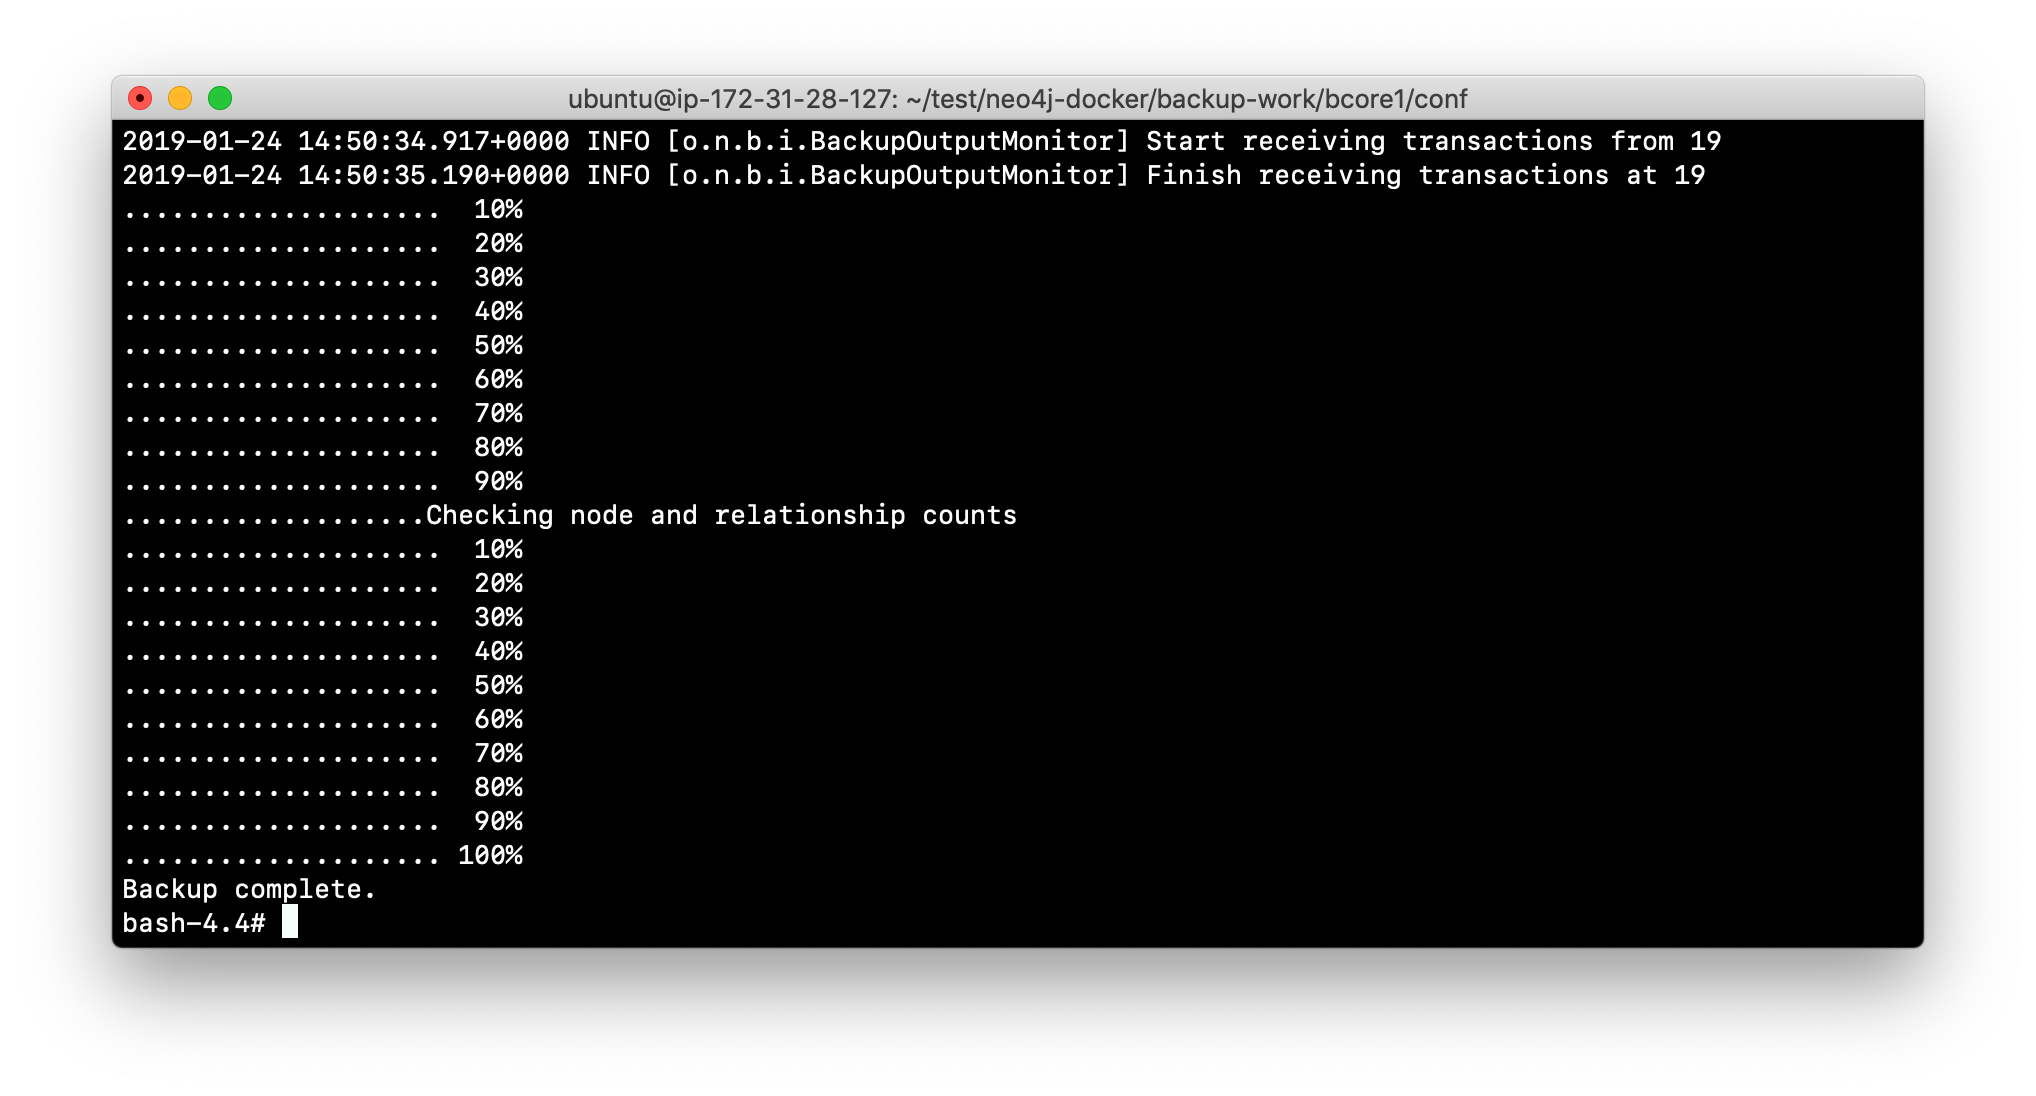
neo4j-admin backup --backup-dir=<backup-path> --name=<backup-name> --from=<core-server:backup-port> --protocol=catchup --check-consistency=trueYou can add more to the backup command as you can read about in the Neo4j Operations Manual.
Example: Backing up the cluster
In this example, we have logged in to the read replica server and we perform the backup using the address and backup port for the LEADER, bcore3. We also specify the location of the backup files and also that we want the backup to be checked for consistency.
Note that this is not an encrypted backup. You will learn about encryption later in this training when you learn about security.
Exercise #6: Backing up a cluster
In this Exercise, you gain some experience backing up a cluster. Because the Docker containers are created without backup configured, in order to back up a cluster, you will need to create a different network that will be used for testing backups. Then you will create the core servers and read replica server to work with backing up the database.
Before you begin
Stop all core and read replica servers.
Exercise steps:
-
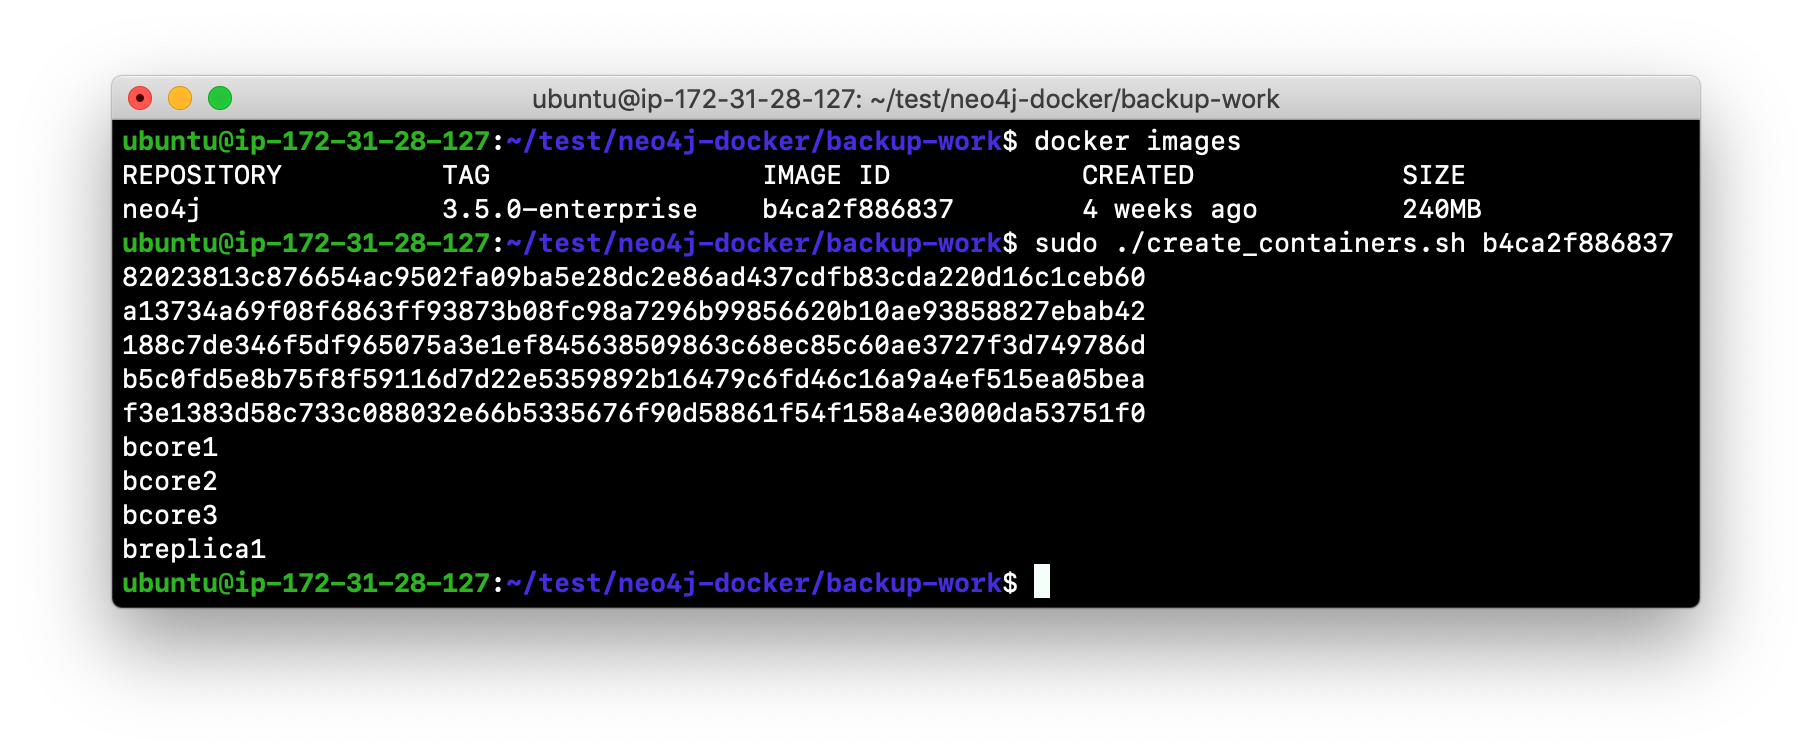
In the neo4j-docker/backup-work folder, there is a script called create_containers.sh that creates a new docker network named test-backup-cluster, creates three core servers: bcore1, bcore2, bcore3, and a read replica server, breplica1. Examine this script and notice that the core servers and the read replica server is configured for backup using the backup port. Any of the core servers can be used for the backup.
-
Run the script to create the containers specifying the Image ID of the Neo4j image.
-
Start all the servers and change the default password for each server.
-
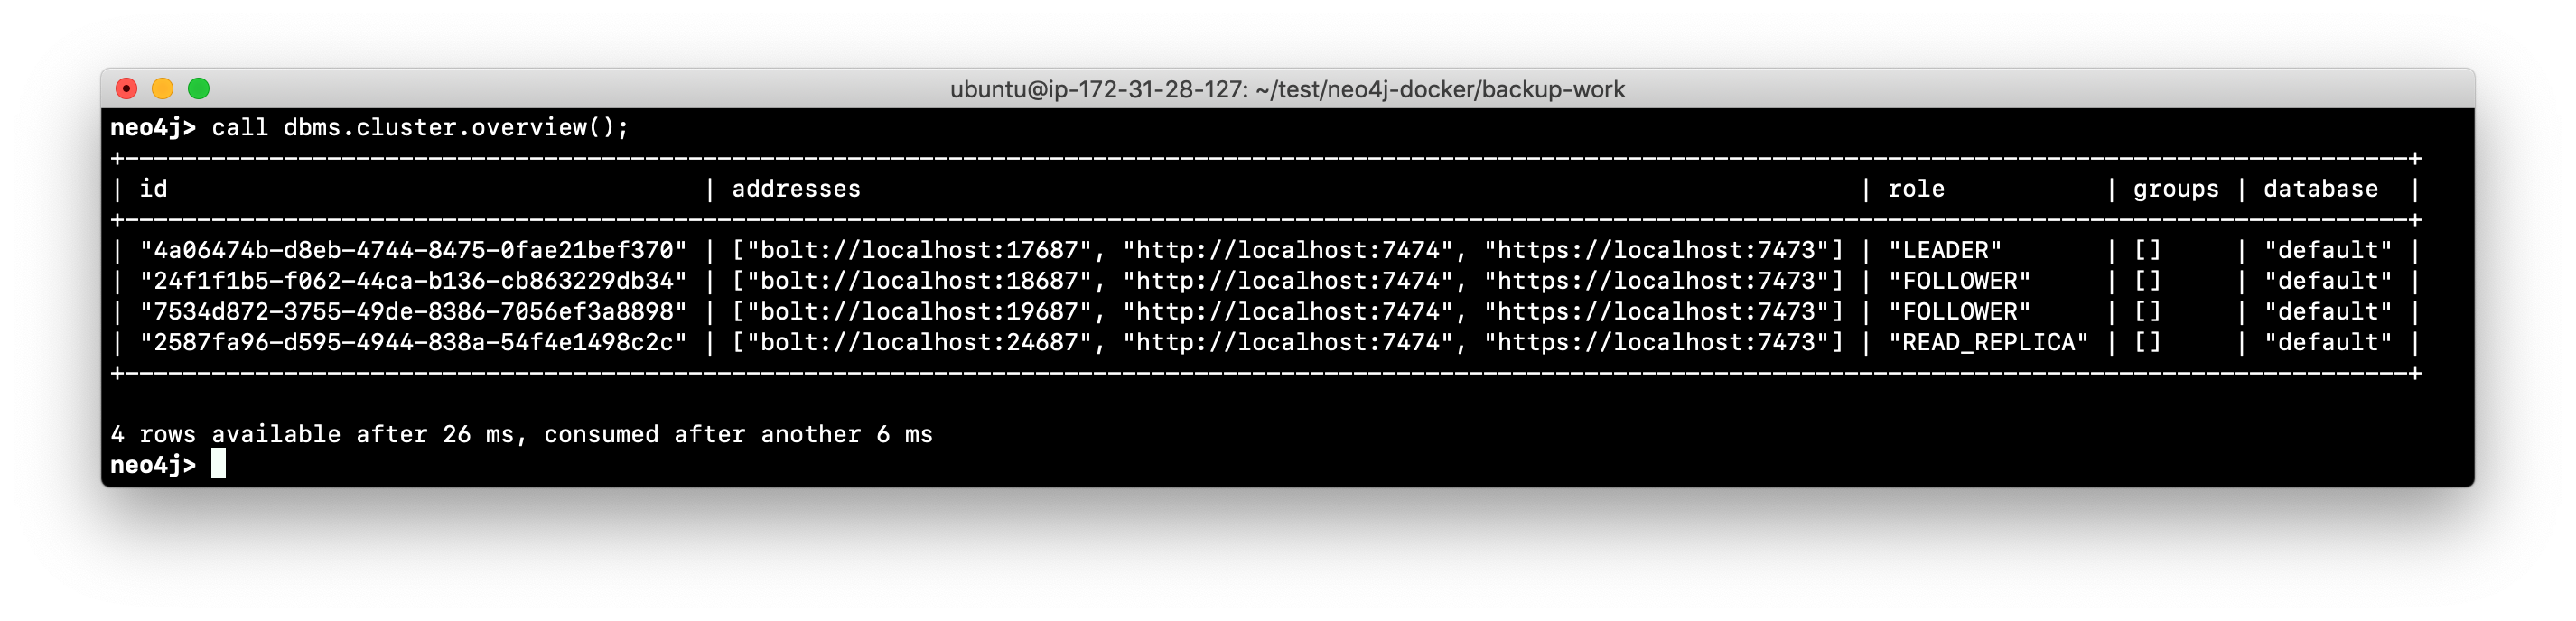
Confirm that all core servers and the read replica are running in the cluster.
-
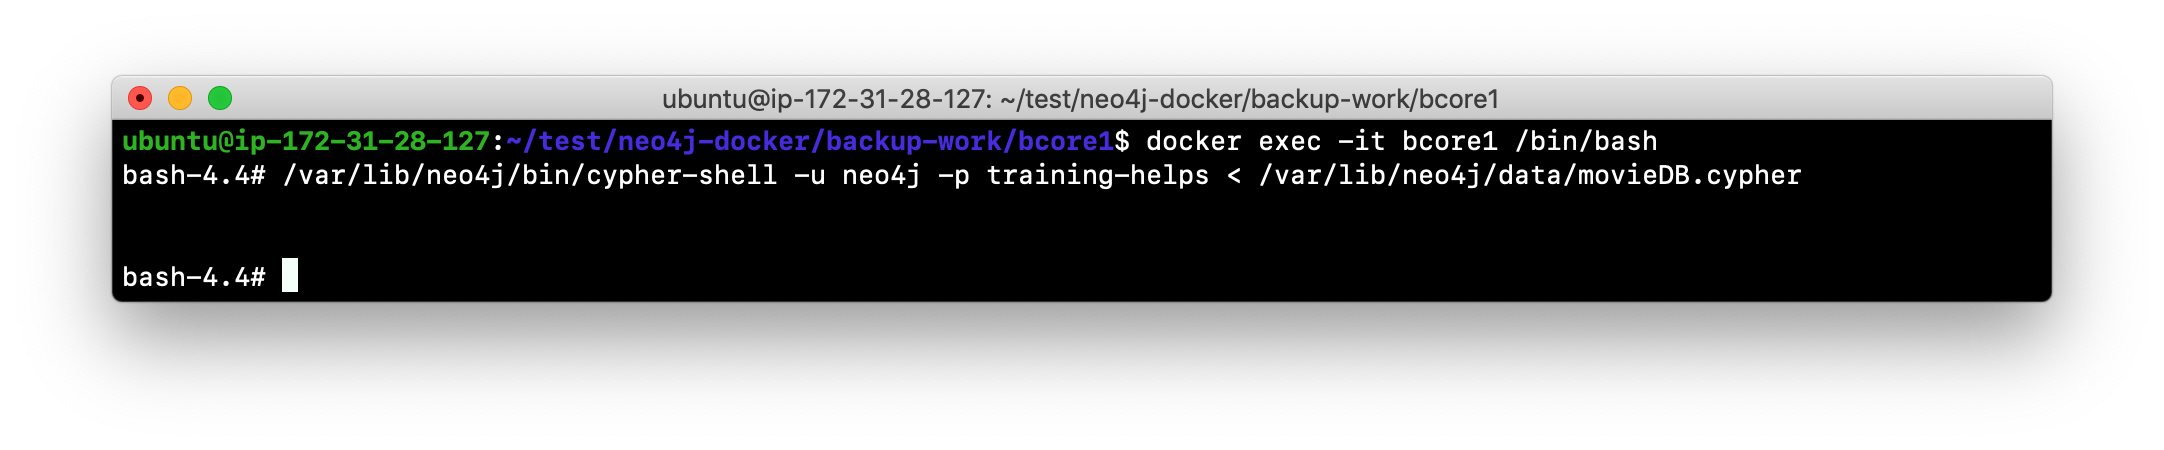
Seed the cluster by loading the movie data into one of the core servers.
-
Shut down all servers as you will be modifying their configurations to enable backups.
-
For each core servers, add these properties to the end of each neo4j.conf file where X is the bcore number:
dbms.backup.enabled=true dbms.backup.address=bcoreX:6362 -
Start the core servers and the read replica server.
-
Check the last transaction ID on the core server that is the LEADER.
-
Log in to the read replica server and check the last transaction ID. This server will have a different last transaction ID, but in a real application, you will find that this ID value increases at the same rate as it increases in the core servers.
-
While still logged in to the read replica, create a subfolder under logs named backups.
-
Perform the backup using
neo4j-adminspecifying the LEADER port for the backup, use the catchup protocol, and place the backup the logs/backups folder, naming the backup backup1.
-
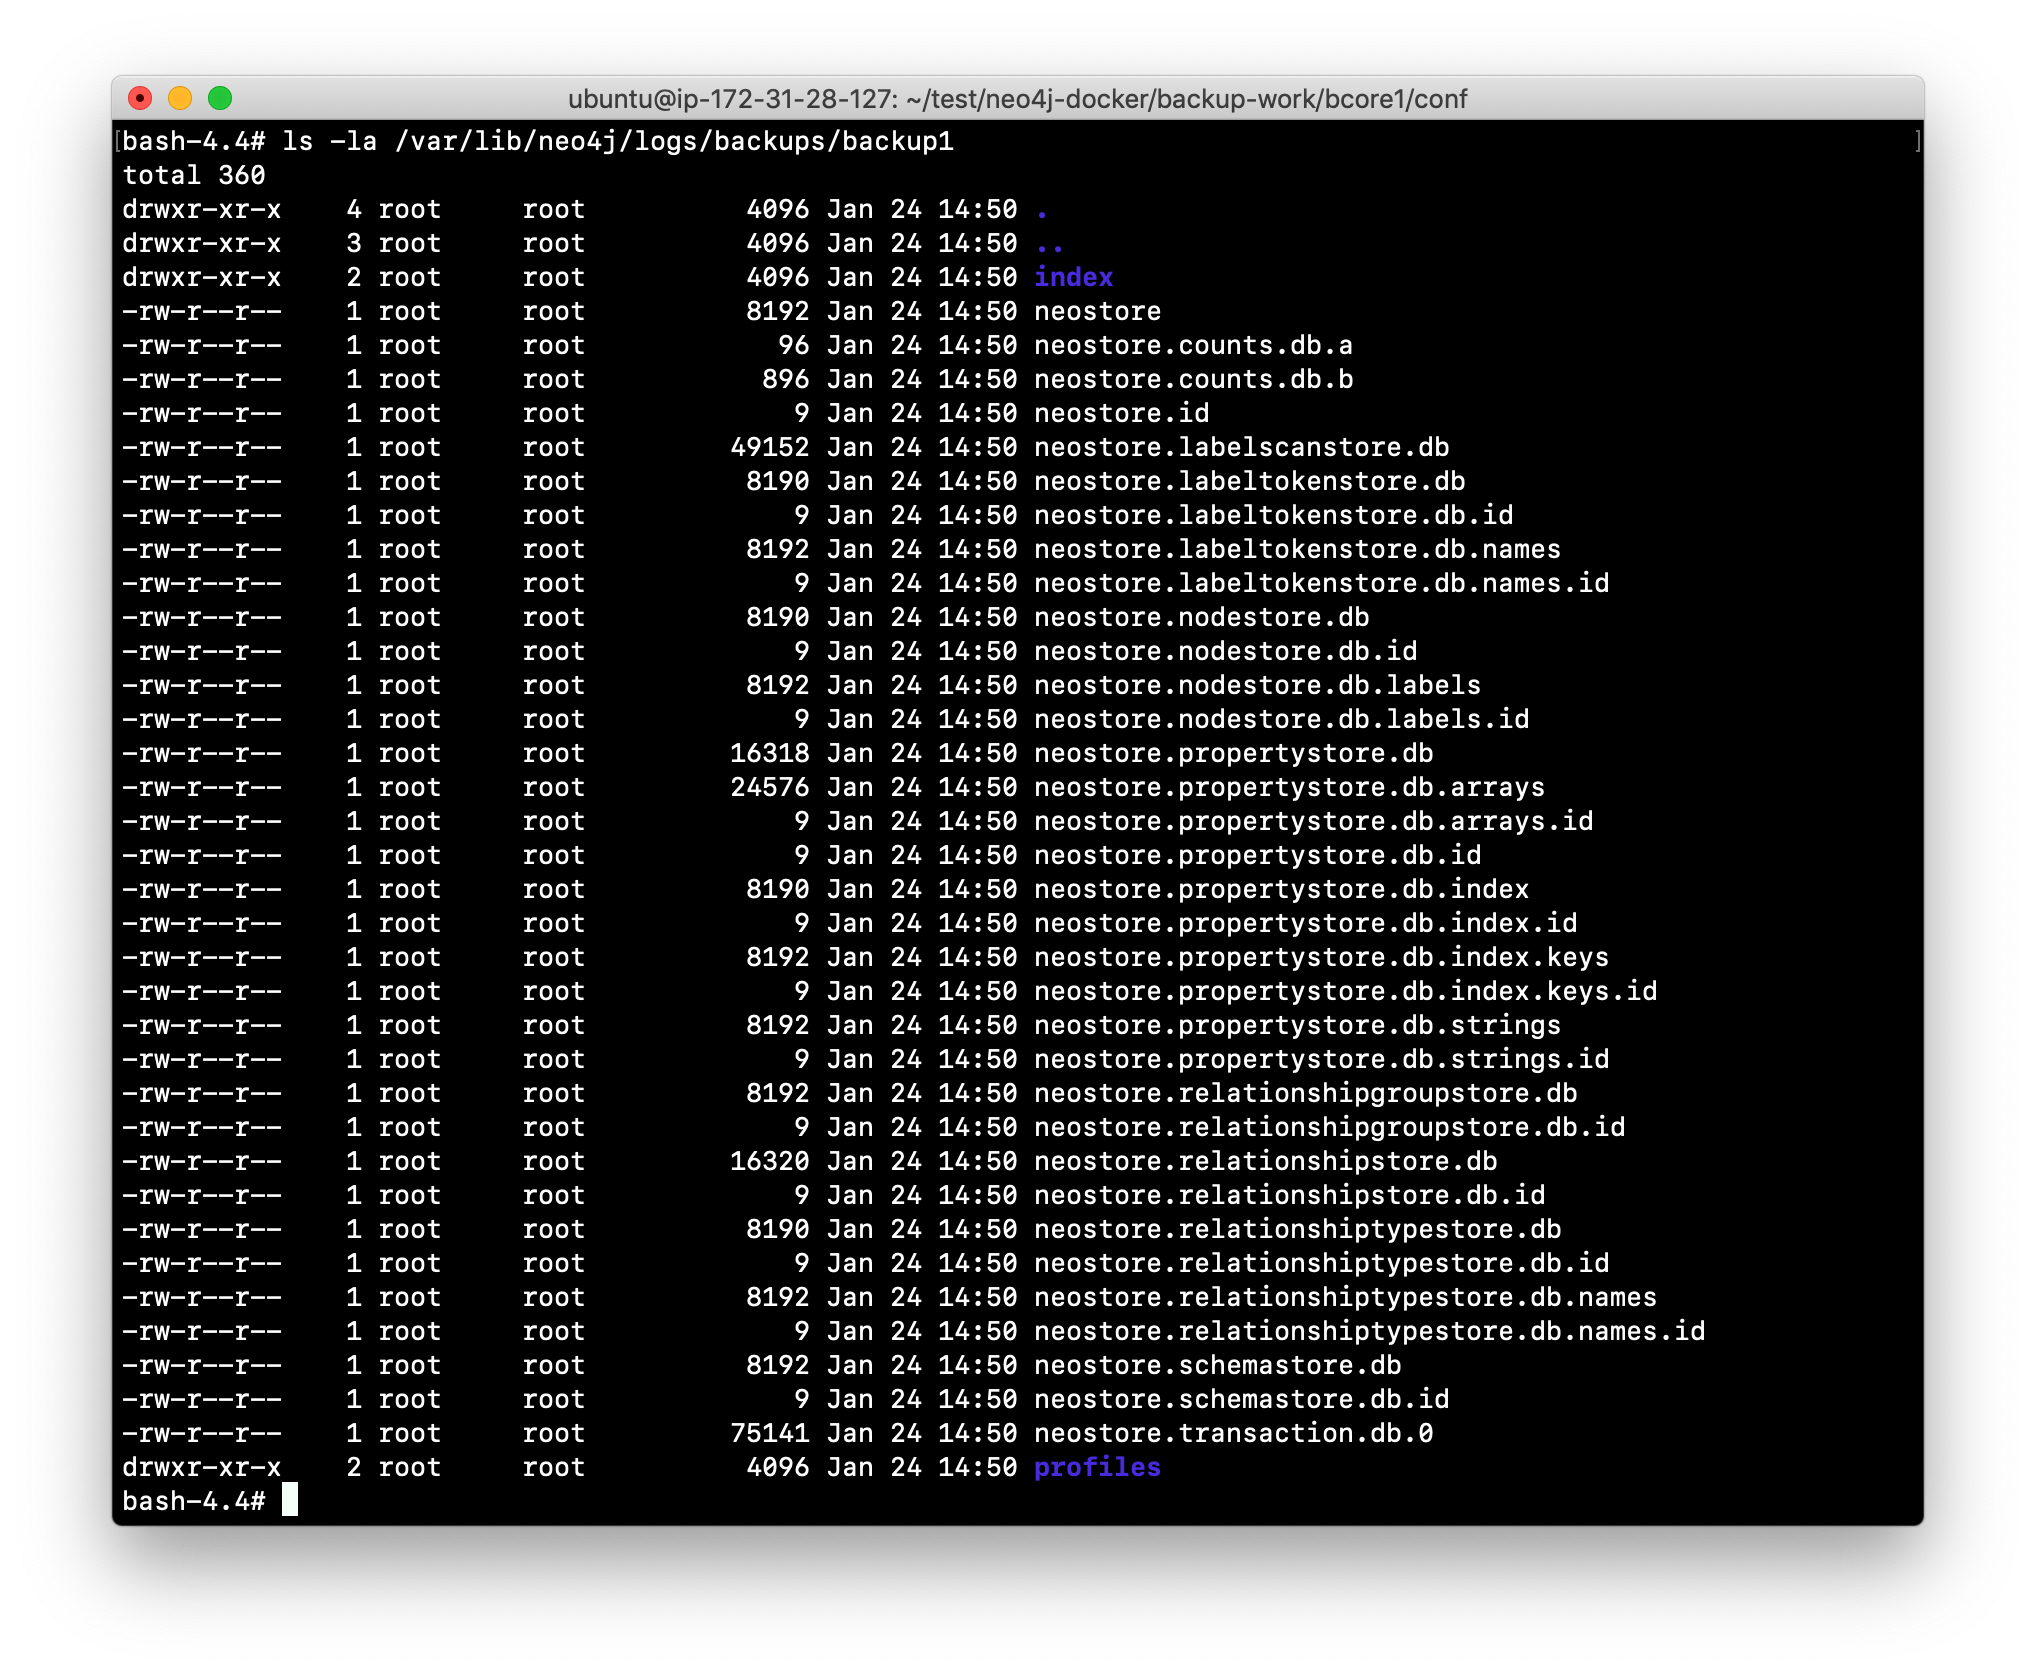
Confirm that the backup files were created.
Check your understanding
Question 1
Suppose you want to set up a cluster that can survive at least two failures and still be considered fault-tolerant. How many LEADERS and FOLLOWERS will this cluster have at a minimum?
Select the correct answer.
-
One LEADER and two FOLLOWERS
-
One LEADER and four FOLLOWERS
-
Two LEADERS and three FOLLOWERS
-
Two LEADERS and two FOLLOWERS
Summary
You can now:
-
Describe why you would use clusters.
-
Describe the components of a cluster.
-
Configure and use a cluster.
-
Seed a cluster with data.
-
Monitor and manage core servers in the cluster.
-
Monitor and manage read replica servers in the cluster.
-
Back up a cluster.
Need help? Ask in the Neo4j Community