Authorization
Lesson Overview
In this lesson we introduce authorization, protecting objects in our API. We cover how to make data available only to authenticated users and how to restrict data access so that customers can only see or modify their own data.
The @auth Directive
The Neo4j GraphQL Library provides an @auth GraphQL schema directive that enables us to attach authorization rules to our GraphQL type definitions. The @auth directive uses JSON Web Tokens (JWTs) for authentication. Authenticated requests to the GraphQL API will include an authorization header with a Bearer token attached. For example:
POST / HTTP/1.1
authorization: Bearer eyJhbGciOiJIUzI1NiIsInR5cCI6IkpXVCJ9.eyJzdWIiOiIxMjM0NTY3ODkwIiwibmFtZSI6IkpvaG4gRG9lIiwiaWF0IjoxNTE2MjM5MDIyLCJyb2xlcyI6WyJ1c2VyX2FkbWluIiwicG9zdF9hZG1pbiIsImdyb3VwX2FkbWluIl19.IY0LWqgHcjEtOsOw60mqKazhuRFKroSXFQkpCtWpgQI
content-type: application/json
Refer to the Auth section of the Neo4j GraphQL Library documentation for full information.
Setup
To enable authorization with the Neo4j GraphQL Library we need to specify the JWT signing secret used to decode and validate tokens. For this lesson we will use the following JWT secret to validate our tokens:
dFt8QaYykR6PauvxcyKVXKauxvQuWQTcWhen instantiating Neo4jGraphQL pass a config object that includes the JWT secret. For example:
const neoSchema = new Neo4jGraphQL({
  typeDefs,
  config: {
    jwt: {
      secret: "dFt8QaYykR6PauvxcyKVXKauxvQuWQTc"
    }
  }
});
This step has been completed in the initial Codesandbox we’ll use for this lesson.
Open the Codesandbox using this link, again forking and editing the .env file to add the connection credentials for your Neo4j Sandbox instance.
You’ll notice we’ve included an additional environment variable to keep track of our JWT secret.
JSON Web Token (JWT)
JWTs are a standard for representing and cryptographically verifying claims securely and are commonly used for authentication and authorization.
Implementing a sign-in flow and generating JWTs is beyond the scope of this course so we will use a few static JWTs for testing our authorization rules.
For an example of a sign-up/sign-in flow using GraphQL mutations and the Neo4j GraphQL Library see the neo-push example application in the neo4j/graphql repository.
Example JWTs
We will use the following JWTs to test the authorization rules we’ll be adding to our GraphQL API. These tokens were generated using the JWT secret signing key above and can be validated using the same secret.
Token For Customer EmilEifrem7474
This token is the token we will use to make authenticated requests on behalf of the customer "EmilEifrem7474":
eyJhbGciOiJIUzI1NiIsInR5cCI6IkpXVCJ9.eyJzdWIiOiJFbWlsRWlmcmVtNzQ3NCIsInJvbGVzIjpbImN1c3RvbWVyIl0sImlhdCI6MTUxNjIzOTAyMn0.YwftAMDTw6GqmYOFLGHC_f6UiUhfrJAGkZGfrGmiQ2UThe token’s payload includes the following claims:
{
  "sub": "EmilEifrem7474",
  "roles": ["customer"],
  "iat": 1516239022
}
Admin user token
This token is used to make authenticated requests to the GraphQL API as an "admin" user:
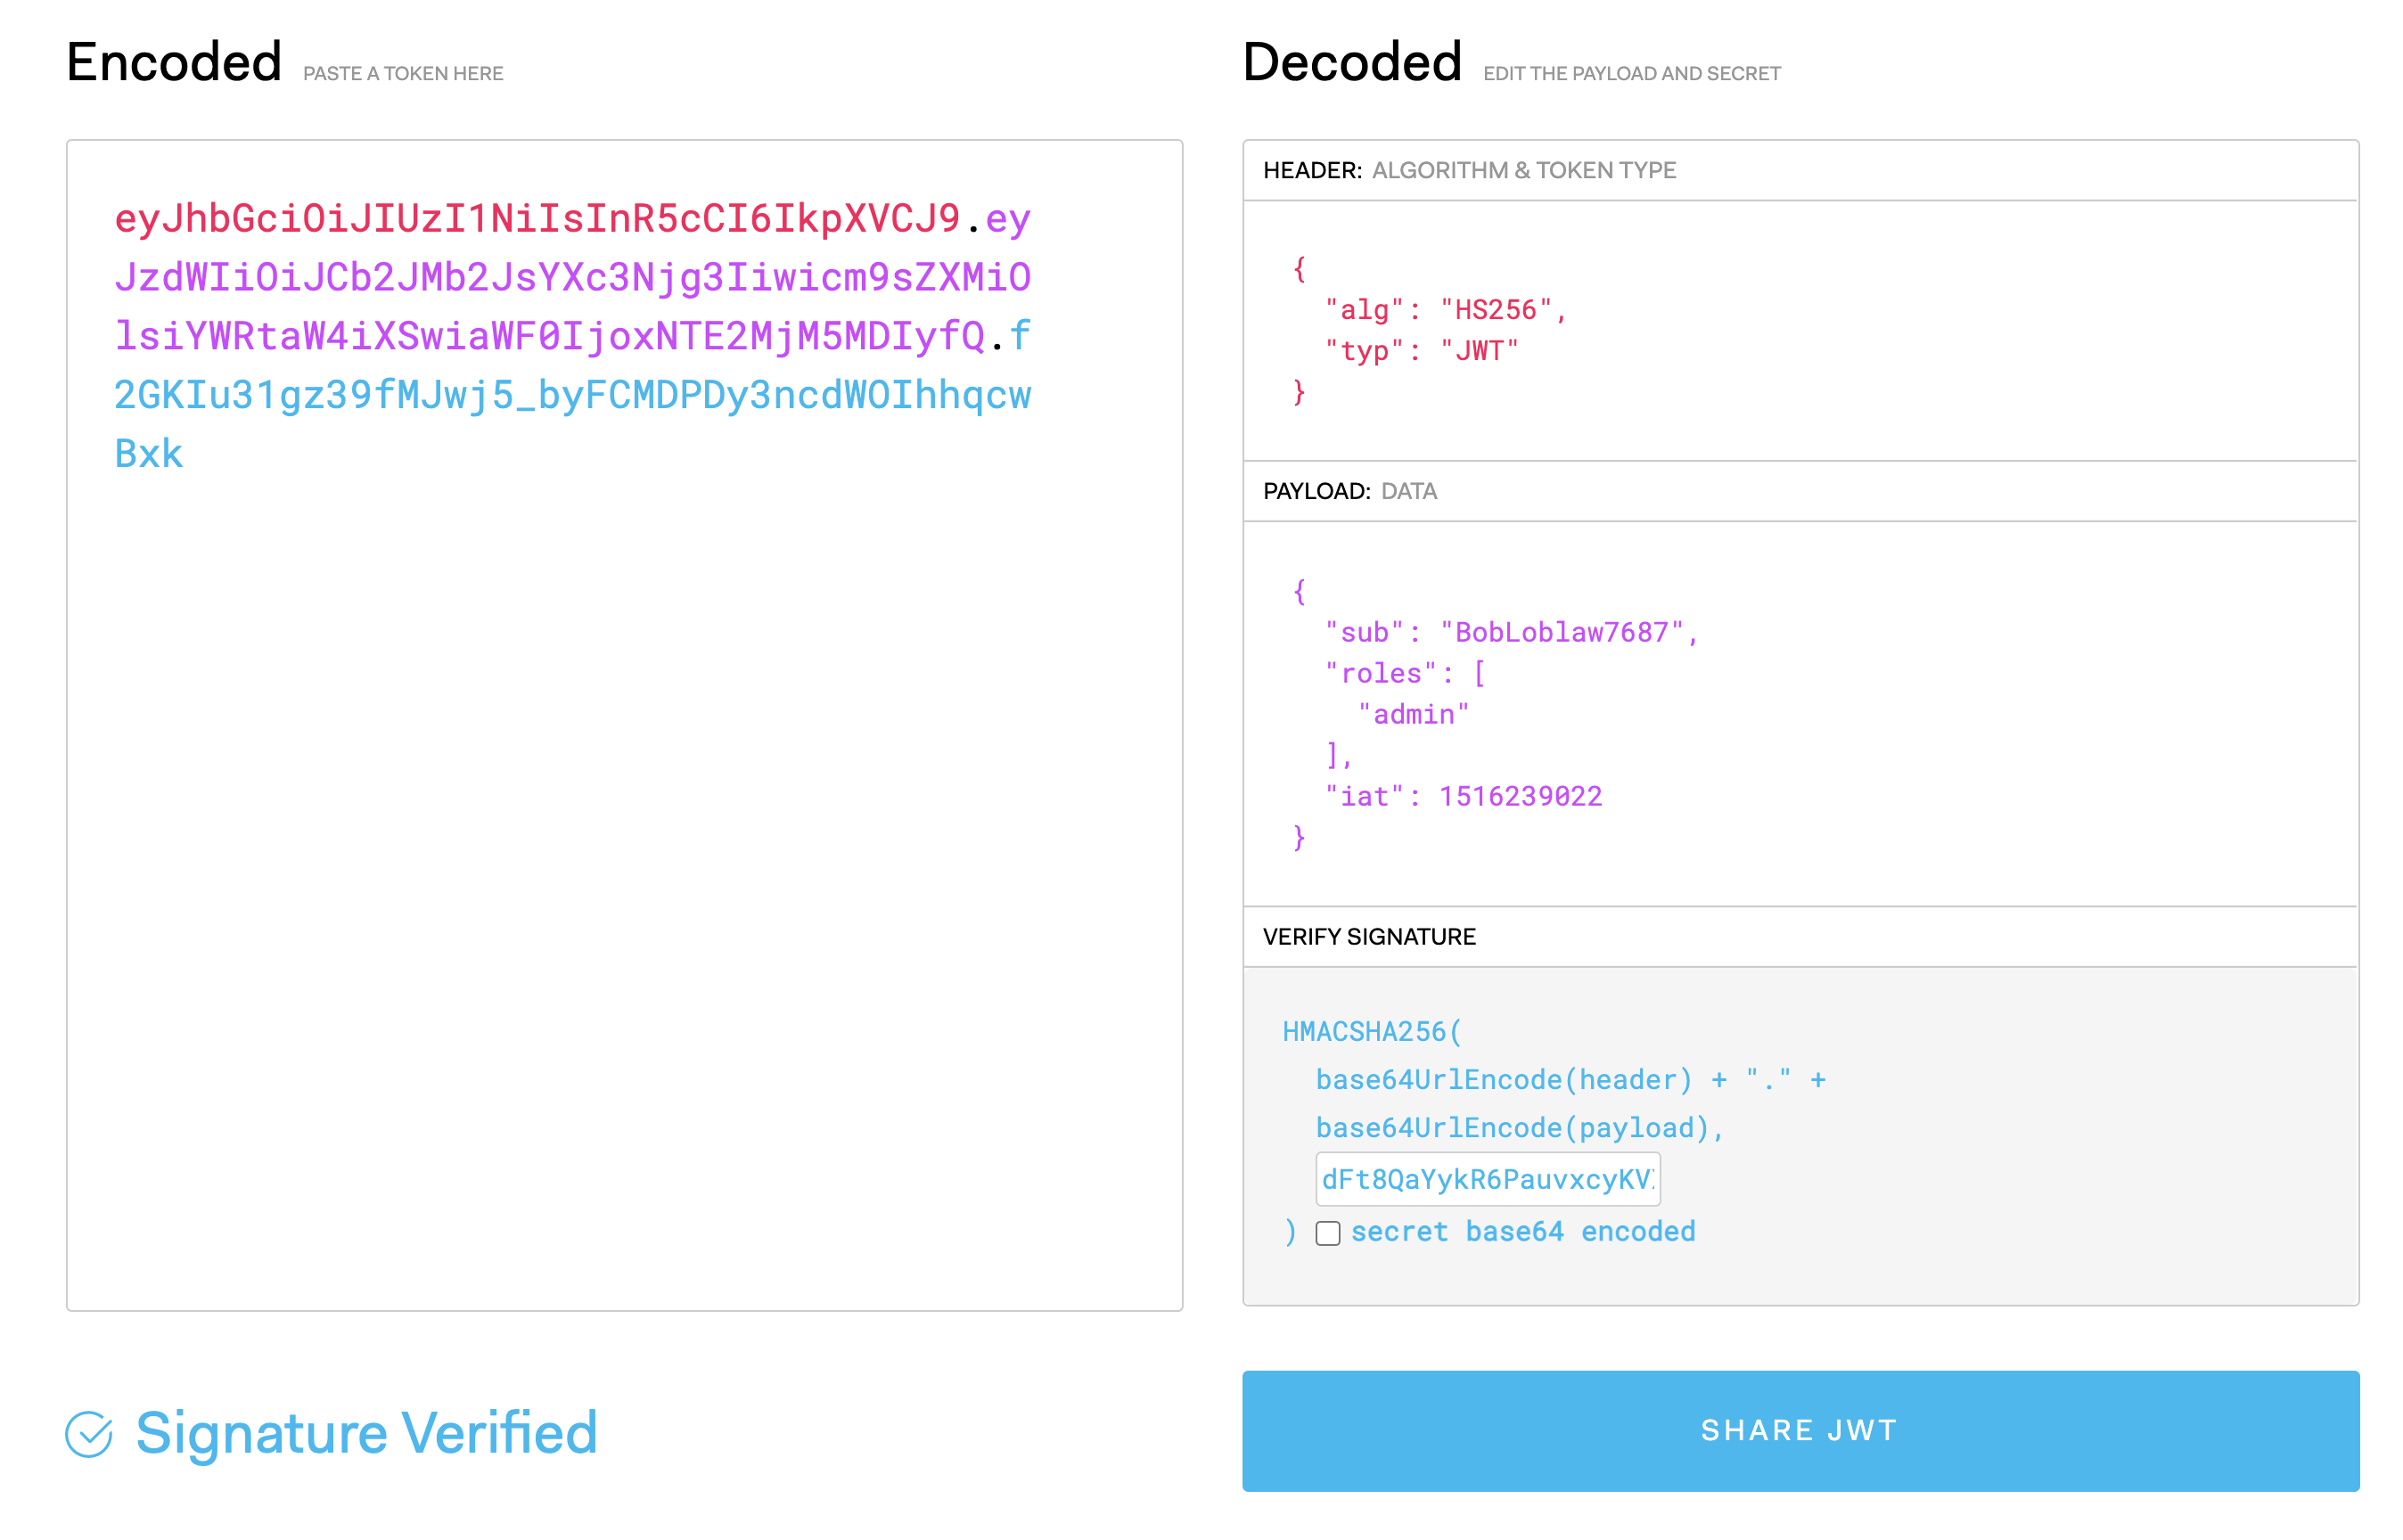
eyJhbGciOiJIUzI1NiIsInR5cCI6IkpXVCJ9.eyJzdWIiOiJCb2JMb2JsYXc3Njg3Iiwicm9sZXMiOlsiYWRtaW4iXSwiaWF0IjoxNTE2MjM5MDIyfQ.f2GKIu31gz39fMJwj5_byFCMDPDy3ncdWOIhhqcwBxkIt includes the following claims:
{
  "sub": "BobLoblaw7687",
  "roles": ["admin"],
  "iat": 1516239022
}
We can use the online tool at jwt.io to encode/decode and validate tokens. Try pasting one of the above tokens into this tool to view the token’s payload.
Adding Authorization Rules
Now that we have our sample tokens we’re ready to start adding authorization rules using the @auth schema directive in our GraphQL type definitions.
isAuthenticated
The isAuthenticated rule is the simplest authorization rule we can add. It means that any GraphQL operation that accesses a field or object protected by the isAuthenticated rule must have a valid JWT in the request header.
Let’s make use of the isAuthenticated authorization rule in our bookstore GraphQL API to protect the Subject type. Let’s say we want to make returning a book’s subjects a "premium" feature to encourage users to sign-up for our application. To do this we’ll make the following addition to our GraphQL type definitions, extending the Subject type:
# schema.graphql

extend type Subject @auth(rules: [{isAuthenticated: true}])
Now any request that accesses the Subject type must include a valid signed JWT or an error will be returned.
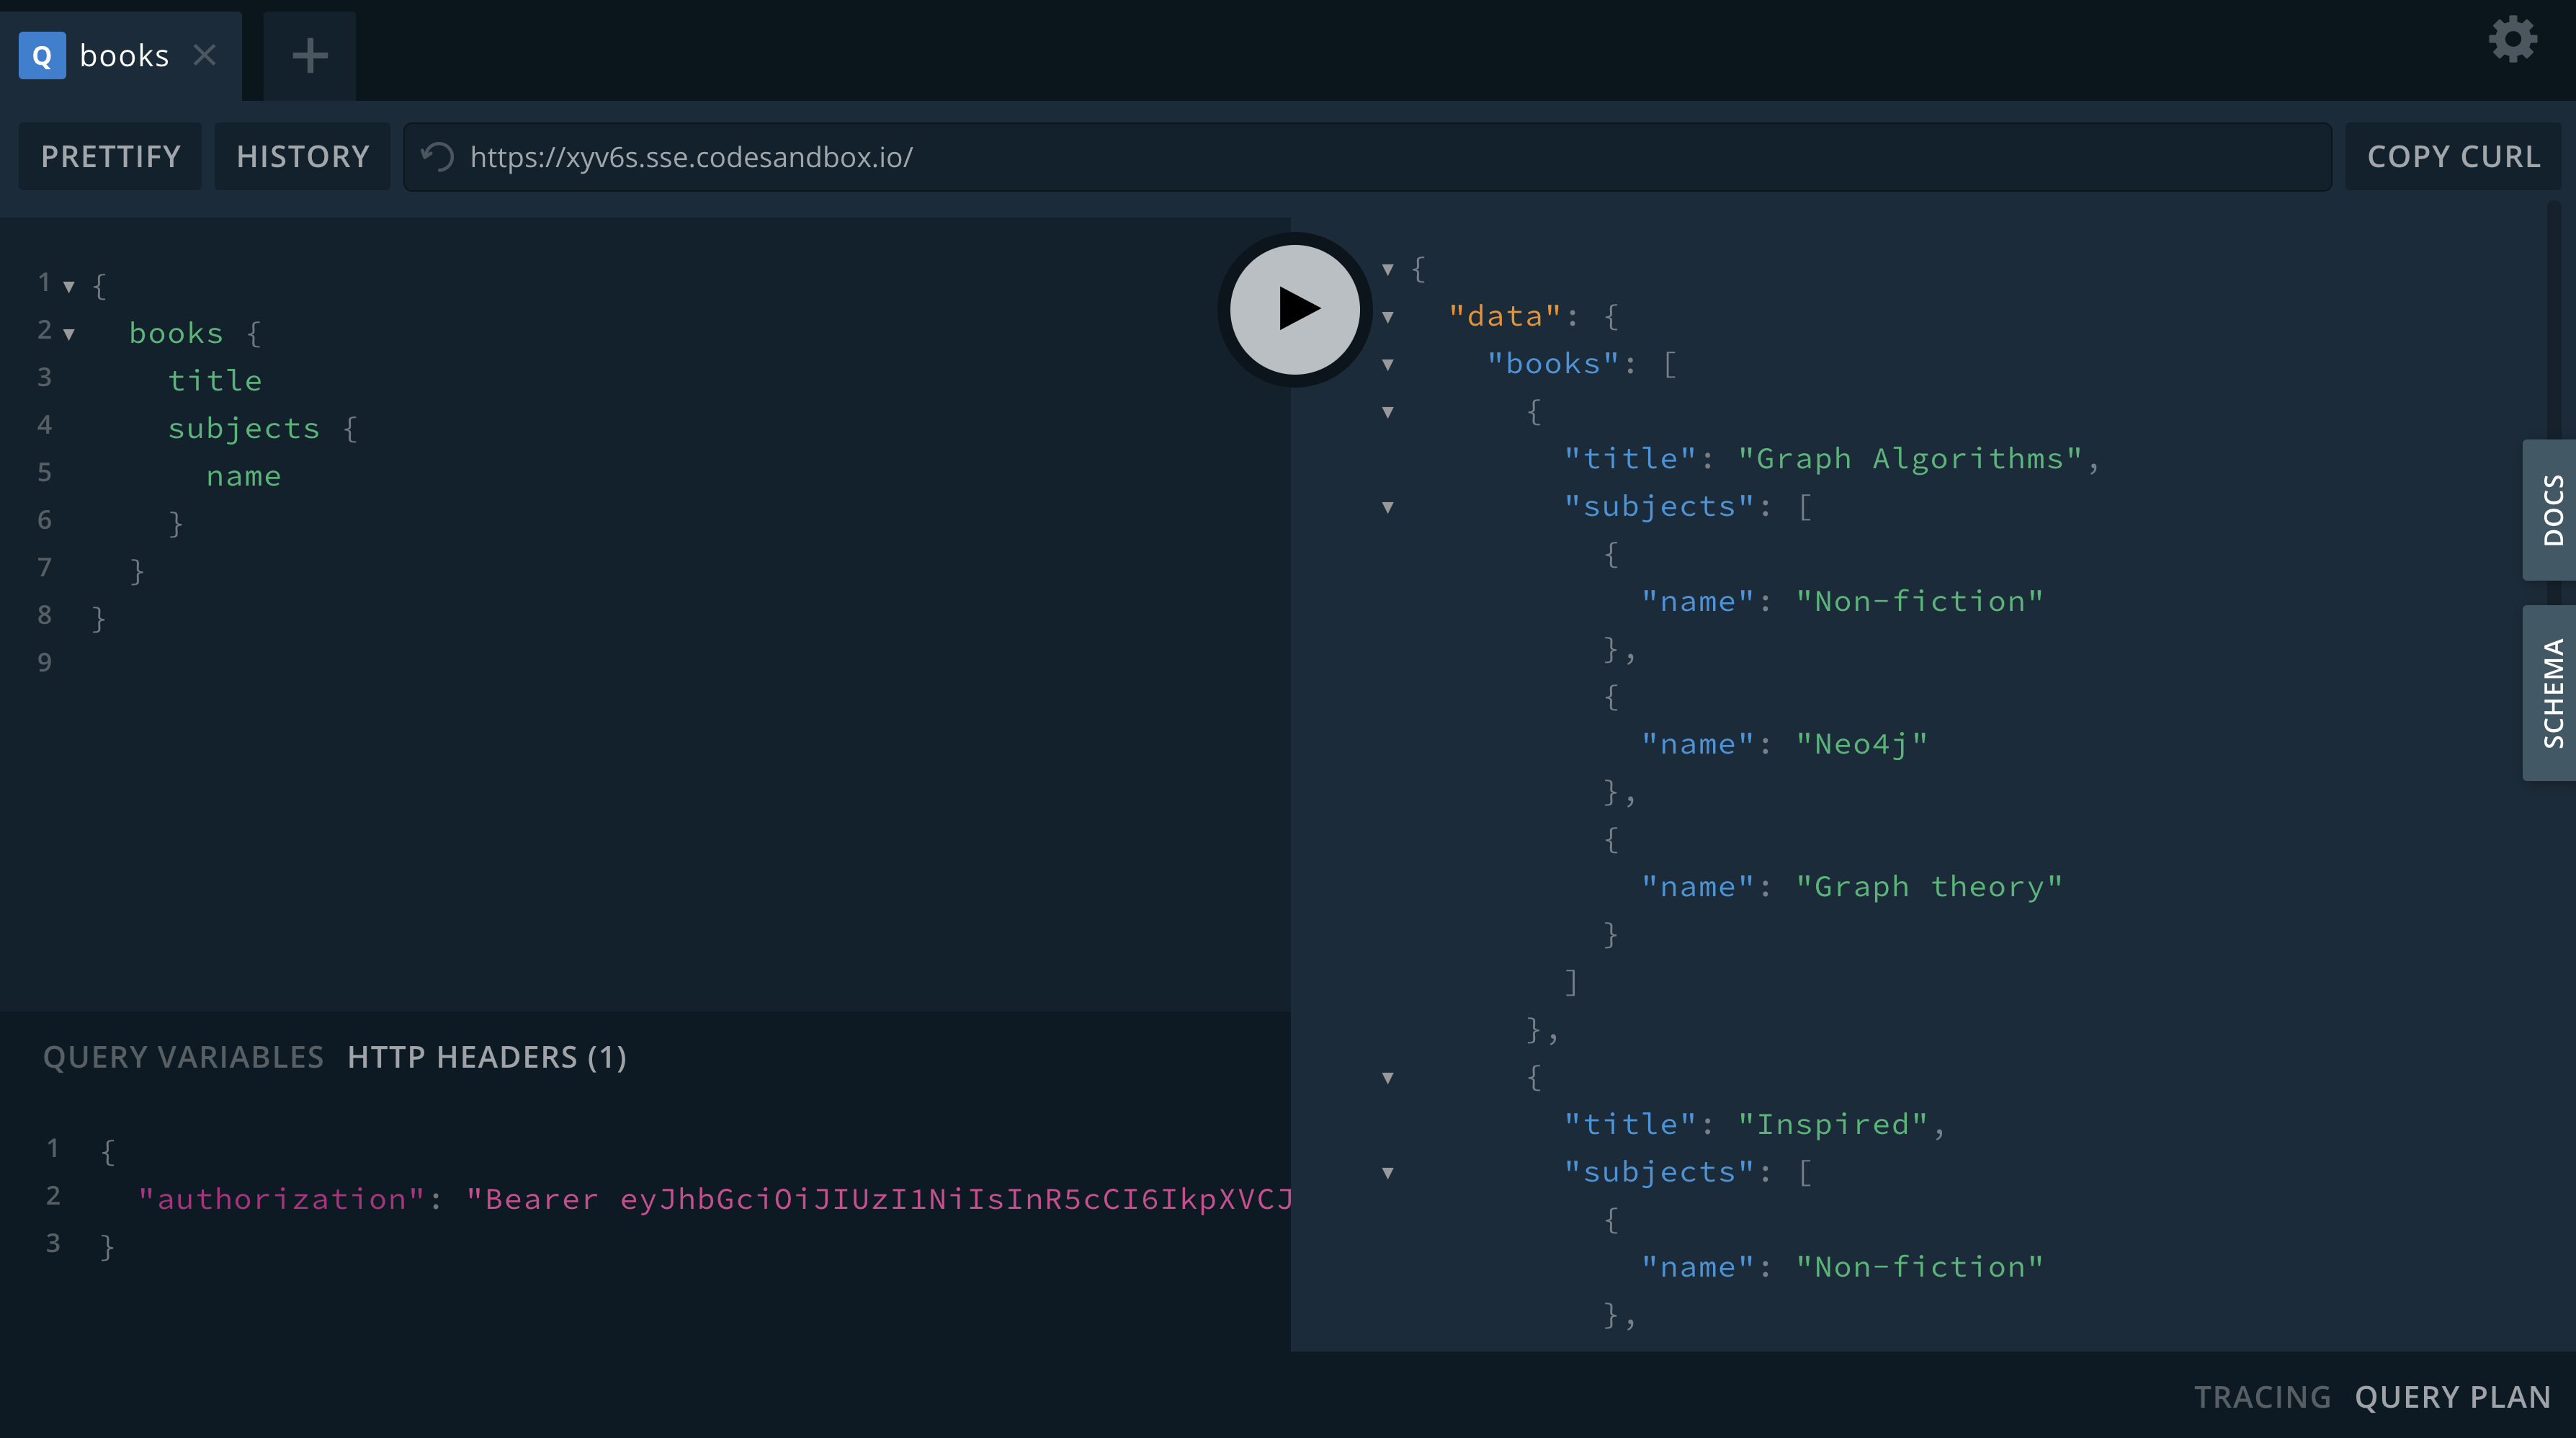
Here we query as usual without including a JWT in the request header:
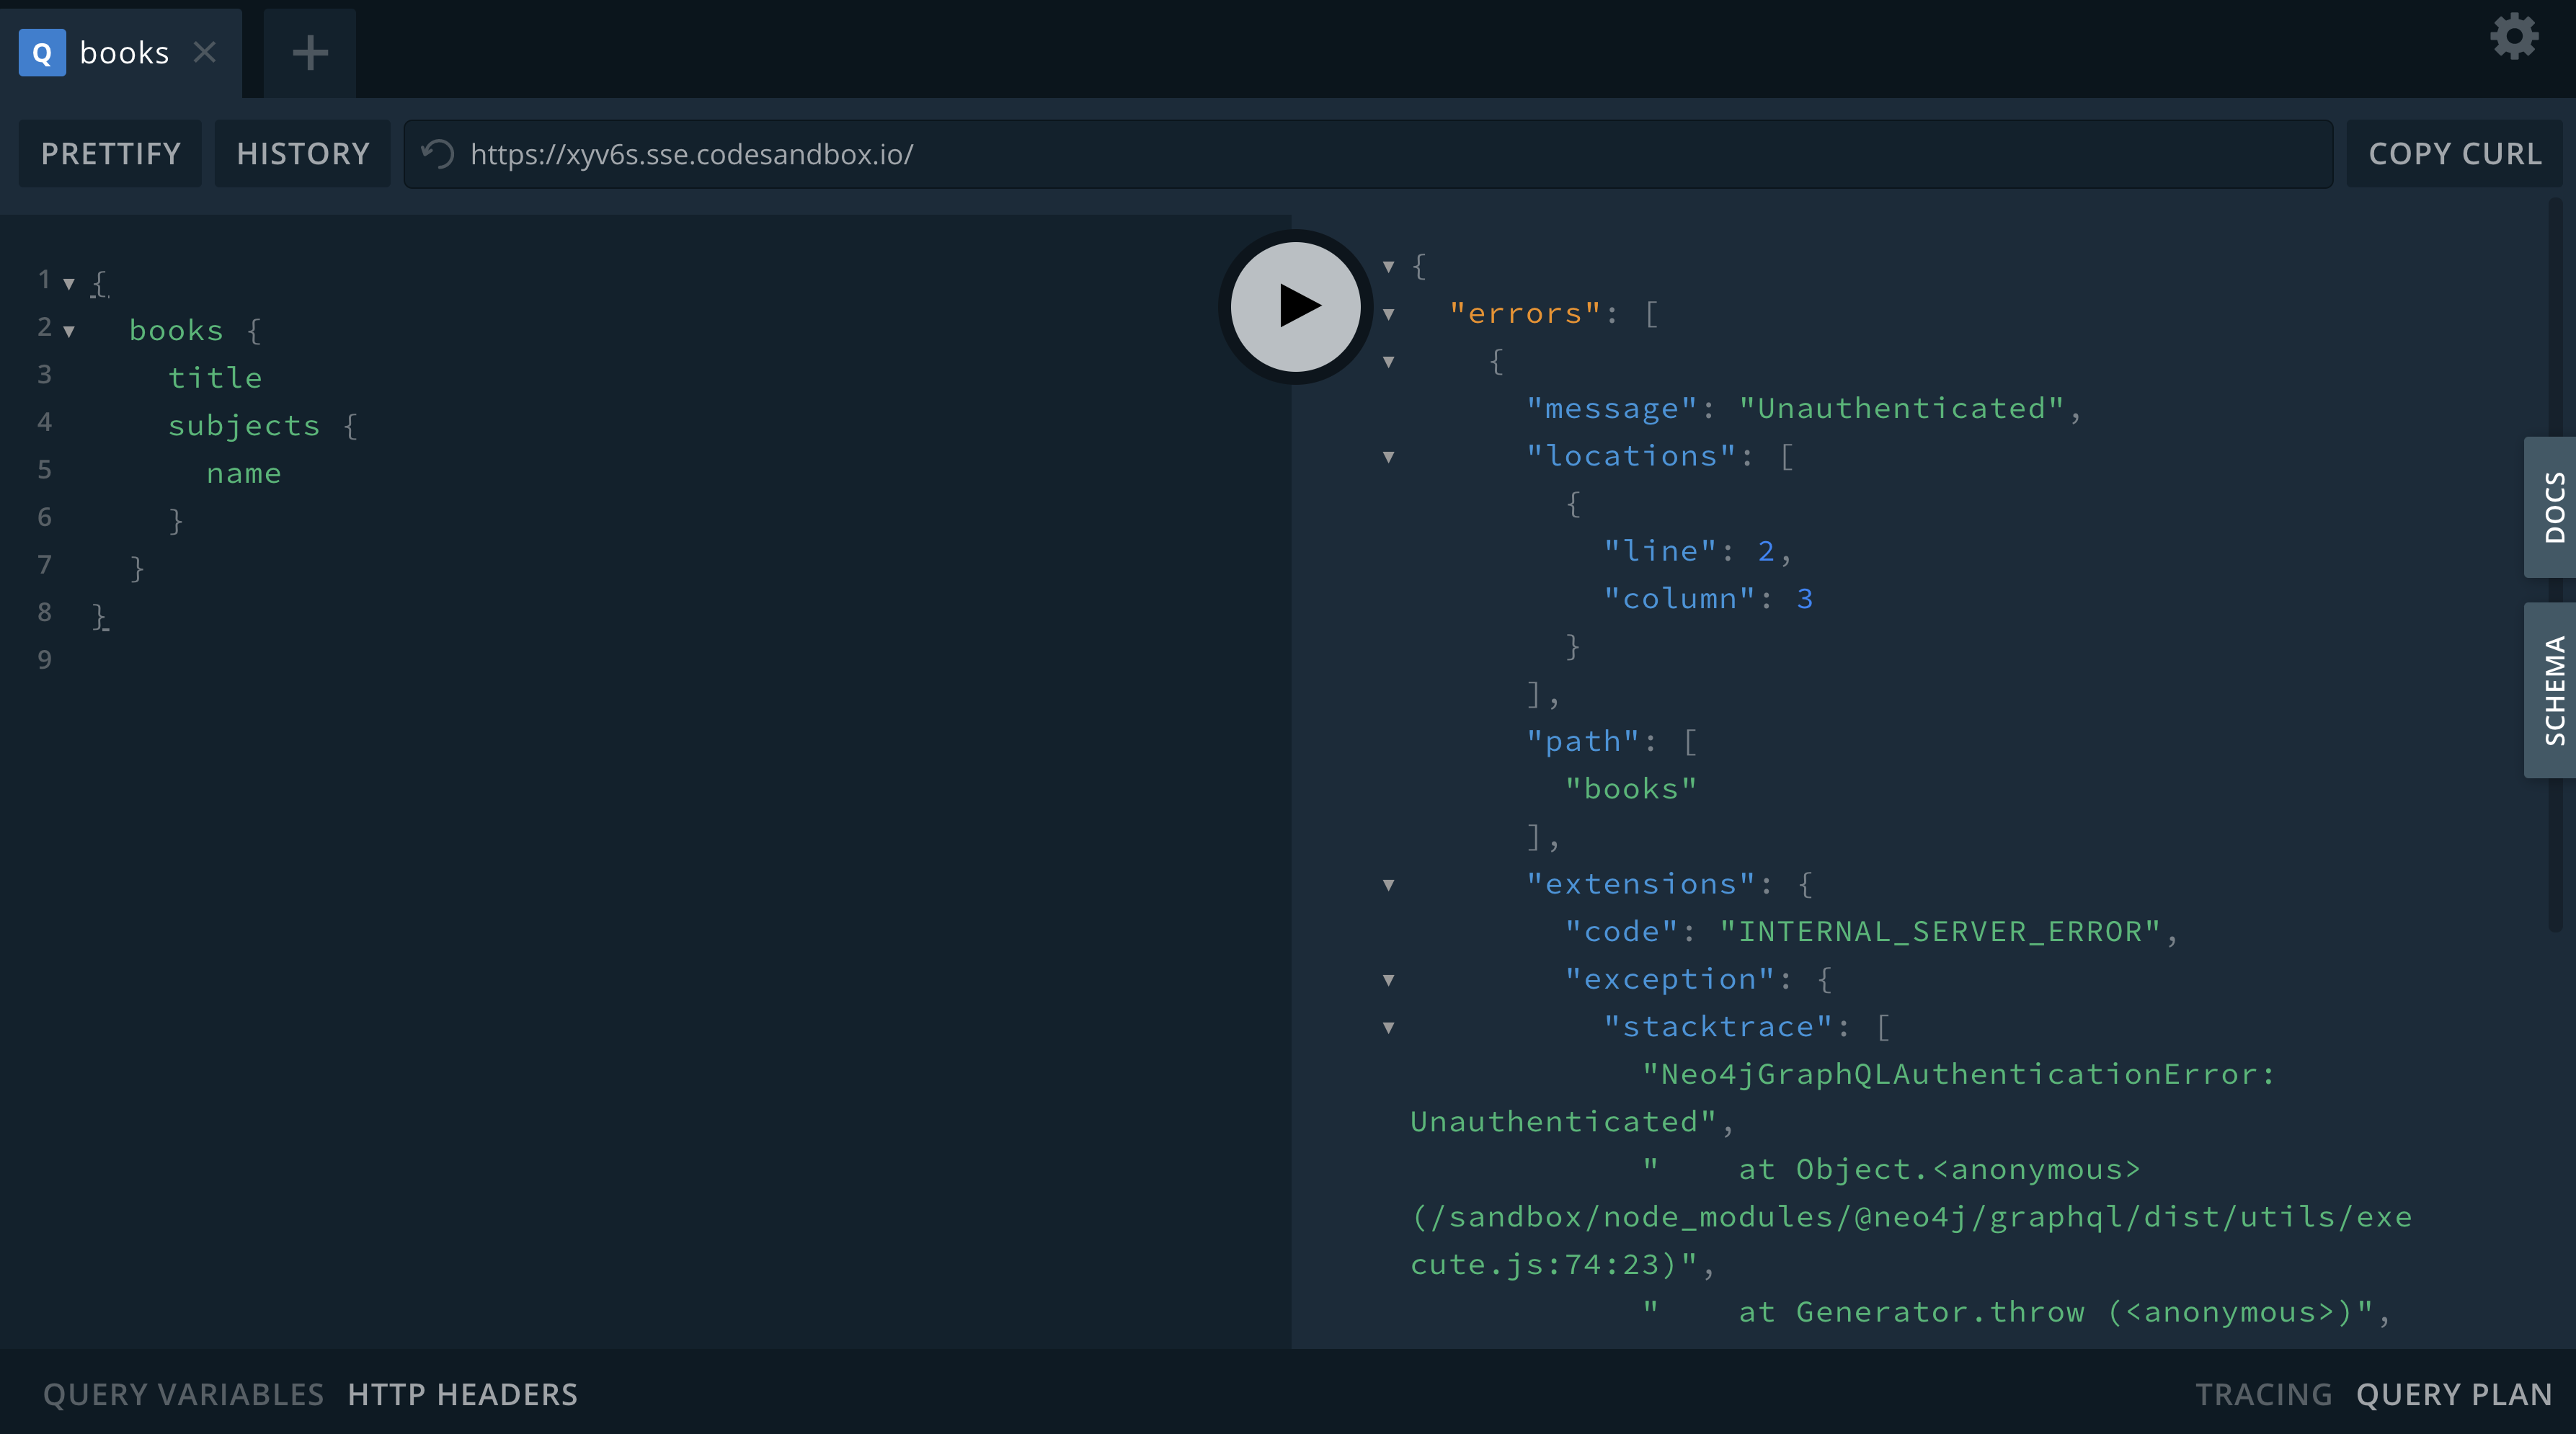
In GraphQL Playground to add a request header we add the following to the "HTTP Headers" box in the lower left window. Now that our request includes a valid token, the data is returned as expected:
Roles
Roles are the next type of authorization rule that we will explore. A JWT payload can include an array of "roles" that describe the permissions associated with the token. For example, our example token for the "admin" user includes the following payload:
{
  "sub": "BobLoblaw7687",
  "roles": ["admin"],
  "iat": 1516239022
}
which means that this user has the "admin" role. Let’s add a rule to our GraphQL type definitions that in order to create, update, or delete books, the user must have the "admin" role.
# schema.graphql

extend type Book @auth(rules: [{operations: [CREATE, UPDATE, DELETE], roles: ["admin"]}])
Note that we’ve included the operations array to specify this rule only applies to CREATE, UPDATE, and DELETE operations - all users will still be able to read book objects, but if any request tries to create or update a book the operation will fail unless a valid "admin" role is included in the token.
Try to execute the following mutation using our example tokens. What error do you get when not using the admin token? What is the result when using the admin token?
mutation {
  createBooks(
    input: {
      title: "Graph Databases"
      isbn: "1491930896"
      subjects: { connect: { where: { name: "Neo4j" } } }
    }
  ) {
    books {
      title
      subjects {
        name
      }
    }
  }
}
Allow
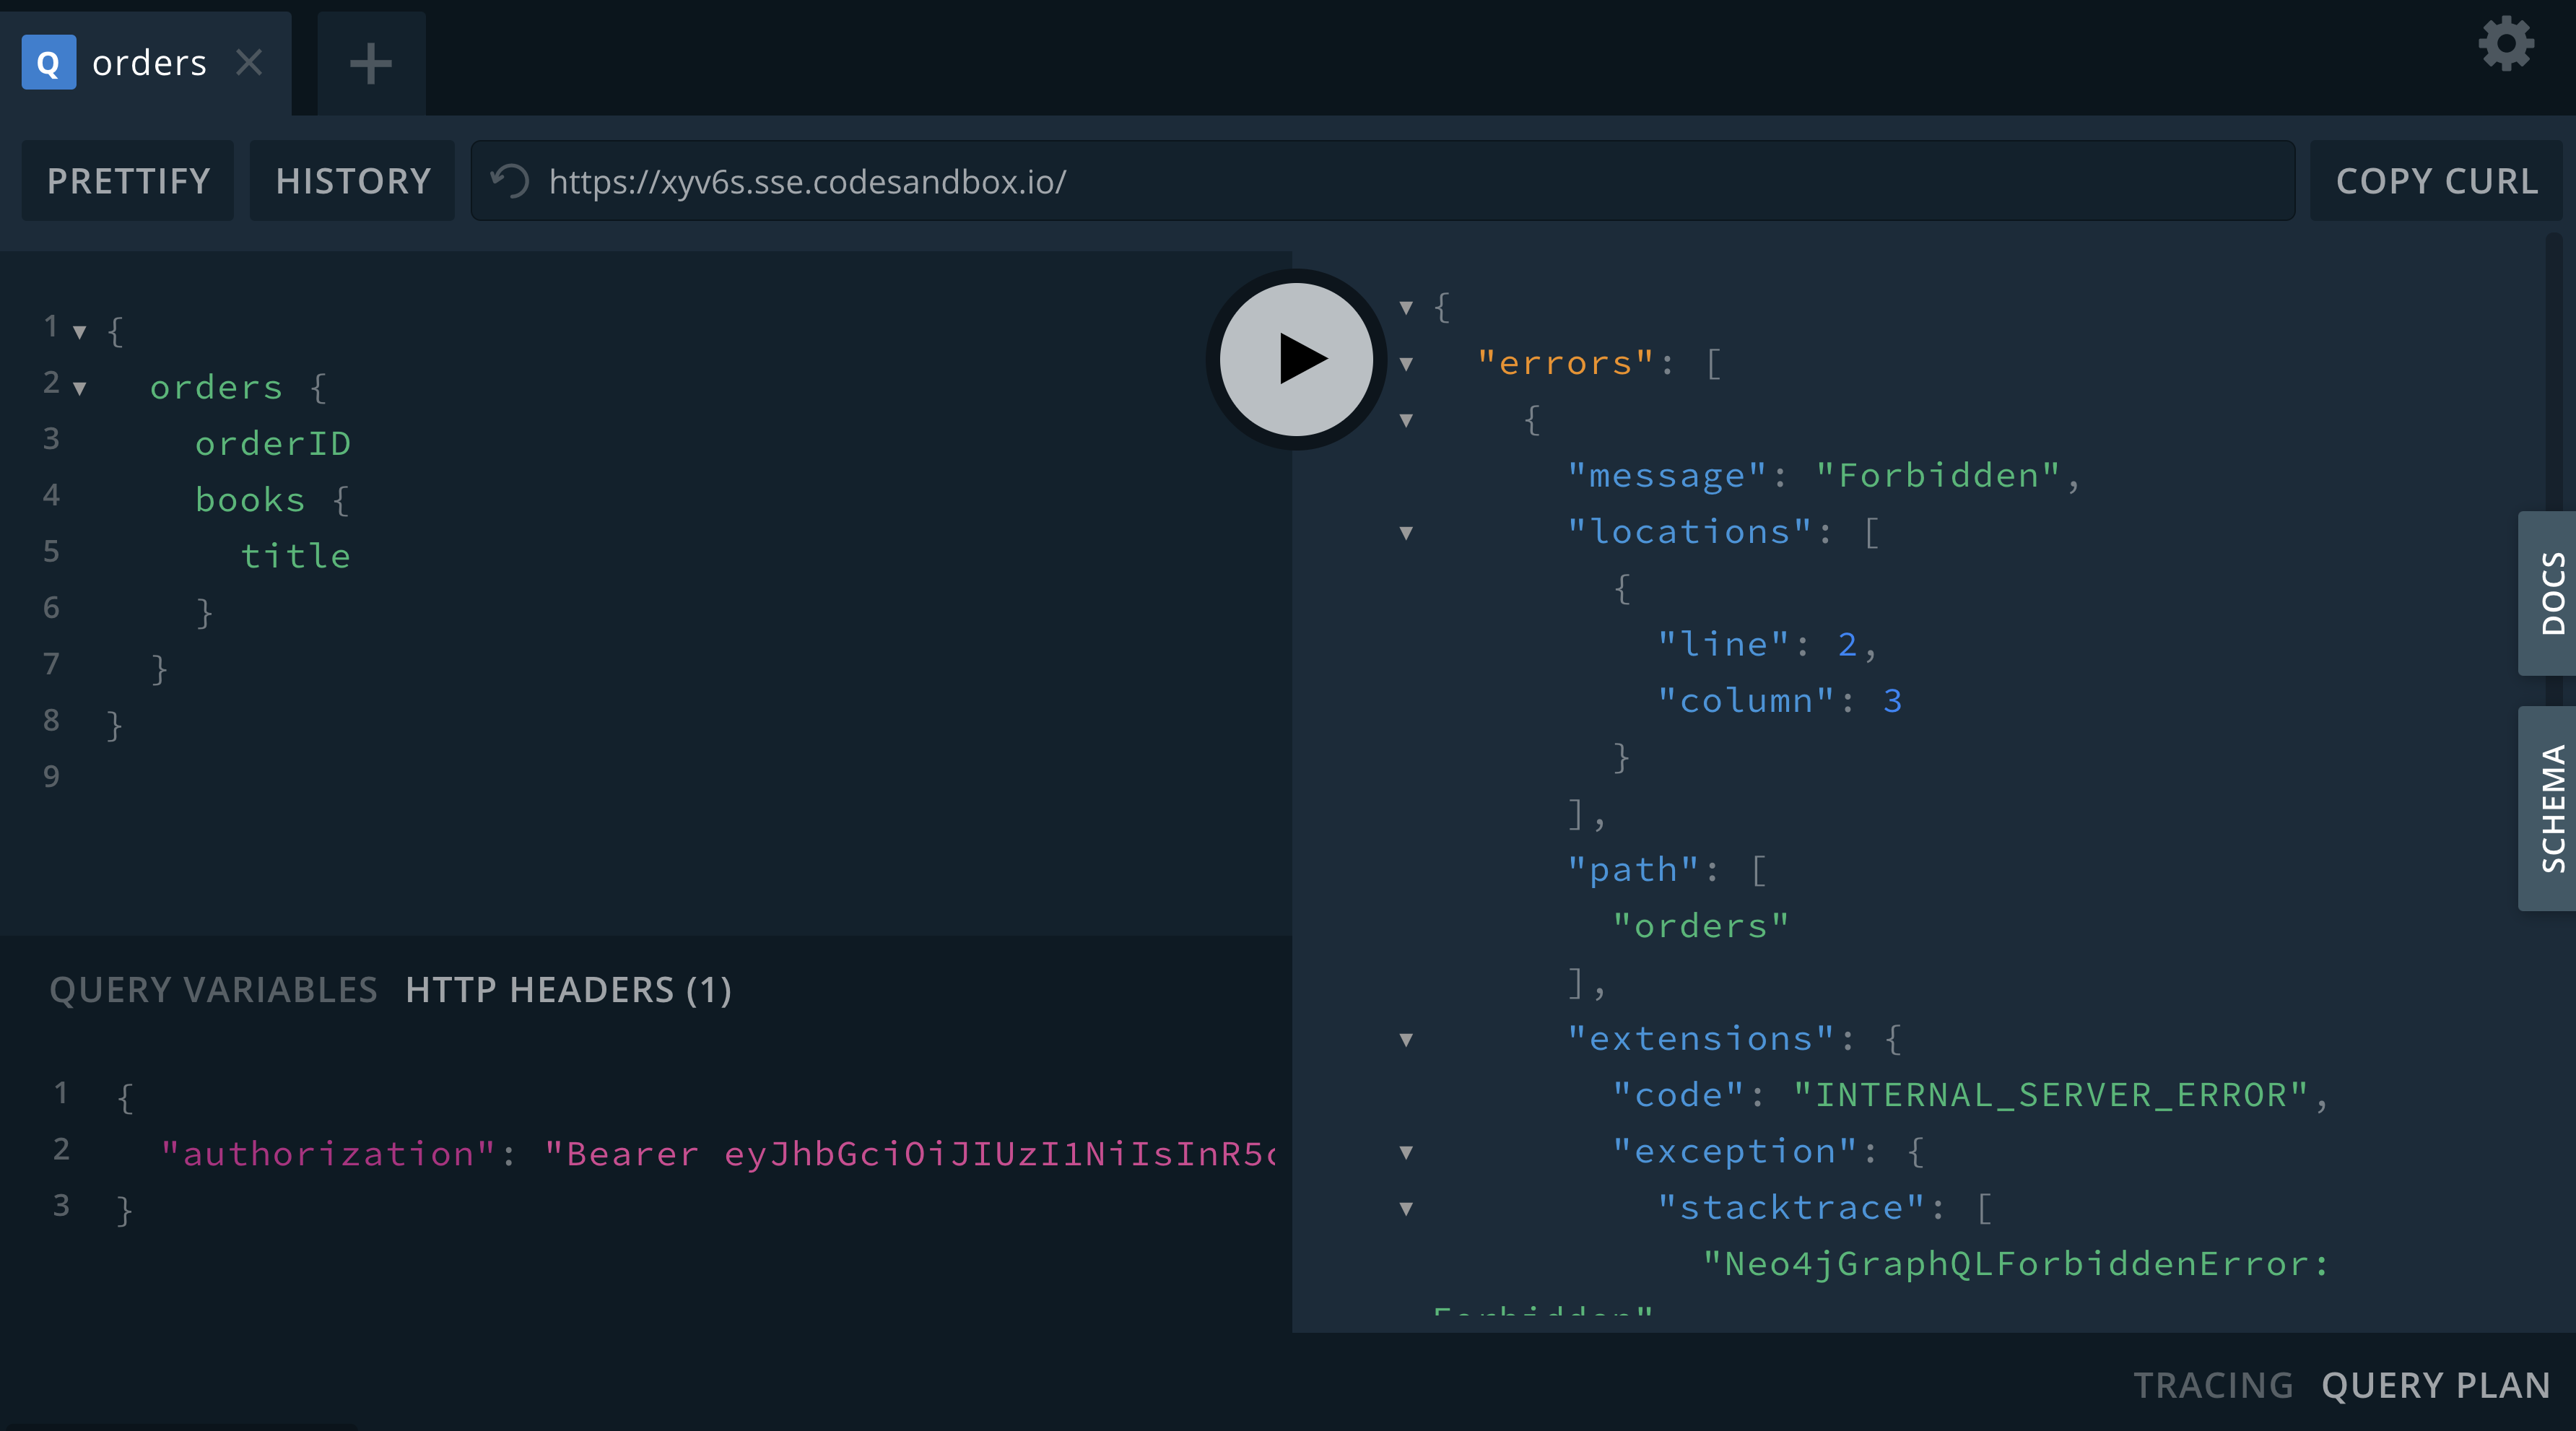
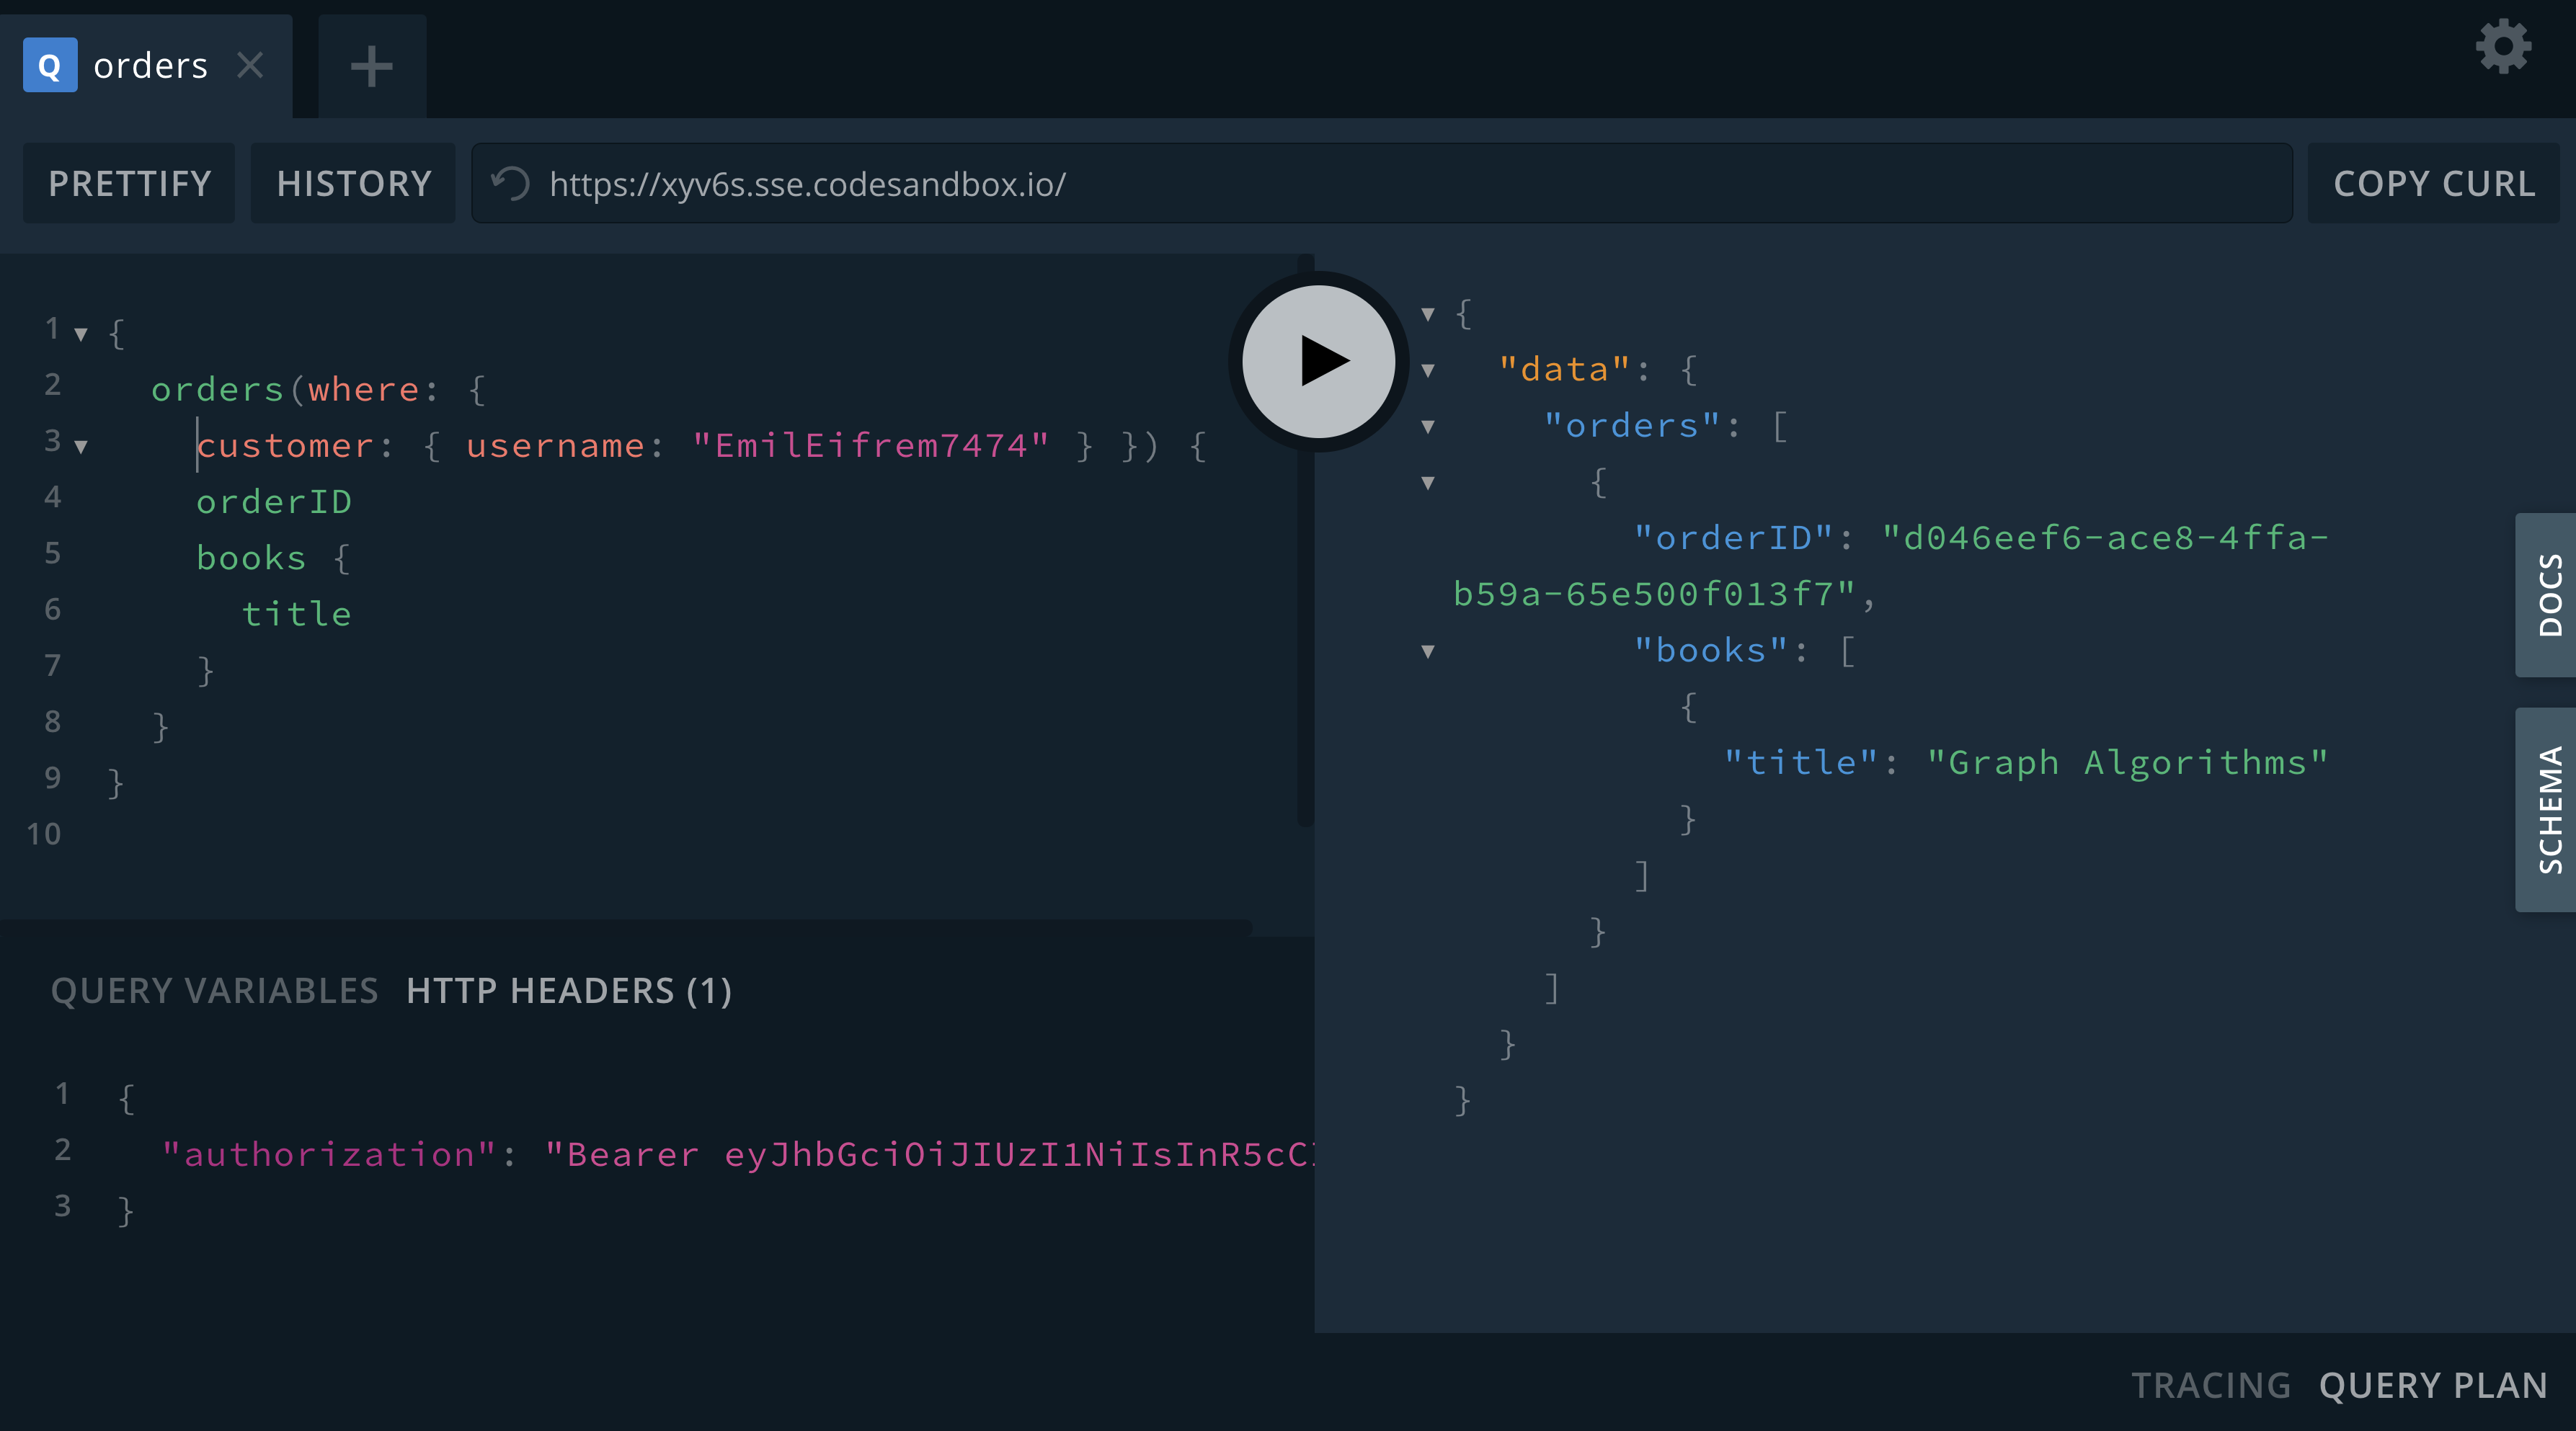
A customer must not be able to view orders placed by other customers. Adding an Allow rule will allow us to protect orders from other nosy customers.
Here we add a rule to the Order type that a customer’s "sub" (the subject) claim in the JWT must match the username of the customer who placed the order.
# schema.graphql

extend type Order @auth(rules: [{allow: {customer: {username: "$jwt.sub"}}}])
If we try to access orders that aren’t ours we’ll see a "Forbidden" error:
but if we filter only for the orders placed by the customer we have access:
Of course we will also allow admins to have access to orders, so let’s update the rule to also grant access to any requests with the "admin" role:
# schema.graphql

extend type Order @auth(rules: [{allow: {customer: {username: "$jwt.sub"}}}, {roles: ["admin"]}])
Where
In the previous example the client was required to filter for orders that the customer had placed. We don’t always want to expect the client to include this filtering logic in the GraphQL query. In some cases we simply want to return whatever data the currently authenticated user has access to. For these cases we can use a Where authorization rule to apply a filter to the generated database queries - ensuring only the data the user has access to is returned.
We want a user to only be able to view their own customer information. Here we add a rule to the Customer type that will apply a filter any time the customer type is accessed that filters for the currently authenticated customer by adding a predicate that matches the username property to the sub claim in the JWT.
# schema.graphql

extend type Customer @auth(rules: [{where: {username: "$jwt.sub"}}])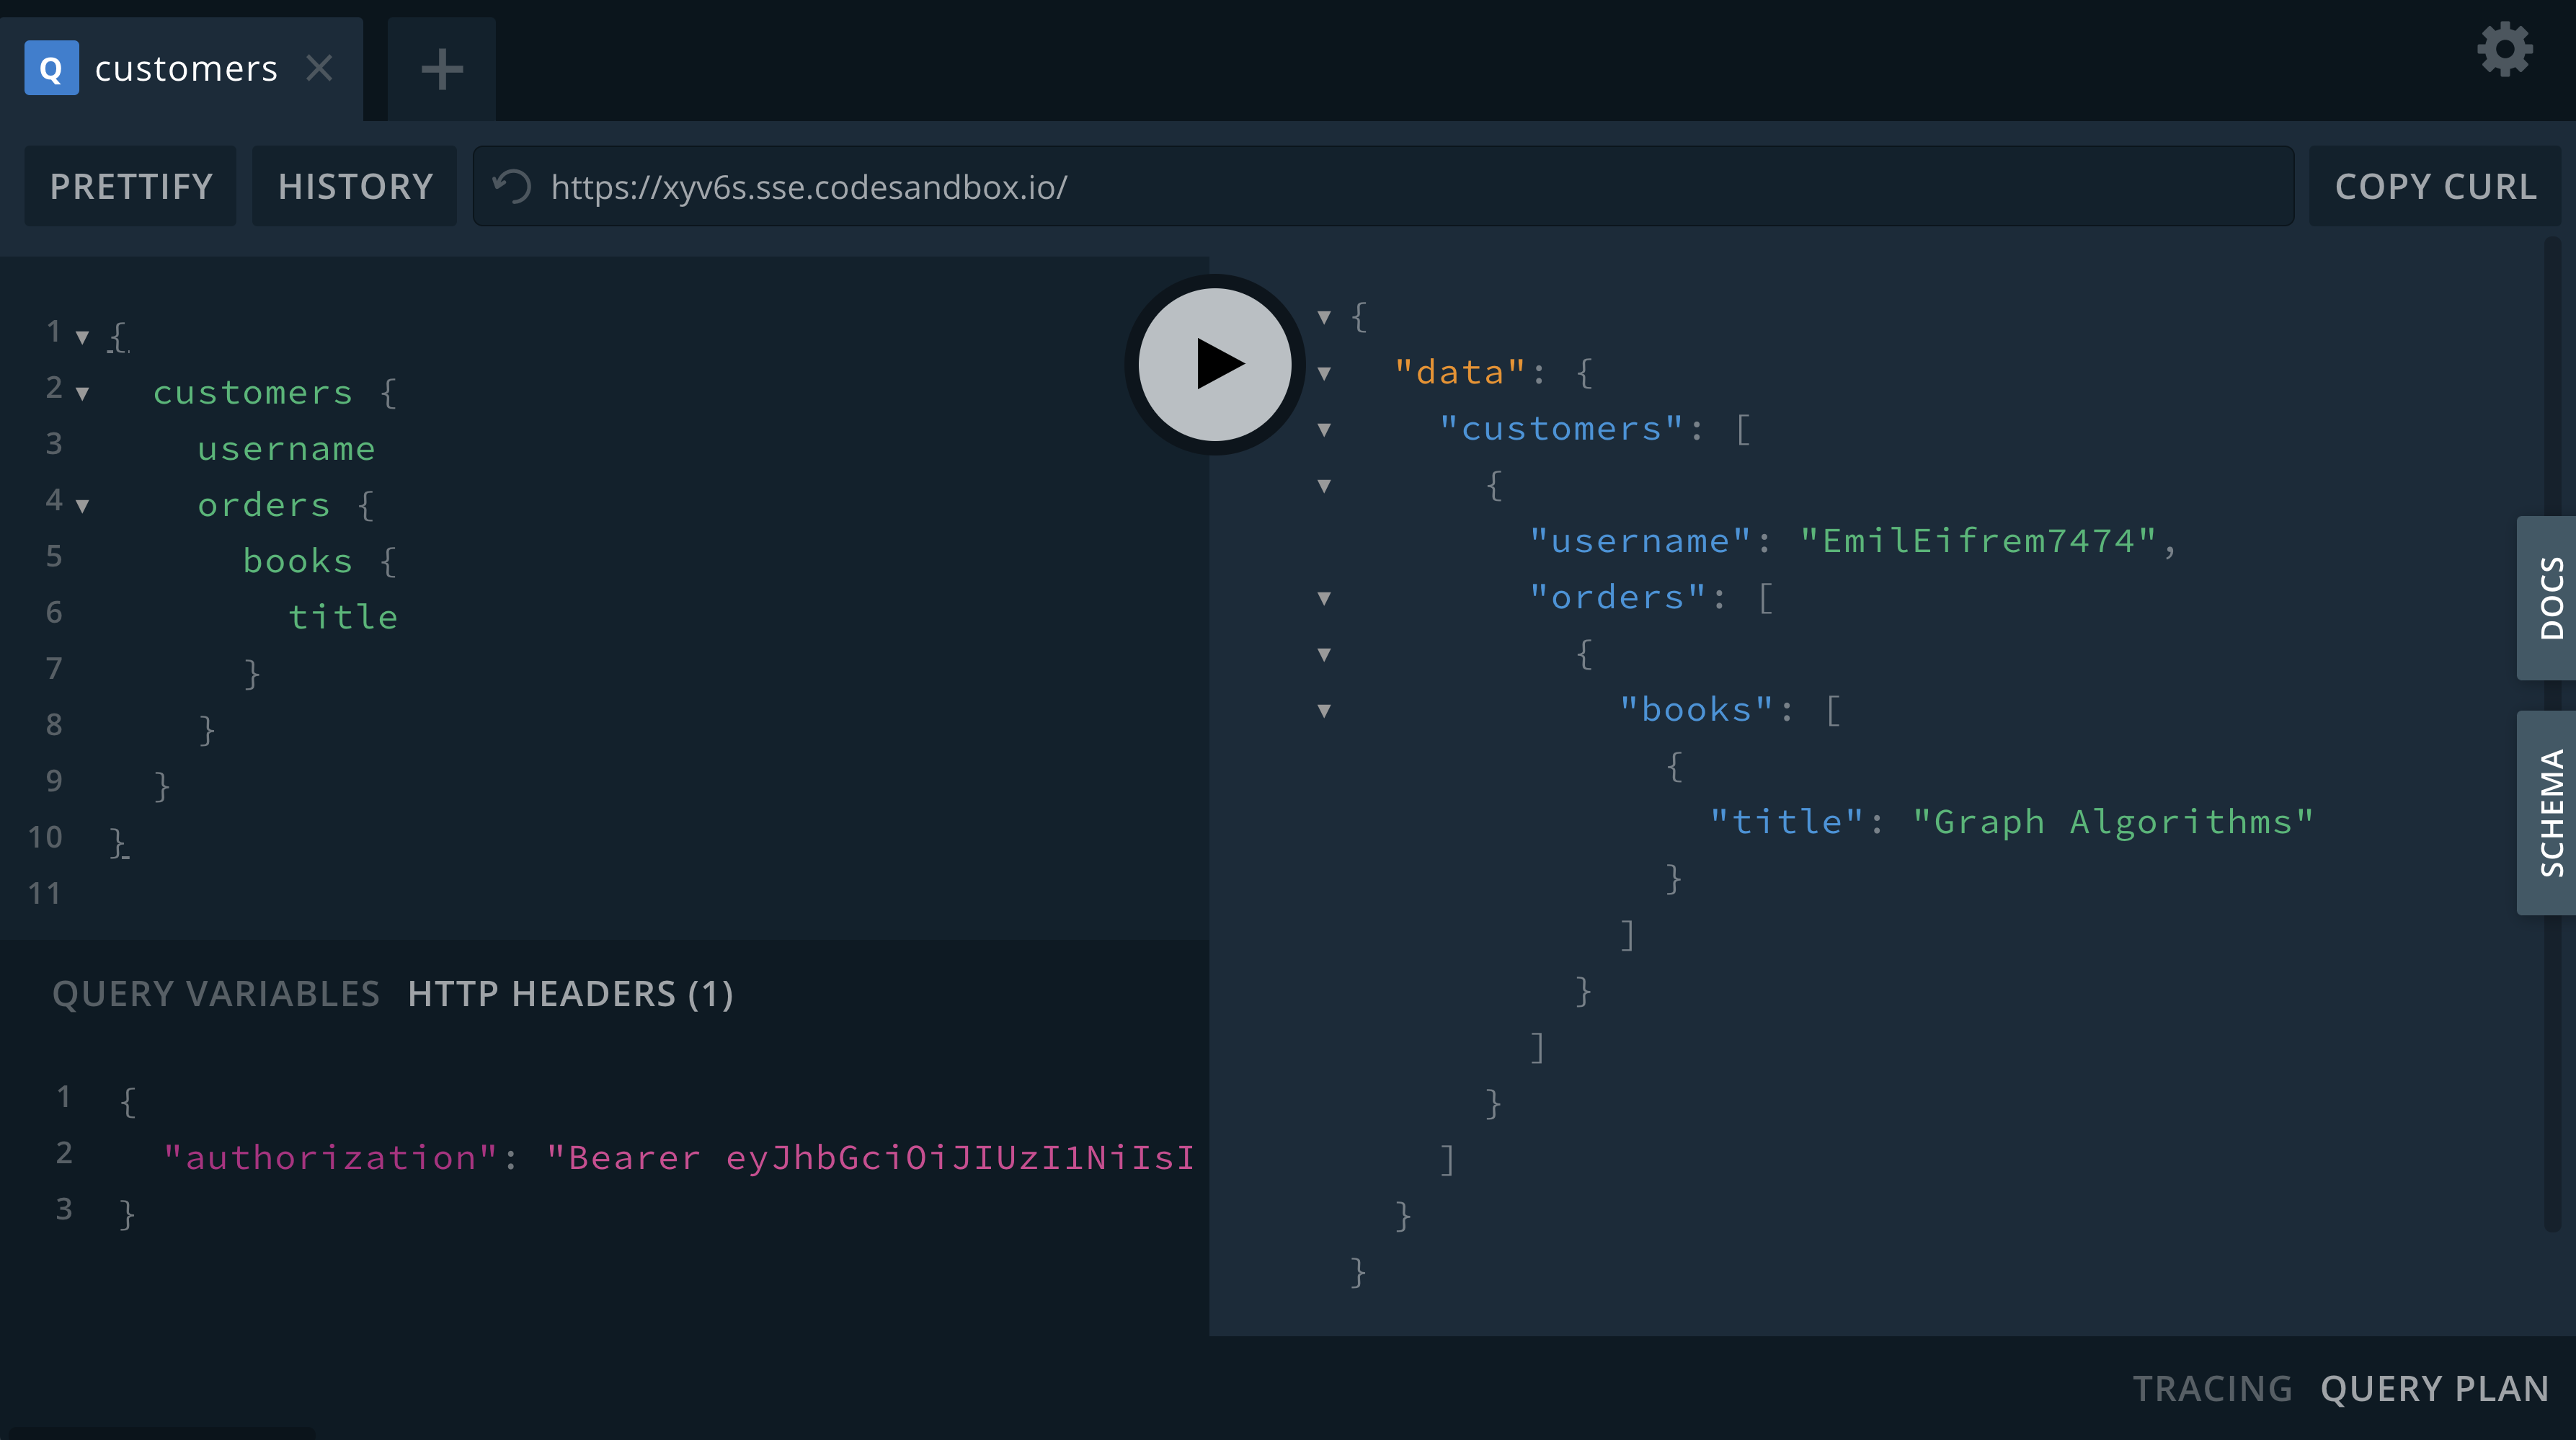
Note that our query doesn’t specify which customer to return - we’re requesting all customers - but we only get back the customer that we have access to.
Bind
The final type of authorization rule that we will explore is the Bind rule. Bind allows us to specify connections that must exist in the graph when creating or updating data based on claims in the JWT.
We want to add a rule that when creating a review, the review node is connected to the currently authenticated customer - we don’t want customers to be writing reviews on behalf of other users! This rule means the username of the author of a review must match the sub claim in the JWT when creating or updating reviews:
# schema.graphql

extend type Review @auth(rules: [{operations: [CREATE,UPDATE], bind: {author: {username: "$jwt.sub"} }}])
If a customer tries to create a review and connect it to a customer other than themselves the mutation will return an error. Try running this mutation using our example JWT. Does it work? Can you tell why?
mutation {
  createReviews(
    input: {
      rating: 1
      text: "Borrring"
      book: { connect: { where: { title: "Ross Poldark" } } }
      author: { connect: { where: { username: "BookLover123" } } }
    }
  ) {
    reviews {
      text
      rating
      book {
        title
      }
    }
  }
}
Auth In Cypher Directive Fields
There are two ways to make use of authorization features when using the @cypher schema directive:
-
Apply the authorization rules
isAuthenticatedandrolesusing the@authdirective. -
Reference the JWT payload values in the Cypher query attached to a
@cypherschema directive.
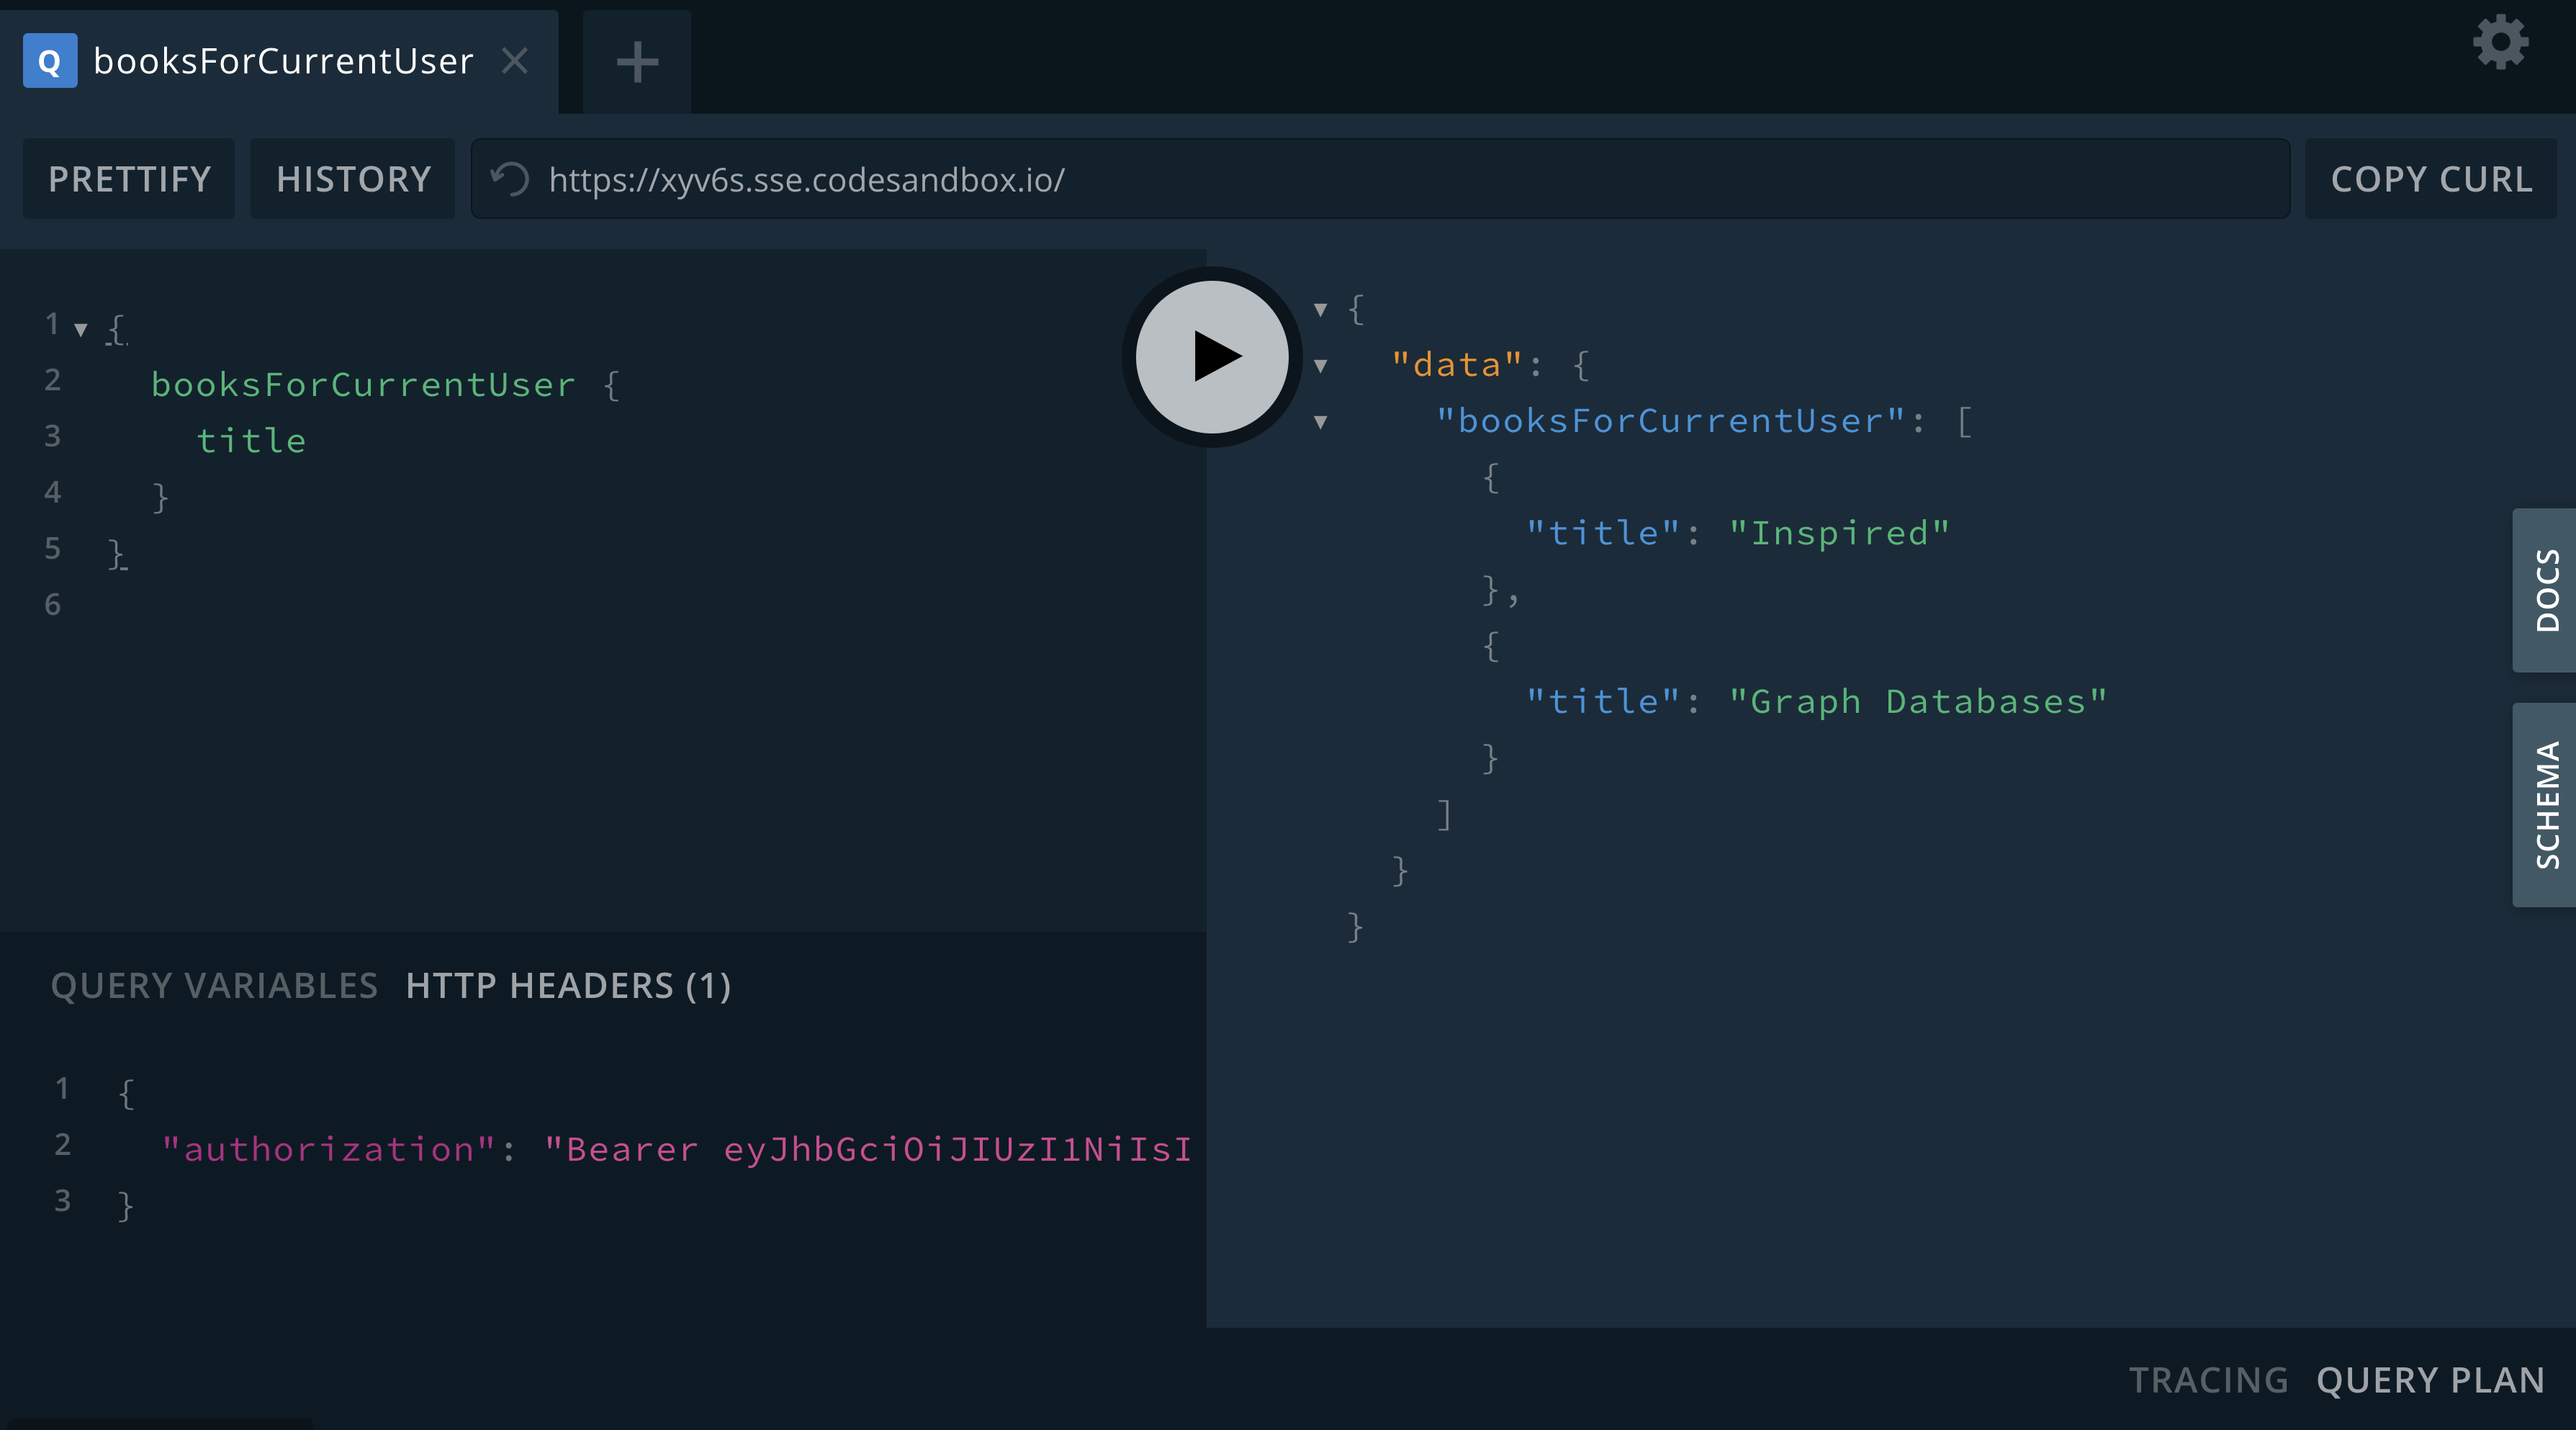
Let’s make use of both of those aspects by adding a Query field that returns personalized recommendations for a customer. In our Cypher query we’ll have access to a $auth.jwt parameter that represents the payload of the JWT. We’ll use that value to look up the currently authenticated customer by username, then traverse the graph to find relevant recommendations based on their purchase history. We’ll also include the isAuthenticated rule since we only want authenticated customers to use this Query field.
# schema.graphql

extend type Query {
 booksForCurrentUser: [Book] @auth(rules: [{ isAuthenticated: true }]) @cypher(statement: """
 MATCH (c:Customer {username: $auth.jwt.sub})-[:PLACED]->(:Order)-[:CONTAINS]->(b:Book)
 MATCH (b)-[:ABOUT]->(s:Subject)<-[:ABOUT]-(rec:Book)
 WITH rec, COUNT(*) AS score ORDER BY score DESC
 RETURN rec
 """)
}
Try running this GraphQL query. What results do you get?
{
  booksForCurrentUser {
    title
  }
}
Exercise: Adding A Customer & Order
-
Update the
schema.graphqlfile adding in the authorization rules we covered above. If you get stuck this Codesandbox includes all the code from this lesson. -
Using the admin token, create a new user.
-
Next, create a JWT token for this user using jwt.io. Use this token to create an order for this user. Be sure to include some books in the order!
-
Next, add a review for the book purchased by this user.
-
Finally, write a query to view the customer’s details, including their order history and their reviews.
Check Your Understanding
Question 1
Decode the following JWT using jwt.io or another method and inspect the payload of the token. What is the value of the sub claim on this token?
eyJhbGciOiJIUzI1NiIsInR5cCI6IkpXVCJ9.eyJzdWIiOiJKZW5ueUNhdDQwNiIsImlhdCI6MTUxNjIzOTAyMn0.rS9h2wbNJDp5mBtj_Of2-I9KnkaMa8xi63nOcFN40bsChoose the correct answer.
-
EmilEifrem7474 -
BookLover123 -
JennyCat406 -
BobLoblaw123
Question 2
Which of the following GraphQL SDL snippets show an authorization rule that states only a user with the role admin can create User nodes.
Select the correct answer.
-
extend type User @auth(rules: [{operations: [CREATE], roles: ["admin"]}]) -
extend type User @auth(rules: [{operations: [CREATE], allow: {role: admin}}]) -
CREATE (u:User) WHERE u.role = "admin"
Summary
In this lesson, we explored how to add authorization rules to our GraphQL API using the @auth schema directive. In the next lesson we explore using the Neo4j GraphQL OGM.
Need help? Ask in the Neo4j Community