How to implement SSO for your Neo4j instance with Auth0

DevOps Engineer, Neo4j
7 min read


SSO allows you to grant access to specific applications (Neo4j Included) with your preexisting user base and centralize user management to an external system to allow for role access control and other features. At Neo4j, we leverage Auth0 for our externally facing customers like many other companies, and there are many other alternatives.
You can read about implementing SSO with Neo4j here. But in this blog post, I will walk you through the use case we use to implement SSO for Neo4j Sandbox and how it might differ from your implementation.
First, configuring SSO can be a pain, but relatively simple once you understand it. Historically protocols like Kerberos, LDAP, and AD (Active Directory) ruled the world of SSO. However, things have changed as the web has become more and more prominent, and SaaS has become the go-to deployment strategy for most companies. OAuth 1.0, OAuth 2.0, OpenID, and OpenID Connect have all become standards for interoperability over the web and are one fundamental thing different than the old methods, and that has to do with state.
The old methods required an open connection or a constant checking of the user state while interacting with applications, which was fine to some extent but not as scalable as the stateless approach used by the newer methods. As our world expands and it’s common for a computer to change connection multiple times during a day, cell phones connecting to different cellular networks without our intervention can cause a persistent connection to close and lose that state.
Instead, the newer methods use tokens like a passport, where a specific token is cryptographically signed to be able to be verified by the issuing party. We will not go into the process of doing this, but the standards above describe how to do it. The format to do this is called JWT (JSON Web Tokens), or in some cases, an access token coupled to a specific user session where the backend will handle how to exchange tokens for user information.
In our example, we want to allow access to Neo4j that is user-specific with the ability to share instances with other users. Your needs might look different; for example, you might want to tether your access group to an organizational group in your backing user store. If you’re using something like Auth0 as an IdP there is a feature called Flow where you can inject information for your application into the issued token for the user. In our case, we will check a database for what instances the user can access. (Don’t forget to add the Neo4j driver and connection credentials as secrets, and the database query might look specific to your application; alternatively, you can do an LDAP lookup or equal to verify the user’s access)
var neo4j = require('neo4j-driver')
exports.onExecutePostLogin = async (event, api) => {
// Should only care about login-flows that are related to our client
if(event.client.client_id ===<<CLIENT_ID>>){
// Let's create a namespace group to hold our roles
const namespace = 'https://sandbox.neo4j.com';
const user_id = event.user.user_id
// Setup database connection
const NEO4J_PASS = event.secrets['NEO4J_PASS']
var roles = ["sandbox:user", "sandbox:user:" + user_id,]
var driver = neo4j.driver('<some-db-host>', neo4j.auth.basic('neo4j', NEO4J_PASS ))
var session = driver.session({ defaultAccessMode: neo4j.session.READ })
// Ask the database what Neo4j instances the user has access to.
const result = await session.run("MATCH (u:User {auth0_key: $sub }) -[:IS_GRANTED_ACCESS_TO] - (s:Sandbox) WHERE s.running = true return u,collect(s) as sbs",{
sub: user_id
})
// Build the necessary roles
result.records.forEach(record => {
  record.get('sbs').forEach(sb => {
    roles.push("sandbox:"+ sb.properties['sandbox_hash_key'])
  })
})
// Attach the roles to the namespace
api.idToken.setCustomClaim(`${namespace}/roles`,roles );
api.accessToken.setCustomClaim(`${namespace}/roles`, roles);
}
};
When finishing the login flow in our application, we should have an id_token that looks something like this decoded:
{
 "https://sandbox.neo4j.com/roles": [
 "sandbox:user",
 "sandbox:user:<<some_auth0_id>>",
 "sandbox:<<some_instance_id>>"
 ],
 "iss": "https://login.neo4j.com/",
 "sub": "<<some_auth0_id>>",
 "aud": "<<audience_id>>",
 "iat": 1676902566,
 "exp": 1676988966,
 "nonce": "NGFySFlPeGRFb1NXdktnVUJWVVRMRnRuOFVpLXpLZTQ5WF8zUllQM35CUA=="
}
And if you can verify the token’s signature, we can trust that information was published by our issuer.
Provisioning Neo4j can be done in multiple ways, but ultimately we need to edit the configuration file for our Neo4j instance to use SSO when we want to login into the database. Using the official Neo4j docker image, you can configure settings as environmental variables, which will then be applied to the configuration in runtime; this helps if you don’t want to build your image, but can also be dynamically set up by your provisioning agent if you are running it in Kubernetes or other orchestrated environments. This blog post will show how it can be done with docker.
First, we will create a file called “neo4j-instance.env” in our working environment and configure our environmental variables.
# ./neo4j-instance.env
# Accept Licence agreement for enterprise version, as SSO is only available for enterprise edition
NEO4J_dbms_security_auth__enabled=true

NEO4J_ACCEPT_LICENSE_AGREEMENT=yes
#Here and next line we set providers auth providers, in our case we will call it oidc-sbpx and will also alow login with native credentials
NEO4J_dbms_security_authentication__providers=oidc-sbpx,native NEO4J_dbms_security_authorization__providers=oidc-sbpx,native
#Custommize the text for our login button that will be used by our frontend-applications such as Browser and Bloom
NEO4J_dbms_security_oidc_sbpx_display__name=Sandbox Login
#Exchange values for your domain hosting your well-known endpoint.
NEO4J_dbms_security_oidc_sbpx_well__known__discovery__uri={oidc_domain}}/.well-known/openid-configuration
#What audience id_tokens should the neo4j accept, would be the same as "aud" in our oidc token
NEO4J_dbms_security_oidc_sbpx_audience={{audience_id}}
#Tell neo4j what type of token we're providing in our callback
NEO4J_dbms_security_oidc_sbpx_config=token_type_principal=id_token;token_type_authentication=id_token
# Here we set some extra paramameters for our auth flow.
NEO4J_dbms_security_oidc_sbpx_params=client_id='{{audience_id}}';response_type=code;scope=openid profile email
# What auth flow we should use, in our case pkce will work just fine.
NEO4J_dbms_security_oidc_sbpx_auth_flow=pkce
# Setup the claim in your token that neo4j should lookup roles to map towards. In our example that would be: https://sandbox.neo4j.com/roles
NEO4J_dbms_security_oidc_sbpx_claims_groups={{groups_claim}}
# We set an admin user to our instance, and all others that are allowed access will be granted the architect role.
NEO4J_dbms_security_oidc_sbpx_authorization_group__to__role__mapping=sandbox:user:{{some_auth0_id}} = admin; sandbox:{{some_instance_id}} = architect;
# Enable authentication logging, that might help you with debugging.
NEO4J_dbms_security_log__successful__authentication=true
Now don’t forget to exchange the variables for your IdP’s environment. You can check out the tutorial here for more information about what setting needs to be configured.
Now that everything is set up, we can run Neo4j with docker by running the following.
docker run - rm -it - env-file=neo4j-instance.env -p7474:7474 -p7687:7687 neo4j:enterprise
For this to work, you will have to allow access to the web application on port 7474 from your IdP’s settings. If you’re running from localhost, you’ll have to set callback urls, logout urls, web origins, and cors settings to allow “https://localhost:7474/browser/, https://localhost:7474/bloom/”
And that’s it. You should now be able to log in to your instance by selecting SSO In your browser application, just like we do in the sandbox described in this blog post.
How to Implement SSO for Your Neo4j Instance With Auth0 was originally published in Neo4j Developer Blog on Medium, where people are continuing the conversation by highlighting and responding to this story.
Share Article


Explore
Related Articles
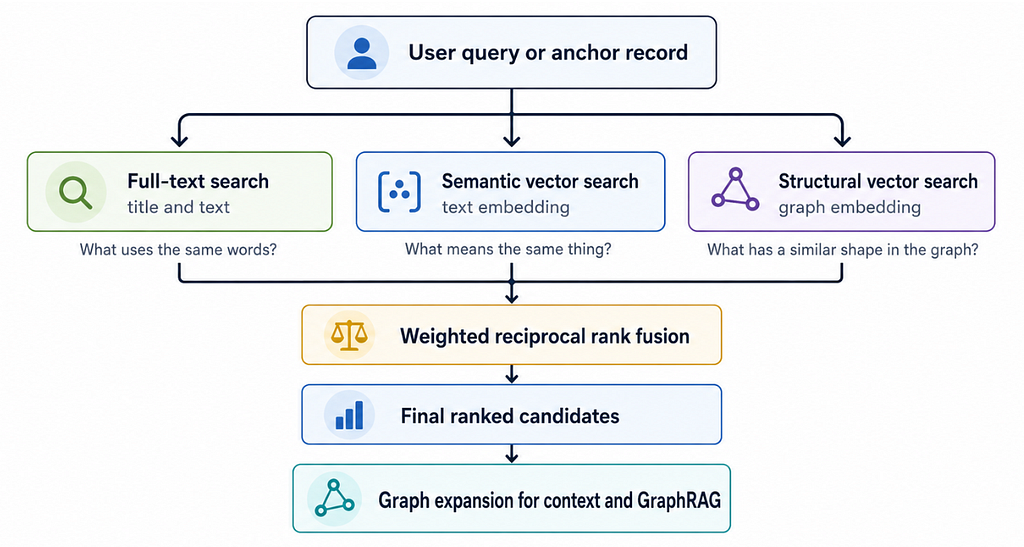
Hybrid Search in Neo4j: Full-Text, Vectors, and Graph Topology with Cypher