Configuring Neo4j Single Sign-On (SSO)Enterprise Edition
Neo4j supports SSO authentication and authorization through identity providers implementing the OpenID Connect (OIDC) standard. This page features detailed examples of how to configure Single Sign-On (SSO) for several identity providers. It also presents frequently asked questions and solutions to common problems encountered when configuring SSO.
|
The following configurations are crafted for a Neo4j Browser served on http://localhost:7474/ (the default URL when starting the database on Therefore, when reproducing them in the identity providers, you must modify the redirect URI to include the URI serving your Neo4j Browser application. For example: http://localhost:7474/browser/?idp_id={provider}&auth_flow_step=redirect_uri
|
SSO works in the following way:
-
The server (Neo4j DBMS) contacts the identity provider (Okta, Entra ID, Google, etc.) and fetches the JSON Web Keys (JWKs) from the provider.
-
The client (e.g., Bloom, Neo4j Browser, etc.) asks the user for credentials and contacts the identity provider.
-
The identity provider responds with a JSON Web Token (JWT), a JSON file containing fields (claims) relative to the user (email, audience, groups, etc.).
-
The client provides the server with the JWT, and the server verifies its signature with the JWKs.
-
Optionally, you can control the authentication and authorization on a user level by setting
dbms.security.require_local_usertotruein the neo4j.conf file and the auth providers for the users, which authentication and authorization you want to control, using Cypher. This setting mandates that users with the relevant auth provider attached to them must exist in the database before they can authenticate and authorize with that auth provider. For information on how to modify or create users in this mode, see Manage users.
This mode allows you the following using Cypher:-
Suspend SSO users.
-
Set a home database for an SSO user.
-
Set a user-friendly name for an SSO user (rather than relying on the external identifier).
-
Set a password for an SSO user.
-
Set a password change requirement for an SSO user.
-
For further information and examples, see Configure SSO at the user level using auth providers.
|
JWTs must always contain a value for |
Okta
The following examples show how to configure Okta for authentication and authorization using access tokens and ID tokens. It assumes that you are using Okta Developer Edition Service. For the complete guide on how to customize tokens returned from Okta with a groups claim, see the Okta official documentation.
Configure the client
-
From the left-hand side of the Okta dashboard, navigate to Applications and click Create App Integration.
-
Select OIDC - OpenID Connect for Sign-in method and Single-Page Application for Application type.
-
Click Next.
-
Configure the client with the appropriate redirect URI.
-
Add a name for the app integration.
-
Add the Sign-in redirect URIs, for example, http://localhost:7474/browser/?idp_id=okta&auth_flow_step=redirect_uri. This URI will accept returned token responses after successful authentication.
-
-
Add the Sign-out redirect URIs, for example, http://localhost:7474/.
-
In the Assignments section, select Skip group assignment for now.
-
Click Save.
-
Take note of the Client ID. You will need it later when configuring the Okta parameters and the Well-known OpenID Connect endpoint in the neo4j.conf file.
Assign Okta groups to the application
-
From the left-hand side of the Okta dashboard, navigate to Dashboard → Directory → Groups, and click Add Group.
-
Add a name for the group, for example,
engineers, and click Save. -
Click the group you just created and then click Assign people.
-
Add users to the group. Users can be added to a group either on user creation or by editing the group.
-
Assign the group to an application.
-
Click Applications and then Assign Applications.
-
Select the application you created earlier and click Assign.
-
Access token
This example shows how to configure Okta for authentication and authorization using access tokens and how to configure Neo4j to use them.
Add a groups claim to access tokens
-
From the left-hand side of the Okta dashboard, navigate to Security → API.
-
Click the default authorization server (the one that shows
api://defaultas audience) to return thegroupsclaim in access tokens:-
On the Claims tab, click Add Claim.
-
Add a claim with the name
groups. -
From the Value type dropdown, select Groups.
-
From the Filter dropdown, select Matches regex and the value
.*. -
Click Create.
-
Configure Neo4j
-
Configure Neo4j to use Okta authentication by configuring the following settings in the neo4j.conf file:
dbms.security.authentication_providers=oidc-okta
dbms.security.authorization_providers=oidc-okta
dbms.security.oidc.okta.display_name=Okta
dbms.security.oidc.okta.auth_flow=pkce
dbms.security.oidc.okta.well_known_discovery_uri=https://dev-54101110.okta.com/oauth2/default/.well-known/oauth-authorization-server
dbms.security.oidc.okta.audience=api://default
dbms.security.oidc.okta.claims.username=sub
dbms.security.oidc.okta.claims.groups=groups
dbms.security.oidc.okta.params=client_id=0oao2rybx5hIERt5W5d7;response_type=code;scope=openid profile email
dbms.security.oidc.okta.authorization.group_to_role_mapping= "engineers" = admin; \
                                                             "collaborators" = reader
The
token_type_principaland thetoken_type_authenticationare omitted, meaning access tokens are used instead. -
Log in with your Okta SSO credentials using the email of an
engineerrole user that results in anadminrole in the database: Figure 1. Okta OIDC successful login
ID token
This example shows how to configure Okta for authentication and authorization using ID tokens and the how to configure Neo4j to use them.
Add a groups claim to ID tokens
You can add a groups claim to ID tokens to configure authentication and authorization using ID tokens.
-
From the left-hand side of the Okta dashboard, navigate to Security → API.
-
Click the default authorization server (the one that shows
api://defaultas audience) to return thegroupsclaim in access tokens:-
On the Claims tab, click Add Claim.
-
Add a claim with the name
groups. -
From the Include in token type dropdown, select ID Token.
-
From the Value type dropdown, select Groups.
-
From the Filter dropdown, select Matches regex and the value
.*. -
Click Create.
-
-
Add a claim with the name
useridand the value typeUser ID.The
useridclaim is not included in the ID token by default like the defaultsubclaim for access tokens, thus you need to add it manually. The name you give to your claim needs to be also indicated in the configurationdbms.security.oidc.okta.claims.username=useridin the neo4j.conf file.-
Click Add Claim.
-
Add a claim with the name
userid. -
From the Include in token type dropdown, select ID Token.
-
From the Value type dropdown, select Expression.
-
In the Value field, type
(appuser !=null) ? appuser.userName : app.clientId. -
Click Create.
-
Configure Neo4j
-
Configure Neo4j to use Okta authentication by configuring the following settings in the neo4j.conf file:
dbms.security.authentication_providers=oidc-okta, native
dbms.security.authorization_providers=oidc-okta
dbms.security.oidc.okta.display_name=Okta
dbms.security.oidc.okta.auth_flow=pkce
dbms.security.oidc.okta.well_known_discovery_uri=https://dev-54101110.okta.com/oauth2/default/.well-known/oauth-authorization-server
dbms.security.oidc.okta.audience=0oao2rybx5hIERt5W5d7
dbms.security.oidc.okta.claims.username=userid
dbms.security.oidc.okta.claims.groups=groups
dbms.security.oidc.okta.params=client_id=0oao2rybx5hIERt5W5d7;response_type=code;scope=openid profile email
dbms.security.oidc.okta.authorization.group_to_role_mapping="admin_group" = admin;
dbms.security.oidc.okta.config=token_type_principal=id_token;token_type_authentication=id_token
You can find the audience parameter under OpenID Connect ID Token of your application on the Sign On tab.
-
(Optional) If you want control the authentication and authorization on a user level, configure
dbms.security.require_local_usertotruein the neo4j.conf file. This setting mandates that users with the relevant auth provider attached to them must exist in the database before they can authenticate and authorize with that auth provider. For information on how to create users in this mode, see Creating users.For example, to create the user
jakewho can authenticate usingnativeorokta, and authorize using Okta (as configured in step 3), you can use the following Cypher query:CREATE USER jake SET HOME DATABASE 'jakesHomeDb' SET AUTH 'oidc-okta' {SET ID 'jakesUniqueOktaUserId'} // `jakesUniqueOktaUserId` must match the value of the claim that you configured via dbms.security.oidc.okta.claims.username SET AUTH 'native' {SET PASSWORD 'changeme' SET PASSWORD CHANGE REQUIRED}See Configure SSO at the user level using auth providers for further examples.
Microsoft Entra ID (formerly Azure Active Directory)
The following examples show how to configure Microsoft Entra ID for authentication and authorization using access tokens and ID tokens.
Register the application
-
Log in to the Azure portal.
-
Click Microsoft Entra ID and navigate to Manage → App registrations.
-
Click New registration.
-
Type a name for your application, for example,
Neo4j SSO. -
Under Select the supported account types, select
Accounts in this organizational directory only (Default Directory only - Single tenant). -
Under Redirect URI, select
Single-page application (SPA)and enter the redirect URI:http://localhost:7474/browser/?idp_id=azure&auth_flow_step=redirect_uriThe redirect URI will accept the returned token responses after successful authentication. -
Click Register.
Access token
This example shows how to configure Neo4j to use an Entra ID access token for authentication and authorization.
Configure Entra ID
-
From the App registrations page, select the app you just created.
-
From the left-hand side menu, navigate to Manage → Token configuration.
-
Click Add groups claim.
-
Select Groups assigned to the application (recommended for large enterprise companies to avoid exceeding the limit on the number of groups a token can emit) to include in your access token.
-
Save your changes.
-
-
Navigate to Expose an API and click Add a Scope.
The first time you click the Add a Scope button, you see a new pane stating that you need to add an Application ID URI before proceeding. You can find it on your app Overview page. It is a GUID that looks like this:
api://<GUID>. The GUID is a unique identifier for your application. -
Click Save and continue after setting the Application ID URI.
-
Fill in all mandatory fields in the pane Add a scope.
-
Enter a new Scope name (e.g.,
access-token), Admin consent display name, and Admin consent description. -
Make sure the Enabled scope state is selected.
-
Select the Add scope button again to create a new scope. You can add all scopes supported by your API. Make a note of them for later.
-
Configure Neo4j
You can configure Neo4j to use Entra ID for authentication by configuring the following settings in the neo4j.conf file:
# Configure the access_token
dbms.security.oidc.azure.config=principal=unique_name;code_challenge_method=S256;token_type_principal=access_token;token_type_authentication=access_token
# Configure the OIDC token endpoint with the Directory (tenant) ID
dbms.security.oidc.azure.token_endpoint=https://login.microsoftonline.com/54e85725-ed2a-49a4-a19e-11c8d29f9a0f/oauth2/v2.0/token
# Configure the iss claim in the id token with the Directory (tenant) ID
# Make sure you add the trailing slash (`/`) at the end of the URL or this operation might fail.
dbms.security.oidc.azure.issuer=https://sts.windows.net/54e85725-ed2a-49a4-a19e-11c8d29f9a0f/
# Provide the Entra ID parameters, such as client_id, response_type, scope, etc.
dbms.security.oidc.azure.params=client_id=4376dc8b-b5af-424f-9ada-c1c1b2d416b9;response_type=code;scope=openid profile email api://4376dc8b-b5af-424f-9ada-c1c1b2d416b9/access-token
ID token
This example shows how to configure Neo4j to use an Entra ID ID token for authentication and authorization.
Configure Neo4j
-
From the App registrations page, select the app you created in Register the application.
-
On the application Overview page, copy the Application (client) ID value and use it to configure the following properties in the neo4j.conf file:
dbms.security.oidc.azure.audience=4376dc8b-b5af-424f-9ada-c1c1b2d416b9 dbms.security.oidc.azure.params=client_id=4376dc8b-b5af-424f-9ada-c1c1b2d416b9;response_type=code;scope=openid profile email -
On the app’s Overview page, click the Endpoints tab, and copy the OpenID Connect metadata document URI: Use it to configure the
well_known_discovery_uriin the neo4j.conf file.dbms.security.oidc.azure.well_known_discovery_uri=https://login.microsoftonline.com/54e85725-ed2a-49a4-a19e-11c8d29f9a0f/v2.0/.well-known/openid-configuration -
Configure Neo4j to use Entra ID authentication in the neo4j.conf file:
dbms.security.authentication_providers=oidc-azure dbms.security.authorization_providers=oidc-azure dbms.security.oidc.azure.display_name=Azure dbms.security.oidc.azure.auth_flow=pkce dbms.security.oidc.azure.config=token_type_principal=id_token;token_type_authentication=id_token -
Configure which JWT claim should be used for usernames. Possible values are
sub,email, orpreferred_username.subis the only claim guaranteed to be unique and stable. For details, see Microsoft documentation as well as the OpenId spec.dbms.security.oidc.azure.claims.username=sub
Map Entra groups to Neo4j roles
Decide whether you want to use Entra groups directly or Entra App Roles.
Using Entra groups directly might be convenient if you already have users assigned to those groups and want to perform Group-to-Role mapping in the neo4j.conf file.
Entra App Roles allow a layer of separation between Neo4j roles and groups. When App Roles are used, only the roles relevant to Neo4j are sent in the JWT token. This prevents leaking permissions between applications. JWT tokens also have a limitation of 200 roles per token per user, which can be avoided by sending only the relevant App Roles.
Details about Entra ID App Roles can be found in the Microsoft documentation.
Using Entra groups directly
-
From the App registrations page, select your application.
-
From the left-hand side menu, navigate to Manage → Manifest.
-
Verify that the server is configured to return the Group Object IDs in the JWT identity tokens:
"groupMembershipClaims": "SecurityGroup, ApplicationGroup", -
From the left-hand side menu, navigate to Manage → Groups.
-
Create groups and assign users to them. Take note of the Object Id column.
-
Configure a mapping from Entra Group Object Ids to Neo4j roles. For details, see Map the identity provider groups to the Neo4j roles.
dbms.security.oidc.azure.authorization.group_to_role_mapping= "e8b6ddfa-688d-4ace-987d-6cc5516af188" = admin; \ "9e2a31e1-bdd1-47fe-844d-767502bd138d" = reader -
Configure Neo4j to use the
groupsfield from the JWT token.dbms.security.oidc.azure.claims.groups=groups
Using Entra ID App roles
-
From the left-hand side menu, navigate to App roles and add the Neo4j roles to the Microsoft Entra ID.
-
Click Create app role.
-
Fill in the fields:
-
Display name:
admin -
Allowed member types:
Users/Groups -
Value:
admin.
The Value column must either correspond to the Neo4j roles or be mapped in the neo4j.conf file. -
Description:
Neo4j admin role
-
-
Click Apply.
-
-
Repeat the previous step for the other roles you want to add.
-
Configure a mapping from Entra App Roles to Neo4j roles in the neo4j.conf file. For details, see Map the identity provider groups to the Neo4j roles.
dbms.security.oidc.azure.authorization.group_to_role_mapping= "managers" = admin; \ "engineers" = reader -
Configure Neo4j to use the
rolesfield from the JWT token.dbms.security.oidc.azure.claims.groups=roles -
(Optional) If you want control the authentication and authorization on a user level, configure
dbms.security.require_local_usertotruein the neo4j.conf file. This setting mandates that users with the relevant auth provider attached to them must exist in the database before they can authenticate and authorize with that auth provider. For information on how to create users in this mode, see Creating users.For example, to create a user
jakewho can authenticate and authorize using Azure, you can use the following Cypher query:CREATE USER jake SET HOME DATABASE 'jakesHomeDb' SET AUTH 'oidc-azure' {SET ID 'jakesUniqueAzureUserId'} // `jakesUniqueAzureUserId` must match the value of the claim that you configured via dbms.security.oidc.azure.claims.usernameSee Configure SSO at the user level using auth providers for further examples.
ID token
This example shows how to use Google OpenID Connect for authentication using ID tokens in conjunction with native authorization.
-
Configure the client and the redirect URI:
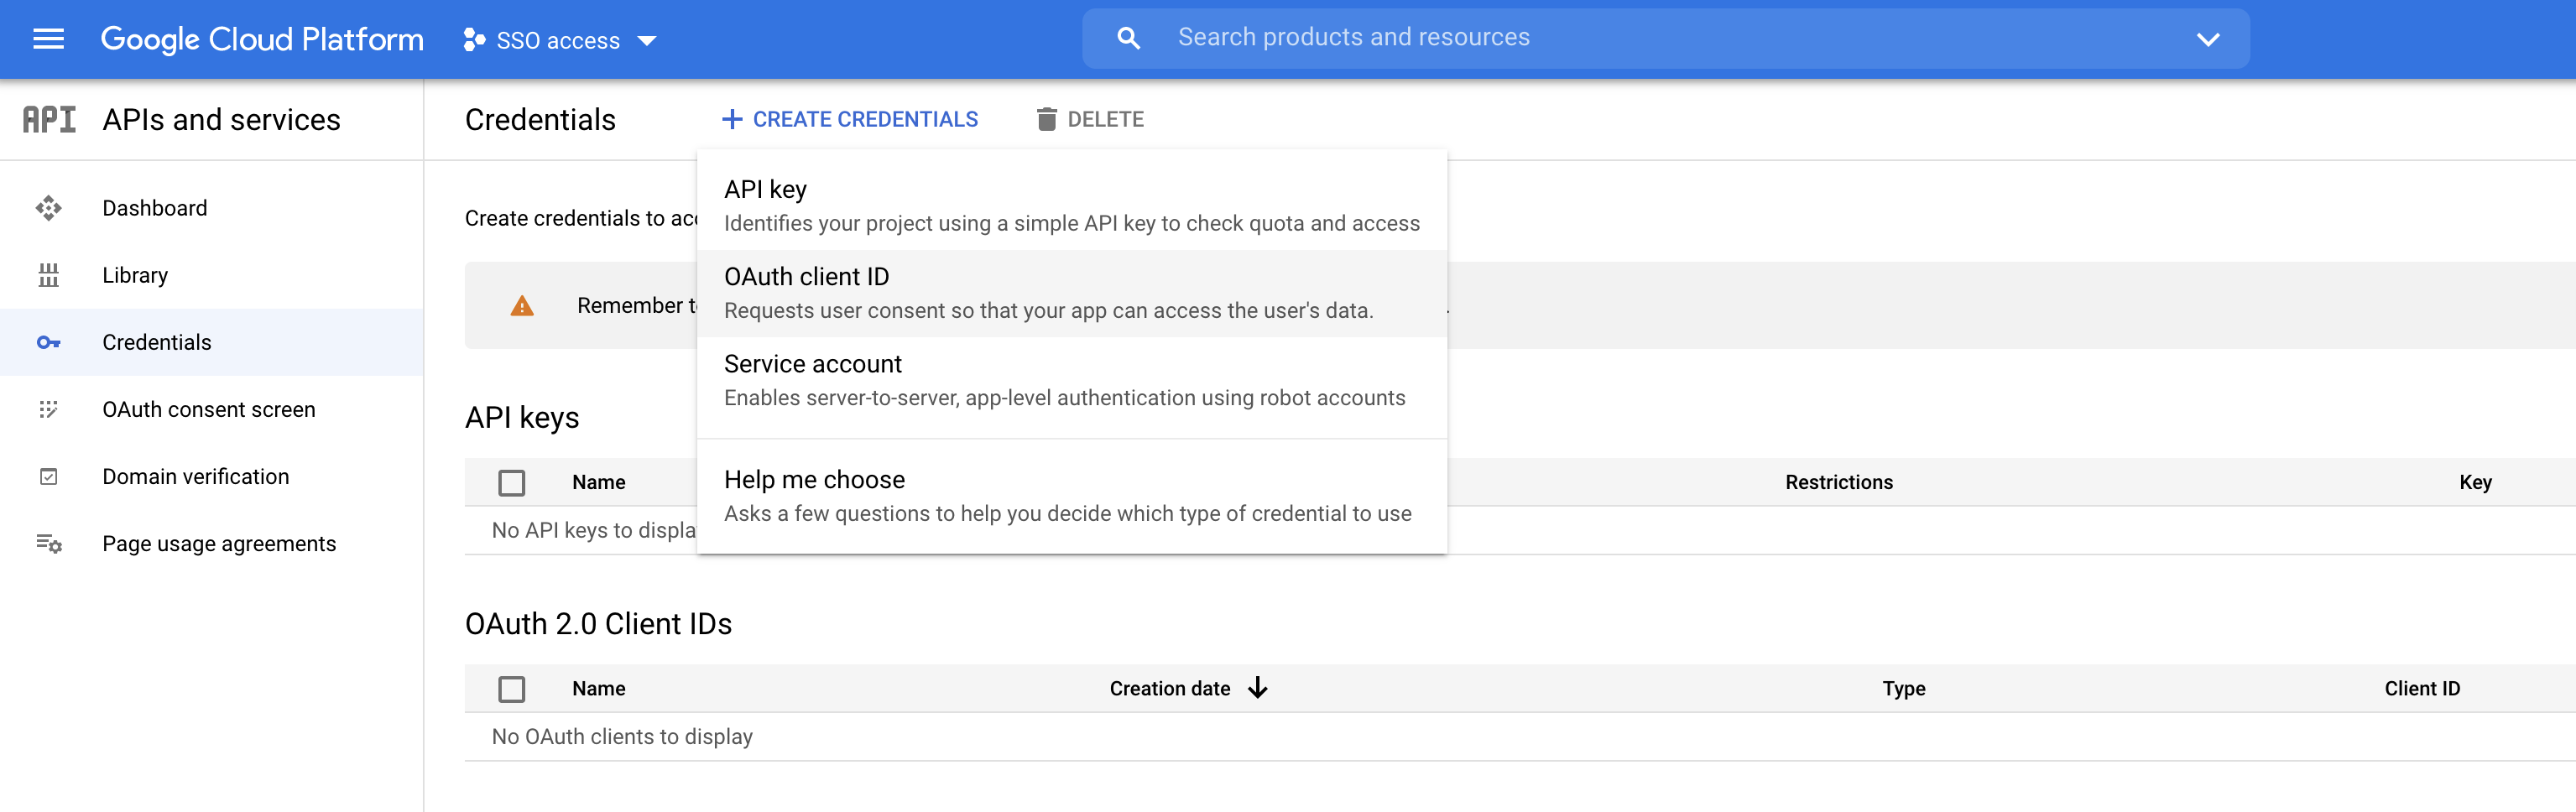 Figure 2. Google OIDC client creation
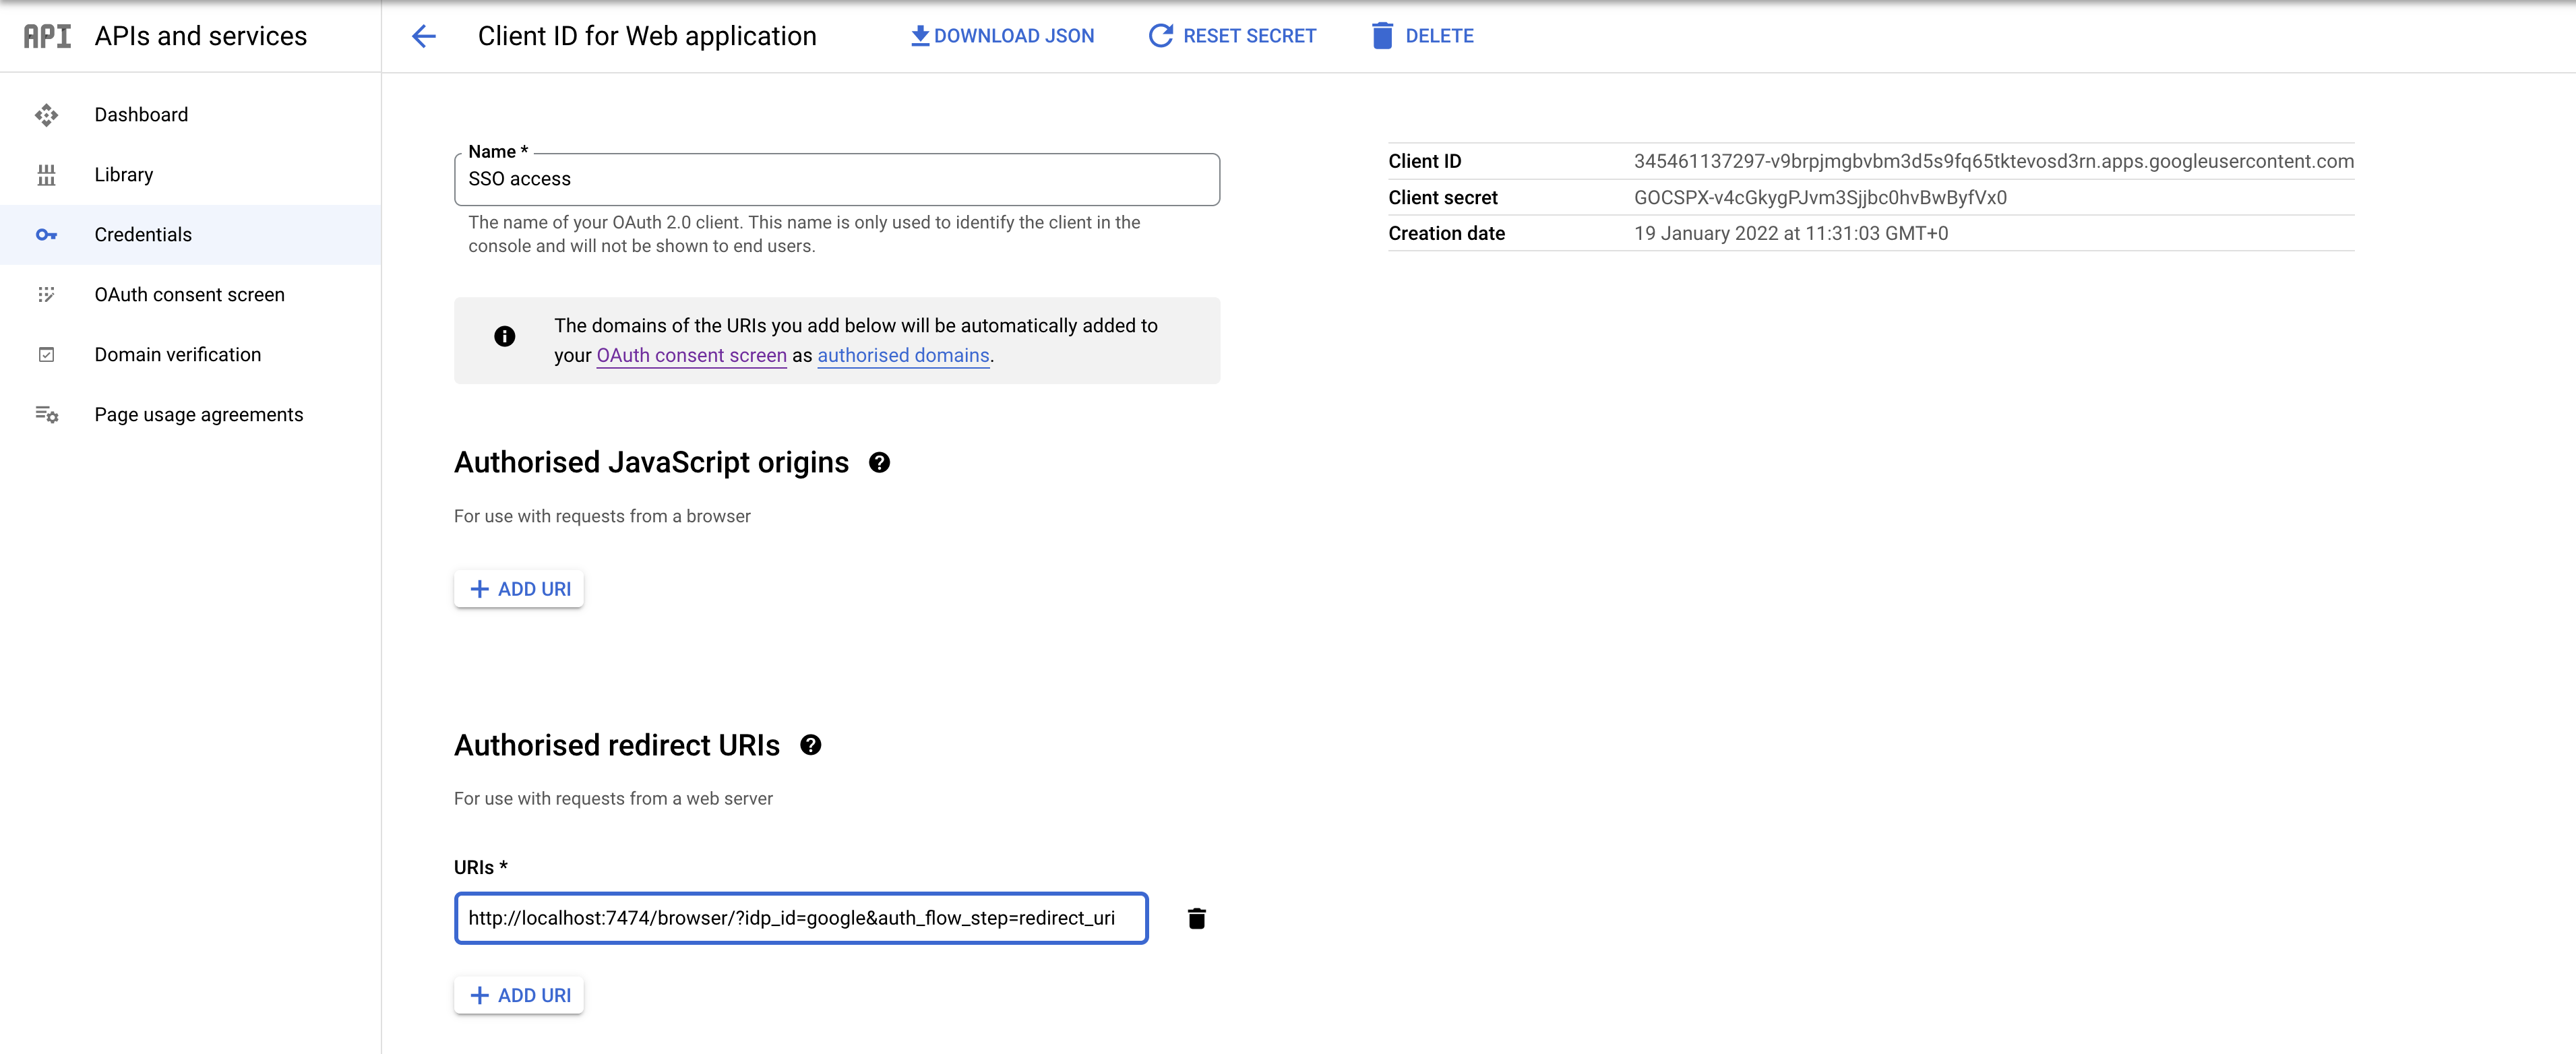 Figure 3. Google OIDC client configuration
SSO authorization does not work with Google, as the JWT returned by Google does not contain information about the groups that a user belongs to, and cannot be configured to. Therefore, it is recommended to use native (or another flavor) authorization by creating a native version of the user in Neo4j.
-
Configure Neo4j to use Google authentication by setting the following configurations in the neo4j.conf file:
dbms.security.authentication_providers=oidc-google dbms.security.authorization_providers=native dbms.security.oidc.google.display_name=Google dbms.security.oidc.google.auth_flow=pkce dbms.security.oidc.google.well_known_discovery_uri=https://accounts.google.com/.well-known/openid-configuration dbms.security.oidc.google.audience=345461137297-v9brpjmgbvbm3d5s9fq65tktevosd3rn.apps.googleusercontent.com dbms.security.oidc.google.claims.username=email dbms.security.oidc.google.params=client_id=345461137297-v9brpjmgbvbm3d5s9fq65tktevosd3rn.apps.googleusercontent.com;response_type=code;scope=openid profile email dbms.security.oidc.google.token_params=client_secret=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 dbms.security.oidc.google.config=token_type_principal=id_token;token_type_authentication=id_token -
Using one of the following options, create a user in the database who can authenticate and authorize natively to be able to give the users roles from native authorization.
This approach relies on the existence of an admin user who can authenticate natively and then create less privileged users via auth providers, who can authenticate only using
oidc-google, but will receive the roles granted to them usingnativeauthorization.An admin user with the name
neo4jis created by default when the database is first started.-
In the neo4j.conf file, temporarily enable native authentication for the
adminuser only and enable the user-level control of authentication and authorization:dbms.security.authentication_providers=oidc-google, native dbms.security.require_local_user=trueThis will switch to user auth providers mode whereby users can only authenticate and authorize if they have a corresponding auth provider in the database.
-
Create a user who can authenticate and authorize only using
oidc-google:CREATE USER jake SET HOME DATABASE 'jakesHomeDb' SET AUTH 'oidc-google' {SET ID 'jakesUniqueGoogleUserId'} (1)1 jakesUniqueGoogleUserIdmust match the value of the claim that you configured viadbms.security.oidc.google.claims.username. -
Grant the user
jakeroles, for example,reader:GRANT ROLE reader TO jakeThe user implicitly receives
nativeauthorization becausenativeis in the list of authorization providers and you have explicitly granted the user a role. -
Once you have set up your users in this way, you can disable native authentication for the database completely. This will prevent all users, including the admin, from logging in with a username and password:
dbms.security.authentication_providers=oidc-google
Alternatively, if you do not use auth providers, you can temporarily enable
nativeauthentication to create an SSO-authenticated admin useralicewho can then create other users who can only authenticate using SSO.-
Temporarily enable
nativeauthentication:dbms.security.authentication_providers=oidc-google, native -
Create an SSO-authenticated
adminuser (in this example an equivalent of[email protected]must be set up in the Google SSO provider and their credentials must be known):CREATE USER `[email protected]` SET PASSWORD 'secretpassword'; GRANT ROLE admin to `[email protected]`; -
Disable native authentication for the database to prevent users logging in with username and password:
dbms.security.authentication_providers=oidc-google -
Log in via Google SSO as
[email protected], theadminuser. -
Create other users who can authenticate only using
oidc-googleand will receive the roles granted to them usingnativeauthorization.CREATE USER jakesUniqueGoogleUserId (1) SET HOME DATABASE 'jakesHomeDb' SET PASSWORD 'secretpassword' SET PASSWORD CHANGE NOT REQUIRED1 jakesUniqueGoogleUserIdmust match the value of the claim that you configured viadbms.security.oidc.google.claims.username. -
Grant the user roles using native authorization:
GRANT ROLE reader TO jakesUniqueGoogleUserId
-
FAQ
When should pkce be used as auth flow?
Assuming the client (Neo4j Browser or Bloom) can be accessed through the public internet, always use pkce auth-flow rather than implicit because the latter requires the client’s secret to be available to the public client.
In general, if both flows are available, it is recommended to opt for pkce because it is more secure than implicit.
Is Google authentication secure if it has a client secret listed in the config?
Yes.
Google uses the pkce flow, but identity providers sometimes also use a client secret to ensure the client asking for a token is the one using it (pkce does not guarantee that).
The client secret does not add any additional security as it is public but the pkce flow provides sufficient security.
Could not parse JWT of type "access_token"
When getting the message Failed to get credentials: Could not parse JWT of type "access_token" on Browser, it probably means the provider only accepts ID tokens.
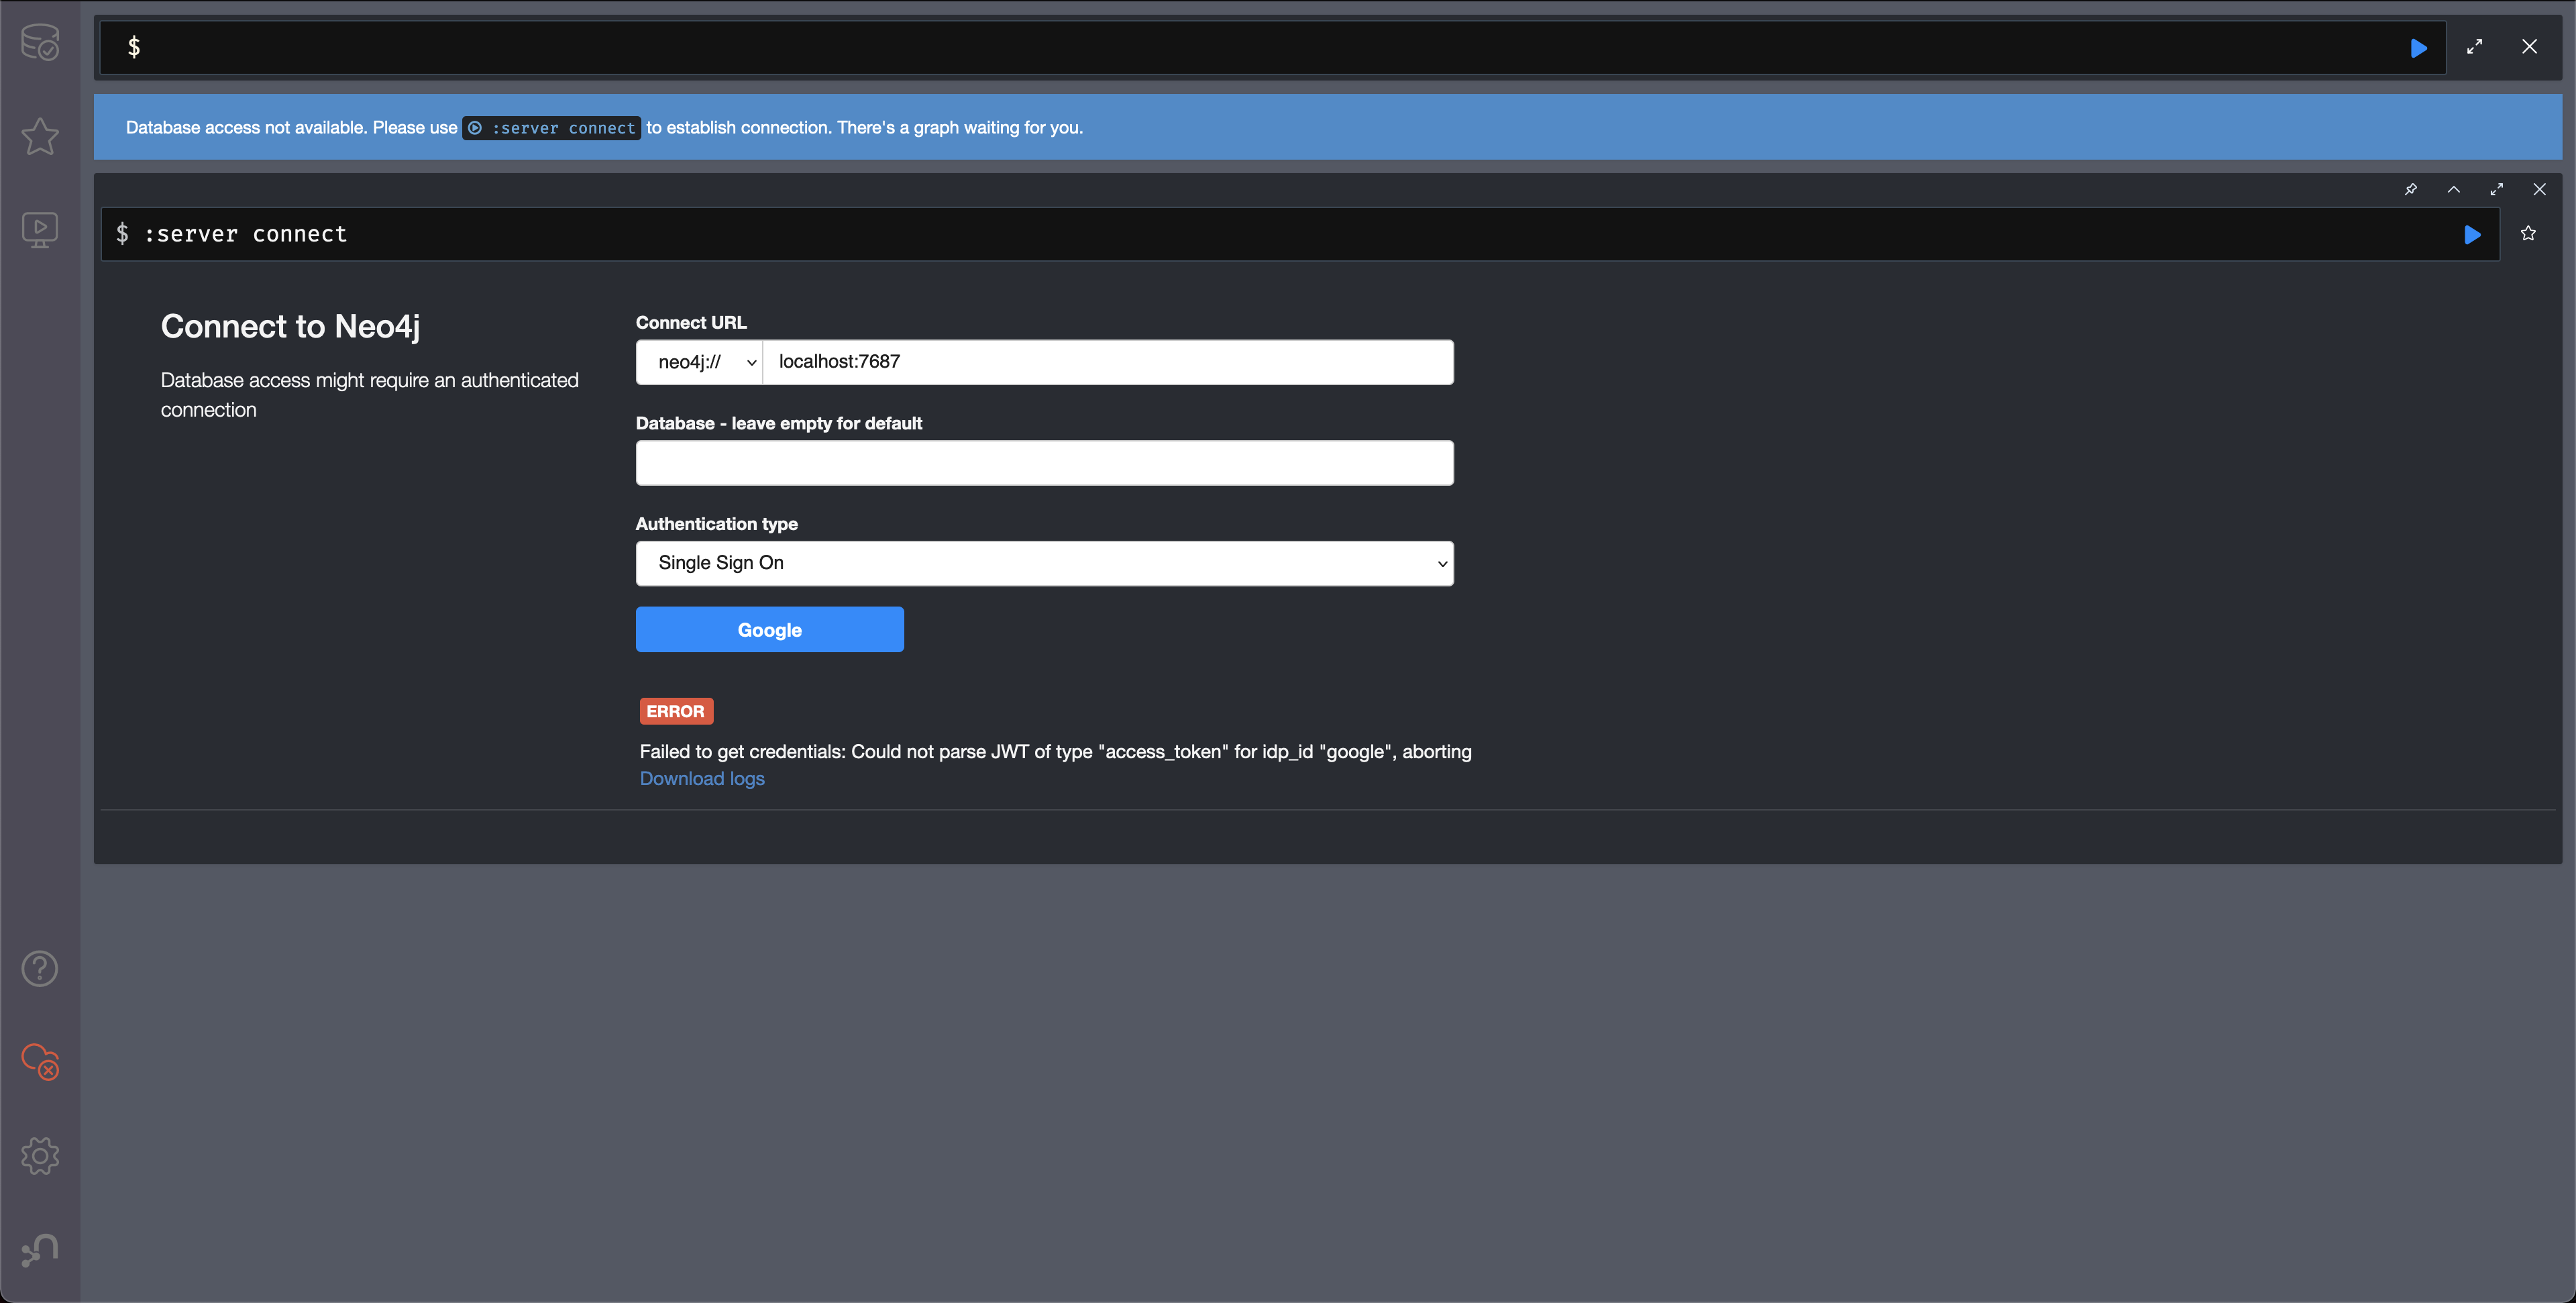
Change to ID tokens in your neo4j.conf:
dbms.security.oidc.{{provider}}.config=token_type_principal=id_token;token_type_authentication=id_tokenWhen should identity tokens vs. access tokens be used?
It is generally safer to use access tokens when possible due to being shorter-lived. If authorization permissions change on the identity provider, Neo4j will fail authorization. Neo4j Browser will try to reconnect and reflect the changed permissions faster than if ID tokens were used.
Debug logging of JWT claims
While setting up an OIDC integration, it is sometimes necessary to perform troubleshooting. In these cases, it can be useful to view the claims contained in the JWT supplied by the identity provider.
To enable the logging of these claims at DEBUG level in the security log, set dbms.security.logs.oidc.jwt_claims_at_debug_level_enabled to true and the security log level to DEBUG.
You can do this in <NEO4J_HOME>/conf/server-logs.xml.
If you need more information on how to set up and manage the security log, see Configure the security log.
|
Make sure to set dbms.security.logs.oidc.jwt_claims_at_debug_level_enabled back to |
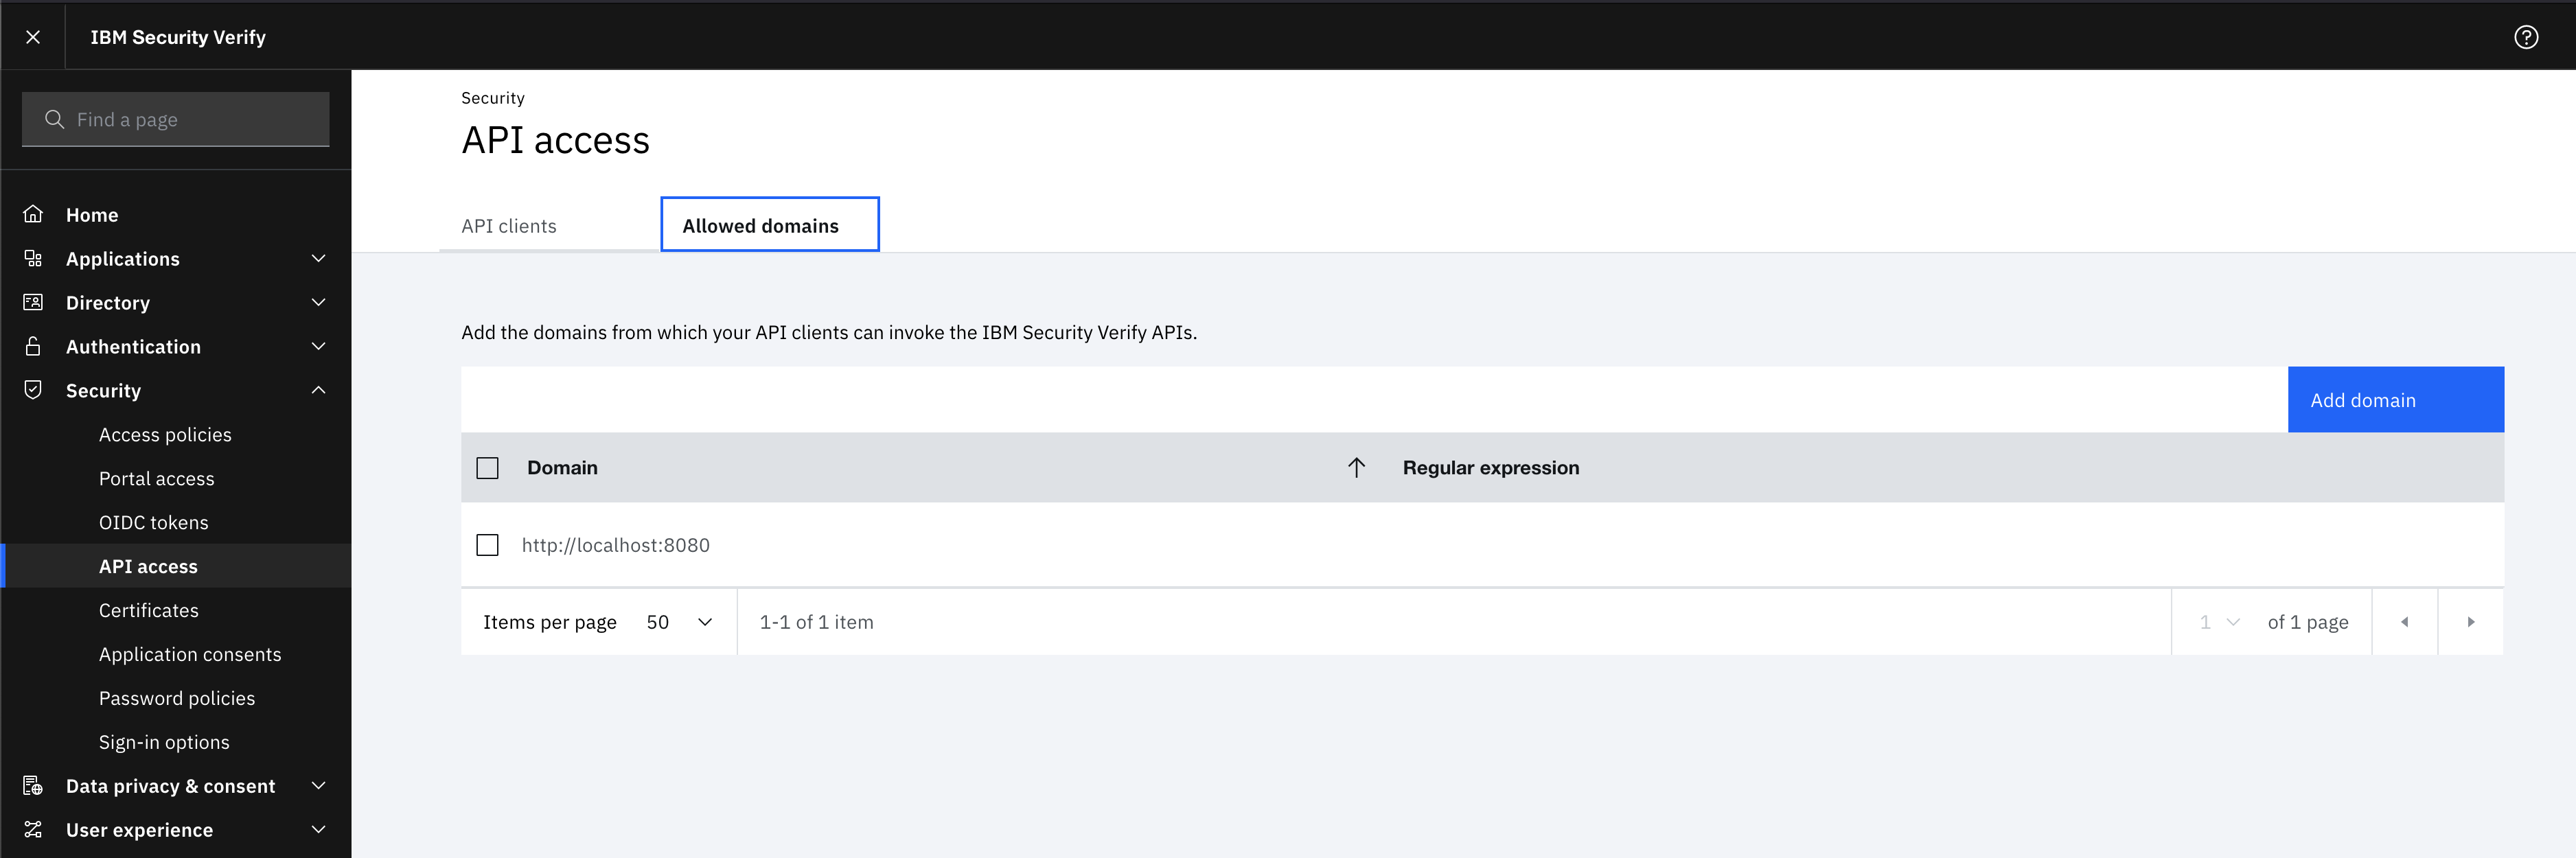
How to debug further problems with the configuration
Apart from the logs available in logs/debug.log and logs/security.log in the Neo4j path, you can also use the web-development console in your web browser when doing the SSO authentication flow with Bloom or Neo4j Browser. This could reveal potential problems, such as the one presented below with an example identity provider and the Cross-Origin Request policy:
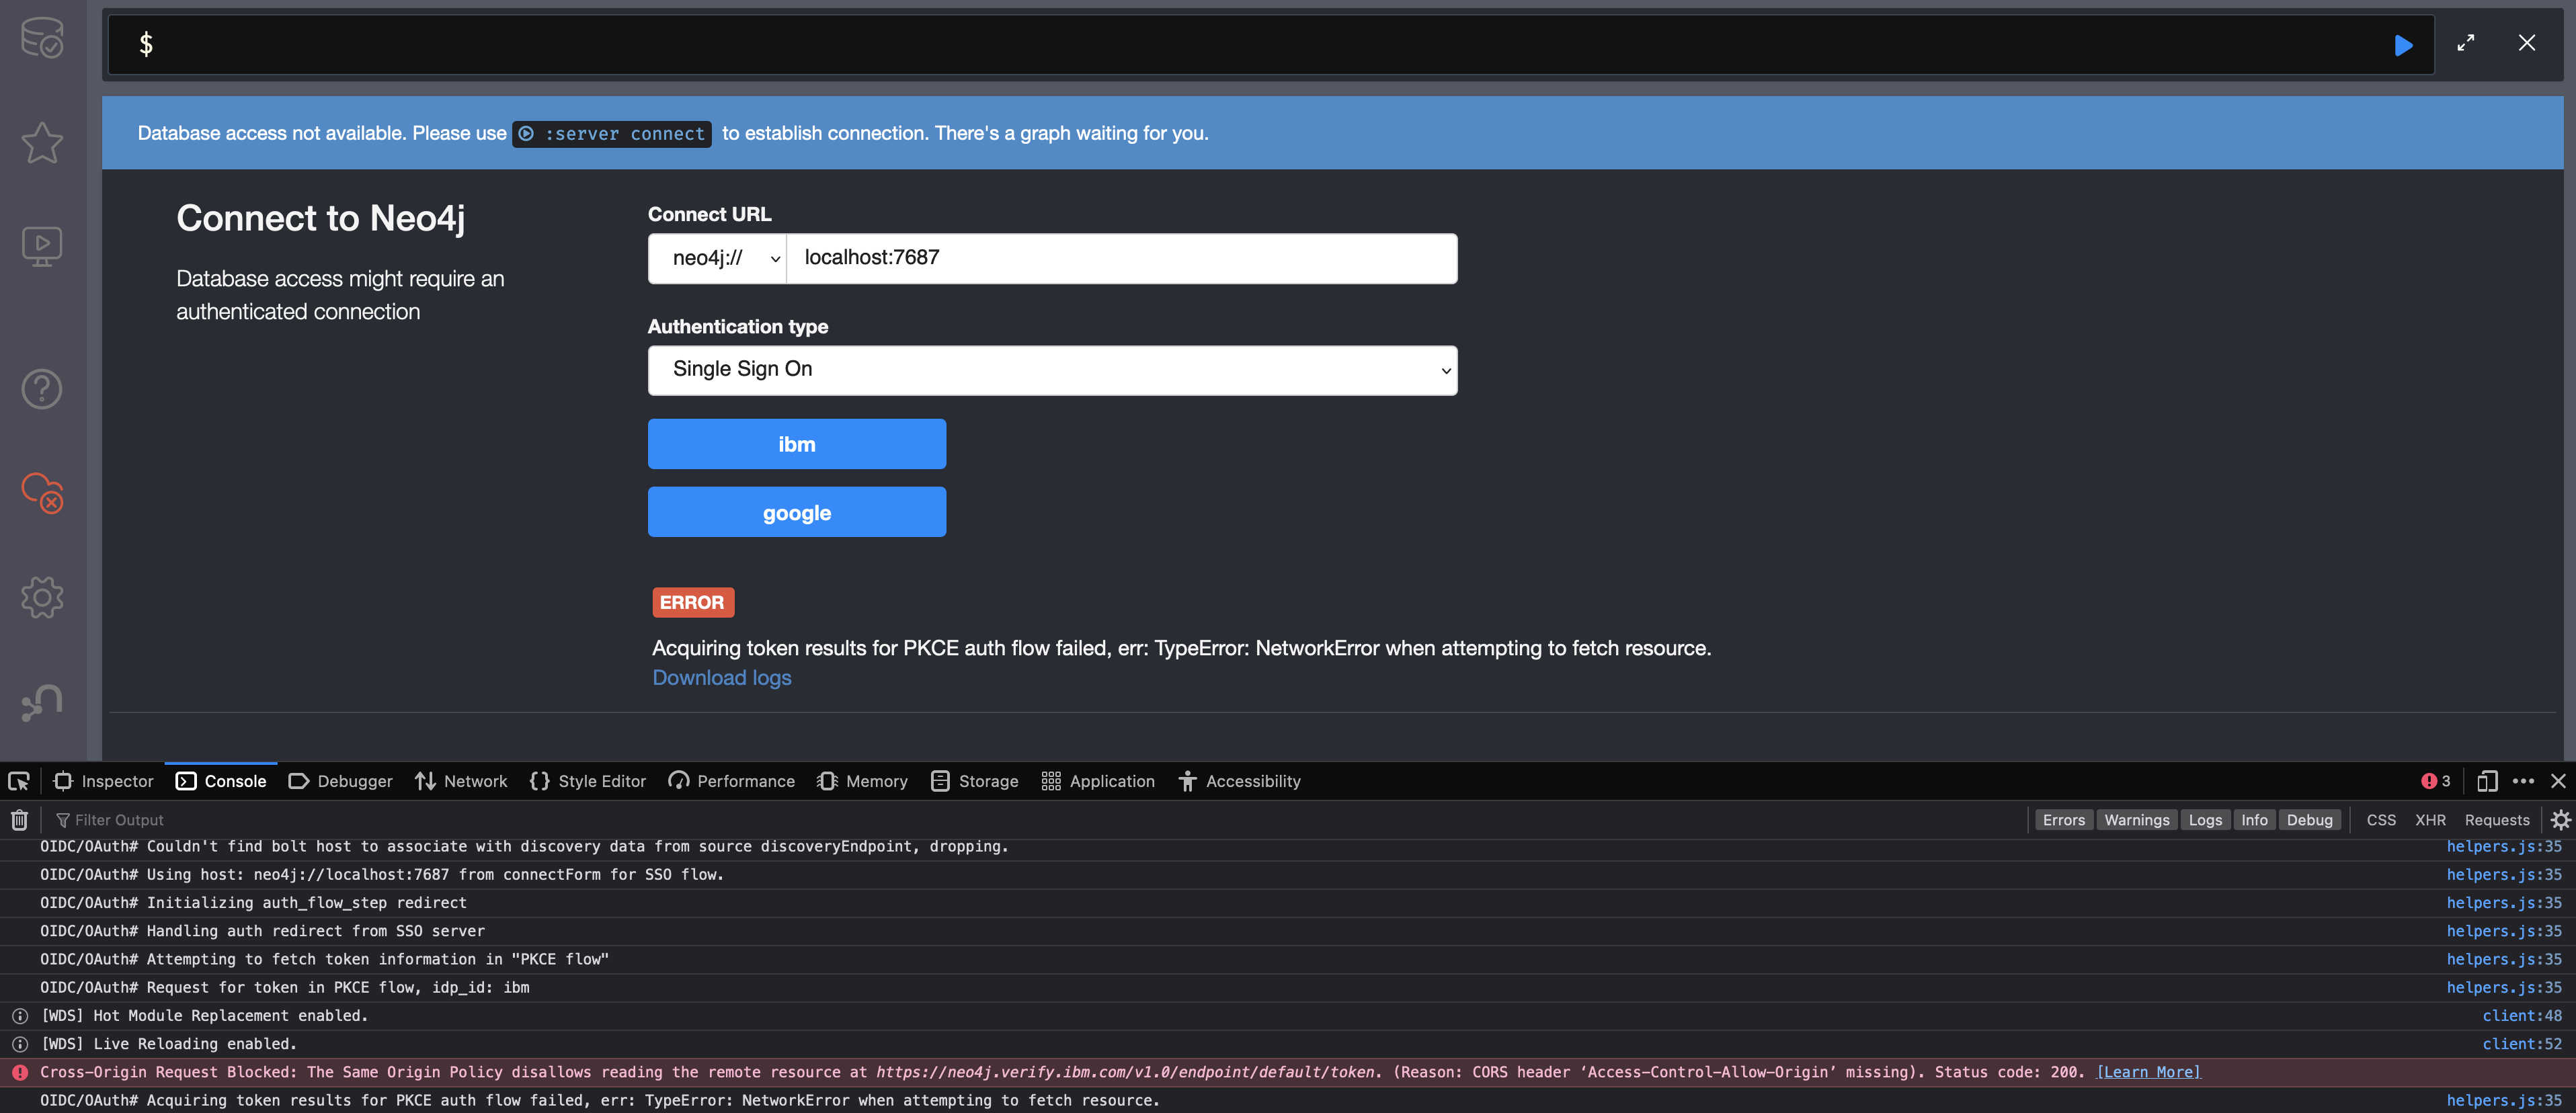
The solution involves adding the redirect domain to the list of allowed domains in the provider (in this case, localhost:8080):