Graph App Development for Neo4j Desktop
|
Important - page not maintained
This page is no longer being maintained and its content may be out of date. For the latest guidance, please visit the Getting Started Manual . |
This guide explains how to develop a Graph App for Neo4j Desktop.
This article assumes that you already have a basic understanding of HTML and CSS. It will also discuss some concepts of Single Page Applications.
-
Basic knowledge of HTML and JavaScript and an understanding of Single Page Applications (SPAs)
-
Knowledge of the offical JavaScript Drivers
-
If you haven’t already, download and install Neo4j Desktop
Learn with GraphAcademy
Building Neo4j Applications with Node.js
In this free course, we walk through the steps to integrate Neo4j into your Node.js projects. You will learn about the Neo4j JavaScript Driver, how sessions and transactions work and how to query Neo4j from an existing application.
Introduction
So, you would like to build a Graph App? You are in good company, many enterprises and community developers are building Graph Apps for a wide range of use cases. These range from utility tools like monitoring tool Halin and educational Graph Apps like Neuler to visulisation apps including GraphXR by Kineviz and NeoMap.
Graph apps can be built with vanilla HTML and JavaScript, but most commonly we see these built with modern front end frameworks like React or Vue.js. Whichever framework you choose to build your application, you will interact with the Graph the same way; by running a Cypher Query through the Official JavaScript drivers. There is plenty of content over on the JavaScript developer guides so we will not cover this in too much detail, only the nuances around how the driver works with the Neo4j Desktop API.
If you are looking for inspiration, head over to the Graph App Gallery to see what other developers have built. Otherwise, let’s get started.
Installing Driver Dependencies
The official JavaScript driver is available via npm using the npm install or yarn add command.
npm install --save neo4j-driverAlternatively, if your graph app will be used in a context where the always has an active internet connection, you can obtain the driver via a CDN.
<!-- unpkg CDN non-minified -->
<script src="https://unpkg.com/neo4j-driver"></script>

<!-- jsDelivr CDN non-minified -->
<script src="https://cdn.jsdelivr.net/npm/neo4j-driver"></script>
Enabling Developer Tools
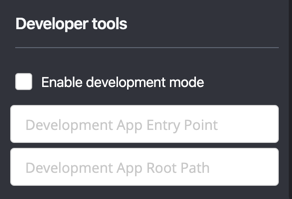
Neo4j Desktop comes with a Development App that can be used while developing and debugging your Graph App.
To enable Development Mode, click on the Settings  icon in the bottom left hand corner of the screen to reveal the Settings pane.
At the bottom of the Settings pane, you will see a Developer Tools form. Click Enable Development Mode and add fill out the Entry Point and Root Path.
-
Entry Point: This is the path to your app, either a location of an HTML file (for example
file:///Users/me/my-graph-app/index.html), or an HTTP url where your app is being served (for examplehttp://localhost:8080). -
Root Path: This is the path to the root of your development project. If you are running Background Processes, this should be the location of the files that contain your Java or Node.js processes - if in doubt, you can just set it to
/.
Getting the Context
If you require access to the the list of projects and databases that the user has configured in Neo4j Desktop, you can access this via the Context API. There are two ways of accessing Neo4j Desktop’s context, either through the Injected API or using GraphQL.
Neo4j Desktop provides information about the current desktop environment via the neo4jDesktopApi object that is injected into the window.
This will provide you with a list the Projects and Database that the user has created.
Injected API
The Injected API is provided through the neo4jDesktopApi object.
The getContext() method returns a Promise which in turn resolves to an object containing a projects key.
Each Project contains a list of Neo4j Databases and a list of files.
if ( window.neo4jDesktopApi ) {
  neo4jDesktopApi.getContext()
    .then(context => {
      // Access to the list of projects will be through context.projects
    })
}
If the context should change for any reason, for example if the active database changes or has been stopped, an event will be fired.
You can listen for these changes using the onContextUpdate method on the API which provides an Event object which includes the type of event (for example), the new context and the previous context.
let online = true
let context = await neo4jDesktopApi.getContext()

neo4jDesktopApi.onContextUpdate((event, newContext, oldContext) => {
  // If the database has stopped, go into an 'Offline' mode
  if ( event.type === "APPLICATION_OFFLINE" ) {
    online = false
  }

  // Keep the context
  context = newContext
})| The Injected API will be removed in Neo4j Desktop version 2.0, however we don’t have a date for this version yet. For now, you are safe to use it. |
The following events will trigger a context update via the API:
Type |
Description |
Additional information on event |
APPLICATION_ONLINE |
Neo4j Desktop is now in Online mode |
|
APPLICATION_OFFLINE |
Neo4j Desktop is now in Offline mode. Offline mode can be enabled in the Settings pane under Offline Mode |
|
PROJECT_CREATED |
A new project has been created |
id: the UUID of the project |
PROJECT_REMOVED |
A project has been removed |
id: the uuid of the project |
PROJECT_RENAMED |
A project has been renamed |
id: the uuid of the updated project |
GRAPH_ACTIVE |
A graph has been made active |
id: the UUID of the graph that has become active |
GRAPH_INACTIVE |
The previous active graph has been made inactive |
id: the UUID of the graph that has become active |
DBMS_CREATED |
A new database has been created within the project with the UUID |
id: the UUID of the new database |
DBMS_STARTED |
A database has been started |
id: the UUID for the database |
DBMS_STOPPED |
The active database has been stopped |
id: the UUID for the database |
DBMS_RENAMED |
A database has been renamed |
id: the UUID for the database |
DBMS_REMOVED |
A database has been deleted |
id: the UUID for the deleted database |
DBMS_UPDATED |
A database has been updated |
id: the UUID for the updated database database: an object containing the updates made for the database |
DBMS_UPGRADED |
A database has been upgraded to a newer version of Neo4j |
id: the UUID for the upgraded database
version: the upgraded version - for example |
DBMS_SETTINGS_SAVED |
The settings for a database have been changed |
id: the UUID for the updated database |
REMOTE_CONNECTION_CREATED |
A new remote connection has been added to a project |
id: the UUID for the new remote connection |
REMOTE_CONNECTION_REMOVED |
A remote connection has been removed from a project |
id: the UUID for the removed remote connection |
REMOTE_CONNECTION_ACTIVATED |
A remote connection has been activated |
id: the UUID for the activated remote connection |
REMOTE_CONNECTION_DEACTIVATED |
A remote connection has been deactivated |
id: the UUID for the deactivated remote connection |
GraphQL API
The GraphQL API contains the same information as the injected API, but instead is accessed via a GraphQL library. For this example we will use Apollo Boost. The Apollo Boost package is available via npm or yarn
npm install apollo-boost graphql # or yarn add apollo-boostThe information required to access the GraphQL API are provided as part of the URL.
-
neo4jDesktopApiUrl: The URL of the GraphQL service
-
neo4jDesktopGraphAppClientId: A token generated by Neo4j Desktop to verify any requests made by the Graph App
const url = new URL(window.location.href)
const apiEndpoint = url.searchParams.get("neo4jDesktopApiUrl")
const clientId = url.searchParams.get("neo4jDesktopGraphAppClientId")

import ApolloClient from "apollo-boost"

const client = new ApolloClient({
  uri: apiEndpoint,
  headers: {
    clientId: clientId
  }
});
You can then use the Apollo Client to query the GraphQL API endpoint. For example, the following code will give you a list of all projects and their databases.
import gql from 'graphql-tag'

const GET_DATABASES = gql`
query {
  workspace {
  	projects {
      name
      graphs {
        name
        status
        connection {
          info {
            version
            edition
          }
          principals {
            protocols {
              bolt {
                tlsLevel
                url
                username
                password
              }
            }
          }
        }
      }
    }
  }
}
`

client.query({ query: GET_DATABASES })
  .then(({ data }) => {
    // Access the list of projects through data.workspace.projects
  })
Creating a Driver Instance
The next step is to create an instance of the JavaScript driver.
This will be the point of interaction with a Neo4j Database.
Now that we have the credentials from the previous step, we can run a series of filter and reduce functions to produce a list of graphs that a driver instance can be created for.
There will be a maximum of one Active graph in Desktop (with the status ACTIVE), but you may also have remote graphs that could be displayed.
To find any active graphs, you could run a reduce and filter on the current context.
| It is recommended that you use the latest version of the Driver, which is currently 4.0.2. You can find full installation instructions on the JavaScript language guide. |
const graphs = context.projects
  .map(project => ({
    graphs: project.graphs.filter(graph => graph.status === "ACTIVE" || graph.connection.type === "REMOTE")
  }))
  .reduce((acc, { graphs }) => acc.concat(graphs), [])

const { url, username, password } = graphs[0].connection.configuration.protocols.bolt
Once you have the correct credentials, you can create an instance of the Driver and run the session.
const driver = new neo4j.driver(url, neo4j.auth.basic(username, password))

const session = driver.session()

session.run('MATCH (n) RETURN n LIMIT 20')
  .then(res => {
    // Handle the Results
  })
Getting ready for Production
There are a few steps to follow in order to get your Graph App ready for Production.
package.json
If you use npm or yarn, you will be familiar with the package.json file.
This file sits in the root of your project and holds various metadata including the name of your project and any third-party dependencies.
Adding a neo4jDesktop setting to your package.json will allow you to tie your Graph App to a particular version of the Neo4j Desktop API or {#permissions}[request certain permissions].
The name and version of the project are read from package.json and used when deciding whether to install a new Graph App or update an existing install.
{
  "name": "my-graph-app",
  "version": "1.0.0",
  "description": "(desktop)-[:LOVES]->(apps)",
  "homepage": "http://neo4j.com",
  "neo4jDesktop": {
    "apiVersion": "^1.4.0",
    "permissions": [ "allGraphs" ]
  }
}
In this example, we are tying the Graph App to the Neo4j Desktop API version 1.4.0 or higher and requesting permission to access all Graphs created in Neo4j Desktop.
The current Neo4j Desktop API version is 1.4.0.
|
manifest.json
The manifest.json file is read during the installation process to gather additional information to Neo4j Desktop about your Graph App.
In a packaged installation of a Graph App (either by manually creating a .tar.gz file or via npm pack), this file should be added to the /dist folder before packaging.
For Graph Apps hosted on the internet, the manifest.json file should be served in the same directory as your index.html file.
{
  "name": "my-graph-app",
  "description": "(desktop)-[:LOVES]->(apps)",
  "icons": [
    {
      "src": "./my-image.png",
      "type": "png"
    },
    {
      "src": "./my-vector-image.svg",
      "type": "svg"
    },
    {
      "src": "data:image/svg+xml;base64,[data]",
      "type": "data"
    }
  ],
  "homepage": "http://neo4j.com"
}
The following image demonstrates how the values from manifest.json are used by Neo4j Desktop.

key |
description |
example |
name |
The name of your application as used in the UI.
If this doesn’t exist, Neo4j Desktop will either use the name from package.json for packaged installs or the |
My Graph App |
shortName |
A shorter name for your Graph App for use in the UI where space is short |
MyApp |
icons |
An array of icons to be used in the UI. This can either be a relative path to an image or an inline data URI. |
|
permissions |
If your Graph App requires additional permissions, for example viewing all graphs, you can list them here |
|
Any values provided in manifest.json will override a value provided in package.json.
For example, if package.json lists version 1.0.0 but manifest.json specifies 1.2.3, the value 1.2.3 will be used.
Deploying your Graph App
File Structure
At the minimum, your project should consist of a dist/ directory containing an index.html file plus any other JavaScript and CSS files that are required to run the Graph App.
The root directory should also include a package.json file and optionally a set of latest release notes in release-notes.md.
dist/
  app.js
  index.html
  manifest.json
package.json
release-notes.md
Deployment via .tar file
The most common option for deploying a Graph App is to create a .tar file.
This can be created by running the npm pack command.
If you have created a project with a command line tool (for example create-react-app or @vue/cli) then the build scripts should be configured for you already.
If not, you can create a build script in package.json to move the appropriate files to the dist/ folder.
Once the files are in the dist folder, you can run the npm pack to package the graph app into a .tar file.
npm packAny files or directories that you do not want to include in the .tar file can be listed in a .npmignore file.
By default, the file will be named using the name and version properties from package.json.
The resulting .tar file can be installed either by pasting a URL or dragging the tar file into the Install form at the bottom of the Graph Apps pane in Desktop.
Deployment via npm
Any published npm package can be installed by copying and pasting the npm registry URL. For example, the Neo4j Cloud Tool Graph App can be installed via Neo4j’s npm registry with the URL https://neo.jfrog.io/neo/api/npm/npm/neo4j-cloud-ui. Neo4j Desktop will periodically check for updates to npm packages and install them automatically.
More information on the npm package command is available on docs.npmjs.com.
Online Deployments
A good example of an Online Deployment is Halin. You can install the hosted version of Halin by entering https://halin.graphapp.io into the Install form at the bottom of the Graph Apps pane and clicking the Install button. The hosted version of Halin hosts a manifest.json in the website’s root directory.
Additional Topics
Deep Links to your app
You can provide a deep link to your app using the neo4j-desktop:// scheme and the name of your app from package.json.
For example, if the name of the app is my-graph-app the link would be the following:
neo4j-desktop://graphapps/my-graph-app?key=valueYou can pass parameters through to the graph app to help set the initial state of the app.
For example, in the URL above, the ?key=value will append a key property with a value of value to the graph app’s url.
The neo4jDesktopApi has an onArgumentsChange function that allows you to listen to changes in the applications arguments, for example when a new deep link has been clicked.
On load, and for each subsequent change of parameters, the callback function is called with two arguments; the original string and an object containing the decoded keys and values.
neo4jDesktopApi.onArgumentsChange((queryString, object) => {
  console.log(object.key) // "value"
})
Deep links to Neo4j Browser
Your graph app can also link to Neo4j Browser using the neo4j-desktop:// scheme and the Graph App name neo4j-browser.
Additionally, you can specify a command and argument to automatically run as it loads. For example, if you wanted to run the :play movies command to open the Movies Browser Guide, you could use the following link:
neo4j-desktop://graphapps/neo4j-browser?cmd=play&arg=moviesYou can also start Neo4j Browser with a pre-populated cypher query by setting cmd in the query string to edit and the arg to the Cypher query in a URL encoded form.
neo4j-desktop://graphapps/neo4j-browser?cmd=edit&arg=MATCH%20%28n%29%20RETURN%20count%28n%29%20AS%20countLinking to Bloom
You can link to Bloom by using the neo4j-desktop:// scheme, and the Graph App name neo4j-bloom. You can also add a search parameter as a URL encoded string to auto-fill the search bar when bloom opens.
neo4j-desktop://graphapps/neo4j-bloom?search=URL%20Encoded%20StringPlugin Dependencies
You can specify any plugins that your Graph App depends on within manifest.json file.
Any plugin with a valid coordinate from Maven Central will be will be automatically installed to all local databases within the current active project in Neo4j Desktop.
For example, if your Graph App requires APOC then your manifest.json file may look something like this:
{
  "name": "my-graph-app",
  "pluginDependencies": [
    "org.neo4j.procedure/apoc"
  ]
}
In order to specify your own plugins here, they must be published to Maven Central. Once published, the coordinates of the Maven Artifact can be added to the array.
Permissions
If a Graph App requires the use of a privileged API (for example executing Java or Node.js), these will need to be specified either in the neo4jDesktop section of package.json or in manifest.json.
Permissions can be defined as an array:
{
  "name": "my-graph-app",
  "permissions": ["backgroundProcess", "allGraphs", "activeGraph"]
}
Or alternatively, a map-like object can be provided with a short description of how the permission will be used.
{
  "name": "my-graph-app",
  "permissions": [
    "activeGraph",
    {
      "backgroundProcess": "Allow background processes to see output of demo Java class",
      "allGraphs": "Another usage description here"
    }
  ]
}
Permissions Available
The following permissions are currently available:
Permission |
Description |
activationKeys |
Provides access to activation keys registered to all Graph Apps |
activeGraph |
Provides access to the active Graph data. This is a default permission granted on app install. |
allGraphs |
Provides access to all the configured Graphs. |
backgroundProcess |
Provides access to |
Checking for Permission
When your graph app is installed, the user will have the option to grant or deny a permission and these permissions can also be revoked at any time from the Graph Apps pane.
Therefore, it is good practice to to check that the permission has been granted.
To do so, you can call the checkPermission method on the injected API.
window.neo4jDesktopApi.checkPermission("backgroundProcess")
  .then(granted => {
    if ( granted === true ) {
      // Permission has been granted
    }
  });
Requesting Permission
If your graph app doesn’t already have the permission it needs, then it can be requested by calling the requestPermission method on the injected API.
In order to request a permission, it must be listed in the graph app’s manifest.json file.
The following example features the longform version of the permission declaration, describing how the backgroundProcess permission will be used within the app.
{
  "name": "my-graph-app",
  "permissions": {
    "backgroundProcess": "Allow this Graph App to create a CSV file on your hard drive"
  }
}
The graph app can then request the permission. The user will be issued with a prompt which will allow them to Allow or Deny the permission to the Graph App.
window.neo4jDesktopApi.requestPermission("backgroundProcess")
  .then(granted => {
    if (granted) {
      // Permission has been granted
    } else {
      // The user has rejected the permission
    }
  });
Activation Keys
Activation Keys can be used to unlock functionality within your Graph App. An Activation Key is a JET token, similar to a JWT token but with specific fields that are used to grant access to protected resources and premium functionality. All users are required to enter an Activation Key when they first download desktop.
All keys are currently issued by Neo4j and are tied to the name from your package.json file.
They hold the following keys:
Key |
Description |
featureName |
The name of the application. This will match the name in your |
expirationDate |
The expiration date for this activation key in ISO format (ISO 8601). |
activationVersion |
The version of the activation key. |
featureVersion |
A semver string denoting the version range that this key is valid for. |
registrant |
The name of the current user that this key belongs to. |
organization |
The company that the current user works for. |
The email address of the current user. |
|
scope |
A string delimited list of features that this activation key grants access for. |
Activation Keys are held as part of the context.
If you have requested the activationKeys setting then it may be appropriate to filter the activation keys by their feature name.
const context = await neo4jDesktopApi.getContext()
const activationKeys = context.activationKeys
  .filter(key => key.featureName == "my-graph-app")
If you are interested in using Activation Keys to unlock features in your app, please get in touch and we will see what we can do.
Files
Neo4j Desktop allows you to drag and drop files into a project for later use. For example, you could create a Browser Guide to explain your project to your coworkers or create set of Cypher scripts to seed a new database within the project or to hold commonly run queries. The Neo4j Desktop UI displays a link to these files so they can be quickly opened in Neo4j Browser.
You can also access these from your Graph App.
For example, a visualisation app may take a set of cypher queries and display them in a forced graph layout.
Each file can be accessed via HTTP through Neo4j Desktop’s API and therefore can be loaded through node’s http module or a third party package like axios.
Key |
type |
description |
contentType |
string |
The mime type of the file |
filename |
string |
The name of the file |
path |
string |
The name of the file |
size |
string |
The name of the file |
url |
string |
The URL to call to load the file |
To get all cypher files from every, you could run a .map and .reduce on Neo4j Desktop’s context:
const axios = require('axios')

const context = await neo4jDesktopApi.getContext()
const cypherFiles = context.projects.map(project =>
    project.files.filter(file => file.filename.endsWith('.cypher'))
  )
  .reduce((files, projectFiles) => files.concat(projectFiles), [])

axios.get(cypherFiles[0].url)
  .then(response => console.log(response.data)) // MATCH (n) ...
Framework Support
We do not recommend any specific front-end frameworks for developing apps. However, community members have built packages that will speed up your workflow.
React
The use-neo4j library provides hooks for running Cypher queries against a Neo4j Database.
The Neo4jProvider component will detect the Neo4j Desktop API and show a list of Projects and Graphs configured in Neo4j Desktop.
The library falls back to a generic login form which allows the user to enter their own credentials.
ReactDOM.render(
  <React.StrictMode>
    <Neo4jProvider>
      <App />
    </Neo4jProvider>
  </React.StrictMode>,
  document.getElementById('root')
);
Starter Kit
You can fork or clone the Graph App Starter kit for React to generate a basic Graph App. The example project uses Semantic UI for styling and use-neo4j to interact with Neo4j.
Vue.js
The vue-neo4j plugin provides a wrapper for the JavaScript driver in all Vue.js components via this.$neo4j object.
There is also a set of helper functions for developing Graph Apps.
For more information, check out the Github repository for using Vue.js with Neo4j.
Community Forum
If you have any questions, comments, or would like to show off your own graph app, then there is a dedicated Graph Apps category on the Neo4j Community site.