How to create and integrate an Okta OIDC service account with Neo4j

Technical Support Engineer at Neo4j
7 min read

What will we build?
If you are using Okta as your identity provider, the recommended approach for service-to-service authentication is to use an API Services application with OAuth 2.0 Client Credentials.
In this guide, you will learn how to:
- Create a service application in Okta
- Configure Neo4j to enable SSO authentication
- Request an access token using the client credentials flow
- Authenticate to Neo4j using a JWT via the Python driver
Why use service accounts with Neo4j?
A service account provides your application with a non-human identity.
Instead of storing Neo4j username and password credentials in scripts or environment variables, you can issue short-lived OAuth 2.0 access tokens from Okta and allow Neo4j to validate them.
This approach offers several advantages:
- Improved secret management (no long-lived credentials)
- Easier rotation and revocation of access
- Fine-grained control over scopes and claims
- Clear auditability for automated workloads
Prerequisites
Before getting started, ensure you have:
- An Okta organization (for example, your-domain.okta.com)
- A Neo4j instance (self-managed or AuraDB)
- The Neo4j Python Driver is installed
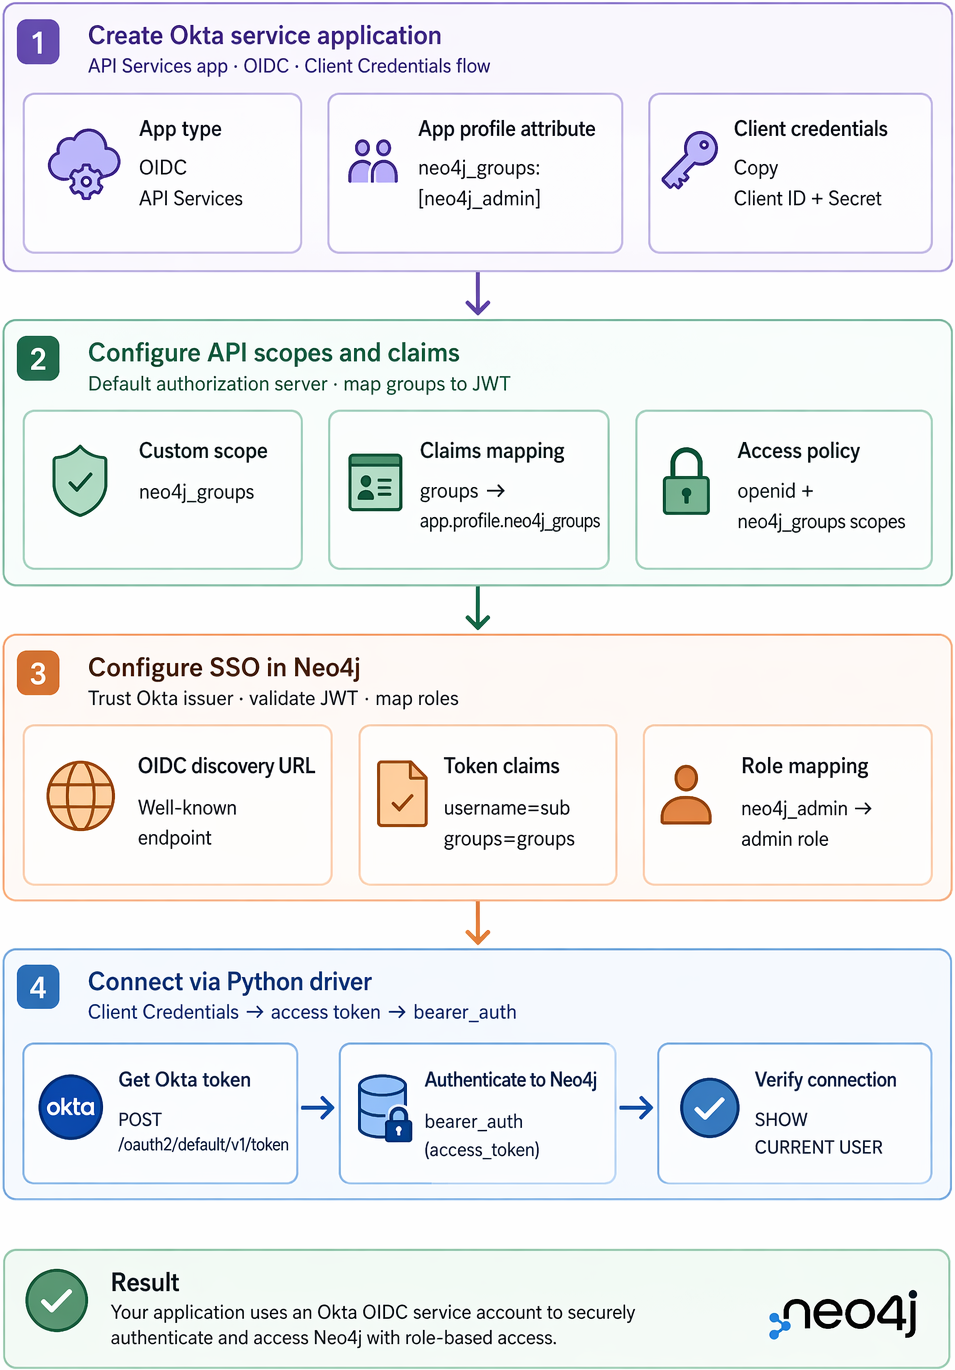
Step 1: Create an Okta service application
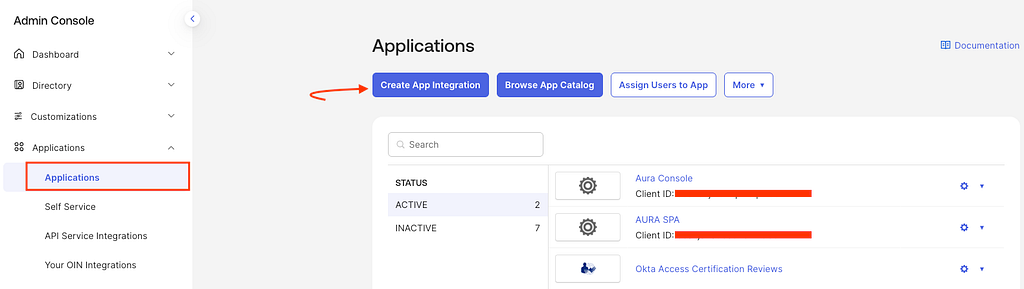
In the Okta Admin Console (https://your-domain.okta.com/admin/home):
- Navigate to Applications → Create App Integration
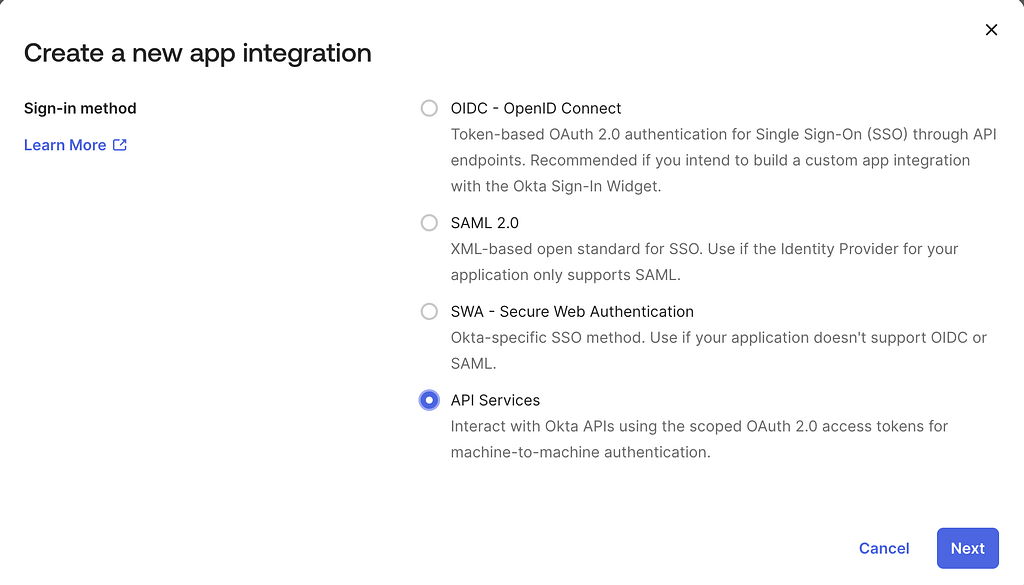
2. Select:
- OIDC — OpenID Connect
- Application type: API Services
3. Provide a name for your application (for example: neo4j-service-account)

4. Configure the application claims:
- Locate the Application Profile Attributes section
- Add the following custom attribute:{“neo4j_groups”: [“neo4j_admin”]}.
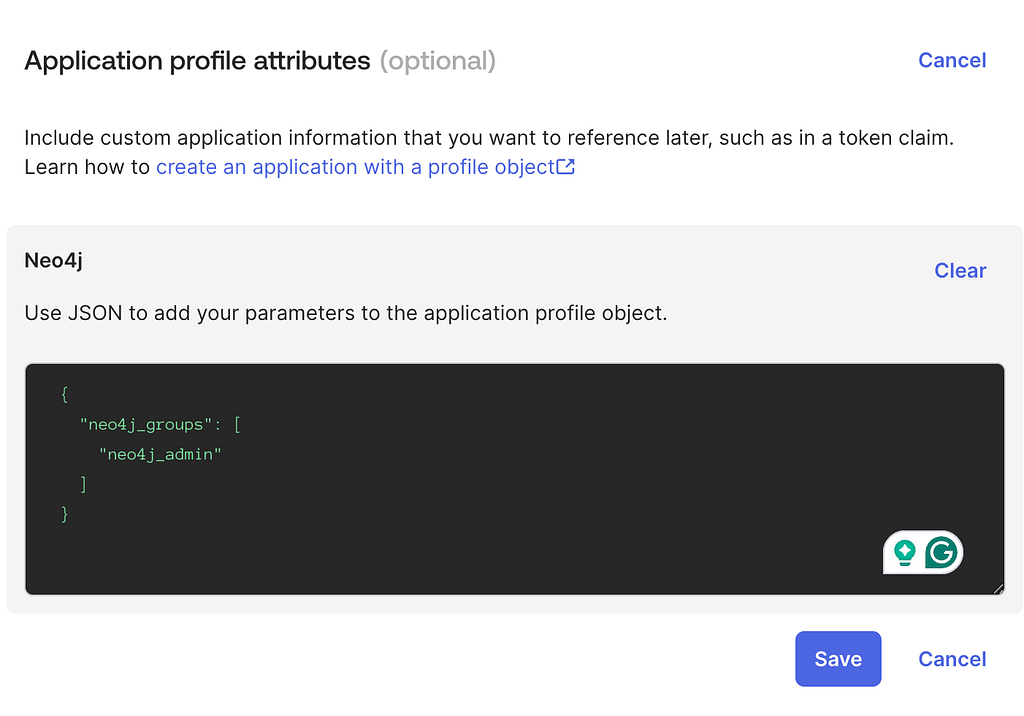
This attribute will later be used by Neo4j to map roles and control access.
Theneo4j_admin is used here as a simple example and maps to the Neo4j admin role, which has broad privileges.
For production, follow least privilege and use roles like reader or publisher. See built-in roles.
5 . Configure client security settings:
- Navigate to the General Settings section of your application
- Disable Proof of Possession (DPoP)

This ensures that Okta issues standard bearer tokens, which are required for compatibility with Neo4j. Neo4j does not currently support DPoP-bound tokens, so leaving this enabled would prevent successful authentication.
6. After creation, copy and securely store:
- Client ID
- Client Secret
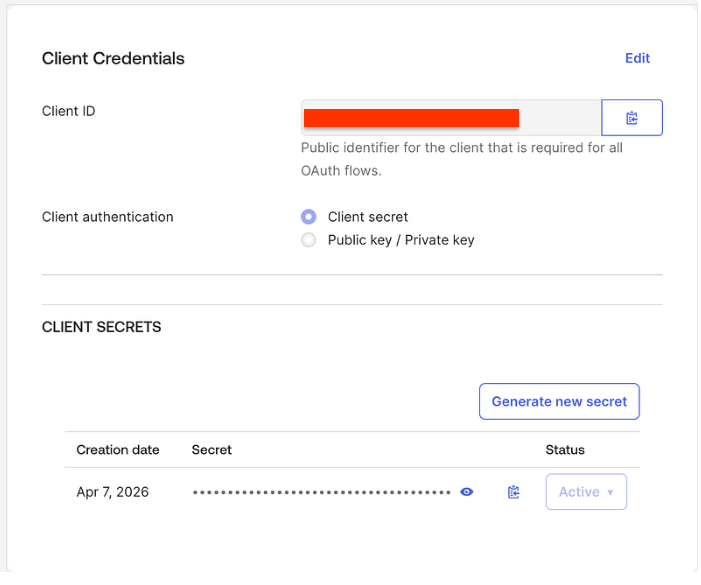
These credentials will be required to request access tokens in the next steps.
Step 2: Configure API scopes and claims
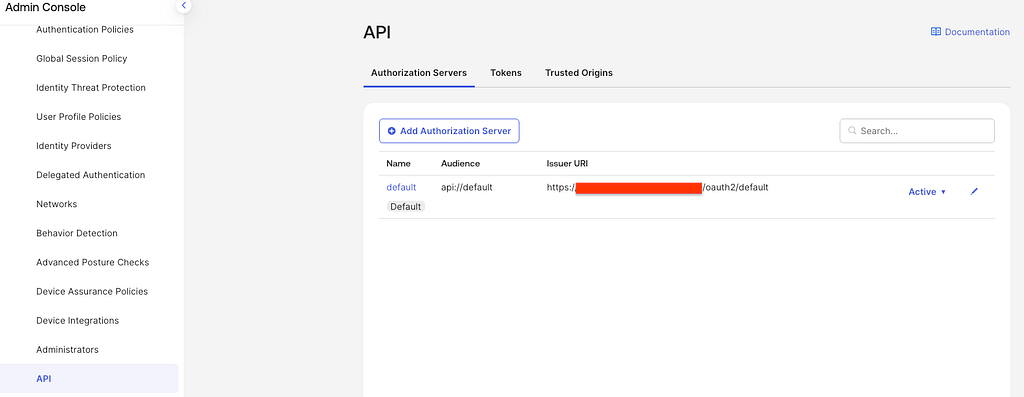
In the Okta Admin Console:
- Navigate to Security → API
- Select the Default Authorization Server
2. Go to the Scopes tab:
- Ensure the default openid scope is present
- Click Add Scope and create a new custom scope:
- Name: neo4j_groups


3. Go to the Claims tab and click Add Claim

4. Create a claim with the following settings:
- Name: groups
- Include in token type: Access Token
- Value type: Expression
- Value: app.profile.neo4j_groups
- Include in: Specific scopes
- Scope: neo4j_groups
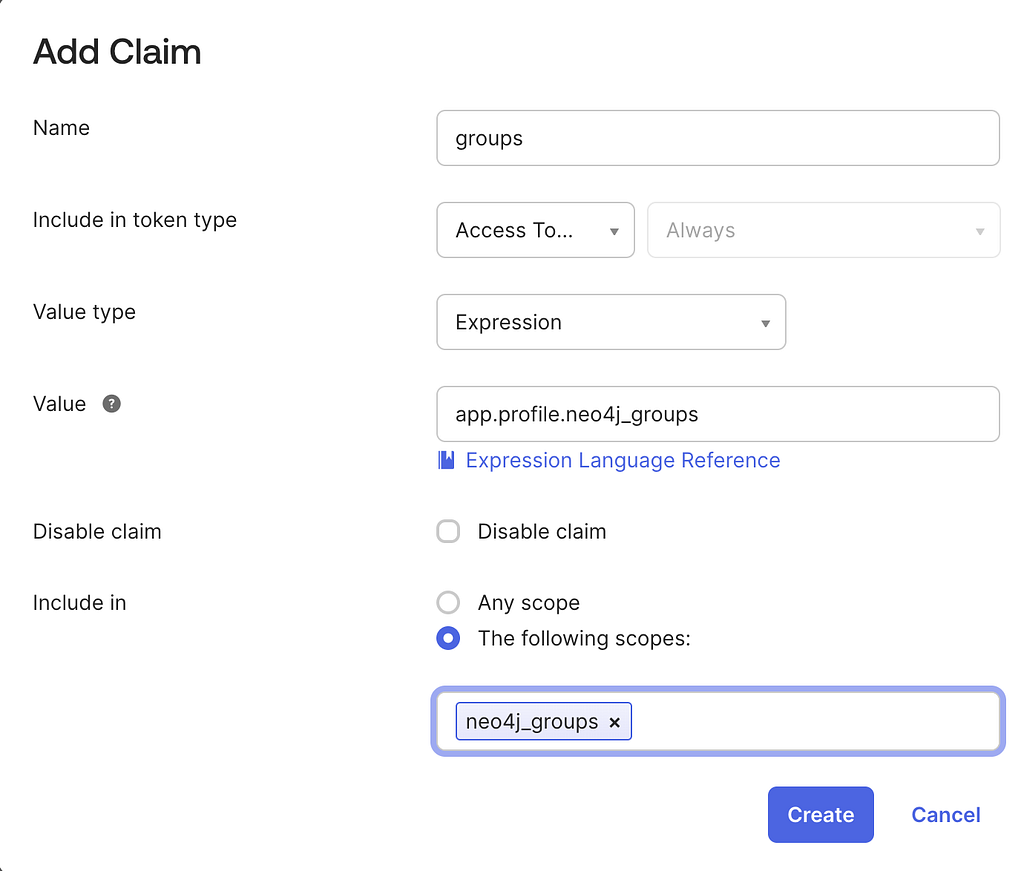
This maps the custom attribute defined in Step 1 to a claim that will be included in the issued JWT.
5. Navigate to the Access Policies tab
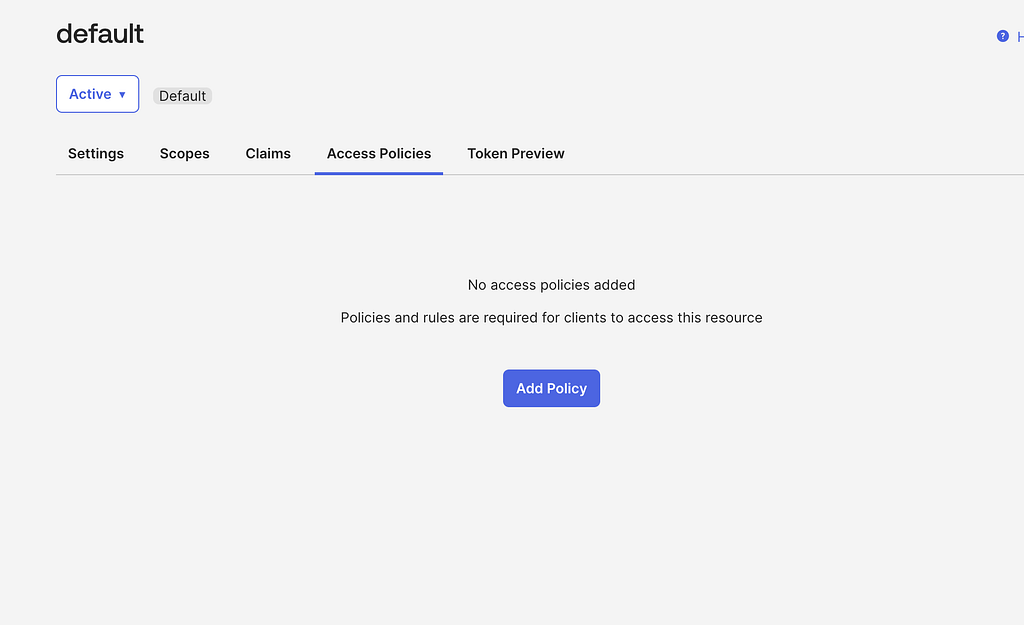
6. Create a new policy for your Neo4j service application
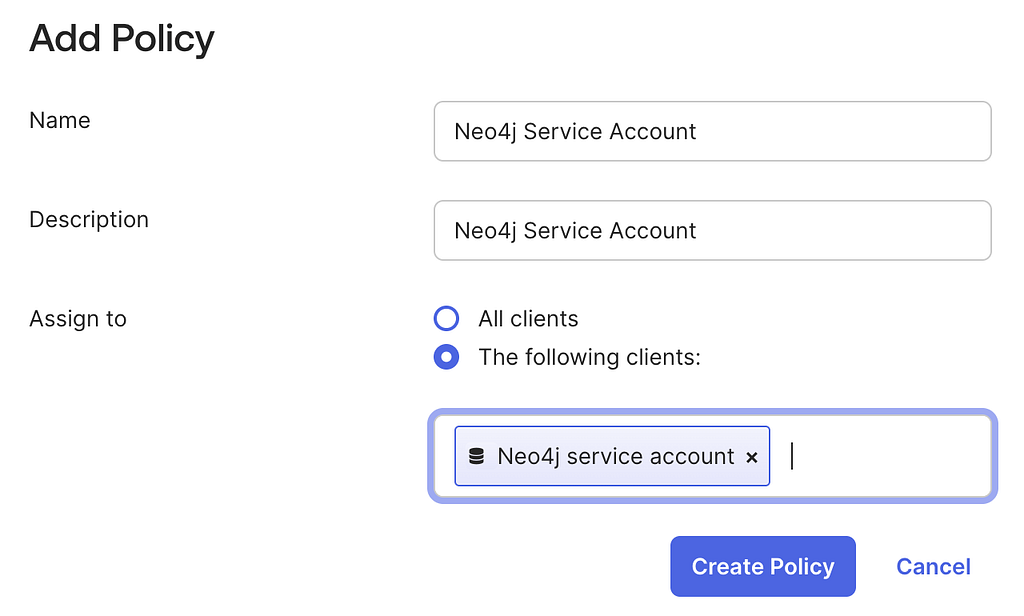
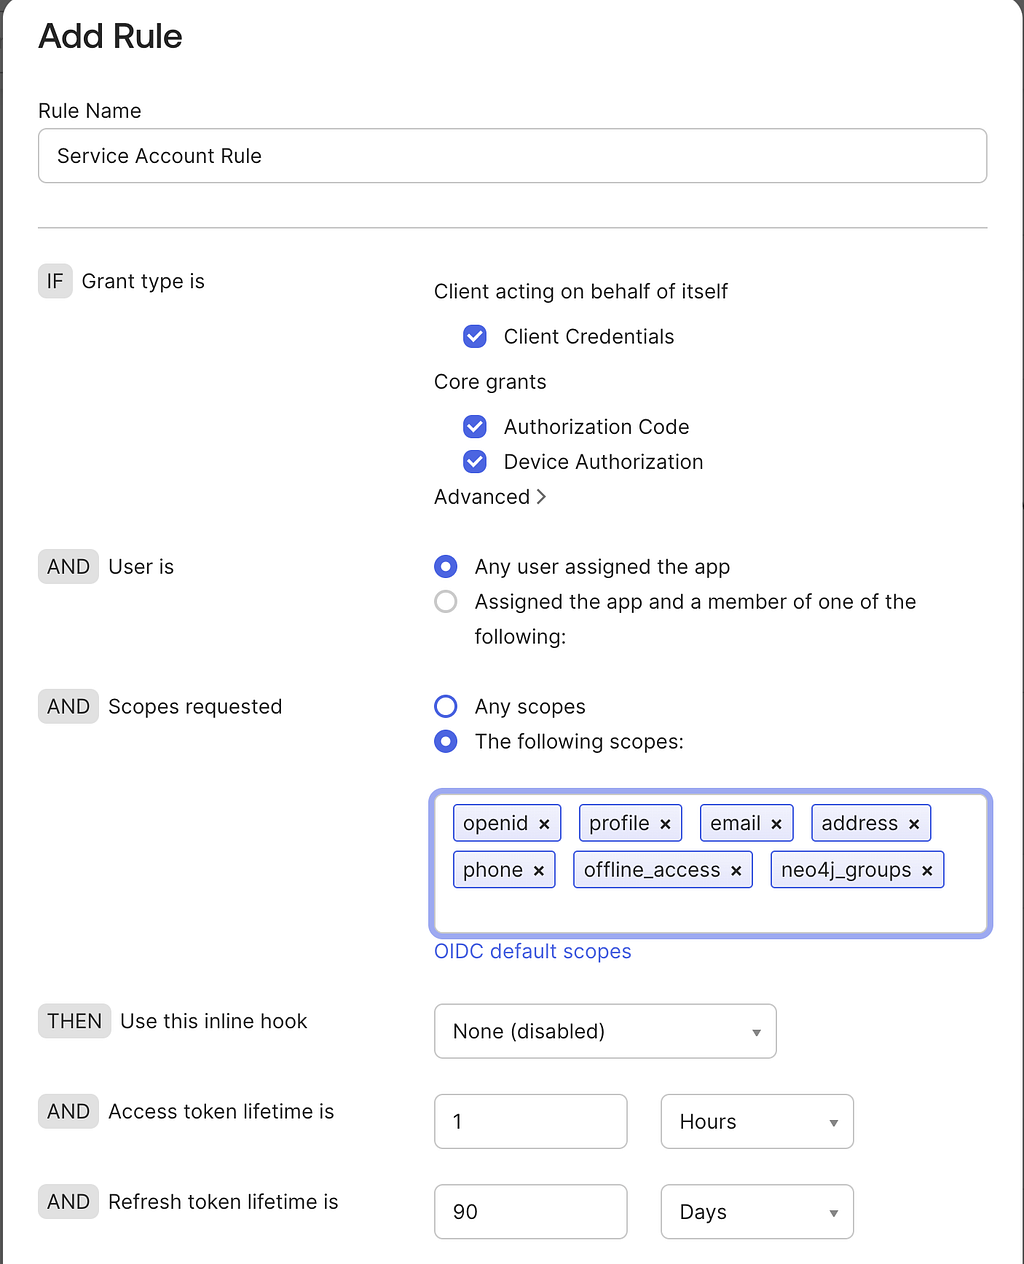
7. Add a policy rule that:
- Allows the client to request tokens
- Includes the scopes: openid and neo4j_groups
Step 3: Configure SSO in Neo4j
Now we need to configure Single Sign-On (SSO) in your Neo4j environment to trust tokens issued by Okta.
Deployment considerations
The configuration process depends on how Neo4j is deployed:
- Self-managed (on-premise / VM):
You can configure SSO directly in the Neo4j configuration file by following the official documentation: Configuring Neo4j. - Neo4j Aura:
Instance-level SSO configuration is managed by the platform and cannot be modified directly. In this case, refer to the available documentation in Instance-level SSO support.
Expected configuration
At the end of this step, your Neo4j server should be configured to:
- Trust the Okta issuer (Authorization Server)
- Validate incoming JWT access tokens
- Extract identity and group information from token claims
- Map claims to Neo4j roles
A typical configuration will include:
- The OIDC discovery endpoint
- The expected audience
- The username claim
- The groups claim
Example configuration
Below is an example of what the SSO configuration may look like in a self-managed Neo4j deployment:
dbms.security.authorization_providers=native,oidc-okta-backend
dbms.security.authentication_providers=native,oidc-okta-backend

dbms.security.oidc.okta-backend.display_name=Okta Backend
dbms.security.oidc.okta-backend.visible=false
dbms.security.oidc.okta-backend.auth_flow=pkce
dbms.security.oidc.okta-backend.well_known_discovery_uri=https://integrator-xxxxxx..okta.com/oauth2/default/.well-known/openid-configuration
dbms.security.oidc.okta-backend.audience=api://default
dbms.security.oidc.okta-backend.claims.username=sub
dbms.security.oidc.okta-backend.params=client_id=<client_id>;response_type=code;scope=openid profile email neo4j_groups api://default
dbms.security.oidc.okta-backend.config=principal=sub;code_challenge_method=S256;token_type_principal=access_token;token_type_authentication=access_token
dbms.security.oidc.okta-backend.claims.groups=groups
dbms.security.oidc.okta-backend.authorization.group_to_role_mapping="neo4j_admin"=admin
Step 4: Connect to Neo4j using the Python driver
Now that your Okta service application and Neo4j SSO configuration are in place, you can authenticate using a JWT access token and connect to the database.
The following Python script demonstrates how to:
- Request an access token from Okta using the Client Credentials flow
- Authenticate to Neo4j using that token
- Execute a simple query to validate the connection
import base64
import json
import os

import requests
from neo4j import GraphDatabase, bearer_auth


def require_env(name: str) -> str:
    value = os.getenv(name)
    if not value:
        raise RuntimeError(f"Missing required environment variable: {name}")
    return value


def get_okta_token() -> str:
    okta_domain = require_env("OKTA_DOMAIN")  # e.g. integrator-xxxxxx.okta.com
    okta_client_id = require_env("OKTA_CLIENT_ID")
    okta_client_secret = require_env("OKTA_CLIENT_SECRET")
    okta_scope = os.getenv("OKTA_SCOPE", "neo4j_groups")

    token_url = f"https://{okta_domain}/oauth2/default/v1/token"
    basic = base64.b64encode(
        f"{okta_client_id}:{okta_client_secret}".encode("utf-8")
    ).decode("utf-8")

    response = requests.post(
        token_url,
        headers={
            "Authorization": f"Basic {basic}",
            "Content-Type": "application/x-www-form-urlencoded",
            "Accept": "application/json",
        },
        data={"grant_type": "client_credentials", "scope": okta_scope},
        timeout=30,
    )

    # Show Okta JSON error details for fast troubleshooting.
    if response.status_code >= 400:
        try:
            detail = json.dumps(response.json(), indent=2)
        except Exception:
            detail = response.text
        raise RuntimeError(
            f"Okta token request failed ({response.status_code}) at {token_url}\n{detail}"
        )

    payload = response.json()
    token = payload.get("access_token")
    if not token:
        raise RuntimeError(
            f"Token response missing access_token. Keys={list(payload.keys())}"
        )
    return token


def connect_and_query_neo4j(access_token: str) -> None:
    neo4j_uri = require_env("NEO4J_URI")  # e.g. neo4j+s://<id>.databases.neo4j.io:7687
    neo4j_db = os.getenv("NEO4J_DATABASE", "neo4j")

    with GraphDatabase.driver(neo4j_uri, auth=bearer_auth(access_token)) as driver:
        driver.verify_connectivity()
        with driver.session(database=neo4j_db) as session:
            record = session.run("SHOW CURRENT USER").single()
            print(record.data())


def main() -> None:
    token = get_okta_token()
    connect_and_query_neo4j(token)


if __name__ == "__main__":
    main()
Expected result
If the authentication is successful, you should see output similar to:
{'user': '<sub>', 'roles': ['admin', 'PUBLIC'], 'passwordChangeRequired': False, 'suspended': False, 'home': None}
This confirms that:
- The token was successfully issued by Okta
- Neo4j validated the token
- Role mapping (via the groups claim) is working as expected
Troubleshooting
In case of any issue during the authentication, review the following Knowledge Articles for troubleshooting steps:
- Troubleshooting SSO problems in Neo4j
- Extract your SSO token
- SSO configuration and Troubleshooting in Aura
How to Create and Integrate an Okta OIDC Service Account with Neo4j was originally published in Neo4j Developer Blog on Medium, where people are continuing the conversation by highlighting and responding to this story.
Share Article


Explore
Related Articles


SumoDB in Neo4j: Chaining Multiple Graph Algorithms in Snowflake — Part 3