How to Integrate Neo4j With SSO on Azure: One Login to Rule Them All

Principal Consultant, Neo4j
15 min read

Learn how to integrate your Neo4j apps and backend services with Azure AD SSO

In your journey to exploring graph databases and getting valuable information, you will want to move your graph into production and share access to your graph with colleagues.
You might need to configure Single Sign-On (SSO) for security reasons and internal policies. This post will guide you through everything you need to know to configure and access your Neo4j graph with SSO authentication and authorization for both user applications (Neo4j Browser, Bloom, Neodash, …) as well as a backend service (which can be your ETL pipeline, GDS batches, etc.).
Introduction
What you’ll learn in this article
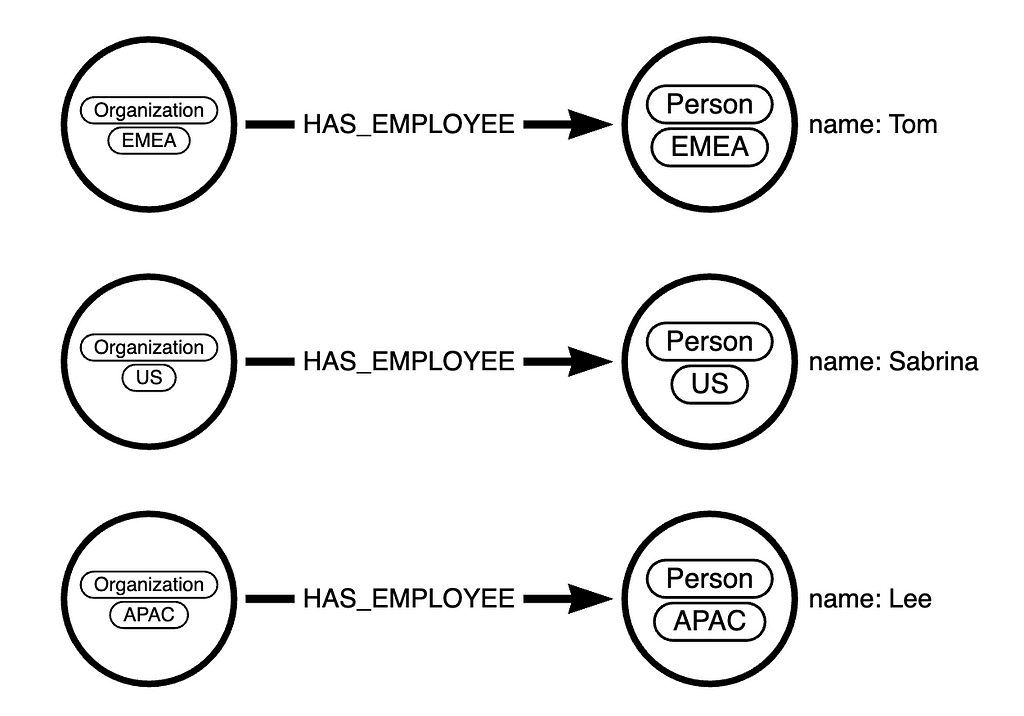
Let’s make a small demo based on an SSO integration. The data model is pretty simple. We have 3 Organization nodes, each in a specific region (EMEA, US, and APAC). Each of the organizations has an employee with a property: name.
We are going to have 2 users connecting to our application:
- An end user based in EMEA (will be determined by a group assignment on the Azure Active Directory (AAD)) who can only see data for his region
- A technical user (or Service Principal) that can read and write anything in our graph from a backend service
That sounds fun, right? Now let’s see how we can make this work:
- Section 1: We will have a high-level introduction to what SSO is and what we get from the integration with Neo4j.
- Section 2: We will setup both AAD and Neo4j to enable SSO authentication for end users.
- Section 3: We will setup both AAD and our backend service to enable SSO for a technical account (Service Principal).
- Section 4: We will put everything together with Neo4j Role Base Access Control (RBAC).
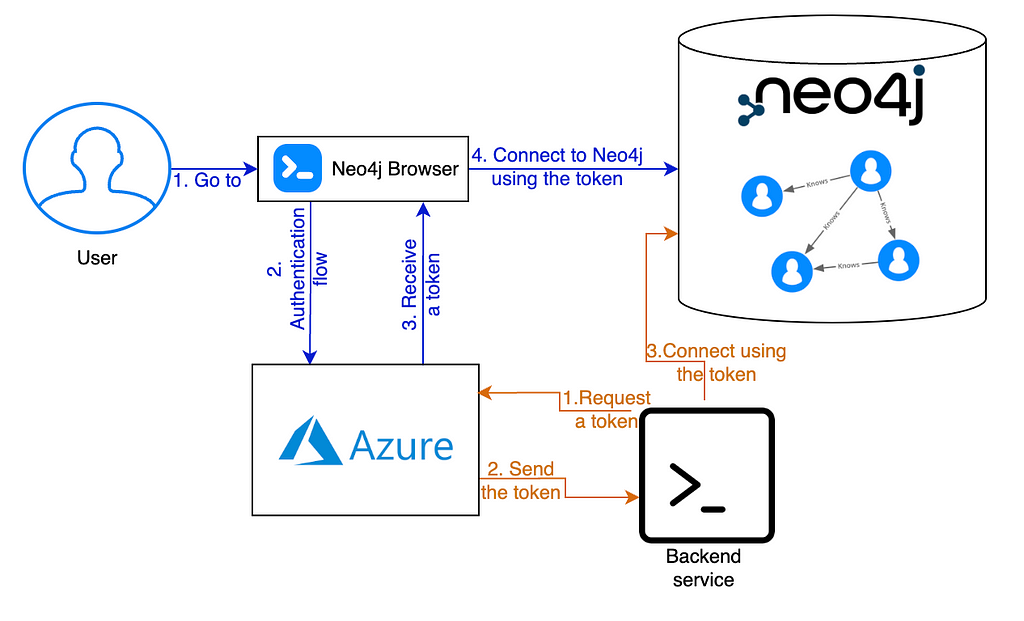
And finally, this is what our simplified SSO flows will look like:
Prerequisites and Assumptions
For this post, we will focus on setting up SSO OpenID Connect (OIDC) for Neo4j Browser and a small Python script as the backend, both using Access Token. We will use Microsoft Azure Active Directory (AAD) as the IdP and use application roles for authorization and data access control.
Although integration with other IdPs (Okta, Google Auth, …), using different types of tokens, and separating the user apps and backend service in different Apps on the IdD and other architectures are possible, they can’t all be covered in one post.
Before diving into the technical details, ensure you have:
- Required permissions on your IdP to create applications, users, and groups.
- A Neo4j Database up and running.
Section 1: Understanding SSO and Neo4j Integration
What Is Single Sign-On (SSO)?
Single Sign-On (SSO) is an authentication mechanism that allows users to access multiple applications or services with a single set of credentials. It eliminates the need for users to remember and enter separate usernames and passwords for each application. SSO enhances user experience, reduces friction, and improves security by centralizing authentication.
End User vs. Technical Account SSO
End User: Enables seamless access for human users by allowing them to log in once and access multiple services without repeated authentication.
Technical Account/Service Principal: Facilitates automated, programmatic access for applications and services, enhancing security and enabling controlled resource interaction.
Benefits of SSO integration With Neo4j
- Unified User Experience: Users can access Neo4j and other applications with a single set of credentials, streamlining their interactions and reducing login fatigue.
- Centralized Identity Management: Neo4j can delegate authentication to a trusted Identity Provider (IdP), reducing the complexity of managing user accounts.
- Enhanced Security: With SSO, Neo4j can rely on the IdP’s security mechanisms, such as multi-factor authentication, for an added layer of protection.
- RBAC Integration: SSO allows for efficient Role-Based Access Control (RBAC) implementation, leveraging roles assigned by the IdP for Neo4j’s access controls.
Now that we know what SSO and Neo4j are and what benefits we can leverage with the integration, let’s get our hands dirty!
Section 2: Setting Up the SSO for User Apps
Azure Active Directory (AAD) Configuration
The first thing we need to do is create an Enterprise Application on AAD. To do so, head over to https://portal.azure.com and go to the AAD service (from this screen, note your Tenant ID as we will need it later for the Neo4j configuration). On the left menu, click on Enterprise Applications and create a new application.
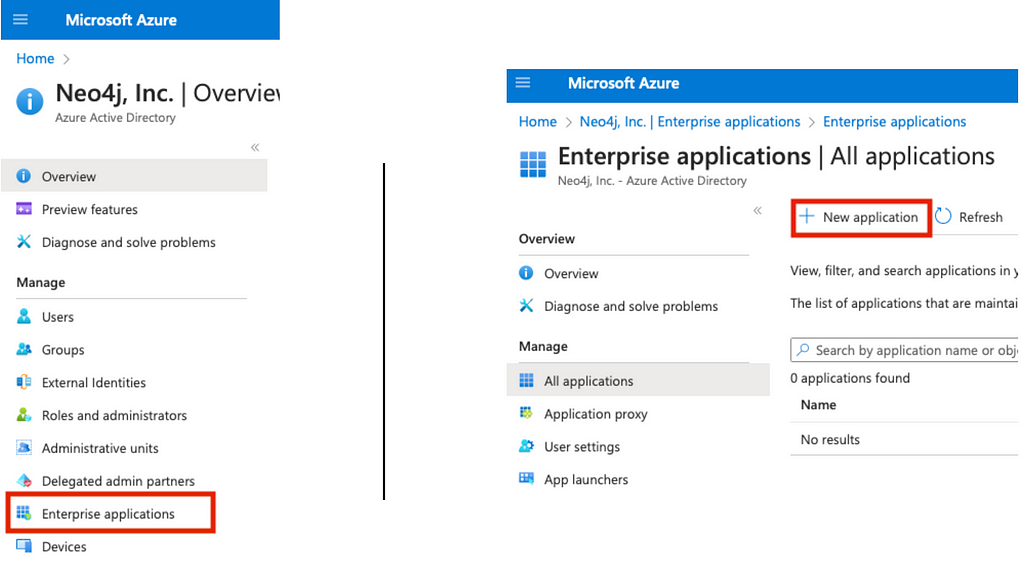
On the top, select Create your own application and give it a name. For this example, I will call it “Neo4jSSO” (make sure to select Register an application to integrate with Azure AD, which will trigger the registration of the application).
Select the supported account type that fits your needs. For this example, I will only allow accounts in my organization. We can then set the redirect URI, which is mandatory for the Neo4j tools (Browser, Bloom, …).
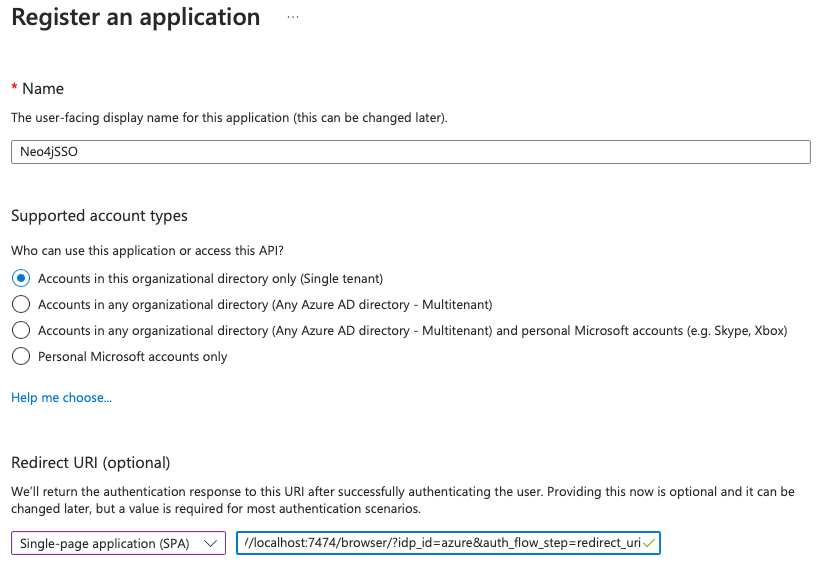
The type for Neo4j Browser is a Single Page Application, and your redirect URI should look like this:
http://localhost:7474/browser/?idp_id=azure&auth_flow_step=redirect_uri
- Replace http://localhost:7474/browser/ according to your server. This must be your Neo4j Browser URL.
- Replace azure in the second part to reflect the IdP ID you want to give for this setup. This can be anything, but it will need to match the ID you provide in the Neo4j configuration in the next section.
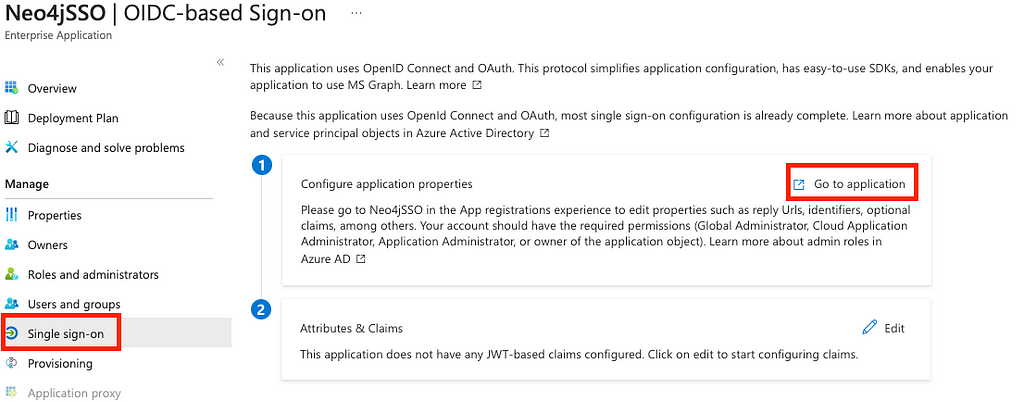
Next, we will configure our application to create a custom scope and therefore restrict access protected by the API. To configure the application, select Single Sign-On on the left menu, then Go to application.
From there, We can note a couple of things that are going to be required for the Neo4j configuration:
- Your Application (client) ID in the essentials card. This is usually a set of 5 UIDs separated by a —
- Your OpenID Connect metadata document (aka Well Known Discovery). You can obtain it by clicking on Endpoints at the top.
If you want to enable SSO for other tools than just Neo4j Browser, simply click on Authentication on the left menu, and add the Redirect URIs for each of your applications.
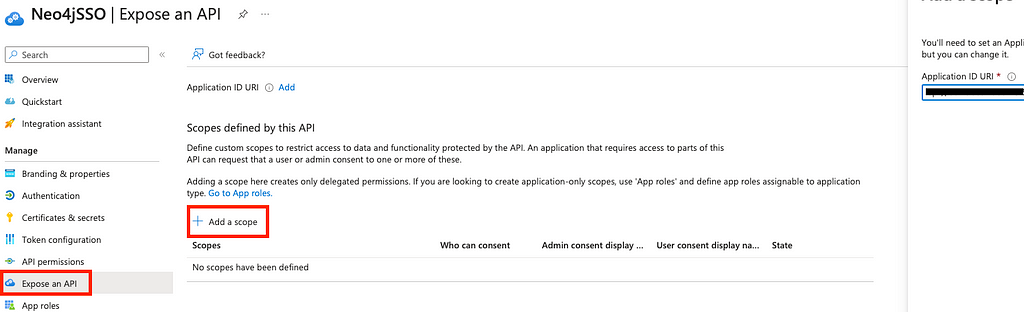
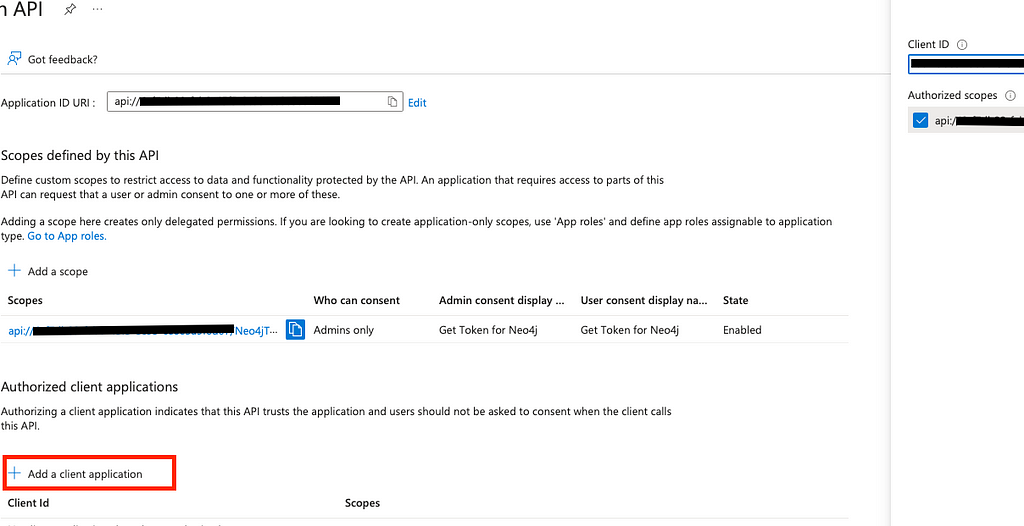
To create the scope, head over to Expose an API on the left menu, then click on Add a scope and keep it to the default value, which should be your application ID.
On the next screen, give your scope a name. For my example, I will name it Neo4jToken. Give an accurate description and display name, then add the scope. Now we need to authorize the client application by adding the application as per the screen below:
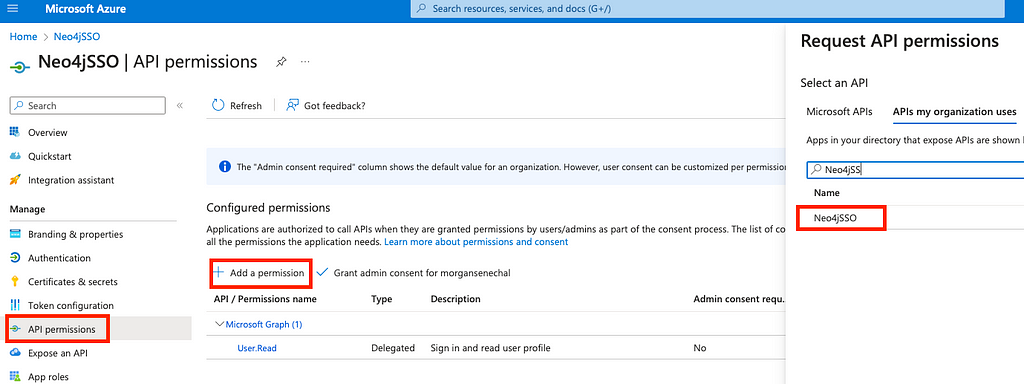
The last step to enable the API is to give it the required permissions. Select API Permissions on the left menu, then + Add a permission and search for your App name in the APIs my organization uses. On the next screen, give the permission for the scope we just created, add permissions, and finally Grant admin consent for the added permission.
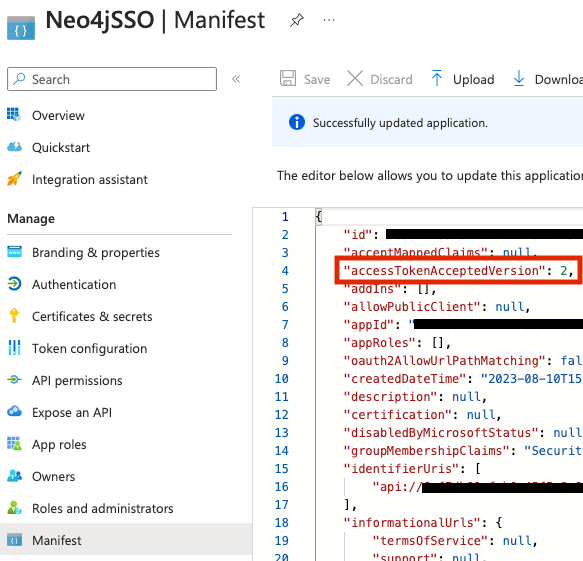
Finally, before we move into the Neo4j configuration, make sure to check that the accessTokenAcceptedVersion property in the manifest is set to 2. This is required because we will be using the v2 endpoints and will be using custom-mapped claims for the backend configuration later.
Neo4j Configuration
Now let’s dive into the Neo4j configuration so we can test the SSO Authentication from Neo4j Browser.
dbms.security.authentication_providers=oidc-<idp-id>,native
dbms.security.authorization_providers=oidc-<idp-id>,native

dbms.security.oidc.<idp-id>.display_name=<display-name>
dbms.security.oidc.<idp-id>.well_known_discovery_uri=<well-known-discovery>
dbms.security.oidc.<idp-id>.auth_flow=pkce
dbms.security.oidc.<idp-id>.config=principal=<user-claim>;code_challenge_method=S256
dbms.security.oidc.<idp-id>.claims.username=<user-claim>

dbms.security.oidc.<idp-id>.audience=<audience>
dbms.security.oidc.<idp-id>.params=client_id=<client-id>;response_type=code;scope=openid profile email <api>

dbms.security.oidc.<idp-id>.claims.groups=roles
- <idp-id>: This must be the same as the value you provided earlier in the redirect URI. In my example, this will be azure
- <display-name>: This will be the name displayed on the SSO button when opening Neo4j Browser. In this example, I will use SSO Login
- <well-known-discovery>: This is the Well Known Discovery we saved earlier. Usually in the form of https://login.microsoftonline.com/<your-tenant-id>/v2.0/.well-known/openid-configuration
- <user-claim>: The claim you want to use for the username. In this example, I will use preferred_username
- <audience>: The audience of the token. Usually for the v2, this will be the same as your Client Application ID
- <client-id>: The Client Application ID we saved earlier
- <api>: This is the API we created earlier. In this example it was api://<client-id>/Neo4jToken
Note that by default Neo4j configuration file already contain a line for the authentication_providers and authorization_providers, which can lead to errors when starting Neo4j if you have duplicates of these settings. Make sure to comment or remove them as shown below:
#dbms.security.authentication_providers=native
#dbms.security.authorization_providers=native
And voila! You should now be able to start (or restart) your Neo4j database and login with SSO. Make sure to check that your username is correct.
Section 3: Implementing SSO for a Backend Service
Azure Active Directory (AAD) Configuration
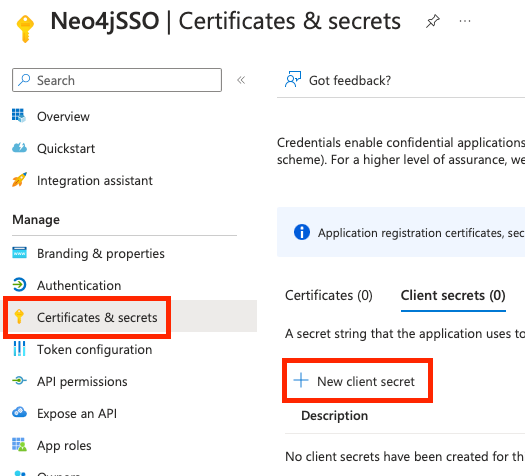
In order to allow our backend to connect to Neo4j using SSO we need to create a technical account (aka Service Principal) that will be used by our script. For this example, we will use a client secret to get a token on behalf of our application.
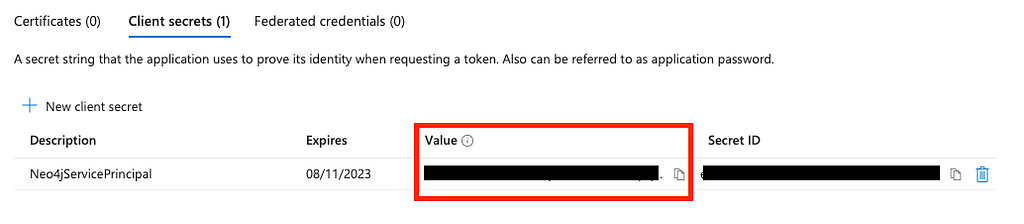
Head over to the Certificates & secrets on the left menu, then click on New client secret. Give the client’s secret a description and an expiration.
Don’t forget to copy the Value (not the Secret ID) as this only appear once and we will need it for our backend script.
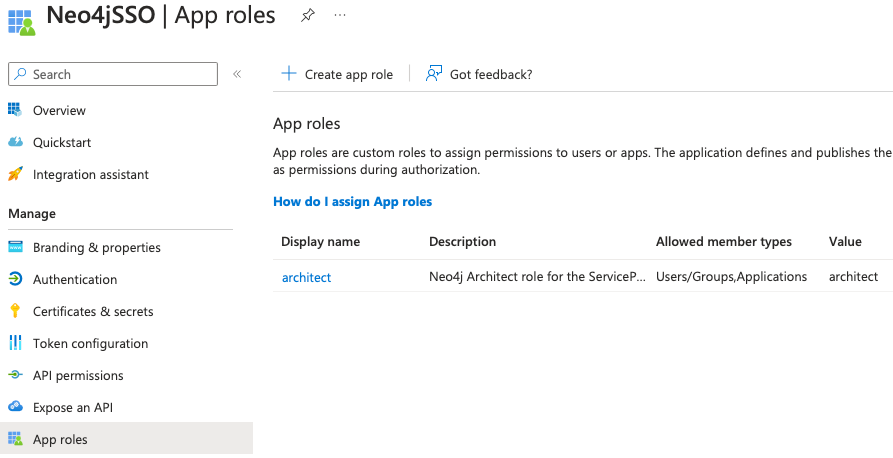
Next, we need to create an application role so that we can later assign it to our ServicePrincipal. To do this, select App roles on the left menu and click on Create app role. Enter the display name you want, select Both (Users/Groups + Applications) as the allowed member types, and provide a value. For this example, I will give my technical user the Architect role.
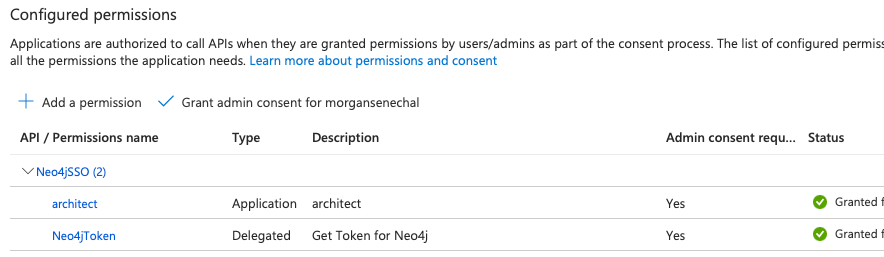
We now need to give the API permission for this new application role. This is done in the same way as we did before by going to API Permissions then Add a permission => APIs my organization uses => YourApp => Application permissions and select the new role you created above.
Do not forget to grant admin consent. This should result in something similar to the screen below:
The final couple of steps we need to do on the Azure AD is to assign the role to our ServicePrincipal and create a custom claim. Custom claims are claims we can add to our token for which we can define the value with a custom mapping, transformation, or fixed value.
Before we move out of the application, make sure to go to the manifest and check that the value of acceptMappedClaims is true (default is null) and save if you need to make the change.
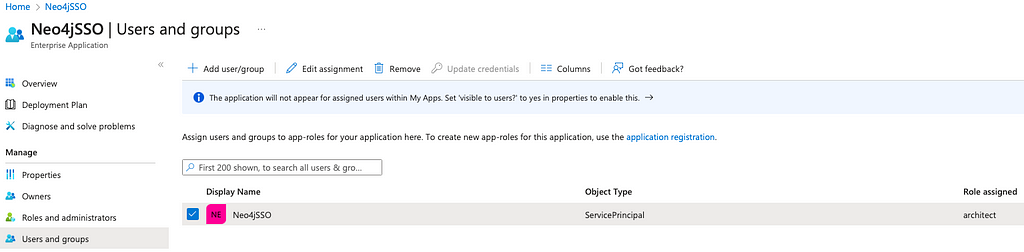
To Create the custom claim as well as assign the role to our ServicePrincipal, we need to go back to the EnterpriseApplication view (Home => Azure Active Directory => Enterprise Applications => YourApp).
From the left menu, select Users and groups. From there, you should see your ServicePrincipal. Select it and Edit assignment. Click on Select a role from the right menu. You should be able to see and select your application role. You should now have your application role assigned to your ServicePrincipal as below:
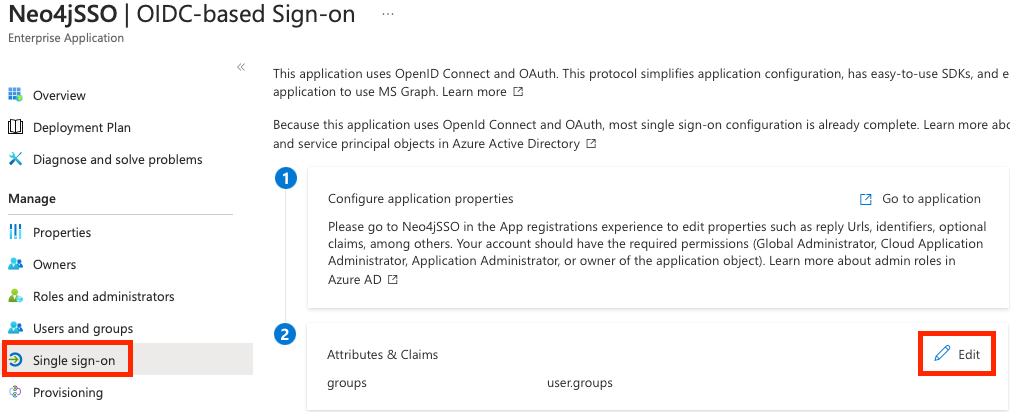
Finally, we need to create a custom claim for our ServicePrincipal since this is not a real user. It does not contain a username claim such as preferred_username, email, etc. To create a custom claim, Select Single Sign-On from the left menu and click on Edit in the Attributes & Claims card.
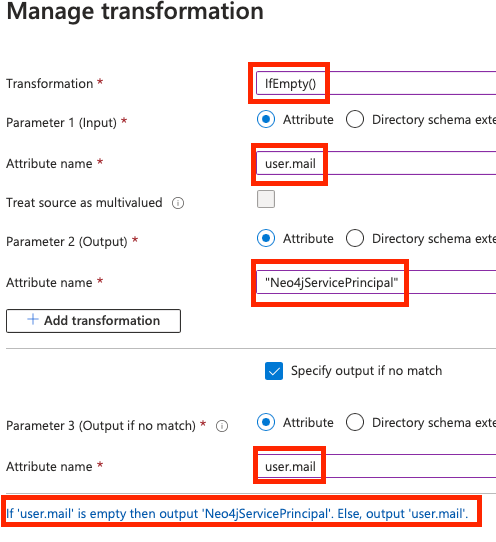
From there, let’s add a new claim. For this example, I will name it myCustomUsername and select Transformation as the Source so we can map an attribute or value depending on a condition. For this demo, I will map the user’s email, and for our ServicePrincipal, I will set a default “Neo4jServicePrincipal” but you can use other types of transformation or custom claims.
Now let’s move into the Neo4j configuration as there are a few changes we need to make so it can accept our Service Principal token.
Neo4j Configuration
From the configuration we made in Section 2, we need to change the new username claim (the custom claim we created in the previous step):
dbms.security.oidc.<idp-id>.config=principal=<user-claim>;code_challenge_method=S256
dbms.security.oidc.<idp-id>.claims.username=<user-claim>
In the previous step, I created a custom claim named myCustomUsername. This will be my new value for <user-claim>. Additionally, you can use the group_to_role_mapping if you want to map your new role to a specific role in your Neo4j Database. (note that this is optional).
Backend Service
GitHub – msenechal/SSO-clientCredentials: SSO-clientCredentials
For this example, I will be using a Python script (available in the GitHub repository above). In this script, we will acquire a user token from Azure and use that token to authenticate to Neo4j. The repo also contains a Nodejs version, but you can achieve the same with any other language as long as there is a Neo4j driver available and you can acquire a token from client credentials.
The script is pretty simple:
import sys
import json
import base64
import msal
from neo4j import GraphDatabase, bearer_auth

config = json.load(open(sys.argv[1]))

app = msal.ConfidentialClientApplication(
    config["client_id"], authority=config["authority"],
    client_credential=config["secret"],
    )

result = app.acquire_token_for_client(scopes=config["scope"])

if "access_token" in result:
    with GraphDatabase.driver(config["NEO4J_URI"], auth=bearer_auth(result['access_token'])) as driver:
        driver.verify_connectivity()
        records, summary, keys = driver.execute_query(
        "MERGE (p:Person {name:'ServicePrincipal', type:'servicePrincipalSSO', app:'python'}) RETURN p",
        database_="neo4j",
        )
else:
    print(result.get("error"))
    print(result.get("error_description"))
    print(result.get("correlation_id"))
First, we are reading the AAD config from a json file passed as a parameter when you run the Python script:
config = json.load(open(sys.argv[1]))
Then we use the MSAL library to get a token from client credentials:
app = msal.ConfidentialClientApplication(
    config["client_id"], authority=config["authority"],
    client_credential=config["secret"],
    )

result = app.acquire_token_for_client(scopes=config["scope"])
And finally, this last part is connecting to Neo4j using the Access Token and creating a node Person (We won’t be using it, but this is so we can test both the authentication and authorization) in the graph with a few properties:
with GraphDatabase.driver(config["NEO4J_URI"], auth=bearer_auth(result['access_token'])) as driver:
        driver.verify_connectivity()
        records, summary, keys = driver.execute_query(
        "MERGE (p:Person {name:'ServicePrincipal', type:'servicePrincipalSSO', app:'python'}) RETURN p",
        database_="neo4j",
        )
If all goes well, you can execute by running:
python python/main.py params.json
And you should now see this new node in your Neo4j graph, created by the Python script using client credentials SSO, as well as this entry in the security.log from Neo4j:
INFO [Neo4jServicePrincipal]: logged in
Now, although all of this is awesome, let’s take a step further and play with the roles we get from Azure AD to restrict access and permissions on the graph!
Section 4: Putting It All Together With RBAC
Role Based Access Control in Neo4j 4.1
Neo4j RBAC, or Role-Based Access Control, is a security mechanism implemented to control and manage user access to specific data and operations within the database.
Azure Active Directory (AAD) Configuration
For this to work, we will need to assign a role to our end user so we can restrict his access based on his role. For this example, I will assign myself the role “EMEA” and keep the role architect for the Service Principal. This way, with the same query, I will only be able to see Tom, where the backend should see all employees.
To assign the “EMEA” role, we simply need to re-do the exact same steps we did in Section 3 when we created the role “architect” and assigned it to the Service Principal. In short: Head to the AAD application, create an app role, give the right permission on the API and assign the new role to your user on the Enterprise Application screen.
Neo4j Graph
First, we need to create the role EMEA so we can assign the right permissions. The Cypher script below :
- (optional) Clean the DB.
- Create the role.
- Give access to the Neo4j DB, give permission to MATCH any node with the label EMEA and give permission to traverse the relationship HAS_EMPLOYEE to the role EMEA.
- Create the graph.
// 1. Make sure the DB is empty
// Uncommenting the line below will delete everything in your database
// MATCH (n) DETACH DELETE n;

// 2. Create the EMEA Role
CREATE ROLE EMEA;

// 3. Grant access to the DB as well as match on the EMEA nodes + relationship
GRANT ACCESS ON DATABASE `neo4j` TO EMEA;
GRANT MATCH {*} ON GRAPH `neo4j` NODE EMEA TO EMEA;
GRANT TRAVERSE ON GRAPH neo4j RELATIONSHIPS HAS_EMPLOYEE TO EMEA;

// 4. Create the graph
CREATE (:Organization:EMEA)-[:HAS_EMPLOYEE]->(:Person:EMEA {name: "Tom"}),
(:Organization:US)-[:HAS_EMPLOYEE]->(:Person:US {name: "Sabrina"}),
(:Organization:APAC)-[:HAS_EMPLOYEE]->(:Person:APAC {name: "Lee"});
For this example, we will be using this simple match query, returning the name of the employees.
MATCH (o:Organization)-[:HAS_EMPLOYEE]->(p:Person) RETURN p.name
Trying It Out!
Backend
In this example, our Service Principal has the architect role, meaning he should be able to access and read data from the entire graph. Using the same Python script as we used in Section 3, we can simply update the Cypher query and print the result to stdout:
records, summary, keys = driver.execute_query(
        "MATCH (o:Organization)-[]->(p:Person) RETURN p.name",
        database_="neo4j",
        )
        print(records)
Result:
[<Record p.name=’Tom’>, <Record p.name=’Sabrina’>, <Record p.name=’Lee’>]
🎉 We can see all 3 employees as expected.
User App (Neo4j Browser)
Using the previously created SSO integration, I can connect to Neo4j Browser with my user and get the role “EMEA” we assigned on Azure earlier. With the same Cypher query, we should now only see Tom:
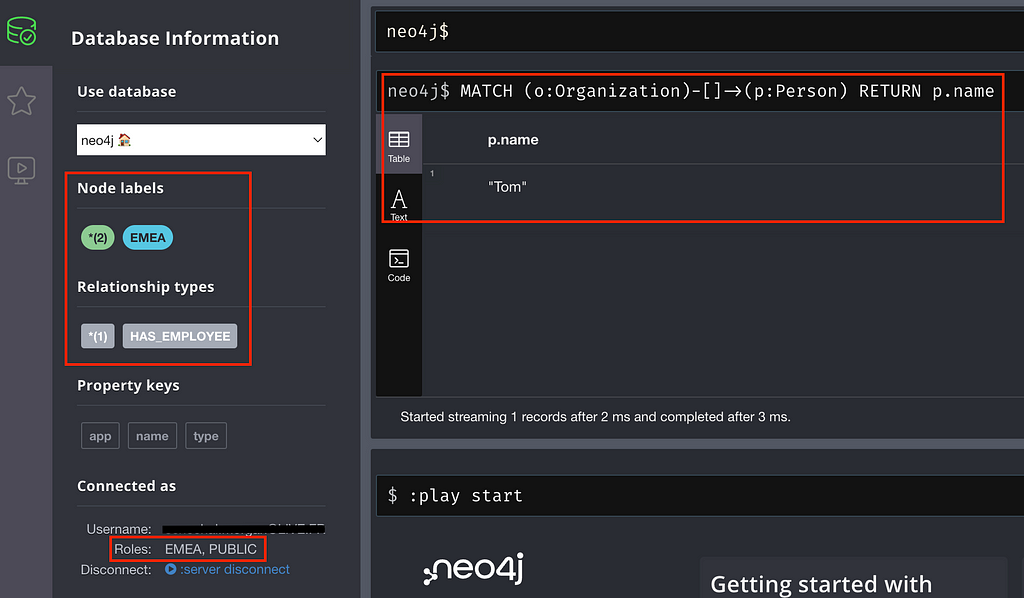
Tada 🎉
What Next?
Although this was a fun demo to make and demonstrate all the potential of an SSO integration with Neo4j, we can still take a step further and extend it by adding Bloom or Neodash with SSO to have a user-friendly visualization dashboard accessible through the seamless authentication process.
In this demo, we had 2users: 1 user with the EMEA role and one technical account who can access everything. As a next step and a good way to test what you learned in this post, I suggest you try to add 2 users to your IdP, one with the role US and another with the role APAC and make sure all 3 users (EMEA, US, and APAC) can only see their region’s data 🤓
For enterprises looking to elevate their security, we can also enable multi-factor authentication and much more. The possibilities are endless!
Wrapping Up
This was only a short post explaining and showing the strength of an SSO OIDC integration with Neo4j and RBAC. The implementation can differ depending on different factors such as your architecture, environment, customization, SSO protocol (OIDC, SAML, …) and so on.
If you encounter issues while setting up SSO with Neo4j, Neo4j user apps (Browser, Bloom, Workspace, Aura,…), NeoDash, and others, here are a few key things you can look at:
- Read the official Neo4j/Neodash documentation linked below on how to configure SSO.
- Read your IdP (AAD, Okta, …) documentation on setting up SSO.
- Reach out on our Neo4j Discord or our community forum.
- For customers, you can also create a support ticket on our support.
- Additionally, if you need one of our experts you can consult our website Neo4j Professional Services or reach out directly at ps_emea_pmo@neotechnology.com.
Additional Resources
- Neo4j Single Sign-On (SSO) configuration – Operations Manual
- Configuration – NeoDash
- Add an OpenID Connect-based single sign-on application – Microsoft Entra
- OpenID Connect Core 1.0 incorporating errata set 1
How to Integrate Neo4j With SSO on Azure — One Login to Rule Them All was originally published in Neo4j Developer Blog on Medium, where people are continuing the conversation by highlighting and responding to this story.
Share Article


Explore
Related Articles

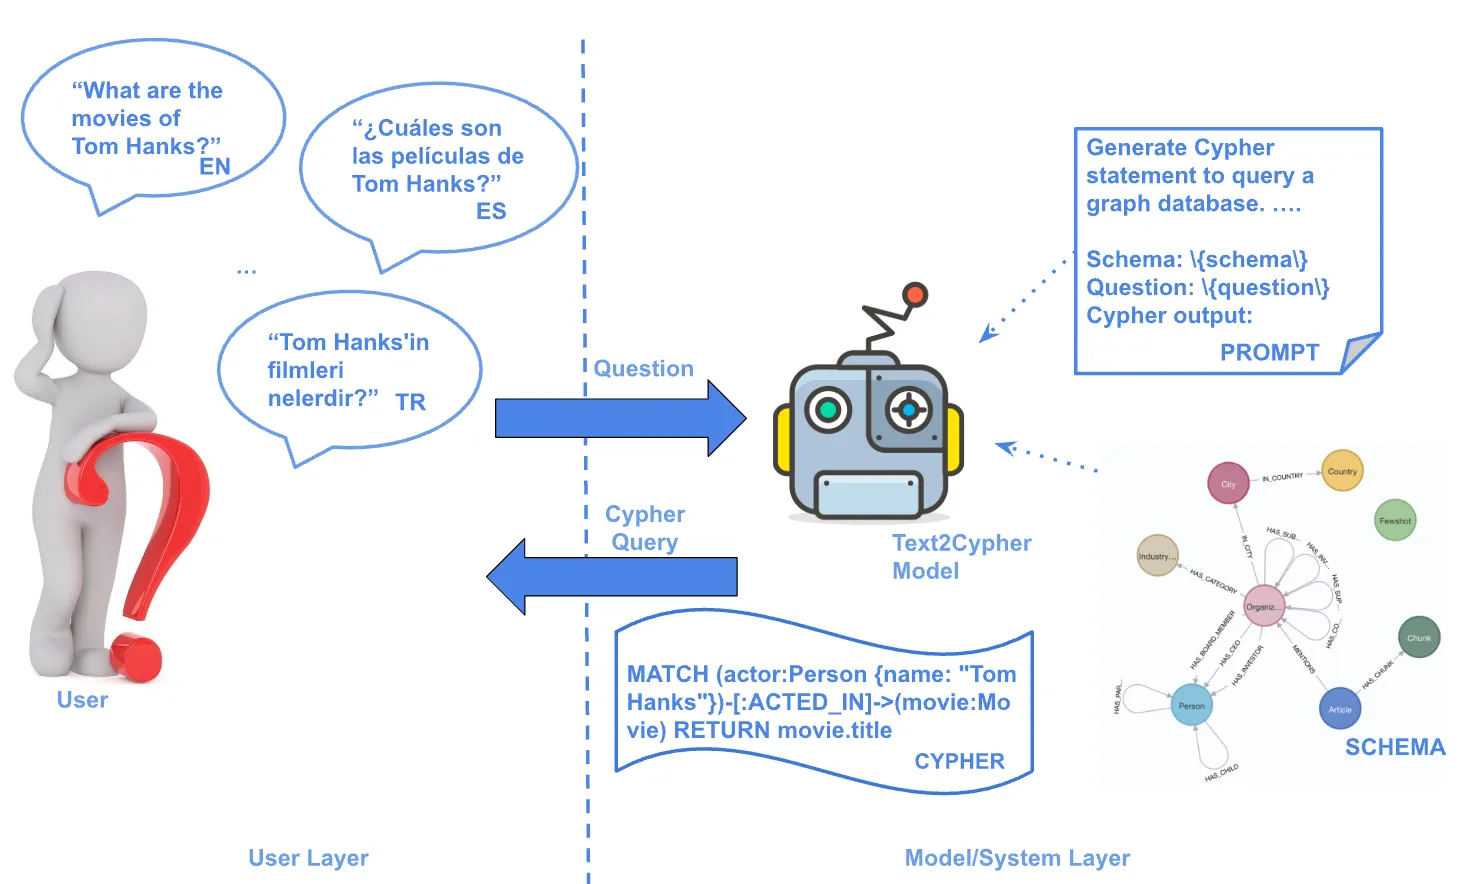
Text2Cypher Across Languages: Evaluating Foundational Models Beyond English