Using LOAD CSV for Import
About this module
In many applications, you want to populate your graph with data that was written to CSV files or files of other types. There are many nuances and best practices for loading data into a graph from files. In this lesson, you will be introduced to some simple steps for loading CSV data into your graph with Cypher.
At the end of this module, you will be able to:
-
Describe the steps for importing data with Cypher.
-
Prepare the graph and data for import:
-
Inspect data.
-
Determine if data needs to be transformed.
-
Determine the size of the data that will be imported.
-
Create the Constraints in the graph.
-
-
Import the data with
LOAD CSV. -
Create indexes for newly-loaded data.
| Because the code examples in this lesson modify the database, it is recommended that you do not execute them against your database as you will be doing so in the hands-on exercises. |
Loading data with Cypher
In Cypher, you can:
-
Load data from a URL (http(s) or file).
-
Process data as a stream of records.
-
Create or update the graph with the data being loaded.
-
Use transactions during the load.
-
Transform and convert values from the load stream.
-
Load up to 10M nodes and relationships.
Steps for loading data with Cypher
CSV import is commonly used to import data into a graph. If you want to import data from CSV, you will need to first develop a model that describes how data from your CSV maps to data in your graph.
Assuming that you have an agreed-upon data model, here are the basic steps you follow for importing using Cypher and CSV files:
-
Determine how the CSV file will be structured.
-
Determine if normalized or denormalized data.
-
Ensure IDs to be used in the data are unique.
-
Ensure data in CSV files is "clean".
-
Execute Cypher code to inspect the data.
-
Determine if data needs to be transformed.
-
Ensure constraints are created in the graph.
-
Determine the size of the data to be loaded.
-
Execute Cypher code to load the data.
-
Add indexes to the graph.
CSV file structure
A CSV file represents rows of a relational table. When CSV files are created from your relational database, you must determine:
-
Whether the CSV file will have header information, describing the names of the fields.
-
What the delimiter will be for the fields in each row.
Including headers in the CSV file reduces syncing issues. If the size of the CSV files is extremely large, it is sometimes better to separate the headers from the data, especially if multiple files will be split to use the same set of headers.

Normalized data
Data normalization is common in relational models. This enables you to have CSV files that correspond to a relational table where an ID is used to identify the relationships.
Here is an example where we have normalized data for people, roles, and movies:
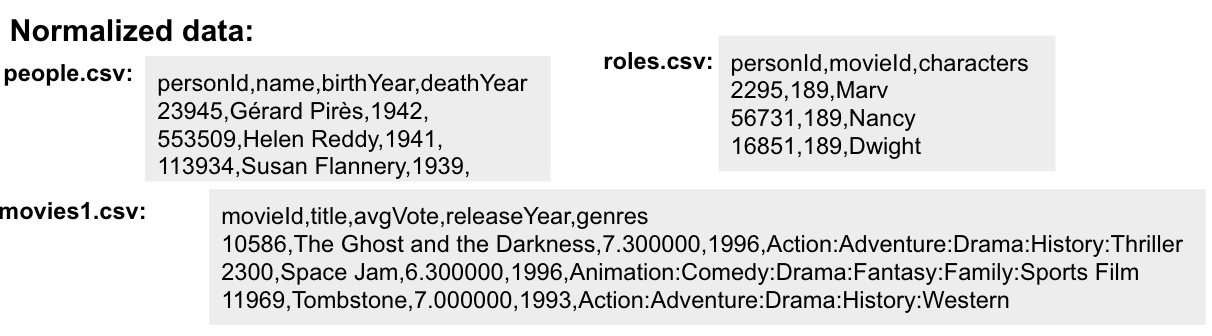
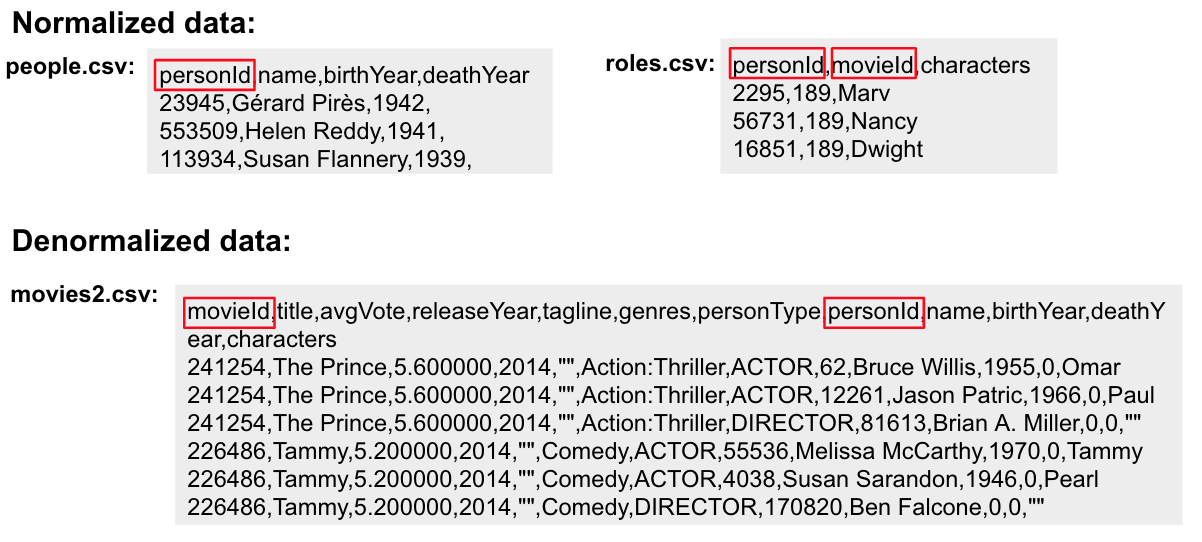
Notice that the people.csv file has a unique ID for every person and the movies1.csv file has a unique ID for every movie. The roles.csv file is used to relate a person to a movie and provide the characters. This is the data that could be used to create the :ACTED_IN relationship that you have seen in the Movie graph.
Denormalized data
Here is an example where we have denormalized data for the same type of data:
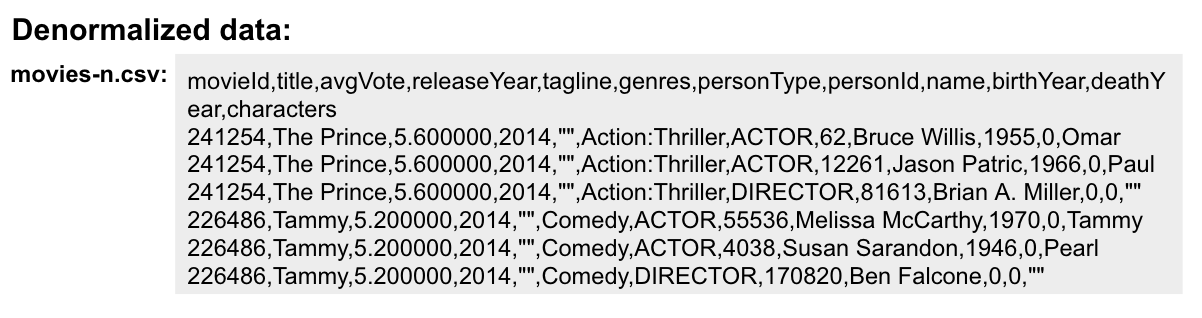
With denormalized data, the data is represented by multiple rows corresponding to the same entity. For example, The movie data (including the ID) is repeated in multiple rows, but for a particular movie, a different actor is represented.
Most CSV files generated from relational databases are normalized which is what we cover in this course.
IDs must be unique
When you load data from CSV files, you rely heavily upon the ID’s specified in the file. In most cases, the ID can be used as a unique property for each node. If the IDs in your CSV file are not unique for the same entity (node), you will have problems when you load the data and try to create relationships between existing nodes.
Is the data clean?
Before you load CSV data, you must understand how delimeters, quotes, and separators are used for each row.
Here are some things you must check:
-
Check for headers that do not match.
-
Are quotes used correctly?
-
If an element has no value will an empty string be used?
-
Are UTF-8 prefixes used (for example \uc)?
-
Do some fields have trailing spaces?
-
Do the fields contain binary zeros?
-
Understand how lists are formed (default is to use colon(:) as the separator.
-
Is comma(,) the delimiter?
-
Any obvious typos?
Example: Inspect the data at a URL
Before you load the data into your graph, you use Cypher to inspect the data.
With LOAD CSV, you can access CSV data at a URL or stored locally.
Here is an example where we can view the first 10 lines of the file at the URL where the headers are included in the CSV file and the default delimiter is the comma character:
LOAD CSV WITH HEADERS
FROM 'https://data.neo4j.com/v4.0-intro-neo4j/people.csv'
AS line
RETURN line LIMIT 10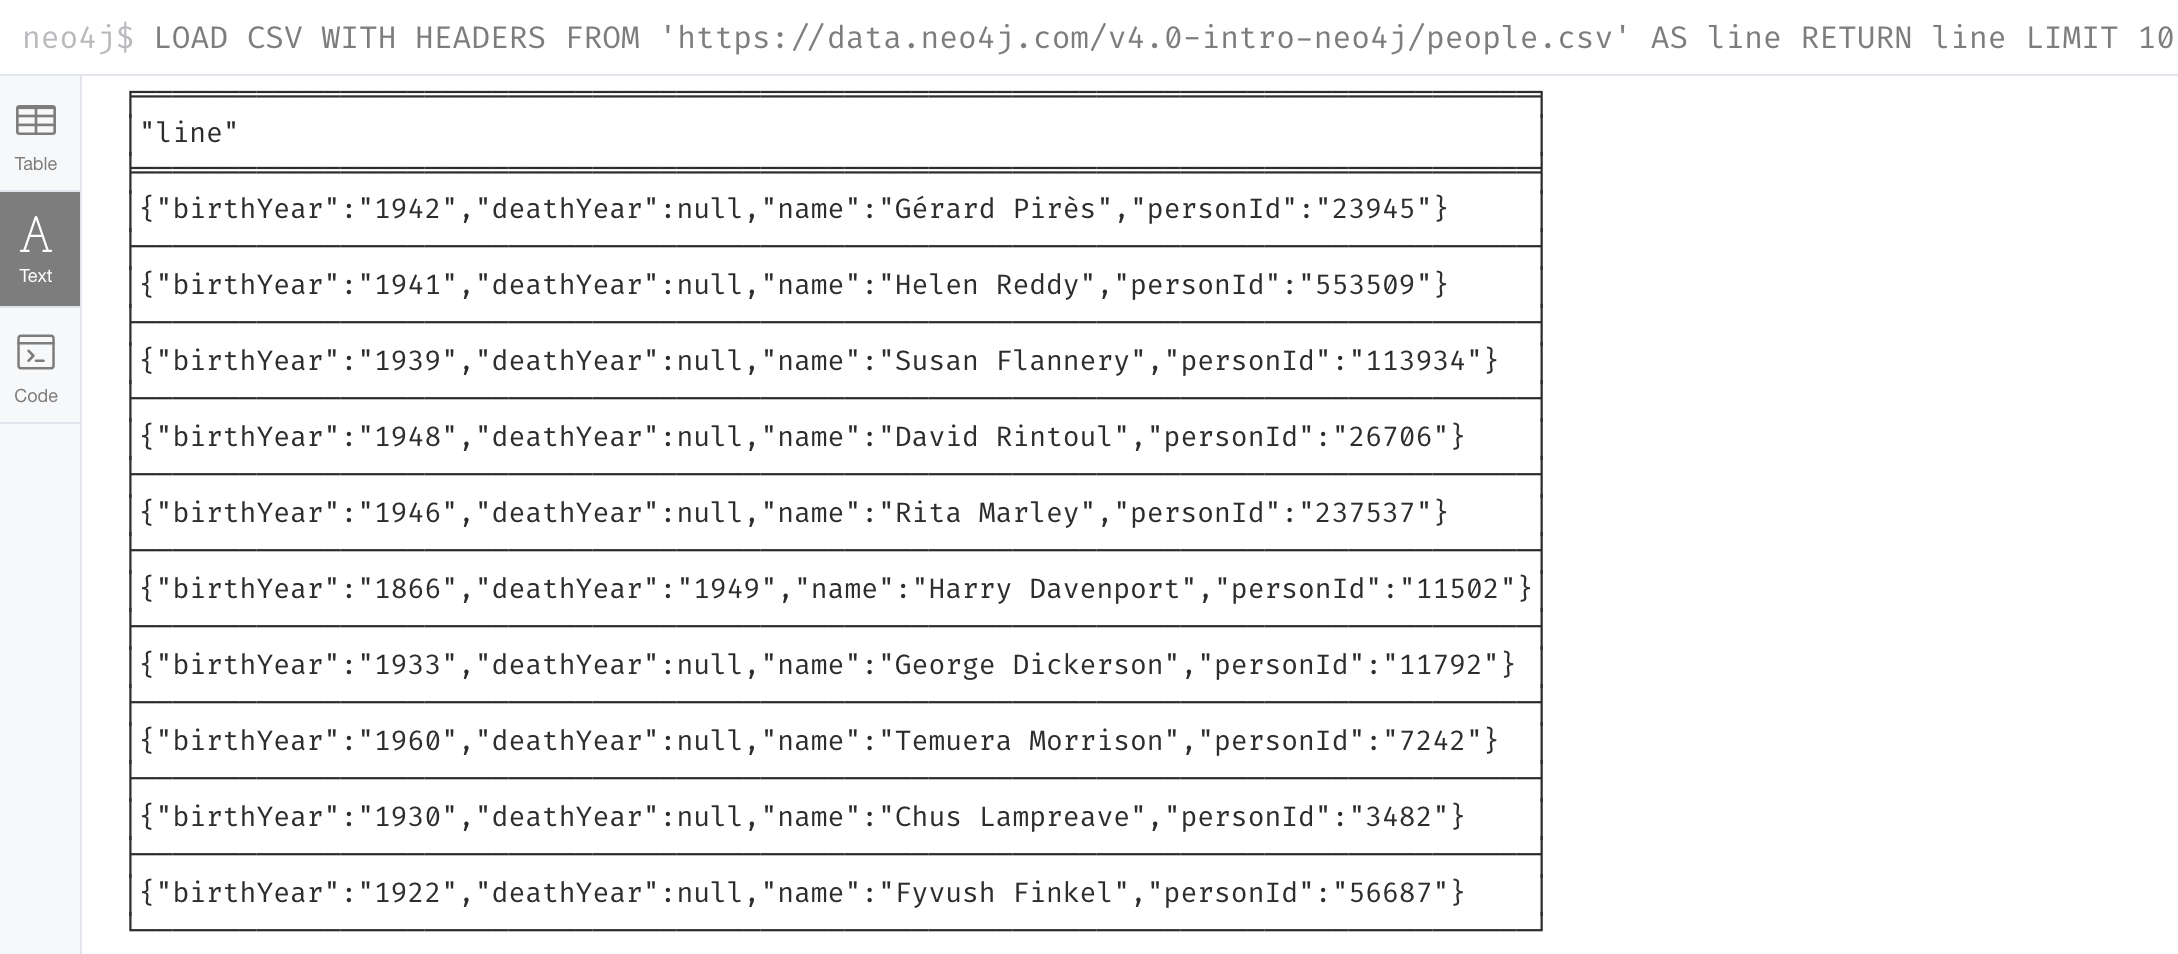
What is shown here is how the data, by default, will be interpreted during the load. For example, notice that the birth year will be interpreted as a string.
Example: Inspect the data stored locally
You can only load local data into a graph with LOAD CSV if the file has been placed in the import folder for the database:
-
Can do this if using Neo4j Desktop which runs a local database.
-
Cannot do this for a cloud-based instance such as a Neo4j Sandbox or Neo4j Aura.
To determine where the import folder is for a local database in Neo4j Desktop, you simply go to the Manage pane for the database and then select Open Folder→Import. Here is an example where we can view the first 10 lines of the local file that has been placed in the import folder for the database:
LOAD CSV WITH HEADERS
FROM 'file:///people.csv'
AS line
RETURN line LIMIT 10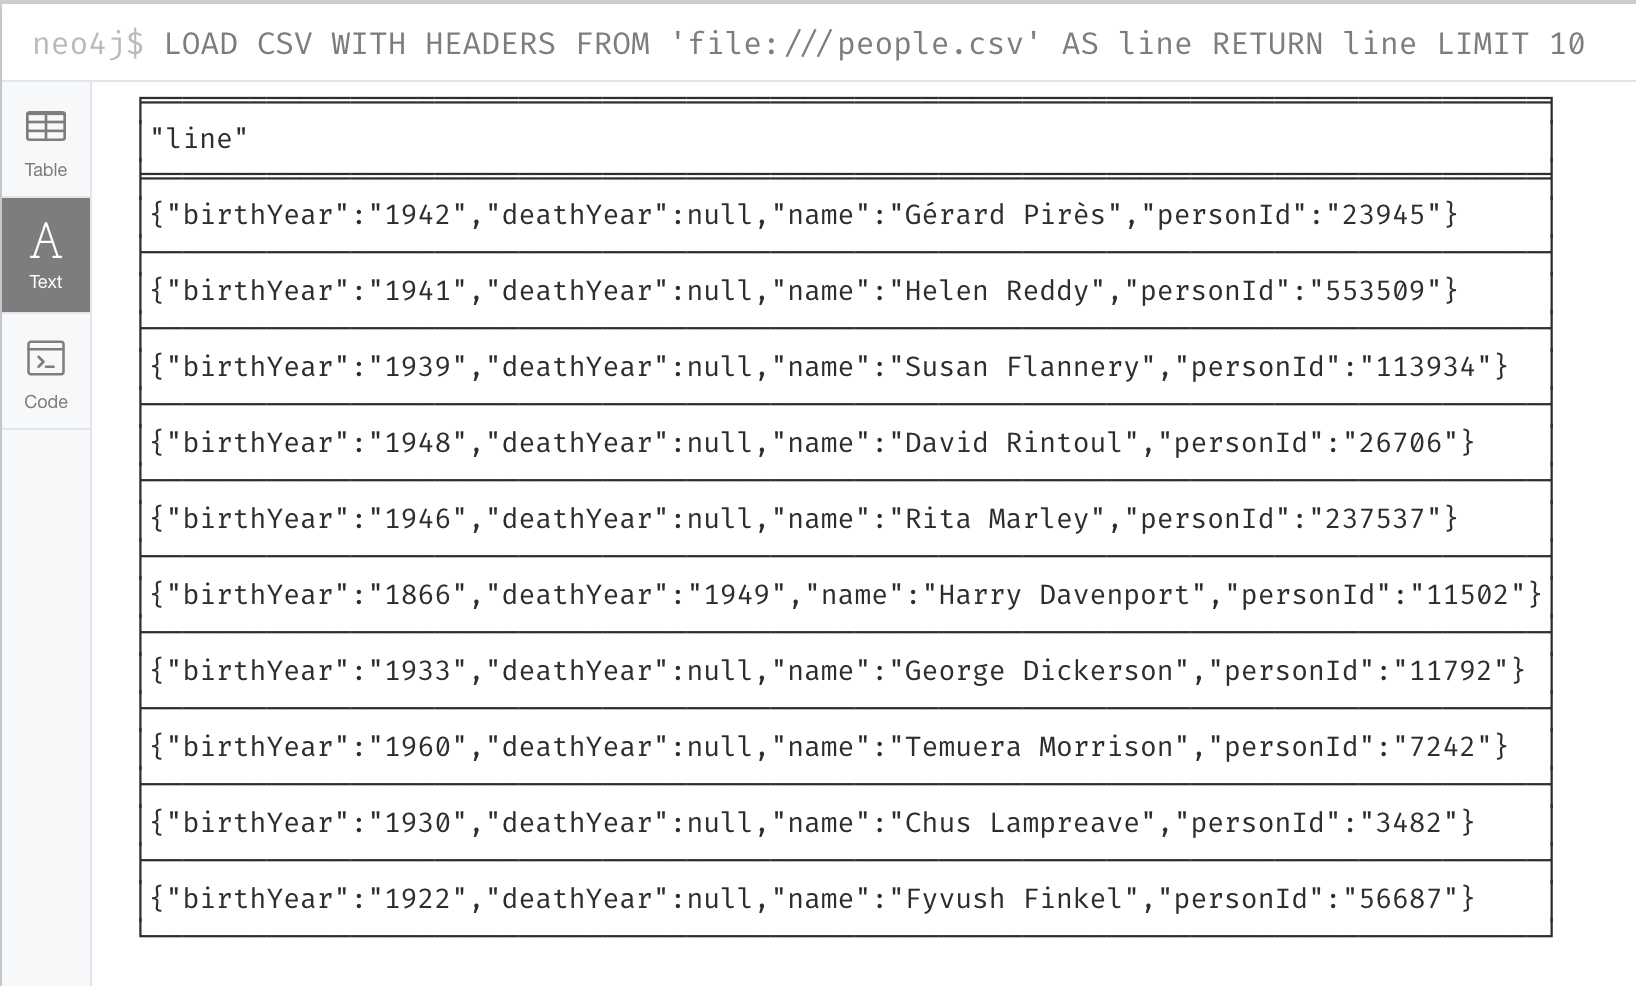
Loading or viewing a subset of the data in the CSV file
If you know that you want to only inspect or load specific data from the CSV file, you can filter the data as follows:
LOAD CSV WITH HEADERS
FROM 'https://data.neo4j.com/v4.0-intro-neo4j/people.csv'
AS line
WITH line WHERE line.birthYear > "1999"
RETURN line LIMIT 10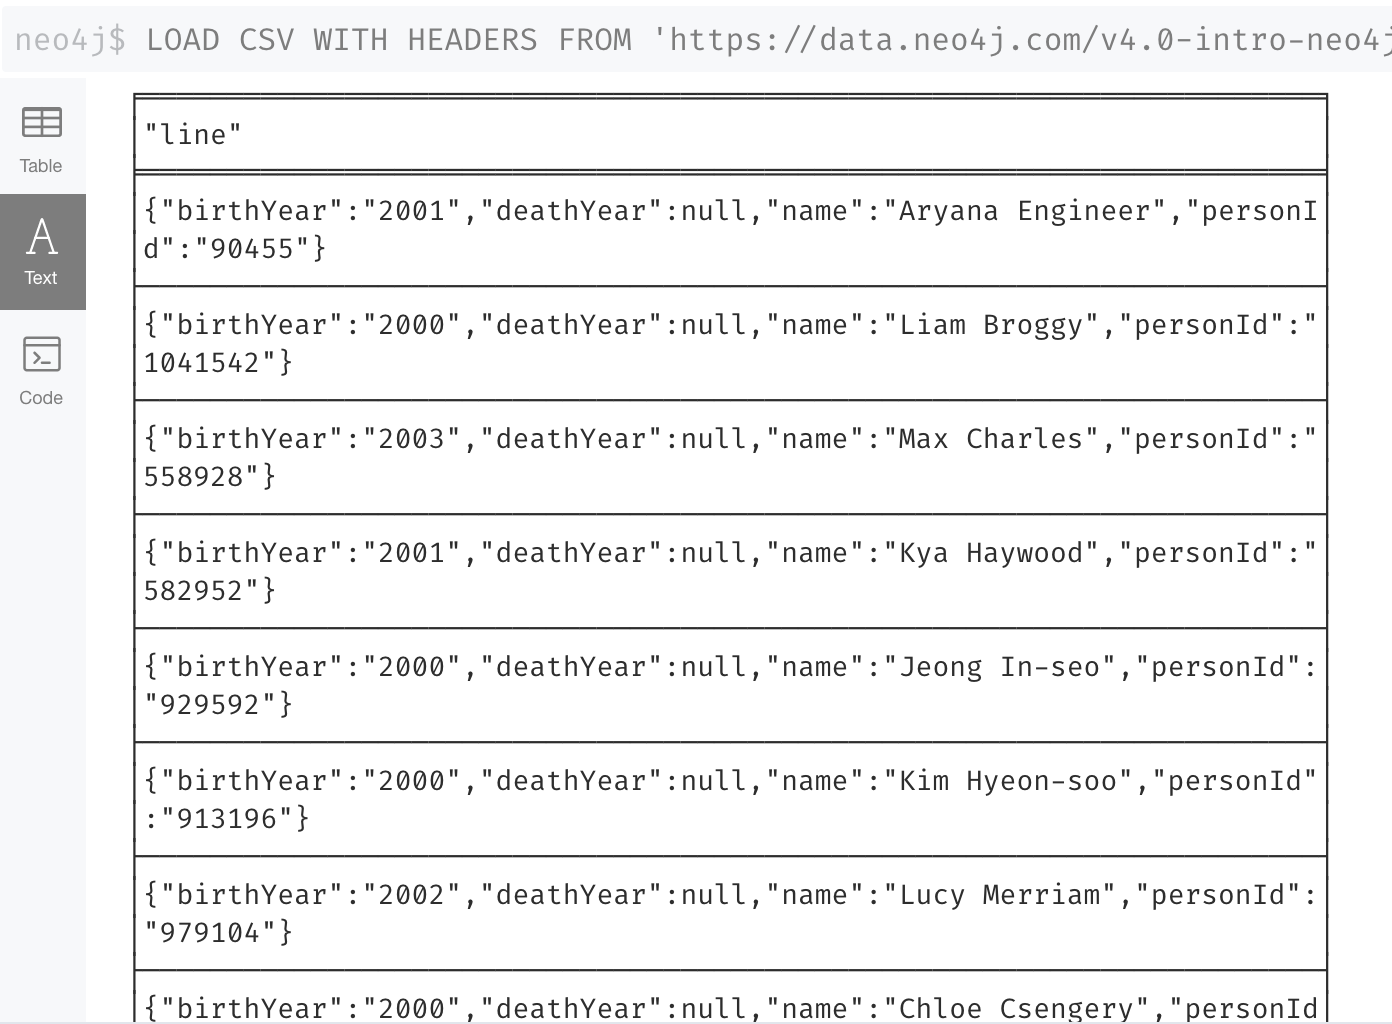
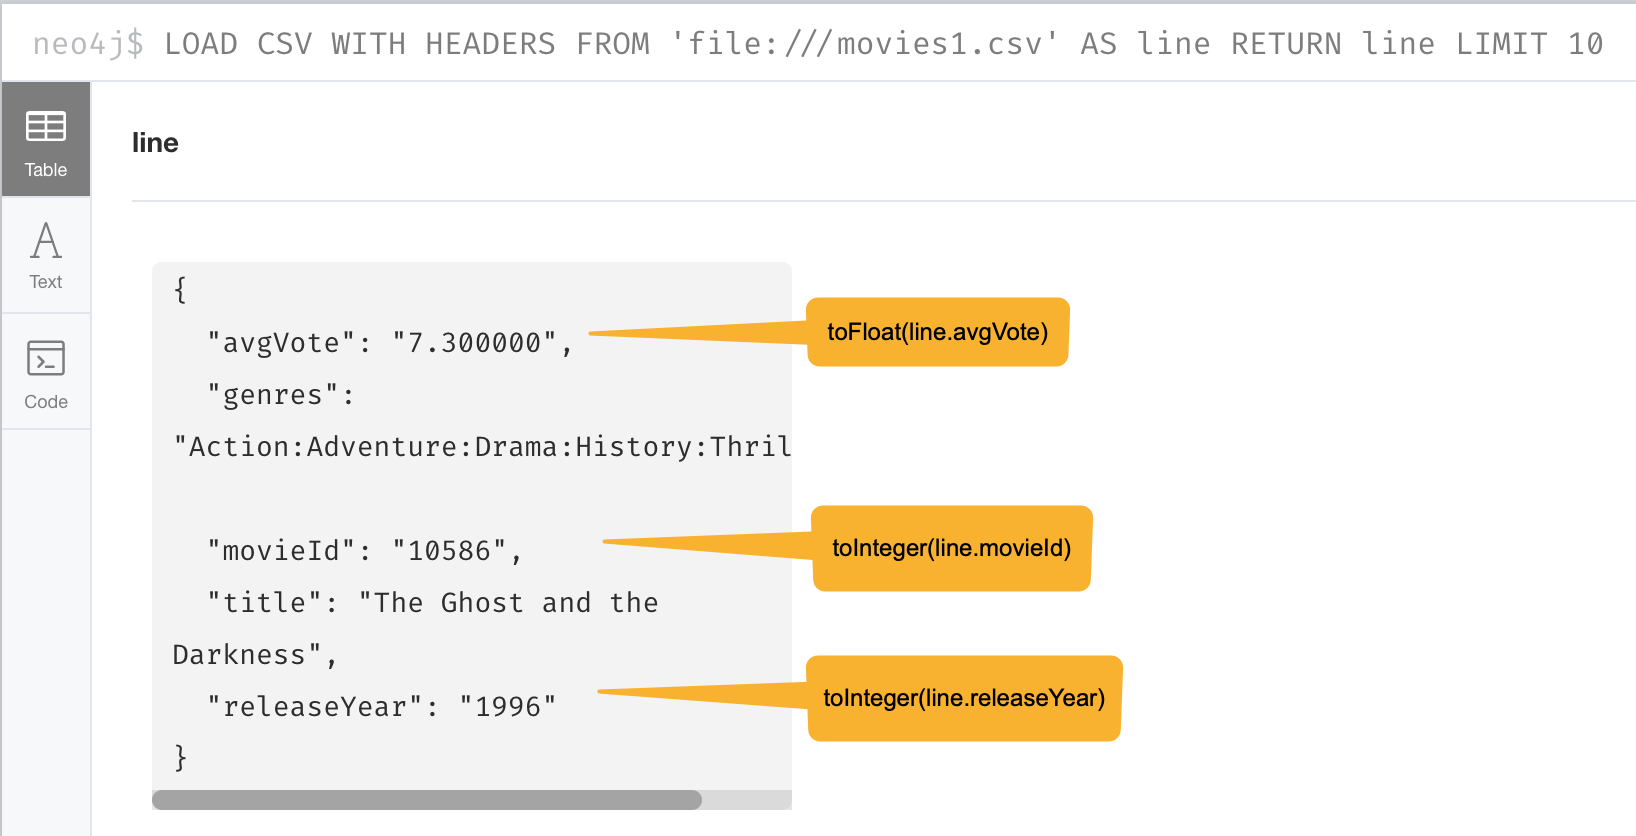
Determine if data needs transformation
The data in the rows of a CSV file may not exactly match how you want field values to be placed into node or relationship property values. When you inspect a subset of the data, you can determine what transformations will be required. As you have seen, data is by default interpreted as a string or null. If you want numeric data, then you must transform it with functions such as:
-
toInteger() -
toFloat()
For example, we want to transform these field values to numbers as shown here:
Preview the data transformation
You can preview the transformations you will make by returning their values:
LOAD CSV WITH HEADERS
FROM 'https://data.neo4j.com/v4.0-intro-neo4j/movies1.csv'
AS line
RETURN toFloat(line.avgVote), line.genres, toInteger(line.movieId),
       line.title, toInteger(line.releaseYear) LIMIT 10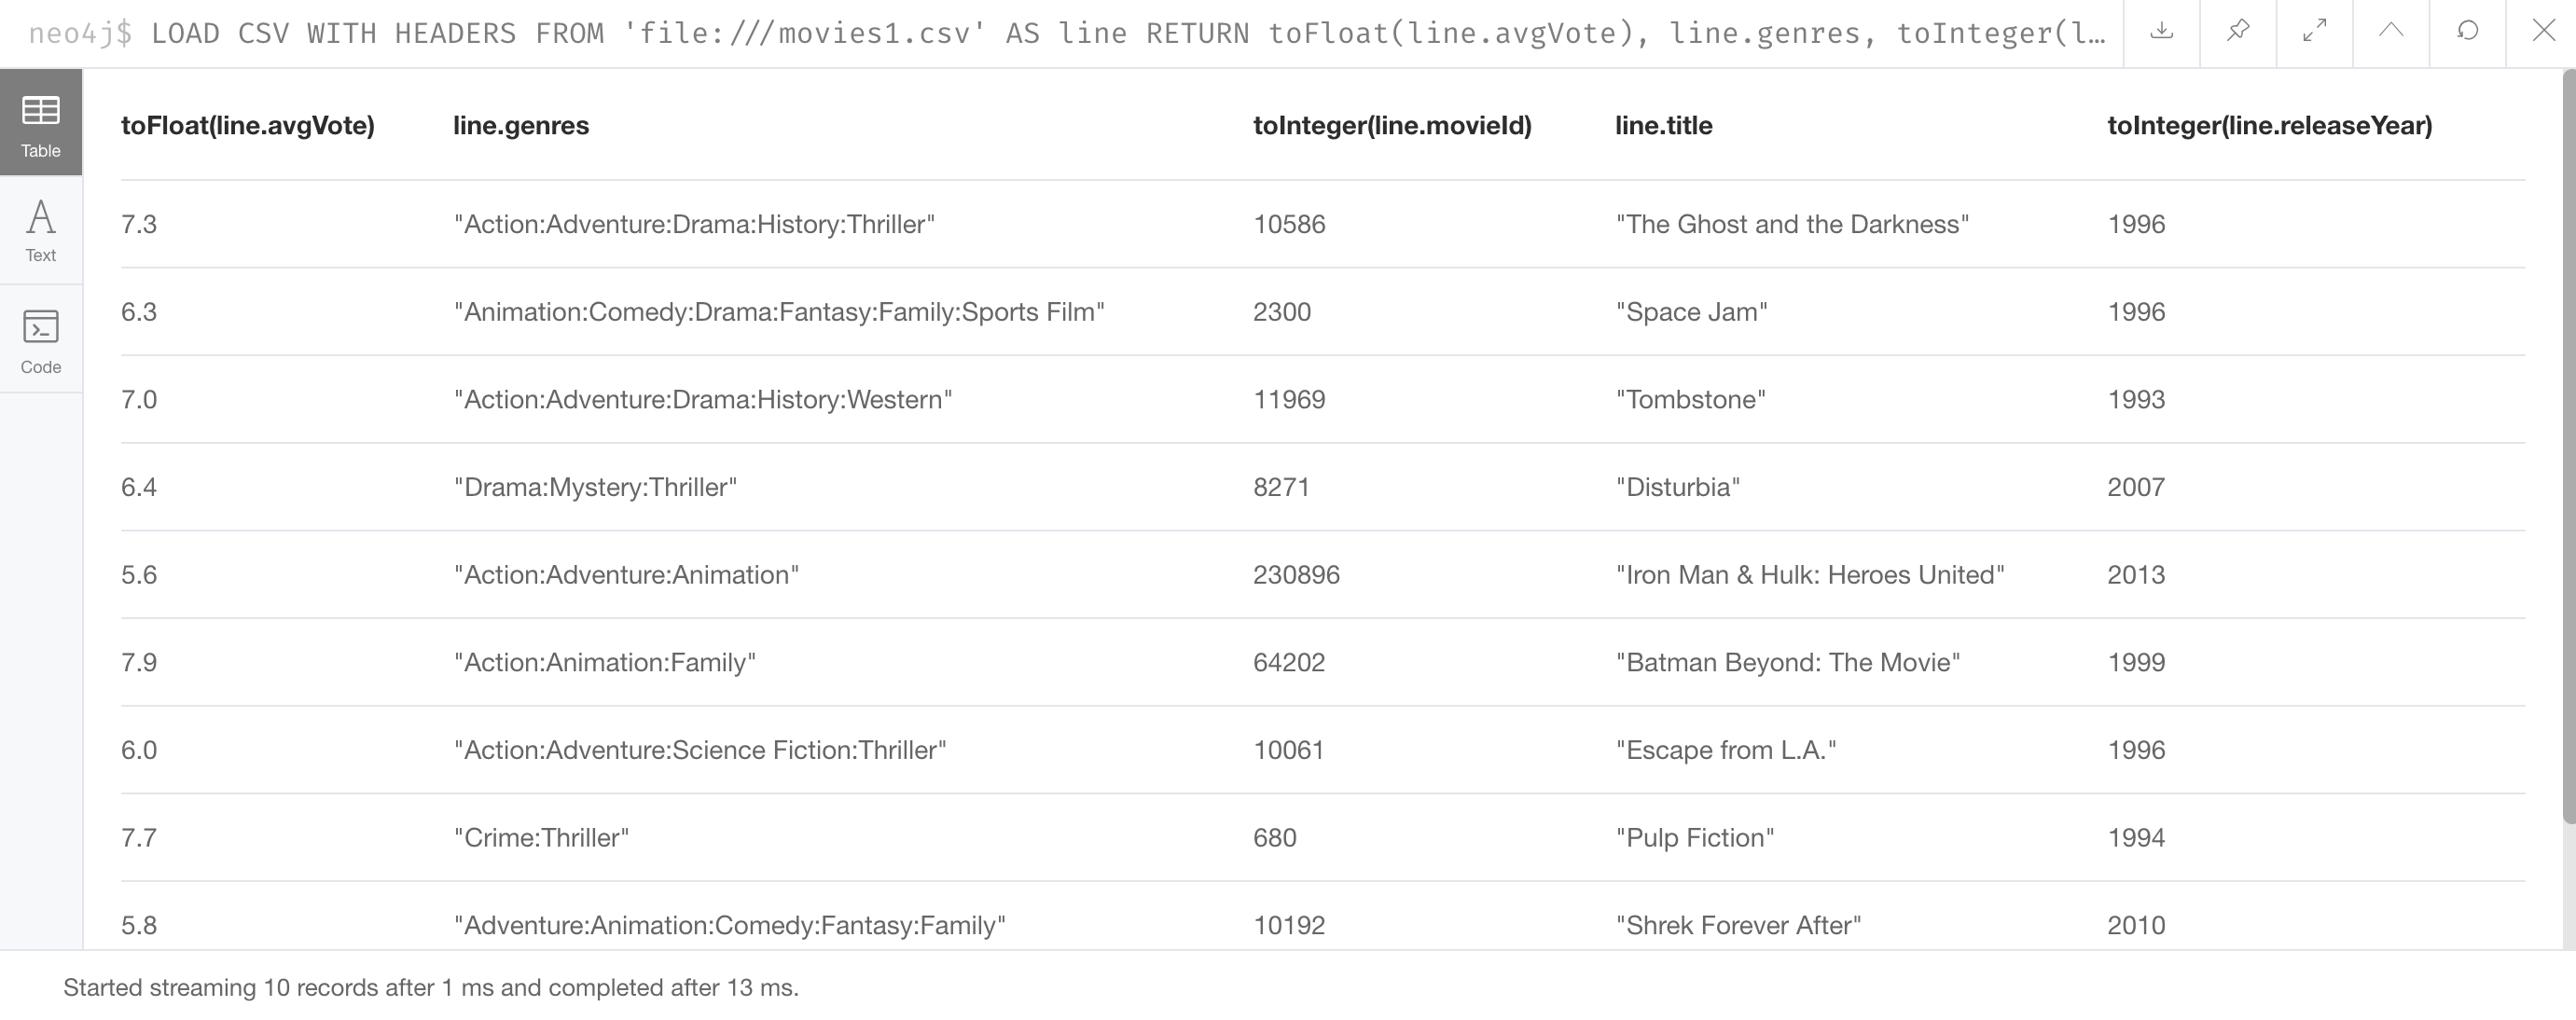
Transforming lists
In additions, lists in a field may need to be transformed to usable lists in Cypher.
As you can see in the data, the genres field contains data separated by a colon (:).
In fact, the genres field is a string and we want to turn it into a Cypher list of string values.
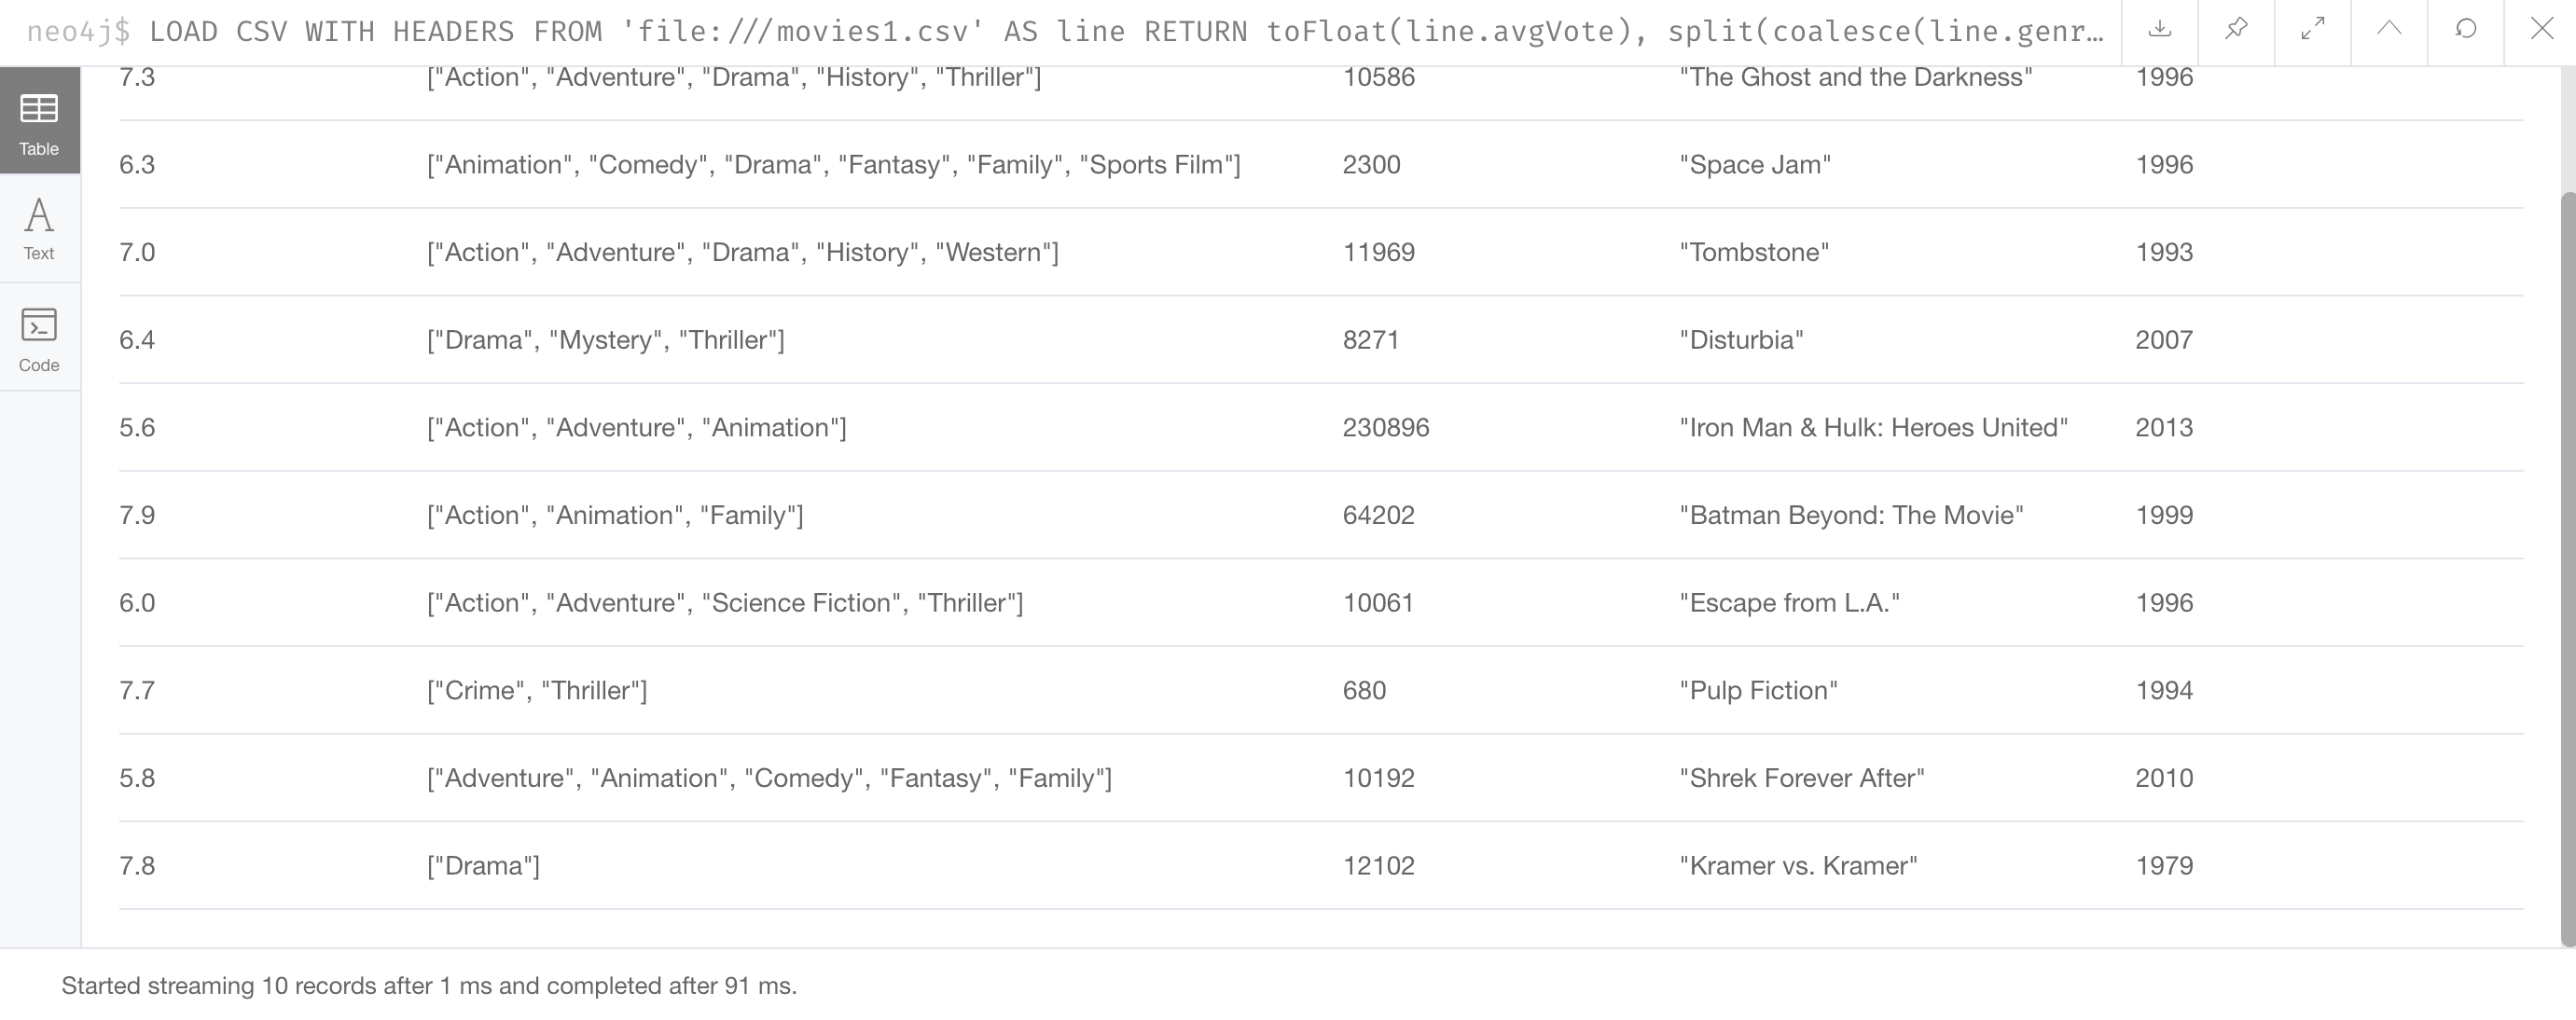
To do this, we use the split() and coalesce() functions as shown here:
LOAD CSV WITH HEADERS
FROM 'https://data.neo4j.com/v4.0-intro-neo4j/movies1.csv'
AS line
RETURN toFloat(line.avgVote), split(coalesce(line.genres,""), ":"),
       toInteger(line.movieId), line.title, toInteger(line.releaseYear)
       LIMIT 10
If all fields have data, then split() alone will work. If, however, some fields may have no values and you want an empty list created for the property, then you use split() together with coalesce().
Guided Exercise: Creating a new database
Neo4j 4.x Enterprise Edition supports multiple databases per Neo4j DBMS.
| If you are using Neo4j Aura or Neo4j Sandbox, you cannot create a new database, but you can start with an empty database or blank sandbox. |
In this exercise, you will create a new database that will be served by the started Neo4j DBMS.
Here are the steps to create a new database, Movies:
-
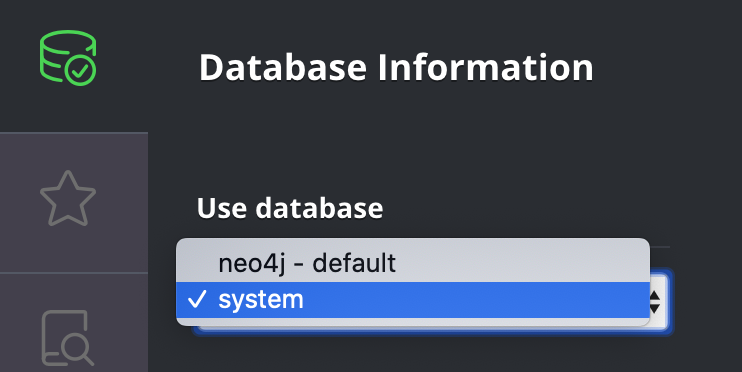
In Neo4j Browser, select the system database.
-
Create the new movies database in the query edit pane with
CREATE DATABASE Movies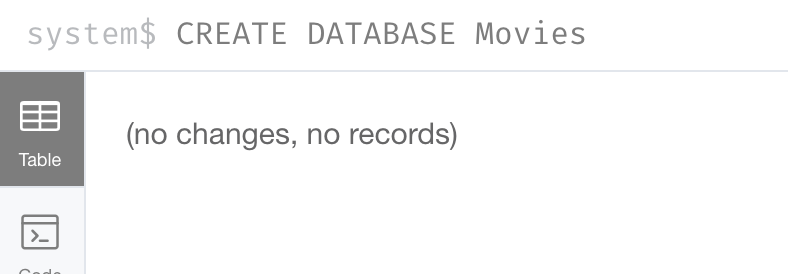
-
Enter the browser command
:dbsin the query edit pane to see the list of existing databases.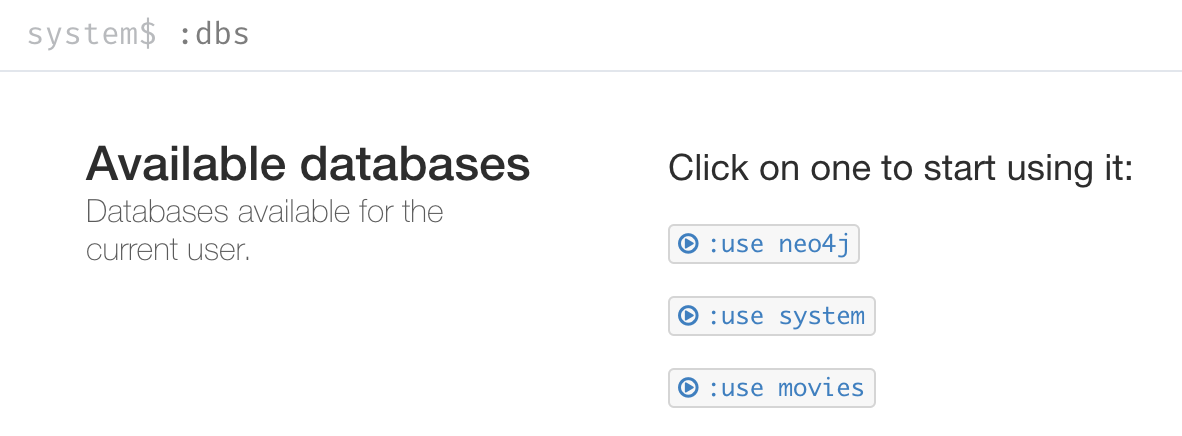
-
Enter the browser command
:use moviesto switch to this newly created, empty database.
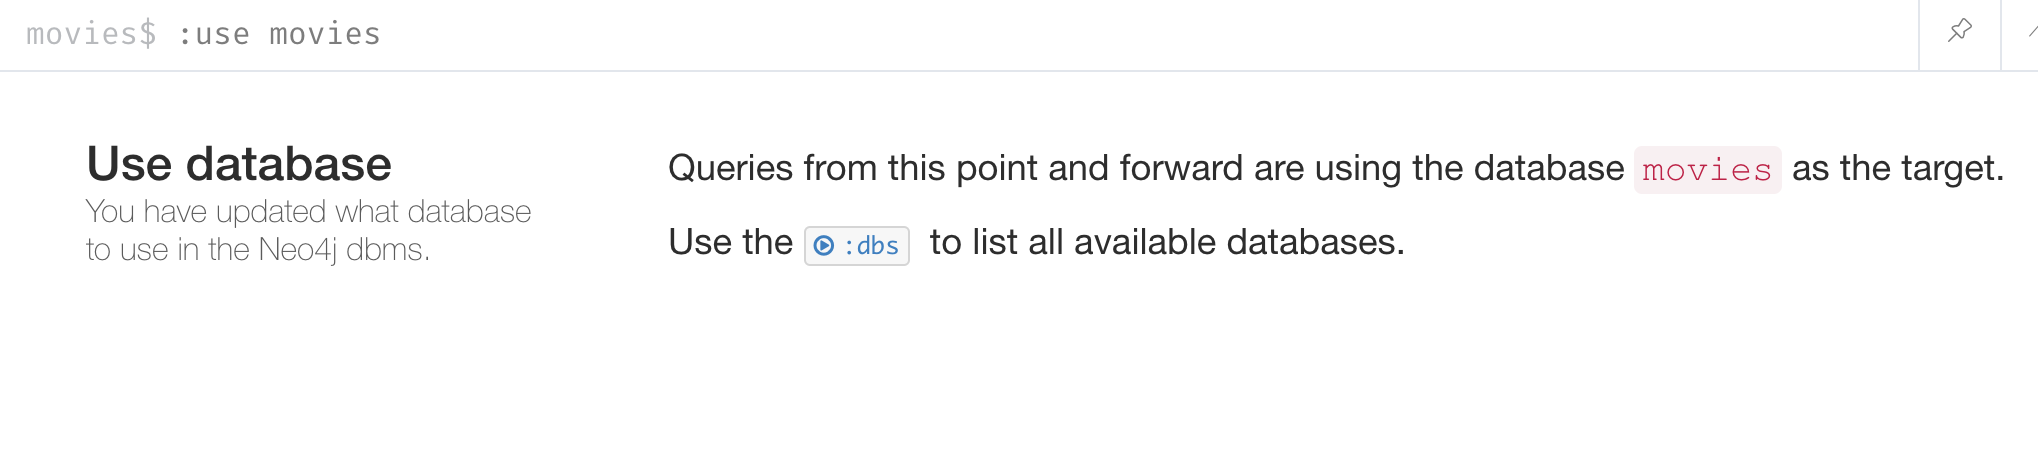
Once you have selected the movies database, all Cypher statements will execute against this new database. You can switch between databases simply by selected them in the left Database pane.
Create constraints before loading the data
As part of your graph data modeling process, you must have agreed upon properties that will unique identify a node. Especially if you have a large amount of data to import, you want to ensure that the data will not introduce duplicate data in the graph. To do this, you create constraints for the data.
For this movie data in the CSV files, we want to ensure that a Movie node is unique as well as a Person node. The IDs in the CSV files ideally are unique, but you must create the constraints in the graph to ensure that this will be true when data is imported.
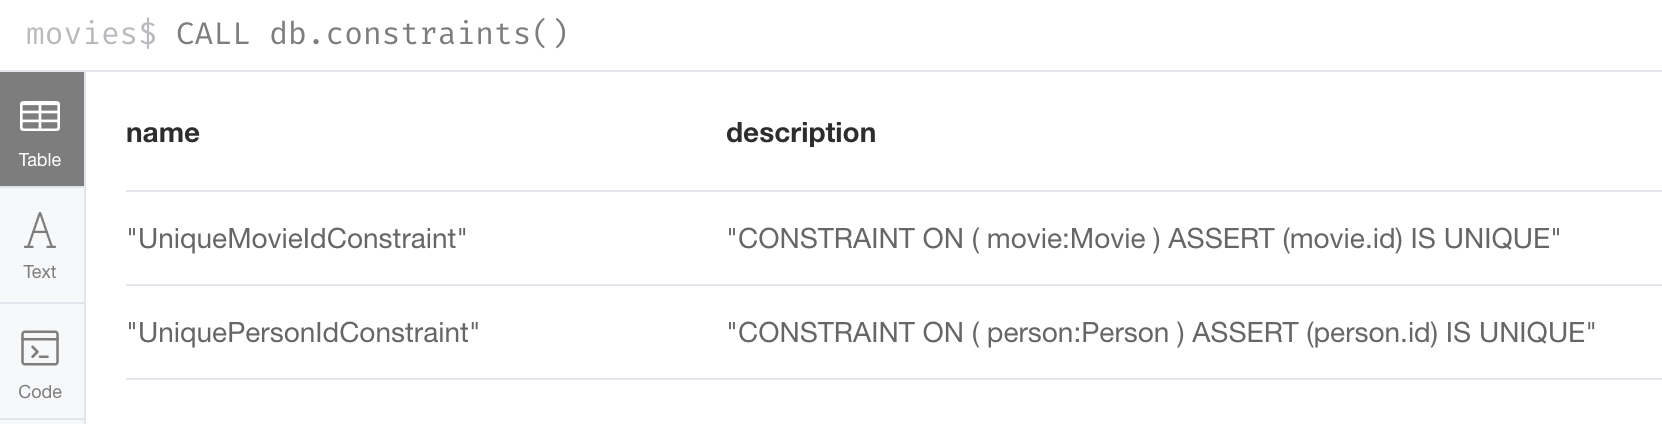
Here is the code for creating the constraints in the graph where we will import data to Movie and Person nodes where the id property will be unique. Note that the id property is different from the internal id of a node that is created automatically by the graph engine.
CREATE CONSTRAINT UniqueMovieIdConstraint ON (m:Movie) ASSERT m.id IS UNIQUE;

CREATE CONSTRAINT UniquePersonIdConstraint ON (p:Person) ASSERT p.id IS UNIQUE
After running this code, you will see the constraints defined for the movies graph:
If your load process uses MERGE, rather than CREATE to create nodes, the load will be VERY slow if constraints are not defined first because MERGE needs to determine if the node already exists.
The uniqueness constraint is itself an index which makes a lookup fast.
Indexes, however, will slow down the creation of data due to added writes, but are necessary if you want transactionally consistent data and indexes in the database. You will create additional indexes in the graph after the data is loaded.
Determine the size of the data to be loaded
It is important for you to understand how much data will be loaded.
By default LOAD CSV can handle the loading of up to 100K lines/rows.
You can query the size of your CSV files as follows:
LOAD CSV WITH HEADERS
FROM 'https://data.neo4j.com/v4.0-intro-neo4j/people.csv'
AS line
RETURN count(line)
Here we see that the largest file, people.csv has fewer that 100K rows so it can easily be loaded with LOAD CSV.
Loading a large CSV file
If the number of rows exceeds 100K, then you have two options.
The first option is to use :auto USING PERIODIC COMMIT LOAD CSV.
Placing :auto USING PERIODIC COMMIT enables the load, by default, to commit its transactions every 1000 rows which will enable the entire import of a large file to succeed.
However, there are certain types of Cypher constructs that will cause :auto USING PERIODIC COMMIT to be ignored.
Cypher statements that use eager operators will prevent you from using :auto USING PERIODIC COMMIT.
Some examples of these eager operators include:
-
collect() -
count() -
ORDER BY -
DISTINCT
If you cannot use :auto USING PERIODIC COMMIT because your Cypher include some eager operators, then you can use APOC to import the data, which you will learn about in the the next lesson.
Importing nodes
In this example, we import the movie data:
:auto USING PERIODIC COMMIT 500
LOAD CSV WITH HEADERS FROM
  'https://data.neo4j.com/v4.0-intro-neo4j/movies1.csv' as row
MERGE (m:Movie {id: toInteger(row.movieId)})
    ON CREATE SET
          m.title = row.title,
          m.avgVote = toFloat(row.avgVote),
          m.releaseYear = toInteger(row.releaseYear),
          m.genres = split(row.genres,":")
With this code, each line is read as row.
Then we use the row field names (from the header row) to assign values to a new Movie node.
We use built-in functions to transform the string data in the row into values that are assigned to the properties of the Movie node.
MERGE is the best choice because we have our uniqueness constraint defined for the id property of the Movie node.
We use split() to set the value for the genres property which will be a list.
Here is the result:

For normalized data, you load all CSV files that contain the data that will be used to create nodes. In our example, this includes the people.csv file.
Importing relationships
Then you load data that will create the relationships between the Movie and Person nodes.
Both the directors.csv and roles.csv files contain information about how Movie data is related to Person data.
In this example, we import the data to create the relationships between existing Movie and Person nodes:
LOAD CSV WITH HEADERS FROM
'https://data.neo4j.com/v4.0-intro-neo4j/directors.csv' AS row
MATCH (movie:Movie {id: toInteger(row.movieId)})
MATCH (person:Person {id: toInteger(row.personId)})
MERGE (person)-[:DIRECTED]->(movie)
ON CREATE SET person:Director
From each row that is read, we find the Movie node and the Person node. Then we create the :DIRECTED relationship between them. And finally, we add the Director label to the node.
Add indexes
The final step after all nodes and relationships have been created in the graph is to create additional indexes. These indexes are based upon the most important queries for the graph.
So for example:
// Do this only after ALL data has been imported
CREATE INDEX MovieTitleIndex FOR (m:Movie) ON (m.title);
CREATE INDEX PersonNameIndex FOR (p:Person) ON (p.name)
These indexes will make lookup of a Movie by title as well as lookup of a Person by name fast. These indexes are not unique indexes.
Exercise: Using LOAD CSV for import
| Prior to performing this exercise, you must have set up your development environment to use one of the following, which is covered in the course, Overview of Neo4j 4.x. |
-
Neo4j Desktop
-
Neo4j Sandbox
-
Neo4j Aura
In the query edit pane of Neo4j Browser, execute the browser command:
:play 4.0-intro-neo4j-exercises
and follow the instructions for Exercise 16.
| This exercise has 9 steps. Estimated time to complete: 30 minutes. |
Check your understanding
Question 1
When you execute LOAD CSV what unit of data is read from the data source?
Select the correct answer.
-
A field
-
All field values for a single field
-
A row
-
A table
Summary
You can now:
-
Describe the steps for importing data with Cypher
-
Prepare the graph and data for import:
-
Inspect data.
-
Determine if data needs to be transformed.
-
Determine the size of the data that will be imported.
-
Create the Constraints in the graph.
-
-
Import the data with
LOAD CSV. -
Create indexes for newly-loaded data.
Need help? Ask in the Neo4j Community