


The TigerGraph platform installs a full development toolchain – including but not limited to a compiler, linker, debugger, disassembler, and assembler – within every TigerGraph deployment.
In this report we demonstrate: (1) that an attacker is able to compile new executables on each TigerGraph system, and (2) that an attacker has the means to change the behavior of the TigerGraph system by using the provided toolchain to change the behavior of a system executable.
Impact
Severe.
Products/Versions Affected
- TigerGraph Enterprise Free Edition 3.7.0 Docker Image
- TigerGraph Enterprise Free Edition 3.7.0
We suspect that this vulnerability may be present in all TigerGraph products (although this is not confirmed).
Standup A TigerGraph System
To follow later steps a running TigerGraph system is needed. Follow these steps to create one using Docker.
Download and Run TigerGraph
Using docker download at the latest TigerGraph image and start the server:
1.) Optional: clean-up old TigerGraph docker images and obtain the latest version:
docker rm tigergraph
docker pull docker.tigergraph.com/tigergraph:latest
2.) Download and run the docker image (note: we do not need to attach a volume):
docker run -d \
	-p 14022:22 \
	-p 9000:9000 \
	-p 14240:14240 \
	--name tigergraph \
	--ulimit nofile=1000000:1000000 \
	-t tigergraph/tigergraph:latest
3.) Once the container has started, connect to it via ssh (note: the default password is tigergraph):
ssh -p 14022 tigergraph@localhost
4.) Start all TigerGraph services
gadmin start all
5.) Enable RESTPP authentication
gadmin config set RESTPP.Factory.EnableAuth true
gadmin config apply -y
gadmin restart restpp nginx gui gsql -y
Tests To Identify Vulnerable Systems
In this section we provide instructions on how to identify whether a TigerGraph system is affected by this CVE – the test is to see whether a compiler (gcc) exists within the installation media and/or the running system.
Checking TigerGraph Software Downloads
Customers that manage their own TigerGraph deployments can check to see whether the compiler is present in the software downloaded from TigerGraph.
1.) Download the desired TigerGraph software and accompanying signature. In this example we choose the latest version of TigerGraph 3.7.0:
wget https://dl.tigergraph.com/enterprise-edition/tigergraph-3.7.0-offline.tar.gz
wget https://dl.tigergraph.com/enterprise-edition/tigergraph-3.7.0-offline.tar.gz.sig
2.) Check that the sha256 checksum of the downloaded software matches the website:
sha256sum  tigergraph-3.7.0-offline.tar.gz
e6ac0f7b8a65482662af4502a632570c978f31003aaeb585b6580ec4d12cbb78  tigergraph-3.7.0-offline.tar.gz
3.) Verify the signature of the downloaded software using gpg and double check that the key fingerprint matches the one provided on the website (https://dl.tigergraph.com/download.html):
gpg --verify tigergraph-3.7.0-offline.tar.gz.sig tigergraph-3.7.0-offline.tar.gz
gpg: Signature made Fri 16 Sep 04:24:30 2022 BST
gpg:                using RSA key E20D2B61FB3857D43B8EB32167BD323E413D1F12
gpg: Good signature from "TigerGraph (TigerGraph Product Release) <release@tigergraph.com>" [unknown]
gpg: WARNING: This key is not certified with a trusted signature!
gpg:          There is no indication that the signature belongs to the owner.
Primary key fingerprint: E20D 2B61 FB38 57D4 3B8E  B321 67BD 323E 413D 1F12
4.) Extract the system image(s) – i.e. the offline-syspre.tar.gz file – that come bundled inside the TigerGraph software release:
tar xvzf tigergraph-3.7.0-offline.tar.gz tigergraph-3.7.0-offline/offline-syspre.tar.gz
x tigergraph-3.7.0-offline/offline-syspre.tar.gz
5.) Search for the compiler (gcc) or other development utilities inside the system images:
tar -tf tigergraph-3.7.0-offline/offline-syspre.tar.gz | grep bin/gcc
centos7_syspre.pkgs/opt/rh/devtoolset-9/root/usr/bin/gcc
centos7_syspre.pkgs/opt/rh/devtoolset-9/root/usr/bin/gcc-ar
centos7_syspre.pkgs/opt/rh/devtoolset-9/root/usr/bin/gcc-nm
centos7_syspre.pkgs/opt/rh/devtoolset-9/root/usr/bin/gcc-ranlib
ubuntu16.04_syspre.pkgs/usr/bin/gcc-ranlib-9
ubuntu16.04_syspre.pkgs/usr/bin/gcc
ubuntu16.04_syspre.pkgs/usr/bin/gcc-9
ubuntu16.04_syspre.pkgs/usr/bin/gcc-ar-9
ubuntu16.04_syspre.pkgs/usr/bin/gcc-nm-9
6.) Using tar extract the files in the system image:
tar xzf tigergraph-3.7.0-offline/offline-syspre.tar.gz
7.) Calculate the checksums of the compiler (in this case we use sha256sum):
sha256sum ubuntu16.04_syspre.pkgs/usr/bin/gcc centos7_syspre.pkgs/opt/rh/devtoolset-9/root/usr/bin/gcc
8d5699484e718d451e418c4052f21e61c6e5db98068f509eed11816d26b47020  ubuntu16.04_syspre.pkgs/usr/bin/gcc
236adc3d420bf905dcd818efb57cf3420cc2aeafe48a938833a4263bd9f2548c  centos7_syspre.pkgs/opt/rh/devtoolset-9/root/usr/bin/gcc
In this case we see that there are two different compilers present: one of which will be installed into the TigerGraph application directory during installation.
Checking Current TigerGraph Installs
In the case where the TigerGraph system is already installed – such as using the docker image – an administrative user can check for the compiler by logging into the remote TigerGraph system as the TigerGraph administrative user. In the example below, we login to a running docker container as the tigergraph user via SSH:
1.) In the example below, we login to a running docker container as the tigergraph user via SSH (note: the default password is `tigergraph`):
ssh -p 14022 tigergraph@localhost
2.) Once logged in to the remote system we can locate the compiler using the find utility:
find . -name gcc -ls
  2235448      4 drwxr-x---   3 tigergraph tigergraph     4096 May  7  2016 ./tigergraph/app/3.7.0/.syspre/usr/lib/gcc
  3025939      4 drwxr-x---   2 tigergraph tigergraph     4096 Sep  2  2020 ./tigergraph/app/3.7.0/.syspre/usr/share/doc/gcc-9-base/gcc
  3145973      4 drwxr-x---   2 tigergraph tigergraph     4096 Sep 11  2020 ./tigergraph/app/3.7.0/.syspre/usr/share/doc/libgcc1/gcc
  1976708      0 lrwxrwxrwx   1 tigergraph tigergraph        5 Mar  4  2022 ./tigergraph/app/3.7.0/.syspre/usr/bin/gcc -> gcc-9
  3153829      4 drwxr-x---   2 tigergraph tigergraph     4096 Sep 29 21:25 ./tigergraph/app/3.7.0/dev/gdk/gsdk/include/thirdparty/boost/mpl/aux_/preprocessed/gcc
3.) Finally, we can verify that this compiler is the one that comes as part of the software download that we examined earlier. To do this we compare its checksums using the sha256sum utility:
sha256sum tigergraph/app/3.7.0/.syspre/usr/bin/gcc
8d5699484e718d451e418c4052f21e61c6e5db98068f509eed11816d26b47020  tigergraph/app/3.7.0/.syspre/usr/bin/gcc
Remote TigerGraph Systems (TigerGraph Cloud)
If shell access is not possible then the compiler toolchain can be located on the remote TigerGraph system using the AdminPortal.
1.) Open a web browser and navigate to the URL of the remote TigerGraph system. In this example we are using the docker image and so we navigate to https://localhost:14240/admin (Note: if you are using the docker image you will not be prompted for login credentials for the AdminPortal.).
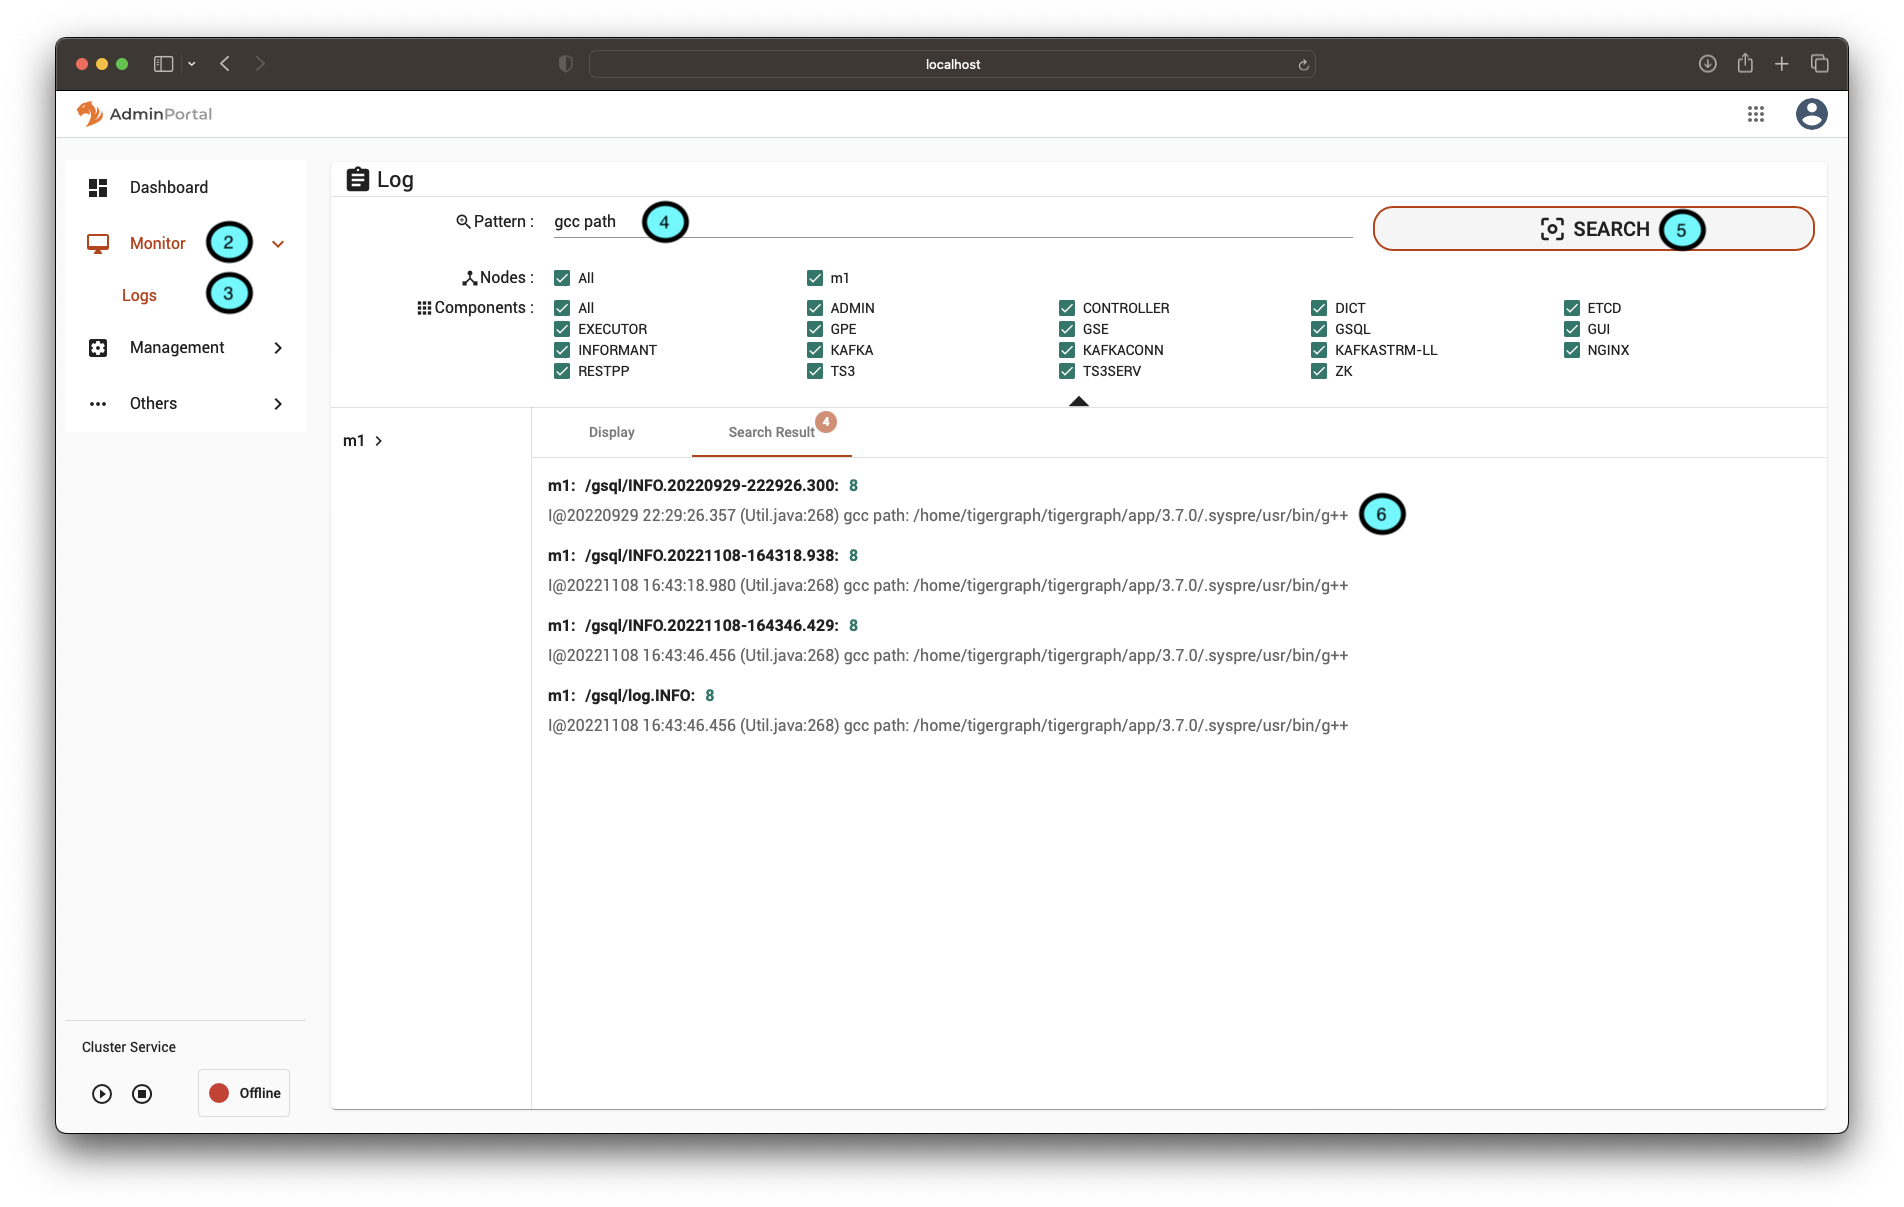
2.) Once in AdminPortal, on the left-hand side expand the “Monitor” menu.
3.) Click on the “Logs” option.
4.) In the Pattern textbox enter “gcc path”.
5.) Click search.
6.) The path of the compiler will be visible in the search results. If obfuscated, clicking on a result will take you to the relevant entry in the log file where the complete path can be found.
From the logs we can see that the path to the compiler is: /home/tigergraph/tigergraph/app/3.7.0/.syspre/usr/bin/g++. (Note: gcc will be installed under the same directory but we can use either as a working compiler).
Using The Compiler Toolchain
The previous section described how to locate a compiler within each of the different types of TigerGraph deployment. The next step is to demonstrate that this compiler is: (1) functional (i.e. it can be used to compile a new executable), and (2) that it is accessible by an attacker.
To run the commands that follow you will need to SSH into your TigerGraph docker image like so (note: the default password is `tigergraph`):
ssh -p 14022 tigergraph@localhost
Configuring The Toolchain
As the compiler looks to be embedded within the TigerGraph installation and not installed into the host operating system then it will need to be configured before use. At a minimum it will need to know where to locate any installed applications, source files (includes), and any required libraries. To do this the PATH and LD_LIBRARY_PATH environment variables will need to be set appropriately.
Below we set these environment variables for the compiler that we found in our docker image.
Note: that the embedded compiler is contained within a system image that is similar to that of a ubuntu linux system. Once we know the root of the embedded system image then we can infer the locations of each of the standard folders (i.e. /bin becomes $SYSROOT/bin and /usr/bin becomes $SYSROOT/usr/bin):
export SYSROOT=$HOME/tigergraph/app/3.7.0/.syspre
export PATH=$SYSROOT/bin:$SYSROOT/usr/sbin:$SYSROOT/sbin:$SYSROOT/usr/bin
export LD_LIBRARY_PATH=$SYSROOT/usr/lib:$SYSROOT/usr/lib/x86_64-linux-gnu
Compiling An Example Application
To demonstrate that the compiler is functional the following steps will walkthrough compiling a simple C program.
1.) Create a C source file hello.c that contains the following source code:
tigergraph@6e65b5fca07b:~$ cat << EOF > hello.c
#include

int main(int argc, char** argv) {
     printf("Hello world!\n");
     return 0;
}
EOF
2.) Compile the source code using g++:
tigergraph@6e65b5fca07b:~$ g++ --sysroot=$SYSROOT -o hello hello.c
3.) Verify that the compiler produced a valid executable by running the program:
tigergraph@6e65b5fca07b:~$ ./hello
Hello world!
If you see the above output then the compiler toolchain is functional.
Accessing The Compiler Toolchain
We have confirmed that the compiler toolchain is accessible by using the vulnerabilities that are described in the following CVEs that affect all TigerGraph products:
- CVE-2022-30331 Malicious UDFs
- CVE-2023-22950 Data loading
- CVE-2023-22948 Insecure SSH keys
- CVE-2023-22949 Insecure login credentials
Modifying A System Binary
One of the compounding factors of having a fully functioning compiler toolchain available on a production system is that it provides the means for an attacker to modify the behavior of the binaries.
This section will highlight the risk that an attacker with access to the compiler toolchain is able to modify the behavior of the TigerGraph application.
The demonstration will show that there are no guarantees as to the integrity of any TigerGraph system as any of the integral components can be modified by an attacker.
1.) Login into your TigerGraph docker image via SSH like so (note: the default password is `tigergraph`):
ssh -p 14022 tigergraph@localhost
2.) Stop all TigerGraph services
gadmin stop all -y
3.) Configure the compiler toolchain by setting the following environment variables (note: that PATH is slightly different to earlier):
export SYSROOT=$HOME/tigergraph/app/3.7.0/.syspre
export PATH=$SYSROOT/bin:$SYSROOT/usr/sbin:$SYSROOT/sbin:$SYSROOT/usr/bin:/bin
export LD_LIBRARY_PATH=$SYSROOT/usr/lib:$SYSROOT/usr/lib/x86_64-linux-gnu
4.) Locate one of the TigerGraph application binaries. In this case we selected the execution engine (tg_dbs_gped):
tigergraph@6e65b5fca07b:~$ ls tigergraph/app/3.7.0/bin
batchdelta      gsql_data_generator  libjemalloc.so.2       libtcmalloc.so        pprof           tg_app_kafkaldr  tg_dbs_restd    tg_infr_exed    tg_infr_ts3m
gbar_bootstrap  gui                  libprofiler.so         libtcmalloc.so.4      _pygdict.so     tg_dbs_gped      tg_infr_admind  tg_infr_goblin  tg_shadower
gbar_master     jeprof               libprofiler.so.0       libtcmalloc.so.4.5.3  statushubcli    tg_dbs_gped.txt  tg_infr_ctrld   tg_infr_ifmd
gbar_slave      libjemalloc.so       libprofiler.so.0.4.18  libtigergraph.so      tg_app_fileldr  tg_dbs_gsed      tg_infr_dictd   tg_infr_ts3d
5.) Use the readelf utility to print out the .rodata of the tg_dbs_gped binary – this is the bit of the binary that is likely to contain string data that is printed out by the application. One of the first variables in this section is the version information for this binary (highlighted in bold).
tigergraph@6e65b5fca07b:~$ readelf -x .rodata tigergraph/app/3.7.0/bin/tg_dbs_gped | more

Hex dump of section '.rodata':
  0x0040d000 01000200 00000000 00000000 00000000 ................
  0x0040d010 3a200000 00000000 54696765 72477261 : ......TigerGra
  0x0040d020 70682076 65727369 6f6e3a20 332e372e ph version: 3.7.
  0x0040d030 302c7072 6f647563 74202020 20202020 0,product
  0x0040d040 20202072 656c6561 73655f33 2e372e30    release_3.7.0
  0x0040d050 5f30392d 32392d32 30323220 20202020 _09-29-2022
  0x0040d060 20202020 32636530 33316631 66386232     2ce031f1f8b2
  0x0040d070 36663437 62363532 66373831 36333866 6f47b652f781638f
  0x0040d080 64396664 39306635 66616361 20203230 d9fd90f5faca  20
  0x0040d090 32322d30 392d3035 2030383a 30363a31 22-09-05 08:06:1
  0x0040d0a0 31202d30 3730302c 63717273 20202020 1 -0700,cqrs
  0x0040d0b0 20202020 20202020 2072656c 65617365          release
6.) We will now use the xxd utility to convert the tg_dbs_gped binary into a hexdump that we are able to modify:
tigergraph@6e65b5fca07b:~$ xxd tigergraph/app/3.7.0/bin/tg_dbs_gped tg_dbs_gped.txt
7.) Now we modify the hexdump and update the version string so that it will now incorrectly report that it is running a non-existent version of Tigergraph 4.7.0. To do this we need to change a single byte in the hexdump. The change is shown below and can be performed using the vi utility like below (note: you will need to use the editors search function to locate the correct part of the file - here searching for TigerGra got us to the correct location.)
0000d010: 3a20 0000 0000 0000 5469 6765 7247 7261  : ......TigerGra
0000d020: 7068 2076 6572 7369 6f6e 3a20 342e 372e  ph version: 4.7.
0000d030: 302c 7072 6f64 7563 7420 2020 2020 2020  0,product
0000d040: 2020 2072 656c 6561 7365 5f33 2e37 2e30     release_3.7.0
0000d050: 5f30 392d 3239 2d32 3032 3220 2020 2020  _09-29-2022
0000d060: 2020 2020 3263 6530 3331 6631 6638 6232      2ce031f1f8b2
0000d070: 3666 3437 6236 3532 6637 3831 3633 3866  6f47b652f781638f
0000d080: 6439 6664 3930 6635 6661 6361 2020 3230  d9fd90f5faca  20
0000d090: 3232 2d30 392d 3035 2030 383a 3036 3a31  22-09-05 08:06:1
0000d0a0: 3120 2d30 3730 302c 6371 7273 2020 2020  1 -0700,cqrs
0000d0b0: 2020 2020 2020 2020 2072 656c 6561 7365           release
0000d0c0: 5f33 2e37 2e30 5f30 392d 3239 2d32 3032  _3.7.0_09-29-202
0000d0d0: 3220 2020 2020 2020 2020 3135 3465 3061  2         154e0a
0000d0e0: 3832 6639 3666 3362 6634 6631 3033 6462  82f96f3bf4f103db
0000d0f0: 3763 3138 3130 3165 3334 3730 3632 3564  7c18101e3470625d
0000d100: 6364 2020 3230 3232 2d30 392d 3239 2031  cd  2022-09-29 1
0000d110: 393a 3531 3a32 3620 2b30 3030 302c 7468  9:51:26 +0000,th
0000d120: 6972 645f 7061 7274 7920 2020 2020 2072  ird_party      r
0000d130: 656c 6561 7365 5f33 2e37 2e30 5f30 392d  elease_3.7.0_09-
0000d140: 3239 2d32 3032 3220 2020 2020 2020 2020  29-2022
0000d150: 6663 3832 3638 6630 6461 6164 3632 6363  fc8268f0daad62cc
0000d160: 6262 3066 3133 6666 6634 3264 3664 3536  bb0f13fff42d6d56
0000d170: 6232 6564 3430 6665 2020 3230 3232 2d30  b2ed40fe  2022-0
0000d180: 382d 3138 2032 333a 3330 3a31 3720 2d30  8-18 23:30:17 -0
0000d190: 3730 302c 6572 2020 2020 2020 2020 2020  700,er
8.) Re-create the tg_dbs_gped binary using xxd:
tigergraph@6e65b5fca07b:~$ xxd -r tg_dbs_gped.txt tigergraph/app/3.7.0/bin/tg_dbs_gped
9.) Re-start all the TigerGraph services:
tigergraph@6e65b5fca07b:~$ gadmin start all
[   Info] Starting EXE
[   Info] Starting CTRL
[   Info] Starting ZK ETCD DICT KAFKA ADMIN GSE NGINX GPE RESTPP KAFKASTRM-LL KAFKACONN TS3SERV GSQL TS3 IFM GUI
10.) Open a web browser and navigate to the URL of the remote TigerGraph system. In this example we are using the docker image and so we navigate to https://localhost:14240/admin (Note: if you are using the docker image you will not be prompted for login credentials for the AdminPortal).
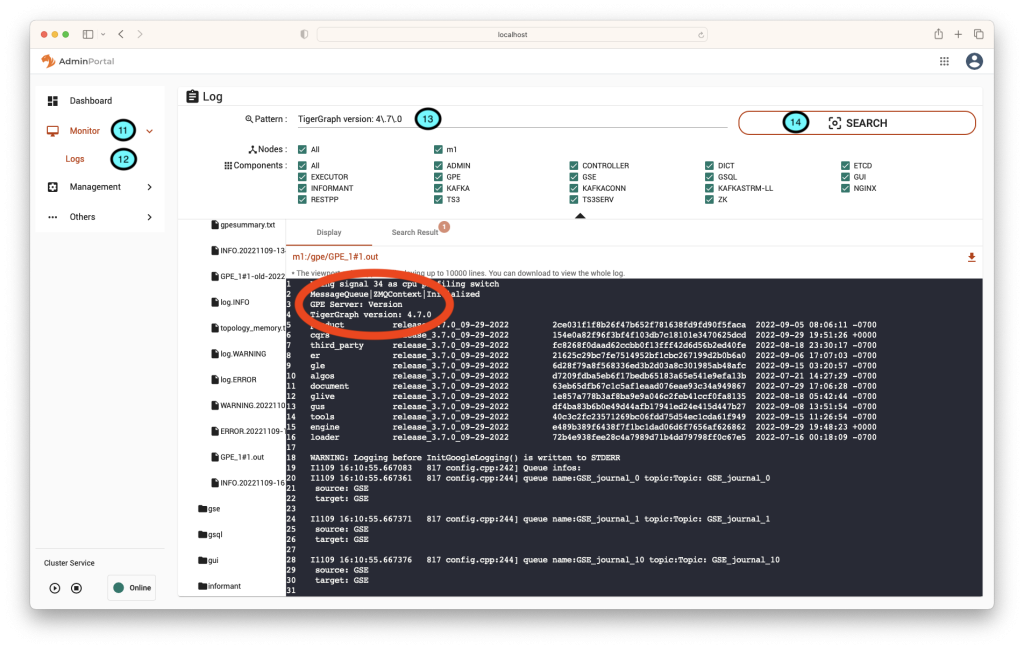
11.) Once in AdminPortal, on the left-hand side expand the “Monitor” menu.
12.) Click on the “Logs” option.
13.) In the Pattern textbox enter “TigerGraph version 4\.7\.0”.
14.) Click on the “Search” button.
15.) Click on the search result to open the GPE log file and if successful it will be reporting that it is on version 4.7.0.