Full Stack Graph in the Cloud

Developer Relations Engineer
16 min read

Editor’s note: This talk was given by Will Lyon at Neo4j’s Connections event Graphs for Cloud Developers.
I will be sharing how Neo4j fits into the modern cloud ecosystem from the perspective of a full stack developer. I work on the Developer Relations team at Neo4j and spend much of my time working to integrate different technologies with Neo4j as well as looking at how customers are already doing this.
The Neo4j Graph Platform
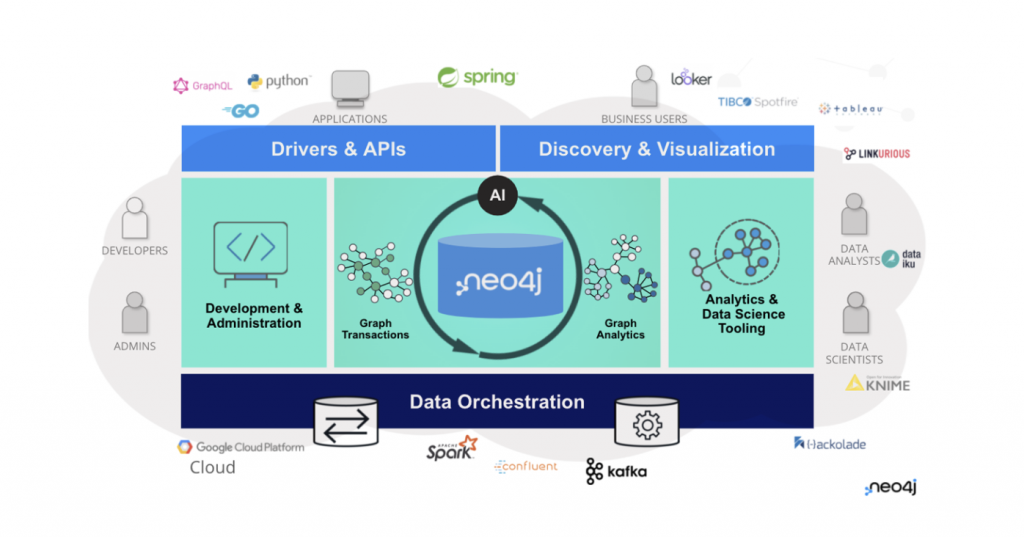
As a database, Neo4j fits into the architectural core of our applications. What we need to think about is how Neo4j works with other technologies, and this is dependent upon what we are trying to accomplish. In the diagram above, you can see there is a spectrum that spans from the data science and analytics use cases on the right side to building more transactional operational applications on the left. With this blog, I will be focusing more on the left side of the spectrum and sharing how we handle operational workloads with Neo4j, for instance, by building an API layer that sits between the client and the database.
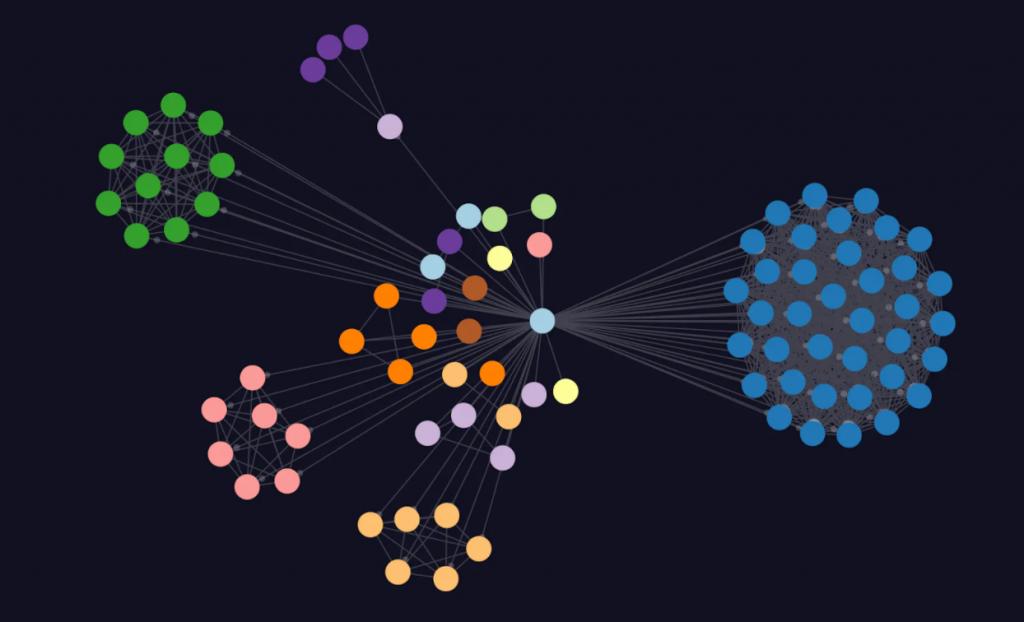
Lobsters Graph Application
Lobsters is a news aggregation site, similar to Hacker News, though perhaps a bit more friendly if you read through the comments. It can be a great site to see what’s going on in the tech community, and I thought it would be fun to build a graph version of the site, which I decided to call Lobsters Graph. It’s basically a graph visualization application that pulls in data from Lobsters. I can still see the top ranked articles and topics around them, but I am able to view the information in a more visual way. I can more quickly see, based on the tags and topics of articles, what I’m interested in. Below is a quick demo of what the Lobsters Graph looks like:
Application Architecture
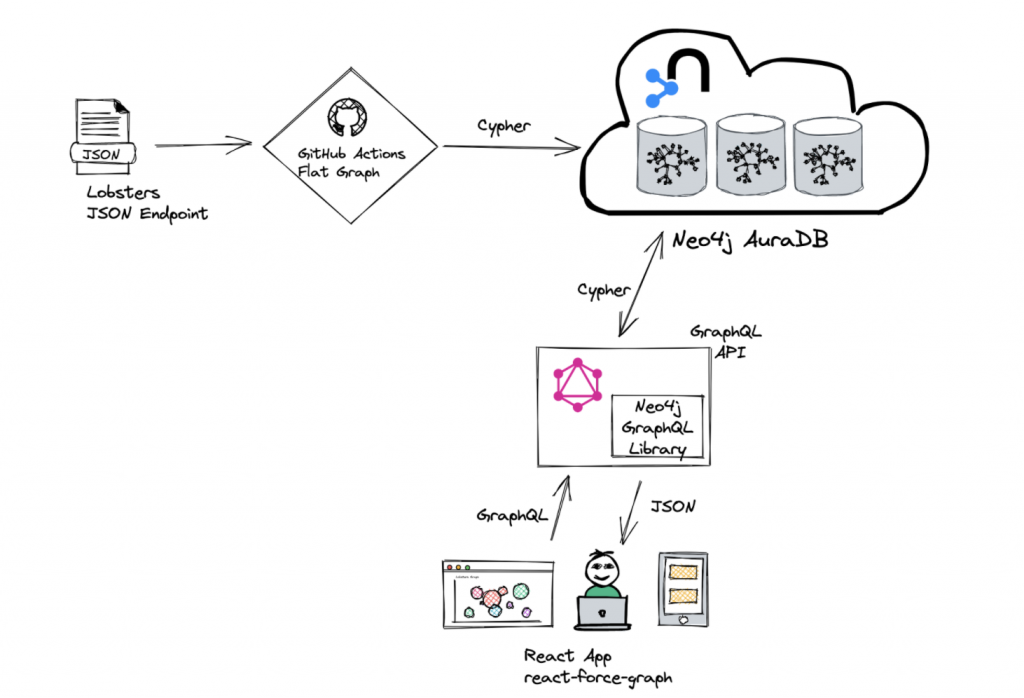
As you can see from the demo, this is a fairly simple graph visualization application. I’ll now discuss how we built this application, and more specifically, I’ll dive into what the architecture looks like, because there are a few moving pieces that demonstrate some of the problems we deal with as full stack developers. Next, I’ll share how we get data into Neo4j by loading data from Lobsters’ JSON endpoints, and once we have the data in Neo4j, I’ll show how we expose that data to our application layer.
How We Get Data Into Neo4j
I start by spinning up a Neo4j AuraDB instance. In this case, we use an AuraDB free instance, which is a great way to get started on hobby projects like this one. Fortunately, with Lobsters, the data is published in a couple of JSON feeds. There’s the hottest.JSON endpoint, which is that leaderboard sorted by highest ranked articles. There’s also a newest end point, so I can keep track of the most recent articles being posted to Lobsters.
Graph Data Modeling
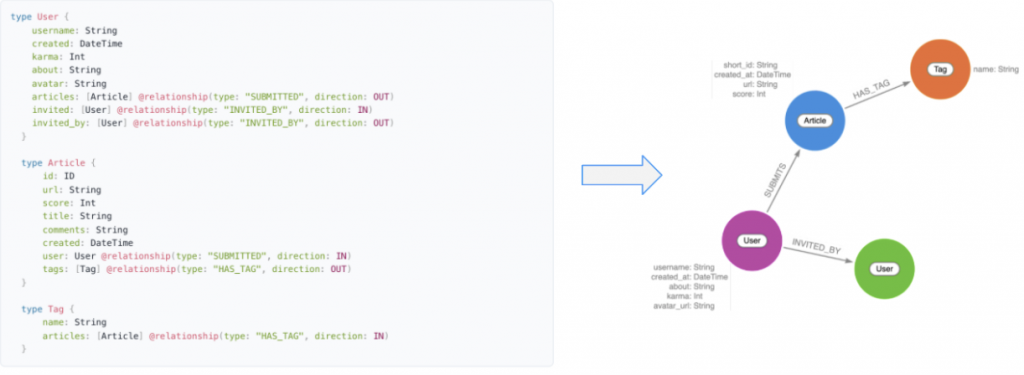
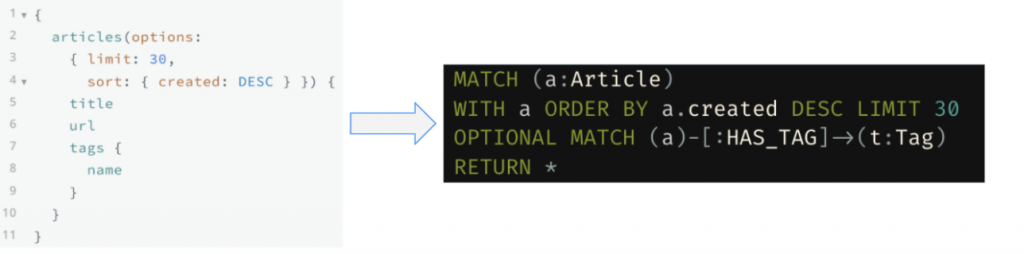
The next step is to go through the graph data modeling process, which is an iterative process. My source data is JSON. To represent this in a graph, we start by identifying the entities, which become the nodes. In this case, the nodes will be the article, the user who posted the article, and the tags that are connected to the article.
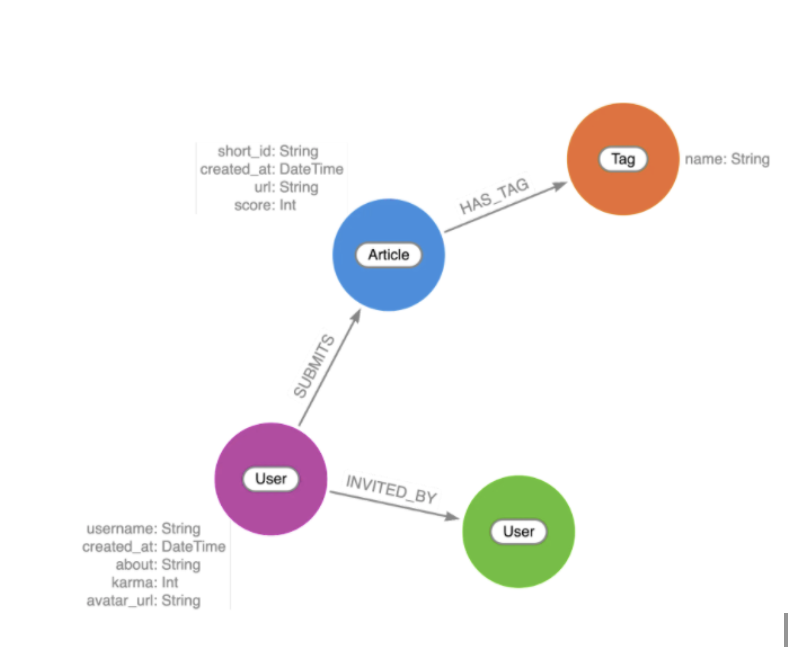
Then, we think of how these entities are connected. These become my relationships. I next look at the attributes I have. For example, articles have an ID, a URL, and some score associated with them. These attributes become my properties, stored either on nodes or relationships. The final step in this iterative process is to look at the business requirements of my application and my data model to see if there is a traversal through this graph that answers the questions that I have in my business requirements.
In this case, it’s fairly simple; I want to see the top ranked articles and I want to see the tags. I then want to be able to see other articles that have the same tags. That makes me think I should sort article nodes by ID or by a score, and traverse that tag relationship. As you go through this data modeling process, there’s a great tool called Arrows that we can use to draw these diagrams. Once we draw the diagrams in Arrows, we can export them as images. Or we can export the JSON that describes the data model, which is nice because I can then check that JSON data into version control and can share the model with others working on the project.
Working with JSON Data in Cypher
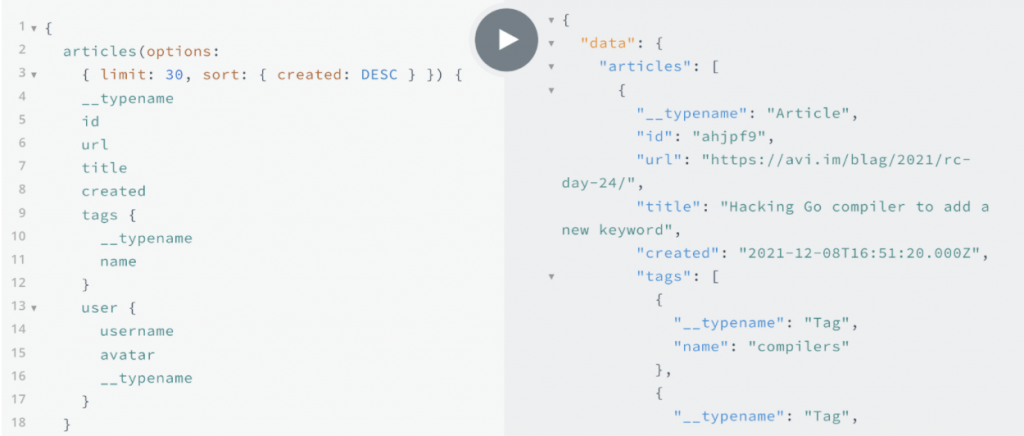
We have our data model and our JSON data. From there, we are going to use Cypher to pull in that JSON data and load it into Neo4j. Fortunately, Neo4j has an APOC Load JSON procedure.

This is part of the APOC procedure Library, and think of APOC as you would the standard Library. It extends Cypher with some procedures and functions and allows us to work with JSON data. With apoc.load.json, I can basically go out to a JSON endpoint and pull that data back with Cypher. We are just returning the JSON object that comes in, in this case an array of objects, but I can use Cypher to describe the data model that I want to create in the graph and unwind over that with Cypher. For each one of those articles, we are then using Cypher to create our article nodes, user nodes, tags, and relationships in the graph.
So with that one Cypher statement, I’ve loaded the data. I can then query that in the Neo4j browser or with Bloom. This is fine for a one point in time representation of the Lobster’s data, but I want to be able to go to the site each morning as part of my usual routine when I’m doing my internet research and be able to read my blogs for the day. This needs to be constantly refreshed, and I can’t just have this script running on my machine. We need to have something in the cloud that’s continuously running and importing our Lobsters data.
Github Actions – Flat Data Cron Job
This is where GitHub Actions comes in. You may be familiar with GitHub Actions in the context of responding to GitHub events. For example, when I check in some code or a pull request comes into GitHub, we can use GitHub actions to run our tests or trigger a deployment. We can also use GitHub Actions as a cron job to run every hour, every day.
The team at GitHub released a GitHub Action called Flat Data, which is really neat. It allows us to create a GitHub Action to go out to a JSON or CSV, some flat file end points, or even to run a database query periodically and then check that data into GitHub. So we have some record of the data, but then we can also define post-processing steps, such as loading that data into a database.
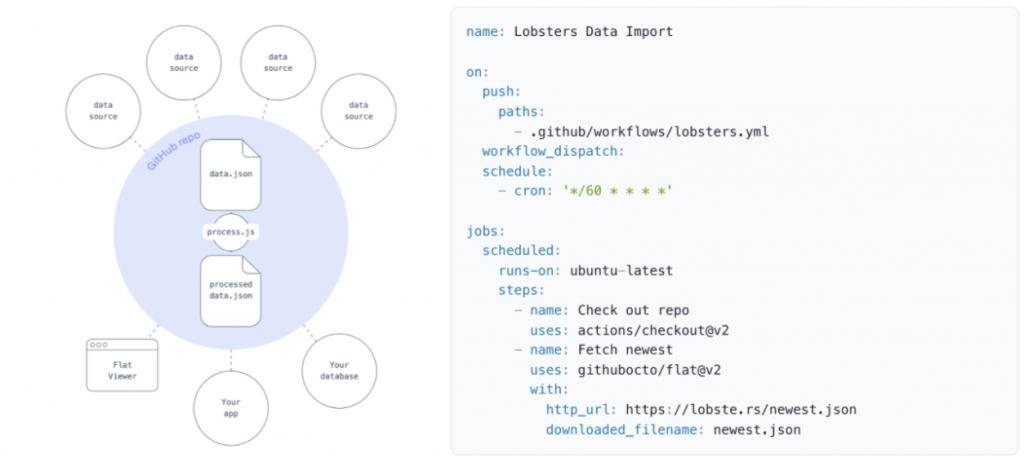
In our GitHub repo, as seen above, we create a YAML file that uses this Flat Data GitHub Action to go out to the Lobsters JSON endpoint, grab the newest .json file, and check that into GitHub. We set this on a cron to run hourly since this data is not changing too frequently.
Github Actions: Flat Graph for Loading Data
For post-processing, where we want to load that data into Neo4j Aura, I wrote a simple GitHub Action that I call Flat Graph. This allows us to define how we want to work with that JSON data, in this case, using Cypher.
Here’s the full YAML file:
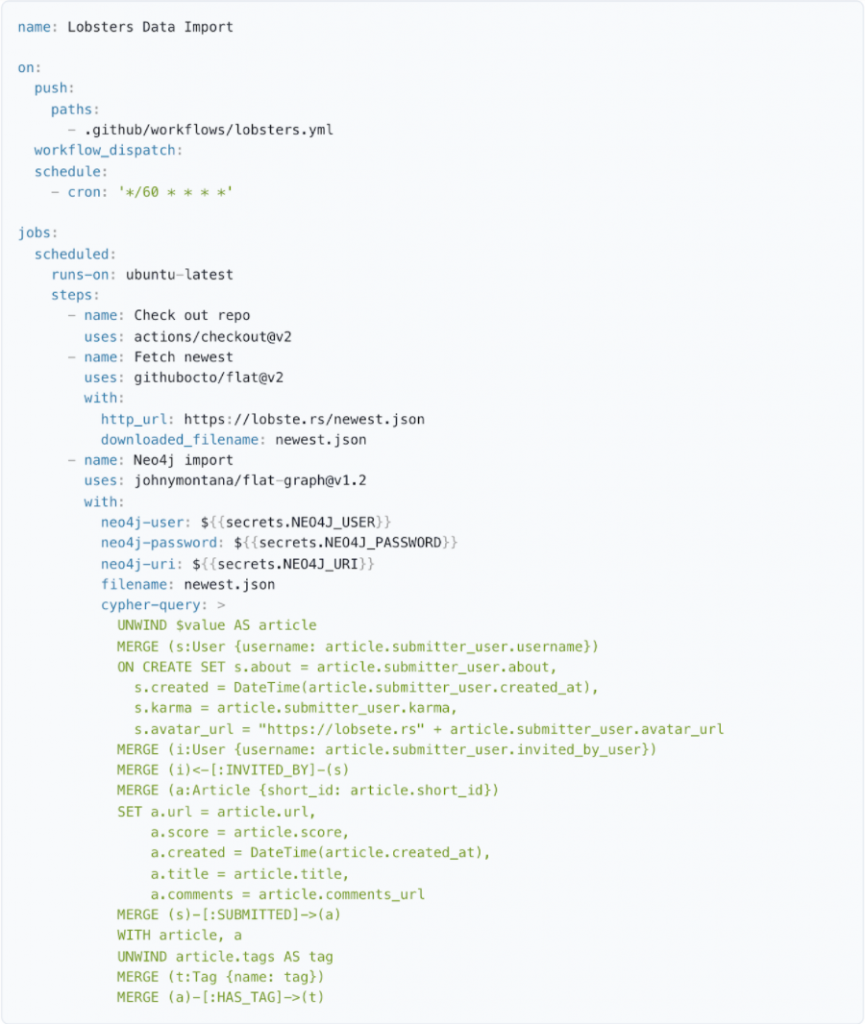
First, use the Flat Data GitHub Action to fetch the newest .json file. Second, use the Flat Graph GitHub Action. I have my credentials for my Neo4j Aura instance checked-in as secrets in GitHub. Then there’s a Cypher query that says how we want to iterate over that JSON array. It is very similar to the query we saw using apoc.load.json, but in this case, we’re passing that JSON in as a Cypher parameter. Now we have this data continuously updating in the background every hour in Neo4j Aura.
Visual Exploration with Neo4j Bloom
An option is to use Neo4j Bloom to visually explore this data.
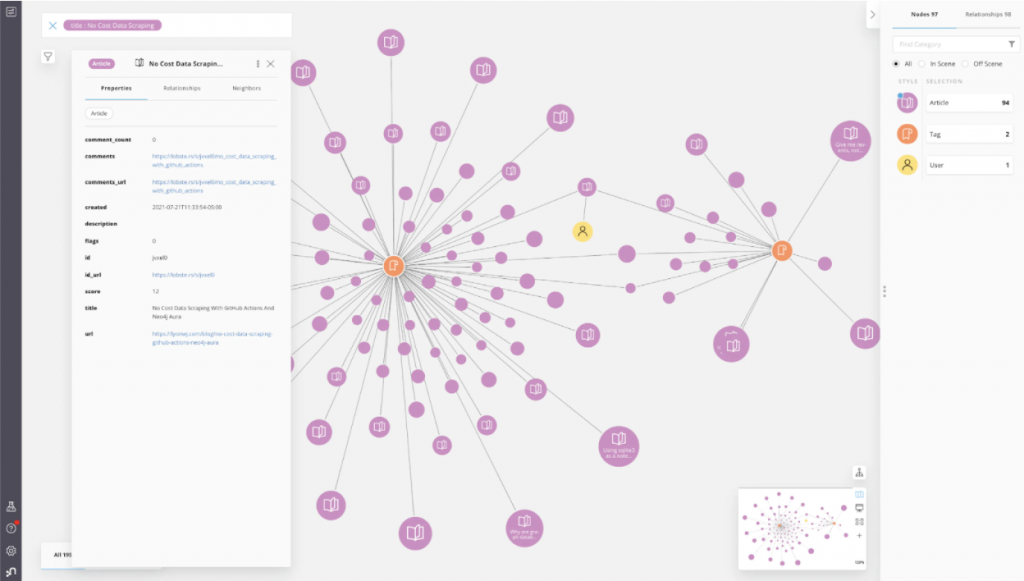
Bloom is a great no-code solution to create a graph UI, once I have my data in Neo4j. In this case, Bloom is not quite what I want. Instead, I want something simpler and don’t want to necessarily expose all the functionality of Bloom. I want to build a web application.
Building the API Layer with the Neo4j GraphQL Library
I don’t want to just expose the database to my front-end application, but instead have some API layer that sits between the clients and the database. I have some custom logic, and typically this is where we would build our authorization. For this project, there are lots of different ways to go about this with a variety of tools we can use. In this case, we are going to build a GraphQL API using the Neo4j GraphQL Library.
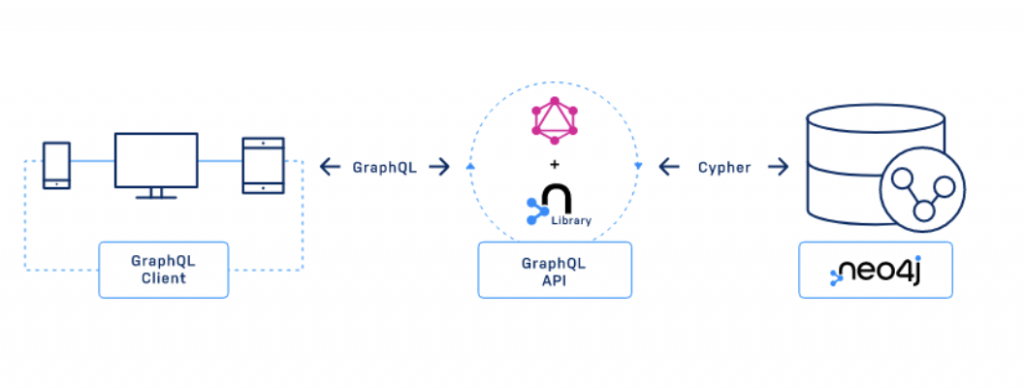
The Neo4j GraphQL Library is a no JS Library for building JavaScript GraphQL APIs. Again, for this layer that sits between the client and the database, we’re not querying the database directly with GraphQL. Still, the Neo4j GraphQL Library does offer some benefits for getting started. If you’re not familiar with GraphQL, it is basically an API query language and then a runtime for fulfilling API requests.

With GraphQL, we have a strict-typed system that defines exactly the shape of the data that we are working with and is available in the API. We define how we can query that data from the clients. Where the graph part comes in is also describing how these types are connected. We have this idea of relationship fields on our types that reference other types, which is the graph in GraphQL.
At query time, the client is free to traverse this data graph that’s described by the GraphQL type definitions to fetch whatever data the client is interested in or whatever data the client needs to render, for example, the view in an application. This type system combined with the client specifying the data that they want to bring back means that we know exactly the shape and type of the data that is coming back, which makes it a really nice way to work with type safe data for the client.
As mentioned, the Neo4j GraphQL Library is this JavaScript Library for building no JS graphical APIs. It is really going to help us out quite a bit here with reducing the boilerplate code that we would have to write when we’re building an API layer. With the new GraphQL Library, we define our GraphQL type definitions and hand that off to the Library, which is going to do a lot of work for us to generate our GraphQL API. So one of the main goals of the Neo4j GraphQL Library is to support this idea of GraphQL first development.
What that means is that we have our GraphQL type definitions that define the data model for not only our GraphQL API, but also for the database. The Graph QL definitions can really drive the data model in the database. In the API, that means we don’t need to maintain two separate schemas as we work with Neo4j and our GraphQL layer.
One thing that’s nice about the tool I mentioned earlier, Arrows, is as we create our graph diagram, one of the export options is GraphQL type definitions. These type definitions work with the Neo4j GraphQL Library. As we visually define our graph model, we can export the GraphQL type definitions directly from Arrows.
Auto-Generate GraphQL CRUD API
Once we have our type definitions, we hand those off to the Neo4j GraphQL Library, which will then generate all of the CRUD operations: create, read, update, delete – basically, operations for every type defined in our type definition.
These are entry points in the API to search for our node types by adding ordering, pagination, complex filtering, and support for the spatial and temporal native types that the database supports as well.
Generate Cypher from GraphQL
At query time, any arbitrary GraphQL request is translated to Cypher. This means that as a developer, I don’t need to write a lot of the boilerplate code to describe how to fetch the data from the data layer. That’s nice for developer productivity, but there’s also another huge performance advantage here; we are generating a single database query. That’s one single roundtrip to the database, and the database can then optimize that query.
Typically with GraphQL, we end up making multiple database requests. We have to think about how we can cache those and batch them, but with the Neo4j GraphQL Library, we’re basically resolving the entire request automatically from the root with a single generated database query.
Extend GraphQL with Cypher
Now I’ll move beyond the basic crud functionality that we had generated for us for free from defining our type definitions with the Neo4j Graph Library. When we have custom logic that we want to define, we can use a Cypher GraphQL schema directive.
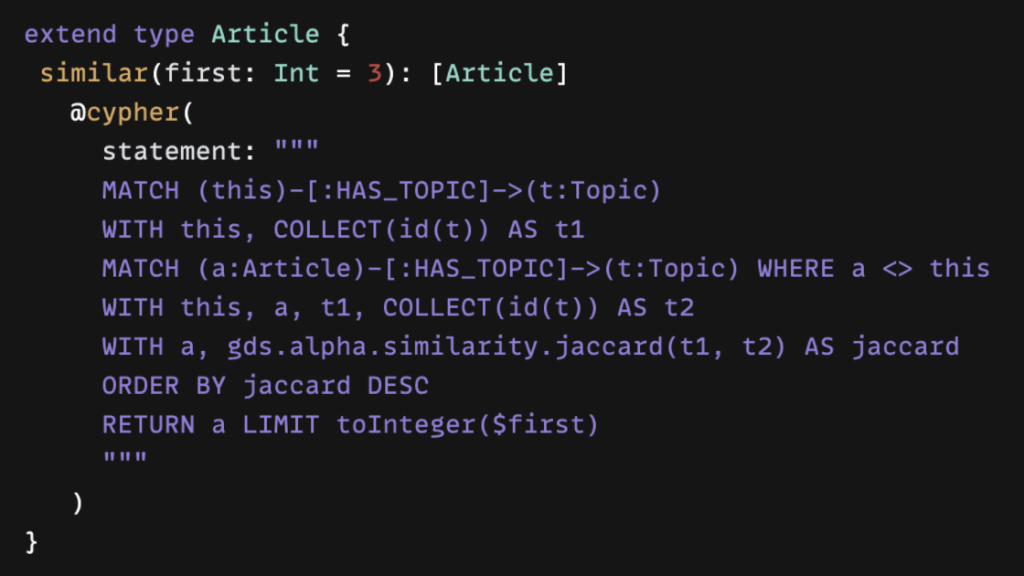
Schema directives are GraphQL’s built-in extension mechanism that indicates that there’s something custom on the server-side that needs to happen. We have quite a few directives with the Neo4j GraphQL Library. This is a major way for the developer to configure the API through directives. The Cypher directive is my favorite feature in the Neo4j GraphQL Library and perhaps the most powerful feature. It allows us to write a Cypher query and annotate a field in our type definitions that maps to the Cypher query.
That means I can write any custom, complex logic in Cypher and just annotate my schema to add that functionality. I don’t have to worry about creating a driver connection because this still works with the single generated database query that gets generated from our GraphQL request. It gets attached as a subquery, so I still get to take advantage of the performance benefits of addressing, not sending multiple round trips to the data layer, and having the database optimize the query for us.
How to Work with Graphs on the Frontend: Next.js
We now have our GraphQL API, we’ve defined our type definitions, we’re using the Neo4j GraphQL Library, and we can write GraphQL requests from the clients to fetch exactly the data that we want to render in our application. The next step is to think about how to work with graph data and GraphQL on the front end.
I like to use Next.js, which is a framework built on top of React. It is referred to as a meta framework that is adding some functionality, like server-side rendering, which is really nice for SEO, or file based routings. I can create a new JavaScript file or component and automatically have a route for handling image compression and code splitting for performance.
A particularly relevant functionality for us is server side API routes. With Next.js I can create my front-end React code that’s going to be my graph visualization. I can also build and deploy my GraphQL endpoints as an API route. This gets deployed as a serverless function. So I now have both my front-end and back end-code in one codebase with one framework.
Apollo Client
As a React application, we typically use a Library called Apollo Client to work with GraphQL data.
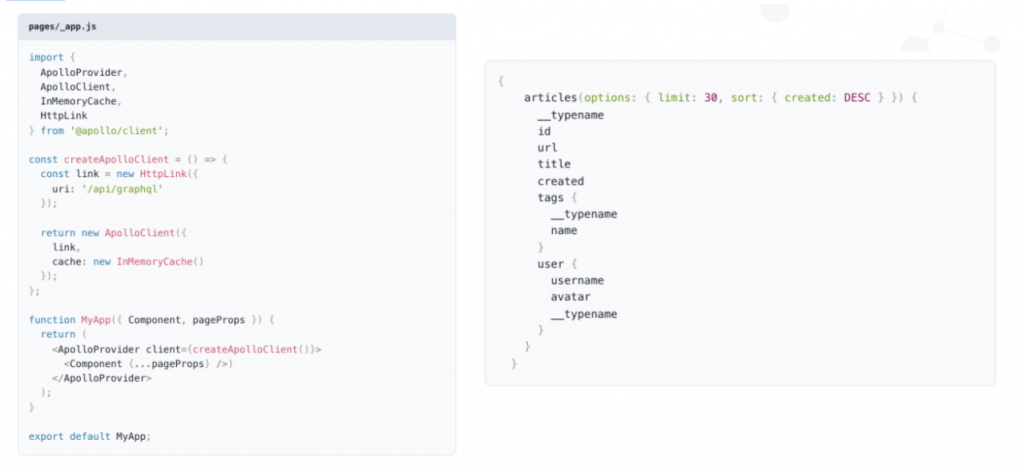
Here we are creating an Apollo Client instance and then injecting that into the react component hierarchy. Any react component in our application has access to the hooks in React, which allow us to write GraphQL queries. Then, Apollo Clients will handle the data fetching. If I’m asking for the same data, Apollo Client can cache locally rather than going out to the API layer. Apollo Client will also manage this data as state data in my React components.
What we need to do is write a GraphQL query that defines all the data that we want to fetch when we first load the application. In this case, it’s going to be the articles sorted by score, which gives me the highest articles at this point in time. We also want to handle user interactions, so that when you click on one of those topics, you go back to the API and fetch more articles that are connected to that specific tag.
Graph Data Visualization with react-force-graph
At this point, we have our data in the front end and want to build a graph visualization.
An important characteristic of most graph visualizations is this idea of a force directed layout. This means there is a physics simulation going on in our browser where the nodes in the visualization have repulsive magnetism, where they are pushing away from each other, and the relationships act as a spring to attract them.
After you run this physics simulation and the visualization settles down, we can start to see where clusters and communities form that allow us to interpret where certain nodes are connected to others and where groups of nodes exist in the graph. You’ll see this idea of the force directed layout in almost all node chart visualizations by default. Of course, there are other layout algorithms that you can use, but force directed is so common, as can be seen in Neo4j Bloom and Neo4j Browser.
Since we’re using React, we’re going to use a React Library called react-force-graph. This is built on top of a library called Force Graph. There’s also a 3D version of this, where we can build 3D graph realizations, and these are essentially the react bindings for react-force-graph.
A GraphQL query is coming back, in this case, as JSON JavaScript’s objects, which makes it easy to pass that off to the react-force-graph Library. We do have to do a little bit of configuration because we want to visualize text instead of nodes, but there’s really not much we need to do outside of some minor configuration to build our graph visualization.
Now we have our graph visualization on the front-end, and we’re pulling in data through our GraphQL API, which is fetching data from Neo4j. This data is being constantly updated using GitHub actions.
Deployment with Vercel
Now it’s time to deploy our application, both the front-end React app and our GraphQL using Vercel. Vercel is a deployment platform that is optimized for developers. In Vercel, we can connect our GitHub repository for the Lobsters Graph.
I need to do a little bit of configuration by putting in environment variables and the connection credentials for my Neo4j Aura instance because my GraphQL API is going to be deployed as a serverless function by Vercel and that needs to be able to make a connection to my Neo4j Aura instance.
The initial time that we connect our GitHub repo, Vercel will build our application and then deploy the static react code to Vercels CDN.
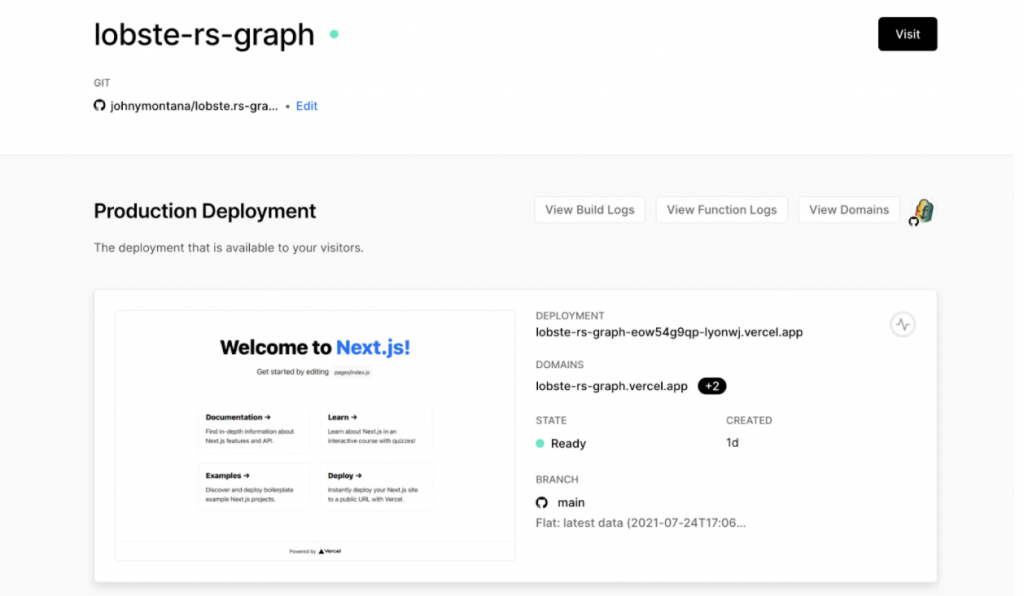
It will give me a couple of domains by default. I can add a custom domain and also get a specific deployment preview URL, as shown above. Any time that there is a pull request or I push new code to GitHub, Vercel is going to get a notification that there’s been some update to this GitHub repository.
Vercel is going to build my app, deploy it to a specific preview URL, which I can then share with my teammates, or if I’m building this app for a client, I can share it with the client. That specific preview build allows them to interact with the application exactly as it was deployed in a live application, but not necessarily promote that to the production domain. Once I’m ready to merge that pull request after the team looks at it and reviews it, then that will be promoted to the production URL for our app. Vercel is really good at managing this idea of preview builds and giving me preview URLs to share with the team.
Now our app is live. We’ll see the graph visualization that we looked at earlier with whatever the latest Lobsters news is, but we can also access the GraphQL API at /API/GraphQL. The React app has been deployed to the CDN and our GraphQL API has been deployed as a serverless function by Vercel. All we needed to do is take advantage of the API routes feature in Next.js.
How We Built the Application
Here is another look at the architecture of the application that we just built. We used GitHub Actions to set up a cron job in the background to continuously fetch data from the Lobsters JSON endpoint. Using Cypher to load that data into our Neo4j Aura instance, we built a GraphQL API.
We use the Neo4j GraphQL Library to expose our application data to our front-end application, which is a React app using react-force-graph components to create our graph visualization. You can find all the code for this on GitHub linked here. If you’re interested, I also wrote up a three-part blog tutorial series that shows how to go through the different steps that we talked about today in a bit more detail. So that’s linked as well.
It’s also worth noting that we built this application on the Neo4j Livestream, where a lot of folks at Neo4j, along with other folks in the community, are showing how to build applications, work with data, and do graph data science. If you enjoy live coding, live streams are great, because you get a chance to ask questions and go on some interesting tangents dependent upon what people are interested in. You can find the recordings on the Neo4j YouTube channel or on the Neo4j Twitch channel.
Resources
I’ll end with just a couple of resources that I think might be interesting. The first is Neo4j AuraDB free. I call it free because there’s a free tier of Neo4j Aura. We can spin up Neo4j AuraDB instances that stick around forever that we can use for these hobby projects or for development and have a low barrier to get started.
It’s also worth mentioning that all the cloud services that we use today, so GitHub Actions, Vercel, Neo4j AuraDB, were the free tier versions. They all have a free tier that we can use to basically build this app without putting in a credit card. We know that when we are ready to deploy something real and scale up, that we have the professional tiers of those services as well.
If you are interested, the landing page for the Neo4j GraphQL Library has a lot more information on other available features as well as links to the documentation and examples. There is also a self-paced course on Neo4j’s GraphAcademy. That goes into more detail on building graphical APIs with the Neo4j GraphQL Library.
The Neo4j GraphQL team is also hiring software engineers in Europe, and you can find the job descriptions here or you can email GraphQL@neo4j.com directly. If you have questions about the role, reach out.
I hope you found this tutorial useful and take advantage of the resources.
Share Article


Explore
Related Articles


Integrating Neo4j With Symfony: Profiling Queries and Centralized Logging