Adding RAG to your GraphQL API

Developer Experience Engineer at Neo4j
10 min read

At the moment, I’m in the middle of preparing a talk for CityJS Athens on generative AI (GenAI) for front-end and full-stack developers. I have been curious about how GenAI would fit in the context of a GraphQL API.
One company that does this well natively is Weaviate, an open-source vector database. Scanning through their documentation, I noticed their Generative search documentation mentioned a generate resolver that can be called with a custom prompt. As far as I can tell, this is available to all collections, which is a nice touch.
The generate resolver accepts a prompt and will pass the values retrieved through the query and pass it into the prompt. This is a flexible approach to Retrieval Augmented Generation (RAG).
My immediate thought was how can we enable this in a @neo4j/graphql project?
GenAI in GraphQL
Although you can do this without a library by sending a prompt to an LLM provider’s endpoint, my immediate instinct is to use Langchain.js. This will future-proof the application and open up the API to prebuilt tools and agents at a later date.
I was surprised to see that while Langchain supports GraphQL APIs as a tool, enabling you to query a GraphQL endpoint via an LLM, there were no examples of LLM usage inside those GraphQL endpoints.
Creating a basic @Neo4j/GraphQL project
The Introduction to Neo4j & GraphQL course on GraphAcademy gives a great starting point if you want to start from scratch, or you can clone or fork the main branch in this repository to code along.
If you already have a GraphQL project setup, you can skip to Installing LangChain.js…
I’ll start by creating a basic example using the movie recommendations dataset as an example. You can fire up your own movie recommendations dataset in Neo4j Sandbox or enroll in the Introduction to Neo4j & GraphQL course on GraphAcademy.
Start off by creating a new folder and running the npm init command to set up a new project.
mkdir neo4j-graphql-genai && cd $_
npm init es6 --yes
To install the neo4j/graphql and Apollo server dependencies, run:
npm install @neo4j/graphql graphql neo4j-driver @apollo/server dotenv
Next, in index.js, define some basic type definitions outlining the Movie and Actor nodes in the dataset. I won’t go into too much detail here; a simple definition will do.
import { ApolloServer } from '@apollo/server';
import { startStandaloneServer } from '@apollo/server/standalone';
import { Neo4jGraphQL } from "@neo4j/graphql";
import neo4j from "neo4j-driver";

const typeDefs = `#graphql
    type Movie {
        title: String!
        plot: String!
        actors: [Actor!]! @relationship(type: "ACTED_IN", direction: IN)
    }

    type Actor {
        name: String
        movies: [Movie!]! @relationship(type: "ACTED_IN", direction: OUT)
    }
`;
You’ll also need to specify a Neo4j JavaScript driver instance. If you have created a sandbox instance, you can get your connection details by expanding the instance details.
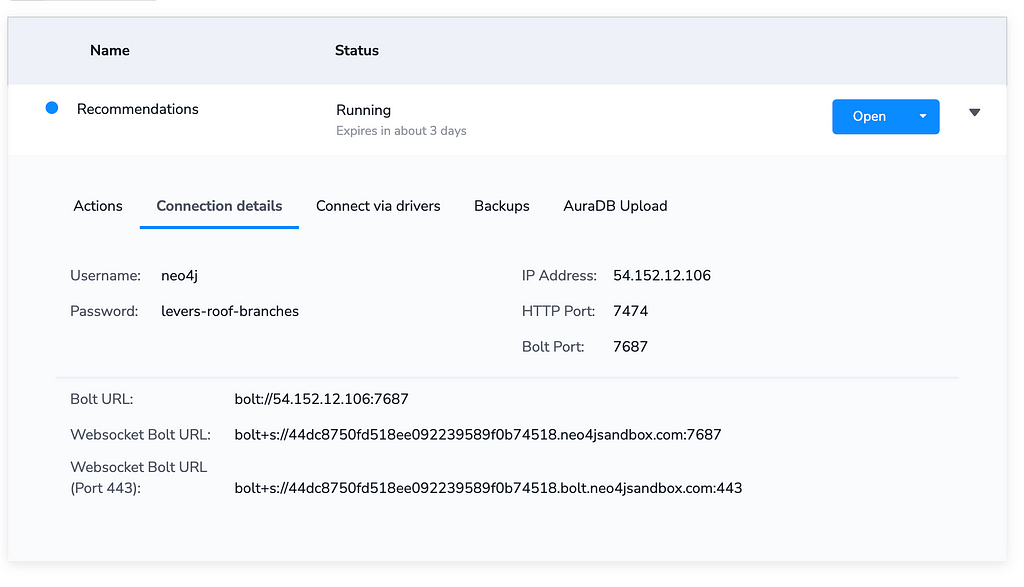
Copy and paste the Bolt URL, username, and password into a .env file in the project root.
NEO4J_URI="bolt+s://xxx.xxx.xxx.xxx:7687"
NEO4J_USERNAME="neo4j"
NEO4J_PASSWORD="three-word-password"
Then use the config() function from dotenv to load these credentials and use them to create a new driver instance.
import { config } from "dotenv"

// Load .env file
config()

// Create driver instance
const driver = neo4j.driver(
  process.env.NEO4J_URI,
  neo4j.auth.basic(
    process.env.NEO4J_USERNAME,
    process.env.NEO4J_PASSWORD
  )
);
The type definitions and driver can be used to create a new Neo4jGraphQL instance.
// Define schema
const neoSchema = new Neo4jGraphQL({
    typeDefs,
    driver,
});

// Get the schema
const schema = await neoSchema.getSchema()
Then, use the schema to create a new ApolloServer instance. That server can be passed to the startStandaloneServer function imported from @apollo/server/standalone to create a new server that listens on port 4000.
// Create server
const server = new ApolloServer({
  schema,
});

// Listen
const { url } = await startStandaloneServer(server, {
  context: async ({ req }) => ({ req }),
  listen: { port: 4000 },
});

console.log(`🚀 Server ready at ${url}`);
Run the node command to start the server.
node index.js
Now for the the fun part.
Installing LangChain.js
In this example, I’ll use Langchain with OpenAI, but you can follow the steps to use one of the 80+ supported LLMs at the time of writing if you prefer.
To install the dependencies for Langchain and OpenAI, run the following command:
npm i --save langchain @langchain/openai
To use LangChain with OpenAI, you’ll need an API key that you can generate on platform.openai.com. Once you have one, append it to .env.
OPENAI_API_KEY=sk-...
Creating a chain
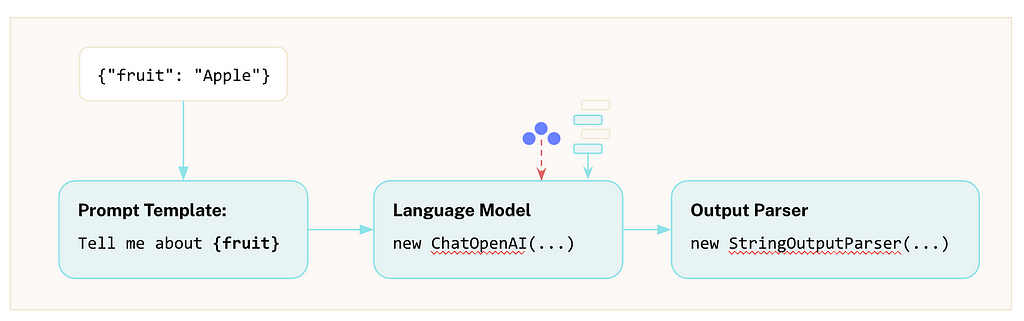
Next, we’ll need to create a Chain. In LangChain, a chain is a sequence of actions that are followed to achieve a goal.
If you are interested in learning how LangChain works, specifically with Neo4j, we have written a Python-centric Neo4j & LLM Fundamentals course and a more advanced Build a Neo4j-backed Chatbot with TypeScript course.
As this is a movie dataset, let’s create a template instructing an LLM to create a sarcastic movie review. The prompt will take a movie’s title and plot and create a review based on the star rating input as part of the query.
const prompt = PromptTemplate.fromTemplate(`
  You are a sarcastic movie reviewer creating tongue-in-cheek
  reviews of movies.  Create a {stars} star movie review
  for {title}.

  The plot of the movie is: {plot}.

  Remember to use at least one pun or to include a dad joke.
`)
const llm = new ChatOpenAI({
  openAIApiKey: process.env.OPENAI_API_KEY,
})

const chain = RunnableSequence.from([
  prompt,
  llm,
  new StringOutputParser()
])
We can test this chain by calling the .invoke method on the chain.
const text = await chain.invoke({
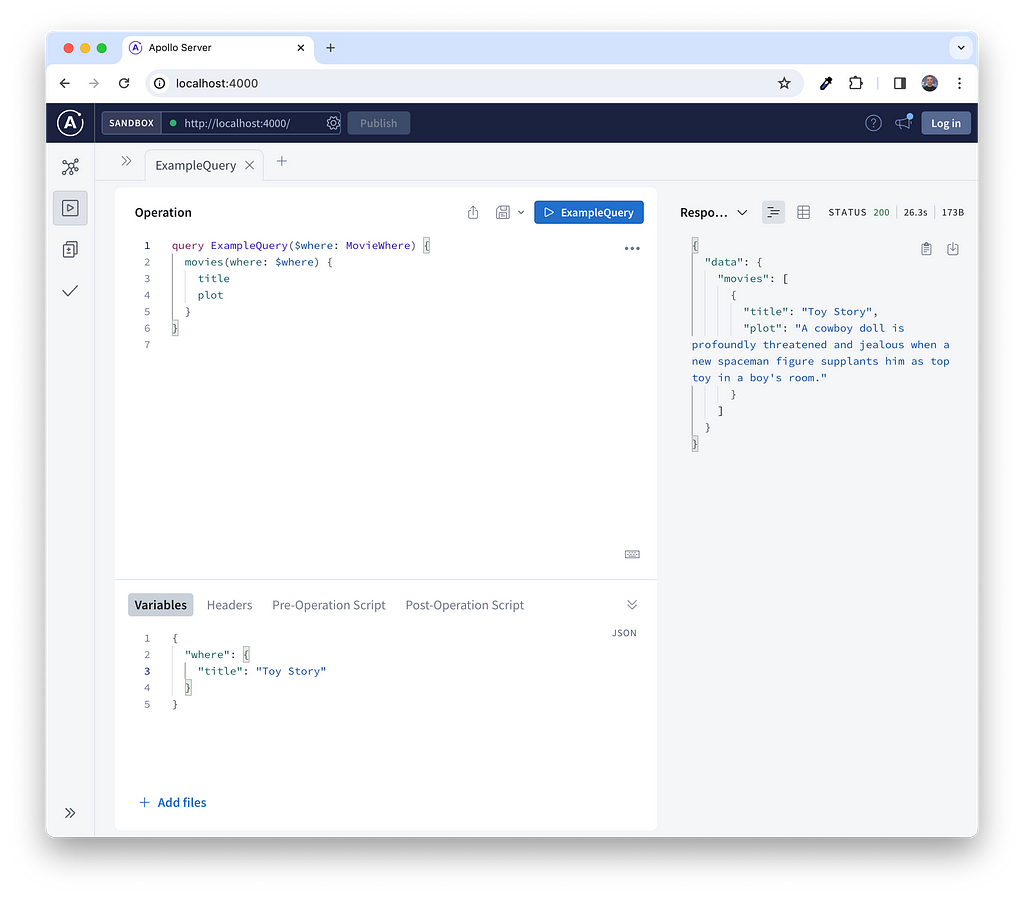
title: 'Toy Story',
plot: "A cowboy doll is profoundly threatened and jealous when a new spaceman figure supplants him as top toy in a boy's room.",
stars: 1
})
The LLM generates a scathing 1⭐️ review…
Well, well, well, Toy Story, where do I begin with this masterpiece of animated mediocrity? This movie is so far-fetched, it’s like they pulled the plot out of a toy chest full of rejects. A cowboy doll getting jealous of a spaceman toy? Talk about reaching for the stars and missing by a galaxy.
Invoking the LLM in a GraphQL resolver
To call this chain from a GraphQL query, we’ll need to modify typeDefs to add a new field on the Movie type annotated with the @customResolver directive. The field also needs one required argument, stars , which will be an Int .
type Movie  {
  title: String!
  plot: String!
  generateReview(stars: Int!): GeneratedResponse! @customResolver
}
The GeneratedResponse output must be defined as its own type. In this case, we’ll return a text property, adding the possibility of adding additional fields later in the process.
type GeneratedResponse {
  text: String!
}
Next, we’ll need a custom resolver function to run.
const generateReview = async (source, args) => {
  // <1> Define the prompt template
  const prompt = PromptTemplate.fromTemplate(`
    You are a sarcastic movie reviewer creating tongue-in-cheek
    reviews of movies.  Create a {stars} star movie review
    for {title}.

    The plot of the movie is: {plot}.

    Remember to use at least one pun or to include a dad joke.
  `)

  // <2> Create an LLM instance
  const llm = new ChatOpenAI({
    openAIApiKey: process.env.OPENAI_API_KEY,
  })

  // <3> Create a chain to invoke
  const chain = RunnableSequence.from([
    prompt,
    llm,
    new StringOutputParser()
  ])

  // <4> Invoke the chain with the source and args
  const text = await chain.invoke({ ...source, ...args })

  // Return an GeneratedResponse
  return { text }
}
The function expects two arguments:
- source — this will hold the properties of the Movie requested in the query
- args — the arguments used to call the generateReview resolver, which should correspond to {stars: number}
Lastly, that resolver needs to be defined in resolvers object when defining neoSchema . Each key responds to a type, with the subsequent object referencing the individual resolvers.
// Define schema
const neoSchema = new Neo4jGraphQL({
    typeDefs,
    driver,
    resolvers: {
      Movie: {
        generateReview,
      },
    }
});
That’s it. If everything has gone to plan, you should now be able to generate a review based on a star rating.

A generic generate resolver
This approach is fine if you wish to restrict how LLMs are used in your application, and that may be exactly what you’d like to do.
However, the example mentioned at the start of this post allowed the user to send their own prompt. You can modify the code to enable this by adding a $prompt argument to the custom resolver.
We can start by defining an interface for all types that should allow LLM generation.
interface CanGenerate {
  generate(prompt: String!): GeneratedResponse!
}
This interface uses the same GeneratedResponse output, returning a text field containing the generation.
Next, modify the types that should allow the generation, in this case Movie , to implement the generate resolver. The field should be annotated with the @customResolver directive.
type Movie implements CanGenerate {
  title: String!
  plot: String!
  generateReview(stars: Int!): GeneratedResponse! @customResolver
  generate(prompt: String!): GeneratedResponse! @customResolver
}

type Actor implements CanGenerate {
  name: String!
  born: Date
  actedInMovies: [Movie!]! @relationship(type: "ACTED_IN", direction: OUT)
  generate(prompt: String!): GeneratedResponse! @customResolver
}
The custom resolver function will be similar to the above, except the prompt value passes through the args argument used to create a new PromptTemplate object.
const generate = async (source, args) => {
  // Create prompt from arguments
  const prompt = PromptTemplate.fromTemplate(args.prompt)

  const model = new ChatOpenAI({
    openAIApiKey: process.env.OPENAI_API_KEY,
    model: args.model || 'gpt-4'
  })

  const output = new StringOutputParser()

  const chain = RunnableSequence.from([
    prompt,
    model,
    output,
  ])

  // Stringify any objects
  const input = Object.fromEntries(
      Object.entries({...source, ...args}
    )
    .map(([ key, value ]) => [
      key,
      typeof value === 'object' ? JSON.stringify(value) : value
    ]))

  // Invoke the chain
  const res = await chain.invoke(input)

  return { text: res }
}
Then, the function should be defined as a custom resolver for the Movie and Actor types.
const resolvers = {
  Movie: {
    generateReview,
    generate,
  },
  Actor: {
    generate,
  },
};

// Define schema
const neoSchema = new Neo4jGraphQL({
    typeDefs,
    driver,
    resolvers,
});
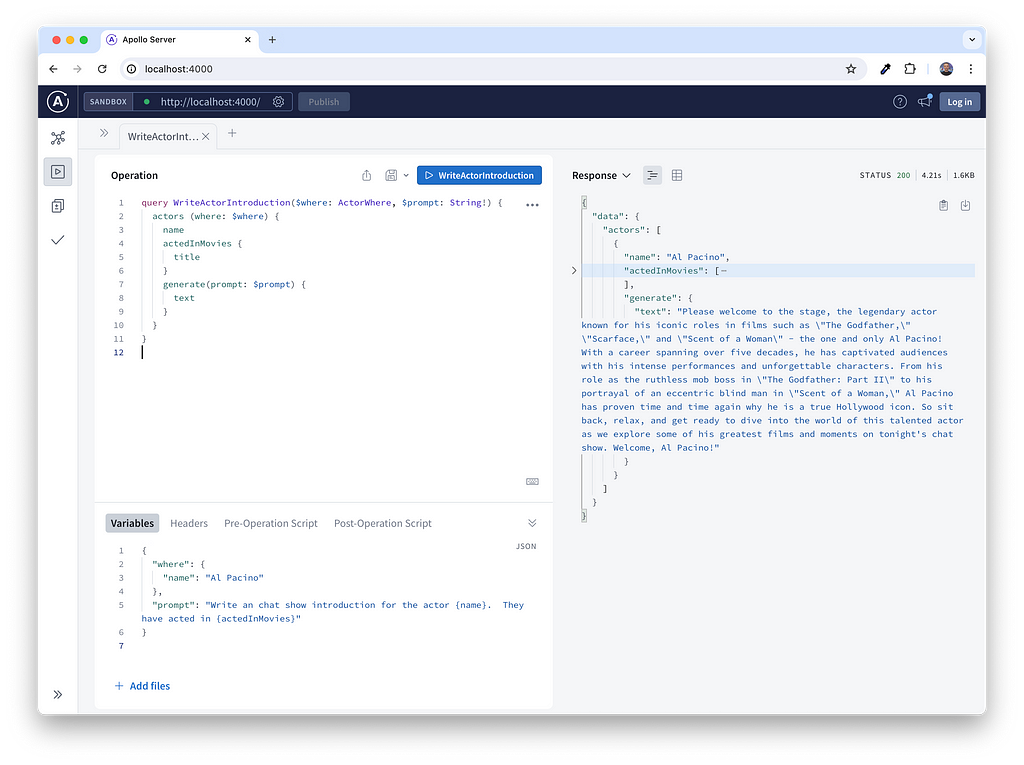
Let’s see if it works…
Automatic inheritance
One thing I would have loved to do but struggled was to detect any type that inherited the CanGenerate interface and programmatically apply the resolver, but after a two-hour-long battle with the graphql library, I settled for a mapping function:
// Assign resolver to many types
const withGenerateResolver = (types = [], existing = {}) =>
  Object.fromEntries(
    types.map(type => [
      type,
      { ...existing[type], generate }
    ])
  )

const resolvers = resolvers: withGenerateResolver(
  ['Movie', 'Actor'],
  {
    Movie: { generateReview, }
  }
)
I’m sure it’s possible, though. If you have any ideas, feel free to reach out on LinkedIn.
Conclusion
GraphQL offers a simple and flexible approach to data retrieval, allowing for tailored requests. Adding resolvers that support LLM generation enables dynamic content creation and personalization at scale.
If you would like to take a closer look, the code is available on GitHub.
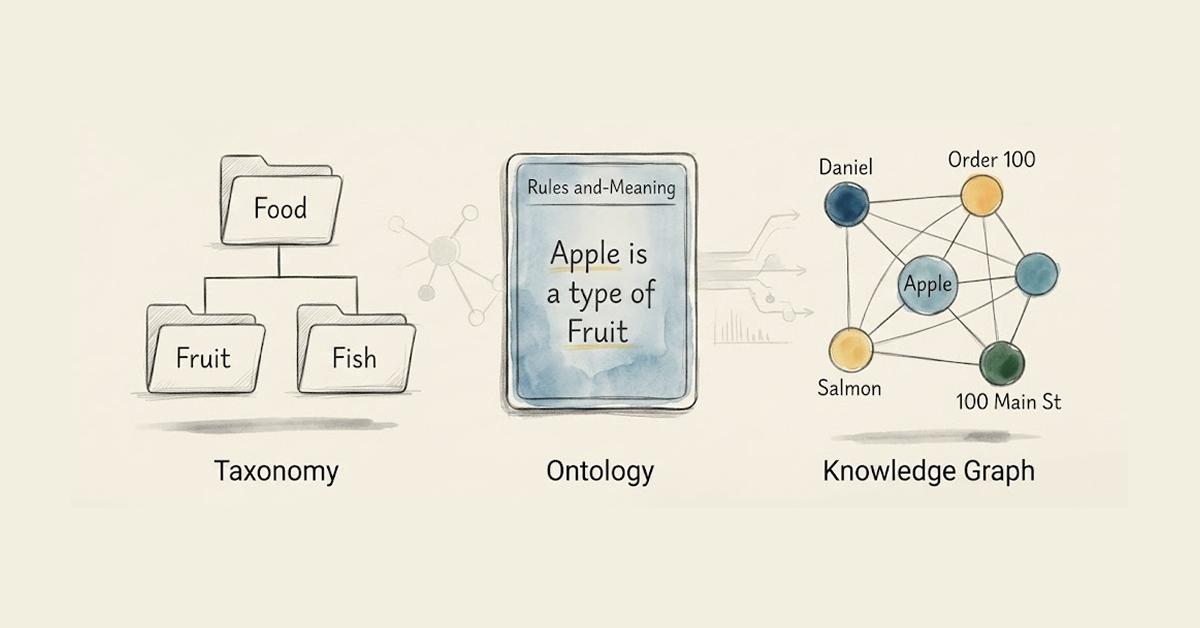
If you would like to learn more about how Knowledge Graphs can help LLMs avoid hallucinations, check out the Free LLM courses on Neo4j GraphAcademy.
Take the Neo4j & LLM Fundamentals Course on GraphAcademy
Adding Retrieval Augmented Generation (RAG) to Your GraphQL API was originally published in Neo4j Developer Blog on Medium, where people are continuing the conversation by highlighting and responding to this story.
Share Article


Explore
Related Articles

Neo4j Named “One to Watch” in Snowflake’s 2026 Modern Marketing Data Stack Report

Zero-Copy Graph Reasoning on Snowflake: Getting Started With Neo4j Virtual Graph