Vertex AI Managed Agents + Neo4j Integration
This repository provides a declarative, infrastructure-led blueprint for deploying a secure, serverless graph database analyst using the Vertex AI Managed Agent platform (Antigravity engine) connected to an enterprise Neo4j Graph Database.
1. Architecture & System Flow
The platform decouples application logic from security boundaries, enforcing content safety at the ingress perimeter and network control at the egress perimeter.
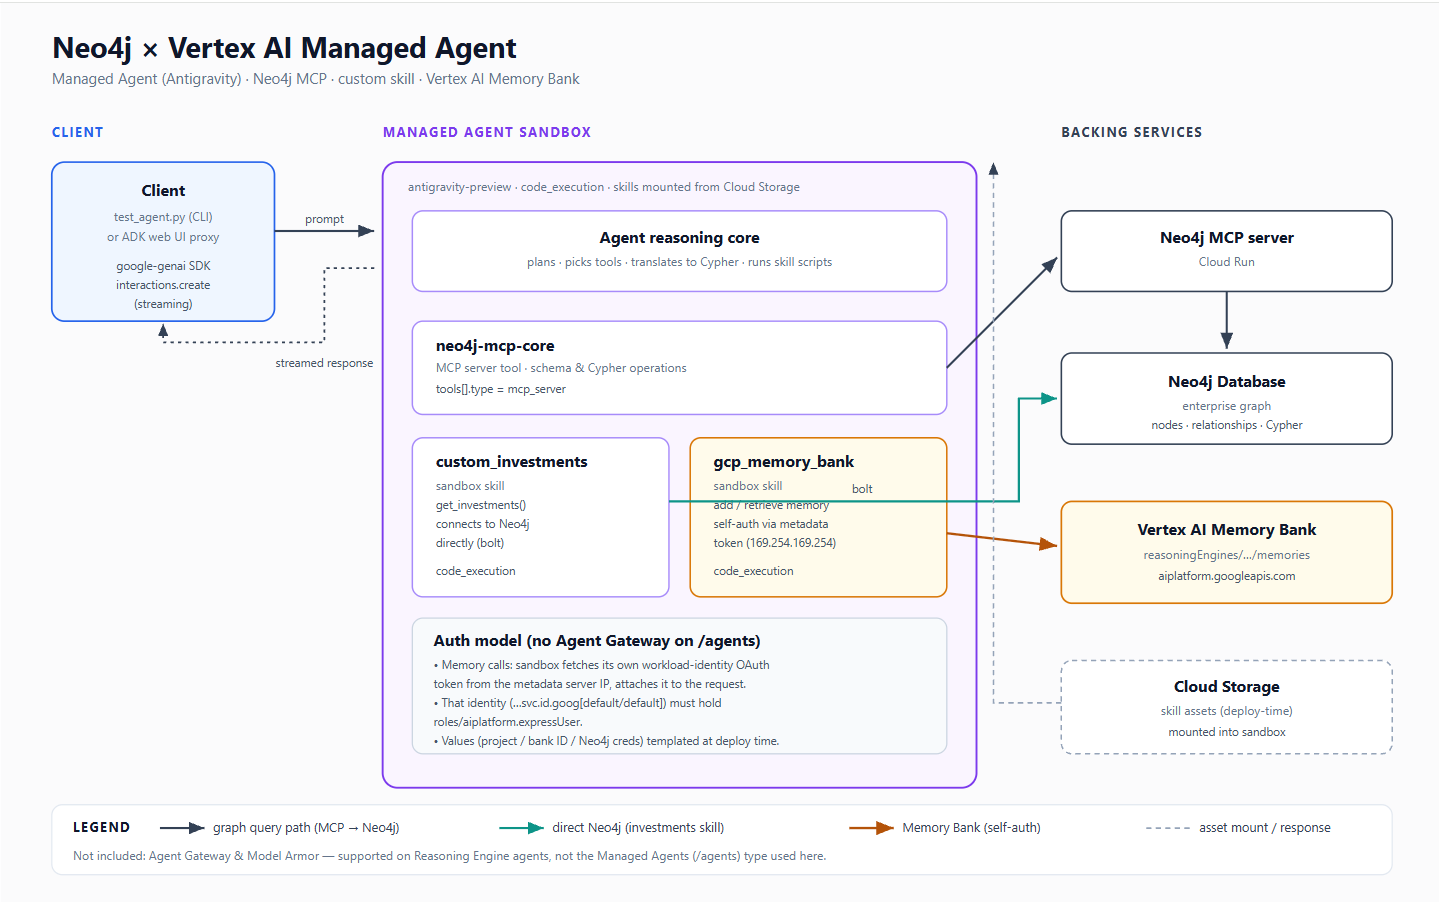
-
Managed Agent Sandbox: Each turn runs in an on-demand sandbox. Skills are mounted from Cloud Storage into
/workspace/.agent/skills/. The agent usescode_executionto run skill scripts. -
Neo4j access (two paths): General graph queries route to an external Cloud Run MCP server (
get-schema,cypher). Portfolio lookups run locally via thecustom_investmentsskill connecting to Neo4j directly. -
Memory (Vertex AI Memory Bank): The
gcp_memory_bankskill records and recalls user-scoped facts. It authenticates using the sandbox’s own workload identity (see Setup Step 3).
2. Project Directory Structure
.
├── .env.example                  # Config template (copy to .env)
├── .gitignore
├── deploy_platform.sh            # Renders values into skills + deploys the agent
├── test_agent.py                 # CLI streaming verification client
├── config/
│   └── agent_config.json         # Managed-agent definition (schema-supported fields only)
├── skills/
│   ├── custom_investments/
│   │   ├── main.py               # Neo4j portfolio lookup (values templated at deploy)
│   │   └── SKILL.md
│   └── gcp_memory_bank/
│       ├── gcp_vertex_client.py  # Memory Bank client (values templated at deploy)
│       └── SKILL.md
└── adk_proxy_ui/                 # Optional local web UI (adk web)
    ├── requirements.txt
    ├── __init__.py
    └── agent.py
3. Prerequisites
-
A GCP project with the Vertex AI API enabled.
-
gcloudauthenticated:gcloud auth loginandgcloud auth application-default login. -
A Cloud Storage bucket to stage skill assets.
-
A Neo4j instance and (optionally) a Neo4j MCP server deployed on Cloud Run.
-
A Vertex AI Memory Bank instance (a Reasoning Engine). Create one with:
import vertexai
client = vertexai.Client(project="YOUR_PROJECT", location="global")
mb = client.agent_engines.create()
print(mb.api_resource.name)   # note the trailing numeric ID -> MEMORY_BANK_ID
or create with script in repo
python create_memory_bank.py4. Backend Deployment & Verification
Step 1: Configure Environment Variables
Copy the template configuration file to a local active .env file and fill out your live project coordinates, bucket destinations, and Neo4j connection keys:
cp example.env .envStep 2: Grant Storage Access to the Sandbox Runtime
Grant Storage Object Viewer (roles/storage.objectViewer) on your bucket to the Vertex AI Reasoning Engine service agent so the sandbox can fetch skill assets.
Step 3: Run the Automated Deployment Script
Execute the deployment script to upload local skill modules to Cloud Storage, register the workspace manifests, compute basic authentication hashes on the fly, and build the persistent Managed Agent configuration via the Vertex API:
./deploy_platform.shStep 3b: Grant Memory Permissions (required for Memory Bank)
This is the one manual step every new user must do, and it can only be done after the first deploy, because the identity doesn’t exist until the agent runs.
-
Trigger one memory attempt (it will fail with
403):
python3 test_agent.py "Remember that I am John Doe and working with Acme Corp" --verbose-
Read the sandbox’s identity from the audit log:
    gcloud logging read \
      'protoPayload.methodName="google.cloud.aiplatform.v1beta1.MemoryBankService.CreateMemory" protoPayload.authorizationInfo.granted=false' \
      --project=YOUR_PROJECT --limit=1 \
      --format="value(protoPayload.authenticationInfo.principalSubject)"
It looks like `serviceAccount:...svc.id.goog[default/default]`.
-
Grant it the runtime memory role (needs an IAM admin / project owner):
    gcloud projects add-iam-policy-binding YOUR_PROJECT \
      --member="PRINCIPAL_FROM_STEP_2" \
--role="roles/aiplatform.expressUser"-
Wait ~1–2 minutes for propagation, then re-run the memory test. It should return
"status": "success".
5. Visual Developer Interface (ADK Proxy Setup)
The backend Managed Agent runs completely serverless in the cloud and exposes an API endpoint without a native graphic UI. To showcase its performance inside a visual chat interface without writing a custom web frontend, you can deploy the optional local ADK Proxy UI.
How it Works
The Google Agent Development Kit framework includes a visual workspace canvas (adk web). We initialize a local root_agent using gemini-3.5-flash to host this UI layout. When a message is entered into the browser chat bubble, the local agent catches the text and forwards it to the query_managed_agent function. This function initializes the enterprise SDK client, executes the query directly against your secure, cloud-hosted Managed Agent, and returns the live cloud response tokens directly back to the UI interface.
Running the UI
-
Install the required client-side interface packages:
pip install -r adk_proxy_ui/requirements.txt-
Navigate to your parent project directory context and start up the local developer server:
adk web --port 8085-
Open your browser and navigate to
http://localhost:8085to interact with your secure cloud platform integration visually.
6. Official References & Documentation
For deeper configuration details regarding the underlying frameworks used in this deployment, refer to the official documentation channels:
-
Vertex AI Managed Agents & Sandboxes: Google Cloud Vertex AI Agent Platform Documentation
-
Model Context Protocol (MCP): Official MCP Specification and Core Ecosystem
-
Google Agent Development Kit (ADK): Google ADK Session & Memory Management Reference
-
Google GenAI Python SDK: Official
google-genaiGitHub Repository & SDK Guide -
Neo4j Python Integration: Neo4j Graph Database Driver Manual for Python Developers